No-Bake Peach Icebox Cake Delightful Summer Dessert

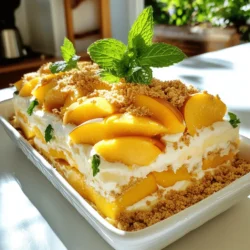
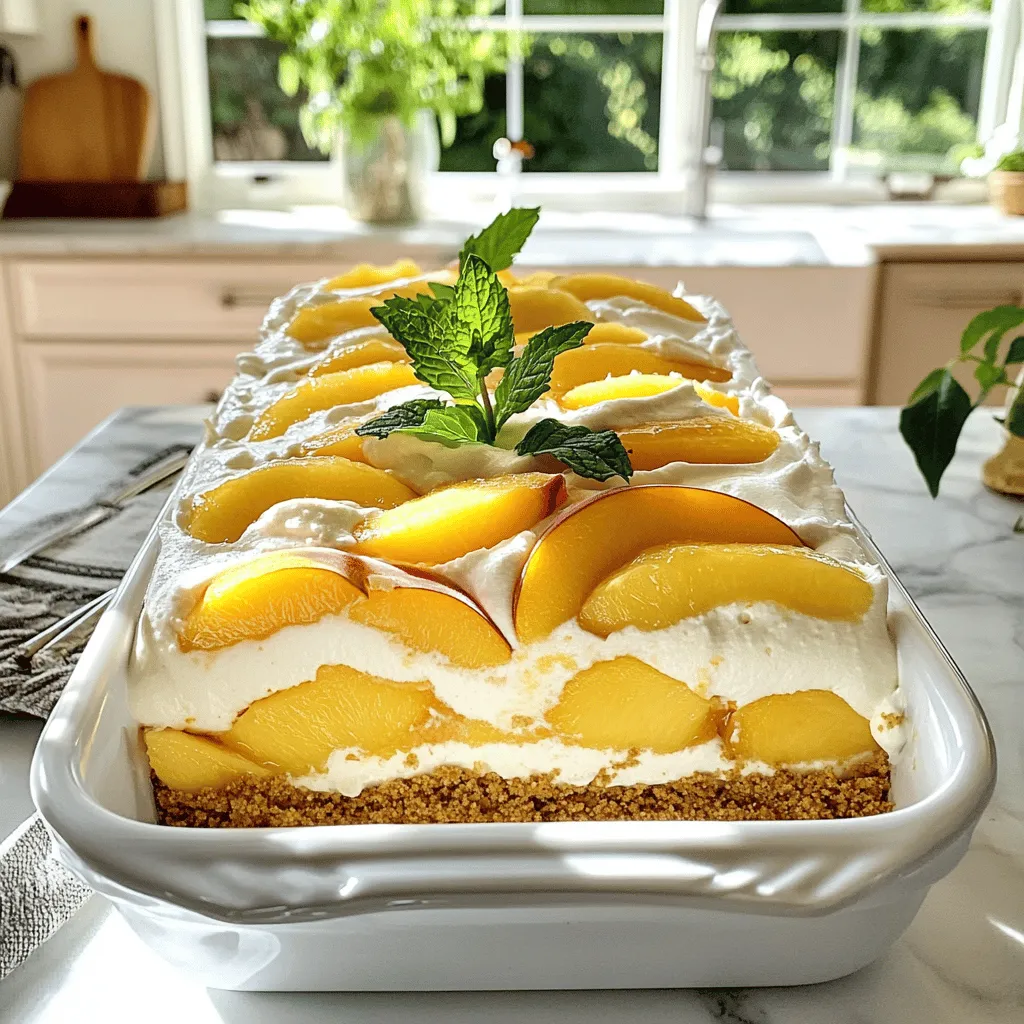
Looking for a cool dessert to beat the summer heat? Try my No-Bake Peach Icebox Cake! This easy recipe combines fresh peaches, rich cream, and graham crackers to create a creamy delight. You won’t need an oven, just some simple steps and a little time in the fridge. Get ready to impress friends and family with this refreshing treat that’s perfect for hot days! Let’s dive into the delicious details.

Ingredients

To make your No-Bake Peach Icebox Cake, gather these fresh ingredients:

– 3 ripe peaches, thinly sliced

– 1 cup heavy whipping cream

– 1/2 cup powdered sugar

– 1 teaspoon vanilla extract

– 1 1/2 cups graham cracker crumbs

– 1 cup cream cheese, softened

– 1 tablespoon fresh lemon juice

– 2 tablespoons honey

– Fresh mint leaves for garnish

Each ingredient plays a key role in creating the layers of flavor and texture. The peaches provide a juicy sweetness. The heavy cream adds richness, while the powdered sugar balances the flavors. Vanilla extract enhances the taste, and graham cracker crumbs give a nice crunch.

Cream cheese adds a creamy base, while lemon juice brightens the mix. Honey adds natural sweetness, and mint leaves are perfect for a fresh touch.

Using ripe peaches is important. They should be sweet and fragrant to enhance the overall flavor. Make sure to soften the cream cheese before mixing. This helps create a smooth filling.

For the best results, measure each ingredient carefully. This ensures a perfect blend of flavors. If you want to try something different, check out the Full Recipe for additional tips and ideas. Enjoy your cooking!

Step-by-Step Instructions

Prepare the Whipped Cream

To start, grab a large mixing bowl. Use an electric mixer to whip the heavy cream. Set it on medium-high speed. Whip until soft peaks start to form. Slowly sprinkle in the powdered sugar. Add the vanilla extract next. Keep whipping until stiff peaks form. This makes a light and fluffy cream.

Make the Cream Cheese Filling

In another bowl, mix the softened cream cheese. Add the fresh lemon juice and honey. Stir this mix until it is smooth. You want to avoid lumps. Next, gently fold in the whipped cream. Use a spatula, and be careful not to deflate it. This mix should be light and airy.

Assemble the Layers

Now, take a rectangular baking dish. Start with a thin layer of the cream mix at the bottom. Then, add a layer of graham cracker crumbs on top. Next, layer the sliced peaches evenly. Repeat this: cream mix, graham cracker crumbs, and peaches. Keep going until all ingredients are used. Make sure the top layer is the cream mix.

Chill the Cake

Cover the dish tightly with plastic wrap. Place the cake in the fridge. Let it chill for at least 4 hours. For the best taste, chill it overnight. This time helps the graham crackers soak up moisture. It will make the cake soft and tasty.

Tips & Tricks

Presentation Tips

To make your No-Bake Peach Icebox Cake look great, use fresh mint leaves. Place them on top for color and aroma. You can also add extra peach slices around the cake for a bright touch. Serve it on a nice platter to impress your guests. This helps create a festive vibe for summer gatherings.

Common Mistakes to Avoid

One common mistake is overwhipping the cream. This can make it grainy and less fluffy. Watch for soft peaks, then stop. Another mistake is not letting the graham crackers soften enough. This can lead to a crunchy texture instead of the desired creamy one. Make sure to chill it long enough to let the layers blend well.

Perfecting Texture and Flavor

The temperature of your ingredients matters. Use cold cream for better whipping. Room temperature cream cheese blends smoothly into the mixture. If you want to change the sweetness, use honey or maple syrup instead of powdered sugar. You can also add a splash of almond extract for extra flavor. This can make your cake unique and delicious.

For the full recipe, check out the detailed instructions!

Variations

Fruit Substitutions

You can use many fruits in this icebox cake. Berries, like strawberries or blueberries, add a nice touch. You can also try mangoes for a tropical vibe. Seasonal fruits work great too. Think apples in fall or citrus fruits in winter. Each fruit brings its own flavor and texture. Mix and match to find your favorite combos!

Flavor Enhancements

Adding extracts can take your cake to the next level. Almond or coconut extracts give a unique kick. Just a few drops can change the whole taste. You can also add spices like cinnamon or nutmeg for warmth. These spices blend well with peaches, creating a cozy feel. They add depth without overwhelming the dish.

Healthier Alternatives

Want a lighter version? Swap cream cheese for yogurt. Greek yogurt works well and adds protein. You can also use alternative crackers for a gluten-free option. Look for gluten-free graham crackers or make your own. These swaps keep the cake tasty while making it healthier. Don’t be afraid to experiment with what you have. For the full recipe, check out the details above!

Storage Info

How to Store Leftovers

To keep your No-Bake Peach Icebox Cake fresh, cover it tightly with plastic wrap. Store it in the refrigerator. This will help prevent the cake from drying out. You can enjoy it for up to four days. The flavors will continue to meld, making each bite even better.

Freezing Options

You can freeze the assembled cake for later enjoyment. First, wrap it well in plastic wrap and then in aluminum foil. This prevents freezer burn. The cake can stay in the freezer for up to three months. When you’re ready to enjoy it, move the cake to the fridge to thaw overnight. Avoid thawing it at room temperature. This will help keep the texture just right. After thawing, serve it cold for the best taste.

FAQs

Can I use frozen peaches?

Yes, you can use frozen peaches. However, the texture may change. Frozen peaches can be softer once thawed. This can affect the layers in your cake. Fresh peaches give a nice crunch and bright flavor. If you use frozen ones, let them thaw. Drain any excess water to keep the cake from getting soggy.

How long can the No-Bake Peach Icebox Cake be stored?

You can store the icebox cake in the fridge for up to 5 days. Make sure to cover it tightly with plastic wrap. This keeps it fresh and prevents it from absorbing other smells in the fridge. If you want to keep it longer, you can freeze it. It can last in the freezer for up to 2 months. Just remember to thaw it in the fridge before serving.

Can this recipe be doubled or halved?

Yes, you can double or halve the recipe. To double it, simply double all the ingredients. Make sure to use a larger dish to fit everything. If you want to halve it, use a smaller dish and cut the amounts in half. This way, you can make the perfect size for your gathering or craving.

This no-bake peach icebox cake combines fresh peaches, whipped cream, and cream cheese for a tasty treat. We covered the ingredients, step-by-step instructions, and tips to make it perfect. Remember, chilling the cake is key for the best flavor and texture.

Feel free to get creative with fruit and flavor swaps. Don’t hesitate to try different presentations to impress your guests. This dessert is simple to make and enjoyable to share. Enjoy every bite of your homemade peach delight!

To make your No-Bake Peach Icebox Cake, gather these fresh ingredients: - 3 ripe peaches, thinly sliced - 1 cup heavy whipping cream - 1/2 cup powdered sugar - 1 teaspoon vanilla extract - 1 1/2 cups graham cracker crumbs - 1 cup cream cheese, softened - 1 tablespoon fresh lemon juice - 2 tablespoons honey - Fresh mint leaves for garnish Each ingredient plays a key role in creating the layers of flavor and texture. The peaches provide a juicy sweetness. The heavy cream adds richness, while the powdered sugar balances the flavors. Vanilla extract enhances the taste, and graham cracker crumbs give a nice crunch. Cream cheese adds a creamy base, while lemon juice brightens the mix. Honey adds natural sweetness, and mint leaves are perfect for a fresh touch. Using ripe peaches is important. They should be sweet and fragrant to enhance the overall flavor. Make sure to soften the cream cheese before mixing. This helps create a smooth filling. For the best results, measure each ingredient carefully. This ensures a perfect blend of flavors. If you want to try something different, check out the Full Recipe for additional tips and ideas. Enjoy your cooking! To start, grab a large mixing bowl. Use an electric mixer to whip the heavy cream. Set it on medium-high speed. Whip until soft peaks start to form. Slowly sprinkle in the powdered sugar. Add the vanilla extract next. Keep whipping until stiff peaks form. This makes a light and fluffy cream. In another bowl, mix the softened cream cheese. Add the fresh lemon juice and honey. Stir this mix until it is smooth. You want to avoid lumps. Next, gently fold in the whipped cream. Use a spatula, and be careful not to deflate it. This mix should be light and airy. Now, take a rectangular baking dish. Start with a thin layer of the cream mix at the bottom. Then, add a layer of graham cracker crumbs on top. Next, layer the sliced peaches evenly. Repeat this: cream mix, graham cracker crumbs, and peaches. Keep going until all ingredients are used. Make sure the top layer is the cream mix. Cover the dish tightly with plastic wrap. Place the cake in the fridge. Let it chill for at least 4 hours. For the best taste, chill it overnight. This time helps the graham crackers soak up moisture. It will make the cake soft and tasty. To make your No-Bake Peach Icebox Cake look great, use fresh mint leaves. Place them on top for color and aroma. You can also add extra peach slices around the cake for a bright touch. Serve it on a nice platter to impress your guests. This helps create a festive vibe for summer gatherings. One common mistake is overwhipping the cream. This can make it grainy and less fluffy. Watch for soft peaks, then stop. Another mistake is not letting the graham crackers soften enough. This can lead to a crunchy texture instead of the desired creamy one. Make sure to chill it long enough to let the layers blend well. The temperature of your ingredients matters. Use cold cream for better whipping. Room temperature cream cheese blends smoothly into the mixture. If you want to change the sweetness, use honey or maple syrup instead of powdered sugar. You can also add a splash of almond extract for extra flavor. This can make your cake unique and delicious. For the full recipe, check out the detailed instructions! {{image_4}} You can use many fruits in this icebox cake. Berries, like strawberries or blueberries, add a nice touch. You can also try mangoes for a tropical vibe. Seasonal fruits work great too. Think apples in fall or citrus fruits in winter. Each fruit brings its own flavor and texture. Mix and match to find your favorite combos! Adding extracts can take your cake to the next level. Almond or coconut extracts give a unique kick. Just a few drops can change the whole taste. You can also add spices like cinnamon or nutmeg for warmth. These spices blend well with peaches, creating a cozy feel. They add depth without overwhelming the dish. Want a lighter version? Swap cream cheese for yogurt. Greek yogurt works well and adds protein. You can also use alternative crackers for a gluten-free option. Look for gluten-free graham crackers or make your own. These swaps keep the cake tasty while making it healthier. Don't be afraid to experiment with what you have. For the full recipe, check out the details above! To keep your No-Bake Peach Icebox Cake fresh, cover it tightly with plastic wrap. Store it in the refrigerator. This will help prevent the cake from drying out. You can enjoy it for up to four days. The flavors will continue to meld, making each bite even better. You can freeze the assembled cake for later enjoyment. First, wrap it well in plastic wrap and then in aluminum foil. This prevents freezer burn. The cake can stay in the freezer for up to three months. When you're ready to enjoy it, move the cake to the fridge to thaw overnight. Avoid thawing it at room temperature. This will help keep the texture just right. After thawing, serve it cold for the best taste. Yes, you can use frozen peaches. However, the texture may change. Frozen peaches can be softer once thawed. This can affect the layers in your cake. Fresh peaches give a nice crunch and bright flavor. If you use frozen ones, let them thaw. Drain any excess water to keep the cake from getting soggy. You can store the icebox cake in the fridge for up to 5 days. Make sure to cover it tightly with plastic wrap. This keeps it fresh and prevents it from absorbing other smells in the fridge. If you want to keep it longer, you can freeze it. It can last in the freezer for up to 2 months. Just remember to thaw it in the fridge before serving. Yes, you can double or halve the recipe. To double it, simply double all the ingredients. Make sure to use a larger dish to fit everything. If you want to halve it, use a smaller dish and cut the amounts in half. This way, you can make the perfect size for your gathering or craving. This no-bake peach icebox cake combines fresh peaches, whipped cream, and cream cheese for a tasty treat. We covered the ingredients, step-by-step instructions, and tips to make it perfect. Remember, chilling the cake is key for the best flavor and texture. Feel free to get creative with fruit and flavor swaps. Don't hesitate to try different presentations to impress your guests. This dessert is simple to make and enjoyable to share. Enjoy every bite of your homemade peach delight!

No-Bake Peach Icebox Cake

Indulge in the refreshing delight of a No-Bake Peach Icebox Cake that’s perfect for summer gatherings! With juicy peaches, creamy filling, and buttery graham cracker layers, this treat is easy to make and utterly delicious. Whip up this dessert in just 20 minutes and let it chill for the ultimate flavor. Ready to impress your friends and family? Click through to explore the full recipe and bring this fruity favorite to your table!

Ingredients
  

3 ripe peaches, thinly sliced

1 cup heavy whipping cream

1/2 cup powdered sugar

1 teaspoon vanilla extract

1 1/2 cups graham cracker crumbs

1 cup cream cheese, softened to room temperature

1 tablespoon fresh lemon juice

2 tablespoons honey

Fresh mint leaves for garnish

Instructions
 

Prepare the Whipped Cream: In a large mixing bowl, use an electric mixer to whip the heavy cream on medium-high speed until soft peaks begin to form. Gradually sprinkle in the powdered sugar and add the vanilla extract, continuing to whip until stiff peaks form, which will create a fluffy texture.

    Make the Cream Cheese Filling: In a separate bowl, combine the softened cream cheese, fresh lemon juice, and honey. Mix vigorously until the mixture is smooth and creamy, ensuring there are no lumps. Gently fold this cream cheese mixture into the whipped cream using a spatula, being careful not to deflate the whipped cream. The goal is a light and airy mixture.

      Assemble the Layers: Take a rectangular baking dish and spread a thin layer of the cream mixture evenly across the bottom. Sprinkle a generous layer of graham cracker crumbs on top of the cream. Follow with a layer of the sliced peaches, making sure they are evenly distributed. Repeat the layering process — cream mixture, graham cracker crumbs, and peaches — until all ingredients are used, ensuring the final layer is the cream mixture.

        Chill the Cake: Cover the assembled cake tightly with plastic wrap and place it in the refrigerator. Let it chill for a minimum of 4 hours, or ideally overnight. This resting period allows the graham crackers to absorb moisture and soften, enhancing the overall flavor and texture of the cake.

          Serve with Style: Once chilled, carefully remove the icebox cake from the refrigerator. Cut it into squares for serving. Plate each square delicately, garnishing with fresh mint leaves to add a pop of color and an aromatic touch.

            Prep Time: 20 minutes | Total Time: 4 hours 20 minutes | Servings: 8

              - Presentation Tips: Consider serving the cake on a decorative platter, and place a few additional peach slices and mint leaves around the edges for a visually stunning presentation.

                Leave a Comment

                Recipe Rating