Skip to content
DisclaimerTerms Of UseGDPR PolicyCookie Policy

lazychefmagic

  • Home
  • Drinks
  • Appetizers
  • Dinner
  • Dessert
  • About
  • Contact
  • Privacy Policy
DisclaimerTerms Of UseGDPR PolicyCookie Policy

Amanda

- 2 large apples (preferably Granny Smith or Honeycrisp), cored and sliced into ½-inch rings - 1 cup all-purpose flour - 1 teaspoon baking powder - ½ teaspoon ground cinnamon - ¼ teaspoon ground nutmeg - 1 tablespoon granulated sugar - 1 cup cold sparkling water - ½ cup breadcrumbs (use panko for an extra crispy texture) - Oil, for frying - Powdered sugar, for dusting (optional) - Caramel sauce, for dipping (optional) When making crispy fried apple rings, the choice of apples matters. I love using Granny Smith or Honeycrisp. They provide a nice balance of sweet and tart. The crunch of the apple contrasts well with the crispy coating. For the batter, I mix flour, baking powder, cinnamon, nutmeg, and sugar. This blend gives the rings flavor and some sweetness. The addition of cold sparkling water makes the batter light and airy. It’s key for that perfect crunch. Using panko breadcrumbs is a game-changer. They create a thicker, crunchier layer on the outside. You can also dust the finished rings with powdered sugar for a sweet touch. A side of caramel sauce makes for a delightful dip. Gather these ingredients and prepare to fry up a delicious treat! - First, core the apples. This means removing the center where the seeds are. - Next, slice the apples into rings that are about ½-inch thick. - After slicing, pat the apple rings dry with a towel. This step is key for crispiness. - In a large bowl, whisk together the dry ingredients. This includes flour, baking powder, cinnamon, nutmeg, and sugar. - Gradually mix in the cold sparkling water. Stir gently until it is smooth, but don’t worry about lumps. - Heat oil in a skillet or fryer to 350°F (175°C). Use a thermometer for accuracy. - Take each apple ring and dip it into the batter. Let excess batter drip off. - Roll the coated apple ring in breadcrumbs until fully covered. - Carefully place the rings in the hot oil. Fry in batches, so they don’t overcrowd. - Cook for 2-3 minutes on each side, until they are golden brown and crispy. - Once done, move them to a plate with paper towels. This will soak up excess oil. Dust with powdered sugar before serving. Enjoy these crispy fried apple rings right away! To get that perfect crispy bite, you must dry your apple rings. After slicing the apples, pat them with a kitchen towel. This step removes extra moisture. Water will make them soggy, not crispy. Next, focus on the frying temperature. Heat your oil to 350°F (175°C). Use a kitchen thermometer to check. If the oil is too cool, the apple rings will absorb oil and become greasy. If too hot, they may burn. You can boost flavor by adding spices. Try a pinch of cayenne for heat or extra cinnamon for warmth. Don’t be afraid to experiment! Different apple varieties can also change the taste. Granny Smith offers a tart flavor, while Honeycrisp gives sweetness. Mix and match to find what you like best. Dips make everything better! Pair your apple rings with caramel or chocolate sauce. The sweetness complements the crispy texture. For a fun presentation, stack the rings on a plate. Dust them with powdered sugar for a touch of elegance. You can even serve them on a wooden board for a rustic feel. Enjoy your treats! {{image_4}} You can choose many types of apples for your fried apple rings. Granny Smith apples bring a tart taste, while Honeycrisp apples add sweetness. Other good options are Fuji and Gala apples. Each apple type gives a unique flavor. Mixing these varieties can create a fun taste experience. If you want a lighter option, try baking instead of frying. Baked apple rings can still be tasty and crispy. Just coat them lightly with oil and bake at 400°F (200°C) for about 15 minutes. You can also swap out the all-purpose flour for almond or coconut flour for a gluten-free option. This change can help with dietary needs, too. You can make your apple rings even more fun. Try mixing in nuts or chocolate chips into the batter. Chopped walnuts or pecans add crunch and flavor. For a sweet twist, add vanilla extract to the batter. These small changes can create exciting new flavors and textures. To keep your leftover apple rings fresh, follow these steps. First, let the rings cool completely at room temperature. Then, place them in an airtight container. Store the container in the fridge. This method helps maintain flavor and texture. They will stay good for about three days. When you want to reheat them, use an oven or air fryer. Set the oven to 350°F (175°C). Place the apple rings in a single layer on a baking sheet. Heat them for around 5-10 minutes. This method helps restore their crispness. Avoid using a microwave, as it can make the rings soggy. If you want to keep apple rings longer, freezing is a great option. Start by preparing the apple rings as usual. After frying, let them cool completely. Then, place them in a single layer on a baking sheet. Freeze them for about 1-2 hours until solid. Once frozen, transfer them to a freezer bag or container. Be sure to remove as much air as possible. This process keeps them fresh for up to three months. When you're ready to eat, thaw the apple rings in the fridge overnight. To reheat, use the oven or air fryer at 350°F (175°C) for 5-10 minutes. This keeps them crispy and delicious. To keep your apple rings crispy, follow these tips. First, dry the apple rings well after slicing. Moisture makes them soggy. Next, heat the oil to 350°F (175°C) before frying. This high heat helps create a crunchy shell. Fry in small batches. Overcrowding lowers the oil temperature, which leads to less crispy rings. After frying, place them on paper towels to absorb extra oil. Dust with powdered sugar right before serving for a nice touch. Yes, you can prepare the batter ahead of time. Mix the dry ingredients and store them in a bowl. Add the cold sparkling water just before frying. This keeps the batter fresh and bubbly. If you let the batter sit too long, it can lose its light texture. Make it right before you fry for the best results. You can enjoy crispy fried apple rings with various dips. Caramel sauce is a classic choice. You can also try chocolate sauce for a sweet twist. For a tangy kick, serve them with yogurt or cream cheese dip. Even a sprinkle of cinnamon sugar can be a fun topping! Choose a dip that fits your taste. Absolutely! You can use gluten-free flour in place of all-purpose flour. Look for a gluten-free all-purpose blend that includes xanthan gum. This helps mimic the texture of regular flour. The batter will still turn out tasty and crispy. Enjoy your apple rings without worry! To make crispy fried apple rings, you need some simple ingredients. Here’s what you will need: - 2 large apples (preferably Granny Smith or Honeycrisp), cored and sliced into ½-inch rings - 1 cup all-purpose flour - 1 teaspoon baking powder - ½ teaspoon ground cinnamon - ¼ teaspoon ground nutmeg - 1 tablespoon granulated sugar - 1 cup cold sparkling water - ½ cup breadcrumbs (use panko for an extra crispy texture) - Oil, for frying - Powdered sugar, for dusting (optional) - Caramel sauce, for dipping (optional) Preparing the Apples Start by coring and slicing the apples. Aim for rings about ½-inch thick. After slicing, pat the rings dry with a kitchen towel. This step is key to getting them crispy. Making the Batter In a large bowl, whisk together the flour, baking powder, cinnamon, nutmeg, and sugar. Mix well until combined. Gradually pour in the cold sparkling water. Stir gently until you have a smooth batter. Don’t worry about lumps; they add texture. Frying the Apple Rings Next, heat about 1-2 inches of oil in a large skillet or deep fryer. Use a kitchen thermometer to check the oil temperature. Aim for 350°F (175°C). This heat ensures crispy results. Coat each apple ring in the batter, letting any extra drip off. Then roll the rings in breadcrumbs. Make sure they are fully coated. Carefully lower the rings into the hot oil with a slotted spoon. Fry in small batches to keep the oil hot. Cook for 2-3 minutes on each side until golden brown. Once cooked, remove the rings and place them on a plate lined with paper towels to drain excess oil. You can dust them with powdered sugar for a sweet touch before serving. If you like, serve with caramel sauce for dipping. Now you have delicious, crispy fried apple rings ready to enjoy! Crispy fried apple rings are simple and fun to make at home. You learned the essential ingredients and step-by-step instructions. Remember to dry your apple rings for the best crunch. Experiment with spices and dipping sauces for extra flavor. These rings are great as snacks or desserts. You can also explore healthier options like baking. Enjoy making these tasty treats, and share them with family and friends. Happy frying!

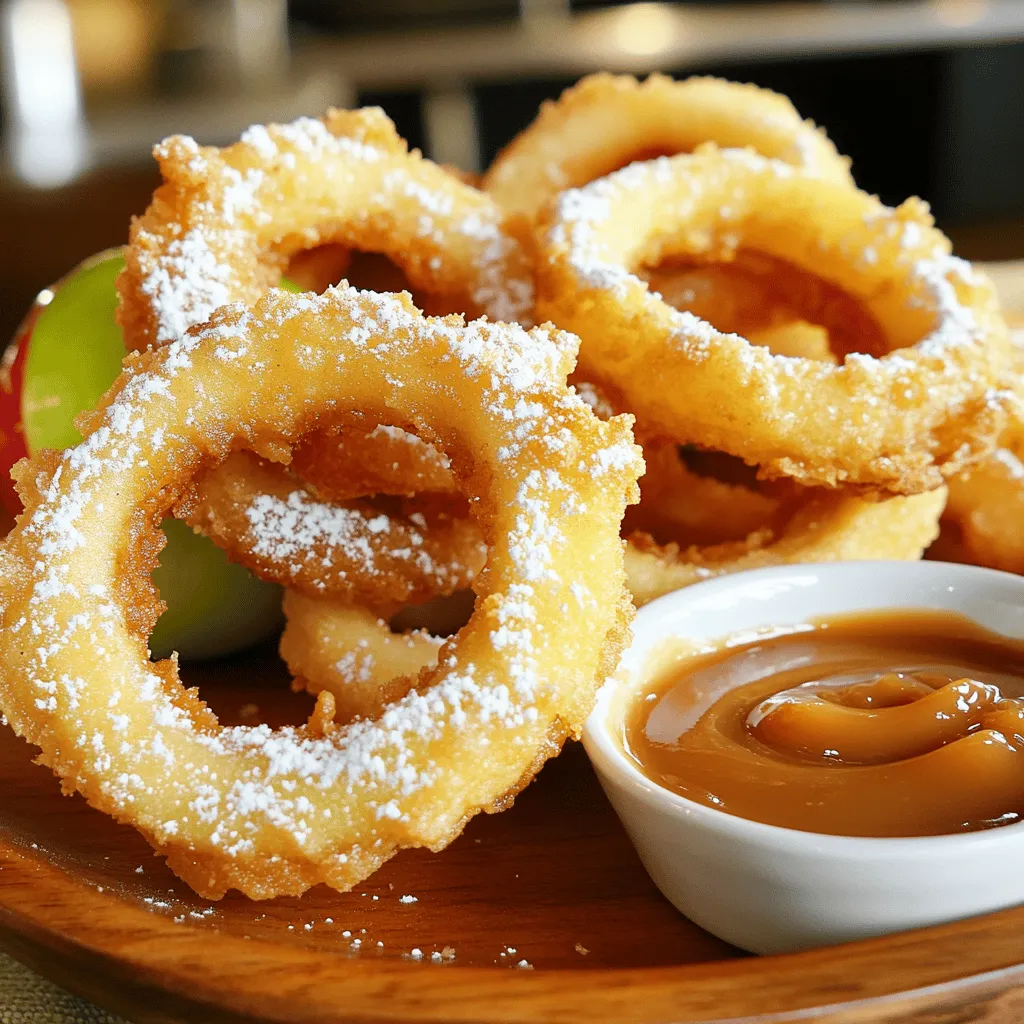
Crispy Fried Apple Rings Simple and Delicious Treat

Get ready to satisfy your sweet tooth with my Crispy Fried Apple Rings! This simple treat combines tart apples and

- 1 cup unsalted butter, softened to room temperature - 1 cup granulated sugar - 1/2 cup packed brown sugar - 2 large eggs, at room temperature - 1 teaspoon pure vanilla extract - 2 cups all-purpose flour - 1 teaspoon baking soda - 1/2 teaspoon fine sea salt - 1/2 cup heavy cream - 1/4 cup granulated sugar (for caramelized topping) These ingredients come together to create a delightful treat. The butter gives a rich flavor and soft texture. Granulated sugar and brown sugar add sweetness and depth. Eggs and vanilla extract bring moisture and aroma. All-purpose flour provides structure, while baking soda helps the cookies rise. The fine sea salt balances the sweetness, making each bite better. Heavy cream contributes to the cookie's richness and creaminess. Finally, the extra granulated sugar is for the crispy caramel topping. This topping gives a satisfying crunch that contrasts with the soft cookie base. Each ingredient plays a key role in making these cookies special. - Preheat the oven to 350°F (175°C). - Prepare two baking sheets by lining them with parchment paper. - In a large mixing bowl, cream together 1 cup of softened unsalted butter, 1 cup of granulated sugar, and 1/2 cup of brown sugar. Mix until fluffy. - Add 2 large eggs, one at a time. Mix well after each egg. Then, add 1 teaspoon of pure vanilla extract and mix until smooth. - In a separate bowl, mix 2 cups of all-purpose flour, 1 teaspoon of baking soda, and 1/2 teaspoon of fine sea salt. - Slowly add this dry mix to the wet ingredients. Mix on low speed until just combined. - Gently pour in 1/2 cup of heavy cream. Fold it into the dough until smooth. - Use a tablespoon or cookie scoop to drop rounded balls of dough on the lined sheets. Leave about 2 inches between each ball. - Bake for 10-12 minutes. Look for lightly golden edges and soft centers. - After cooling for 5 minutes, sprinkle about 1/4 teaspoon of granulated sugar on each cookie. - Use a kitchen torch to caramelize the sugar. Move the flame in small circles until it melts and forms a golden crust. Watch it closely to avoid burning. To get the right dough consistency, mix the butter and sugars well. The mix should be light and fluffy. After adding eggs and vanilla, blend carefully. When combining dry and wet ingredients, mix until no dry bits remain. The heavy cream adds a nice gloss to the dough. For baking time, keep an eye on the cookies. They should bake for 10-12 minutes. The edges need to be golden while the center stays soft. One common mistake is overmixing the dough. This can make the cookies tough. Be gentle when combining the dry and wet ingredients. Another issue is burning the caramelized sugar. When using a kitchen torch, move in small circles. Watch closely to prevent burning. If the sugar looks too dark, it’s likely burnt. Presentation can elevate your cookies. Arrange them on a decorative platter. Add fresh berries or a drizzle of chocolate sauce for flair. For beverages, pair these cookies with coffee or sweet tea. The rich flavors complement the cookies well. Enjoy the delightful contrast of sweet and crunchy textures! {{image_4}} You can make Crème Brûlée Cookies even more fun with flavor additions. Start by infusing the dough. You can add a teaspoon of almond extract for a nutty twist. If you love citrus, try some lemon or orange zest. Both give a fresh taste that pairs well with the sweet sugar. Next, think about toppings and mix-ins. Chopped nuts like pecans or walnuts add a nice crunch. You can also fold in chocolate chips for a richer treat. Or, try adding dried fruit like cranberries for a chewy surprise. Each of these options changes the cookie's taste while keeping that classic crème brûlée flavor. You can easily adjust this recipe for different diets. For gluten-free cookies, swap all-purpose flour with a gluten-free blend. Look for one that works well in baking. This way, you still get a great texture without the gluten. If you're vegan, replace the eggs with flax eggs. Mix one tablespoon of flaxseed meal with three tablespoons of water. Let it sit for a few minutes to thicken. Use a plant-based butter instead of regular butter. Also, choose a non-dairy cream for the heavy cream. These swaps keep the cookie delicious while fitting a vegan diet. To keep your Crème Brûlée Cookies fresh, store them properly. You can keep them at room temperature in an airtight container. Make sure the cookies are fully cooled before sealing. This helps maintain their crispy topping and soft center. If you live in a humid area, refrigeration is a better choice. Place the cookies in an airtight container and store them in the fridge. Just remember, the caramelized sugar may lose its crunch in the fridge. You can freeze Crème Brûlée Cookies before or after baking. To freeze before baking, scoop the dough into balls and place them on a baking sheet. Freeze them for about an hour, then transfer them to a freezer bag. You can bake them straight from the freezer; just add a couple of extra minutes to the baking time. If you freeze the cookies after baking, let them cool completely. Wrap each cookie in plastic wrap and place them in a freezer-safe bag. For thawing, remove the cookies from the freezer and let them sit at room temperature for about an hour. If you want to enjoy that crispy sugar topping, reheat the cookies in the oven for a few minutes before serving. Crème brûlée cookies are sweet treats inspired by the classic dessert. They have a soft, chewy center and a crunchy caramelized top. The flavors blend vanilla, butter, and cream, giving a rich taste. Each cookie offers a delightful mix of textures. Yes! You can make these cookies in advance. Store them in an airtight container at room temperature for up to three days. To keep them fresh, avoid stacking them. For longer storage, place them in the fridge for a week. To control spread, chill the dough before baking. After mixing, cover the dough and place it in the fridge for at least 30 minutes. Also, ensure your baking sheets are cool when you place the dough on them. This helps cookies hold their shape better. You can find pre-made crème brûlée cookies in bakeries or specialty dessert shops. Some grocery stores may carry them in the frozen section. Online, check websites like Amazon or local bakery delivery services. If the caramelized sugar does not harden, it may be too hot. Allow it to cool longer before serving. If it remains soft, reheat the cookies slightly and caramelize again. Remember to use the torch carefully to avoid burning. In this guide, we covered everything about Crème Brûlée Cookies. You learned the essential ingredients, step-by-step mixing and baking instructions, and tips for perfect texture. I shared common mistakes to avoid and creative serving ideas. We explored fun flavor variations and storage techniques. Crème Brûlée Cookies are a unique treat. With practice, you can master them. Enjoy experimenting and sharing your tasty cookies with others!

Crème Brûlée Cookies Delightfully Sweet and Crunchy

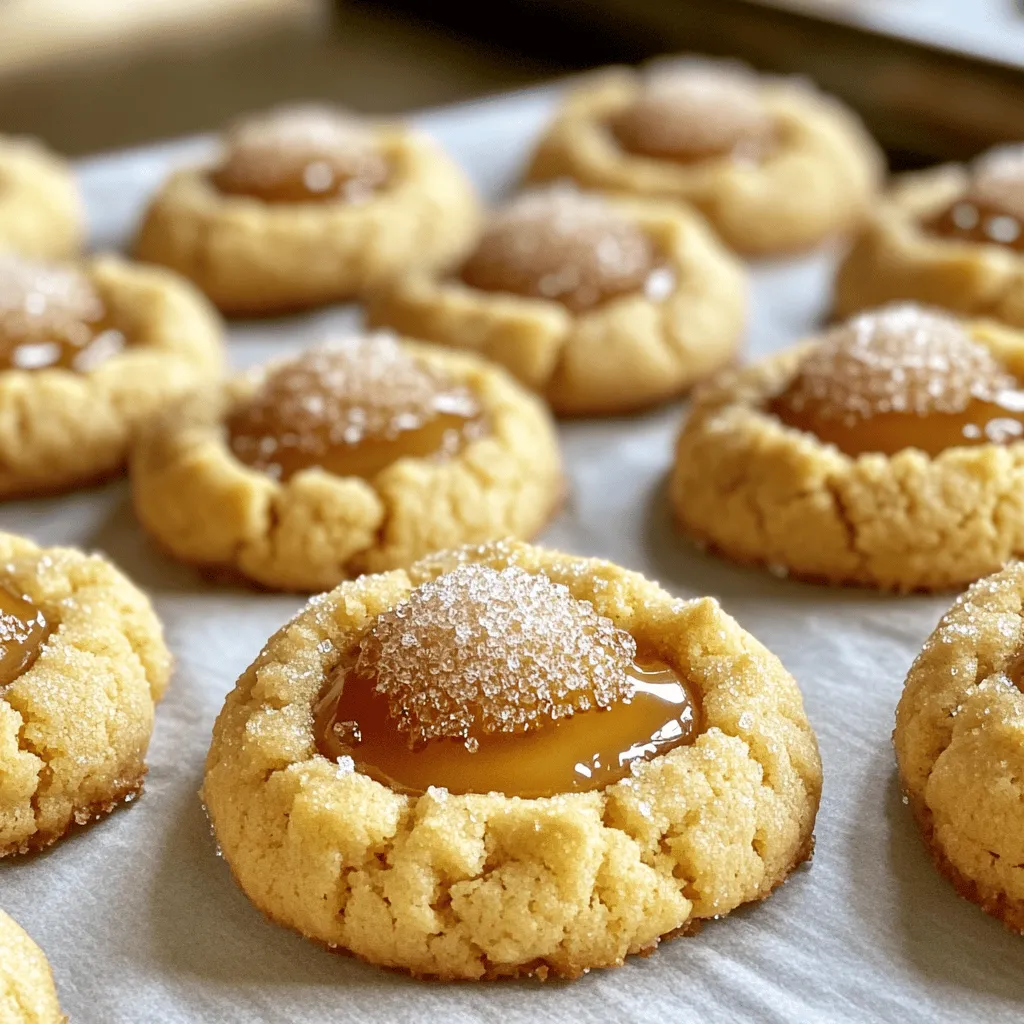
Are you ready for a sweet treat that combines the classic flavors of crème brûlée with the joy of cookies?

To make a rich and tasty pumpkin loaf, you need: - 1 ½ cups all-purpose flour - 1 teaspoon baking powder - 1 teaspoon baking soda - ½ teaspoon salt - Spices: 1 teaspoon ground cinnamon, ½ teaspoon ground nutmeg, ½ teaspoon ground ginger These dry ingredients create the perfect base. The flour gives structure. Baking powder and baking soda help it rise. The salt and spices add flavor and balance. Next, you need the wet ingredients: - ½ cup unsweetened applesauce - 1 cup pure pumpkin puree - ¾ cup granulated sugar - ½ cup packed brown sugar - 2 large eggs - ½ cup vegetable oil - 1 teaspoon vanilla extract These ingredients bring moisture and sweetness. The applesauce and pumpkin puree keep the loaf soft. The sugars add sweetness and a nice golden color. For extra flavor and texture, consider these add-ins: - ½ cup chopped walnuts or pecans - ½ cup chocolate chips These add-ins can make the loaf even more special. Nuts give a nice crunch, while chocolate adds a sweet surprise. You can mix and match based on your taste. For the full recipe, check out the complete guide to making this delicious treat. - Preheat to 350°F (175°C) - Grease or line a 9x5-inch loaf pan Start by preheating your oven to 350°F (175°C). This step is key for even baking. While the oven heats, grab your 9x5-inch loaf pan. You can grease it with a bit of oil or line it with parchment paper. Lining helps with easy removal after baking. - Combine flour, baking powder, baking soda, salt, and spices In a medium bowl, mix the dry ingredients. Combine 1 ½ cups of all-purpose flour, 1 teaspoon of baking powder, 1 teaspoon of baking soda, and ½ teaspoon of salt. Add in 1 teaspoon of ground cinnamon, ½ teaspoon of ground nutmeg, and ½ teaspoon of ground ginger. Whisk them together well, so there are no clumps. Set this bowl aside for later. - Mix applesauce, pumpkin puree, sugars, eggs, oil, and vanilla Now, let’s make the wet mixture. In a large bowl, combine ½ cup of unsweetened applesauce and 1 cup of pure pumpkin puree. Add ¾ cup of granulated sugar and ½ cup of packed brown sugar. Crack in 2 large eggs, then pour in ½ cup of vegetable oil and 1 teaspoon of vanilla extract. Beat this mixture until it's smooth and well mixed. - Fold dry mixture into wet mixture, avoiding overmixing Next, it’s time to bring the two mixtures together. Take the dry mixture and gradually fold it into the wet mixture. Use a silicone spatula to gently combine them. It’s okay if some lumps remain. Avoid overmixing; this keeps the loaf soft and moist. - Incorporate nuts or chocolate chips gently If you want to add some fun, now is the time! Fold in ½ cup of chopped walnuts or pecans, or ½ cup of chocolate chips if you like. Be gentle to keep the batter fluffy and light. - Pour batter into the pan and bake for 55-65 minutes Pour your batter into the prepared loaf pan. Use a spatula to smooth out the top. Place the loaf pan in your preheated oven. Bake for 55 to 65 minutes. To check if it’s done, insert a toothpick into the center. It should come out clean. If the top gets too brown, cover it loosely with foil for the last 10-15 minutes. To make your pumpkin loaf super moist, avoid overmixing. When you mix the wet and dry ingredients, do it gently. This keeps the loaf light and fluffy. Also, use fresh pumpkin puree if you can. It adds a richer flavor and moisture compared to canned puree. Watch your loaf while it bakes. If it gets too brown on top, cover it with aluminum foil. This helps it cook evenly without burning. To check if it’s done, insert a toothpick in the center. It should come out clean. If it has batter on it, bake a bit longer. Slice your warm loaf and serve it with butter or cream cheese. These pair well with the pumpkin flavor. For a nice touch, sprinkle powdered sugar on top. This adds a sweet finish and makes it look lovely. Enjoy each bite of this tasty treat, and share it with friends! {{image_4}} To make a gluten-free version, swap all-purpose flour with a gluten-free flour blend. Look for blends that include xanthan gum, as it helps with texture. You can measure it the same way as regular flour. This change keeps your loaf soft and moist. If you need a dairy-free option, replace eggs with flax eggs. Mix one tablespoon of ground flaxseed with three tablespoons of water. Let it sit for five minutes to thicken. For oil, use coconut oil or avocado oil instead of vegetable oil. Both will keep your loaf rich and tasty. To make your loaf even more exciting, add some citrus zest. A teaspoon of orange or lemon zest brightens the flavor. You can also fold in dried fruits like cranberries or raisins. They add sweetness and texture to the loaf. This way, you can customize your pumpkin loaf to fit your taste. For the complete recipe, check out the Full Recipe section. You can keep your pumpkin loaf fresh for three days. Wrap it well in plastic wrap. This helps lock in moisture. Place it in a cool, dry place. Avoid direct sunlight. If you notice it getting stale, you can toast slices for a warm treat. To store your loaf in the fridge, wrap it tightly in plastic wrap. This keeps it from drying out. It’s best to eat it within a week. You can also use an airtight container for extra protection. Just remember to let it cool before wrapping. Freezing your pumpkin loaf is a great option for later. First, slice the loaf into pieces. Wrap each slice in plastic wrap tightly. Then, place them in a freezer bag. This helps save space. When you want to enjoy a slice, take it out of the freezer. Let it thaw in the fridge or on the counter for a few hours. Enjoy the fresh taste! To make your pumpkin loaf extra moist, focus on key techniques and ingredients. First, use fresh pure pumpkin puree or a good quality canned one. This adds moisture and flavor. Next, add unsweetened applesauce; it keeps the loaf soft. Using vegetable oil instead of butter also helps. Oil locks in moisture better. Finally, avoid overmixing the batter. This keeps the loaf light and fluffy, resulting in a perfect texture. Yes, you can substitute unsweetened applesauce with other ingredients. Use mashed bananas or yogurt for a similar effect. Both will add moisture and flavor. You can also try pureed prunes for added sweetness. Each option will change the taste slightly, but they will keep your loaf moist. To enhance the flavor of your pumpkin loaf, consider adding spices and mix-ins. You can add chopped nuts like walnuts or pecans for a nice crunch. Chocolate chips are another great option for a sweet twist. Try adding spices like clove or allspice for an extra kick. If you love citrus, a bit of orange zest brightens the loaf beautifully. When stored properly, the pumpkin loaf lasts about 3-5 days at room temperature. Keep it in an airtight container to maintain moisture. If you want it to last longer, refrigerate it for up to a week. For longer storage, you can freeze it. Wrap it well and it can last for up to three months. Yes, you can make mini pumpkin loaves! Use a mini loaf pan instead of a standard one. Adjust the baking time to about 25-30 minutes. Check for doneness with a toothpick. When it comes out clean, the mini loaves are ready. This is a fun way to share them with friends! In this post, we covered the essential ingredients for a moist pumpkin loaf, how to bake it, and tips for perfecting your recipe. With this guide, you can make a delicious treat that’s great for any occasion. Remember to store your loaf well to ensure it stays fresh. Try different variations and enjoy the process. Baking is fun, and your pumpkin loaf will impress everyone. Happy baking!

Super Moist Pumpkin Loaf Simple and Tasty Recipe

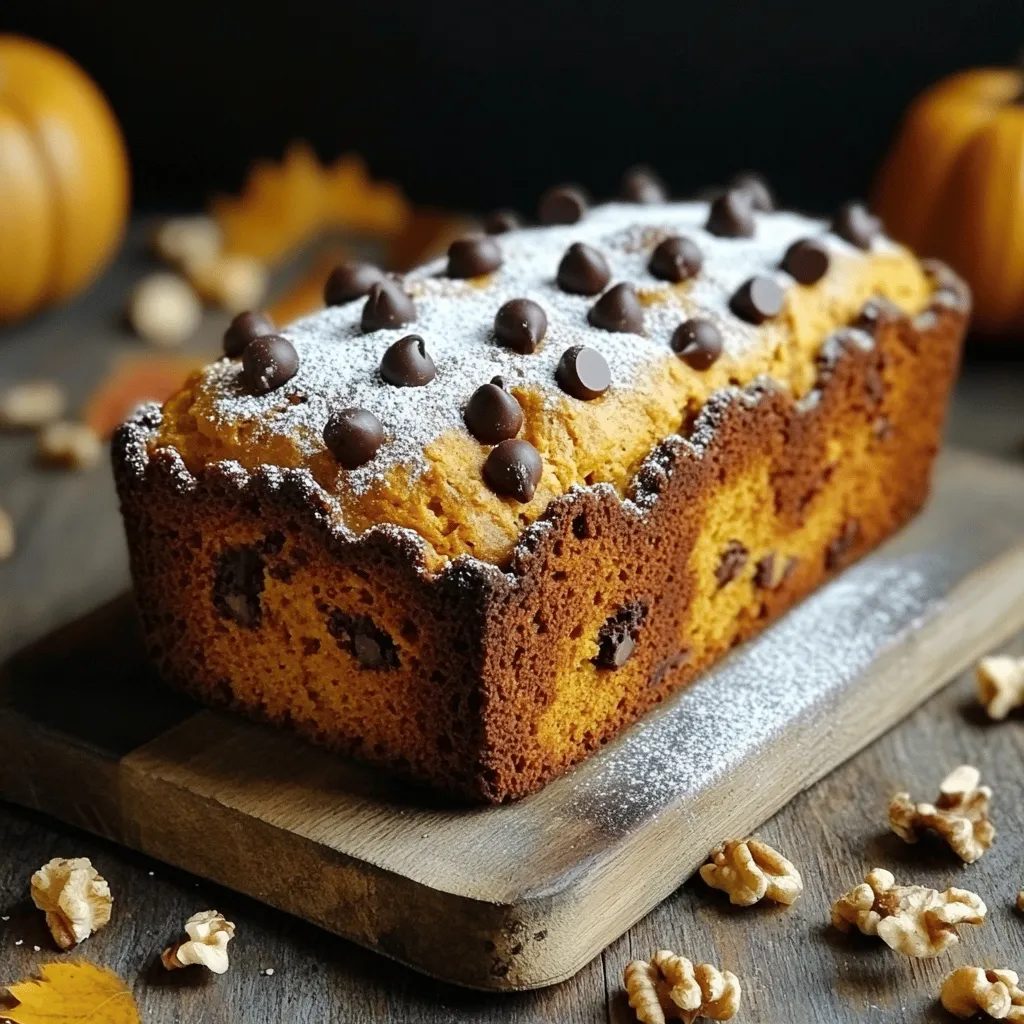
Are you ready to bake the perfect Super Moist Pumpkin Loaf? This simple and tasty recipe will delight your taste

- 1 ½ cups all-purpose flour - 1 teaspoon baking powder - 1 teaspoon baking soda - ½ teaspoon salt - 1 teaspoon ground cinnamon - ½ teaspoon ground nutmeg - ¼ teaspoon ground ginger - ½ cup vegetable oil - 1 cup granulated sugar - 2 large eggs - 1 cup canned pumpkin puree - 1 teaspoon vanilla extract - ½ cup chopped walnuts or pecans In this recipe, each ingredient plays a key role. The all-purpose flour gives structure. Baking powder and baking soda create rise. Salt enhances flavor. The spices—cinnamon, nutmeg, and ginger—bring warmth and depth. The wet ingredients add moisture and sweetness. Vegetable oil keeps the bread tender. Sugar adds sweetness, while the eggs create a rich texture. Canned pumpkin puree is the star, providing flavor and moisture. If you want to add a crunchy texture, consider the optional nuts. They not only add flavor but also a nice bite. Check out the Full Recipe for all the steps to make this delicious pumpkin bread! - Preheat your oven to 350°F (175°C). - Prepare a 9x5-inch loaf pan by greasing or lining it. - In a medium bowl, whisk together: - 1 ½ cups all-purpose flour - 1 teaspoon baking powder - 1 teaspoon baking soda - ½ teaspoon salt - 1 teaspoon ground cinnamon - ½ teaspoon ground nutmeg - ¼ teaspoon ground ginger This mix brings warmth and spice. Make sure to blend well. - In a large bowl, combine: - ½ cup vegetable oil - 1 cup granulated sugar - Then, add: - 2 large eggs - 1 cup canned pumpkin puree - 1 teaspoon vanilla extract Whisk until smooth. This step creates a rich base. - Gradually fold the dry ingredients into the wet mixture. - Mix just until combined. Overmixing can make the bread dense. If you like, fold in ½ cup chopped walnuts or pecans for crunch. - Pour the batter into the loaf pan and smooth the top. - Bake for 60-70 minutes. Check doneness with a toothpick. The bread is ready when a toothpick comes out clean. - Let the bread cool in the pan for 10 minutes. - After that, transfer it to a wire rack. This cooling helps enhance the flavor and texture. For the full recipe, visit the link provided. To keep your pumpkin bread moist, avoid overmixing. Mix just until combined. Overmixing adds air and can make the bread dense. Use fresh pumpkin puree for more flavor. Fresh puree gives a richer taste than canned. Always check for doneness before the baking time ends. This helps you avoid overbaking. Insert a toothpick into the center. If it comes out clean, the bread is done. Rotate the pan halfway through baking. This ensures even cooking and a perfect rise. Serve your warm pumpkin bread with powdered sugar on top. Cream cheese makes a great spread, too. For a charming gift, wrap the bread in parchment paper. Secure it with twine for a rustic look that impresses. {{image_4}} You can make your pumpkin bread even more fun. Try adding chocolate chips or dried cranberries for a tasty twist. These add-ins bring a new layer of flavor that kids and adults love. You can also swap out spices. Try using cardamom or cloves to create a chai-flavored version. This gives your bread a warm and cozy vibe. For a healthier option, use whole wheat flour instead of all-purpose flour. Whole wheat adds fiber and nutrients, making your bread more wholesome. If you want a less sugary bread, replace granulated sugar with coconut sugar. Coconut sugar has a lower glycemic index, making it a better choice for some people. If you want to make a vegan version, you can use plant-based eggs. Flaxseed meal mixed with water works well. Instead of vegetable oil, try using coconut oil or applesauce. These options keep the bread moist and delicious while being completely plant-based. This way, everyone can enjoy your easy pumpkin bread! Try the full recipe to see how these variations can work for you. Store your pumpkin bread at room temperature in an airtight container. It will stay fresh for up to 3 days. This keeps the bread moist and tasty. Just remember to check for any signs of spoilage before enjoying another slice. If you want your pumpkin bread to last longer, refrigerate it. It can stay fresh for up to a week in the fridge. Wrap it well to prevent it from drying out. This helps keep the flavors intact, and you can enjoy it for breakfast or a snack. For even longer storage, you can freeze the bread. Wrap it tightly in plastic wrap, then place it in a freezer-safe bag. This way, it can last for up to 3 months. When you're ready to eat, just thaw it in the fridge overnight or at room temperature for a few hours. You’ll have delicious pumpkin bread ready to enjoy anytime! For the complete making process, check out the Full Recipe. Total preparation and cooking time is approximately 1 hour and 20 minutes. This includes about 15 minutes to prep the ingredients and 60 to 70 minutes of baking time. You can easily fit this into your day, and the smell of baking bread will be worth it! Yes, fresh pumpkin can be pureed and used as a substitute for canned. To do this, cook the pumpkin until soft, then mash or blend it until smooth. This adds a fresh taste and extra nutrition to your bread! Enjoy it with cream cheese, butter, or a sprinkle of cinnamon sugar. Each option adds a unique flavor that pairs well with the bread's warmth and spices. You can even make a fun breakfast out of it! Overmixing the batter or improperly measuring the flour can result in density. To keep it light, mix the ingredients just until combined. This will help your pumpkin bread rise beautifully and stay soft. This blog post covers all you need for easy pumpkin bread. We discussed key dry and wet ingredients, including optional add-ins. I shared step-by-step instructions to help you bake perfectly every time. Alongside tips for moisture and variations, we explored storage methods for lasting freshness. Remember, baking is fun, so feel free to try new flavors. With practice, you’ll create delicious bread that impresses everyone. Enjoy every bite and share this recipe with others!

Easy Pumpkin Bread Simple and Delicious Recipe

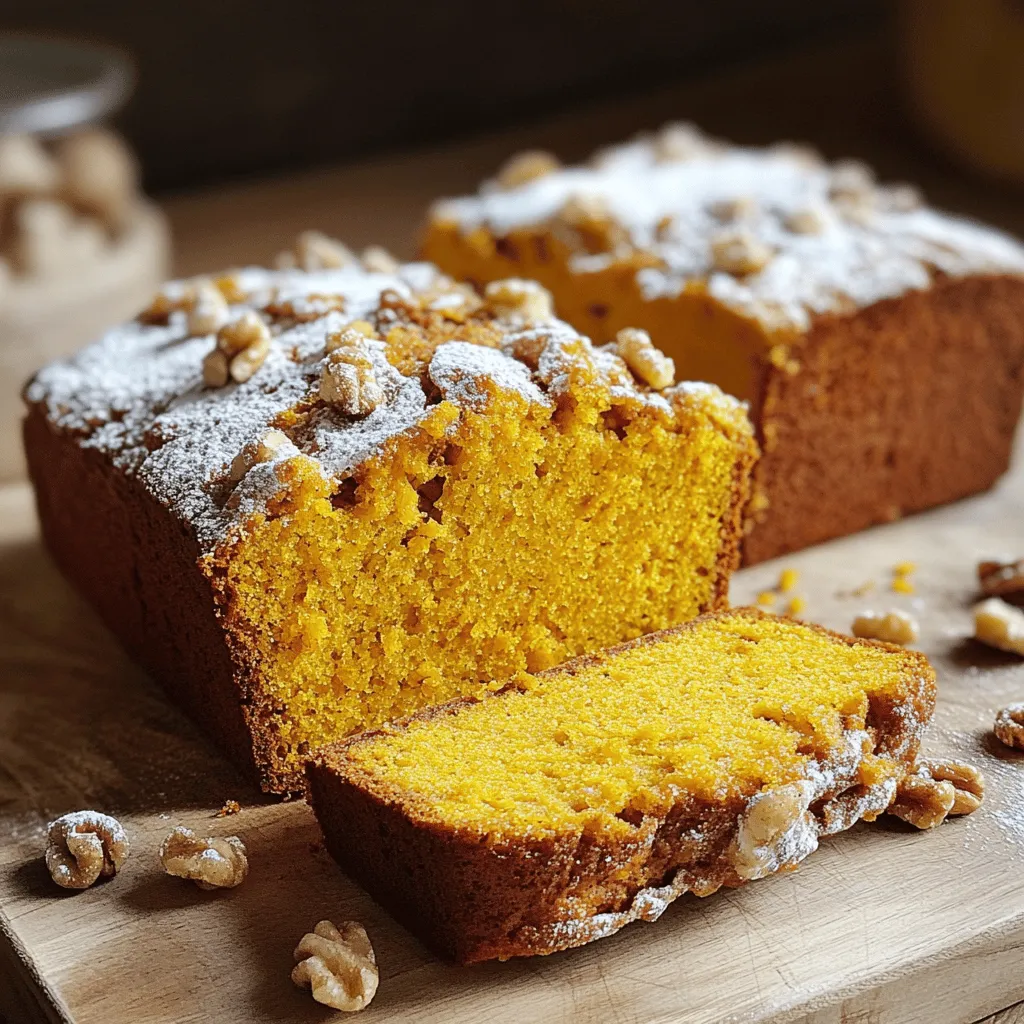
Are you ready to fill your kitchen with the warm scents of fall? My Easy Pumpkin Bread recipe is simple,

- Apples: I recommend using Granny Smith or Honeycrisp apples. These apples have the right balance of sweet and tart. Peel, core, and dice them into small pieces. This helps them cook evenly and fill your pies nicely. - Sweetener and spices: For sweetness, use 1/2 cup of brown sugar. It adds a rich flavor. You also need 1 teaspoon of ground cinnamon and 1/4 teaspoon of ground nutmeg. These spices bring warmth and depth to the filling. A tablespoon of lemon juice brightens the flavor and keeps the apples fresh. Cornstarch helps thicken the filling, so use 1 tablespoon. - Pie crust options: I suggest using pre-made pie crusts, which save time. A package usually contains two crusts. Roll them out a bit to make them easier to work with. - Egg wash and garnish details: For the egg wash, beat 1 egg until smooth. This gives your mini pies a shiny, golden top. You can sprinkle 1 tablespoon of granulated sugar on top for extra sweetness and crunch. These ingredients come together to create a delightful treat that is both easy and fun to make. For the full recipe, be sure to follow along! 1. Preheat the Oven: First, set your oven to 375°F (190°C). This heat will help your pies bake perfectly. 2. Create the Apple Filling Mixture: In a bowl, mix diced apples with brown sugar, ground cinnamon, nutmeg, lemon juice, and cornstarch. Stir well to coat the apples. Let this sit for a few minutes. The flavors will blend and deepen. 3. Grease the Muffin Tin: Lightly coat your muffin tin with non-stick spray or softened butter. This step is key for easy removal later. 4. Rolling Out the Pie Crust: On a floured surface, roll out your pre-made pie crusts. Aim for an even thickness. Use a round cutter or a glass to cut out 12 circles from the dough, each about 4 inches wide. 5. Forming Pie Shells: Place each dough circle into a muffin cup. Press it gently against the bottom and sides. Make sure the edges rise a bit above the rim. This adds to the look and keeps the filling in. 1. Filling the Pie Shells: Spoon your apple filling into each pie shell. Fill them just to the brim. This helps prevent any overflow while baking. 2. Creating Decorative Topping: With leftover dough, cut out smaller shapes for a decorative lid. Think stars or hearts! You can also leave them open for a rustic feel. 3. Applying Egg Wash: Brush the tops with the beaten egg. This gives your pies a golden color. Sprinkle a bit of granulated sugar on top for a sweet crunch. 4. Baking Instructions: Place the muffin tin in the oven and bake for 20-25 minutes. Look for a golden brown crust and bubbling apple filling to know they are done. 5. Cool and Serve: Let the mini pies cool in the tin for about 10 minutes. Then, move them to a wire rack to cool fully. The smell will fill your kitchen and make everyone eager to try them. For the complete recipe with all the ingredients and detailed steps, check out the Full Recipe. Choosing the right apples is key. I love using Granny Smith or Honeycrisp apples. They provide a great mix of sweetness and tartness. Their firm texture holds up well during baking. Avoid soft apples as they can turn mushy. For a flaky crust, here are my favorite techniques: - Keep Ingredients Cold: Use cold butter and ice water. This helps create layers. - Don’t Overwork the Dough: Mix just until combined. Overworking makes it tough. - Chill the Dough: Refrigerate the dough for at least 30 minutes before rolling. This helps the gluten relax. What do you do if your pies overflow? First, avoid overfilling them. Fill the shells just to the brim. If they do overflow, place a baking sheet under the muffin tin. This will catch any drips. Adjusting baking time is also important. Ovens can vary in heat. Start checking your pies a few minutes early. Look for a golden crust and bubbling filling. If your oven runs hot, reduce the baking time slightly. If it runs cool, add a few extra minutes. {{image_4}} You can switch up the filling in your mini apple pies. Try using other fruits like pears or berries. Each fruit adds a unique taste. For a fun twist, mix fruits together. Imagine a berry and apple pie! When it comes to crust, don't be shy to explore. You can use gluten-free crusts if you want. Whole wheat crusts also offer a nutty flavor. Both options can still give you a nice, flaky texture. Pair your mini apple pies with ice cream or whipped cream. Adding a drizzle of caramel sauce makes them even more special. The warm pie contrasts beautifully with cold ice cream. For special occasions, think about presentation. Arrange the pies on a nice platter. Garnish with fresh mint leaves. This makes your dessert look fancy and inviting. For the full recipe, check out the details above. To keep your muffin tin mini apple pies fresh, store them properly. The best way is to let them cool completely. Then, place them in an airtight container. If you put them in the fridge, they stay fresh for up to five days. Make sure to separate layers with parchment paper to avoid sticking. If you want to keep them longer, freezing is a great option. Wrap each mini pie tightly in plastic wrap. Then, place the wrapped pies in a freezer-safe bag. They can last up to three months in the freezer. When you’re ready to eat them, you can thaw them in the fridge overnight. To enjoy your mini apple pies warm, reheating is key. Preheat your oven to 350°F (175°C). Place the pies on a baking sheet. Heat them for about 10-15 minutes or until they are warm throughout. This method makes the crust crispy again. You can also use a microwave if you’re in a hurry. Just heat them for about 20-30 seconds. However, this may make the crust soft. For the best texture, use the oven method. For the full recipe, check out the [Full Recipe]. Can I use fresh apples instead of canned? Yes, you can use fresh apples. I recommend Granny Smith or Honeycrisp apples. They add a nice tartness and crunch. Just peel, core, and dice them before mixing with the sugar and spices. Fresh apples will give your mini pies a great flavor. What is the best way to prevent a soggy crust? To avoid a soggy crust, make sure your filling is not too wet. Drain any excess liquid from the apple mixture. Also, pre-baking the crust for a few minutes helps create a barrier. This way, your crust stays crisp and delicious. How long do mini apple pies typically last? Mini apple pies can last about 3-4 days in the fridge. Keep them in an airtight container to maintain freshness. If you want to store them longer, consider freezing them. They can stay good for up to 3 months in the freezer. Just thaw and reheat before serving. For the complete details on making these delightful treats, refer to the Full Recipe. In this post, you learned to make delicious mini apple pies using a muffin tin. We covered ingredients, preparation steps, and baking tips. You discovered ways to make them your own with flavor variations and serving suggestions. Proper storage and reheating methods ensure your pies stay fresh and tasty. Now you can impress friends and family with your baking skills. Enjoy your mini apple pies, and don’t forget to share them with others!

Muffin Tin Mini Apple Pies Delightful and Easy Treat

Looking for a fun and easy dessert? Muffin tin mini apple pies are your answer! These bite-sized treats combine sweet

- 1 ¾ cups all-purpose flour - 1 teaspoon baking soda - ½ teaspoon baking powder - 1 teaspoon ground cinnamon - ½ teaspoon ground nutmeg - ½ teaspoon ground ginger - ½ teaspoon salt - 1 cup granulated sugar - ½ cup packed brown sugar - ½ cup vegetable oil - 3 large eggs - 1 cup pumpkin puree (canned or fresh) - 1 teaspoon vanilla extract - 1 cup chopped walnuts or pecans (optional) For the Cream Cheese Frosting: - 8 oz cream cheese, softened - ½ cup unsalted butter, softened - 2 cups powdered sugar - 1 teaspoon vanilla extract - A pinch of salt For this pumpkin bread, precision is key. Here are exact amounts for each ingredient: - All-purpose flour: 1 ¾ cups - Baking soda: 1 teaspoon - Baking powder: ½ teaspoon - Ground cinnamon: 1 teaspoon - Ground nutmeg: ½ teaspoon - Ground ginger: ½ teaspoon - Salt: ½ teaspoon - Granulated sugar: 1 cup - Brown sugar: ½ cup packed - Vegetable oil: ½ cup - Eggs: 3 large - Pumpkin puree: 1 cup - Vanilla extract: 1 teaspoon - Optional nuts: 1 cup chopped walnuts or pecans Feel free to add walnuts or pecans to your batter. They give a nice crunch and flavor. Adjust the amount to your liking! Start by preheating your oven to 350°F (175°C). This temperature helps the bread rise well. While the oven heats, grab a 9x5 inch loaf pan. Grease it lightly with butter or cooking spray. This step prevents the bread from sticking, making it easier to remove later. In a medium mixing bowl, combine the following dry ingredients: - 1 ¾ cups all-purpose flour - 1 teaspoon baking soda - ½ teaspoon baking powder - 1 teaspoon ground cinnamon - ½ teaspoon ground nutmeg - ½ teaspoon ground ginger - ½ teaspoon salt Whisk them together well. Sifting your dry ingredients helps avoid clumps. It ensures the spices and leavening agents mix evenly, leading to a better rise and flavor. In a large mixing bowl, blend these wet ingredients: - 1 cup granulated sugar - ½ cup packed brown sugar - ½ cup vegetable oil Use a whisk to mix until smooth. Next, crack in 3 large eggs, adding one at a time. Mix well after each egg. Then add 1 cup pumpkin puree and 1 teaspoon vanilla extract. Stir until everything is well combined and creamy. Gradually add the dry mixture into the wet mixture. Stir gently. Mix just until you don’t see any flour streaks. Over-mixing can make the bread dense and tough. If you want to add nuts, fold in 1 cup of chopped walnuts or pecans now. Pour the batter into your prepared loaf pan. Use a spatula to smooth the top. Bake in the preheated oven for about 60-70 minutes. To check if it's done, insert a toothpick into the center. If it comes out clean, your bread is ready. While the bread bakes, make the cream cheese frosting. In a medium bowl, beat together: - 8 oz cream cheese, softened - ½ cup unsalted butter, softened Mix until smooth and creamy. Gradually add 2 cups powdered sugar, 1 teaspoon vanilla extract, and a pinch of salt. Blend until fluffy. This frosting will enhance your pumpkin bread and add a lovely touch. Once the pumpkin bread is cool, spread the cream cheese frosting generously over the top. Enjoy your delicious treat! For the full recipe, check the recipe section. To make sure your pumpkin bread is moist, use fresh pumpkin puree. Canned pumpkin also works well, but check the label for quality. The right amount of oil keeps the bread tender. If your batter is too thick, add a splash of milk. This helps achieve the perfect texture. To avoid a dense loaf, mix your ingredients carefully. Over-mixing can lead to tough bread. Stir just until you see no dry flour. Let your batter rest for a few minutes before pouring it into the pan. This can help improve the rise. For a smooth cream cheese frosting, start with softened cream cheese. Beat it with softened butter until creamy. Gradually add the powdered sugar while mixing. This prevents lumps and gives you the best texture. If it seems too thick, add a drop of milk to loosen it. For garnishing, consider adding a sprinkle of cinnamon or chopped nuts on top of the frosting. You can also use mini chocolate chips for a sweet twist. These small touches make your bread look and taste even better. To serve your pumpkin bread, slice it into thick pieces. Place the slices on a nice plate or wooden board for a rustic look. A light dusting of cinnamon on the frosting adds warmth and charm. Pair your bread with warm drinks like coffee or spiced tea. The flavors match perfectly and create a cozy vibe. For a fun twist, serve it with a scoop of vanilla ice cream on the side. This makes for a delightful treat. For the full recipe, check out our Pumpkin Spice Delight Bread. {{image_4}} You can make your pumpkin bread even tastier by adding extras. Chocolate chips bring a rich flavor that many love. Dried fruit, like raisins or cranberries, adds a sweet burst. You can also change the spices. Try using allspice or cardamom for a fun twist. These changes can make your bread unique with every bake. Want to lighten up your pumpkin bread? Use whole wheat flour instead of all-purpose flour. This swap adds fiber and nutrients. You can also try different sweeteners. Honey or maple syrup can replace granulated sugar for a more natural taste. If you are vegan, substitute eggs with applesauce or flaxseed mixed with water. These options keep the bread moist and delicious. Pumpkin bread is great year-round, but you can make it festive. For Halloween, add a hint of nutmeg or cloves. During the winter holidays, incorporate spices like peppermint or vanilla. These flavors bring joy and warmth to each slice. Use seasonal spices to make your bread reflect the time of year. You can even add a layer of cranberry sauce on top for a tart finish. Each season offers new ways to enjoy this classic treat. To keep your pumpkin bread fresh, store it in an airtight container. This helps retain moisture and flavor. You can also wrap it tightly in plastic wrap or foil. If you want to freeze it, slice the bread first. Place the slices in a freezer bag, removing as much air as possible. This makes it easy to grab a piece later without defrosting the whole loaf. Store your cream cheese frosting in a sealed container in the fridge. It can last up to one week. If you need to reapply frosting, let it sit at room temperature for about 30 minutes. This will soften it and make it easier to spread. If it seems too thick, you can add a bit of milk to reach your desired consistency. At room temperature, pumpkin bread lasts about 3-4 days. If refrigerated, it can last up to a week. Always check for signs of spoilage. Look for mold or a change in smell. If it feels dry or crumbly, it’s best to toss it. Enjoy your pumpkin bread within these time frames for the best taste and quality! Baking pumpkin bread usually takes about 60 to 70 minutes. Check it at 60 minutes. Insert a toothpick into the center. If it comes out clean, the bread is done. If it has batter on it, bake longer. Keep an eye on the edges; they may brown faster. Yes, you can make pumpkin bread ahead of time. Bake it, then cool and wrap it tightly. Store it in the fridge for up to a week. You can also freeze it for up to three months. Just make sure to let it cool completely before wrapping. If you don't have pumpkin puree, try using applesauce or mashed sweet potatoes. Both give moisture and good flavor. You can also use butternut squash puree if you have it. Just make sure to keep the same amount as the recipe calls for. You can make pumpkin bread without eggs. Try using a flaxseed meal instead. Mix one tablespoon of flaxseed meal with three tablespoons of water for each egg. Let it sit for a few minutes until it thickens. Applesauce can also work as an egg substitute—use a quarter cup for each egg. Your cream cheese frosting should be smooth and fluffy. It should easily spread on the bread. If it is too thick, mix in a bit of milk. If too thin, add more powdered sugar. The right texture should hold its shape but still be soft. For the full recipe, check the previous sections. You learned how to make delicious pumpkin bread from start to finish. We covered all ingredients, including optional nuts for texture. I shared tips for perfecting your loaf and creating smooth cream cheese frosting. You also discovered storage techniques to keep your bread fresh. Remember, baking is both fun and a chance to be creative. Try variations or seasonal flavors to make this recipe your own. Savor every slice and enjoy the warm, inviting aroma in your home!

Pumpkin Bread with Cream Cheese Frosting Divine Recipe

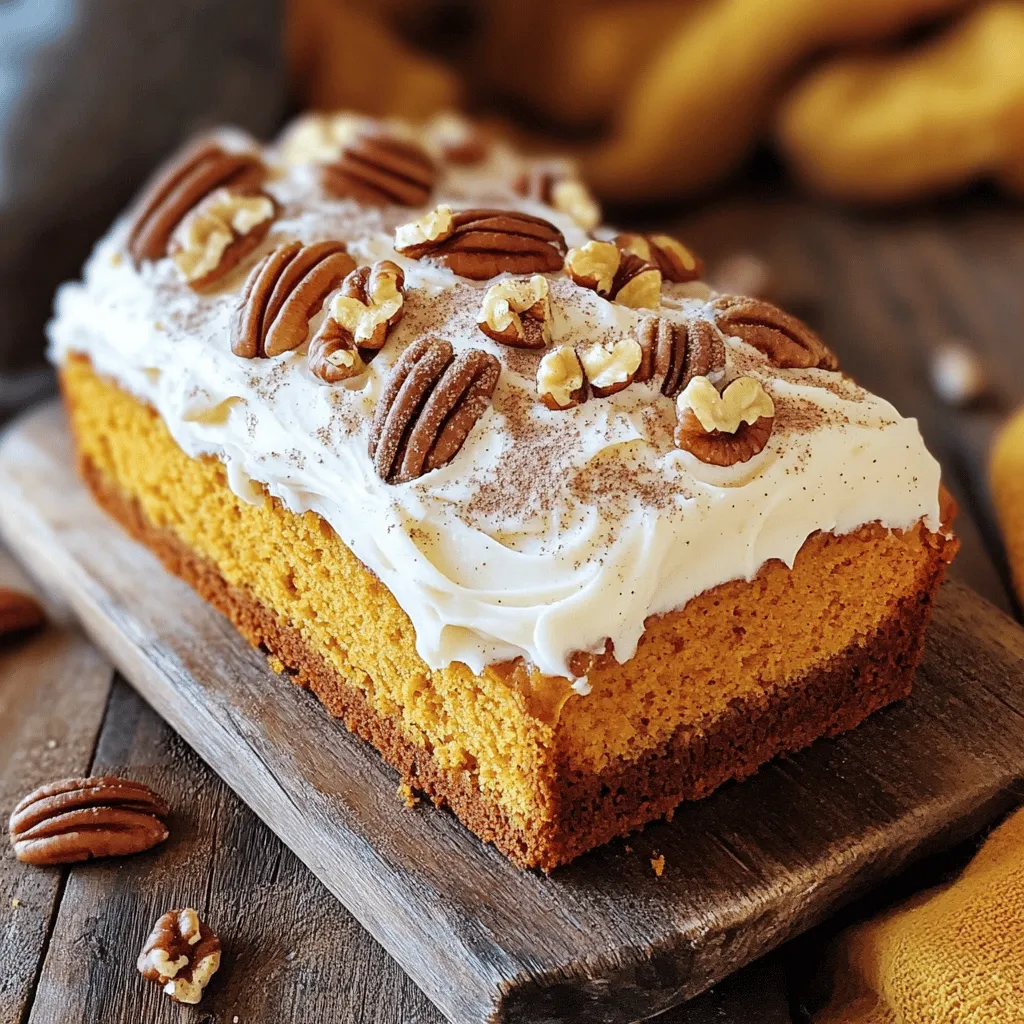
Are you ready to indulge in a warm slice of heaven? This Pumpkin Bread with Cream Cheese Frosting is the

- Pasta: You can choose either penne or fettuccine. Both work well and hold sauce nicely. - Butternut Squash: Use about 2 cups of butternut squash. Make sure it is peeled and diced into small cubes. This helps it cook evenly. - Olive Oil: This adds richness and helps cook the squash evenly. It gives the dish a nice base flavor. - Garlic: I use three cloves of minced garlic. It adds a fresh, aromatic punch to the dish. - Spices: I add one teaspoon of dried oregano and half a teaspoon of nutmeg. These spices bring warmth and depth to the flavor profile. Don’t forget to season with salt and pepper to taste. - Sausage: I recommend using one pound of Italian chicken sausage. You can also try turkey sausage for a lighter option. - Serving Suggestions: Top with half a cup of grated Parmesan cheese. For those who like heat, sprinkle red pepper flakes for a spicy kick. This adds flavor and enhances the overall dish experience. For the full recipe, check out the details above. Start by filling a large pot with salted water. The salt adds flavor. Bring it to a rolling boil. Then, add your choice of pasta. Cook it according to the package instructions. Aim for al dente, usually around 8-10 minutes. Before draining, reserve 1 cup of the pasta cooking water. This water helps adjust the sauce later. Drain the pasta and set it aside. In a large skillet, heat 1 tablespoon of olive oil over medium heat. Once the oil is hot, add the diced butternut squash. Sauté it for about 5-7 minutes. Stir occasionally to avoid burning. You want the squash to become tender and slightly caramelized. It’s ready when it has a golden color and a soft texture. Now, move the cooked squash to one side of the skillet. Create space for the Italian sausage. Add the sausage to the other side. Use a wooden spoon to break it apart while it cooks. Cook for about 5-6 minutes, until browned and fully cooked. After the sausage is browned, add 3 cloves of minced garlic. Sauté for about 1 minute until fragrant. Next, sprinkle in the chopped spinach. Stir everything together and cook until the spinach wilts, about 2-3 minutes. Gently fold the cooked pasta into the skillet with the sausage and vegetables. Season with 1 teaspoon of dried oregano, 1/2 teaspoon of nutmeg, plus salt and pepper to taste. Gradually pour in some of the reserved pasta water. Mix until you reach your desired creaminess. This step is key to a well-balanced dish. Finally, stir in 1/2 cup of grated Parmesan cheese. Allow it to melt and combine fully with the pasta. Taste the dish to see if it needs more seasoning. When serving, plate the pasta in shallow bowls. Top with extra grated Parmesan. For a bit of spice, sprinkle some red pepper flakes on top. A drizzle of olive oil adds a nice touch too. To ensure your pasta has a great texture, you should cook it al dente. This means it should be firm when you bite it. Start with a large pot of salted water. Once it boils, add the pasta. Check the package for cooking time, usually around 8-10 minutes. Before draining, save a cup of that pasta water. This water helps make the sauce creamy later. Caramelizing butternut squash takes some care. Start by cutting it into small cubes. Heat olive oil in a large skillet over medium heat. Add the squash and stir it often. Cook for about 5-7 minutes. It should be tender and golden brown. This brings out its natural sweetness. You can easily swap ingredients to fit your diet. For a lower-fat option, try turkey sausage or a plant-based sausage. If you prefer a vegetarian meal, just leave out the sausage. Use mushrooms or lentils for extra protein. You can also add more veggies like bell peppers or zucchini for added color and nutrients. If you want to make this dish vegan, skip the cheese and use nutritional yeast instead. It adds a cheesy flavor without dairy. For side dishes, a simple green salad pairs well. A light lemon vinaigrette adds brightness. You could also serve some garlic bread on the side for a tasty crunch. When it comes to drinks, a crisp white wine like Pinot Grigio complements this dish nicely. If you prefer non-alcoholic options, a sparkling water with a splash of lemon works too. For the full recipe, check out the recipe section above. {{image_4}} You can use many pasta types for this dish. Penne and fettuccine work well, but you can try others too. Each shape holds sauce differently. For example, rotini catches more sauce in its twists. Shells can add a fun bite. The key is to pick a pasta that you love. Cooking time may vary, so check your package for details. You can switch out the Italian sausage for other proteins. Turkey sausage is a great option if you want less fat. Plant-based sausage works well for those who prefer vegan meals. If you love seafood, shrimp is a tasty substitute. Just cook the shrimp until pink and tender. No matter your choice, the flavors will still shine. Using seasonal veggies can change the taste of your pasta. In the fall, add roasted Brussels sprouts or kale. In spring, peas or asparagus can lighten the dish. Summer brings fresh tomatoes or zucchini, adding bright flavors. These swaps let you enjoy the dish year-round and keep it exciting. You can find fresh, local produce to enhance your meals and support your community. To keep your Butternut Squash Sausage Spinach Pasta fresh, store leftovers properly. First, let the pasta cool down. Then, transfer it to an airtight container. Make sure to seal it well to avoid air exposure. Refrigerate it. This will keep it good for about 3 to 4 days. If you want to save some for later, freezing is a great option. Divide the pasta into single portions. Use freezer-safe bags or containers. Remove as much air as possible before sealing. This helps prevent freezer burn. You can freeze it for up to 3 months. Reheating your pasta is easy. For the best results, use the stovetop. Place your pasta in a pan over medium heat. Add a little water or olive oil to keep it moist. Stir often until it warms through. This helps maintain the texture of the ingredients. If you prefer using a microwave, that works too. Transfer your portion to a microwave-safe bowl. Add a splash of water to keep it from drying out. Cover it with a microwave-safe lid. Heat in short bursts, stirring in between, until hot. This method is quick but might not keep the texture as nice as the stovetop. For the full recipe, check out the detailed instructions on how to make this delicious dish! You can use gluten-free pasta instead of regular pasta. Many brands offer good options. Just check the label to ensure it fits your needs. Cook it as you would regular pasta. Follow the same timing and steps from the Full Recipe. Yes, you can prepare this dish in advance. Cook the pasta and the sauce but leave out the cheese until you’re ready to serve. Store them in separate containers in the fridge. You can reheat them together when you're ready to eat. If you don’t have Parmesan cheese, try using Pecorino Romano or nutritional yeast. Nutritional yeast gives a nice cheesy flavor without dairy. Grate it and add it the same way as Parmesan. You can also use a dairy-free cheese if you prefer. The sausage is fully cooked when it reaches an internal temperature of 165°F (74°C). You can cut into a piece to check. It should not be pink inside. The outside should look golden brown. Absolutely! You can add more vegetables like bell peppers, zucchini, or mushrooms. Just chop them small and sauté them with the squash. This adds more flavor and nutrition to your dish. This blog post covered how to make Butternut Squash Sausage Spinach Pasta. We explored the main ingredients like pasta, butternut squash, and spices. I shared step-by-step cooking tips and tricks to ensure your dish is flavorful and creamy. You can customize it with different proteins or pasta shapes. Remember, this dish is versatile and easy to adapt to your needs. Enjoy experimenting with flavors and making it your own. Happy cooking!

Butternut Squash Sausage Spinach Pasta Delight

Are you ready to spice up your dinner routine? This Butternut Squash Sausage Spinach Pasta Delight combines creamy texture, savory

- 1 cup all-purpose flour - 1/2 cup rolled oats - 1/2 teaspoon baking soda - 1/2 teaspoon baking powder - 1/4 teaspoon salt - 1 teaspoon ground cinnamon - 1/2 teaspoon ground nutmeg - 1/4 cup unsalted butter, softened to room temperature - 1/2 cup brown sugar, packed - 1/4 cup granulated sugar - 1/2 cup pumpkin puree (canned or freshly made) - 1 teaspoon vanilla extract - 1/2 cup mini marshmallows - 1/2 cup semi-sweet chocolate chips - 1/2 cup crushed graham crackers When making pumpkin s'mores cookies, the right ingredients make all the difference. First, you need pumpkin puree. I recommend using canned pumpkin puree. It’s easy and saves time. If you want to use fresh pumpkin, make sure to cook and puree it well. For the flour, I use all-purpose flour because it gives the cookies a great texture. If you want a healthier option, you can swap half of it for whole wheat flour. Rolled oats add a nice chewiness to the cookies. When it comes to spices, ground cinnamon and nutmeg are must-haves. They give the cookies that warm, cozy flavor we love in fall. For butter, always use unsalted butter. This helps control the saltiness in your cookies. As for the sugars, I use both brown sugar and granulated sugar. Brown sugar keeps them soft and adds moisture. The mini marshmallows and chocolate chips give that classic s'mores taste, while the crushed graham crackers add crunch. Remember, using quality ingredients leads to better cookies. Brands like King Arthur Flour for flour and Ghirardelli for chocolate are great choices. This full recipe will guide you through creating these delicious treats! Start by preheating your oven to 350°F (175°C). This ensures even baking. While the oven warms, line a baking sheet with parchment paper. This step is crucial because it prevents the cookies from sticking. You want them to slide off easily when they cool. Next, grab a medium bowl. In it, whisk together these dry ingredients: - 1 cup all-purpose flour - 1/2 cup rolled oats - 1/2 teaspoon baking soda - 1/2 teaspoon baking powder - 1/4 teaspoon salt - 1 teaspoon ground cinnamon - 1/2 teaspoon ground nutmeg Whisking helps mix everything well and removes lumps. A good dry mix looks even and smooth. You should not see any clumps. In a larger bowl, beat together these ingredients until they are fluffy: - 1/4 cup unsalted butter, softened - 1/2 cup brown sugar, packed - 1/4 cup granulated sugar Use an electric mixer on medium speed. This takes about 2-3 minutes. Softening the butter is key. It blends better, making your cookies light and airy. Now, add the pumpkin puree and vanilla extract to your creamed mixture. Beat until smooth. Slowly add the dry mix to the wet mix. Use a spatula or wooden spoon. Stir gently until just combined. Be careful not to overmix; this keeps the cookies soft and chewy. Next, fold in these sweet treats: - 1/2 cup mini marshmallows - 1/2 cup semi-sweet chocolate chips - 1/2 cup crushed graham crackers Evenly distribute them in the dough. This ensures every bite is packed with s'mores goodness. Using a cookie scoop or spoon, drop tablespoon-sized mounds onto the baking sheet. Leave about 2 inches between each mound. Bake for 12-15 minutes. The edges should turn light golden brown, and the centers should look set. Let the cookies cool on the baking sheet for about 5 minutes. Then, move them to a wire rack to cool completely. You can find the Full Recipe for Pumpkin S’mores Cookies with all these steps and more! To get a chewy cookie, use more brown sugar. This sugar adds moisture. For a crispy cookie, use more granulated sugar. You can also bake them a bit longer for a crispier texture. Resting the dough helps too. Let it chill for at least 30 minutes. This makes the cookies thicker and chewier. It also stops the cookies from spreading too much. To make your cookies pop, try adding spices. A pinch of ginger or cloves can warm up the taste. You might also add a splash of maple syrup for extra flavor. If you want to change the chocolate, try dark or white chocolate instead. You can even mix in peanut butter chips for a fun twist. For serving, arrange your cookies on a colorful plate. A sprinkle of sea salt on top gives a nice touch. You can also add mini s’mores skewers for a fun look. Store your cookies in a sealed container at room temperature. This keeps them soft and fresh. For a pretty display, stack them on a cake stand or a wooden board. Try out these tips as you bake your Pumpkin S’mores Cookies. You’ll enjoy every bite! For the full recipe, check out the details above. {{image_4}} For those who need gluten-free treats, you can easily swap out regular flour. Use a gluten-free flour blend instead. These blends work well in cookies, giving you great texture. Look for brands that include xanthan gum; it helps with binding. Some popular gluten-free options are: - Almond flour - Coconut flour - Oat flour Just remember, each flour type has its own unique taste and texture. You may need to adjust your ratios slightly. Fall brings many flavors to play with. Try adding spices like ginger or cloves to your cookie mix for a festive twist. You can also fold in some crushed candy canes for a holiday touch. Here are some ideas to spice up your cookies: - Drizzle melted white chocolate on top for a sweet finish. - Add a pinch of nutmeg for warmth. - Use seasonal toppings like caramel bits or even apple slices. These small changes can turn your cookies into a unique seasonal treat. Don’t be afraid to mix things up! You can add different toppings to enhance your cookies. Consider using: - Peanut butter chips for a nutty flavor. - Dried cranberries for a tart contrast. - Chopped nuts for extra crunch. These pairings can create fun flavor combinations. For example, chocolate and peanut butter always make a great team. Try different combos to find your favorite! For the full recipe, refer to the section above. To keep your pumpkin s’mores cookies fresh, use an airtight container. This helps to lock in moisture. I recommend using a glass or plastic container. Avoid metal containers since they can alter the taste. Store the cookies at room temperature, away from heat and sunlight. The ideal humidity level is low, as too much moisture can make them soggy. You can freeze both the cookie dough and the baked cookies. For dough, scoop it into balls and place them on a baking sheet. Freeze them until firm, then transfer the balls into a zip-top bag. This way, you can bake fresh cookies whenever you want. For baked cookies, let them cool completely first. Then, stack them with parchment paper in between and place them in a freezer-safe container. When you are ready to enjoy your frozen cookies, thaw them at room temperature for about 30 minutes. You can also warm them in the oven for a few minutes. This will make them taste fresh and delicious, just like they came out of the oven! To find the full recipe, check out the earlier sections of this article. You can use fresh pumpkin, but it takes extra work. Fresh pumpkin gives a rich taste. However, it has more water, which can change the dough. Canned pumpkin is easy and saves time. It is consistent and gives great flavor too. These cookies will stay fresh for about five days in a sealed container. Keep them at room temperature to maintain their chewy texture. You can also freeze them for up to three months. Just make sure to wrap them well to prevent freezer burn. If your dough is too sticky, try adding a bit more flour. Start with one tablespoon at a time. Mix gently until the dough is easier to handle. Chilling the dough for 30 minutes can also help. It firms up the dough and makes it less sticky. Yes, you can add nuts like pecans or walnuts for a crunchy texture. Dried fruit, such as cranberries or raisins, works well too. Just keep the total mix-ins to about one cup. This way, you maintain the cookie's balance. Serve these cookies warm for the best taste. Pair them with a glass of cold milk or hot cocoa. You can also enjoy them with vanilla ice cream for a sweet treat. For a fun touch, add mini s’mores skewers as a cute garnish. For the full recipe, visit the recipe section. This blog covered key steps to bake perfect s'mores cookies. You learned about measuring ingredients and the importance of parchment paper. I shared how to mix everything well and achieved the right cookie texture. You also got tips for flavoring, presentation, and storage. With these insights, you're ready to create and enjoy delicious cookies. Get baking, and let your creativity shine!

Pumpkin S’mores Cookies Irresistible Fall Treat

Fall is the perfect time for cozy treats, and Pumpkin S’mores Cookies are a must-try! These delicious cookies blend the

Let’s break down the ingredients for this tasty Crockpot Kung Pao Chicken. Each one plays a key role in making this dish flavorful and satisfying. - 2 pounds boneless, skinless chicken thighs - 1 cup unsalted roasted peanuts - 1 red bell pepper, diced - 1 green bell pepper, diced - 1 small onion, diced - 3 cloves garlic, minced - 1 tablespoon fresh ginger, minced - 1/4 cup low-sodium soy sauce - 1/4 cup chicken broth - 2 tablespoons rice vinegar - 2 tablespoons brown sugar - 1 tablespoon cornstarch - 1/2 teaspoon crushed red pepper flakes - 1 tablespoon sesame oil - Salt and pepper, to taste - Chopped green onions - Sesame seeds For the main part of the dish, I use chicken thighs. They stay moist and tender during cooking. The peanuts add a nice crunch. The red and green bell peppers bring color and sweetness. The marinade makes this dish pop! Fresh garlic and ginger give it depth. Soy sauce and chicken broth add savory notes, while rice vinegar brings balance. Brown sugar adds a hint of sweetness, and cornstarch helps thicken the sauce. Adjust the crushed red pepper flakes based on your spice level. Garnishing with green onions and sesame seeds makes it look fun and inviting. You can find the full recipe for this dish to see how everything comes together. - Combine chicken with marinade ingredients - Ensure even coating of chicken Start by cutting 2 pounds of boneless, skinless chicken thighs into small chunks. In a large bowl, mix the chicken with the marinade. The marinade includes low-sodium soy sauce, chicken broth, rice vinegar, brown sugar, cornstarch, minced garlic, minced ginger, and crushed red pepper flakes. Mix well to cover every piece of chicken. This step adds great flavor and helps keep the chicken juicy. - Layer chicken mixture and vegetables - Drizzle with sesame oil Next, pour the marinated chicken into your crockpot. On top of the chicken, add diced red and green bell peppers along with diced onion. This mix brings color and crunch to the dish. Finally, drizzle one tablespoon of sesame oil over everything. This oil gives a rich taste and aroma to the meal. - Set cooking time on low or high - Check for tenderness and doneness Put the lid on your crockpot. You can set it to cook on low for 6 to 8 hours or on high for 3 to 4 hours. Cooking on low gives a softer texture, while high speeds things up. It’s important to check the chicken for tenderness. When it is fully cooked, it should shred easily with a fork. - Incorporate peanuts 30 minutes before serving About 30 minutes before you are ready to serve, add 1 cup of unsalted roasted peanuts. Stir them in gently. The peanuts will soften and mix their flavor into the dish, giving it that classic Kung Pao taste. - Taste and adjust seasoning before serving When the cooking time is up, taste the dish. You may want to add a little more salt or pepper to enhance the flavors. Adjusting the seasoning is key to making it just right. - Tips for plating and presentation When serving, scoop both the chicken and vegetables into colorful bowls. Serve over fluffy rice for a filling meal. Don’t forget to garnish with chopped green onions and a sprinkle of sesame seeds for a beautiful finish. This makes your Crockpot Kung Pao Chicken not just tasty but also appealing to the eye. To get the best results with your crockpot, I have a few tips. First, always cut your chicken into even pieces. This helps it cook evenly. Place your chicken in the crockpot with the marinade for at least 30 minutes. This step adds flavor and moisture. You can make this dish your own by changing the heat level. If you want it spicy, add more crushed red pepper flakes. For a milder dish, use less. You can also try adding other spices. Garlic powder or a dash of cayenne can boost the flavor. When making this dish for meal prep, portion it into meal-sized containers. This makes it easy to grab and go. For reheating, use a microwave or a stove. Make sure to add a splash of water to keep it moist. Enjoy your meal anytime! {{image_4}} You can make Kung Pao Chicken even better by adding more veggies. Consider using: - Carrots, sliced thin - Snow peas, for crunch - Broccoli florets, for color These additions boost the flavor and make it more colorful. You can also swap the chicken for different proteins. Try using: - Tofu, for a plant-based option - Shrimp, for a seafood twist - Pork, for a richer taste If you need to avoid gluten, use tamari instead of soy sauce. Tamari has a similar taste but is gluten-free. For those who watch their sugar, try these tips: - Replace brown sugar with coconut sugar - Use a sugar substitute like stevia You can also lower the sodium by choosing low-sodium chicken broth and soy sauce. Different regions have unique takes on Kung Pao Chicken. Explore new flavors by trying different sauces. For a spicy kick, use: - Szechuan sauce, for heat - Hoisin sauce, for sweetness You can also change the nuts. Instead of peanuts, consider: - Cashews, for creaminess - Almonds, for a different crunch Feel free to mix and match these variations to create your perfect dish. For the full recipe, check the link above! After you enjoy your meal, store any leftovers right away. Place the Kung Pao Chicken in an airtight container. This keeps it fresh for up to four days in the fridge. Make sure to let it cool down to room temperature first. This helps avoid excess moisture that can make the chicken soggy. For best results, use glass containers. They are easy to clean and do not absorb odors. If you want to keep your Kung Pao Chicken longer, freezing is a great option. Pour the cooled chicken into a freezer-safe bag. Remove as much air as possible before sealing. This prevents freezer burn and keeps the flavor intact. It can stay in the freezer for up to three months. To thaw, place the bag in the fridge overnight. This method preserves taste and texture well. For reheating, the best method is using the stovetop. Place the chicken in a pan over low heat. Add a splash of chicken broth to keep it moist. Stir it often until it is heated through. You can also use the microwave, but cover it to trap steam. This helps the chicken stay juicy. Make sure it is hot all the way through before serving again. Enjoy your leftovers just as much as the first time! Kung Pao Chicken comes from China. It is named after a governor of Sichuan. This dish is famous for its bold flavors and spicy taste. It blends sweet, salty, and spicy elements. You find it in many Chinese restaurants today. The original recipe uses diced chicken, peanuts, and hot peppers. This dish shows how local flavors can create a unique meal. Yes, you can use chicken breast. However, chicken thighs are juicier. They stay tender during cooking. Chicken breast can dry out more easily. If you choose breasts, cut them into smaller pieces. This helps them cook evenly. The flavor will still be good, but the texture may change. Cooking in a crockpot is easy and flexible. If you set it on low, it takes 6-8 hours. On high, it takes 3-4 hours. The chicken should be tender when it's done. Always check for doneness by looking for clear juices. This ensures your meal is safe and tasty. You can make Kung Pao Chicken ahead of time. Just prepare and store it in the fridge. It stays good for 3-4 days. Reheat it on the stove or in the microwave. For longer storage, freeze it for up to 3 months. Just remember to cool it first before freezing. This helps keep the flavors fresh. Serve your Kung Pao Chicken hot over rice. Rice soaks up the sauce well. You can add vegetables like steamed broccoli or snap peas for color. Garnishing with green onions and sesame seeds makes it look great. This adds a nice crunch too. Enjoy it with friends for a fun meal! For the full recipe, check the earlier section. In this blog post, we covered how to make a tasty Crockpot Kung Pao Chicken. We explored the main ingredients, marinade, and garnishes that add flavor. I shared step-by-step instructions and helpful cooking tips. You also learned about variations to suit your taste. In conclusion, this dish is easy to prepare and customize. Whether you’re cooking for a crowd or meal prepping for the week, it’s a winner. Enjoy your cooking, and don’t be afraid to experiment with different flavors.

Crockpot Kung Pao Chicken Flavorful and Easy Recipe

Looking for a simple, delicious meal that packs a punch? My Crockpot Kung Pao Chicken is the answer! With tender

- 2 lbs boneless, skinless chicken breasts - 1 can (10 oz) enchilada sauce - 1 can (15 oz) black beans - 1 can (15 oz) corn - 1 cup salsa - 1 tsp ground cumin - 1 tsp garlic powder - 1 tsp onion powder - 1 tsp chili powder - 8 large tortillas - 2 cups shredded cheese - Fresh cilantro for garnish - Sour cream for serving For a delicious slow cooker chicken enchiladas dish, gather these main ingredients. The chicken provides a great base, while the enchilada sauce adds the needed flavor. Black beans and corn add texture and nutrition. Salsa gives a fresh taste, and spices like cumin, garlic, onion, and chili powder make it pop. You can use corn or flour tortillas, depending on your taste. Shredded cheese adds that melty goodness on top. Finish it with cilantro and sour cream for a delightful touch. - Avocado slices - Jalapeños for heat - Bell peppers for crunch Feel free to mix in optional add-ins. Avocado slices can bring a creamy texture. Jalapeños will kick up the heat, and bell peppers add a nice crunch. These add-ins let you customize the dish to your liking. - Slow cooker - Mixing bowl - Baking dish - Tongs To make this recipe, you need a few tools. A slow cooker cooks the chicken perfectly. A mixing bowl helps combine all the sauce ingredients. A baking dish is needed for the final step, where you bake the enchiladas. Tongs will help you handle the hot chicken when shredding. With these tools, you’ll create a satisfying meal. For the full recipe, check out the earlier section. - Place chicken breasts in the slow cooker. - Coat with sauce mixture. To start, I take two pounds of boneless, skinless chicken breasts. I lay them flat in the slow cooker. This helps them cook evenly. Next, I mix the enchilada sauce with other ingredients. This sauce will coat the chicken well, adding great flavor. - Combine enchilada sauce, beans, corn, salsa, and spices. - Stir until well mixed. I grab a medium bowl for the sauce. I pour in the enchilada sauce, then add the black beans and corn. I like to include my favorite salsa too. Finally, I sprinkle in cumin, garlic powder, onion powder, and chili powder. I stir everything together until it looks nice and smooth. - Set slow cooker to low for 6-7 hours or high for 3-4 hours. - Shred chicken and mix back into the sauce. I cover the slow cooker and set it on low for six to seven hours. If I’m in a hurry, I can set it on high for three to four hours. When the chicken is done cooking, it should shred easily. I take it out and shred it using two forks. Then, I mix the shredded chicken back into the delicious sauce. - Preheat oven to 350°F (175°C). - Fill tortillas with chicken mixture and cheese. - Arrange in baking dish and top with sauce and cheese. I preheat my oven to 350°F (175°C). While it heats, I grab large tortillas. I spoon the chicken mixture into each tortilla. I add a bit of cheese for extra flavor. I roll them up tightly and place them seam-side down in a baking dish. Once all are in the dish, I pour any extra sauce on top and sprinkle more cheese. - Bake until cheese is melted and golden, 20-25 minutes. I bake the enchiladas in the oven for 20 to 25 minutes. I look for the cheese to melt and turn golden. This is when they are ready to serve! The smell is always amazing, and I can't wait to dig in. To shred chicken easily, use two forks. Hold one fork in each hand. Pull apart the meat with the forks. This method gives you control and speed. If you want a faster way, use a stand mixer. Place the cooked chicken in the bowl. Turn it on low speed, and watch the magic happen! Your chicken will be perfectly shredded in seconds. For a fun twist, try different cheeses. Pepper jack adds a spicy kick. It brings heat and flavor to your dish. If you want creaminess, use cream cheese. It melts beautifully and makes the enchiladas rich. You can mix and match cheeses based on your taste. Want to take your enchiladas to the next level? Add lime juice to the sauce. It adds a bright, zesty kick. Just squeeze half a lime into the sauce before pouring it over the chicken. You will love the fresh burst of flavor it brings. This small change can make a big difference in taste! {{image_4}} You can easily make a vegetarian version of these enchiladas. Substitute the chicken with jackfruit or use more beans. Jackfruit has a meaty texture, making it a great choice. You can also mix in black beans or pinto beans for added protein. This swap keeps the dish hearty and filling while being meat-free. Feel free to try different sauces for your enchiladas. Using green enchilada sauce gives a fresh twist. It adds a tangy flavor and bright color. You can also mix red and green sauces for a unique taste. Experimenting with sauces lets you find your favorite flavor profile. You can enhance the flavor of your enchiladas by adding spices. Try smoked paprika for a rich, smoky taste. Other spices like cayenne pepper can add heat. You can also use a pinch of cinnamon for warmth. Mixing spices can create exciting new flavors for your dish. After enjoying your enchiladas, store leftovers in an airtight container. They will stay fresh in the fridge for 3 to 4 days. Make sure the lid is on tight to keep moisture in. If you want to save some for later, wrap the enchiladas tightly. Use plastic wrap or foil to protect them from freezer burn. You can freeze them for up to 3 months. Label them with the date for easy tracking. For the best taste, reheat your enchiladas in the oven. Set your oven to 350°F (175°C) and bake for about 15-20 minutes. This keeps the tortillas crisp and the cheese melty. If you're short on time, you can use the microwave. Just heat them for 1-2 minutes. Enjoy them warm with sour cream and cilantro! Yes, but adjust cooking time accordingly. Frozen chicken may need more time to cook. If using frozen chicken, cook on high for about 4 to 5 hours. Check it for tenderness before shredding. Spice level can be adjusted based on the salsa and spices used. If you prefer mild, use a mild salsa. For more heat, choose spicy salsa or add chili powder. You control the spice! Yes, prepare and refrigerate the filling for up to 24 hours before assembly. This saves time on busy days. Just make sure you mix it well before filling the tortillas. Serve with rice, beans, or a fresh salad for a complete meal. You can also add some chips and salsa for extra crunch. These sides complement the enchiladas well. Refer to the recipe section above for the full instructions on Slow Cooker Chicken Enchiladas. This section includes all the details you need to make them delicious! In this post, we explored how to make delicious Slow Cooker Chicken Enchiladas. We covered main ingredients and optional add-ins to suit your taste. I shared easy step-by-step instructions to guide you through. You learned tips on shredding chicken, cheese swaps, and flavor enhancements. Remember, these enchiladas can be customized and stored for later. Enjoy the process and impress your family with this meal. Happy cooking!

Savory Slow Cooker Chicken Enchiladas Recipe Delight

Are you ready for a meal that will make everyone smile? My Savory Slow Cooker Chicken Enchiladas are easy to

Older posts
Page1 Page2 … Page74 Next →

dsad

© 2025 lazychefmagic • Built with GeneratePress

Our Policies

  • Copyright Policy
  • Cookie Policy
  • GDPR Policy
  • Privacy Policy
  • Disclaimer
  • Terms Of Use

More Information

  • Home
  • About
  • Contact
  • Appetizers
  • Dessert
  • Dinner
  • Drinks
©2025, lazychefmagic About Back To Top