Skip to content
DisclaimerTerms Of UseGDPR PolicyCookie Policy

lazychefmagic

  • Home
  • Drinks
  • Appetizers
  • Dinner
  • Dessert
  • About
  • Contact
  • Privacy Policy
DisclaimerTerms Of UseGDPR PolicyCookie Policy

Amanda

- 4 medium zucchinis, thinly sliced - 1 cup shredded cheddar cheese - 1 cup ricotta cheese - 1/2 cup grated Parmesan cheese - 1 medium onion, finely chopped - 3 cloves garlic, minced - 2 large eggs - 1 teaspoon dried oregano - 1/2 teaspoon crushed red pepper flakes (optional) - Salt and pepper to taste - 1 cup breadcrumbs - 2 tablespoons olive oil Gathering the right ingredients is key to making a great Cheesy Zucchini Casserole. Start with fresh, medium zucchinis. Their mild flavor and tender texture shine in this dish. You will need 4 zucchinis, sliced thin for even cooking. Next, cheese lovers will rejoice! Use 1 cup of shredded cheddar cheese for that creamy richness. The ricotta cheese adds a smooth layer of flavor. You’ll want 1 cup of ricotta to complement the cheddar. To boost the taste, add some grated Parmesan cheese. Just 1/2 cup will do. It adds a nice salty bite. Chopping one medium onion and mincing 3 cloves of garlic will enhance the smell and flavor. For binding, you need 2 large eggs. They help hold everything together. A teaspoon of dried oregano gives a wonderful herb note. If you like a bit of heat, add 1/2 teaspoon of crushed red pepper flakes. Finally, season with salt and pepper to taste. You’ll also need 1 cup of breadcrumbs for a crunchy top. Finish it off with 2 tablespoons of olive oil, which adds richness and helps the breadcrumbs brown. When you have all these ingredients ready, you're set to make a delicious casserole. Check the [Full Recipe] for more details on how to combine these ingredients into a tasty meal. - Preheat the oven to 375°F (190°C). This gets your oven ready for baking. - Sauté the onions and garlic. In a skillet, heat 2 tablespoons of olive oil over medium heat. Add the chopped onion. Cook for about 5 minutes until soft. Then, add minced garlic and cook for 1 more minute. - Combine zucchini, cheeses, eggs, and seasonings. In a large bowl, mix sliced zucchinis with ricotta, cheddar, Parmesan, eggs, oregano, and seasonings. - Mix thoroughly for even consistency. Make sure everything blends well so every bite has flavor. - Prepare and grease the baking dish. Use olive oil or cooking spray in a 9x13 inch baking dish. This helps prevent sticking. - Pour zucchini mixture into the dish and spread evenly. Use a spatula to flatten it out for even cooking. - Top with breadcrumbs and drizzle with olive oil. Mix breadcrumbs with a little olive oil and sprinkle on top for crunch. - Bake for 30-35 minutes until golden brown. Check it with a fork to see if the zucchini is tender. - Allow the casserole to cool for 10 minutes. This helps it set for easier serving. - Serve and enjoy! Feel free to add a fresh herb garnish for a nice touch. To boost the taste, use fresh herbs. Basil, parsley, or thyme can add a nice touch. You can also customize spices based on your own taste. A pinch of cumin or paprika can really change the dish. Experiment and find what you love! Slice the zucchini evenly for the best results. Thin slices cook faster and blend well with the cheese. For an extra cheesy finish, add a layer of cheese on top before baking. It gives a nice, melty crust that everyone loves. Every oven is different. You may need to adjust the baking time based on your own oven settings. Start with 30 minutes, but check for doneness. A fork should easily pierce the zucchini when it's tender. This ensures your casserole is perfectly cooked. For the full recipe, check the details above. {{image_4}} You can easily make this dish more colorful and tasty. Add bell peppers or mushrooms to the mix. Both add great flavor and texture. If you want a different cheese, try mozzarella instead of cheddar. It melts well and gives a nice stretch. If you want more protein, add cooked ground beef or turkey. This makes the casserole heartier and more filling. You can also mix in shredded chicken for a simple, tasty upgrade. Both options work well with the zucchini and cheese. For gluten-free eaters, use gluten-free breadcrumbs. They help keep the crunchy top without the gluten. You can also swap zucchini with other vegetables, like eggplant. This keeps the meal light while still being full of flavor. To keep your cheesy zucchini casserole fresh, store it in an airtight container in the fridge. This way, it stays tasty and safe to eat. For the best flavor and texture, enjoy it within 2-3 days. You can freeze the casserole either before or after baking. If you freeze it before baking, let it cool completely. Then, wrap it tightly in foil or plastic wrap. This helps keep it fresh. If you bake it first, let it cool down too. Then, wrap it well before placing it in the freezer. For the best texture when reheating, use the oven. Set it to 350°F (175°C) and warm the casserole until hot. This helps keep the crispy top. If you need a quick option, you can use the microwave. Just heat it for a minute or two until it's warm enough to enjoy. You can prepare and assemble the casserole, then cover and refrigerate it overnight. This lets the flavors blend well. When ready, just bake it straight from the fridge. This method saves time on busy days. Fresh zucchini is best for the best texture and flavor. However, you can use thawed frozen zucchini in a pinch. Just make sure to drain any extra water to avoid a soggy casserole. Fresh veggies always make a difference. This dish pairs well with a green salad, garlic bread, or grilled chicken. These sides add color and balance to your meal. They complement the creamy casserole nicely. The casserole is done when the top is golden brown. You can check if the zucchini is tender by piercing it with a fork. This simple test ensures you get a perfect bake every time. This blog post lays out an easy and tasty cheesy zucchini casserole recipe. You learned about must-have ingredients like zucchini and cheese, plus ways to enhance the flavor. I shared tips for perfecting texture and how to adapt the dish for different diets. Whether you want to prep ahead or store leftovers, you now have the tools to succeed. Enjoy making this dish and delight in the flavors. It’s a simple way to bring joy to your table!

Cheesy Zucchini Casserole Simple and Tasty Recipe

Craving a dish that bursts with flavor and celebrates the season’s best veggie? Look no further! This Cheesy Zucchini Casserole

To make delicious peach cobbler pancakes, gather these items: - 1 cup all-purpose flour - 2 tablespoons granulated sugar - 1 tablespoon baking powder - 1/2 teaspoon salt - 1 cup whole milk - 1 large egg, at room temperature - 2 tablespoons unsalted butter, melted - 1 teaspoon pure vanilla extract - 1 cup fresh peaches, peeled and diced (or drain and use canned peaches) - 1 teaspoon ground cinnamon - 1/2 cup chopped pecans (optional for a crunchy texture) - Maple syrup, for drizzling Sometimes, you may need swaps for ingredients. Here are some easy ideas: - For all-purpose flour, use whole wheat flour or almond flour. - Swap granulated sugar with brown sugar or coconut sugar. - If you need a dairy-free option, use almond milk or oat milk. - Replace whole milk with yogurt for a thicker batter. Fresh peaches offer bright flavor and texture. They bring juiciness to the pancakes. They are perfect when in season. Canned peaches, though easy, may have added sugar. Make sure to drain them well. If you use canned peaches, choose those packed in juice or water. Both options work, but fresh peaches can elevate your dish. Start by gathering your dry ingredients. You will need: - 1 cup all-purpose flour - 2 tablespoons granulated sugar - 1 tablespoon baking powder - 1/2 teaspoon salt In a large bowl, whisk these ingredients together. This step is key. It helps mix the baking powder evenly. An even mix helps the pancakes rise well. Next, move on to the wet ingredients. You will need: - 1 cup whole milk - 1 large egg, at room temperature - 2 tablespoons unsalted butter, melted - 1 teaspoon pure vanilla extract In another bowl, combine these wet ingredients. Whisk them until creamy. This ensures a smooth batter. Creamy batter leads to fluffy pancakes. Now, it’s time to cook the pancakes. Preheat your skillet over medium heat. Lightly grease it with cooking spray or butter. Use a measuring cup to pour 1/4 cup of batter onto the skillet. Cook for about 2-3 minutes. Look for bubbles on the surface. This shows it’s ready to flip. Flip the pancake and cook for another 2-3 minutes. You want them golden brown. Repeat this with the rest of the batter. If you want to check if they’re done, poke the center. If it springs back, they are ready. Serve your pancakes warm. Drizzle with maple syrup for a tasty finish. For more details, check the Full Recipe. To make fluffy pancakes, avoid over-mixing the batter. When you combine the wet and dry ingredients, stir just until blended. A few lumps are okay. This helps keep the pancakes light. Also, let the batter rest for a few minutes. This gives the baking powder time to activate and adds air to the mix. If you have leftover pancakes, let them cool first. Then, stack them with parchment paper in between. Place them in an airtight container. They can last in the fridge for up to three days. For longer storage, freeze them. Just wrap each pancake in plastic wrap and put them in a freezer bag. You can enjoy them later! Maple syrup is a classic choice for pancakes. It adds natural sweetness. You can also try honey or agave for a different flavor. For toppings, fresh peach slices work great. Add a sprinkle of cinnamon for warmth. If you like crunch, pecans or walnuts are a nice touch. Whipped cream can turn your pancakes into a dessert treat! For the full recipe, check out the complete guide. {{image_4}} You can change up the fruit in your peach cobbler pancakes. Try using seasonal fruits like blueberries, strawberries, or even apples. When blueberries are in season, add a cup to your batter. This adds a nice pop of color and flavor. Using apples? Just peel, core, and dice them. They will soften as they cook and add a great taste. If you want a vegan version, swap the egg for a flax egg. Mix 1 tablespoon of ground flaxseed with 2.5 tablespoons of water. Let it sit until it thickens. Use almond milk or oat milk instead of whole milk. For gluten-free pancakes, use a gluten-free flour blend. Make sure it has a good binding agent for the best texture. Adding different spices can make your pancakes unique. Try nutmeg or ginger for a warm flavor. You can also mix in vanilla or almond extract for a twist. Consider adding a bit of lemon zest for freshness. These small changes can give your pancakes a new life. Don’t be afraid to experiment and find your favorite mix! For the full recipe, check out the detailed steps above. To keep your peach cobbler pancakes fresh, store them in an airtight container. Place a piece of parchment paper between pancakes to prevent sticking. This small step helps maintain their fluffy texture. Refrigerate the container if you plan to eat them within three days. If you want to keep them longer, freezing is a great option. For freezing, let the pancakes cool completely. Stack them with parchment paper in between. Then, wrap the stack tightly in plastic wrap. Place the wrapped pancakes in a freezer bag. This way, they stay fresh for up to three months. Make sure to label the bag with the date. To reheat pancakes, use either a microwave or a skillet. For the microwave, place one pancake on a plate and cover it with a damp paper towel. Heat for about 30 seconds. If you prefer a skillet, heat a small amount of butter over medium heat. Cook each pancake for about one minute on each side. This gives them a nice, warm texture. Enjoy your pancakes with maple syrup or fresh fruit! For the complete recipe, check out the Full Recipe section. Peach cobbler pancakes taste sweet and fruity. The fresh peaches add a juicy burst. The cinnamon gives a warm spice that feels cozy. The pancakes are fluffy, and the maple syrup adds a rich sweetness. Overall, they melt in your mouth and brighten your morning. Yes, you can make peach cobbler pancakes ahead. You can cook the pancakes and let them cool. Store them in an airtight container in the fridge. Reheat them on a skillet or microwave when ready to eat. This makes breakfast quick and easy! This recipe has some common allergens. It contains flour, milk, and eggs. For gluten-free needs, you can use a gluten-free flour blend. For dairy-free, use almond milk and a plant-based egg substitute. Always check labels to avoid hidden allergens. In this blog post, we explored all you need to make delicious peach cobbler pancakes. We discussed key ingredients, cooking tips, and creative variations. You learned how to make fluffy pancakes, store leftovers, and even heat them for a perfect breakfast. These pancakes are easy to adapt for any diet, delicious, and fun. Whether fresh or canned, peaches shine in this dish. With these tips, you can enjoy a warm stack any day. Start cooking and make your mornings brighter!

Peach Cobbler Pancakes Delightful Morning Treat

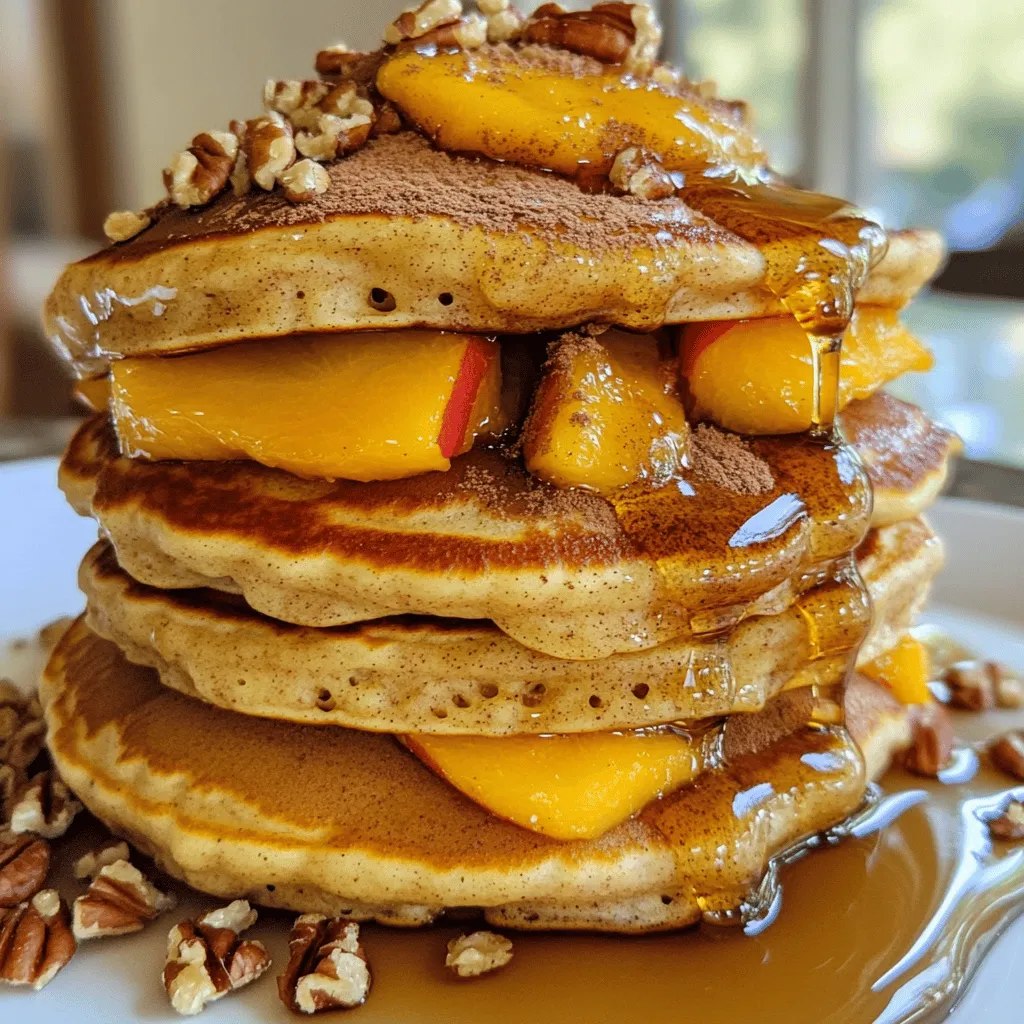
Start your day right with Peach Cobbler Pancakes! These fluffy, sweet treats combine the flavors of classic peach cobbler with

For the creamy cheesy zucchini casserole, here’s what you need: - 4 medium zucchinis, thinly sliced - 1 cup ricotta cheese - 1 cup shredded mozzarella cheese - 1/2 cup grated Parmesan cheese - 1 cup heavy cream - 2 cloves garlic, minced - 1 teaspoon dried oregano - 1 teaspoon salt - 1/2 teaspoon black pepper - 1/2 teaspoon red pepper flakes (optional for a spicy kick) - 1 cup breadcrumbs (preferably panko for extra crunch) - Fresh parsley, chopped (for garnish) Let’s talk about the zucchinis first. You want fresh zucchinis that are firm and shiny. Wash them well, then slice them thin. This helps them cook evenly in the casserole. Next, cheese options are key. I love using ricotta for creaminess. Mozzarella melts beautifully and adds stretch. Parmesan gives that sharp taste that balances the dish. You can mix and match these cheeses based on what you have. Now, let’s not forget the cream. Heavy cream adds richness. Together with the cheese, it creates a silky sauce. Garlic and oregano bring out the flavors. Salt, black pepper, and red pepper flakes add seasoning and a bit of heat. With this complete ingredient list, you're ready for the full recipe of creamy cheesy zucchini casserole! Start by washing your zucchinis. Cut off both ends and slice them thinly. Thin slices cook better and soak up flavor. Next, mix your cheese. In a big bowl, add ricotta, heavy cream, garlic, oregano, salt, black pepper, and red pepper flakes if you want a kick. Blend these until smooth. This mixture gives the dish its creamy base. Layering is key for flavor. Grease a 9x13 inch baking dish lightly. Place half of your zucchini in an even layer on the bottom. Spoon half of your cheese mixture over the zucchini. Then, sprinkle mozzarella and Parmesan cheese on top. Repeat this with the rest of the zucchini and cheese mixture. Make sure you top it well with cheese for that delicious, cheesy finish. Preheat your oven to 375°F (190°C). This step is important to bake your casserole evenly. Cover your dish with aluminum foil. This keeps moisture in and helps cook the zucchini. Bake for 25 minutes. After that, take off the foil. This helps the top brown nicely. Bake for another 15 to 20 minutes. You want the top to be golden and bubbly. After baking, let the casserole cool for a few minutes. This helps it set and makes it easier to cut. When serving, sprinkle fresh parsley on top for color. Drizzle a bit of olive oil to enhance the flavor. Enjoy this creamy cheesy zucchini casserole as a perfect side or main dish! For the complete recipe, check out the Full Recipe. To make your creamy cheesy zucchini casserole even richer, try using full-fat ingredients. You can swap ricotta cheese with mascarpone for a silkier texture. If you want more flavor, consider adding cream cheese. This will give the dish a delightful tang. You can also mix in some sour cream for added creaminess and a slight tartness. Each choice enhances the dish while keeping it delicious. The right breadcrumbs can make all the difference. I recommend using panko breadcrumbs. They are light and create a great crunch. If you want to add flavor to the crumbs, mix in some grated Parmesan or Italian seasoning. You can also toast the breadcrumbs lightly in olive oil before adding them to your casserole. This step adds flavor and keeps them from getting soggy. When serving your casserole, consider fresh herbs like parsley or basil for garnish. They add color and freshness. A drizzle of good olive oil on top enhances the flavor too. Pair this dish with a crisp salad or roasted veggies for a complete meal. You can also serve it with crusty bread to soak up all that creamy goodness. Enjoy this dish with your favorite sides for a delightful dinner! {{image_4}} For a lighter version of this creamy cheesy zucchini casserole, you can use low-fat cheese options. Try part-skim ricotta or low-fat mozzarella. These still provide great flavor without the extra fat. You can also add more vegetables for extra nutrition. Spinach, bell peppers, or carrots blend well with zucchini and boost the dish’s health profile. To enhance the flavor, incorporate herbs and spices. Fresh basil, thyme, or even dill can add a fresh twist. You can also play with different cheeses. Instead of just mozzarella, consider using gouda or feta for a unique taste. Mixing cheeses creates a nice depth of flavor that keeps each bite exciting. If you need gluten-free options, swap regular breadcrumbs for gluten-free ones. For a vegan version, use plant-based cheese and cream alternatives. Silken tofu can replace ricotta, giving a rich texture. These changes keep the casserole delicious while meeting dietary needs. Enjoy experimenting with these variations to find your perfect mix! To keep your creamy cheesy zucchini casserole fresh, store leftovers in an airtight container. Place it in the fridge within two hours of cooking. This will help keep the flavors intact. Make sure you consume it within three to four days for the best taste. When you’re ready to enjoy the leftovers, reheat them in the oven. Preheat your oven to 350°F (175°C). Place the casserole in a baking dish and cover it with foil. This keeps it moist. Heat for about 20 minutes or until it is warmed through. You can also use the microwave, but the oven helps maintain the texture and flavor of the cheese. To freeze the casserole, let it cool completely. Cut it into individual portions for easy meals later. Wrap each portion tightly in plastic wrap and place them in a freezer-safe bag. When you want to eat it, thaw it overnight in the fridge. Then, reheat it using the instructions above. This way, you can enjoy this dish even weeks later! For the full recipe, check the Creamy Cheesy Zucchini Casserole section. You can tell the casserole is done when the top is golden brown and bubbly. The edges will also start to pull away from the sides of the dish. A knife inserted in the center should come out warm and clean. Use these signs for perfect doneness to ensure your dish is ready. The baking time is about 40 to 45 minutes in total. Yes, you can prepare this casserole ahead of time! Layer the zucchini and cheese mixture in the baking dish. Cover it with plastic wrap or foil and store it in the fridge. This dish can sit for up to 24 hours before baking. Just remember to let it sit at room temperature for about 30 minutes before you bake it. This helps it cook evenly. To add some heat to your casserole, mix in extra red pepper flakes. You can also add diced jalapeños for a fresh kick. For a smoky flavor, consider using chipotle peppers in adobo sauce. If you enjoy spicy cheese, try using pepper jack instead of mozzarella. These options will give your dish a delightful zing. This blog post covered all the key steps for making a delicious zucchini casserole. We explored ingredient choices, from fresh zucchinis to various cheeses and creams. The baking process ensures great flavor, while tips and tricks enhance creaminess and crunch. Variations let you customize for any diet and taste. Remember to store leftovers properly and reheat for the best experience. Embrace your creativity in the kitchen and enjoy every bite. A great dish starts with solid skills and a bit of fun!

Creamy Cheesy Zucchini Casserole Quick and Simple Dish

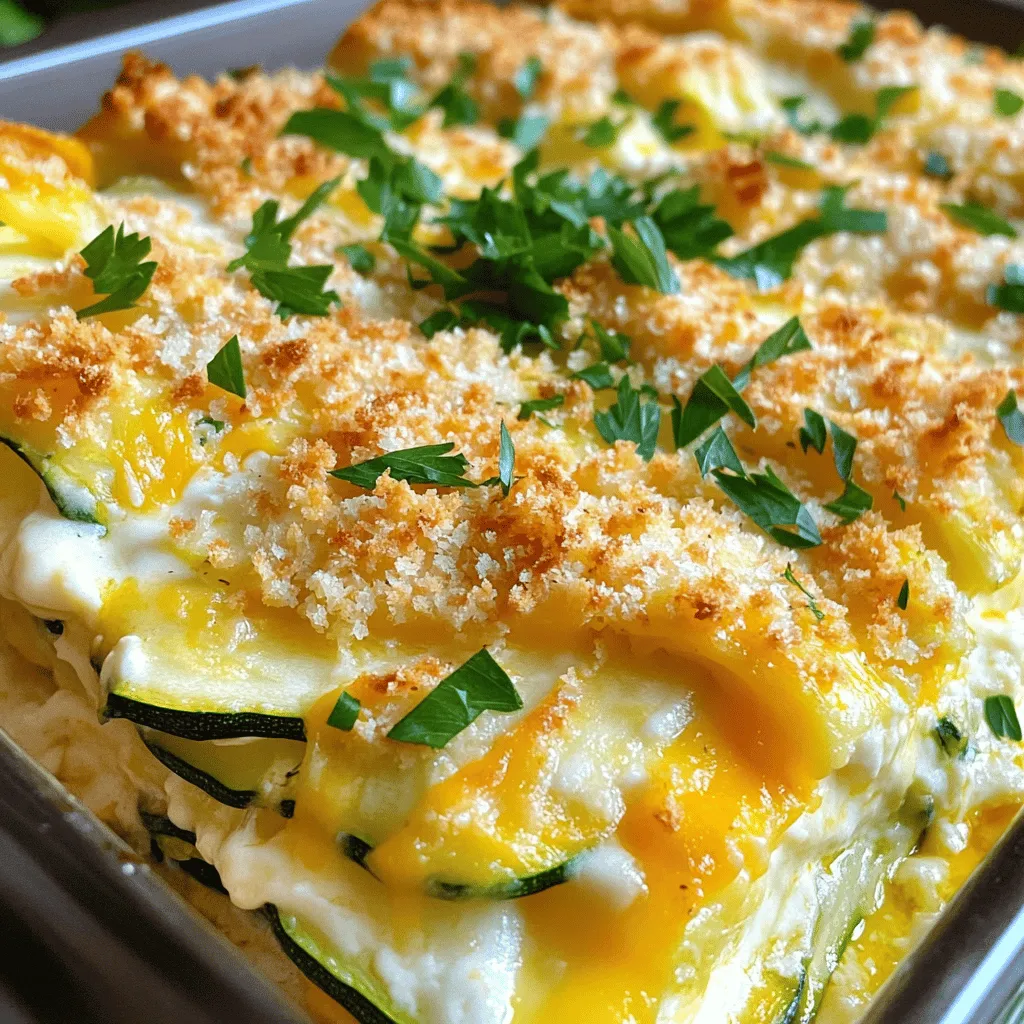
Looking for a quick and simple dish that bursts with flavor? My Creamy Cheesy Zucchini Casserole is just what you

When I make olive oil zucchini bread, I focus on fresh and simple ingredients. Here is what you need: - 2 cups finely grated zucchini - 1/2 cup high-quality extra virgin olive oil - 3 large eggs, at room temperature - 1 cup granulated sugar - 1 teaspoon pure vanilla extract - 2 cups all-purpose flour - 1 teaspoon baking powder - 1 teaspoon baking soda - 1/2 teaspoon sea salt - 1 teaspoon ground cinnamon - 1/2 teaspoon ground nutmeg - Optional: 1/2 cup chopped walnuts, 1/2 cup raisins, or semi-sweet chocolate chips Each ingredient plays a key role in making this bread moist and flavorful. The grated zucchini adds moisture and a subtle sweetness. Olive oil provides richness and depth. Eggs help bind everything together, while sugar adds sweetness. The spices bring warmth and a hint of spice to every bite. Using high-quality olive oil enhances the overall flavor. The optional nuts or chocolate chips add texture and extra flavor. If you want to try a variation, consider using different spices or nuts. For the full recipe, you can check the details above. Enjoy your baking! - Preheat the oven to 350°F (175°C). - Grease a 9x5-inch loaf pan. - In a bowl, mix olive oil, eggs, sugar, and vanilla. - Stir in the grated zucchini until fully combined. - In a separate bowl, sift flour, baking powder, and spices. - Gently fold the dry mix into the wet mix. Do not overmix. - If you like, add walnuts or raisins, and mix them in. - Pour the batter into your greased loaf pan and smooth the top. - Bake for 50-60 minutes. Use a toothpick to check for doneness. It should come out clean. For the full recipe, check the details above! To keep your zucchini bread fresh, wrap it in plastic wrap. This helps seal in moisture. Store it at room temperature for up to three days. If you want to keep it longer, freeze it. Slice the bread first for easy thawing. Wrap each slice in plastic wrap and place in a freezer bag. It can last up to three months in the freezer. Overmixing the batter makes the bread dense. Mix just until you see no dry flour. This will help keep your bread light and fluffy. Also, use room temperature eggs. Cold eggs can lower the batter's temperature, affecting the rise. While cinnamon and nutmeg are great, consider adding ginger or cardamom for a twist. These spices bring warmth and depth. For olive oil, choose high-quality extra virgin. It offers rich flavor and health benefits. Look for a bright green color and a fruity aroma when selecting your oil. For the complete process, check out the Full Recipe. {{image_4}} You can make your olive oil zucchini bread even more exciting with some fun additions. - Nuts and Dried Fruits: Try different nuts like almonds or pecans. You can also add dried fruits like cranberries or apricots for a sweet twist. Each choice brings its own unique flavor and texture. - Chocolate-Infused: Want a chocolatey kick? Add 1/3 cup of cocoa powder to the batter. This will give your bread a rich, decadent taste. If you prefer, swap out the raisins for semi-sweet chocolate chips. This makes it a treat everyone will love! Making this zucchini bread fit your diet is easy. - Gluten-Free: If you need a gluten-free option, replace the all-purpose flour with almond or coconut flour. Both flours work well, but you may need to adjust the liquid a bit. Start with less and add more if needed. - Vegan Substitutions: For a vegan version, use flax eggs instead of regular eggs. Mix 1 tablespoon of ground flaxseed with 2.5 tablespoons of water for each egg. For dairy, use plant-based milk instead of regular milk if your recipe calls for it. This way, you can enjoy the bread without any animal products. These simple changes let you enjoy olive oil zucchini bread in many ways! For the full recipe, check out the detailed instructions. To keep your olive oil zucchini bread fresh, store it in the fridge. Wrap it in plastic wrap or place it in an airtight container. This method helps keep the moisture locked in. It stays fresh for up to a week. If you want a quick snack, you can slice it and grab a piece anytime! For long-term storage, freezing is the way to go. Slice the zucchini bread into pieces and wrap each slice in plastic wrap. Place the wrapped slices in a freezer bag. Be sure to remove as much air as possible. This helps prevent freezer burn. Your bread can last for up to three months this way. When you crave a slice, simply thaw it overnight in the fridge. To reheat your zucchini bread, use the oven or microwave. In the oven, preheat to 350°F (175°C). Place the slices on a baking sheet and warm them for 10 minutes. This method keeps the bread moist and tasty. If using the microwave, heat each slice for about 15-20 seconds. Check to make sure it doesn’t get too hot. Enjoy your delicious, warm bread! Can I use other types of oil instead of olive oil? Yes, you can use other oils. Canola, avocado, or melted coconut oil work well. Olive oil gives a rich flavor, but other oils can be good too. Just keep in mind that each oil has its own taste. What is the best way to serve zucchini bread? Zucchini bread tastes great warm or at room temperature. Slice it thick and enjoy it plain, or spread some cream cheese on top. A drizzle of more olive oil adds a nice touch. Fresh herbs like mint can make it look pretty too. Is it necessary to peel the zucchini before using? No, you do not need to peel the zucchini. The skin has nutrients and adds color. Just wash the zucchini well and grate it. This way, you keep all the good stuff in the bread. How can I tell if my zucchini bread is done baking? You can check if the bread is done by inserting a toothpick in the center. If it comes out clean or with a few crumbs, it’s ready. The top should look golden and slightly firm to the touch. Can I substitute the sugar with a healthier option? Yes, you can swap granulated sugar with honey or maple syrup. If you use a liquid sweetener, you may need to reduce the liquid in the recipe. You can also try using coconut sugar for a more natural option. Olive oil zucchini bread brings together simple, fresh ingredients for a tasty treat. We covered the essential ingredients, detailed instructions, and helpful tips to ensure your bread turns out perfectly. Remember, don’t overmix for a light texture and feel free to explore add-ins for flavor. This recipe is not just healthy; it’s fun to customize! Enjoy every slice, knowing you made something special and delicious.

Olive Oil Zucchini Bread Moist and Flavorful Recipe

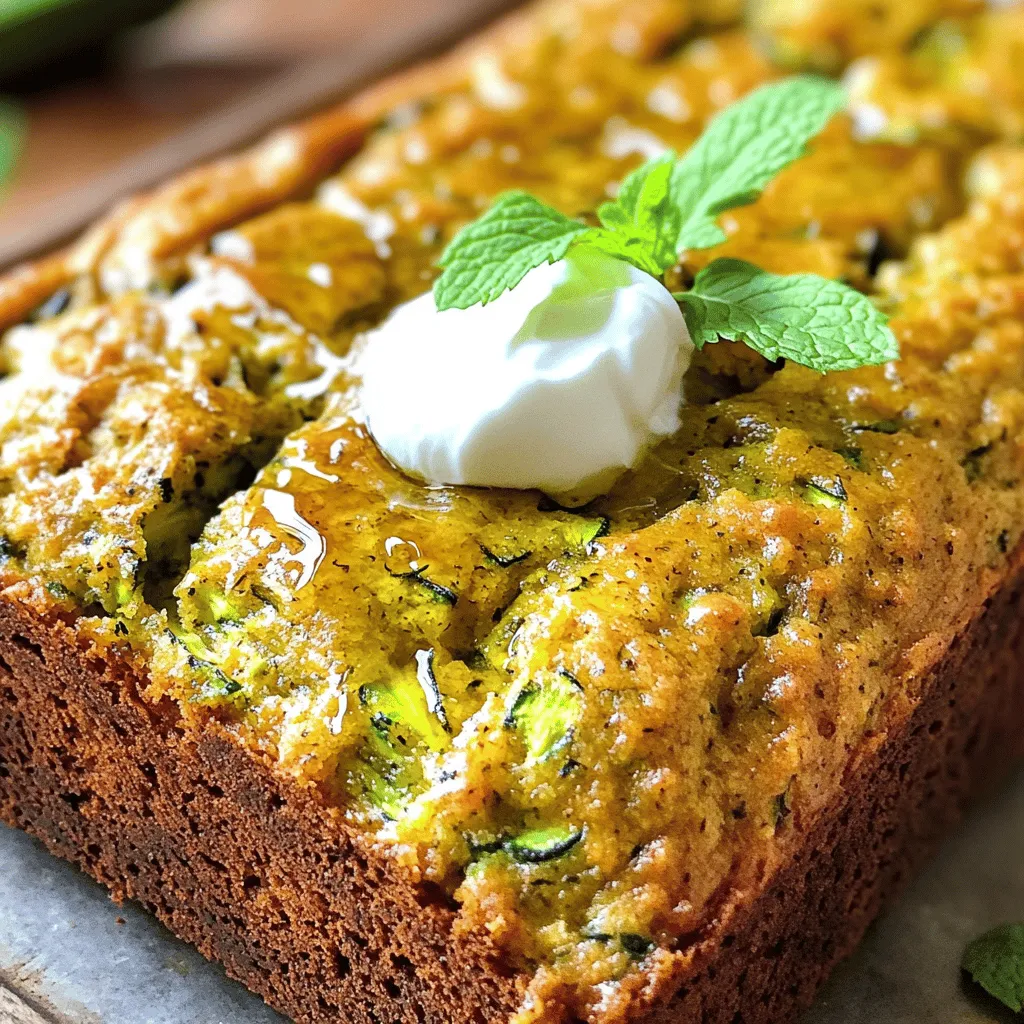
Are you ready to bake something delicious? This Olive Oil Zucchini Bread is both moist and full of flavor! No

To make these delicious Fig and Walnut Bars, gather the following items: - 1 cup dried figs, finely chopped - 1 cup walnuts, coarsely chopped - 1 cup rolled oats - 1/2 cup almond butter - 1/4 cup honey or maple syrup - 1 teaspoon pure vanilla extract - 1/2 teaspoon ground cinnamon - 1/4 teaspoon sea salt - 1/4 cup mixed seeds (like pumpkin or sunflower) for extra crunch These ingredients not only taste great but also boost your health. Here are some benefits: - Dried figs are rich in fiber. They help digestion and keep you full. - Walnuts contain omega-3 fatty acids. These are good for heart health. - Rolled oats provide energy. They lower cholesterol and keep blood sugar stable. - Almond butter is high in protein and healthy fats. It supports muscle health. - Honey or maple syrup adds natural sweetness, plus antioxidants. - Cinnamon can help lower blood sugar levels and fight inflammation. - Mixed seeds add crunch and are full of vitamins and minerals. Each ingredient works together to make these bars not only tasty but also a smart choice for snacks. Need to make swaps? Here are some ideas: - Use peanut butter instead of almond butter if you prefer. - Swap maple syrup for agave nectar if you're looking for a vegan option. - Choose gluten-free oats to make these bars gluten-free. - Replace nuts with seeds if you're allergic to nuts. Use sunflower seeds instead. These alternatives ensure everyone can enjoy Fig and Walnut Bars. For the full recipe, check out the detailed instructions provided. To make Fig and Walnut Bars, start with simple steps. First, preheat your oven to 350°F (175°C). This helps the bars bake evenly. Next, line an 8x8-inch baking dish with parchment paper. This makes it easier to lift the bars out later. In a big bowl, mix 1 cup of finely chopped dried figs with 1 cup of coarsely chopped walnuts. Stir them well so they blend nicely. In another bowl, combine 1 cup of rolled oats, 1/2 cup of almond butter, 1/4 cup of honey (or maple syrup), 1 teaspoon of pure vanilla extract, 1/2 teaspoon of ground cinnamon, and 1/4 teaspoon of sea salt. This mixture should be creamy and smooth. Now, pour the oat mixture over the fig and walnut mix. Use a spatula to stir gently until everything is well coated. Finally, fold in 1/4 cup of mixed seeds for added crunch. Transfer this mixture to your prepared baking dish. Spread it out evenly and press it down firmly. This helps the bars hold together when they bake. When baking, timing is crucial. Bake your bars for about 20-25 minutes. Check them when the edges turn golden brown. This color shows they are ready. Every oven is different, so keep an eye on them. If they look too soft in the middle, give them a few more minutes. After baking, remove the dish from the oven. Let the bars cool completely in the dish. This cooling time is key. It allows the bars to firm up, making them easier to cut. Once the bars are cool, lift them out using the parchment paper. Place them on a cutting board. Use a sharp knife to cut them into bars of your chosen size. To store your bars, place them in an airtight container. Keep them in a cool, dry place. They will stay fresh for about a week. For longer storage, you can freeze them. Just wrap each bar in plastic wrap, then place them in a freezer bag. This way, you have a healthy snack ready whenever you want! For the full recipe, check the section above. Enjoy making your delicious Fig and Walnut Bars! To make great fig and walnut bars, use fresh ingredients. Choose ripe, sweet figs. Their flavor adds depth. Chop them finely for better texture. This helps the bars stay together. Also, use high-quality walnuts. Toast them lightly for a richer taste. This simple step enhances their nutty flavor. Make sure to mix your wet and dry ingredients well. This ensures every bite bursts with flavor. When pressing the mixture into the pan, be firm. A compact layer holds the bars together. A common mistake is overbaking the bars. Keep an eye on them. You want golden edges, not burnt ones. Another mistake is not letting the bars cool completely. This makes them crumbly when cut. Also, avoid skipping the sea salt. It balances the sweetness and enhances flavor. Lastly, do not rush the mixing process. Take your time to combine everything well. Serve your fig and walnut bars as a snack. They pair well with a cup of tea or coffee. You can also enjoy them with yogurt. For a fun twist, top them with fresh fruit or honey. Cut the bars into bite-sized pieces for easy sharing. These bars are perfect for lunchboxes or picnics. If you like, drizzle a little extra almond butter on top. This adds a creamy touch. For the full recipe, check the complete guide. {{image_4}} You can easily change the taste of your Fig and Walnut Bars. Try adding dried fruits like apricots or cranberries. They give a sweet and tangy kick. You can also use nuts like pecans or almonds instead of walnuts. This gives a different crunch and flavor. For a fun twist, add some dark chocolate chips. They melt in the oven and add a rich taste. To make these bars vegan, swap honey with maple syrup. This keeps the sweetness while staying plant-based. For a gluten-free version, use gluten-free oats. Make sure to check the labels. They help keep the bars safe for those with gluten issues. You can also use nut butters like cashew or sunflower seed butter for variety. Want to boost the flavor? Add spices like nutmeg or ginger. They bring warmth and depth. A splash of orange or lemon zest brightens the bars, giving a fresh taste. You can also try adding extracts like almond or coconut. Just a drop can change the whole vibe of your bars. These small changes keep your snacks fun and exciting. For more detailed steps, check the Full Recipe. To keep your Fig and Walnut Bars fresh, store them in an airtight container. This will help maintain their chewy texture and flavor. You can keep them at room temperature for a few days. If you want them to last longer, the fridge is a great option. Just make sure to wrap them well before placing them in the fridge. If stored properly, these bars can last up to a week at room temperature. In the fridge, they can stay fresh for about two weeks. This makes them a perfect snack to prepare in advance. You can enjoy a healthy treat throughout the week. For longer storage, you can freeze your bars. Wrap each bar in plastic wrap and place them in a freezer bag. They can last up to three months in the freezer. When you're ready to eat, just take one out and let it thaw. It’s that easy! Enjoy your Fig and Walnut Bars anytime with this simple storage method. Check out the Full Recipe for more details on making them. You will know when your Fig and Walnut Bars are done baking by checking the edges. They should turn a lovely golden brown. This usually happens between 20 to 25 minutes. A toothpick inserted in the center should come out clean. If it has wet batter, keep baking for a few more minutes. Don’t worry if the center looks soft; it will firm up as it cools. Yes, you can use fresh figs, but it changes the recipe a bit. Fresh figs have more moisture than dried ones. You may need to adjust the other ingredients to account for this. Consider reducing the amount of almond butter or oats. This will help keep the bars from being too wet. Dried figs provide a concentrated sweetness that fresh figs do not. You can find pre-made Fig and Walnut Bars at many grocery stores. Look in the health food or snack aisle. Some online retailers also sell them. Check brands that focus on healthy snacks. They often have a variety of options that are easy to grab. If you want to support local businesses, try farmers' markets or specialty food shops. In this article, we explored how to make delicious fig and walnut bars. We covered the key ingredients and their health benefits. You learned effective baking steps and how to store your bars. We shared tips to avoid mistakes and suggested fun variations to try. Homemade fig and walnut bars can be healthy and tasty. With practice, you can master these treats. Enjoy creating and sharing them!

Fig and Walnut Bars Easy and Healthy Snack Choice

Looking for a tasty and healthy snack? Try these Fig and Walnut Bars! Packed with nutrients, they are easy to

- 4 medium yellow squash - 1 pound ground beef - 1 cup cooked quinoa - 1 small onion, finely diced - 2 cloves garlic, minced - 1 cup diced tomatoes (fresh or canned) - 1 teaspoon Italian seasoning - 1/2 teaspoon paprika - Salt and freshly cracked pepper to taste - 1 cup shredded mozzarella cheese - 2 tablespoons olive oil - Fresh basil leaves, for garnish When making stuffed yellow squash with beef, I focus on fresh and tasty ingredients. You start with medium yellow squash, which you can find at most grocery stores. The squash should feel firm and smooth. Ground beef is the star of the dish, so choose a good quality one. I like to use lean beef to keep the dish light. Cooked quinoa adds texture and nutrition. It’s a great way to boost the meal. Don't forget the onion and garlic; they add a lot of flavor. I always dice the onion finely. This way, it mixes well with the beef. Minced garlic gives that aromatic touch we love. For flavor, I use diced tomatoes. Fresh ones are great, but canned works too. Italian seasoning brings warmth, while paprika adds a nice color. Salt and pepper are key for taste. Finally, I sprinkle shredded mozzarella cheese on top. This cheese melts beautifully and makes the dish creamy. A drizzle of olive oil brings everything together. I love to garnish with fresh basil leaves at the end. They add a lovely pop of green and flavor. For the full recipe, check out the complete guide. 1. Preheat your oven to 375°F (190°C). This heat helps cook the squash well. 2. Slice the yellow squash in half lengthwise. Use a sharp knife for a clean cut. 3. Use a spoon to scoop out the seeds and flesh. Leave about a 1/4-inch shell. 4. Set the scooped-out flesh aside for later. You’ll use it in the beef mix. 5. Place the hollowed squash halves cut side up in a baking dish. Make sure they sit flat. 1. In a large skillet, heat 2 tablespoons of olive oil over medium heat. This oil adds flavor. 2. Add 1 small diced onion and 2 minced garlic cloves. Sauté until the onion is soft, about 3-4 minutes. 3. Add 1 pound of ground beef to the skillet. Cook it until it is browned, breaking it into smaller pieces, about 5-7 minutes. 4. Stir in the reserved squash flesh, 1 cup of diced tomatoes, 1 cup of cooked quinoa, 1 teaspoon of Italian seasoning, and 1/2 teaspoon of paprika. 5. Season with salt and freshly cracked pepper to taste. Mix well and cook for another 5 minutes. This step allows the flavors to blend. 1. Generously spoon the beef and vegetable mixture into each squash half. Pack it in well. 2. Sprinkle 1 cup of shredded mozzarella cheese over the top of each stuffed squash. This cheese will melt beautifully. 3. Cover the baking dish with aluminum foil. Bake in the preheated oven for 25 minutes. This softens the squash. 4. Remove the foil and bake for another 10 minutes. Check that the cheese is melted and bubbly. 5. After baking, let the stuffed squash cool slightly. Garnish with fresh basil leaves for color and taste. For the full recipe, refer to the [Full Recipe] for more details. - Selecting the right yellow squash: Choose squash that feels firm and has smooth skin. Avoid any blemishes or soft spots. Medium-sized squash works best for stuffing. They hold their shape and cook evenly. - Ensuring even cooking and flavor absorption: Cut the squash in half lengthwise to create a shell. Make sure to scoop out enough flesh but leave a sturdy base. This helps the squash cook evenly and soak up the tasty filling. - Presentation ideas for serving the dish: Serve the stuffed squash on a colorful platter. You can drizzle balsamic reduction over the top for a touch of elegance. Add fresh basil leaves on each half for a lovely pop of color. - Suggested side dishes to accompany the meal: A light salad pairs well with this dish. You can also serve some crusty bread or roasted vegetables for a complete meal. These sides enhance the flavors and add variety. - Additional spice options or garnishes: You can add chili flakes for heat or fresh herbs like parsley for freshness. Consider topping with a dollop of sour cream or yogurt for a creamy finish. - Substitution options for dietary needs: If you need a healthier option, swap the beef for ground turkey or a plant-based protein. For a gluten-free version, ensure your quinoa is certified gluten-free. This way, everyone can enjoy this delicious meal! {{image_4}} For a vegetarian twist, swap the ground beef for plant-based protein. Options like lentils, chickpeas, or crumbled tofu work great. This keeps the dish hearty while being meat-free. You can also add more vegetables, like spinach, zucchini, or carrots. Spice it up with herbs like basil or oregano to enhance the flavor. If you want a Mediterranean flair, mix in feta cheese and olives. These ingredients bring a tangy taste that pairs well with the squash. You can also replace the yellow squash with bell peppers for a colorful and tasty option. This change offers a different texture while still being delightful. For those who love heat, add chili flakes or diced hot peppers to the beef mix. This gives the dish a spicy kick that delights the taste buds. You can also include jalapeños for an extra layer of flavor. Just be careful not to overdo it if you prefer a milder taste. Consider these variations to make stuffed yellow squash your own. Each option adds a unique twist to a classic dish, making it fun to explore new flavors! You can keep leftovers in the fridge for up to three days. Use an airtight container to keep them fresh. Before storing, let the stuffed squash cool down. This helps prevent condensation and sogginess. When you want to eat it again, simply reheat in the oven or microwave. To freeze stuffed squash, place it in a freezer-safe container. It can last for about three months in the freezer. To reheat, first thaw it overnight in the fridge. Then, heat it in the oven at 350°F (175°C) until warmed through. This keeps the flavors and texture intact. For quick meals, you can prep the ingredients ahead. Chop the onions and garlic, and cook the quinoa. You can even brown the ground beef in advance. Store each item in separate containers. When you're ready to cook, simply assemble everything and bake. This saves time and makes dinner easy! For the full recipe, check the link above. It takes about 55 minutes in total. You need 15 minutes to prep the squash and ingredients. Cooking in the oven takes roughly 40 minutes. This time allows the squash to soften and the flavors to blend well. Yes, you can! Ground turkey or chicken works great. If you want a twist, try sausage or even pork. Each meat brings its own flavor, so feel free to mix it up. Stuffed yellow squash pairs well with a fresh salad. Try a simple green salad with vinaigrette. Roasted vegetables or garlic bread also make great sides. They balance the meal and add more flavor. Absolutely! You can prepare the stuffing a day before. Just store it in the fridge. For cooking, assemble the squash and stuffing when you're ready. You can also reheat leftovers in the oven at 350°F for about 15 minutes. Enjoy that delicious taste again! Stuffed yellow squash with beef combines fresh ingredients and bold flavors. You learned about the main components, cooking steps, and tips to enhance your dish. I shared ideas for variations and ways to store leftovers. Each option allows for creativity in your kitchen. Enjoy exploring this dish and making it your own. Whether you stick with the classic theme or try a twist, you can create a meal that delights and satisfies. Happy cooking!

Stuffed Yellow Squash with Beef Flavorful Recipe Guide

Do you want to impress your family with a creative and tasty dish? This Stuffed Yellow Squash with Beef recipe

To make Zucchini Orange Bread, you need fresh ingredients. Here’s a list of the key items: - 2 cups freshly grated zucchini (about 2 medium zucchinis) - 1 cup granulated sugar - 1/2 cup packed brown sugar - 1/2 cup vegetable oil - 3 large eggs, at room temperature - 1 teaspoon pure vanilla extract - Zest from 1 medium orange - 1/4 cup freshly squeezed orange juice - 2 cups all-purpose flour - 1 teaspoon baking soda - 1/2 teaspoon baking powder - 1 teaspoon ground cinnamon - 1/2 teaspoon salt - 1/4 teaspoon ground nutmeg These ingredients create a moist and flavorful bread. The zucchini adds moisture and texture, while the orange zest and juice bring a bright, citrusy flavor. You can customize your Zucchini Orange Bread with optional add-ins. Here are some ideas: - 1/2 cup chopped walnuts or pecans for crunch - 1/2 cup chocolate chips for sweetness - 1/2 cup dried cranberries or raisins for a fruity twist These add-ins can change the taste and texture of your bread. Feel free to experiment and find your favorite mix! If you need to swap some ingredients, here are some easy substitutions: - Use applesauce instead of vegetable oil for a lighter option. - Substitute honey or maple syrup for granulated sugar for a natural sweetener. - Replace all-purpose flour with almond flour for a gluten-free version. These substitutions will keep your Zucchini Orange Bread delicious while fitting your diet. For the full recipe, check out the provided details. Start by preheating your oven to 350°F (175°C). This is key for even baking. While the oven heats up, take a 9x5 inch loaf pan. Lightly grease it with oil or use non-stick spray. This helps the bread come out easily after baking. In a large mixing bowl, add 2 cups of freshly grated zucchini. This gives the bread moisture. Next, pour in 1 cup of granulated sugar and 1/2 cup of packed brown sugar. Stir in 1/2 cup of vegetable oil for richness. Crack in 3 large eggs, making sure they are at room temperature. Add 1 teaspoon of pure vanilla extract, the zest from 1 medium orange, and 1/4 cup of freshly squeezed orange juice. Whisk these ingredients together until well combined. This mixture will create a flavorful base for the bread. In a separate bowl, sift together 2 cups of all-purpose flour, 1 teaspoon of baking soda, 1/2 teaspoon of baking powder, 1 teaspoon of ground cinnamon, 1/2 teaspoon of salt, and 1/4 teaspoon of ground nutmeg. Sifting helps to aerate the flour. Slowly fold the dry mixture into the wet mixture. Use a spatula or wooden spoon to mix gently. It's fine if a few lumps remain; overmixing can make the bread tough. If you want extra crunch, fold in 1/2 cup of chopped walnuts or pecans. Once mixed, pour the batter into your prepared loaf pan. Use a spatula to smooth the top. Now you are ready to bake! To make your zucchini orange bread moist and tasty, start with fresh zucchini. Grate it just before using. This keeps the moisture high. Squeeze out some excess water if it looks too wet. The orange zest and juice add bright flavor. Don't skip these! They balance the bread's sweetness. For an extra boost, try adding a bit of vanilla extract. It enhances the overall flavor. Preheat your oven to 350°F (175°C). This is key for even baking. Bake the bread for 55 to 65 minutes. Every oven is different, so check after 55 minutes. Insert a toothpick into the center. If it comes out clean or with a few crumbs, it's ready. Let it cool in the pan for about 10 minutes before moving it to a wire rack. If your bread turns out too dry, it may have baked too long. Check your oven temperature with an oven thermometer. If it's too low, the bread may not rise well. If it sinks in the middle, you may have overmixed the batter. Mix just until combined. Lastly, if it sticks to the pan, make sure to grease it well. This helps with easy release. For more details, check the Full Recipe. {{image_4}} You can make this bread gluten-free. Use a gluten-free flour blend. Look for one that has a good balance of starch and protein. This mix will keep the bread light and fluffy. Follow the same steps in the recipe. Just swap out the flour. Check the baking time, as it may vary slightly. Feel free to add other fruits. Chopped apples or crushed pineapple work well in this recipe. They add natural sweetness and moisture. You can also mix in spices. Try a pinch of ginger for warmth or cloves for depth. These small changes create a unique flavor profile every time. When serving, consider toppings. Cream cheese is a classic choice. It pairs wonderfully with the orange flavor. You could also sprinkle some powdered sugar on top. For a crunchy twist, add chopped nuts or seeds. They give a nice texture contrast and boost nutrition. To keep your zucchini orange bread fresh, wrap it well. Use plastic wrap or aluminum foil. Store it at room temperature for up to three days. If you want to keep it longer, consider refrigeration. This can extend its life to about a week. However, it may lose some moisture. To prevent this, wrap it tightly. Freezing is a great option for longer storage. First, let the bread cool completely. Then, slice it if you prefer. Wrap each slice in plastic wrap. Place the wrapped slices in a freezer bag. Remove as much air as possible before sealing. You can freeze the bread for up to three months. When you’re ready to enjoy, just thaw it at room temperature. Reheating zucchini orange bread is simple. If it’s frozen, let it thaw first. Preheat your oven to 350°F (175°C). Place the bread on a baking sheet. Cover it with foil to keep it moist. Heat for about 10 to 15 minutes. If you like it warm, you can also use a microwave. Heat it for 10 to 15 seconds. Enjoy the warm, inviting aroma as it fills your kitchen! For the full recipe, check out the main article. Yes, you can use yellow squash. Both types of squash have similar moisture and texture. Your bread will still be moist and tasty. Yellow squash may add a slight color difference. In terms of flavor, it is mild and won’t change the taste much. To make your bread sweeter, you can add more sugar. Try adding an extra 1/4 cup of granulated sugar. You can also use honey or maple syrup instead. These will add sweetness and a unique flavor twist. Lastly, consider adding chocolate chips or dried fruit for added sweetness. Zucchini Orange Bread lasts about 3 to 5 days at room temperature. Keep it in an airtight container to stay fresh. If you want it to last longer, store it in the fridge for up to a week. You can also freeze it for up to 3 months. Just wrap it well to prevent freezer burn. Try the Full Recipe for a delicious treat! Zucchini Orange Bread offers a delightful mix of flavors and textures. We covered key ingredients, from zucchini to oranges, and explored fun variations. You learned how to prep, mix, and bake with easy steps. Plus, tips ensured your bread stays moist and tasty. As you experiment, remember to enjoy the process. Use the storage tips to keep your bread fresh longer. With these insights and your creativity, your baking adventures will surely impress. Make this bread your own and share it with others!

Zucchini Orange Bread Delightfully Moist Recipe

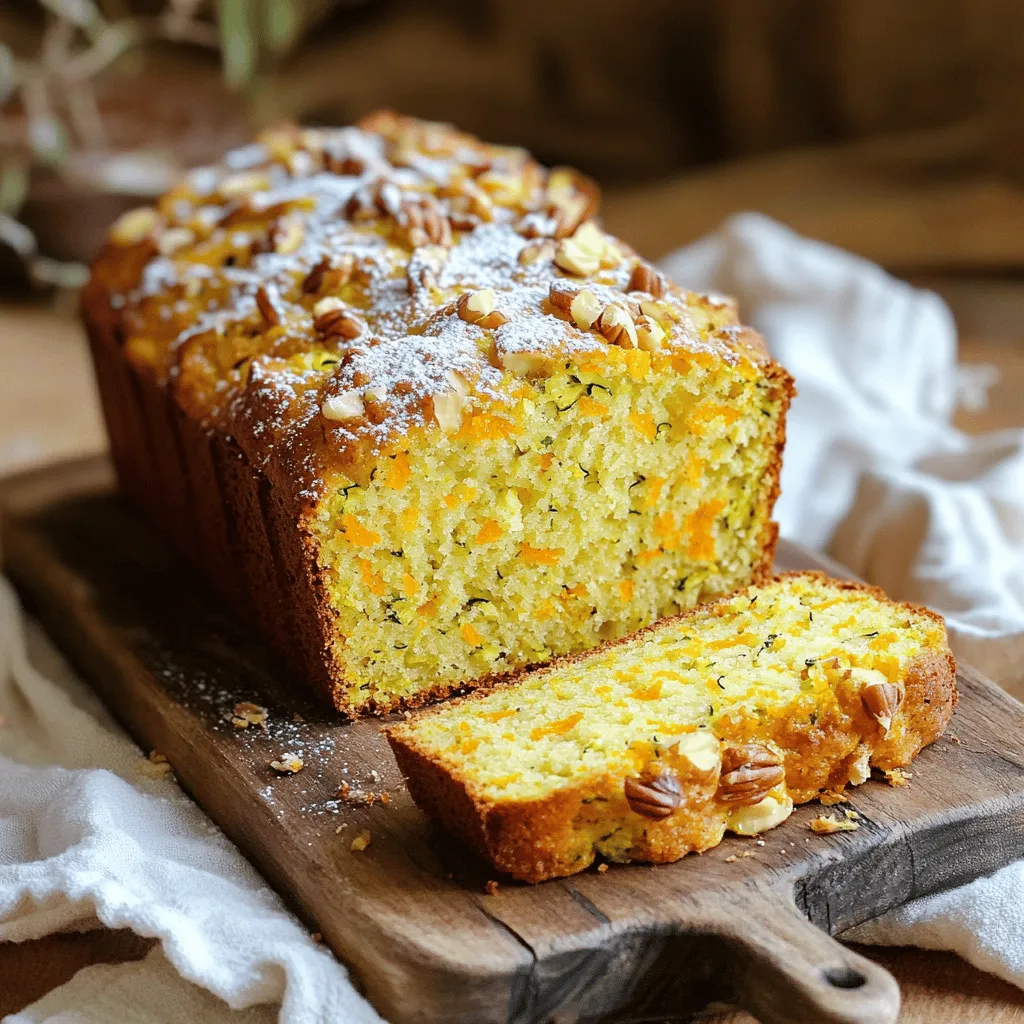
Are you ready to bake something delightful? My Zucchini Orange Bread is not just tasty—it’s wonderfully moist too! Perfect for

- 4 small cucumbers - 1 cup fresh water - 1 cup apple cider vinegar - 2 tablespoons granulated sugar - 1 tablespoon fine salt - 2 cloves garlic - 1 teaspoon mustard seeds - 1 teaspoon dill seeds - 1/2 teaspoon crushed red pepper flakes - Fresh dill sprigs for garnish To make quick refrigerator pickles, you need a few simple items. The main ingredients are cucumbers, water, and apple cider vinegar. I like using small cucumbers because they stay crisp and have great flavor. For seasoning, granulated sugar, fine salt, and garlic give the pickles a nice taste. The sugar balances the vinegar's tang. Don't skip the garlic; it adds depth to the flavor. You can also add optional ingredients to customize your pickles. Mustard seeds and dill seeds give an extra kick. If you like it spicy, add crushed red pepper flakes. Fresh dill sprigs make a lovely garnish and enhance the taste. In total, you can create a delightful and flavorful pickle with just these ingredients. It's fun to mix and match based on what you have at home! For the complete recipe, check out the Full Recipe. To start making your quick refrigerator pickles, combine water, apple cider vinegar, granulated sugar, and fine salt in a medium saucepan. Heat the mixture over medium heat. Stir well until the sugar and salt dissolve completely. This step is important because it forms the base for your pickles. Once dissolved, remove the saucepan from the heat and let it cool for about 10 minutes. While the brine cools, it’s time to prepare your cucumbers. Slice the small cucumbers into thin rounds. Next, take two cloves of garlic and gently smash them with the flat side of a knife. In a clean, airtight jar or container, begin layering your cucumber slices. Start with a layer of cucumber, then add the smashed garlic, mustard seeds, dill seeds, and optional crushed red pepper flakes for some heat. This layering adds flavor and texture. Now, carefully pour the cooled brine over the layered cucumbers. Make sure they are completely submerged in the liquid. This step is key for even flavor throughout the pickles. Once done, seal the jar tightly with a lid. Place it in the refrigerator and let the pickles marinate for at least 24 hours. If you can wait, the flavors will deepen. You can enjoy them after just a few hours, but be patient for the best taste. You can find the full recipe for these crispy quick refrigerator pickles to guide you through each step. Let your pickles marinate for at least 24 hours. This waiting time lets the flavors blend well. If you want more zing, consider adding spices. Mustard seeds and dill seeds bring depth. A pinch of crushed red pepper flakes adds heat if you like spice. Garnish your pickles with fresh dill. The green color looks nice and adds flavor. Serve them as a colorful appetizer or a tasty side dish. They pair well with sandwiches and BBQ. Always use clean jars to store your pickles. This keeps your pickles safe and fresh. Label your jars with the date you made them. This helps you track freshness and know when to eat them. {{image_4}} You can easily adjust the heat of your pickles. If you like spice, add more crushed red pepper flakes. They bring a nice kick. You can also try using jalapeños or other spicy peppers. Slice them thin and layer them with the cucumbers for a fun twist. This can turn a simple pickle into a spicy treat. To make your pickles unique, play with different vinegars. White wine vinegar or rice vinegar can change the taste. Each type of vinegar adds its own twist. You might also want to add herbs. Fresh thyme or basil can give your pickles a garden-fresh flavor. Just toss in a few sprigs while layering the cucumbers. This small change can lead to big flavor. The sweetness of your pickles is all up to you. If you want sweeter pickles, add more sugar. On the flip side, use less sugar for a tangier taste. You can also swap sugar with honey or agave syrup. This can add a different flavor profile. Experiment with these options to find your perfect balance. For the full recipe, check out the full recipe. To keep your quick refrigerator pickles fresh, use airtight containers or jars. This will prevent any air from getting in and ruining the flavor. Always store your pickles in the refrigerator. The cold helps keep them crunchy and tasty. Enjoy your pickles within 1-2 weeks for the best quality. After that, they may lose their crunch and flavor. Watch for signs of spoilage. If you see mold, off smells, or a change in color, it’s best to toss them out. Freezing pickles isn’t recommended. The texture changes when thawed, making them mushy. Instead, try other methods to preserve. You can make more pickles and give them away or share with friends. This way, you can enjoy your tasty treats without wasting any! Quick refrigerator pickles can last about 1 to 2 weeks in the fridge. Store them in an airtight jar to keep them fresh. Always check for any off smells or changes in texture before eating. If the pickles smell sour or feel slimy, it’s best to throw them away. Keeping your pickles submerged in the brine helps maintain their crispness and flavor. Yes, you can use many different vegetables for refrigerator pickles. Carrots, radishes, and green beans work well. You can even try cauliflower or bell peppers for a colorful mix. Just cut them into similar shapes and sizes for even pickling. The same brine works for these vegetables, but adjust the pickling time based on their texture. Quick refrigerator pickles are safe to eat if you follow proper methods. Make sure to use clean jars and fresh vegetables. The vinegar in the brine helps stop harmful bacteria. Always refrigerate your pickles after making them. If you notice any signs of spoilage or if they smell off, it's best to discard them. Enjoy your pickles safely! In this post, we explored making quick refrigerator pickles, detailing main and optional ingredients. Following simple steps, you can create tasty pickles in no time. Remember to let them marinate for the best flavor. Be creative with spices and adjust sweetness to your liking. Store in airtight jars for freshness and enjoy within 1-2 weeks. Quick pickles are fun and safe to make. With these tips, you can impress your friends or family. Now, go ahead and enjoy your homemade pickles!

Quick Refrigerator Pickles Easy and Flavorful Recipe

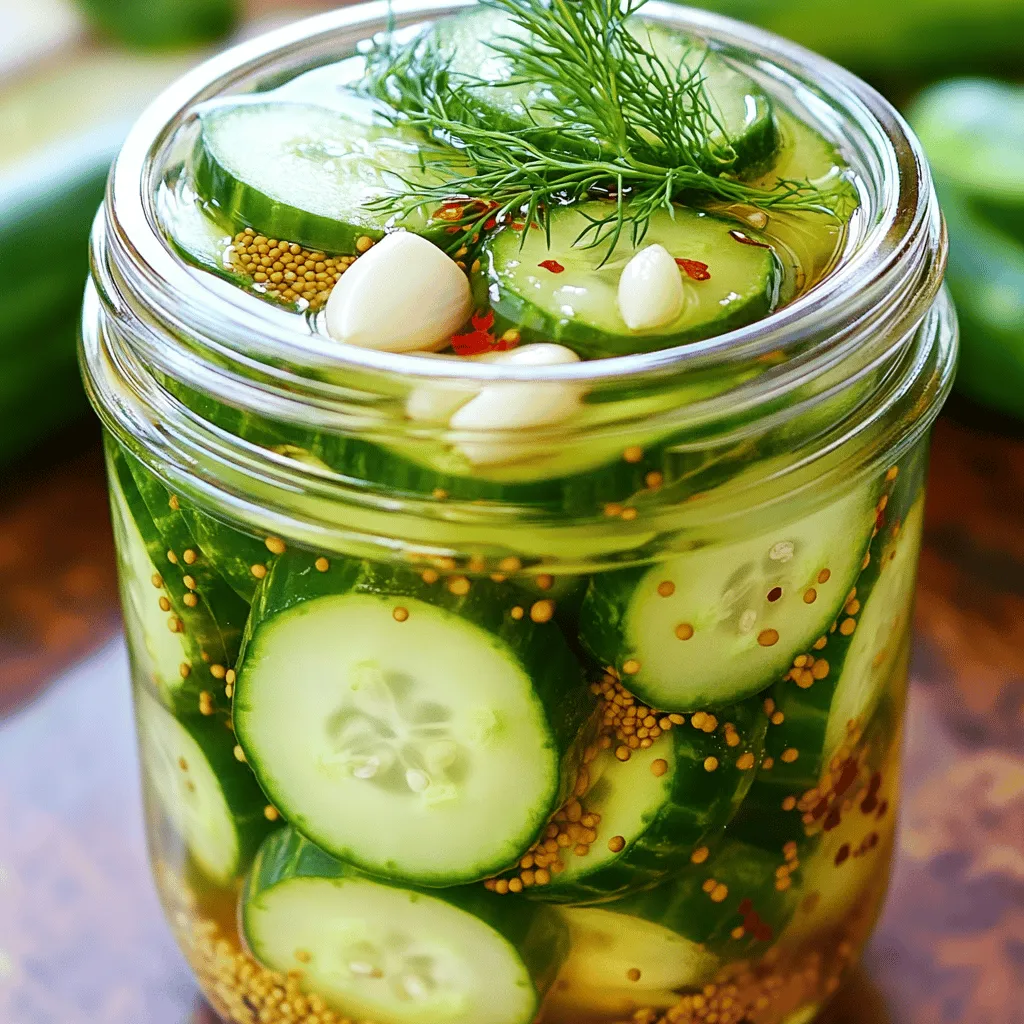
Ready to elevate your meals with crunchy, tangy flavors? Quick refrigerator pickles are your go-to solution! In just a few

- 1 cup grated zucchini - 1/2 cup unsweetened applesauce - 1/4 cup vegetable oil - 1/2 cup granulated sugar - 1/4 cup firmly packed brown sugar - 1 teaspoon pure vanilla extract - 1 cup all-purpose flour - 1/3 cup unsweetened cocoa powder - 1/2 teaspoon baking soda - 1/4 teaspoon baking powder - 1/4 teaspoon fine salt - 1/2 cup semi-sweet chocolate chips (optional) Zucchini brings moisture and nutrition to brownies. It makes them soft and tasty. Applesauce is another key ingredient. It adds sweetness and keeps calories lower. We use less sugar in this recipe. This makes the brownies a healthier treat for kids. Zucchini is full of good stuff. It has vitamins A and C. It also has fiber. Fiber helps kids feel full longer. Applesauce is a smart swap for oil or eggs. It cuts fat while adding flavor. Using less sugar means kids can enjoy sweets without too much sugar. This recipe balances taste and health. You get a sweet treat that is good for kids. You can find the full recipe above to make these yummy brownies at home. - Wash and grate the zucchini. - Drain excess moisture from the grated zucchini. Start by washing the zucchini under cool water. This step removes dirt and pesticides. Next, use a box grater or food processor to grate the zucchini. Aim for small pieces for even cooking. After grating, place the zucchini in a fine mesh strainer. Let it sit for 5-10 minutes to drain. You can press it gently with a spoon to help remove extra water. This step keeps your brownies from being too soggy. - Combine wet ingredients in a mixing bowl. - Whisk together dry ingredients in a separate bowl. In a large mixing bowl, combine the drained zucchini, applesauce, vegetable oil, granulated sugar, brown sugar, and vanilla extract. Use a whisk or spatula to mix until smooth. This mixture adds moisture and sweetness to your brownies. In another bowl, mix the flour, cocoa powder, baking soda, baking powder, and salt. Whisk these dry ingredients well to ensure even distribution. - Combine mixtures and prepare for baking. - Baking time and temperature details. Now, slowly add the dry mix to the wet mix. Stir gently until just combined. It’s okay if there are a few lumps. If you like, fold in chocolate chips for extra flavor. Pour the batter into a greased 8x8-inch baking pan. Spread it out evenly with a spatula. Bake in a preheated oven at 350°F (175°C) for 25-30 minutes. Check doneness with a toothpick. It should have a few moist crumbs when inserted. Once done, let the brownies cool for at least 10 minutes before slicing. For the full recipe, refer to the previous section. To make your zucchini brownies even better, add spices like cinnamon. A teaspoon will bring warmth and depth to the flavor. When picking zucchini, look for firm ones with shiny skin. Avoid soft or dull zucchini, as they may not taste as good. Mixing the batter is key. You want to mix just until everything is combined. Over-mixing can make brownies tough. If you want fudgy brownies, take them out of the oven when a toothpick comes out with a few moist crumbs. For cake-like brownies, bake a little longer until the toothpick comes out clean. To make the brownies look fun for kids, cut them into shapes or use colorful plates. You can also dust the brownies with powdered sugar for a nice finish. For a special treat, add a scoop of vanilla ice cream on top. This will make the dessert extra yummy and appealing. Enjoy your delicious and nutritious treat using the Full Recipe! {{image_4}} You can make zucchini brownies even better by changing a few ingredients. If you want to skip eggs, use 1/4 cup of unsweetened applesauce for each egg. This keeps the brownies moist and healthy. If you don’t have vegetable oil, you can use melted coconut oil or even yogurt. For a sweeter taste, try using honey or pure maple syrup instead of granulated sugar. Just remember to reduce the liquid in your recipe slightly since honey adds moisture. Want to make your brownies special? Add nuts like walnuts or pecans for a nice crunch. You can also include dried fruits like raisins or cranberries for a sweet twist. If you love chocolate, try using dark chocolate chips or even white chocolate for a unique taste. You can also mix in some peanut butter for a fun flavor combo. Experimenting with these options makes each batch exciting! For those who need gluten-free treats, use almond flour or oat flour instead of all-purpose flour. This change keeps the brownies soft and delicious. To make them vegan, swap out vegetable oil for a plant-based butter and use flaxseed meal mixed with water instead of eggs. These simple swaps help everyone enjoy the tasty zucchini brownies! To keep your zucchini brownies fresh, store them in an airtight container. Place parchment paper between layers to avoid sticking. If you leave them at room temperature, they stay fresh for about 3 days. For longer storage, keep them in the fridge for up to a week. You can freeze your brownies for later enjoyment. First, let the brownies cool completely. Then, cut them into squares. Wrap each square in plastic wrap, then place them in a freezer bag. They can stay frozen for up to 3 months. When you're ready to eat them, take the brownies out of the freezer. Let them thaw in the fridge overnight. To warm them up, place them in the microwave for a few seconds. Enjoy your tasty treat! Yes, you can. If you want to try different flavors, consider using carrots or sweet potatoes. Both add sweetness and moisture. Grated carrots work well in brownies. They also offer a nice texture. Sweet potatoes give a rich taste and a hint of sweetness. Just ensure to drain any excess moisture the same way you do with zucchini. This keeps the brownies from getting too wet. To boost the chocolate flavor, add more cocoa powder. You can increase it up to 1/2 cup. Adding more semi-sweet chocolate chips is also a great idea. Try melting some chocolate and mixing it into the batter. This will create a deeper chocolate taste. You can even sprinkle chocolate chips on top before baking for added richness. Check for a few key signs. First, look at the edges; they should pull away from the sides of the pan. Next, use a toothpick; insert it into the center. It should come out with a few moist crumbs but not wet batter. You can also gently press the top. If it feels set and springs back, they are ready. Keep an eye on the time; baking usually takes 25 to 30 minutes for perfect brownies. These brownies pack flavor and health benefits. You learned about key ingredients, like zucchini and applesauce, which add nutrition. I also shared tips on baking and storage. Feel free to experiment with flavors or substitutes to suit your needs. Remember, these brownies are not just tasty but can fit many diets, too. Enjoy your baking and the delicious results!

Zucchini Brownies for Kids Delicious and Nutritious Treat

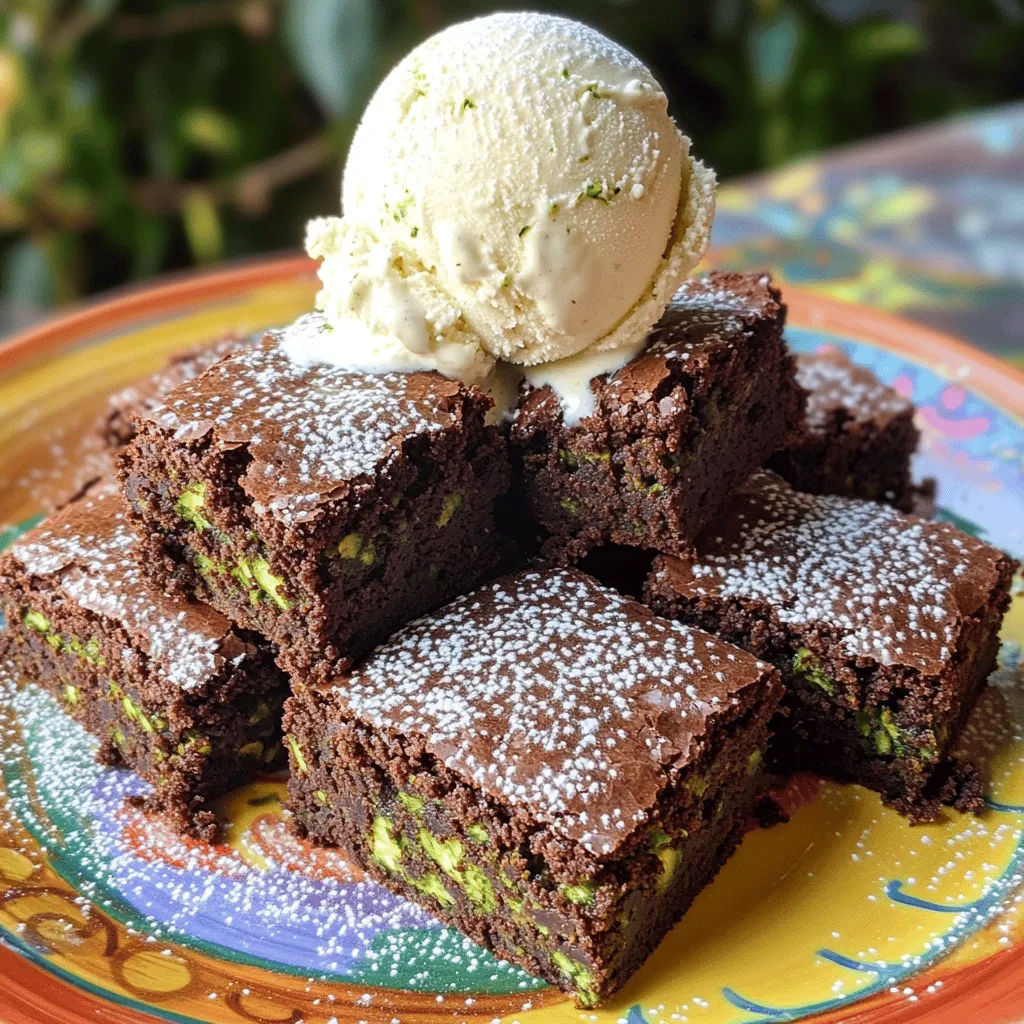
Are you ready to surprise your kids with a treat that’s both delicious and nutritious? Zucchini brownies are the perfect

- 2 medium zucchinis, diced - 1 medium yellow squash, diced - 1 cup fresh corn kernels - 1 red bell pepper, chopped - 1 small onion, finely diced - 3 cloves garlic, minced - 1 teaspoon smoked paprika - 1 teaspoon ground cumin - Salt and freshly ground black pepper to taste - 2 tablespoons extra virgin olive oil - 1/4 cup fresh basil, chopped - 1/4 cup feta cheese, crumbled (optional) The main ingredients in this dish create a colorful and vibrant mix. The zucchinis and yellow squash provide a soft base, while the corn adds sweetness. The red bell pepper gives a nice crunch and a pop of color. The onion and garlic create a savory base, making the dish fragrant and inviting. For spices, I use smoked paprika and ground cumin. They bring a warm, earthy flavor that pairs well with the veggies. Don't forget to add salt and pepper to taste; they enhance all the fresh flavors. You can drizzle the extra virgin olive oil over the veggies to help them cook evenly and add a rich taste. Fresh basil adds a bright note, while feta cheese, if you choose to use it, gives a creamy finish. You can find the full recipe [here]. - Heat olive oil in a non-stick skillet over medium heat. - Sauté diced onion until soft and translucent. Start by adding the olive oil to your skillet. You want it hot but not smoking. Next, toss in the diced onion. Stir it around for about 3-4 minutes. The goal is to make the onion soft and a bit clear. This step lays the base for a tasty dish. - Add minced garlic and cook briefly. - Introduce diced zucchini and yellow squash. Once the onion looks good, it’s time to add the minced garlic. Cook it for one minute. This helps release its great aroma. After that, add the diced zucchini and yellow squash. Stir these for about 5-6 minutes. They should soften and brighten up, making your skillet colorful and inviting. - Stir in chopped red bell pepper and corn kernels. - Season with spices; simmer to harmonize flavors. Now, it’s time to bring in the chopped red bell pepper and corn. Mix everything well. Cook for another 4-5 minutes. You want all the veggies to be tender but still bright. Then, sprinkle in smoked paprika, ground cumin, salt, and black pepper. Stir thoroughly so the spices coat the veggies. Let them simmer for 2-3 minutes. This helps all the flavors come together perfectly. With these steps, you create a vibrant and delicious Squash and Corn Summer Skillet. For the full recipe, check out the detailed instructions above. - Ensure oil is properly heated for sautéing: Start by heating your olive oil in a non-stick skillet over medium heat. The oil should shimmer but not smoke. This helps to cook your veggies evenly. - Avoid overcooking the garlic and vegetables: When you add garlic, stir it for just one minute. This keeps it fragrant and prevents bitterness. For the vegetables, cook them until tender but still bright in color. - Serve directly from the skillet for rustic appeal: This adds charm to your meal. Guests enjoy the look and feel of a home-cooked dish right from the pan. - Suggestions for drizzling extra olive oil before serving: A drizzle of olive oil adds richness and shine. You can also sprinkle some fresh basil or feta cheese for color and flavor. - Options for using frozen corn when fresh isn't available: If fresh corn isn’t on hand, frozen corn works great. Just add it straight into the pan and adjust the cooking time slightly. - Alternative herbs and cheeses to enhance flavor: Try using fresh thyme or oregano for a different taste. You can also swap feta cheese for goat cheese or omit it for a dairy-free option. For the full recipe, check out the detailed cooking steps and ingredient list! {{image_4}} You can easily add protein to your Squash and Corn Summer Skillet. If you like meat, try adding cooked chicken or shrimp. Just add them after the veggies soften. Cook them until heated through. For a vegetarian option, add chickpeas or black beans. They add great texture and protein. Rinse and drain canned beans before adding them. Mix them in during the last few minutes of cooking. This keeps the beans warm without overcooking. To change the flavor, add herbs like thyme or oregano. These herbs pair well with squash and corn. You can chop fresh herbs and sprinkle them in during cooking. Dried herbs work too; just use less. You can also try different spices. Smoked paprika gives a lovely depth. Cumin adds warmth. Want some heat? Add a pinch of cayenne or crushed red pepper. Experiment and find your favorite blend. If you're watching calories, you can adjust the recipe. Use less oil or skip the feta cheese. This keeps the dish light yet flavorful. For a dairy-free option, just leave out the feta cheese. Your skillet will still taste great. You can also add more veggies for extra nutrients. Think spinach or kale for a colorful boost. To store leftovers, cool the dish to room temp first. Then, place it in an airtight container. This will keep it fresh for longer. I recommend using glass or BPA-free plastic containers. They help keep your food safe and tasty. If you want to freeze servings for later, divide the dish into portions. Use freezer-safe containers or bags. Remove as much air as you can to prevent freezer burn. To thaw, place in the fridge overnight. Reheat on the stove or microwave until hot. In the fridge, this dish lasts about 3 to 4 days. Check for signs of spoilage. If you see mold or an off smell, discard it. Always trust your senses when it comes to food safety. You can use carrots or bell peppers instead of zucchini and squash. Carrots add a nice crunch and sweetness. Bell peppers bring a burst of color and flavor. Both options work well and keep the dish fresh and vibrant. Yes, you can make this dish vegan. Just leave out the feta cheese. The other ingredients provide great taste and texture. You might even try adding some nutritional yeast for a cheesy flavor without dairy. This dish pairs well with grilled chicken or fish. It also complements rice or quinoa nicely. For a light meal, serve it with a simple green salad. You can even enjoy it as a filling for tacos or wraps. Absolutely! You can prepare the vegetables ahead of time and store them in the fridge. For best results, cook and reheat the dish on the stove or in the microwave. This keeps the vegetables from getting too soggy. The total time for this dish is about 25 minutes. You’ll need 10 minutes for prep and 15 minutes for cooking. It’s quick and easy, making it perfect for a busy weeknight meal. This blog post shared a simple recipe for Squash and Corn Summer Skillet. We discussed vital ingredients, cooking steps, and helpful tips. You learned about fun variations, like adding protein or herbs. I also provided storage info to keep your dish fresh. Be creative with your flavors and serve this dish any way you like. Enjoy cooking and sharing this vibrant meal with others!

Squash and Corn Summer Skillet Flavorful Vegetable Dish

Summer brings fresh flavors, and there’s no better way to celebrate than with a vibrant Squash and Corn Summer Skillet.

Older posts
Newer posts
← Previous Page1 … Page11 Page12 Page13 … Page75 Next →

dsad

© 2025 lazychefmagic • Built with GeneratePress

Our Policies

  • Copyright Policy
  • Cookie Policy
  • GDPR Policy
  • Privacy Policy
  • Disclaimer
  • Terms Of Use

More Information

  • Home
  • About
  • Contact
  • Appetizers
  • Dessert
  • Dinner
  • Drinks
©2025, lazychefmagic About Back To Top