Skip to content
DisclaimerTerms Of UseGDPR PolicyCookie Policy

lazychefmagic

  • Home
  • Drinks
  • Appetizers
  • Dinner
  • Dessert
  • About
  • Contact
  • Privacy Policy
DisclaimerTerms Of UseGDPR PolicyCookie Policy

Amanda

To make a Bang Bang Chicken Bowl, gather these main ingredients: - 2 cups cooked rice (white or brown, your choice) - 1 lb (450g) chicken breast, diced into bite-sized pieces - 1 cup broccoli florets, fresh or frozen - 1 red bell pepper, sliced into strips - 1 medium carrot, julienned - 2 green onions, chopped, for garnish - 1 tablespoon vegetable oil - Salt and pepper to taste These ingredients create a balanced bowl filled with flavor. The chicken provides protein, while the veggies add color and nutrients. You can adjust the quantities based on your needs. Now, let’s focus on the sauce that ties everything together. Here’s what you need for the Bang Bang Sauce: - 1/4 cup mayonnaise - 2 tablespoons sweet chili sauce - 1 tablespoon sriracha sauce (adjust according to your heat preference) - 1 teaspoon garlic powder - 1 teaspoon fresh lime juice This sauce brings a sweet and spicy kick. The mayo gives it a creamy texture, while the lime juice adds a nice zing. You can also enhance your Bang Bang Chicken Bowl with a few optional garnishes: - Chopped cilantro for freshness - Sesame seeds for crunch - A lime wedge for extra zest If you want to switch things up, consider these substitutions: - Use tofu or shrimp instead of chicken for a different protein. - Swap in bell peppers or snap peas for the broccoli. Feel free to customize your bowl to your liking! For the step-by-step instructions, check the Full Recipe. To make the sauce, grab a small bowl. Add 1/4 cup of mayonnaise. Then, pour in 2 tablespoons of sweet chili sauce. Next, add 1 tablespoon of sriracha sauce. You can change the amount of sriracha based on how spicy you like it. Mix in 1 teaspoon of garlic powder and 1 teaspoon of fresh lime juice. Whisk everything together until it is smooth. Set the sauce aside so the flavors can blend. Now, let’s cook the chicken. Heat 1 tablespoon of vegetable oil in a large skillet over medium-high heat. While the oil heats, season 1 pound of diced chicken breast with salt and pepper. Once the oil is hot, add the chicken. Cook it for about 6 to 8 minutes. Stir the chicken often. You want it to be fully cooked and golden-brown. When the chicken is done, it’s time for the veggies. Add 1 cup of broccoli florets, 1 sliced red bell pepper, and 1 julienned carrot to the skillet. Stir-fry these colorful vegetables with the chicken for about 4 to 5 minutes. You want the veggies to be tender but still crisp and bright. After cooking, take the skillet off the heat. Drizzle half of the Bang Bang sauce over the chicken and vegetables. Toss everything gently to coat well. Next, take 2 cups of cooked rice and divide it into four bowls. Spoon the chicken and vegetable mix on top of the rice in each bowl. To finish, drizzle the remaining Bang Bang sauce over each bowl. This adds flavor and looks great. Sprinkle chopped green onions on top for a fresh crunch and a pop of color. For a fun touch, serve with a lime wedge on the side. Enjoy your beautiful Bang Bang Chicken Bowl! To make the best Bang Bang sauce, mix the ingredients well. Start with 1/4 cup mayonnaise. Add 2 tablespoons of sweet chili sauce for a sweet touch. Then, add 1 tablespoon of sriracha sauce for heat. Adjust the amount based on your spice level. Mix in 1 teaspoon of garlic powder for flavor and finish with 1 teaspoon of fresh lime juice to brighten the taste. Let it sit for a few minutes. This will help the flavors blend. For perfect chicken, use a large skillet. Heat 1 tablespoon of vegetable oil over medium-high heat. Cut 1 pound of chicken breast into bite-sized pieces. Season the chicken with salt and pepper. Cook for 6-8 minutes, stirring often. Look for a golden-brown color and ensure it is cooked through. This will keep the chicken juicy and flavorful. When adding veggies, keep them colorful and crisp. After the chicken is done, add 1 cup of broccoli florets, 1 sliced red bell pepper, and 1 julienned carrot. Stir-fry for 4-5 minutes. This short cooking time keeps the veggies tender-crisp. Bright colors make the dish appealing and full of nutrients. To make your Bang Bang Chicken Bowls look great, use colorful dishes. Start with 2 cups of cooked rice in each bowl. Top with the chicken and veggie mix. Drizzle the remaining Bang Bang sauce on top. Garnish with chopped green onions for a fresh crunch. Add a lime wedge on the side for extra zest. A sprinkle of sesame seeds can add flair and texture. For the full recipe, refer back to the beginning. {{image_4}} You can swap chicken for other proteins. Tofu works great. It soaks up flavors well. Use firm tofu for the best results. Just press it first to remove excess water. Then, dice and cook it like chicken. Shrimp is another tasty choice. Use peeled, deveined shrimp and cook it for about 3-4 minutes. Both options add unique flavors to your Bang Bang Bowl. Feel free to mix up the veggies. Snow peas or snap peas add crunch. Bell peppers in different colors brighten the dish. Zucchini offers a soft texture. You can even add mushrooms for an earthy taste. Just chop them and stir-fry until tender. The more colorful your bowl, the more fun it is to eat! Adjust the heat to your liking. If you want mild, skip the sriracha. You can use less or more as needed. For a spicy kick, add fresh chili slices or chili flakes. Mix in a bit of ginger for added warmth. Taste as you go and find the right level for you. Your Bang Bang Chicken Bowl should be just how you like it. For the complete experience, check out the Full Recipe for the perfect balance of flavors! You can store your Bang Bang Chicken Bowl in an airtight container. Make sure to let it cool first. Place it in the fridge. It will last for three to four days. If you have leftover sauce, keep it in a separate container. This helps keep the rice and veggies fresh. To reheat, use the microwave or stovetop. If using the microwave, place the bowl in for two to three minutes. Stir halfway through to ensure even heating. On the stovetop, add a splash of water to the pan and heat over low for about five minutes. This keeps everything moist and tasty. You can freeze the Bang Bang Chicken Bowl if you want to save it for later. Use a freezer-safe container for best results. It can last for up to three months. When ready to eat, thaw it in the fridge overnight. Then, reheat it as described above. Bang Bang Chicken Bowl is a fun and tasty dish. It features tender chicken, colorful veggies, and a creamy sauce. You serve it over rice for a filling meal. This dish is great for lunch or dinner. The mix of flavors makes it a crowd-pleaser. You can find the full recipe at the end. To make this dish healthier, consider these tips: - Use brown rice instead of white rice. - Choose skinless chicken breast for less fat. - Add more vegetables like spinach or snap peas. - Use Greek yogurt instead of mayonnaise in the sauce. - Cut back on the sweet chili sauce to lower sugar. These swaps keep the flavor while boosting nutrition. Yes, you can switch up the sauce! Try these options: - Teriyaki sauce for a sweet and savory taste. - Peanut sauce for a nutty flavor. - A spicy barbecue sauce for a smoky kick. Use what you like best or what you have at home. Bang Bang Chicken Bowl pairs well with many sides. Here are a few ideas: - A simple green salad for freshness. - Steamed edamame for extra protein. - A side of pickled vegetables for tang. - Crusty bread for dipping in the sauce. These sides balance the meal and add variety. In this article, we explored how to make a Bang Bang Chicken Bowl. We covered key ingredients, creating the sauce, cooking chicken, and stir-frying vegetables. I shared tips to perfect each step and suggested fun variations. Remember, you can store any leftovers for later. Enjoy experimenting with this recipe, and don’t hesitate to customize it to your taste. Making your Bang Bang Chicken Bowl can be simple and fun! Dive in and enjoy your cooking adventure!

Bang Bang Chicken Bowl Flavorful and Easy Recipe

Are you ready to spice up your dinner routine? The Bang Bang Chicken Bowl is your answer! This dish packs

- 2 cups cooked chicken breast, diced into bite-sized pieces - 1 can (15 oz) chickpeas, thoroughly rinsed and drained - 1/2 cup plain Greek yogurt You need cooked chicken breast for protein. Chickpeas add fiber and texture. Greek yogurt gives creaminess and tang. These three ingredients make a great base for your salad. - 1/4 cup Dijon mustard - 1 tablespoon honey for a hint of sweetness - 1 cup cherry tomatoes, halved - 1/2 cup cucumber, diced - 1/4 cup red onion, finely chopped Dijon mustard adds a spicy kick. Honey balances the flavors with sweetness. Fresh veggies like cherry tomatoes, cucumbers, and red onions bring color and crunch. They also enhance the taste and nutrition of the dish. - Salt and pepper to taste - 1/4 cup fresh parsley, chopped Seasoning is key. Salt and pepper bring out the flavors. Fresh parsley adds brightness and a pop of color. Together, these seasonings elevate the dish and make it more appealing. This high protein chicken salad is not only easy to prepare but also packed with flavors and nutrients. You can find the Full Recipe in the previous section. Enjoy creating this delightful meal! 1. Start by placing the diced cooked chicken breast and rinsed chickpeas in a large bowl. Mix them well so they combine evenly. This step gives you a solid protein base. 2. Next, make the dressing. In a separate bowl, whisk together the Greek yogurt, Dijon mustard, and honey. Mix until smooth and creamy. This dressing adds a tasty kick to your salad. 3. Drizzle the dressing over the chicken and chickpeas. Use a spatula or spoon to gently mix everything together. Ensure that all the ingredients get coated with the dressing. 4. Now, add the halved cherry tomatoes, diced cucumber, finely chopped red onion, and fresh parsley. These fresh veggies bring color and crunch to the salad. 5. Carefully fold all the ingredients together with a spatula. Be gentle to keep the vegetables intact while ensuring everything is well combined. 6. Cover the mixing bowl with plastic wrap or a lid. Refrigerate the salad for at least 30 minutes. Chilling is key as it helps the flavors blend well. 7. For best results, let it chill longer if you can. The longer it sits, the better the taste becomes. Enjoy it as a meal or a side dish! For the full recipe, check out the recipe section above. To make this chicken salad easy, start with pre-cooking your chicken. I like to grill or roast chicken breast seasoned with salt and pepper. This method keeps it juicy and flavorful. Cook extra chicken when you meal prep. This way, you can use it in salads or wraps later. Store your ingredients separately until you are ready to mix. This keeps the salad fresh and crunchy. You can keep the chicken, chickpeas, and veggies in different containers in the fridge. Mix them just before serving for the best taste. When serving, consider the presentation. Use a large bowl to show off the colors. Garnish with extra parsley on top for a fresh look. You can also serve it on a bed of mixed greens for a colorful meal. Pair the salad with warm pita bread or whole-grain crackers. These sides add texture and a nice contrast to the salad’s creaminess. You can also add some sliced avocado for extra creaminess and healthy fats. To boost flavor, add spices like paprika or garlic powder. A pinch of chili flakes can add a nice kick. Don’t be afraid to try new spices. This makes your salad more exciting. Experiment with fresh herbs too. Basil or cilantro can change the salad's flavor profile. You can mix and match to find what you love best. Each herb brings its unique taste and aroma, making your salad special. {{image_4}} If you're looking for low-carb options, you can skip the chickpeas. This keeps the carbs down while still giving you protein from the chicken. If you want to make it keto-friendly, use avocado instead of Greek yogurt. Avocado adds creaminess without carbs. You can switch up the proteins in this salad. Try using canned tuna or shredded turkey. Both options keep the meal high in protein. For dressings, consider using a vinaigrette or a creamy avocado dressing. They add different flavors and textures to your salad. Adding fruits can take your chicken salad to the next level. Try diced apples or grapes for a sweet twist. You can also toss in nuts or seeds for a crunchy texture. Almonds or sunflower seeds work well and add healthy fats. For the full recipe, check out the Protein-Packed Chicken Salad section. Keep your chicken salad fresh by using airtight containers. These containers keep air out, which helps prevent spoilage. If you don’t have one, covered bowls work well too. Just make sure the cover fits snugly. For added freshness, store the salad in the fridge right after making it. This also helps the flavors blend better. Yes, you can freeze chicken salad! However, it’s best to freeze it without the fresh veggies. This way, they stay crunchy when you thaw the salad. To freeze, place the salad in a freezer-safe container. Make sure to leave some space at the top, as the salad will expand. When you want to eat it, take it out and thaw it in the fridge overnight. This keeps it safe and tasty. In the fridge, your chicken salad will last about 3 to 5 days. Always check for signs of spoilage before eating. If you see any mold or if it smells off, toss it out. A good rule is to trust your senses. If it doesn't look or smell right, it's best to let it go. Enjoy your high protein chicken salad fresh to get the best flavor! To boost protein in your chicken salad, add these ingredients: - 1 can (15 oz) chickpeas, rinsed and drained - 1/2 cup plain Greek yogurt - 1/4 cup diced hard-boiled eggs - 1/4 cup shredded cheese Chickpeas and Greek yogurt are great sources of protein. They not only enhance the taste but also make the salad creamy. Adding hard-boiled eggs increases protein and adds richness. Cheese brings a nice flavor and adds more protein. Yes, you can make this salad ahead of time. Here are some tips for meal prep: - Cook and cool chicken: Make sure your chicken is fully cooked and cooled before mixing it. - Store separately: Keep the dressing separate from the salad. This keeps veggies crisp. - Chill before serving: Refrigerate for at least 30 minutes. This helps the flavors blend well. You can prepare the chicken and chop the veggies a day before serving. Just mix everything together when you are ready to eat. Here are some great side dishes and pairings: - Whole-grain pita bread: Perfect for scooping up the salad. - Mixed greens: A fresh base adds crunch and color. - Vegetable sticks: Carrots or cucumbers are fun to dip in the salad. - Quinoa: A protein-rich grain that complements the salad well. These sides add variety and balance to your meal, making it more enjoyable. In this blog post, we explored the main ingredients, flavor boosters, and seasonings for a tasty chicken salad. We walked through step-by-step instructions on how to mix and chill your salad. I shared helpful tips for meal prep, serving suggestions, and variations to fit different diets. Finally, we discussed proper storage and answered common questions. With these insights, you can enjoy a delicious chicken salad that fits your needs. Now you can create your own version that’s both satisfying and easy to make!

High Protein Chicken Salad Easy and Flavorful Meal

Looking for a quick, tasty way to boost your protein intake? This High Protein Chicken Salad is the answer! Packed

- 1 cup cherry tomatoes, halved - 1 cup cucumber, diced - 1 cup assorted bell peppers, diced - 1 cup corn kernels - 1 ripe avocado, diced - 1/4 cup red onion, finely chopped - 1/4 cup fresh cilantro, chopped - 1 can black beans, drained and rinsed - 2 fresh limes (juice) - 3 tablespoons extra-virgin olive oil - 1 teaspoon ground cumin - Sea salt and black pepper - Optional: 1 jalapeño, minced For a vibrant Mexican chopped salad, fresh ingredients matter. Each item adds a unique taste and texture. You want a mix of colors and flavors. This salad shines with its bright hues and crunch. Fresh Produce Requirements bring life to the dish. Cherry tomatoes offer sweetness. Cucumbers add crispness. Bell peppers lend a burst of color. Corn kernels give a sweet finish. Avocado brings creaminess, while red onion adds a sharp bite. Finally, cilantro rounds it out with a fresh herb taste. Additional Ingredients elevate the salad further. Black beans add protein and fiber. Lime juice gives a zesty kick. Extra-virgin olive oil adds richness. Ground cumin warms the flavors. Sea salt and black pepper enhance everything. If you like heat, minced jalapeño can spice things up. Gather all these ingredients for the full recipe and prepare to enjoy a salad that bursts with flavor and freshness. Start by gathering all your ingredients in a large mixing bowl. Here’s what you need: - 1 cup cherry tomatoes, halved - 1 cup cucumber, diced into bite-sized pieces - 1 cup assorted bell peppers, diced into small cubes - 1 cup corn kernels, freshly cooked or canned, drained - 1 can (15 oz) black beans, thoroughly drained and rinsed - 1 ripe avocado, diced - 1/4 cup red onion, finely chopped - Optional: 1 jalapeño, deseeded and minced for spice Add each ingredient to the bowl. The colors will make your salad pop! Next, take a separate small bowl. Whisk together the juice of 2 fresh limes, 3 tablespoons of extra-virgin olive oil, 1 teaspoon of ground cumin, and a pinch of sea salt and black pepper. Whisk until well combined. This step creates a fresh and zesty dressing that brings all the flavors together. Now, drizzle the dressing over the salad mixture in the large bowl. Gently toss everything together using a spatula or wooden spoon. This helps coat all the ingredients evenly with the dressing. Then, fold in 1/4 cup of chopped cilantro. This adds a fresh taste that brightens the salad. Taste the salad and adjust the seasoning as needed. You can add more salt, pepper, or lime juice to find your perfect flavor balance. Finally, let your salad rest for about 10 minutes at room temperature. This short pause allows the flavors to mingle. Your vibrant Mexican Chopped Salad is now ready to delight your taste buds! Check the [Full Recipe] for more tips and details. - Use fresh ingredients for the best flavor. Fresh tomatoes and crisp cucumbers make a big difference. - Adjust lime juice based on taste preference. Some like it tart, while others prefer less acid. - Serve in a vibrant bowl. A bright dish makes the salad look more inviting. - Garnish with additional cilantro and lime wedges. This adds color and a fresh pop. - Pair with grilled chicken or fish. This makes for a well-rounded meal. - Serve as a side dish or main course. It’s versatile and can fit any occasion. {{image_4}} You can change up your Mexican chopped salad in many ways. Here are two great ideas: - Substitute quinoa or farro for added protein. These grains boost nutrition and make the salad more filling. - Use different beans like pinto or kidney. This swap adds variety and new flavors to your dish. The dressing is key to this salad's taste. Here are some fun options: - Try a yogurt-based dressing for creaminess. It will give your salad a smooth texture and a tangy flavor. - Add chili powder or smoked paprika for extra flavor. This simple change will kick up the heat and add depth. Everyone can enjoy this salad with a few tweaks: - Make it vegan by omitting the honey from dressings. This ensures it fits a plant-based diet. - Use certified gluten-free ingredients for a gluten-free option. This way, those with gluten sensitivities can enjoy without worry. Overall, feel free to experiment with these variations. They make the salad your own and keep it fresh. For a complete guide, check out the Full Recipe. Store leftovers in an airtight container in the fridge. This helps keep the salad fresh. You should consume it within 2-3 days for the best taste and texture. To store long-term, freeze the ingredients separately. Avoid freezing the avocado since it can get mushy. When you’re ready to eat, thaw the ingredients and assemble the salad. It keeps the flavors bright and fresh. Keep the dressing separate until you are ready to serve. This prevents the salad from getting soggy. Add the avocado just before serving to stop it from browning. These steps help keep your Mexican chopped salad looking and tasting great! For the full recipe and more tips, check out the vibrant Mexican chopped salad recipe. You can make this salad more filling by adding grilled chicken, tofu, or quinoa. Each of these options provides protein and keeps you satisfied longer. Grilled chicken adds a savory flavor. Tofu is a great choice for a vegetarian option. Quinoa gives a nice nutty taste and extra texture. Yes, you can prepare this salad ahead of time. First, chop your ingredients and store them in separate containers. Keep the dressing in another container. Just combine everything right before you serve it. This helps keep the salad fresh and crisp. If you don’t have black beans, you can use other beans like chickpeas or lentils. Chickpeas add a creamy texture and a nutty flavor. Lentils are great for added protein and fiber. Both options work well in this salad and keep it delicious. For the Full Recipe, check the main section above. This blog post shared how to make a vibrant Mexican Chopped Salad. We covered fresh produce requirements, additional ingredients, and step-by-step instructions. Tips for perfecting your salad and suggestions for variations were included. I also shared how to store your salad for short- and long-term use. Enjoy this salad as a main dish or side. It's fresh, tasty, and adaptable. With these easy steps, you can create a dish that impresses at any meal. Let your creativity shine with different ingredients and dressings. Happy salad-making!

Mexican Chopped Salad Flavorful and Fresh Delight

Looking for a refreshing, vibrant dish? Dive into my Mexican Chopped Salad! This colorful mix bursts with flavor, making it

- 1 pre-made tart shell (9-inch) - 2 ripe white peaches, thinly sliced - 1 cup mascarpone cheese - 1/2 cup heavy cream - 1/4 cup powdered sugar - 1 teaspoon vanilla extract - Zest of 1 lemon - Fresh mint leaves for garnish - Optional: Honey for drizzling For this tart, I love using ripe white peaches. They add a sweet and juicy touch. The creamy mascarpone gives a rich flavor that pairs well with the peaches. The heavy cream makes it light and airy. I also add lemon zest for a fresh kick. - Mixing bowls - Hand mixer or whisk - Spatula - Serving platter You’ll need a few basic tools. Mixing bowls help combine ingredients easily. A hand mixer or whisk will whip the mascarpone and cream together. A spatula is great for smoothing the mixture into the tart shell. Lastly, a serving platter is perfect for a beautiful display. Gather these items before you start. You’ll find it helps to have everything ready to go. This way, you can focus on making a delicious tart. For the Full Recipe, keep reading. 1. In a medium bowl, combine the mascarpone cheese, heavy cream, powdered sugar, vanilla extract, and lemon zest. 2. Use a hand mixer or whisk to beat the mixture until it is light and fluffy. This should take about 2-3 minutes. Aim for a smooth mix that holds soft peaks. 1. Carefully pour the whipped mascarpone mixture into the pre-made tart shell. 2. Use a spatula to smooth it out evenly across the surface. 3. Next, artfully arrange the thinly sliced peaches on top of the mascarpone layer. Overlap them slightly to create a pretty pattern. 1. Place the tart in the refrigerator and chill for at least 1 hour. This helps the flavors blend and the tart to set. 2. Just before serving, garnish the tart with fresh mint leaves. This adds a pop of color and a hint of freshness. This delightful White Peach Mascarpone Tart is simple yet impressive. For the complete recipe, check out the Full Recipe section. To get the best whipped mascarpone, start with cold ingredients. Cold mascarpone and cream whip better. Use a medium mixing bowl for easy handling. Beat the mascarpone and cream together with a hand mixer. Start on low speed to blend, then increase to high. You want the mixture to be fluffy but not too runny. Aim for soft peaks, which means it holds its shape but is still creamy. This usually takes about 2-3 minutes. If you overbeat, it may turn grainy. Keep an eye on it! A well-presented tart makes a big impact. Before serving, dust the top with a little powdered sugar. This adds a touch of elegance. Cut the tart into neat wedges for easy serving. You can place extra peach slices around the tart for a colorful display. Fresh mint leaves also make a great garnish. They add color and a hint of freshness. Arrange everything nicely on your serving platter to impress your guests. To elevate the sweetness, consider adding toppings. Honey drizzled over the peaches adds both shine and flavor. You might also try a berry sauce for a fruity twist. A sprinkle of cinnamon can add warmth to the dish. If you want a bit of crunch, chopped nuts work well, too. These enhancements can take the tart to a new level of deliciousness. Enjoy experimenting with flavors to find your favorite combination! {{image_4}} You can use many fruits in this tart. Some great options include: - Ripe strawberries - Juicy nectarines - Sweet raspberries - Plump blackberries These fruits add their own flavor and color. You can mix and match to create your favorite combination. Each fruit brings a new taste, making the tart special. You can flavor the mascarpone in fun ways. Here are some ideas: - Add almond extract for a nutty taste - Mix in citrus zest like orange or lime - Stir in a splash of maple syrup for sweetness - Try a pinch of cinnamon or nutmeg for warmth These flavors change the tart. They make it unique and exciting. Feel free to experiment and find your favorite blend. Making a gluten-free tart shell is easy. You need gluten-free flour, butter, and sugar. Here’s how to do it: 1. Mix 1 ½ cups gluten-free flour with ½ cup softened butter and ¼ cup sugar. 2. Press this mixture into your tart pan. 3. Bake at 350°F for about 15 minutes or until golden. This crust is just as tasty as the regular one. It holds the creamy mascarpone and sweet fruit well. Enjoy your gluten-free dessert! To keep your White Peach Mascarpone Tart fresh, store it in the fridge. Use an airtight container or cover it tightly with plastic wrap. This keeps the tart moist and prevents it from absorbing other smells. Make sure to chill the tart for at least an hour before serving. This helps set the flavors and makes it taste even better. If you want to save the tart for later, freezing is a great option. Wrap the tart in plastic wrap first, then place it in a freezer-safe bag. This way, it stays fresh for up to three months. To enjoy the tart again, take it out of the freezer and let it thaw in the fridge overnight. This slow thaw helps to keep the texture smooth and tasty. When stored properly in the fridge, the tart lasts about three to four days. After that, the quality may drop. If you freeze it, you can enjoy it for about three months without losing flavor. Always check for any signs of spoilage before serving. Yes, you can! Cream cheese is a good choice. It has a tangier taste. Ricotta is also nice but will be grainier. If you want a lighter option, use Greek yogurt. Each cheese will change the tart's flavor. Mascarpone is rich and creamy. If you swap, remember to adjust sugar. To slice the tart well, use a sharp knife. Warm the knife in hot water first. This helps cut through the creamy layer. Make clean cuts by wiping the knife after each slice. You want neat, pretty pieces. This makes your dessert look great on a plate. You can prepare the tart a day ahead. First, make the mascarpone filling and fill the tart shell. Chill it overnight. However, wait to add the peaches until the day you serve it. This keeps them fresh and bright. You can also drizzle honey just before serving. This keeps the flavor fresh and tasty. In this blog post, I guided you through making a delightful peach tart. We covered the key ingredients, from ripe peaches to creamy mascarpone. You learned how to assemble, chill, and serve your dessert perfectly. I shared tips for achieving the right texture and creative variations for flavor. Finally, I explained how to store your tart for freshness. This peach tart not only tastes amazing but enhances any gathering. Enjoy this sweet treat and feel proud of your creation!

White Peach Mascarpone Tart Irresistibly Delicious Recipe

If you’re craving a dessert that’s both simple and divine, look no further. This White Peach Mascarpone Tart combines sweet

- 2 cups cooked jasmine rice - 1 pound boneless, skinless chicken breasts - 2 cups broccoli florets - 3 tablespoons soy sauce - 2 tablespoons sesame oil - 1 tablespoon honey - 2 cloves garlic (minced) - Fresh ginger (1 inch piece, grated) - 1 tablespoon rice vinegar - Salt and freshly cracked pepper - 2 green onions (finely chopped) - 1 tablespoon sesame seeds When I make chicken and broccoli rice bowls, I start with fresh, simple ingredients. The jasmine rice is my go-to. It’s fluffy and pairs well with the savory chicken. For the protein, I choose boneless, skinless chicken breasts. They cook evenly and absorb flavors well. Next, I add broccoli florets for crunch and color. They not only taste great but also add nutrition. The marinade is where the magic begins. I mix soy sauce, sesame oil, honey, minced garlic, and grated ginger. This combination adds depth and sweetness to the dish. Rice vinegar adds a tangy note. I always season with salt and freshly cracked pepper for balance. After the chicken cooks, I top the bowls with green onions and sesame seeds. These garnishes give a fresh finish and a bit of crunch. You can find the full recipe below for exact measurements and instructions. - Whisk together soy sauce, sesame oil, honey, garlic, ginger, and rice vinegar. - Coat the chicken pieces in the marinade and let them rest for 15 to 60 minutes. Marinating adds flavor and keeps the chicken juicy. The longer it marinates, the better the taste. - Heat a large non-stick skillet over medium-high heat and add the marinated chicken. - Sauté the chicken for 6 to 8 minutes, stirring often, until golden brown. - Use a meat thermometer to check if it reaches 165°F (74°C). Cooking chicken this way gives it a nice brown color. It also ensures it cooks evenly and stays moist. - Add broccoli florets to the same skillet. - Pour in a splash of water and cover to steam for about 3 to 4 minutes. - Remove the lid, then add the reserved marinade and cook for 2 to 3 minutes. This step keeps the broccoli bright green and crunchy. The marinade adds extra flavor, making it delicious. - Mix the cooked chicken back in with the broccoli and marinade. - Stir well to coat everything in sauce and season with salt and pepper. Combining everything ensures each bite is tasty. Adjust the seasoning to your liking for the best flavor. - Divide cooked jasmine rice into four bowls. - Top each bowl with the chicken and broccoli mixture. The rice serves as the perfect base for this dish. It soaks up the sauce and balances the flavors. - Sprinkle each bowl with chopped green onions and sesame seeds. Garnishing adds a nice crunch and freshness. It makes the dish look amazing and taste even better. For the complete experience, check out the Full Recipe. - Marinate the chicken for at least 15 minutes. The longer, the better. Try an hour for deeper flavor. - Balance flavors by mixing sweet with savory. Honey adds sweetness, while soy sauce brings saltiness. - Cook chicken in a hot skillet for a nice sear. This keeps it juicy and tender. - To avoid overcooked broccoli, cook it briefly. Steam for about 3-4 minutes until it’s bright green. - Add extra sides like steamed rice or a fresh salad. Sauces like teriyaki or hoisin can enhance flavors. - If you don’t have jasmine rice, try brown rice or quinoa. These grains offer different textures and flavors. For the full recipe, check the details above. {{image_4}} You can easily make this dish vegetarian. Just substitute chicken with tofu. Firm tofu works best. Cut it into cubes and marinate like the chicken. The marinade adds great taste. Keep the same marinade for tofu. It will soak up all the flavors. To make the dish even tastier, add spices. Red pepper flakes bring heat. You can also try different sauces. Teriyaki sauce adds a sweet touch. Sweet chili sauce gives it a nice kick. Mix and match to find your favorite. Switching grains can change the meal's feel. Brown rice is a healthy option. Quinoa adds protein and a nutty taste. Cauliflower rice is great for low-carb diets. Cooking times will differ, so adjust as needed. Brown rice takes longer to cook than jasmine rice. Quinoa cooks in about 15 minutes. Cauliflower rice cooks quickly, only needing 5 minutes. Enjoy exploring these variations in your Chicken and Broccoli Rice Bowls! For the complete recipe, check out the Full Recipe section. To keep your chicken and broccoli rice bowls fresh, store them in airtight containers. Make sure to let the food cool first. This step helps prevent moisture buildup. Place the container in the fridge. These bowls stay tasty for up to four days. If you want to save them longer, freeze the bowls. Use freezer-safe containers and label them with the date. They can last for about three months in the freezer. When reheating your leftovers, you want to keep them just right. The microwave is quick and easy. Place the bowl in for about 2-3 minutes, stirring halfway through. If you prefer a crispier result, use the oven. Preheat it to 350°F (175°C). Bake for about 15-20 minutes. This method helps keep the chicken and broccoli from getting soggy. In the fridge, your leftovers last about four days. After that, the food could spoil. Look for signs like an off smell or mold. If either appears, it’s best to toss the food. Always trust your senses to judge freshness. You want to enjoy your meal safely and with great taste. Feel free to check the Full Recipe for more ideas on preparing this delightful dish! I recommend marinating the chicken for at least 15 minutes. This short time helps the chicken absorb the flavors. For a deeper taste, you can marinate it for up to 1 hour. The longer the chicken sits in the marinade, the better it will taste. Yes, you can use frozen broccoli in this dish. Just add the frozen florets directly to the skillet. You may need to steam it a bit longer than fresh broccoli. This way, you save time and still enjoy great flavor. If you can't find jasmine rice, there are great alternatives. Brown rice is a healthy option that adds fiber. Quinoa is another choice, packed with protein. If you prefer a low-carb option, try cauliflower rice. Each alternative has its own cooking time, so check the package for instructions. This recipe is quite healthy! Chicken is a lean protein, and broccoli is loaded with vitamins. Jasmine rice provides energy through carbs. The dish is low in sugar and high in nutrients. Plus, you can customize it to fit your diet needs by adjusting the sauce or adding more veggies. This blog post covered how to make tasty chicken and broccoli rice bowls. We looked at the main ingredients, marinade, and garnishes. I shared step-by-step instructions to prepare the dish perfectly. Tips helped enhance flavors and skills, and we explored fun variations and storage ideas. Now, you can enjoy a quick, healthy meal that fits your family’s tastes. You can always mix things up to make it your own! Happy cooking!

Chicken and Broccoli Rice Bowls Tasty and Simple Meal

Looking for a quick and tasty meal? Chicken and Broccoli Rice Bowls are your answer! This recipe combines juicy chicken,

- 2 cups whole wheat pasta (fusilli or rotini) - 1 cup cooked chicken breast, shredded - 1 ripe avocado, diced - 1 cup cherry tomatoes, halved - 1/2 cucumber, diced - 1/4 red onion, finely chopped - 1/4 cup Greek yogurt (plain) - 2 tablespoons fresh lime juice (about 1 lime) - 1 tablespoon extra virgin olive oil - 1 teaspoon garlic powder - Salt and black pepper, to taste - Fresh cilantro or parsley, chopped, for garnish In this chicken pasta salad, I focus on healthy ingredients. Whole wheat pasta gives you fiber. It helps keep you full. The cooked chicken adds protein, which is great for your muscles. Avocado gives you healthy fats and makes the salad creamy. I love using fresh veggies like cherry tomatoes and cucumber. They add color and crunch. The Greek yogurt in the dressing is a healthy swap for mayo. It keeps it light but still creamy. Lime juice brightens the flavors. Olive oil adds richness. Garlic powder gives it a tasty kick. You can adjust the salt and pepper to your liking. Fresh herbs like cilantro or parsley finish it off. They add a burst of freshness. If you want to make this salad, use the full recipe. It shows you how to combine all these tasty ingredients into one bowl of goodness! To cook whole wheat pasta, bring a pot of salted water to a boil. Add 2 cups of whole wheat pasta, like fusilli or rotini. Cook until al dente, usually about 8 to 10 minutes. Check the package for exact times. Once done, drain the pasta and rinse it under cold water. This step cools it down quickly and stops the cooking. Set it aside in a bowl. Next, gather your salad base. In a large mixing bowl, combine 1 cup of shredded chicken, 1 diced avocado, 1 cup of halved cherry tomatoes, 1/2 diced cucumber, and 1/4 finely chopped red onion. It’s important to mix gently. If you mash the avocado, it will not look good. You want to keep those lovely green chunks. Now, let’s make the dressing. In a small bowl, whisk together 1/4 cup of plain Greek yogurt, 2 tablespoons of fresh lime juice, 1 tablespoon of extra virgin olive oil, and 1 teaspoon of garlic powder. Add salt and black pepper to taste. Blend until you have a smooth and creamy sauce. If it feels too thick, add a little more lime juice. Pour the yogurt dressing over the chicken and vegetable mix. Use a spatula to toss gently. You want everything to be coated but not smashed. After mixing, add the cooled pasta. Toss again until well combined. Cover the salad with plastic wrap or put it in an airtight container. Chill it in the fridge for about 30 minutes. This helps the flavors blend nicely. When you are ready to serve, remove the salad from the fridge. Present it in a clear glass bowl to show off the colors. You can also portion it into individual bowls. For a fresh touch, add lime wedges on the side. Garnish with chopped cilantro or parsley to enhance the flavor. Enjoy your tasty and healthy chicken pasta salad with avocado! You can find the full recipe [here](insert-link). - Overcooking the pasta: Always cook your pasta until it is al dente. This keeps it firm and helps avoid mushiness. If you cook it too long, it becomes soggy in the salad. - Mashing the avocado while mixing: When you add the avocado, be gentle. Use a spatula to fold it in with the other ingredients. If you mash it, you lose that creamy texture and fresh taste. - Suggestions for seasoning adjustments: If you like more flavor, add extra lime juice or a pinch of salt. Taste as you go to find your perfect balance. - Adding fresh herbs for extra freshness: Fresh cilantro or parsley brightens the dish. Chop it finely and sprinkle it over the salad just before serving. - Best practices for prepping ahead of time: You can cook the pasta and chicken a day before. Just store them in separate airtight containers. This makes the salad quick to finish. - Storage tips for freshness: Keep the salad in the fridge if you make it ahead. A sealed container helps it stay fresh for about two days. If possible, add the avocado right before serving to keep it green and tasty. {{image_4}} You can switch up the protein in your salad. Grilled shrimp adds a sweet, smoky flavor. It cooks fast and pairs well with avocado. Tofu is a great choice for a plant-based option. Just marinate it in lime juice and grill or sauté it until golden. Canned chickpeas are also easy to add. They are packed with protein and fiber. Just rinse and toss them in for a vegetarian boost. Seasonal vegetables can make your salad shine. Try fresh bell peppers for crunch and color. Zucchini or asparagus can add a nice twist, too. If you want more crunch, consider adding radishes or snap peas. These veggies enhance the texture and make your salad more exciting. Feel free to mix up your dressing. A tangy vinaigrette can give your salad a bright kick. Ranch dressing also works well if you prefer something creamier. To customize the yogurt dressing, try adding herbs like dill or basil. You can also mix in spices like cumin or paprika for extra flavor. This way, your salad stays fresh and fun every time you make it. For the complete recipe, check out the [Full Recipe]. To keep your chicken pasta salad fresh, store it in the fridge. Use airtight containers to lock in moisture and flavor. I recommend glass or BPA-free plastic containers. They help prevent spills and keep your salad crisp. In the fridge, this salad lasts about three days. After that, its taste and texture may change. Watch for signs of spoilage. If you see brown avocado or a sour smell, it’s best to toss it. You can freeze chicken pasta salad, but it may change texture. The pasta and veggies can become mushy when thawed. If you decide to freeze it, pack it tightly in an airtight container or freezer bag. When you're ready to eat, thaw it in the fridge overnight before serving. Yes, you can use regular pasta. Whole wheat pasta has more fiber. Fiber helps you feel full longer. It also aids digestion. Regular pasta is lower in fiber. If you want a lighter dish, use regular pasta. Just keep in mind its health benefits. I recommend cutting the avocado into bite-sized pieces. This size gives the best flavor and texture. Too small, and it may mash into the salad. Too big, and it becomes hard to eat. Aim for about one-inch cubes. This way, you enjoy every bite. To make it gluten-free, switch to gluten-free pasta. There are many types available. Look for rice, corn, or quinoa pasta. They work well in this salad. You can also skip the pasta and add more veggies, like bell peppers or zucchini. This keeps it fresh and delicious. Yes, cheese adds great flavor! Feta or mozzarella works well. Use about half a cup if you like cheese. Crumbled feta gives a tangy taste, while mozzarella adds creaminess. Just make sure to mix it in gently so you don’t crush the avocado. This salad is healthy and filling. A serving has about 350 calories. It has around 30 grams of protein from chicken and yogurt. Healthy fats come from avocado and olive oil. You will also get fiber from whole wheat pasta and veggies. This makes it a balanced meal. For the full recipe, check out the detailed steps above. This blog post provides a simple and tasty recipe for chicken pasta salad. We covered each ingredient, step, and tip to ensure your dish is perfect. You now have the knowledge to make it your own. Remember to experiment with veggies and dressings. This allows for unique flavors each time. Trust your taste buds, and enjoy every bite. Happy cooking!

Healthy Chicken Pasta Salad with Avocado Boost

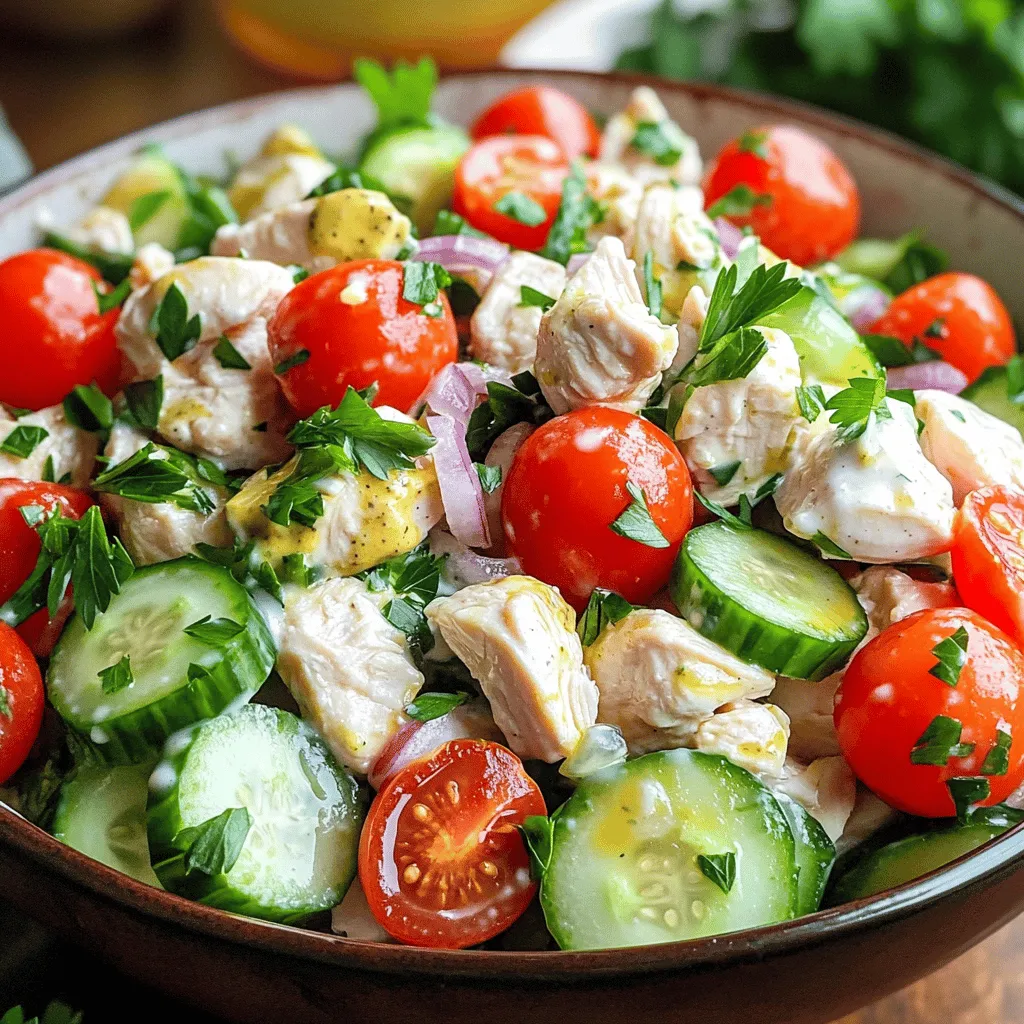
Looking for a tasty and healthy meal? You’ll love this Healthy Chicken Pasta Salad with Avocado! It’s packed with lean

To make a Lychee Rose Mojito, you need some simple ingredients. Here’s what you need: - 1 cup fresh lychee, peeled and pitted - 1/2 cup fresh mint leaves (plus extra for garnish) - 2 tablespoons rose syrup - 2 tablespoons freshly squeezed lime juice - 1 tablespoon granulated sugar (adjust to taste) - Sparkling water (to top off) - Ice cubes - Whole lychee and mint sprigs for garnish Each ingredient plays a key role in this drink. Fresh lychee adds sweetness and a unique flavor. Mint gives a fresh aroma and taste. Rose syrup adds floral notes that pair well with the other flavors. Lime juice adds a bright, tangy kick. Sugar balances the drink, while sparkling water gives it a nice fizz. Ice cubes keep your drink cool and refreshing. Finally, the garnish makes your mojito look pretty and inviting. For the full recipe, check out the instructions on how to put these ingredients together to create your delicious summer drink! Making a Lychee Rose Mojito is simple and fun! You will need fresh lychee, mint, and lime juice. Keep your ingredients ready. This drink is great for hot days. It feels light and refreshing. 1. Muddle the Base: In a sturdy glass, add 1 cup of fresh lychee, 1/2 cup of mint leaves, and 1 tablespoon of granulated sugar. Use a muddler or a spoon. Gently mash the lychee. You want it soft and juicy. The mint should smell nice and fresh. 2. Add Flavor: Pour in 2 tablespoons of rose syrup and 2 tablespoons of lime juice. Lightly muddle again. This helps the mint mix well with the other flavors. 3. Prepare the Glasses: Take two serving glasses. Fill each with ice cubes halfway. This keeps your drink cold and refreshing. 4. Build Your Drink: Spoon the lychee mix into the ice-filled glasses. Divide it evenly. 5. Finish with Sparkling Water: Carefully top off each glass with sparkling water. Stir gently with a spoon. Be careful not to lose the bubbles! 6. Taste and Adjust: Take a sip of your drink. If it needs more sweetness, add a bit more sugar. For more tartness, add a splash of lime juice. Stir gently to mix. 7. Garnish: To make your drink look beautiful, add a mint sprig on top. Place a whole lychee on the rim of each glass. This adds a nice touch. Consider taking photos at each step. Show the fresh ingredients, the muddling process, and the final drink. A video can also help others see how to make it. These visuals make it easier to follow the recipe. Check out the [Full Recipe] for more details! To make the best Lychee Rose Mojito, start with ripe lychees. They should smell sweet and fragrant. If you use canned lychees, pick the ones in light syrup. Fresh mint is essential too. Gently clap the mint leaves before adding them. This step helps release their oils. Make sure to muddle gently. You want to mix flavors, not mash everything into bits. Adjust the sweetness according to your taste. More sugar will make it sweeter, while extra lime juice adds a nice zing. One common mistake is over-muddling the mint. This can make your drink bitter. Instead, muddle just enough to release the mint’s scent. Another mistake is not tasting the drink. Always taste and tweak the flavors before serving. Also, don’t skip the sparkling water. It adds a refreshing fizz. Lastly, avoid using too much ice. Too much ice can dilute your drink and ruin the taste. A beautiful drink makes it even more enjoyable. Use tall glasses to show off the colors. Garnish with a sprig of mint and a whole lychee on the rim. You can also add a slice of lime for color. For an extra touch, consider using decorative straws. This makes it fun and fancy. Remember, the look of your drink can enhance the experience. For the full recipe, check out the details above. {{image_4}} You can change the flavor of your Lychee Rose Mojito easily. Try adding different fruits. For a twist, use mango or passion fruit. You can also swap the rose syrup for elderflower syrup. This gives your drink a lovely floral note. Another option is to add a splash of coconut milk. It creates a creamy texture that is very refreshing. Want a fun drink without alcohol? You can make a mocktail version. Just skip any alcohol and add more sparkling water. You might also add a splash of soda for extra fizz. This drink still tastes great and is perfect for all ages. The flavors of lychee and mint shine through just as well. You can adapt this drink for any season. In summer, use fresh berries like strawberries or blueberries. They add a burst of color and flavor. In fall, try adding a hint of cinnamon. It pairs well with the sweetness of lychee. You can also use spiced syrup for a cozy twist. Each season brings its own unique taste to the drink. Enjoy exploring these different adaptations! To keep your lychee rose mojito fresh, store ingredients properly. For fresh lychee, keep it in the fridge. Use it within a few days for the best taste. Place mint leaves in a glass of water. Cover them loosely with a plastic bag. This keeps them fresh longer. Rose syrup can stay in a cool, dark place. Make sure the lid is tight. If you have extra mojito, pour it into a sealed container. Store it in the fridge, but drink it within a day. The mint may lose its flavor and color over time. If you want to serve it later, add fresh mint and more sparkling water before serving. This gives it a fresh taste and look. - Fresh lychee: 3-5 days in the fridge. - Mint leaves: 3-7 days in water. - Rose syrup: Up to a year if sealed. - Lime juice: 1 week if fresh; longer if bottled. By knowing how to store these ingredients, you can always enjoy a refreshing lychee rose mojito. For the full recipe, check the earlier section! The Lychee Rose Mojito blends cultures and flavors. Mojitos come from Cuba and are refreshing. Lychee is native to China and has a sweet taste. The rose flavor adds a floral touch. This drink became popular in many places. It combines the classic mojito with unique ingredients. You can prepare the mixture ahead of time. Just muddle the lychee, mint, and sugar. Add the rose syrup and lime juice. Store this mix in the fridge. When you're ready, add ice and top with sparkling water. This keeps it fresh and fizzy. If you can't find fresh lychee, try canned lychee. Drain the syrup and rinse them. You can also use frozen lychee. Let them thaw before mashing. Other fruits like peaches or pears can work too. They bring a similar sweetness and texture. This blog post detailed how to make a refreshing Lychee Rose Mojito. We explored the key ingredients, step-by-step instructions, and tips to perfect your drink. I shared common mistakes and presentation ideas to elevate your mojito game. We also discussed variations and how to store your ingredients and leftover drinks. In conclusion, making this drink is simple and fun. Try it at your next gathering. Enjoy the unique flavors and impress your friends!

Lychee Rose Mojito Refreshing Summer Drink Recipe

Looking for a cool drink to beat the summer heat? Let me introduce you to the Lychee Rose Mojito! This

For a vibrant Thai beef salad, fresh ingredients are key. Here’s what you need: - 1 pound beef sirloin, thinly sliced across the grain - 2 cups mixed salad greens (arugula, spinach, and crisp lettuce) - 1 cucumber, sliced into thin rounds - 1 red bell pepper, cut into thin strips - 1 medium carrot, julienned into matchsticks - 1/4 cup fresh cilantro leaves, roughly chopped - 1/4 cup fresh mint leaves, roughly chopped These fresh components give your salad bright colors and crisp textures. The greens add a nice base, while the veggies bring crunch and sweetness. The spices and condiments bring the bold flavors that Thai food is famous for. You will need: - 2 tablespoons fish sauce - 1 tablespoon freshly squeezed lime juice - 1 tablespoon palm sugar (or brown sugar) - 1 clove garlic, finely minced - 1 teaspoon chili flakes (adjust according to your spice preference) These ingredients create the perfect balance of salty, sour, sweet, and spicy. They also help tenderize the beef while adding depth to your salad. Garnishes can elevate the dish and add extra flavor. Consider these options: - 1 tablespoon roasted peanuts, coarsely crushed (for garnish) Adding crushed peanuts gives a delightful crunch and a nutty taste. You can also sprinkle extra herbs on top for fresh aroma and look. This recipe is about creating a fresh and flavorful experience. For the full recipe, check the details above to make this dish shine! To start, gather your ingredients. In a medium bowl, whisk together: - 2 tablespoons fish sauce - 1 tablespoon lime juice - 1 tablespoon palm sugar - 1 clove garlic, minced - 1 teaspoon chili flakes Mix until the sugar dissolves. This marinade gives the beef a zesty flavor that sings with every bite. Next, add 1 pound of thinly sliced beef sirloin to the marinade. Use your hands or a fork to coat each piece well. Let it sit for at least 15 minutes at room temperature. For a stronger flavor, you can refrigerate it for up to an hour. This step makes the beef tender and tasty. While the beef marinates, prepare the salad. In a large bowl, combine: - 2 cups mixed salad greens - 1 cucumber, sliced - 1 red bell pepper, sliced - 1 medium carrot, julienned Gently toss the vegetables to mix. Set this aside. After marinating, grill or sauté the beef for 2-3 minutes per side, just until cooked. Slice the beef thinly and add it to the salad. Top with fresh cilantro, mint, and crushed peanuts. Serve this fresh and vibrant dish right away! For the complete recipe, check out the [Full Recipe]. To make your Thai beef salad truly shine, use fresh ingredients. The fish sauce adds umami. Lime juice gives it a zesty kick. Always taste as you go. Adjust spice and sweetness to your liking. Fresh herbs like cilantro and mint are key. They elevate the dish's flavor. Choose good-quality beef, like sirloin. This cut is tender and flavorful. Grilling is the best way to cook the beef. It gives a nice char and flavor. If you don’t have a grill, a skillet works too. Just heat it well before adding the beef. Cook it quickly, about 2-3 minutes per side. This keeps the beef juicy and tender. Remember, let it rest after cooking. This helps keep the juices inside. Serve your salad right after mixing. This keeps the greens crisp and fresh. You can add more texture with crushed peanuts. They add a nice crunch. Pair the salad with jasmine rice for a full meal. It’s also great with a cold drink. Try iced tea or coconut water. Enjoy the vibrant colors and flavors! Check out the Full Recipe for a detailed guide. {{image_4}} You can swap the beef for chicken, shrimp, or tofu. - Chicken: Use thinly sliced chicken breast for a lighter taste. - Shrimp: Grill or sauté shrimp for a quick, tasty option. - Tofu: Firm tofu works well for a vegetarian choice. These swaps keep the salad fresh while adding different flavors. For a vegetarian or vegan Thai beef salad, use plant-based proteins. - Use marinated tempeh or seitan to mimic the beef's texture. - Swap fish sauce with soy sauce or a vegan fish sauce. Include extra veggies like bell peppers, carrots, and avocado for more flavor. Mix in unique ingredients for a twist on the classic recipe. - Add mango or pineapple for sweetness. - Toss in sliced jalapeños for extra heat. - Use cashews instead of peanuts for a rich crunch. These creative additions can really elevate your salad experience. Check out the Full Recipe for more ideas! After enjoying your Thai Beef Salad, you might have some leftovers. Store them in an airtight container. Keep the salad and beef separate to maintain freshness. The beef can last in the fridge for about three days. The salad greens will wilt faster, so eat them within one day. When you are ready to enjoy the leftover beef, reheat it carefully. Use a skillet over low heat. Add a splash of water to keep it moist as it warms. Avoid using the microwave, as it can make the beef tough. Heat until just warm, then serve it again over fresh greens. You can freeze the marinated beef, but not the salad. Place the beef in a freezer-safe bag. Remove as much air as possible before sealing. It can stay frozen for up to three months. When ready to use, thaw it overnight in the fridge before cooking. Enjoy a fresh meal with the Zesty Thai Beef Salad Full Recipe! To make beef tender, choose the right cut. Sirloin works well for this dish. Slice the beef thinly against the grain. This helps break down muscle fibers. Marinating the beef also helps. Use a mix of fish sauce, lime juice, and sugar. Let it sit for at least 15 minutes. For more flavor, refrigerate for up to an hour. Cooking the beef quickly over high heat will keep it juicy. Avoid overcooking to maintain tenderness. Yes, you can use other vegetables in your salad. Feel free to get creative! Bell peppers, carrots, or cucumbers add crunch. You can also add radishes or snap peas for freshness. Leafy greens like spinach or arugula are great choices too. Mix and match based on your taste or what you have at home. The key is to keep the colors bright and textures varied. This makes the salad more fun and interesting. The dressing for Thai Beef Salad is key to its flavor. The mix of fish sauce, lime juice, and palm sugar creates a perfect balance. You can also add a bit of chili for heat. If you want something different, try a peanut dressing. A simple mix of peanut butter, lime, and soy sauce can work well. Always remember to adjust the flavors to your liking. The right dressing enhances the fresh taste of the salad. You can find the complete recipe in the Full Recipe. This blog post covered how to make a delicious Thai Beef Salad. We talked about fresh ingredients, spices, and optional garnishes. You learned step-by-step instructions for marinating the beef and assembling the salad. Helpful tips ensured you get the best flavor. We explored fun variations like vegetarian options. Lastly, you now have smart storage tips for leftovers. Enjoy creating your Thai Beef Salad, and don't hesitate to experiment!

Thai Beef Salad Fresh and Flavorful Recipe Guide

Are you ready to enjoy a fresh and flavorful Thai Beef Salad? This vibrant dish combines juicy beef with crisp

- 4 cups mixed baby greens (arugula, spinach, watercress) - 1 cup fresh strawberries, hulled and thinly sliced - 1 ball of creamy burrata cheese, cut into large, luscious pieces - 6 slices of prosciutto, torn into bite-sized, rustic pieces - 1/4 cup roasted pistachios, roughly chopped for added crunch The main ingredients create a bright and tasty dish. You mix the greens with juicy strawberries for a fresh base. The creamy burrata adds a rich and smooth texture. Prosciutto gives a salty kick that balances well with the sweet strawberries. The chopped pistachios add a nice crunch, making every bite exciting. - 2 tablespoons balsamic glaze, for a sweet finish - 2 tablespoons extra virgin olive oil, to enrich the flavors - Sea salt and freshly cracked black pepper, to taste The dressing brings all the flavors together. Balsamic glaze adds sweetness, while olive oil makes the salad rich. A pinch of sea salt and cracked black pepper can brighten each bite. You can adjust these to fit your taste. - Fresh basil leaves, for a fragrant garnish - Additional nuts or seeds Garnishes can take your salad to the next level. Fresh basil adds a lovely aroma and a pop of color. You can also sprinkle on more nuts or seeds for extra crunch. These touches make your dish not just tasty but also pretty to look at. For the full recipe, check out the complete ingredients and instructions to make this delightful salad. To start, gather your mixed baby greens and strawberries. In a large bowl, combine the greens with the sliced strawberries. Toss them gently to mix. This ensures every bite has a burst of flavor. Next, drizzle the olive oil over the salad. Add a pinch of sea salt and a sprinkle of black pepper. Toss the salad lightly to coat everything evenly. This step adds a nice touch and enhances the taste. Now it's time to plate your salad. On a large plate, artfully arrange the greens and strawberries. Create a nest in the center for the burrata pieces. Scatter the torn prosciutto over the salad for flavor in every bite. Place the creamy burrata on top, letting it shine. Finish by drizzling balsamic glaze over the salad. This sweet touch ties all the flavors together. Finally, sprinkle the chopped pistachios for crunch and add fresh basil for a pop of color and aroma. For the full recipe, check out the instructions above. Enjoy your fresh and tasty dish! To make your salad shine, get the salt and pepper right. I suggest using about 1/4 teaspoon of sea salt and a few cracks of black pepper for every serving. This will brighten the flavors without overpowering them. Next, pay attention to the balsamic glaze. If you like it sweeter, drizzle a bit more. If you want a tangy kick, use less. Balance is key, so taste as you go. When serving, make your salad look as good as it tastes. Start by arranging the greens and strawberries in a bowl. Use a large plate or bowl to let the colors pop. Place the burrata in the center, so it draws the eye. High-quality serveware makes a big difference. Use a beautiful plate to elevate your dish. A simple white plate can make the colors stand out even more. To save time, prep your ingredients ahead of time. Slice strawberries and tear prosciutto early in the day. Store them in separate containers. This way, you can assemble the salad quickly when you’re ready to eat. For quick assembly, keep everything within reach. Have your greens, strawberries, and burrata ready to go. This helps you build your salad in just a few minutes. For the full recipe, check out the Prosciutto Strawberry Burrata Salad details. {{image_4}} You can swap ingredients based on the season or your taste. For fruits, try using peaches or figs instead of strawberries. They add a sweet twist. You can also switch the cheese. Instead of burrata, use fresh mozzarella or creamy goat cheese. Both choices bring unique flavors to the salad. If you want a vegan version, simply omit the cheese. You can add a plant-based dressing for flavor. Make sure to check that all other ingredients are vegan-friendly. For gluten-free diets, this salad fits perfectly. Just ensure your balsamic glaze does not contain gluten. To make this salad heartier, think about adding protein. Grilled chicken or shrimp can boost the dish. They add a nice texture and flavor. If you prefer vegetarian options, consider chickpeas or lentils. They provide protein and complement the salad well. Explore the [Full Recipe] for all the details you need! To keep your Prosciutto Strawberry Burrata Salad fresh, use airtight containers. Glass or plastic containers work well. Make sure to separate the dressing from the salad. This prevents soggy greens. Keep the salad in the fridge. Aim for a temperature of 40°F (4°C) or lower. For the best taste, eat the salad within 2 days. After this, the greens may wilt. Check for signs of spoilage. If the strawberries look mushy or the cheese smells sour, it's time to toss them. Freshness matters for flavor and safety. This salad is best enjoyed cold. If you prefer it warm, gently heat the cheese. Use a microwave on low power for a few seconds. Be careful not to overheat. Enjoy it cold for a crisp, refreshing bite. When choosing prosciutto, look for prosciutto di Parma. It has a rich flavor and a melt-in-your-mouth texture. This type of prosciutto comes from specific regions in Italy. It is made from selected pigs and is aged for at least 12 months. You can also try prosciutto di San Daniele for a slightly sweeter taste. Always buy from a trusted source to ensure quality. Yes, you can prep parts of the salad ahead of time. Wash and dry the baby greens and strawberries a few hours before serving. Keep them in separate containers to stay fresh. You can also tear the prosciutto and chop the pistachios early. Just wait to add the burrata and dressing until right before serving. This keeps everything fresh and tasty. Pair this salad with a light white wine, like Sauvignon Blanc. The wine’s crispness matches the salad's flavors. A fresh sparkling water with lemon also works well. For sides, consider serving crusty bread or a light soup. These options enhance the meal without overpowering the salad. Enjoy the full recipe to create this delightful dish! This blog post covered how to make a delicious prosciutto strawberry burrata salad. We explored each ingredient, from mixed greens to roasted pistachios. You learned how to assemble and dress the salad perfectly. I shared tips for flavor balance and ways to adjust the recipe. Finally, we discussed storage and variations to suit your taste. Enjoy trying this refreshing salad. It’s easy, tasty, and perfect for any meal!

Prosciutto Strawberry Burrata Salad Fresh and Tasty Dish

Looking for a fresh and tasty dish that wows every time? Try my Prosciutto Strawberry Burrata Salad! This delightful mix

- 1 cup graham cracker crumbs - 1/4 cup unsalted butter, melted - 2 cups cream cheese, softened - 1/2 cup granulated sugar - 1/2 cup sour cream - 1 teaspoon vanilla extract - Zest of 1 lemon - 2 tablespoons fresh lemon juice - 2 large eggs, at room temperature - 1 cup fresh blueberries, rinsed and drained - 2 tablespoons blueberry jam (for topping) - Fresh mint leaves (for garnish) When I create mini lemon blueberry cheesecakes, I love to gather fresh ingredients. The quality of your ingredients matters. Start with graham cracker crumbs for the crust. They give a nice crunch. The melted butter helps bind them together. Next, I use cream cheese. It should be soft to mix well. Pair it with sugar and sour cream for creaminess. I always add vanilla extract for depth. The zest and juice of a lemon add brightness. Make sure your eggs are at room temperature. This helps them blend smoothly. Fresh blueberries add a burst of flavor. I also like to top each cheesecake with blueberry jam. It makes them look nice too. Don’t forget fresh mint leaves for garnish. They add a lovely touch and aroma. - Muffin tin - Paper liners - Mixing bowls - Electric mixer - Spatula For making these cheesecakes, you need a few tools. A muffin tin is a must for mini sizes. Paper liners help with easy removal. Mixing bowls are handy for combining ingredients. An electric mixer makes blending easy and quick. A spatula helps fold in the blueberries gently. These tools make the process smooth and fun. - Soften cream cheese properly - Measure ingredients accurately Before you start, ensure your cream cheese is soft. Leaving it out for about an hour works well. Measuring ingredients accurately is key. It helps get the right texture and flavor. With everything ready, you're set to create these delightful treats! - Set temperature to 325°F (160°C) - Prepare muffin tin with liners Start by preheating your oven to 325°F (160°C). This will ensure your cheesecakes bake evenly. While the oven heats, grab a muffin tin and line it with paper liners. This makes cleanup easy and helps the cheesecakes pop out smoothly. - Mix graham cracker crumbs with melted butter - Press mixture into muffin liners Next, you’ll want to prepare the crust. In a medium bowl, mix 1 cup of graham cracker crumbs with 1/4 cup of melted butter. Stir until the crumbs look like wet sand. Now, take about a tablespoon of this mixture and press it firmly into each muffin liner. This forms a sturdy base for your mini cheesecakes. - Beat cream cheese until smooth - Incorporate sugar, sour cream, and flavorings Now it’s time for the cheesecake filling. In a large bowl, beat 2 cups of softened cream cheese using an electric mixer. Mix until it’s smooth and creamy. This should take about 2-3 minutes. Next, add in 1/2 cup of granulated sugar, 1/2 cup of sour cream, 1 teaspoon of vanilla extract, the zest of 1 lemon, and 2 tablespoons of fresh lemon juice. Beat until everything is blended well. - Mix in eggs gently - Fold in blueberries carefully Add 2 large eggs, one at a time, to your cheesecake mixture. Mix on low speed until just combined. It’s key to not overmix here, as this keeps your filling light. After that, gently fold in 1 cup of fresh blueberries. Use a spatula to make sure they are evenly mixed without breaking them. - Fill the muffin tin with batter - Bake for 20-25 minutes Now, spoon the cheesecake batter evenly over each crust. Fill each liner about three-quarters full. Place the muffin tin in the preheated oven and bake for 20-25 minutes. The edges will look set, but the center should still jiggle slightly. This is perfect for a creamy texture. - Allow to cool at room temperature - Refrigerate for at least 2 hours After baking, take your mini cheesecakes out of the oven and let them cool at room temperature for about 10 minutes. Then, refrigerate them for at least 2 hours. This helps them set properly and makes them easier to serve. Once they’re chilled, you can add a dollop of blueberry jam on top for an extra sweet touch. Enjoy your delightful mini lemon blueberry cheesecakes! For the complete instructions, check the Full Recipe. To make your mini lemon blueberry cheesecakes just right, avoid overmixing the eggs. Mix them in gently, one at a time. This keeps the cheesecake light and fluffy. Next, control the oven temperature. Preheating to 325°F ensures even baking. A steady heat helps the cheesecakes rise without cracking. Presentation matters! Use a decorative platter to showcase your mini cheesecakes. It adds charm to any event. For a pop of color, add fresh blueberries around each cheesecake. They look stunning and taste great too. A sprinkle of powdered sugar can also make them look fancy. To boost flavor, consider adding lemon zest. It gives a bright and fresh taste. You might also want to explore different jams or fruits for topping. Raspberry or strawberry jam can create a fun twist. These simple changes can make your mini cheesecakes unique and delightful. For the full recipe, check out the details above. {{image_4}} You can easily change the taste of mini lemon blueberry cheesecakes. Try making strawberry lemon cheesecakes. Just swap blueberries with fresh strawberries. The sweet and tart mix works well. Another option is to create a raspberry cheesecake swirl. Simply add pureed raspberries into the batter. This adds a fun swirl effect and a burst of flavor. Both variations keep the cheesecake's creamy texture while adding new tastes. If you want a twist, consider using different crusts. An Oreo crust adds a rich, chocolatey flavor. To make this, crush Oreo cookies and mix them with melted butter. Press the mixture into your muffin liners. For a gluten-free version, use an almond flour crust. Combine almond flour with melted butter and press it into the liners. Both options give a tasty base for your cheesecakes. You can swap some ingredients to fit your taste. For example, use Greek yogurt instead of sour cream. This change makes the cheesecake a bit healthier while keeping it creamy. You can also replace blueberries with other berries. Blackberries or raspberries work great. This lets you customize the flavors to your liking. For the full recipe, check out Mini Lemon Blueberry Cheesecakes. To keep your mini lemon blueberry cheesecakes fresh, refrigerate them in an airtight container. This helps them stay moist and delicious. They will stay good for up to five days. Ensure the lid seals tightly to prevent odors from other foods. If you want to save some for later, freeze the cheesecakes for up to three months. To do this, wrap each cheesecake in plastic wrap and place them in a freezer-safe bag. This way, they won’t get freezer burn and will taste just as good when you thaw them. When you’re ready to enjoy your frozen mini cheesecakes, thaw them in the refrigerator overnight. This keeps the texture smooth. Avoid using a microwave, as it can make them soggy. Once thawed, they are ready to serve. Enjoy them chilled for the best flavor! Yes, just ensure they are thawed and drained. Frozen blueberries work well in this recipe. They add a burst of flavor and keep the mini cheesecakes moist. Just be careful not to overmix them into the batter. They last about 5 days in the refrigerator. Store them in an airtight container to keep them fresh. If you wait too long, you may lose that creamy texture. Yes, they can be made up to 2 days in advance for best results. This is perfect for busy days or events. Just chill them well, and they will taste great when served. Serve chilled, garnished with fresh mint and blueberry jam. This adds a nice touch and makes them look fancy. The mint gives a pop of color and freshness. No, but they help with easy removal and cleanup. If you skip the liners, be sure to grease the muffin tin well. This will help prevent sticking and make serving easier. For the full recipe, check out the Mini Lemon Blueberry Cheesecakes section above! You now have all the steps and tips to make delicious mini lemon blueberry cheesecakes. From gathering the right ingredients to mastering your baking technique, every detail counts. Remember to refrigerate them for firm, tasty bites. Feel free to explore variations to suit your taste. Enjoy your baking journey and share these treats with friends and family. You’ll impress everyone with these delightful mini desserts!

Mini Lemon Blueberry Cheesecakes Perfect for Events

If you’re seeking the perfect crowd-pleaser for your next event, look no further! Mini Lemon Blueberry Cheesecakes are a delightful

Older posts
Newer posts
← Previous Page1 … Page15 Page16 Page17 … Page75 Next →

dsad

© 2025 lazychefmagic • Built with GeneratePress

Our Policies

  • Copyright Policy
  • Cookie Policy
  • GDPR Policy
  • Privacy Policy
  • Disclaimer
  • Terms Of Use

More Information

  • Home
  • About
  • Contact
  • Appetizers
  • Dessert
  • Dinner
  • Drinks
©2025, lazychefmagic About Back To Top