Skip to content
DisclaimerTerms Of UseGDPR PolicyCookie Policy

lazychefmagic

  • Home
  • Drinks
  • Appetizers
  • Dinner
  • Dessert
  • About
  • Contact
  • Privacy Policy
DisclaimerTerms Of UseGDPR PolicyCookie Policy

Amanda

To make Honey Sriracha Salmon Bowls, you need fresh and simple ingredients. Here’s what you will need: - 4 salmon fillets - 2 tablespoons honey - 2 tablespoons sriracha sauce - 1 tablespoon soy sauce - 1 tablespoon sesame oil - 2 cups cooked jasmine rice - 1 cup broccoli florets - 1 carrot, julienned - 1 cucumber, thinly sliced - 2 green onions, finely chopped - Sesame seeds, for garnish - Fresh cilantro, for garnish These ingredients come together to create a dish that is both tasty and bright. The salmon brings healthy fats, while the honey and sriracha add a sweet and spicy kick. The jasmine rice serves as a warm base that holds all the flavors together. Broccoli and carrots add crunch, and cucumber brings a refreshing coolness. Topping it with green onions, sesame seeds, and cilantro gives it a beautiful finish. Using these ingredients, you can whip up a meal that looks great and tastes even better. For the full recipe, check out the detailed instructions! - Preheat the oven to 400°F (200°C). - In a bowl, whisk together 2 tablespoons of honey, 2 tablespoons of sriracha sauce, 1 tablespoon of soy sauce, and 1 tablespoon of sesame oil. - Use a brush to coat 4 salmon fillets with this honey sriracha mixture. - Place the salmon on a lined baking sheet. - Bake the salmon for 12-15 minutes until it is fully cooked. - Steam 1 cup of broccoli florets for 5-7 minutes until they are bright green. - In four bowls, add 2 cups of cooked jasmine rice as the base. - Top the rice with the steamed broccoli, 1 julienned carrot, and 1 thinly sliced cucumber. - Once the salmon is done, place one fillet on each bowl. - Drizzle the reserved honey sriracha sauce over the salmon and veggies. - Finish with sesame seeds and 2 finely chopped green onions. - Add fresh cilantro for garnish. For the full recipe, check out the ingredient list above! To make the best honey sriracha glaze, balance the sweet and spicy flavors. Start with equal parts honey and sriracha. If you want more heat, add a bit more sriracha. If you prefer it sweeter, increase the honey. Always taste it before using. You can customize this glaze too. Try using maple syrup instead of honey for a different flavor. Agave nectar works well for a vegan option. You can also add garlic or ginger for extra depth. For side dishes, serve your Honey Sriracha Salmon Bowls with steamed vegetables or a fresh salad. A crisp cucumber salad or a simple coleslaw pairs nicely. When it comes to drinks, consider iced tea or sparkling water with lime. Both will refresh your palate. For presentation, use bright bowls to showcase the colorful salmon and veggies. Garnish with lime wedges and fresh herbs for a pop of color. A sprinkle of sesame seeds adds a lovely touch. For an extra kick, add crushed red pepper on top. Make your meal look as good as it tastes! Enjoy every bite of your Honey Sriracha Salmon Bowls. You can find the Full Recipe to guide you step-by-step. {{image_4}} You can swap the salmon for other proteins. Tofu is a great choice for plant-based diets. It absorbs flavors well and gives a nice texture. Chicken is another option; just grill or bake it to keep it juicy. Shrimp also works well. Cook it quickly with the honey sriracha sauce for a sweet and spicy kick. If you want to change up the base, there are many choices. Quinoa is a healthy option packed with protein. Brown rice adds a nutty taste and is full of fiber. For a low-carb choice, try cauliflower rice. It’s light and soaks up the sauce nicely. To make a vegan bowl, keep the honey sriracha sauce but use maple syrup instead of honey. This keeps the sweetness while making it plant-based. You can add more veggies, like bell peppers or snap peas, for extra crunch and color. Use tofu or tempeh for protein, and your bowl will be both filling and flavorful. For the full recipe, check out the Honey Sriracha Salmon Bowls . To keep your Honey Sriracha Salmon Bowls fresh, use airtight containers. Glass or plastic containers work well. Make sure to store the salmon, rice, and veggies separately to maintain texture. Allow the food to cool before sealing it. This step helps prevent moisture buildup, which can make your meal soggy. When reheating, keep the salmon and veggies juicy. Use a microwave-safe dish and cover it with a damp paper towel. Heat on medium power for about 1-2 minutes. Alternatively, you can reheat in the oven at 350°F (175°C) for about 10 minutes. This method keeps the salmon flaky and the veggies crisp. Yes, you can freeze Honey Sriracha Salmon Bowls. However, I suggest freezing only the salmon and rice. Store them in freezer bags, removing as much air as possible. The veggies may lose texture after freezing. To enjoy later, thaw in the fridge overnight. Reheat as directed for the best taste. For a vegan option, you can use maple syrup or agave nectar. Both alternatives keep the sweet touch while being plant-based. You might also try brown rice syrup or date syrup. Each option brings a unique flavor to the dish. Just keep the same amount as the honey in the recipe. To lower the spice, use less sriracha sauce. You can start by adding just one teaspoon. Another option is to mix in a bit more honey. This will sweeten the sauce and balance the heat. Adding a splash of lime juice can also help tone down the spice. Taste as you go to find the right balance for you. Yes, you can meal prep these bowls! Cook the salmon and veggies ahead of time. Store them in airtight containers in the fridge. To keep the rice fresh, cook it just before serving. Reheat the salmon and veggies in the oven or microwave. This way, you enjoy a quick, tasty meal during the week. You now have a simple and tasty way to make Honey Sriracha Salmon Bowls. We covered the ingredients, step-by-step cooking, and tips for the perfect glaze. You also learned about variations and storage options. Whether you want to switch proteins or try a vegan twist, you have options. This dish is great for meal prep too. Enjoy making it your own and sharing with family and friends. Happy cooking!

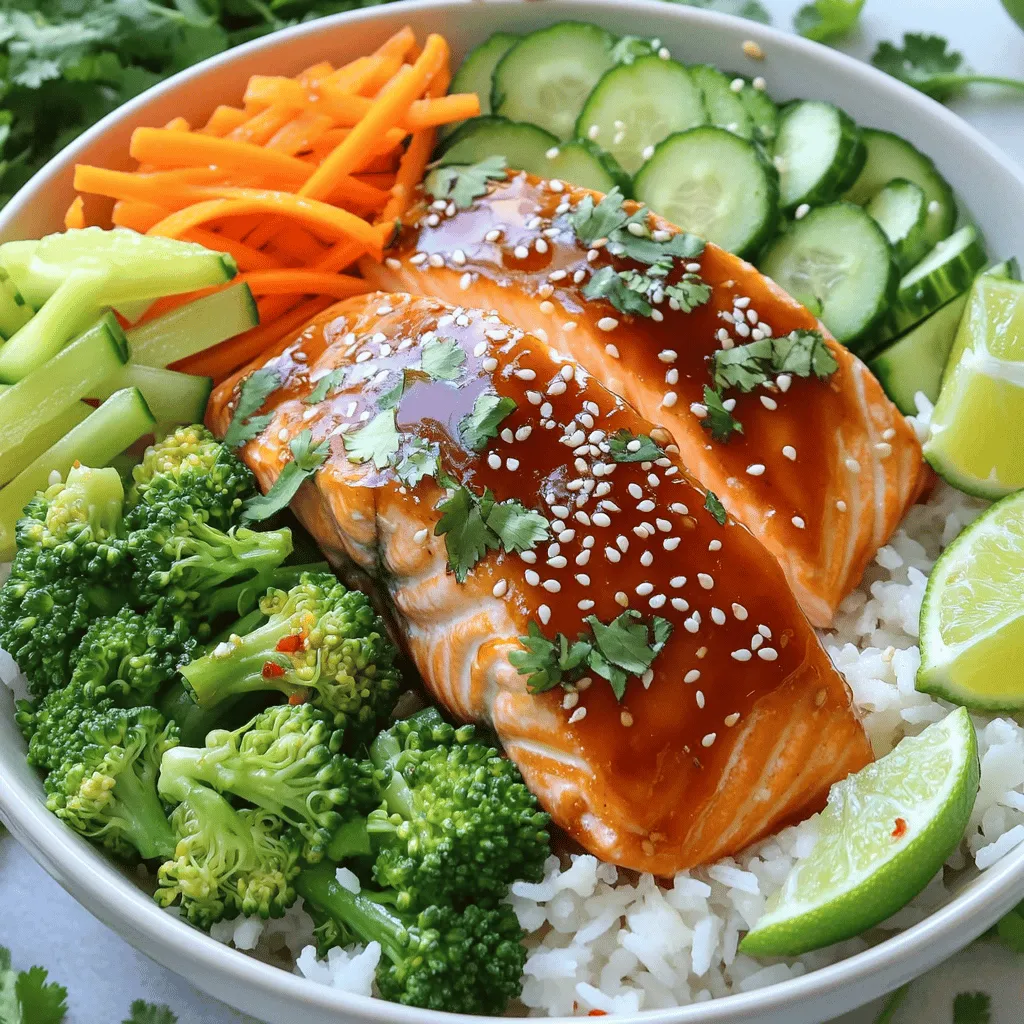
Honey Sriracha Salmon Bowls Easy Weeknight Meal

Craving a quick, tasty dinner? Honey Sriracha Salmon Bowls are just what you need. This dish blends sweet and spicy

To create a vibrant Mediterranean brunch board, you need a mix of flavors and colors. Here are the key ingredients: - 1 cup creamy hummus (store-bought or homemade) - 1 cup refreshing tzatziki sauce - 1 cup sweet cherry tomatoes, halved - 1 crisp cucumber, thinly sliced - 1 juicy red bell pepper, sliced into strips - 1 cup mixed olives (both green and black varieties) - 1 cup rich feta cheese, crumbled - 1 cup sliced salami or turkey (for a delightful vegetarian option, use roasted vegetables) - 1 cup soft pita bread, cut into triangles - Fresh herbs for a beautiful garnish (such as parsley or mint) These ingredients create a balance of creamy, crunchy, and savory tastes. The bright colors also make your board visually appealing. You can enhance your brunch board with more flavors. Here are some tasty options: - Roasted red peppers for sweetness - Artichoke hearts for a tangy kick - Marinated feta for extra zest - Sliced avocado for creaminess - Nuts like almonds or pistachios for crunch Adding these items can make your brunch board even more exciting. They provide different textures and tastes, making it a feast for the senses. To serve your Mediterranean brunch board, you might want to add a few items: - Small bowls for dips and olives - Toothpicks for easy serving - A cutting board or large platter for a rustic look - Fresh fruits like grapes or figs for a sweet touch These serving items not only help with organization but also add charm to your presentation. It’s all about making the experience enjoyable for everyone at the table. For the full recipe, refer to the main section above. Choose a large wooden board or a nice platter. This will hold all your goodies. Make sure it has enough space for dips, veggies, and more. A clean surface helps food look great. I love using a board that shows off the colors of the food. In the center, scoop out hummus and tzatziki. These dips add creaminess and flavor. You can create small wells in each dip to make them extra pretty. This way, guests can enjoy dipping right away. Now, it’s time to add those fresh veggies. Arrange halved cherry tomatoes, cucumber slices, and red bell pepper strips around your dips. This makes the board colorful and fun. Next, scatter crumbled feta cheese around the veggies for a creamy touch. Feta brings a tangy flavor that pairs well with the dips. If you like meat, roll slices of salami or turkey into spirals. Place these on one side of the board. For a veggie version, neatly arrange roasted vegetables like eggplant or zucchini. Both options add delicious flavors and textures. Fill any empty spaces with soft pita triangles. They are perfect for dipping! Finally, top it all off with fresh herbs, like parsley or mint. This adds a burst of freshness and makes the board look amazing. Present it right away, so everyone can enjoy this fun spread. For full details on how to make each component, refer to the Full Recipe. Use fresh, seasonal ingredients for the best taste. Visit your local farmers' market. Pick ripe tomatoes, crisp cucumbers, and fresh herbs. The flavors will shine on your board. For instance, in summer, include juicy heirloom tomatoes. In fall, add roasted squash. Seasonal produce enhances taste and helps support local farms. Visual appeal is key! Arrange your ingredients in clusters. Group dips near fresh veggies for easy access. Use a large board or platter to showcase colors. Place colorful items, like red bell peppers, next to green olives. This contrast makes the board pop. Consider adding small bowls for dips to keep things neat. Sprinkle fresh herbs over the whole board for a lovely finish. Save time by prepping ahead. Make hummus and tzatziki a day early. Cut veggies the night before. Store them in airtight containers to keep them fresh. On serving day, just arrange everything on your board. This not only saves time but also makes your brunch stress-free. Enjoy the fun with your guests instead of being stuck in the kitchen! For a complete guide, check out the Full Recipe for detailed steps and ingredient lists. {{image_4}} Hummus is a star of the Mediterranean brunch board. You can change its flavor easily. Try adding roasted garlic for a rich taste. For a spicy kick, mix in some harissa. If you like it sweet, blend in roasted red peppers or sun-dried tomatoes. Each flavor can bring a new twist to your spread. You can also make a classic beet hummus. Its vibrant color will impress your guests. You might have guests with different diets. That's okay! You can swap ingredients to fit their needs. For a vegan option, use roasted veggies instead of salami. If someone is gluten-free, serve the dips with veggies or gluten-free crackers. You can also use almond or cashew cheese instead of feta. These swaps keep everyone happy and included at your brunch. Want to add a fun twist? Try international flavors! Use a spicy salsa instead of tzatziki for a Mexican flair. Add some marinated artichokes or sun-dried tomatoes for an Italian vibe. For a Middle Eastern touch, include baba ganoush or tabbouleh. Each twist will make your brunch board unique and exciting. Your guests will enjoy exploring these different tastes together. For the full recipe, check out the Mediterranean Brunch Board Delight. To keep your Mediterranean brunch board fresh, store leftovers in an airtight container. Place dips like hummus and tzatziki in separate containers to maintain their taste and texture. Wrap any leftover pita bread in plastic wrap to prevent it from drying out. For chopped veggies and cheese, use a sealed container to keep them crisp. When storing ingredients, keep them in the fridge. Store vegetables like cucumbers and bell peppers whole until you're ready to eat them. This helps them stay crunchy. For herbs, you can place them in a glass of water and cover them with a plastic bag. This keeps them fresh longer. If you have leftover olives, keep them in their brine for maximum flavor. Reheat pita bread in the oven for a few minutes to restore its softness. If you have leftover hummus or tzatziki, use them as a spread for sandwiches or wraps. You can also mix leftover veggies into an omelet or a salad for a quick meal. These methods help you enjoy all the flavors without waste. For the full recipe, check the section above. You can serve a mix of dips, veggies, and proteins. Key items include: - 1 cup creamy hummus - 1 cup refreshing tzatziki sauce - 1 cup sweet cherry tomatoes, halved - 1 crisp cucumber, thinly sliced - 1 juicy red bell pepper, sliced - 1 cup mixed olives - 1 cup crumbled feta cheese - 1 cup sliced salami or turkey - 1 cup soft pita bread, cut into triangles Fresh herbs like parsley or mint can add beauty. Each item brings its own flavor, making the board exciting. You can prep your brunch board up to a day ahead. Keep the dips and fresh veggies in the fridge. Slice the veggies the night before. Just cover them with plastic wrap. Assemble the board right before serving for the best look and taste. Yes! You can easily make a vegetarian brunch board. Swap the salami or turkey for roasted vegetables. Eggplant, zucchini, or artichokes work great. This keeps the flavors rich while being meat-free. You can still use all the dips and fresh veggies for a colorful spread. For drinks, consider serving herbal teas or fresh juices. A light sparkling water adds a nice touch. If you want something stronger, try a fruity mimosa or a light wine. These drinks complement the bright flavors of the brunch board perfectly. A Mediterranean brunch board is fun and easy to make. You learned about key ingredients, tips for a great spread, and how to store leftovers. I shared various options to suit different tastes and diets. Remember to keep it colorful and fresh. Use seasonal ingredients for the best flavors. Enjoy trying different flavors of hummus to add a twist. A well-planned brunch board brings friends and family together. Simple steps can create a beautiful and tasty spread for any occasion. Your brunch will impress and delight all!

Mediterranean Brunch Board Flavorful and Fun Spread

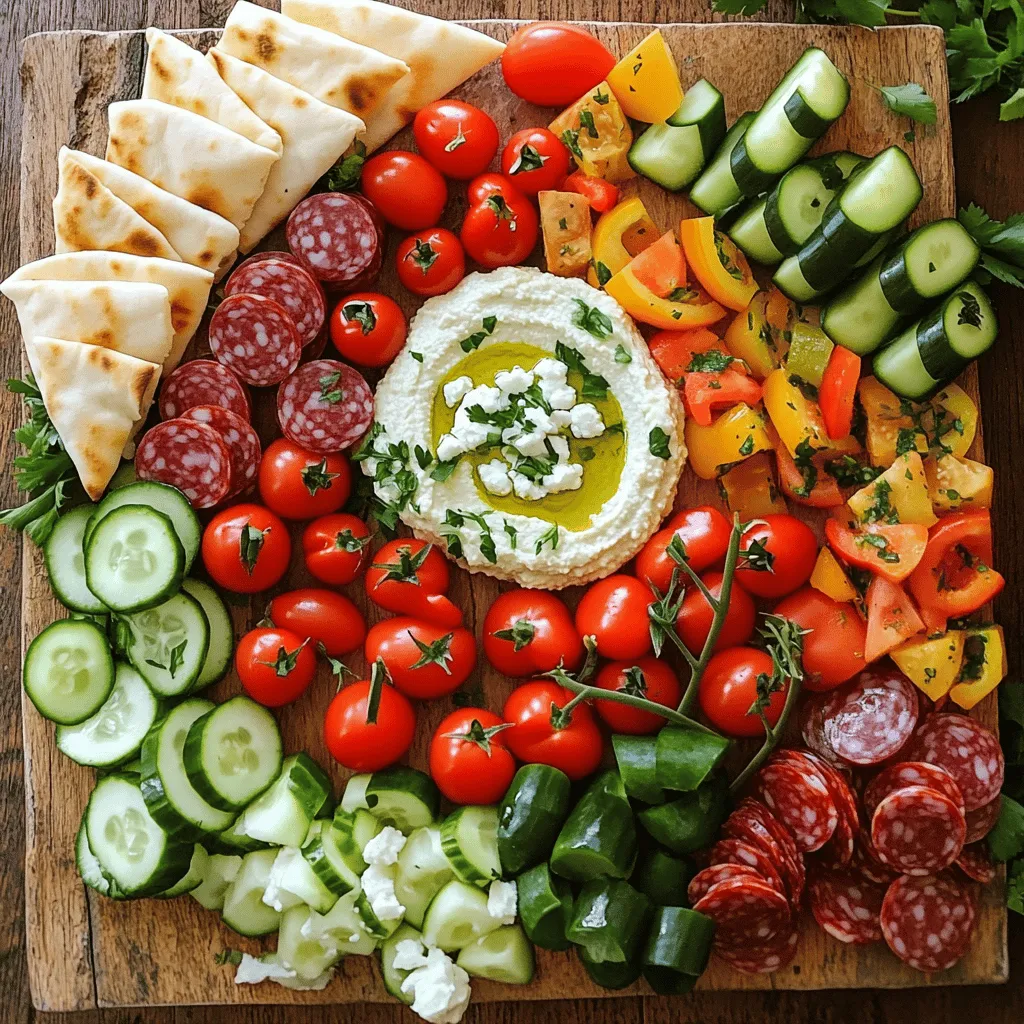
Get ready to elevate your brunch game with a Mediterranean Brunch Board that’s both tasty and fun! This vibrant spread

- 2 medium cucumbers, diced - 3 ripe tomatoes, diced - 1 small red onion, finely sliced - 1 bell pepper, diced - 1/4 cup fresh parsley leaves, chopped - 2 tablespoons lemon juice - 1 tablespoon olive oil - 1 teaspoon honey (optional) - Sea salt and black pepper to taste Using fresh produce makes a big difference. Fresh ingredients taste better and help your dish shine. They bring out the natural flavors in your salad. Fresh cucumbers add a crisp bite, while ripe tomatoes provide sweetness. Red onions give it a sharp kick. Fresh herbs like parsley not only add color but also a burst of flavor. When you mix all these fresh ingredients, you create a harmony of tastes. The quality of your salad depends on the freshness of its parts. Always choose ripe and bright ingredients for the best results. With fresh ingredients, you create a dish that feels alive and vibrant. For the full recipe, check out the details to make this easy cucumber tomato onion salad. Start by dicing the cucumbers into bite-sized pieces. This size helps them mix well with other veggies. Next, take your ripe tomatoes and also dice them. A mix of colors adds to the salad's look. Then, grab a bell pepper. Dice it too, making sure to keep the pieces small for a good crunch. Finally, slice your small red onion into thin rings. This will add a sharp flavor that balances the other ingredients. In a large mixing bowl, combine all your diced cucumbers, tomatoes, sliced onion, and diced bell pepper. Stir gently to mix everything evenly. This step is key for a balanced bite. Now, take your fresh parsley and chop it coarsely. Add it to the bowl. This herb gives the salad a fresh taste and bright color. In a separate small bowl, whisk together 2 tablespoons of lemon juice, 1 tablespoon of extra virgin olive oil, and 1 teaspoon of honey if you want a touch of sweetness. This dressing is key for flavor. Whisk until it blends well and becomes smooth. This process, called emulsification, ensures your dressing coats the veggies nicely. Drizzle the dressing over the vegetable mix and gently toss everything together. Season with sea salt and freshly cracked black pepper to taste. Let your salad sit for about 10 minutes. This resting time allows the flavors to mix and deepen. For the full recipe, check out the details above. Let your salad rest for about 10 minutes. This helps the flavors blend well. The lemon juice and olive oil will soak into the veggies. Adjust seasoning to your liking. Taste it and add more salt or pepper as needed. Serve your salad in a large, shallow bowl. This makes it inviting and easy to share. To make it look pretty, garnish with fresh parsley on top. You can also add lemon wedges around the bowl. This gives guests a chance to add more zest to their salad. Use a sharp knife when slicing. This makes cutting the veggies easier and safer. Aim for uniform cuts. This helps the flavors mix evenly in each bite. Cutting everything the same size makes the salad look nicer too. For the full recipe, check out the [Full Recipe]. {{image_4}} You can swap out some veggies in this salad. Try using zucchini or radishes for crunch. Fresh herbs like cilantro or basil can boost the flavor too. For a heartier salad, add proteins like chickpeas or grilled chicken. To give your salad a kick, add spices like cumin or smoked paprika. You might also try different dressings, like balsamic vinaigrette or yogurt dressing. For creaminess, mix in feta cheese or avocado. They add a rich texture that complements the fresh veggies. Add a Mediterranean twist by mixing in olives and feta cheese. This gives a salty flavor that pairs well with tomatoes. For a Southwestern flair, toss in corn and avocado. This adds sweetness and creaminess, making it a complete meal. To store your Easy Cucumber Tomato Onion Salad, place it in a sealed container. This helps keep it fresh. Make sure to eat it within 2 to 3 days. To keep the veggies crisp, avoid dressing it until you serve. The dressing can make the salad soggy if left too long. You can freeze this salad, but the texture may change. Freezing makes cucumbers watery and mushy. Instead, consider using jars for quick meal prep. Layer the ingredients, starting with the dressing at the bottom. This keeps the veggies fresh until you’re ready to eat. This salad stays fresh in the fridge for about 2 to 3 days. Watch for any signs of spoilage. If the veggies look slimy or have an off smell, it's time to toss them. Always trust your senses when it comes to food safety. You can store this salad in the fridge for up to three days. To keep it fresh longer, use an airtight container. This will help reduce moisture loss and keep the flavors intact. Always check for any signs of spoilage, like off smells or mushy veggies. Yes, you can make this salad ahead of time. This is great for meal prep. Just remember to add the dressing just before serving. Letting the salad rest for about ten minutes will improve its flavor. This resting time allows the veggies to soak up the dressing, making each bite taste even better. This salad pairs well with grilled chicken or fish. You can also serve it as a side with tacos or burgers. Consider adding some crusty bread for a complete meal. Other complementary dishes include quinoa or couscous salads. This variety will elevate your dining experience and impress your guests. For the full recipe, check out the earlier sections! Using fresh ingredients makes your salad tasty and healthy. We covered key ingredients, preparation steps, and tips for great flavor. Remember to let your salad rest for the best taste. You can try fun variations to mix it up. Store leftovers well to keep them fresh longer. With these pointers, you’ll enjoy making this salad again and again. Enjoy your delicious, fresh flavors!

Easy Cucumber Tomato Onion Salad Fresh Flavor Boost

Looking for a simple, fresh salad that bursts with flavor? You’ve come to the right place! This Easy Cucumber Tomato

To make creamy mango ice cream, you will need: - 3 ripe mangoes, peeled and diced into small pieces - 1 cup heavy cream, chilled - 1 cup coconut milk, full-fat for richer flavor - 3/4 cup sweetened condensed milk - 1 tablespoon fresh lime juice - 1 teaspoon pure vanilla extract - A small pinch of salt Using ripe mangoes is key for great flavor. If you can’t find fresh mangoes, you can use frozen ones. They work well too. For dairy-free ice cream, swap heavy cream and coconut milk for almond or oat milk. Sweetened condensed milk can be replaced with agave syrup or maple syrup for a healthier option. Lime juice adds a fresh twist. You can use lemon juice if needed. Mangoes are not just tasty; they are good for you too! They are packed with vitamins A and C. These vitamins help your skin stay healthy. Mangoes also have antioxidants that fight free radicals. Eating mango can improve your digestion thanks to the fiber they contain. They are low in calories, so they make a nice treat without the guilt. Enjoying creamy mango ice cream means you get a delicious dessert and some health benefits too! To start, gather your ingredients. You need ripe mangoes, chilled heavy cream, coconut milk, sweetened condensed milk, lime juice, vanilla extract, and a pinch of salt. Next, peel and dice the mangoes into small pieces. Place these mango pieces into a blender. Add the heavy cream, coconut milk, sweetened condensed milk, lime juice, vanilla extract, and salt. Blend everything on high speed until the mixture is smooth and creamy. You want it lump-free. After blending, taste it. If you want it sweeter, add more sweetened condensed milk or some sugar. Blend again to mix. Now, pour this smooth mango mixture into your ice cream maker. Follow your ice cream maker's instructions. Usually, it takes about 20 to 25 minutes to churn until it looks like soft-serve ice cream. For a creamy texture, make sure your heavy cream is very cold. This helps the ice cream whip up nicely. Use ripe mangoes for the best flavor and smoothness. If your blender struggles, add a little more coconut milk to help it blend. Blend until it's silky; a bit of patience goes a long way here. Once the mixture is churned, transfer it to an airtight container. Use a spatula to smooth the top. Freeze this container for at least 4 hours. This allows the ice cream to firm up. When you're ready to serve, take it out of the freezer. Let it sit for a few minutes. This helps soften it for easier scooping. You can now enjoy your creamy mango ice cream! To make your mango ice cream creamy, use ripe mangoes. They add natural sweetness and smooth texture. Blend the mangoes well with heavy cream and coconut milk. Ensure there are no lumps in the mix. Churning at the right speed also helps. If your ice cream maker is slow, it might not mix well. Churn until it looks fluffy and soft, similar to soft-serve. Avoid using unripe mangoes. They can make your ice cream taste sour. Don’t skip the heavy cream or coconut milk. These add richness and creaminess. If the mixture is too sweet, it can freeze hard. Taste it before freezing. If it’s too sweet, adjust with lime juice or salt. Finally, don’t rush the freezing process. Give it enough time to firm up for the best scoop. Store your ice cream in an airtight container. This keeps it fresh and prevents ice crystals. To avoid freezer burn, press plastic wrap onto the surface before sealing. Keep your ice cream in the back of the freezer. This spot stays colder than the door. Remove it from the freezer a few minutes before serving for easy scooping. Enjoy your creamy mango ice cream! Find the full recipe [here](#). {{image_4}} You can make a dairy-free version of mango ice cream. Use coconut cream instead of heavy cream. This keeps the creaminess while making it dairy-free. Use the same amount of coconut cream as heavy cream in the recipe. The coconut milk adds a tropical twist. You can also use almond milk for a lighter option. Blend it with the mango and follow the same steps as in the Full Recipe. Want to change the flavor a bit? Add fresh lime juice for a zesty pop. This brightens the mango taste. You can also mix in shredded coconut for added texture. Stir in about 1/2 cup of coconut when blending. If you love spices, try adding a pinch of cardamom or cinnamon. These spices add warmth and depth to your ice cream. Mixing mango with other fruits creates exciting new flavors. Combine mango with ripe pineapple for a tropical twist. Blend equal parts of diced mango and pineapple. This combo gives a sweet and tangy flavor. You can also try blending mango with berries like strawberries or blueberries. This adds a splash of color and a hint of tartness. Finding creamy mango ice cream is easy. You have many choices, from brands to local shops. When I think of creamy mango ice cream, a few brands stand out. Look for: - Häagen-Dazs: Their mango flavor is rich and smooth. - Ben & Jerry's: They often have mango flavors, too! - Talenti: Their gelato offers a unique, creamy texture. These brands are available in many grocery stores. Check the ice cream aisle for them. Local ice cream shops are gems for finding mango ice cream. They often make small batches with fresh ingredients. Ask around for shops that offer mango flavors. Many places have rotating flavors. Some shops to explore: - Scoop Shops: Look for small, artisan shops in your area. - Gelato Stores: They often have tropical flavors, including mango. - Farmers’ Markets: Vendors may sell homemade mango ice cream. Support local businesses and enjoy fresh tastes! If you prefer shopping online, you can find creamy mango ice cream there, too. Websites like Amazon or Instacart let you order from various brands. Some specialty ice cream companies ship directly to your door. Look for: - Jeni's Splendid Ice Creams: They offer unique flavors, including mango. - Salt & Straw: Known for creative flavors, they sometimes have mango options. Make sure to check shipping options and delivery times! For a delicious homemade option, don't forget to check out the Full Recipe. To store homemade mango ice cream, use an airtight container. This keeps air out and helps keep ice crystals from forming. Make sure to smooth the top before sealing. If you have space, cover the ice cream with plastic wrap before closing the lid. This extra layer seals in freshness. Yes, you can use frozen mango. Just thaw the mango pieces first. This helps blend them smoothly. Frozen mango can be just as tasty as fresh. Be sure to check the sweetness of the frozen mango. You may need to adjust the sweetened condensed milk in the recipe. Homemade mango ice cream lasts about two weeks in the freezer. After that, it may lose its texture and flavor. To enjoy the best taste, try to eat it within that time. Always check for any ice crystals or off flavors before serving. In this post, we explored how to make creamy mango ice cream. We discussed the essential ingredients and their health benefits. The step-by-step instructions ensure your ice cream turns out creamy every time. Tips and tricks helped you avoid common mistakes. We also shared variations and where to find the best mango ice cream. Making ice cream at home can be fun and rewarding. Enjoy experimenting with flavors and sharing your creations. You'll impress friends and family with your skills and delicious treats.

Creamy Mango Ice Cream Delightfully Smooth Treat

Looking for a cool treat that bursts with fruity flavor? You’ve found it! This Creamy Mango Ice Cream will take

To make tasty Korean BBQ meatballs, gather these main ingredients: - 1 pound ground beef (or ground turkey for a leaner option) - 1/2 cup panko breadcrumbs for added crunch - 1/4 cup green onions, finely chopped - 2 cloves garlic, minced for fragrance - 1 tablespoon ginger, freshly grated for a zesty kick - 1/4 cup soy sauce for depth of flavor - 1 tablespoon sesame oil for a nutty aroma - 1 tablespoon brown sugar to balance the savory notes - 1 large egg, beaten to bind the ingredients - Salt and pepper to taste for seasoning - 1 teaspoon sesame seeds (for garnish) The spicy mayo adds a great kick to the meatballs. For this sauce, you will need: - 1/2 cup mayonnaise - 1 tablespoon sriracha (adjust to your preferred spiciness) - 1 teaspoon lime juice to brighten the flavors Feel free to customize your dish! Here are some optional garnishes and add-ins: - Additional green onions for garnish - Extra sesame seeds for crunch - A sprinkle of chopped cilantro for freshness These ingredients help create a delightful balance of flavor. Check the Full Recipe for detailed steps! To start, gather all your ingredients. You need ground beef or turkey, panko breadcrumbs, green onions, garlic, ginger, soy sauce, sesame oil, brown sugar, an egg, salt, and pepper. In a large bowl, mix the ground meat, breadcrumbs, chopped green onions, minced garlic, grated ginger, soy sauce, sesame oil, brown sugar, and the beaten egg. Use your hands to mix until it feels sticky. This mix binds well when cooked. Now, with wet hands, form the mixture into small balls, about one inch wide. Place these meatballs on a lined baking sheet. Make sure to space them out. This helps them cook evenly. Next, preheat your oven to 400°F (200°C). Once it's hot, put the baking sheet inside. Bake the meatballs for 15 to 20 minutes. They should be golden brown and fully cooked. If you use beef, check for an internal temperature of 160°F. For turkey, it should be 165°F. This ensures they are safe to eat and tasty. While the meatballs are baking, it's time to prepare the spicy mayo. In a small bowl, combine half a cup of mayonnaise, one tablespoon of sriracha, and one teaspoon of lime juice. Mix it all together until smooth. You can adjust the heat by adding more sriracha if you like it spicier. This sauce adds a great kick to your meatballs. Once the meatballs are cooked, let them cool for a few minutes. Serve them warm and drizzle the spicy mayo over the top. Garnish with sesame seeds and more green onions if you want. Enjoy this delicious dish that brings Korean flavors to your table! For the full recipe, refer to the earlier section. To make the best meatballs, mix the ingredients well. Use your hands for this. The meatball mix should feel sticky. This helps them hold together. If they are too dry, add a splash of soy sauce. For a softer bite, use ground turkey instead of beef. This keeps the meatballs moist. Bake the meatballs at 400°F (200°C). This gives you a nice brown crust. Check them after 15 minutes. If they need more time, bake for 5 more minutes. The meatballs are done when they reach the right temperature. For beef, that’s 160°F. For turkey, it’s 165°F. Use a meat thermometer for best results. These Korean BBQ meatballs are great with rice or noodles. You can also serve them in lettuce wraps. Add some fresh veggies for crunch. Try a side of kimchi for spice. Drizzle extra spicy mayo on top for more flavor. You can find the full recipe to impress your guests. {{image_4}} You can swap ground beef for other meats. Ground turkey or chicken works well. These options are leaner and still tasty. Try pork for a richer flavor. Each choice brings its own unique taste. Just keep the same seasonings and steps from the Full Recipe. For a vegan twist, use lentils or chickpeas. Mash them well and mix with breadcrumbs. You can also try plant-based meat alternatives. For keto, use ground turkey and almond flour instead of breadcrumbs. These swaps keep the flavor while fitting your diet needs. Spicy mayo adds a great kick. You can change it up by using different sauces. Try a tangy hoisin sauce for sweetness. Or mix soy sauce with honey for a glaze. If you prefer less heat, use plain mayo and add a dash of vinegar. This variety adds fun to your meals! To keep your Korean BBQ meatballs fresh, store them in an airtight container. Let them cool to room temperature before sealing. Place a paper towel at the bottom of the container to absorb excess moisture. This helps maintain their texture. Refrigerate the meatballs for up to three days. When stored well, they will stay flavorful and delicious. When you're ready to enjoy leftovers, reheating is key. Preheat your oven to 350°F (175°C). Place the meatballs on a baking sheet. Heat them for about 10-15 minutes. This method keeps them juicy and soft. You can also reheat them in the microwave. Just cover the bowl with a paper towel to trap steam. Heat in 30-second intervals until warm. For longer storage, freezing is a great option. After cooking, let the meatballs cool completely. Arrange them in a single layer on a baking sheet, then freeze until firm. Once frozen, transfer them to a freezer bag. Remove as much air as possible to prevent freezer burn. They will keep well for up to three months. Thaw in the fridge overnight before reheating. For the full recipe, you can refer back to the original section. You can easily change the spice level in your meatballs. If you like it mild, reduce the sriracha in the spicy mayo. You can also add less ginger and garlic. For more heat, add extra sriracha to the mayo. You can even mix in some red pepper flakes into the meatball mix. Taste a small piece of the raw mix before cooking to find your perfect balance. This way, you control the heat just how you like it! Yes, you can switch out the spicy mayo for other sauces. A sweet soy glaze works well. You might also try a simple teriyaki sauce for a different flavor. If you want something tangy, try a hoisin sauce. Each sauce gives the meatballs a unique twist. Experiment with different sauces to find your favorite combo. The meatballs are versatile and pair well with many flavors! Korean BBQ meatballs pair great with many sides. Here are some tasty options: - Steamed rice for a hearty base. - A fresh cucumber salad for a crunchy bite. - Kimchi for a tangy kick. - Stir-fried vegetables for added color and health. - Noodles tossed in sesame oil for a filling side. These sides enhance the meal and make it more fun to eat. Enjoy and mix and match to find your perfect plate! Korean BBQ meatballs are a tasty dish anyone can try. We covered the main ingredients, like ground meat and spices, and how to make a spicy mayo. I shared tips for great texture and serving ideas too. You can even switch up the recipes to fit your needs. Remember, store your leftovers well for the best taste later. Enjoy cooking these meatballs, and don't be afraid to get creative!

Korean BBQ Meatballs with Spicy Mayo Flavor Boost

Get ready to elevate your weeknight dinner with Korean BBQ Meatballs and Spicy Mayo! I’ll show you how to blend

- 1 lb white fish fillets (such as tilapia or cod) - 1 tablespoon olive oil - 1 teaspoon chili powder - 1 teaspoon ground cumin - 1 cup riced cauliflower - 1 cup shredded cabbage - 1 ripe avocado, diced - 1/2 cup cherry tomatoes, halved - 1/4 cup fresh cilantro, finely chopped - Juice of 1 lime - 1/4 cup plain Greek yogurt - Salt and freshly ground black pepper When I create a low-carb fish taco bowl, I love to use fresh and vibrant ingredients. The fish gives a great flavor and protein. I use white fish like tilapia or cod. It cooks quickly and tastes fantastic. I coat the fish with olive oil, chili powder, and cumin. This mix adds a warm spice that makes every bite exciting. Next, I prepare the fresh ingredients. Riced cauliflower replaces traditional grains. It keeps the dish light and low-carb. Shredded cabbage adds crunch and color. I also like to include diced avocado for its creamy texture. Cherry tomatoes bring a sweet burst of flavor. They brighten the bowl and make it more appealing. For toppings, I reach for fresh cilantro. It adds a fresh taste that pairs well with the other flavors. A squeeze of lime juice gives the bowl a zesty kick. Greek yogurt adds creaminess and balances the heat from the spices. I use salt and pepper to season my ingredients just right. I recommend checking out the Full Recipe for detailed steps on how to put this together. Enjoy crafting your bowl with these fresh and tasty ingredients! - Preheat your oven to 400°F (200°C). - In a small bowl, mix olive oil, chili powder, cumin, garlic powder, salt, and pepper. - Coat the fish fillets well with this rub. Make sure every side is covered. - Place the seasoned fish on a parchment-lined baking sheet. - Bake for 15-20 minutes until the fish turns opaque and flakes easily. - Heat a skillet over medium heat. - Add the riced cauliflower and sauté for 5-7 minutes. - Season it with salt and pepper to taste. - In a bowl, start with a scoop of sautéed riced cauliflower. - Layer shredded cabbage, diced avocado, halved cherry tomatoes, and the baked fish. - Make it look great; a colorful dish is fun to eat! - Squeeze fresh lime juice over each bowl for a zesty kick. - Add a dollop of Greek yogurt for a creamy texture. - Top each bowl with chopped cilantro for freshness. - Serve with extra lime wedges on the side for more flavor. You can find the Full Recipe to make this dish delicious and easy to prepare. To know when the fish is done, look for a few signs. The fish should be opaque and flake easily with a fork. If it is still shiny, it needs more time in the oven. For seasoning, keep it simple but bold. I like to use chili powder, ground cumin, and garlic powder. Just mix them with olive oil and rub it all over the fish. This adds flavor without being too much. Making homemade riced cauliflower is easy. Just take fresh cauliflower and cut it into small pieces. Then, pulse it in a food processor until it looks like rice. If you don’t have a food processor, you can grate it using a box grater. You can also use frozen riced cauliflower if you want to save time. Just cook it straight from the bag. For added flavor, pair the bowl with fresh lime wedges. This adds a nice zing. You can also serve it with salsa or hot sauce for heat. When meal prepping, keep the fish and toppings separate until you are ready to eat. This helps them stay fresh. You can store the components in airtight containers for easy access. Enjoy your low-carb fish taco bowl with ease! {{image_4}} You can swap the fish in this bowl for shrimp or chicken. Shrimp cooks quickly and adds a nice texture. Chicken works well too, especially if you grill or bake it. For a vegetarian option, try using tofu. Firm tofu absorbs flavors well and adds protein to your meal. Just season it like the fish before cooking. Garnishes can make your dish pop. Try using salsa or hot sauce for a kick. These add flavor without too many carbs. You can also add cheese or nuts for extra crunch. Cheese gives a creamy texture, while nuts add a nice nutty flavor. Both options enhance the taste and keep it low-carb. You can easily modify this bowl to fit your diet. For gluten-free or dairy-free needs, skip the Greek yogurt or replace it with avocado cream. You can also change up the veggies. Try bell peppers, zucchini, or radishes for a fresh twist. Each swap keeps the dish vibrant and tasty. For the full recipe, check the details above and get cooking! To store leftovers, let the bowl cool first. Place it in an airtight container. You can keep it in the fridge for up to three days. Make sure to separate components like fish and veggies. This keeps each part fresh and tasty. You can freeze the fish and cauliflower rice. Wrap the fish tightly in plastic wrap. Then place it in a freezer bag. For the riced cauliflower, use a freezer-safe container. It can stay good for up to three months. When you’re ready to eat, thaw the fish in the fridge overnight. For the cauliflower rice, you can microwave it straight from the freezer. To reheat, use the microwave or a skillet. If using the microwave, heat in short bursts, stirring often. This helps keep the bowl from getting soggy. For the skillet, warm it over medium heat. Add a splash of water to keep veggies crisp. Enjoy your fresh, tasty delight! For the full recipe, check the details above. A low-carb fish taco bowl swaps high-carb items for fresh veggies. It uses riced cauliflower instead of rice and focuses on lean fish. This dish is light, tasty, and perfect for low-carb diets. Yes, you can prep some parts ahead. You can cook the fish and riced cauliflower and store them in the fridge. Just assemble the bowl before serving for the best taste. You can adjust spice levels easily. For mild flavor, skip the chili powder. For a kick, add more chili powder or some diced jalapeños. Taste as you go to find what you love. This dish is full of benefits. It is low in carbs, helping with weight loss. Each serving has about 300 calories, making it a healthy choice. It also offers protein from fish and healthy fats from avocado. This recipe is quick! You need about 10 minutes to prep and 20 minutes to cook. In total, it takes about 30 minutes to make four servings. Yes, frozen fish works well. Just thaw it first before cooking. Make sure to check for any ice crystals. This ensures your fish cooks evenly without excess moisture. You learned how to create a tasty low-carb fish taco bowl. With fresh ingredients and simple steps, you can make this dish in no time. The mix of flavors from the fish, veggies, and toppings really stands out. Don’t forget to use my tips for customizing and storing your meals. Enjoy this healthy option that fits your lifestyle! You’ll be excited to share it with friends and family. Make it your own, and let me know how it turns out!

Low-Carb Fish Taco Bowl Fresh and Tasty Delight

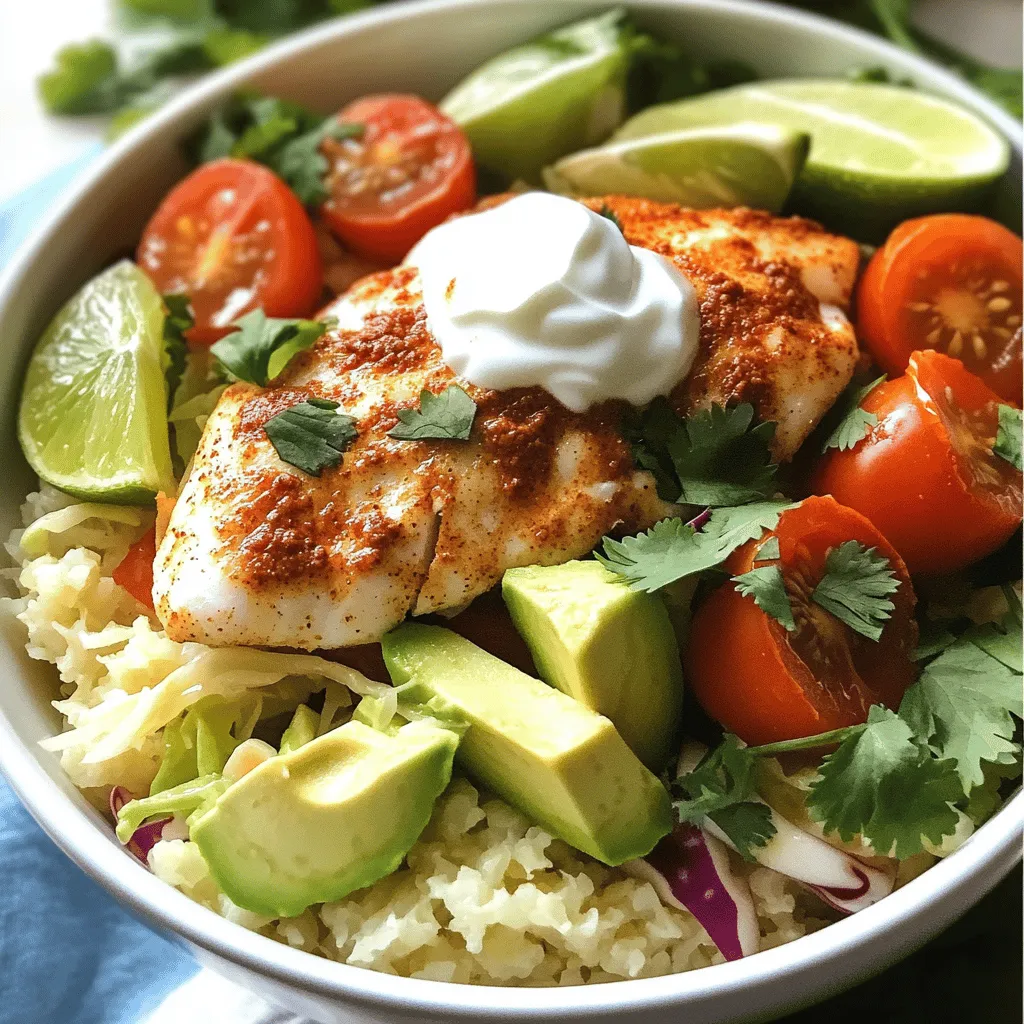
Are you ready for a fresh and tasty delight that won’t break your diet? This Low-Carb Fish Taco Bowl shines

You need ripe, fresh strawberries for the best flavor. Aim for about 2 cups of strawberries. Make sure to hull and slice them before blending. This helps them mix well. Choose strawberries that are bright red and fragrant. They should feel firm but slightly soft to the touch. For a creamy texture, use about 2 cups of vanilla ice cream. You can pick regular or dairy-free options. If you want a lighter treat, consider frozen yogurt. This can give you a similar taste with less fat. Vanilla ice cream adds richness, while strawberry ice cream boosts the berry flavor. Milk adds smoothness to your milkshake. Use 1 cup of whole milk for a classic taste. If you prefer dairy-free, almond milk works great too. It has a nutty flavor that pairs well with strawberries. You can also try oat milk or coconut milk for a different twist. Each option creates a unique taste, making your milkshake special. Remember, you can find the Full Recipe at the beginning of this section. To start, wash your fresh strawberries under cool water. Remove the green tops, called hulls, and slice the berries into small pieces. This makes it easier to blend them later. Fresh strawberries give your milkshake the best flavor. If you can, choose ripe ones for a sweeter taste. Now it's time to blend! In a high-speed blender, add the sliced strawberries, creamy vanilla ice cream, whole milk, honey, and pure vanilla extract. Blend these ingredients on high until the mix is smooth and creamy. Stop the blender a few times to scrape down the sides. This ensures everything gets mixed well and no chunks remain. Want your milkshake thicker? Add another scoop of ice cream. For a thinner shake, pour in a bit more milk. Blend again until you reach the texture you love. Always taste your shake. If you want it sweeter, add more honey or agave syrup. When it’s perfect, pour the milkshake into tall glasses. Top each with whipped cream and a fresh strawberry for a lovely look. Enjoy this delightful treat! To make the best strawberry milkshake, start with fresh, ripe strawberries. Look for berries that are bright red and firm. Avoid any that are mushy or have dark spots. If you can, pick them in the morning when they are most flavorful. If you can’t find fresh ones, frozen strawberries also work well. Just make sure to thaw them first for easy blending. You need a few basic tools to whip up your milkshake. A high-speed blender is key for a smooth drink. It helps blend the ice cream and strawberries evenly. Use tall glasses to serve your milkshake, making it look extra inviting. A straw is a fun touch, too! If you want to add whipped cream, have a spatula or spoon handy to help. Sweetness can make or break your milkshake. When mixing, taste as you go. Start with the honey or agave syrup. You can always add more if needed. If you find it too sweet, add a splash of milk to balance it out. Remember, everyone's taste is different. Make it just right for you! For the best results, follow the Full Recipe to ensure a delightful treat. {{image_4}} You can easily make a vegan strawberry milkshake. Just swap regular ice cream for a plant-based option. Use almond milk or coconut milk instead of whole milk. This change keeps it creamy while being dairy-free. For sweetness, try maple syrup instead of honey. Blend it just like the original recipe, and enjoy a cool treat. To make a healthier version, use Greek yogurt instead of ice cream. This choice adds protein and cuts down on sugar. You can also use unsweetened almond milk to lower calories. Fresh strawberries add fiber and vitamins. If you want sweetness, use ripe bananas instead of syrup. This will give you a creamy taste without extra sugar. You can get creative with flavors! Try adding a scoop of peanut butter for a nutty twist. Mixing in a bit of cocoa powder makes a chocolate-strawberry delight. For a tropical vibe, blend in some mango or pineapple. Each mix gives a new taste and fun look. Experiment and find your favorite combo. The full recipe offers a classic base to start your journey. If you have extra milkshake, store it in a sealed container. This keeps it fresh. Place the container in the fridge. It will stay good for up to 24 hours. When you want to enjoy it again, give it a little stir. You may need to add a splash of milk to bring it back to life. You can freeze the leftover strawberry milkshake. Pour it into ice cube trays first. Once frozen, store the cubes in a zip-top bag. This way, you can use them later in smoothies or shakes. Strawberries can also be frozen. Wash, hull, and slice them before freezing. Place them in a single layer on a baking sheet. Once frozen, transfer them to a bag. This keeps them fresh for up to six months. To thaw your frozen milkshake cubes, place them in the fridge overnight. If you're in a hurry, use a microwave. Heat in short bursts, checking often. You want it cold and creamy, not hot. For thawed strawberries, just let them sit at room temperature. They will be ready for use in no time. To make a strawberry milkshake thicker, add more ice cream. Ice cream gives it a rich, creamy texture. You can also blend in some frozen strawberries. They will chill the shake and add thickness. If you want to adjust it later, add more liquid slowly. Yes, you can use frozen strawberries. They work great in milkshakes. Frozen berries add chill and thickness without needing ice. This also keeps your shake smooth. Just remember to blend longer to break them down well. Serve a strawberry milkshake in tall, chilled glasses. This makes it look fancy and keeps it cold. Top it with whipped cream for a fun touch. You can also add fresh strawberries on the rim for decoration. Use colorful straws to make it more inviting. For the full recipe, check out the complete instructions above. You now have the tools to make a great strawberry milkshake. We explored fresh strawberries, various ice cream options, and milk alternatives. Follow the simple steps to prepare and blend your ingredients. Remember the tips for choosing quality strawberries and adjusting sweetness to your taste. Get creative with variations like vegan or healthy options. Store any leftovers properly and enjoy them later. Making a delicious milkshake is easy and rewarding. Dive in and enjoy your yummy creation!

Strawberry Milkshake Delightful Treat for Summer

Craving a refreshing treat for summer? Look no further than the classic strawberry milkshake! This delightful drink combines fresh strawberries,

To create a vibrant Thai Mango Salad, you need fresh ingredients. Here’s what you will need: - 2 ripe mangoes - 1 cup cucumber - 1 bell pepper (red or yellow) - 1 cup carrots - 1 cup red cabbage - 1/4 cup fresh cilantro - 1/4 cup roasted peanuts - 2 tablespoons lime juice - 1 tablespoon fish sauce or soy sauce - 1 tablespoon sesame oil - 1 tablespoon honey or agave syrup - 1 small red chili (optional) - Salt to taste Each ingredient adds a unique flavor and texture. Ripe mangoes bring sweetness, while cucumber adds crunch. Bell peppers add color, and carrots provide a nice bite. Red cabbage gives a lovely crunch and color. Fresh cilantro brings herbal notes, and roasted peanuts add depth. The dressing combines lime juice, fish sauce (or soy sauce), sesame oil, and honey (or agave syrup) to balance the flavors. You can add a red chili for spice if you like a little heat. Check out the Full Recipe for more details on preparing this delicious salad! - Peel and julienne mangoes and cucumber. - Slice the bell pepper thinly. - Shred carrots and red cabbage. Start by peeling the mangoes. Use a sharp knife to cut them into thin strips, called julienne. You want them to be the same size for even texture. Next, peel the cucumber and julienne it too. This adds a nice crunch. Thinly slice the bell pepper. You can use red or yellow for color. Finally, shred the carrots and red cabbage. These ingredients will make the salad bright and colorful. - Whisk lime juice, fish sauce (or soy sauce), sesame oil, and honey (or agave syrup). In a small bowl, add two tablespoons of lime juice. This gives the salad a fresh taste. Next, add one tablespoon of fish sauce or soy sauce, depending on your choice. Then, pour in one tablespoon of sesame oil for that nutty flavor. Finally, add one tablespoon of honey or agave syrup to balance the tanginess. Whisk all these ingredients together until smooth. If you want some heat, add a small red chili, finely sliced. - Combine all the vegetables and fruits in a large bowl. - Drizzle dressing over the salad and toss well. In a large mixing bowl, combine all the prepared vegetables and fruits. Gently toss them together to mix well. Next, drizzle the prepared dressing over the salad. Toss everything again until all the pieces are coated with the dressing. This ensures every bite is flavorful. - Allow salad to rest for 10 minutes. - Garnish with cilantro and roasted peanuts before serving. Let the salad sit for about 10 minutes. This resting time helps the flavors blend perfectly. Just before serving, sprinkle chopped cilantro and roasted peanuts on top. This adds a nice crunch and fresh aroma to your dish. Enjoy your Thai mango salad fresh and colorful! Using fresh lime juice makes your salad bright and zesty. Lime juice adds a fresh taste that lifts the flavors. You can also experiment with chili for heat. If you like spice, add thin slices of red chili. Start small, so you can control the heat level. Serve the salad in a large bowl or on individual plates. A large bowl allows guests to help themselves. Individual plates make it easy for serving. For garnishing, add extra cilantro leaves on top. A lime wedge on the side not only looks good but lets you add more lime juice if you want. When cutting ingredients, try to make them the same size. This helps the salad look nice and makes each bite even. Choose ripe mangoes for the best flavor. Look for mangoes that are slightly soft when you press them. They should smell sweet at the stem. Using the ripest mangoes gives your salad that perfect taste. For the full recipe, you can check [Full Recipe]. {{image_4}} You can change the veggies in the salad for more color and taste. Try using bell peppers or radishes. Both add a nice crunch and flavor. Bell peppers give a sweet touch, while radishes add spice. If you want to skip fish sauce, use soy sauce instead. Coconut aminos is another great vegan option. This keeps the salad tasty without losing the special umami flavor. Mango salad changes from one area of Thailand to another. In the north, people might add herbs like mint. In the south, you can find more seafood mixed in, like shrimp. Each region uses what is fresh and local. Outside Thailand, other countries have their own takes. In Vietnam, for example, they often add more herbs and a different dressing. This shows how mango salad can be a fun dish to explore around the world. You can easily change the spice in your salad. To make it mild, skip the red chili or use less. If you love heat, add more chili slices. You can also try different chili types for unique flavors. Remember, taste as you go! This way, you create the salad just right for you. To keep your Thai mango salad fresh, store it in an airtight container. This will help prevent moisture loss. Place the salad in the fridge right after serving. Try to eat any leftovers within two days. The salad is best when fresh, but it can last up to three days if stored well. For meal prep, you can make parts of the salad ahead of time. Prepare the mangoes, cucumbers, bell peppers, and carrots in advance. Store each ingredient separately in airtight containers. This way, you can quickly assemble the salad when you’re ready to eat. The chopped cilantro and peanuts can also be stored in small containers. Just mix everything together right before serving. Enjoy the freshness of your salad with ease! I recommend using ripe, sweet mangoes like Haden or Tommy Atkins. These mango varieties provide a nice balance of sweetness and tang. When choosing mangoes, look for ones that yield slightly to gentle pressure. This means they are ripe and ready for your salad. Using the right mango helps create a fresh and vibrant dish. Yes, you can make this salad ahead of time. However, I suggest preparing the dressing separately. Keep the salad fresh by mixing it just before serving. If you prepare it too early, the veggies can become soggy. Aim to make this salad within a few hours of serving for the best taste. Absolutely! To make this salad gluten-free, just use gluten-free soy sauce. Many brands offer gluten-free options that taste great. Always check the label to ensure there are no hidden gluten ingredients. This way, everyone can enjoy this delicious salad without worry. This salad pairs well with grilled chicken or shrimp. You can also serve it with rice dishes like jasmine rice or fried rice. It adds bright flavors to any meal. For a light lunch, enjoy it with spring rolls or a fresh soup. The full recipe yields about four servings. Each serving is generous, so it works well for sharing. If you’re feeding a crowd, feel free to double the recipe. You'll have a colorful and tasty dish that everyone will love! This Thai mango salad combines fresh ingredients for a vibrant dish. You start with ripe mangoes, crunchy cucumbers, and colorful veggies. The dressing brings it all together, making each bite delicious. Remember to let it rest before serving, and feel free to customize based on your taste. In the end, this salad is not just tasty; it’s easy to prepare and share. Enjoy making it your own by substituting ingredients or adjusting the spice level. With these tips, you're ready to impress at any meal!

Thai Mango Salad Fresh and Colorful Delight

Are you ready to brighten your meal with a burst of flavor? This Thai Mango Salad is the perfect mix

- 1 lb (450g) fresh potato gnocchi - 2 cups homemade or store-bought marinara sauce - 1 cup cherry tomatoes, halved - 1 cup mozzarella cheese, shredded - ½ cup Parmesan cheese, finely grated - 1 teaspoon dried basil - 1 teaspoon dried oregano - ½ teaspoon red pepper flakes (optional) - Salt and freshly ground black pepper to taste - Fresh basil leaves, for garnish - 2 tablespoons extra-virgin olive oil The main ingredients for your Tomato Gnocchi Bake create a lovely mix of flavors. Start with fresh potato gnocchi, which gives a soft and pillowy texture. You can find these at most grocery stores. Next, choose a good marinara sauce. Use homemade sauce for more flavor, or grab your favorite store-bought version. Cherry tomatoes add a sweet touch. Halve them to let their juices mingle with the sauce. The cheeses bring richness. Mozzarella melts beautifully, while Parmesan adds a salty kick. For seasonings, dried basil and oregano enhance the Italian flavor. If you like heat, add red pepper flakes. Adjust salt and pepper to your taste. Finally, drizzle olive oil on top. This adds a nice finish and helps the bake brown evenly. You can find the Full Recipe above to guide you through each step. Enjoy making this hearty meal! - Preheat the oven to 375°F (190°C). - Cook the gnocchi in salted water until they float. First, set your oven to 375°F (190°C). This heat will help our dish cook evenly. Next, grab a large pot and fill it with water. Add a good amount of salt and bring it to a boil. Once boiling, gently add the gnocchi. Keep an eye on them. They will float when they are ready, which takes about 2-3 minutes. When they float, drain them carefully and set aside. - Combine cooked gnocchi with marinara sauce and tomatoes. - Layer ingredients in a baking dish with cheese. Now, it's time to mix! In a big bowl, combine your cooked gnocchi with the marinara sauce and halved cherry tomatoes. Gently stir so all the gnocchi get coated in that tasty sauce. Next, lightly grease a baking dish with olive oil. Spread half of the gnocchi mixture in the dish. Sprinkle half of the mozzarella and Parmesan cheese on top. This will create a nice cheesy layer. Then, add the rest of the gnocchi mixture on top. Make sure it is spread out evenly. Finish this layer with the remaining mozzarella and Parmesan cheese. Drizzle a bit of olive oil on top. Season with salt and pepper to taste. - Cover and bake for 20 minutes. - Uncover and bake for an additional 10-15 minutes. Cover your baking dish tightly with aluminum foil. This helps keep the moisture in while baking. Place the dish in the preheated oven for 20 minutes. After that, carefully remove the foil. Bake it uncovered for another 10-15 minutes. You want the cheese to be bubbly and golden brown. When it looks perfect, take it out and let it cool for a few minutes before serving. For the full recipe, refer to the delightful Tomato Gnocchi Bake. Enjoy your meal! - Use fresh gnocchi for superior texture. Fresh gnocchi cooks quickly and stays soft. - Don’t overboil the gnocchi. Boil them just until they float. This keeps them tender. - Consider adding garlic or onions to the sauce. These add a nice depth to your dish. - Experiment with cheese types for different flavors. Try feta or goat cheese for a twist. - Serve in individual ramekins for a charming touch. It makes each serving special and fun. - Garnish with fresh basil and drizzled olive oil. This brightens the dish and adds flavor. Using these tips will elevate your Tomato Gnocchi Bake experience. For the complete details on making this dish, check the Full Recipe. {{image_4}} You can make this dish lighter and still tasty. Try using whole wheat gnocchi for more fiber. Zucchini noodles also work well and add nutrients. You can swap in low-fat cheese to cut calories without losing flavor. For extra taste, add sautéed vegetables. Spinach or bell peppers mix well with the sauce. You can also add cooked sausage or ground meat for a hearty twist. These options boost flavor and protein, making the dish more filling. If you need gluten-free gnocchi, many brands offer options made from rice or corn. For a dairy-free version, use vegan cheese substitutes. These changes let everyone enjoy this meal, no matter their diet. Remember, you can find the full recipe above to create your own delicious version! Let your Tomato Gnocchi Bake cool before storing. This step helps keep the texture nice. Once cooled, transfer it to airtight containers for refrigeration. This will keep it fresh for up to three days. For the best texture, reheat the bake in the oven. Set your oven to 350°F (175°C) and cover the dish with foil. This helps warm it evenly. You can also use the microwave if you need a quick fix. Just be aware that it might get a bit soggy. You can freeze the Tomato Gnocchi Bake before or after baking. If you freeze it before baking, just wrap it well. When you’re ready to eat, thaw it completely before reheating. This ensures it warms properly and tastes great. The best way to cook gnocchi is simple. Start with salted water in a large pot. Bring it to a boil. Once boiling, add your fresh potato gnocchi. Cook for about 2-3 minutes. You'll know they are ready when they float to the top. After they float, drain the gnocchi right away. This keeps them tender and fluffy. For extra flavor, you can add a bit of olive oil to the water. It helps to keep them from sticking together. Yes, you can make Tomato Gnocchi Bake ahead of time. Prepare the dish as directed, but don’t bake it. After mixing the gnocchi and sauce, layer it in your baking dish. Cover it tightly with plastic wrap or foil. You can store it in the fridge for up to 24 hours. When you're ready to eat, just bake it as directed. You may need to add a few extra minutes to the baking time. Tomato Gnocchi Bake lasts about 3-4 days in the fridge. Make sure to store it in an airtight container. This keeps it fresh and safe to eat. If you want to enjoy it later, consider freezing it. It can last up to three months in the freezer. Just thaw it completely in the fridge before reheating. For the best taste, reheat it in the oven. The texture stays nice that way. This blog post covered how to make a tasty Tomato Gnocchi Bake. We went through the key ingredients, cooking steps, and helpful tips. You now know how to add your own twist with variations and store your dish properly. Remember, using fresh ingredients makes a big difference. Enjoy experimenting and creating your perfect bake. Simple techniques can lead to delicious meals every time. I hope you feel ready to try this dish and share it with others. Happy cooking!

Tomato Gnocchi Bake Flavorful and Hearty Meal

If you’re looking for a meal that’s both hearty and full of flavor, you’ll love my Tomato Gnocchi Bake! This

To create a Peach Burrata Salad with Champagne Vinaigrette, gather the following fresh and tasty ingredients: - 2 ripe peaches - 1 ball fresh burrata cheese - 4 cups arugula or mixed leafy greens - 1/4 cup toasted pistachios - 1/4 cup fresh basil leaves - 2 tablespoons honey - 2 tablespoons apple cider vinegar - 1 tablespoon Dijon mustard - 1/2 cup extra-virgin olive oil - Salt and freshly cracked black pepper By using these ingredients, you get the perfect balance of sweet and savory. The peaches add a juicy burst, while the burrata brings creaminess. The greens provide freshness, and the pistachios add a nice crunch. The Champagne vinaigrette ties everything together, making your salad both vibrant and delicious. You can find the complete instructions in the Full Recipe. Enjoy each bite! To whip up the Champagne vinaigrette, start with a small bowl. Add the honey, apple cider vinegar, and Dijon mustard. Use a whisk to mix until smooth. This helps blend the flavors well. Next, slowly pour in the olive oil. Keep whisking as you pour. This step is key for a proper emulsion. When done, set the vinaigrette aside. Letting it rest will enhance the taste. Grab a large salad bowl. Layer the arugula or your favorite greens at the bottom. This creates a fresh base for your salad. Now, arrange the sliced peaches on top of the greens. Next, add the torn burrata cheese. Aim for an attractive layout. The colors and textures should invite you to dig in. Sprinkle the coarsely chopped pistachios over the salad. They add a nice crunch. Then, add the torn basil leaves for a burst of aroma. Drizzle the Champagne vinaigrette generously over the salad. Make sure all the ingredients get coated. Season with salt and freshly cracked black pepper. Gently toss the salad. Be careful not to break up the creamy burrata too much. For a stunning presentation, serve in a large bowl. You can also plate it individually. A final drizzle of honey or olive oil looks nice. Enjoy making this Peach Burrata Salad with Champagne Vinaigrette! For the full recipe, check out the [Full Recipe]. To find the best peaches, look for ones that feel firm but yield slightly when you press them. The color should be vibrant, with a golden hue. A sweet, fragrant aroma is also a good sign. Avoid peaches with blemishes or soft spots. They may not taste good. Look for organic options to get the best flavor and support sustainable farming. Burrata cheese is a delicate treat. To keep it fresh, store it in its original packaging until you're ready to use it. If you open it, place it in a bowl with some of its whey or cream. Cover it tightly with plastic wrap. Keep it in the fridge and use it within a few days for the best taste. Never freeze burrata, as it will change its texture. When it comes to seasoning your salad, start with a light touch. Add salt and pepper to taste. If you want more zing, consider a squeeze of fresh lemon juice. You can also try a bit of balsamic vinegar for extra depth. Taste as you go to find the perfect balance. This way, you can make the salad truly yours. For more tips, check out the Full Recipe. {{image_4}} You can switch out peaches for other fruits. Try ripe nectarines or juicy plums. You can also use greens like spinach or kale if you prefer. Both options add a nice twist to the salad. For a nut crunch, swap pistachios for walnuts or almonds. Both work well with the creamy burrata. To make the salad heartier, add grilled chicken or shrimp. They both pair nicely with the sweet peaches and creamy burrata. Simply grill the proteins with a little salt and pepper. Slice them thin and place them on top of the salad. This gives you a filling meal that still feels light. You can easily make this salad vegan. Replace the burrata with a vegan cheese alternative. Also, use maple syrup instead of honey for sweetness. For a gluten-free option, ensure your Dijon mustard is gluten-free. This way, everyone can enjoy the salad without worry. To store leftover salad, first place it in an airtight container. This keeps the flavors fresh. Try to separate the dressing from the salad. If you mix it all together, the greens may wilt. Store the salad in the fridge for the best taste. Enjoy it within two days for the best quality. Peaches stay fresh for about three to five days when kept in the fridge. Burrata cheese lasts about two days once opened. Arugula and leafy greens can last up to a week, but they taste best within three days. Toasted pistachios keep for about a month if stored in a cool, dry place. Reheating salad is not recommended, especially for greens. Instead, enjoy it cold. If you must reheat, do so gently in a pan on low heat. Avoid the microwave; it can make the greens soggy. Keep the burrata out until you serve to maintain its creamy texture. Yes, you can prepare the vinaigrette ahead of time. This saves you time when making the salad. To store it, use a clean jar with a lid. Just mix the honey, apple cider vinegar, and Dijon mustard together. Then, whisk in the olive oil. Seal the jar and keep it in the fridge. The flavors will blend well over time. When you’re ready to use it, shake it well. This keeps it fresh and tasty. Absolutely! This salad is mostly vegetarian already. To make it even more veggie-packed, add sliced cucumbers or cherry tomatoes. You can also toss in roasted bell peppers for a sweet touch. If you want, try adding more greens, like spinach or kale. These options will give you extra color and crunch. This salad pairs well with many dishes. Try serving it with grilled chicken or shrimp for protein. A nice, crusty bread is also a great choice. If you want something lighter, serve it with a bowl of soup. A chilled cucumber soup or a hearty tomato bisque works nicely. These options create a balanced and delicious meal. For a drink, a light white wine or sparkling water complements the flavors beautifully. This blog post covered how to create a delicious Peach Burrata Salad. You learned about the fresh ingredients and simple steps needed to prepare it. We also discussed tips for selecting ripe peaches and keeping burrata fresh. Additionally, you discovered fun variations and storage tips for leftovers. Enjoy making this salad for friends and family. It’s a lovely dish for summer gatherings. Remember, you can tweak it to suit your taste. Make it your own, and have fun in the kitchen!

Peach Burrata Salad with Champagne Vinaigrette Joy

Are you ready to elevate your salad game? This Peach Burrata Salad with Champagne Vinaigrette blends sweet peaches and creamy

Older posts
Newer posts
← Previous Page1 … Page17 Page18 Page19 … Page75 Next →

dsad

© 2025 lazychefmagic • Built with GeneratePress

Our Policies

  • Copyright Policy
  • Cookie Policy
  • GDPR Policy
  • Privacy Policy
  • Disclaimer
  • Terms Of Use

More Information

  • Home
  • About
  • Contact
  • Appetizers
  • Dessert
  • Dinner
  • Drinks
©2025, lazychefmagic About Back To Top