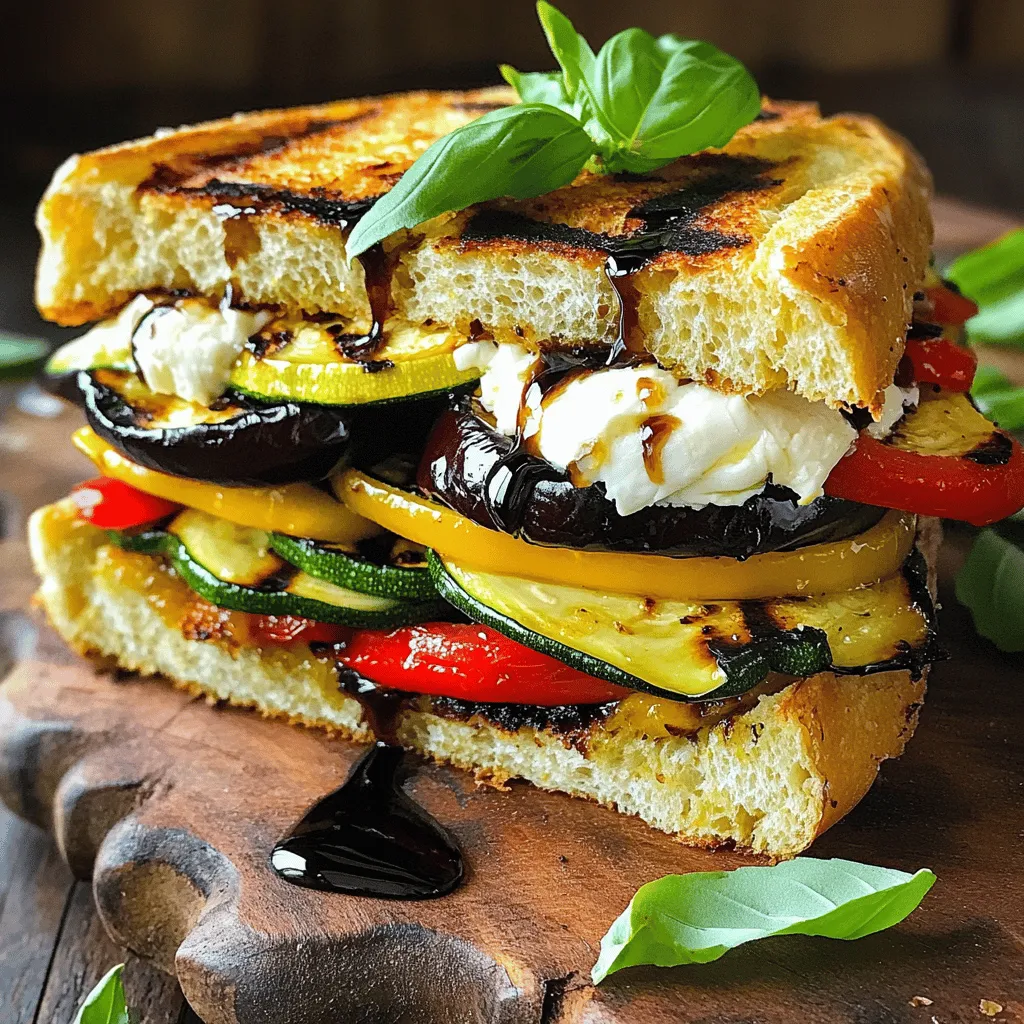
Grilled Veggie Burrata Panini Tasty and Simple Dish
Looking for a simple, tasty dish that impresses? Try my Grilled Veggie Burrata Panini! This delightful sandwich packs bold flavors
Looking for a simple, tasty dish that impresses? Try my Grilled Veggie Burrata Panini! This delightful sandwich packs bold flavors
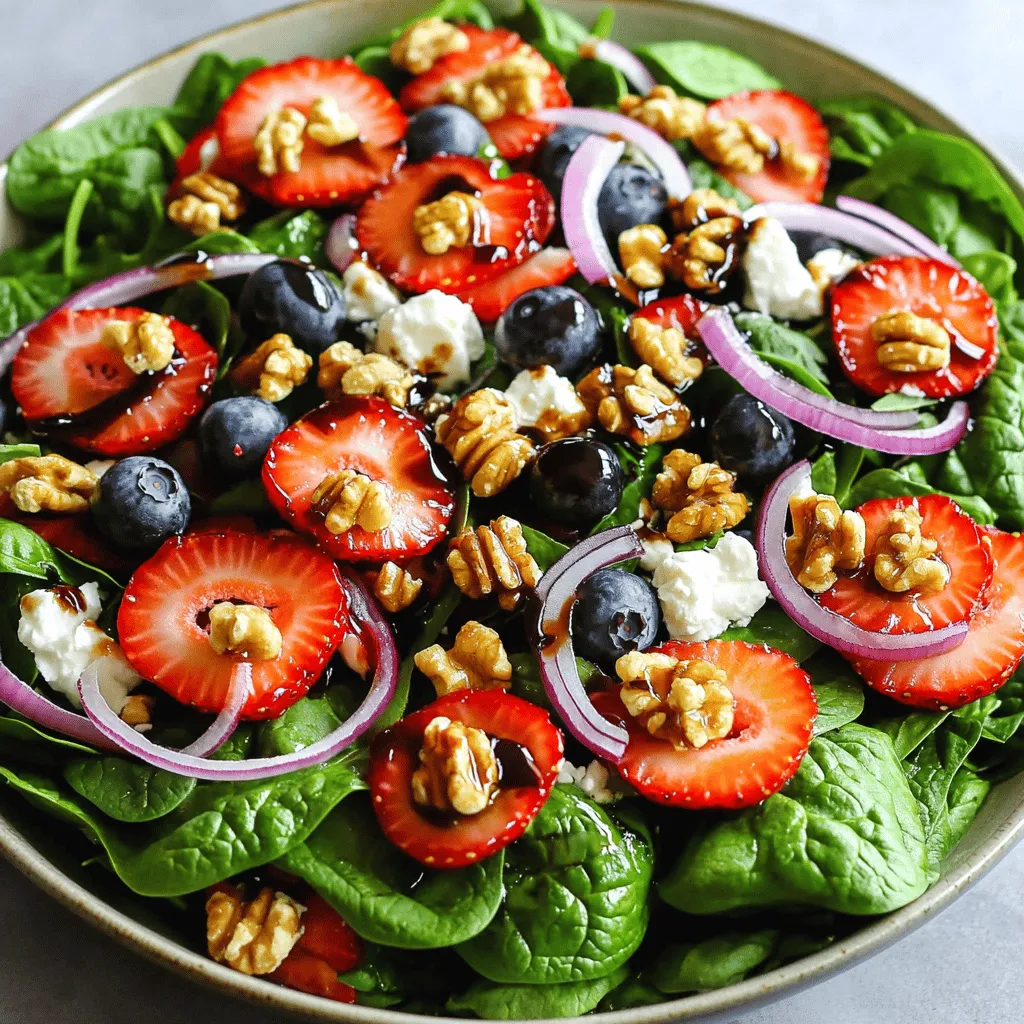
Are you ready to enjoy a fresh and tasty meal? The Strawberry Spinach Salad with Blueberries Delight combines sweet strawberries,
![- 4 large heirloom tomatoes - 1 ball of fresh burrata cheese - Balsamic vinegar and olive oil For this salad, I love using heirloom tomatoes. Their colors and flavors are simply amazing. Each tomato brings a unique taste, making your dish pop. Burrata cheese adds a creamy texture that pairs well with the juicy tomatoes. You can find it in most grocery stores. The balsamic vinegar and olive oil are key for a tasty dressing. They bring acidity and richness, making the salad shine. - Honey, garlic, lemon zest - Sea salt and black pepper For the perfect dressing, I use honey for a touch of sweetness. Garlic adds a punch of flavor, while lemon zest brightens everything up. Sea salt and black pepper bring out the best in the tomatoes and cheese. Balance is key. You want a mix of sweet, salty, and tangy. - Fresh basil leaves - Optional additional toppings Fresh basil leaves are a must for garnish. They add a lovely aroma and a burst of green. If you want to get creative, you can add other toppings, like olives or nuts. These can add extra flavors and textures to the salad. For the full recipe, check the link provided. Enjoy making this vibrant dish! To start, grab a medium mixing bowl. Combine 2 tablespoons of balsamic vinegar with 2 tablespoons of olive oil. Add 1 teaspoon of honey, 1 minced garlic clove, and the zest of 1 lemon. Sprinkle in sea salt and freshly cracked black pepper to taste. Whisk everything together until smooth. Taste it and adjust seasoning if needed. Next, take your 4 large heirloom tomatoes. Slice them into thick, even rounds. This creates a beautiful base for your salad. Arrange the tomato slices on a large plate. Now, it’s time to marinate the tomatoes. Evenly drizzle the marinade over the sliced tomatoes. Make sure each slice gets a good coating. Let them sit for at least 30 minutes at room temperature. This allows the tomatoes to soak up the flavors. After marinating, gently tear the burrata cheese into pieces. Place the pieces in the center of your plate. Finally, garnish with fresh basil leaves. Drizzle any leftover marinade over the salad. Serve it right away for the best flavor. For the full recipe, check the details above. To make a great Marinated Tomato Burrata Salad, choose ripe heirloom tomatoes. Look for tomatoes that are firm yet slightly soft when pressed. They should have rich colors and strong scents. Heirloom tomatoes offer unique flavors, which enhance the dish. You can find them at local markets or farms. Picking the right tomatoes is key to a fresh taste. The marinade makes this salad shine. You need to balance acidity and sweetness. Combine balsamic vinegar with olive oil for tartness and richness. Honey adds sweetness to the mix. Make sure to taste as you whisk. Adjust flavors to fit your preference. A well-balanced marinade will elevate the tomatoes and burrata. Visual appeal matters in this dish. Artful plating can make your salad pop. Start by arranging the tomatoes in a circle on the plate. Place burrata pieces in the center. Scatter fresh basil leaves around for a splash of color. Drizzle any remaining marinade over the entire salad. A beautiful presentation adds to the enjoyment of eating. For the complete details and steps, check out the Full Recipe. {{image_4}} You can switch burrata cheese for fresh mozzarella. It gives a similar creamy taste. For tomatoes, use cherry tomatoes or grape tomatoes if you prefer a sweeter bite. Heirloom tomatoes are beautiful but not always easy to find. You can use any ripe tomatoes for this dish. Want to make it even tastier? Try adding olives or capers. These will add a nice salty kick. Nuts like pine nuts or walnuts can bring a crunchy texture. Toasted nuts also boost the flavor and make every bite exciting. Change up the salad with the seasons. In summer, use fresh basil and juicy tomatoes. Come fall, try adding roasted squash or pumpkin seeds for a warm touch. In winter, use citrus fruits like oranges or pomegranates for a bright pop of color. You can always adapt this dish to fit any time of year. For the full recipe, visit the link provided. To keep your marinated tomato burrata salad fresh, store it in an airtight container. Make sure to separate the burrata from the tomatoes. This helps prevent the cheese from getting soggy. If you have extra marinade, keep it in a small jar. It adds great flavor when drizzled on the salad later. You can enjoy this salad cold. If you want to refresh it, drizzle a bit of olive oil or balsamic vinegar before serving. Avoid reheating the salad. It tastes best when served fresh. The marinated tomatoes last about 2-3 days in the fridge. Burrata cheese is best used within 1-2 days. Check for any signs of spoilage. Fresh basil can wilt quickly. Use it within a day or two for the best flavor. Burrata is a fresh cheese that comes from Italy. It has a creamy center and a soft outer shell made from mozzarella. This cheese dates back to the 1900s in the Apulia region of Italy. Burrata means "buttered" in Italian, which reflects its rich flavor and texture. When you cut into it, the creamy filling spills out. This makes it a perfect partner for fresh tomatoes and adds a delightful creaminess to the salad. Yes, you can prepare the salad ahead of time. I recommend marinating the tomatoes for at least 30 minutes. This allows the flavors to blend well. However, for the best taste, serve the salad soon after assembling. The burrata is best fresh, as it can lose its creaminess if left too long. If you want to prep ahead, slice the tomatoes and make the marinade. Combine them just before serving for a vibrant, fresh taste. This salad pairs well with many dishes. You can serve it with grilled chicken or fish for a complete meal. It also goes great with crusty bread or a light pasta dish. For drinks, consider serving it with a crisp white wine or sparkling water. The fresh flavors of the salad will balance nicely with these options. For the complete recipe, check out the [Full Recipe]. This blog post covered how to make a Marinated Tomato Burrata Salad. We discussed the key ingredients, from heirloom tomatoes to fresh burrata. You learned to prepare the marinade, slice tomatoes, and assemble the salad. Tips on choosing ripe tomatoes and presenting your dish were also shared. In conclusion, this salad is fresh, easy, and versatile. Enjoy experimenting with flavors for every season. Don't forget to check the full recipe for all the details. Enjoy your culinary adventure!](https://lazychefmagic.com/wp-content/uploads/2025/07/d8553e39-d382-492d-a75f-9a55b17ced6a.webp)
If you love fresh flavors, you’ll enjoy this Marinated Tomato Burrata Salad. With juicy heirloom tomatoes and creamy burrata, it’s

Looking for a refreshing drink this summer? Try making homemade Hwachae! This Korean punch is full of vibrant flavors and
![- 2 cups cooked jasmine rice - 2 medium chicken breasts, diced - 1 cup corn kernels (fresh or frozen) - 1 tablespoon chili powder - 1 teaspoon ground cumin - 1 tablespoon extra virgin olive oil - 2 tablespoons unsalted butter - 1/2 cup cotija cheese, crumbled - 1/4 cup fresh cilantro, finely chopped - 1 lime, juiced - Salt and pepper to taste - Optional: sliced jalapeños The main ingredients create a solid base for this dish. Jasmine rice adds sweetness and texture. Chicken gives protein and heartiness. Corn brings a crunchy, sweet pop. Chili powder and cumin add warmth and depth to your bowl. The flavor enhancers elevate your dish. Extra virgin olive oil provides healthy fats and richness. Butter adds a creamy touch to the corn. Cotija cheese brings saltiness and a crumbly texture that ties it all together. Finally, fresh elements like cilantro and lime brighten the dish. They add a burst of flavor and color. Salt and pepper are essential for balancing all the tastes. If you like spice, jalapeños can give your meal a kick. If you want to dive into the full recipe, don't miss the chance to try my Zesty Chicken Rice Bowl with Roasted Street Corn! First, season the diced chicken. Use salt, pepper, chili powder, and cumin. Mix well so each piece gets coated. Next, heat olive oil in a large skillet over medium-high heat. Once hot, add the chicken. Cook for 6-8 minutes, stirring occasionally. The chicken should turn golden brown and reach an internal temperature of 165°F. Once done, take the skillet off the heat and set the chicken aside. In the same skillet, add unsalted butter. Let it melt fully. Then, add the corn kernels. Stir them often. Cook for about 5-7 minutes. This time allows the corn to get charred marks. Season with salt, pepper, and half of the lime juice. Mix well and remove from heat. Now, grab a large serving bowl. Start with a layer of cooked jasmine rice. Then, add the sautéed chicken on top. Finally, evenly distribute the roasted street corn mixture over everything. Sprinkle crumbled cotija cheese over the dish. Next, add chopped cilantro for freshness. Drizzle the remaining lime juice across the top. This will brighten the flavors and make it pop. If you love spice, add sliced jalapeños on top. They will give your bowl an extra kick. Feel free to adjust the amount to your taste! For the complete recipe, check the [Full Recipe]. - Ensuring chicken is cooked through: Always check the chicken's internal temperature. It should reach 165°F for safe eating. Use a meat thermometer for accuracy. Cook the chicken for about 6-8 minutes, stirring often, until it turns golden brown. - Tips for perfecting roasted corn: For great flavor, use fresh corn if possible. If using frozen, thaw it first. Melt your butter in the skillet before adding corn. Cook it on medium heat until it gets nice charred marks, about 5-7 minutes. This adds a toasty taste that makes the dish pop. - Serving suggestions for visual appeal: Use a colorful bowl to make your dish stand out. Layer the rice first, then add chicken and corn on top. Finish with cotija cheese and cilantro for a bright look. - Enhancing flavors with lime: Always include lime wedges. They add a fresh burst of flavor. A squeeze of lime juice before eating brightens the whole bowl. It brings all the flavors together and makes every bite taste better. - Preparing ingredients in advance: To save time, you can dice the chicken and prep the corn ahead. Store them in the fridge until you are ready to cook. This makes weeknight meals quick and easy. - Storing leftovers effectively: Keep any leftover chicken rice bowl in an airtight container. It stays fresh in the fridge for up to three days. When you reheat, add a splash of water to keep the rice moist. This helps retain the dish's flavors. {{image_4}} You can switch out the chicken for shrimp or tofu. Shrimp cooks fast and adds a nice flavor. Just sauté the shrimp until they turn pink, about 3-4 minutes. Tofu offers a hearty option for plant-based eaters. Use firm tofu, press it to remove moisture, and then cube it. Cook it until golden brown. Adding more veggies boosts nutrition and flavor. Bell peppers, zucchini, or spinach all work well. Toss them in with the chicken or shrimp and let them cook for a few minutes. This adds color and crunch to your bowl. If you want a healthier option, try brown rice or quinoa. Brown rice has more fiber and a nice nutty flavor. Quinoa is gluten-free and packs a protein punch. Both can replace jasmine rice in this dish. You can also use cauliflower rice for a low-carb twist. Just sauté riced cauliflower for a few minutes until tender. It gives you a light and fresh base for your savory toppings. Adjusting spice levels is easy. If you like it spicy, add more chili powder or fresh jalapeños. For a milder taste, reduce the chili powder or skip the jalapeños. Changing up cheese options can also add new flavors. Try feta or shredded cheddar instead of cotija. Each cheese brings a different taste and texture. Experiment with what you have on hand to make the dish your own. For the full recipe, check out the Zesty Chicken Rice Bowl with Roasted Street Corn. Store any leftover chicken rice bowl in an airtight container. Let the dish cool down first. Place it in the fridge within two hours to keep it safe. Proper storage helps maintain flavor and texture. It can last for up to three days. Always check for any off smells or changes in texture before eating. To reheat, use the microwave or a skillet. If using a microwave, cover the bowl to keep moisture in. Heat it in short bursts, stirring in between. This helps keep the chicken tender. If using a skillet, add a bit of water or broth. This prevents drying out and keeps the flavors intact. To freeze portions, let the dish cool completely first. Use freezer-safe containers or bags. This keeps it fresh for up to three months. When you’re ready to eat, thaw it in the fridge overnight. Reheat it gently using the microwave or skillet method. This will bring back the great taste of the chicken rice bowl. For the full recipe, check out the detailed version above. To make a vegetarian version, you can swap chicken for tofu or beans. Use firm tofu, diced, and sauté it until golden. For beans, black beans or chickpeas work well. Adjust the spices to keep the flavor bold. You can also add more veggies like bell peppers or zucchini for extra texture and taste. Jasmine rice is a top choice for its fragrance and softness. You can also use basmati rice for a nutty flavor. Brown rice adds a hearty texture and is more nutritious. If you want low-carb, try cauliflower rice for a fresh twist. Yes, you can prepare the rice and chicken ahead of time. Cook and store them separately in the fridge. This helps keep the rice from getting mushy. You can assemble the bowl right before serving. It’s a great option for meal prep. Many local eateries offer tasty chicken rice bowls. Chains like Chipotle and Panera often have similar dishes. Check out local food trucks or casual dining spots for unique takes on this dish. Yelp or Google Maps can help you find nearby options. Pair your chicken rice bowl with a light salad or fresh guacamole. Chips and salsa add a nice crunch. For drinks, a lime soda or iced tea complements the flavors well. You can also serve a refreshing cucumber salad on the side. This article covered how to make a delicious Chicken Rice Bowl with street corn. We discussed the essential ingredients, from cooked jasmine rice to spices. I shared easy steps for cooking chicken and corn, along with tips for a great presentation. You learned about variations and smart storage tips to keep your meal fresh. In the end, this dish is tasty and flexible. Enjoy making it your own!](https://lazychefmagic.com/wp-content/uploads/2025/07/301e5ac5-49e2-4b6f-b8ff-438e5597c3e1.webp)
Are you ready to elevate your weeknight dinners? This Savory Chicken Rice Bowl with Street Corn recipe brings bold flavors
![- 2 boneless, skinless chicken breasts - 2 tablespoons olive oil - 2 teaspoons dried oregano - 1 teaspoon garlic powder - 1 teaspoon paprika - Salt and freshly ground black pepper to taste - 4 whole grain pita breads - 1 cup cherry tomatoes, halved - 1 small cucumber, diced - 1 small red onion, thinly sliced - Fresh parsley, chopped, for garnish - 1 cup Greek yogurt - 1 clove garlic, minced - 1 tablespoon fresh dill, chopped - 1 tablespoon lemon juice - 1/2 cucumber, grated and well-drained - Salt to taste For serving size, this recipe makes four gyros. Each gyro uses one pita. If you want more, just double the ingredients. If you need fewer gyros, cut the amounts in half. Make sure to keep the same ratio for the spice mix to keep the flavor right. This way, you can enjoy a great meal, no matter how many guests you have. To start, mix the marinade. In a bowl, whisk together these ingredients: - 2 tablespoons olive oil - 2 teaspoons dried oregano - 1 teaspoon garlic powder - 1 teaspoon paprika - Salt and freshly ground black pepper to taste Add the chicken breasts and coat them well. For the best flavor, let the chicken marinate. I suggest at least 30 minutes, but 2 hours is even better. This helps the chicken soak up all those tasty flavors. While the chicken marinates, let’s make the tzatziki. In a bowl, combine: - 1 cup Greek yogurt - 1 clove garlic, minced - 1 tablespoon fresh dill, chopped - 1 tablespoon lemon juice - 1/2 cucumber, grated and well-drained - Salt to taste Mix everything well. Cover the bowl and chill it in the fridge. This waiting time allows the flavors to blend nicely. For an extra kick, try adding more dill or garlic to taste. Now, it’s time to cook the chicken. Preheat your grill or skillet over medium-high heat. Once hot, add the marinated chicken breasts. Grill or pan-cook them for about 6-7 minutes per side. The chicken should turn golden brown and reach an internal temperature of 165°F (75°C). After cooking, let the chicken rest on a plate for a few minutes. This makes it juicier when you slice it. While the chicken rests, warm your pita bread. You can do this on the grill or in a dry skillet. Heat the pita for about 1-2 minutes on each side. You want them soft and slightly toasted. This makes them easier to wrap around the fillings. Now comes the fun part: assembling the gyros! On each warm pita, layer: - Sliced chicken - Halved cherry tomatoes - Diced cucumber - Thinly sliced red onion Drizzle a generous amount of tzatziki sauce on top. This adds freshness and creaminess. Finally, sprinkle some fresh chopped parsley over the filled pitas. Wrap the pita around the filling, and it’s ready to eat. Enjoy your Mediterranean Chicken Gyros with Tzatziki Delight! For a full recipe, check out the [Full Recipe]. To get the best taste, adjust the seasonings to fit your style. If you love garlic, add more garlic powder. Enjoy a bit of heat? A pinch of cayenne pepper adds a nice kick. Taste your marinade before adding the chicken. This way, you can make changes as needed. For a richer flavor, marinate the chicken for two hours or more. This allows the spices to soak in deeply. Serve your gyros with fresh sides. A Greek salad pairs well with the savory chicken. Roasted vegetables add color and nutrition. For presentation, stack the gyros on a large platter. Add colorful sides around them. This makes your meal look appealing and festive. Use fresh herbs like parsley to garnish the dish for a nice touch. Watch out for overcooking the chicken. Cooking it too long makes it dry. Aim for a golden brown on each side. Use a meat thermometer to check if it’s done. The inside should reach 165°F (75°C). Also, don’t skip the resting period. Let the chicken sit for a few minutes after cooking. This keeps the juices locked in and makes each bite tender. {{image_4}} You can use different proteins for gyros. Pork, beef, or tofu work well. Each option brings its own flavor. When cooking pork or beef, aim for medium doneness. This keeps the meat juicy. For tofu, press it to remove moisture. Marinate it like chicken for great taste. To make gyros vegetarian, swap chicken for grilled vegetables. Zucchini, bell peppers, and mushrooms are tasty choices. You can also try a vegan tzatziki. Use cashew yogurt or coconut yogurt as a base. Blend it with garlic, lemon, and grated cucumber. This keeps the fresh taste of tzatziki. Add spices to change up the flavor. Consider cumin, coriander, or smoked paprika. Fresh herbs like mint or basil also add a nice touch. You can also mix in different vegetables. Consider adding roasted red peppers or artichokes. They give a unique twist to each bite. For even more ideas, check out the Full Recipe for Mediterranean Chicken Gyros with Tzatziki Delight! To keep your gyros fresh, place leftovers in an airtight container. Store them in the refrigerator. Gyros stay good for about three days. Tzatziki sauce also lasts for three days when stored correctly in the fridge. Make sure to seal it tightly to avoid drying out. To freeze gyros, separate the chicken, veggies, and pita. This helps keep each component fresh. Place them in freezer bags or containers. They can last up to three months in the freezer. When you want to eat them, thaw the chicken in the fridge overnight. Reheat it on the stove or grill until hot. Warm the pita bread in a skillet for a few minutes. To save time, prepare ingredients ahead of time. Marinate the chicken and make the tzatziki sauce the day before. Chop the veggies and store them in the fridge. When you’re ready to eat, just assemble the gyros. This way, you can enjoy a fresh meal in minutes. To make tzatziki, you need simple ingredients. Start with these: - 1 cup Greek yogurt - 1 clove garlic, minced - 1 tablespoon fresh dill, chopped - 1 tablespoon lemon juice - 1/2 cucumber, grated and drained - Salt to taste Mix all these ingredients in a bowl. Stir until smooth. Chill it in the fridge for at least 30 minutes. This helps the flavors blend well. Yes, you can use store-bought tzatziki. It saves time and may taste good. However, homemade tzatziki is fresher and can be tailored to your taste. Store-bought may have preservatives and less flavor. Try both to see what you prefer. Serve gyros on a large platter. Stack the gyros high for a fun look. Add colorful sides like Greek salad or roasted veggies. This makes the meal more inviting. You can also use parchment paper for easy grabbing. Marinate chicken for at least 30 minutes. For deeper flavors, let it sit for up to 2 hours. This time allows the spices to soak into the meat. Don't exceed 2 hours, as it can make the chicken too salty. Yes, you can use alternatives. Try lettuce wraps for a low-carb option. Tortillas or flatbreads also work well. You can even serve the chicken and toppings over rice or salad. Get creative with how you enjoy your gyros! Great sides include: - Greek salad - Roasted vegetables - Hummus and pita chips - Rice pilaf These sides complement the flavors of the gyros. They add variety and color to your meal, making it even more enjoyable. You learned how to make delicious gyros from start to finish. We covered key ingredients, from chicken to tzatziki. You also found tips for marinating, cooking, and assembling your dish. Remember to avoid common mistakes, like overcooking the chicken. Explore variations, such as using different proteins or creating vegan options. With these steps, you can serve tasty gyros that impress everyone. Enjoy your cooking and share these flavors with friends!](https://lazychefmagic.com/wp-content/uploads/2025/07/c9862c5d-7673-4d1e-8cf9-b712b840ab5d.webp)
Are you ready to dive into a world of flavor? Mediterranean Chicken Gyros with Tzatziki Delight bring the sunshine of

Looking for a tasty dinner option that’s quick and easy? Greek Chicken Meatballs are the answer! Bursting with flavor, these
![- 1 pound boneless, skinless chicken thighs - 2 tablespoons olive oil - 2 teaspoons ground cumin - 2 teaspoons ground paprika - 1 teaspoon ground turmeric - 1 teaspoon ground coriander - ½ teaspoon cayenne pepper - 4 cloves garlic, minced - Zest and juice of 1 lemon - Salt and freshly ground black pepper to taste - 2 cups cooked quinoa or fluffy rice For a perfect Chicken Shawarma Bowl, the main ingredient is chicken thighs. They stay juicy and tender when cooked. The marinade brings out rich flavors. It contains olive oil, spices, garlic, lemon zest, and juice. Each component plays a key role in making the chicken tasty. - 1 cup cherry tomatoes, halved - 1 cucumber, finely diced - ½ cup red onion, thinly sliced - 1 cup fresh parsley, roughly chopped The fresh vegetables add color and crunch. Cherry tomatoes burst with sweetness. Cucumbers bring a refreshing crunch. Red onion gives a mild bite. I also like to add parsley for a bright finish. These veggies make the dish vibrant and healthy. - ½ cup tahini sauce for drizzling - Optional: pickled vegetables for a tangy garnish Tahini sauce is a must-have for this bowl. It adds creaminess and flavor. You can drizzle it generously over the chicken and grains. For an extra punch, add pickled vegetables. They offer a tangy contrast and elevate the taste. This combination of ingredients makes the Chicken Shawarma Bowl not just delicious but also fun to prepare. You can find the full recipe to guide you through each step. To start, gather your marinade ingredients. In a medium bowl, mix: - 2 tablespoons olive oil - 2 teaspoons ground cumin - 2 teaspoons ground paprika - 1 teaspoon ground turmeric - 1 teaspoon ground coriander - ½ teaspoon cayenne pepper - 4 cloves garlic, minced - Zest and juice of 1 lemon - Salt and pepper to taste Whisk these together until smooth. This mix will give your chicken great flavor. Next, add the chicken thighs. Make sure they are coated well in the marinade. Cover the bowl with plastic wrap. Let it sit in the fridge for at least one hour. For the best taste, leave it overnight. When you are ready to cook, preheat your grill or grill pan to medium-high heat. Take the chicken from the fridge. Let it sit for about 10 minutes to reach room temperature. This helps it cook evenly. Grill the chicken for about 6-7 minutes on each side. You want the chicken to reach an internal temperature of 165°F (75°C). This step ensures it is fully cooked. After grilling, let the chicken rest for 5 minutes. Resting keeps it juicy. Then, slice the chicken into thin strips. Now it’s time to build your bowl. Start with a base. Use 2 cups of cooked quinoa or fluffy rice. Place it in each serving bowl. Next, arrange the sliced chicken on top of the grain. Add a mix of fresh veggies. Use: - 1 cup cherry tomatoes, halved - 1 cucumber, finely diced - ½ cup red onion, thinly sliced - 1 cup fresh parsley, roughly chopped This makes your bowl look colorful and fresh. Finally, drizzle with ½ cup of tahini sauce. If you like tangy flavors, add pickled vegetables on top. Serve your Chicken Shawarma Bowl warm. Enjoy the burst of flavors! For more detailed steps, check the Full Recipe. Marinating chicken is key for great flavors. Always use a mix of oil, spices, and acid. For this recipe, lemon juice adds a nice zing. Make sure to coat the chicken fully in the marinade. Cover it tightly in the fridge. For the best taste, marinate for at least one hour. If you have time, marinate overnight for deeper flavor. You don’t have to grill your chicken if you prefer. You can use a skillet or oven instead. Just make sure your pan is hot before adding the chicken. Cook on medium heat to keep it juicy. Avoid overcooking; aim for an internal temperature of 165°F. Letting the chicken rest after cooking keeps it moist. A well-arranged bowl is eye-catching and tasty. Start with a base of quinoa or rice. Lay the sliced chicken on top neatly. Add colorful veggies for a vibrant look. Sprinkle parsley for freshness and color. Drizzle tahini sauce generously over the top. For extra fun, add pickled vegetables on the side. Serve while warm for the best experience. Check the [Full Recipe] for more tips and steps! {{image_4}} You can easily change the Chicken Shawarma Bowl to fit your needs. If you want a gluten-free option, use quinoa or rice as your base. Both are naturally gluten-free and perfect for this dish. You can also swap the chicken for chickpeas, tofu, or tempeh for a vegan option. These proteins take on the marinade well, making them tasty. To add some kick, try a spicy twist! You can increase the cayenne pepper or add harissa. If you prefer herbs, use fresh dill or mint for a fragrant change. For sauces, tahini is classic, but you could use yogurt sauce or even hot sauce. Each choice can change the bowl's flavor profile and keep meals exciting. Feel free to explore other grains for your base. Farro, bulgur, or even couscous work great. Each grain adds a unique texture. You can also serve the chicken over a bed of fresh greens. This makes the dish lighter and more refreshing. If you want something quick, wrap the ingredients in a flatbread. It makes for a fun and portable meal. After enjoying your Chicken Shawarma Bowl, store leftovers in the fridge. Use an airtight container for best results. This helps keep your meal fresh for up to three days. If you want to save it longer, freeze the chicken and grains separately. Place them in freezer bags and remove as much air as possible. This way, they can last for up to three months. When it's time to eat your leftovers, reheating is key. For chicken, use a skillet on medium heat. Add a splash of water to keep it moist. Heat for about 5 minutes, stirring often. For grains and vegetables, you can use the microwave. Place them in a bowl with a lid. Heat for 1-2 minutes, stirring halfway through. This keeps everything fresh and tasty. To make meal prep easy, prepare ingredients in advance. Marinate the chicken the night before. Cook grains and chop vegetables ahead of time. Store them in separate containers. Use clear glass containers to see what you have. This helps you grab and go during busy days. You can mix and match for quick meals throughout the week. For a balanced bowl, add protein, grains, and fresh veggies. Chicken shawarma is a popular Middle Eastern dish. Its roots trace back to the Ottoman Empire. People enjoy this dish worldwide for its rich flavors. Shawarma uses marinated meat, typically grilled and served with toppings. The spices in shawarma include cumin, paprika, and turmeric. These spices add depth and warmth to the dish. Shawarma is often served in wraps or bowls, making it versatile. It symbolizes the blend of cultures and flavors in the region. To add more heat to your chicken shawarma, adjust the cayenne pepper. You can also add chili powder for extra spice. If you like it really hot, try adding sliced jalapeños. Mixing in a dash of hot sauce can also boost the flavor. Remember to taste as you go to find your perfect level of heat. You can start with a little spice and add more if needed. This way, you control the heat and enjoy every bite. Yes, you can prepare your chicken shawarma bowl ahead of time. Cooked chicken stays fresh in the fridge for about four days. Store your chicken and veggies separately to keep them fresh. You can also cook the grains in advance and store them. When you're ready to eat, just reheat your chicken and grains. This method saves time and makes meals easy. You can enjoy a delicious chicken shawarma bowl all week long with smart planning. To make your Chicken Shawarma Bowl, start with juicy marinated chicken thighs. Layer fresh veggies like tomatoes and cucumbers, then top with creamy tahini sauce. Remember, don’t skip the details—how you store and reheat leftovers matters! You can also try new flavors or bases to match your taste. This dish is versatile and easy to customize. Enjoy making it your own. Eating well can be fun and rewarding!](https://lazychefmagic.com/wp-content/uploads/2025/07/506b58b9-a5f1-4a4e-8390-7267e6e82eb4.webp)
Craving a meal that’s both delicious and easy to prepare? Look no further! A Chicken Shawarma Bowl delivers savory flavor,
![- Mixed greens (arugula, spinach, romaine) - Red cabbage - Carrots - Cucumber - Red bell pepper - Edamame - Sesame oil - Soy sauce - Honey - Lime juice - Salt and pepper - Toppings: Roasted peanuts, cilantro, green onions This Peanut Crunch Salad shines with fresh greens and colorful veggies. Start with a mix of arugula, spinach, and romaine for a base that’s both crunchy and tender. Adding red cabbage gives it a beautiful pop of color and sweetness. Grated carrots add a nice crunch and a hint of earthiness. Next, you can layer in crisp cucumber and sliced red bell pepper. Both bring freshness and a slight crunch that makes each bite delightful. Edamame adds protein and a fun texture. For the dressing, combine sesame oil, soy sauce, honey, and lime juice. This mix creates a tangy and sweet flavor that ties the salad together. Adjust salt and pepper to your taste. Finally, top your salad with roasted peanuts, cilantro, and green onions. The peanuts provide a great crunch, while the herbs add brightness. For the full recipe, see [Full Recipe]. Start by gathering your fresh greens. I love using arugula, spinach, and romaine together. They add a great mix of flavors and textures. Next, thinly slice the red cabbage. The bright color makes the salad pop. Grate the carrots and cut the cucumber into julienne strips. Slice the red bell pepper into thin pieces. Don’t forget the shelled edamame; it adds protein. Lastly, chop the cilantro and green onions. Now, grab a large salad bowl. Mix all these greens and veggies together. Arrange them nicely for a pretty look. The vibrant colors will catch the eye and make your salad inviting. In a small bowl, gather your dressing ingredients: sesame oil, soy sauce, honey, lime juice, salt, and pepper. Measure each ingredient carefully. This mix gives the salad a tasty kick. Whisk everything together until smooth. You want the honey to dissolve well. This dressing is key to tying all the flavors together. Now comes the fun part—assembling your salad! Pour the dressing over the salad base. Toss gently to coat all the veggies. Make sure everything is covered in that delicious dressing. Right before serving, sprinkle the chopped roasted peanuts on top. They add a nice crunch and extra flavor. Enjoy this fresh and flavorful Peanut Crunch Salad! For more details, check the Full Recipe. To make your Peanut Crunch Salad extra crunchy, choose fresh ingredients. Fresh greens, crisp veggies, and crunchy peanuts add texture. Look for greens with vibrant colors. They should feel firm and crisp. The fresher, the better! Toasting your peanuts can boost flavor and crunch. Heat a pan over medium heat. Add the peanuts and toast them for 3-5 minutes. Stir often to avoid burning. Once they turn golden brown, let them cool before adding to the salad. You can toast other nuts too, like almonds or cashews, for more variety. Storing salad components separately helps keep them fresh. Place greens in one container and veggies in another. Keep the dressing in a small jar. This way, your salad stays crisp until serving time. Add the dressing just before serving. If you dress the salad too early, the greens can wilt. Pour the dressing over the salad and toss it gently. This keeps everything fresh and tasty. Peanut Crunch Salad pairs well with grilled chicken or shrimp. It’s also great with rice or quinoa as a light meal. Serve it alongside a warm soup for a cozy lunch. For a beautiful dish, arrange the salad in layers. Start with greens, then add veggies, and top with peanuts. Use a big bowl to show off the colors. A sprinkle of cilantro can add a lovely touch on top. Enjoy the fresh and vibrant flavors of your Peanut Crunch Salad! For the full recipe, check out the detailed instructions above. {{image_4}} You can change up the nuts or seeds in this salad. Try cashews, sunflower seeds, or pumpkin seeds. Each adds a fun twist. If you want to swap salad greens, use kale or mixed baby greens instead. These options still give you that fresh crunch. To add some spice, sprinkle in red pepper flakes or black pepper. You can also try fresh herbs like mint or basil. For a different dressing, mix peanut butter with yogurt or use a sesame ginger dressing. These choices make the salad exciting and unique. To make the salad vegan, skip the honey and use maple syrup. For gluten-free, ensure your soy sauce is gluten-free. If you want a low-calorie version, use less oil and more lime juice. These tweaks help meet different dietary needs while keeping it tasty. To keep your Peanut Crunch Salad fresh, store it in an airtight container. This helps keep the ingredients crisp. Place the salad in the fridge right after making it. You should eat it within 2-3 days for the best taste. If you add peanuts, do this just before serving. This keeps them crunchy. Freezing salad is tricky since fresh greens do not freeze well. However, you can freeze individual salad components. For example, you can freeze edamame or chopped bell peppers. Just make sure to store them in freezer bags. If you have leftover salad, try to separate the dressing first. This way, the salad stays fresh longer. You can use it within a day or two. Look for changes in color or smell. If the salad looks brown or smells off, it’s time to toss it. Soggy greens signal spoilage as well. Always check the peanuts too. If they taste stale or bitter, don’t eat them. Safe food practices help you avoid illness. Store leftovers properly and always wash your hands before handling food. Enjoy this Peanut Crunch Salad fresh for the best flavors and health! For the full recipe, see the section above. To make Peanut Crunch Salad, follow these easy steps: 1. Grab a large salad bowl. Add mixed greens like arugula, spinach, and romaine. 2. Slice red cabbage, grate carrots, and julienne cucumber. Add these to the bowl. 3. Chop red bell pepper and shelled edamame. Mix them in with the other veggies. 4. Finely chop fresh cilantro and green onions. Toss them into the salad. 5. For the dressing, combine sesame oil, soy sauce, honey, lime juice, salt, and pepper in a small bowl. 6. Pour the dressing over the salad and toss gently to coat all ingredients. 7. Just before serving, sprinkle roasted peanuts on top for a crunchy finish. 8. Serve immediately and enjoy this fresh flavor explosion! For a complete look at the ingredients and steps, check the Full Recipe. If you have a peanut allergy, you can use different nuts or seeds. Here are some options: - Almonds: Sliced or chopped, they add a nice crunch. - Cashews: These provide a creamy texture. - Sunflower seeds: Great for a nut-free option. - Pumpkin seeds: They add flavor and texture. Always check for allergies before serving. Each substitute offers a unique taste, so feel free to experiment! Yes, you can prep this salad ahead of time. Here are some tips: - Wash and chop your greens and veggies. Store them in airtight containers. - Keep the dressing separate to avoid sogginess. - Combine salad ingredients and dressing just before serving for the best taste. This way, you can enjoy a fresh salad anytime! This blog post highlighted how to make a crunchy peanut salad. We covered fresh greens, vibrant vegetables, and simple dressing ingredients. Following easy steps, you can mix and assemble your salad for a tasty dish. Remember to enhance crunchiness with fresh ingredients and toasted nuts. You can even modify the salad to fit different diets. With proper storage, your salad will stay fresh longer. Enjoy your flavorful creations and feel free to share your own twists on this recipe. Happy cooking!](https://lazychefmagic.com/wp-content/uploads/2025/06/dbcfeba9-213a-4454-bcd4-c43c4aae78a5.webp)
Looking for a fresh and crunchy salad that bursts with flavor? Look no further! My Peanut Crunch Salad is a
![To make this vibrant salad, you will need: - 8 oz elbow macaroni or fusilli pasta - 2 cups corn kernels (fresh, frozen, or canned) - 1 red bell pepper, diced - 1 jalapeño, seeded and finely minced - ½ cup red onion, finely chopped - 1 cup cherry tomatoes, halved - ½ cup crumbled cotija cheese - ¼ cup fresh cilantro, chopped - 3 tablespoons mayonnaise - 2 tablespoons sour cream - 2 tablespoons freshly squeezed lime juice - 1 teaspoon chili powder - Salt and black pepper to taste If you're missing some ingredients, here are a few swaps: - Use any small pasta shape if you can't find elbow macaroni or fusilli. - Swap cotija cheese with feta or queso fresco for a similar flavor. - For a creamier texture, try Greek yogurt instead of sour cream. - Use corn salsa for a zesty kick instead of plain corn. This pasta salad can fit different diets: - For gluten-free, choose gluten-free pasta made from rice or quinoa. - If you want a vegan option, replace the mayonnaise and sour cream with vegan alternatives. - Omit the cheese or use a dairy-free cheese for a full vegan dish. - This salad is naturally vegetarian, making it a great choice for plant-based diets. Feel free to explore these options, customizing the salad to your taste and dietary needs! Start by boiling a large pot of salted water. The salt helps the pasta taste better. Once the water boils, add 8 oz of elbow macaroni or fusilli pasta. Cook it according to the package instructions. You want it to be al dente, which means it should be firm to the bite. This usually takes about 7-10 minutes. After cooking, drain the pasta and rinse it under cold water. This stops the cooking process and keeps it from getting mushy. While the pasta cools, heat a large skillet over medium heat. Add 2 cups of corn kernels. You can use fresh, frozen, or canned corn. Sauté the corn for about 5-7 minutes. Stir it occasionally until it gets a nice char and smells great. The charring brings out the corn's natural sweetness. Once it's done, remove it from the heat and let it cool. In a large mixing bowl, combine the cooled pasta and charred corn. Add your diced red bell pepper, minced jalapeño, finely chopped red onion, halved cherry tomatoes, and chopped cilantro. Mix everything gently to make sure the ingredients are evenly spread. This is where all the flavors start to come together. In a small bowl, whisk together the mayonnaise, sour cream, freshly squeezed lime juice, chili powder, and a pinch of salt and pepper. Whisk until the dressing is smooth and creamy. This dressing adds richness and ties the whole salad together. Drizzle the dressing over the pasta and vegetable mixture. Use a spatula to gently toss everything together. Make sure each piece is coated well with the dressing. After mixing, sprinkle ½ cup of crumbled cotija cheese over the top. Toss it lightly again to distribute the cheese. Finally, cover the salad with plastic wrap and chill it in the fridge for at least 30 minutes. This resting time lets the flavors meld beautifully. Serve it in a large bowl, and don't forget to garnish with extra cilantro and cotija cheese for that perfect touch. If you want, add lime wedges on the side for extra zest. Enjoy your meal! For more details, check the Full Recipe. To make your Mexican Street Corn Pasta Salad burst with flavor, use fresh corn. The natural sweetness of fresh corn adds depth. Lightly charring it in a skillet enhances its taste. Sauté the corn until it gets a nice golden color. This step gives it a smoky flavor that pairs well with the other ingredients. Don't forget the lime juice! It brightens the dish and balances the creaminess of the dressing. Prep your ingredients ahead of time. Chop the vegetables and make the dressing before cooking the pasta. You can even cook the pasta a day in advance. Store it in the fridge with a bit of olive oil to prevent sticking. If you’re short on time, use frozen corn. It cooks quickly and still tastes great. Canned corn works too, but rinse it well to remove excess salt. Serve your salad in a large, colorful bowl to show off its vibrant colors. Garnish with extra chopped cilantro and a sprinkle of cotija cheese on top. This adds a nice visual touch. For extra zing, add lime wedges on the side. Guests can squeeze fresh lime juice over their servings. This small detail makes the dish even more appealing and fun! {{image_4}} You can make this dish even heartier by adding proteins. Grilled chicken adds a smoky flavor. Just chop it into bite-sized pieces and toss it in. Shrimp is another great option. Cook them until they are pink and tender. Then mix them in with the pasta and veggies. You can also try black beans for a nice twist. They boost the protein and add a creamy texture. To make this dish vegetarian, keep the cheese but skip the meat. You can use more veggies like avocado or zucchini. For a vegan option, swap the cotija cheese for a plant-based version. Use vegan mayonnaise and sour cream to keep the creaminess. This way, everyone can enjoy the salad. The dressing can change the whole vibe of your salad. For a zesty kick, add some chipotle sauce to the mayo. This will give a smoky flavor. If you want it creamier, mix in some Greek yogurt. For a refreshing twist, try using a vinaigrette made with olive oil and lime juice. This adds bright notes that pair well with the corn and peppers. These variations let you customize the salad to fit any taste or diet you want. Enjoy experimenting! You can find the Full Recipe to get started. To store your Mexican Street Corn Pasta Salad, place it in an airtight container. Make sure to seal it tightly. This keeps moisture in and air out. If you have any leftover cotija cheese, store it separately to maintain its texture. The salad stays fresh in the fridge for about 3 to 5 days. After that, the flavors may fade. If it looks or smells off, it's best to toss it away. Always check before eating leftovers. You can serve this dish chilled or at room temperature. If you prefer it warm, gently heat it in a skillet over low heat. Add a splash of lime juice to brighten the flavors. If it's too dry, mix in a bit of dressing. Enjoy this refreshing dish anytime! Mexican Street Corn Pasta Salad mixes pasta with fresh corn and bold flavors. It takes inspiration from elote, a popular Mexican street food. This dish includes ingredients like corn, jalapeño, and cotija cheese. The creamy dressing adds a tangy kick, making it a delightful summer dish. Yes, you can make this salad ahead of time. It tastes better when chilled for at least 30 minutes. You can prepare the salad a few hours or even a day in advance. Just store it in the fridge until you’re ready to serve. To make it spicier, add more jalapeño or some diced serrano peppers. You can also include a dash of hot sauce in the dressing. For a milder version, use less jalapeño or remove the seeds. You can also skip the chili powder if you want to tone it down. This pasta salad pairs nicely with grilled meats like chicken or shrimp. It also goes well with tacos or quesadillas. For a light meal, serve it with a crisp green salad. Add some fresh lime wedges on the side for an extra zing. You can find the complete recipe for Mexican Street Corn Pasta Salad [Full Recipe]. Be sure to explore different variations and tips to make this dish your own! This article covered everything you need for Mexican Street Corn Pasta Salad. You learned about the ingredients, cooking steps, and tips for great flavor. The recipe can fit many diets and offers tasty variations. Plus, you know how to store leftovers. In the end, this dish is fun and easy to make. Whether for a meal or a gathering, it will impress everyone. Enjoy creating and sharing this tasty salad!](https://lazychefmagic.com/wp-content/uploads/2025/06/30c7d595-f3c8-4597-aec3-0a76293dd938.webp)
Looking for a refreshing dish to elevate your summer gatherings? Mexican Street Corn Pasta Salad is your new go-to! This
