Skip to content
DisclaimerTerms Of UseGDPR PolicyCookie Policy

lazychefmagic

  • Home
  • Drinks
  • Appetizers
  • Dinner
  • Dessert
  • About
  • Contact
  • Privacy Policy
DisclaimerTerms Of UseGDPR PolicyCookie Policy

Amanda

To create a Biscoff cheesecake, you will need the following ingredients: - 1 cup Biscoff cookie crumbs - 4 tablespoons unsalted butter, melted - 16 oz cream cheese, softened to room temperature - 1 cup powdered sugar - 1 teaspoon vanilla extract - 1 cup heavy whipping cream - 1/2 cup Biscoff spread - Whipped cream for topping - Extra Biscoff cookies for garnish These ingredients come together to create a creamy, rich dessert that is sure to impress. Each component plays a key role in building flavor and texture. The Biscoff cookie crumbs form a delicious base, while the cream cheese and whipping cream create a light and airy filling. Biscoff spread adds a unique taste that many love. Don't forget the whipped cream and extra cookies for the perfect finish! For the full recipe, you can check out the details above. Start by mixing 1 cup of Biscoff cookie crumbs with 4 tablespoons of melted butter. Stir until every crumb is coated. Then, press this mixture into the bottom of a 9-inch springform pan. Make sure it's even and packed tightly. Place the pan in the fridge while you make the filling, so it sets nicely. In a large bowl, beat 16 oz of softened cream cheese until it's smooth. This should take about 2 to 3 minutes. Next, add 1 cup of powdered sugar a little at a time. Keep mixing until the sugar is fully combined, and the mixture is creamy. Now it's time for flavor! Mix in 1 teaspoon of vanilla extract and 1/2 cup of Biscoff spread. Blend until everything is smooth and well combined. The Biscoff spread adds a rich taste that pairs perfectly with the cream cheese. In a separate bowl, beat 1 cup of heavy whipping cream until you see soft peaks. This takes about 3 to 5 minutes. Gently fold the whipped cream into the cream cheese mixture. Be careful, as you want to keep the air in the whipped cream for a light texture. Pour the cheesecake filling over the crust in the springform pan. Use a spatula to smooth the top. Cover the pan and place it in the fridge. Let it chill for at least 4 hours, but overnight is better for a firmer texture. When the cheesecake is set, carefully remove it from the springform pan. Top it with a generous dollop of whipped cream and sprinkle extra Biscoff cookies on top for garnish. This adds both flavor and a beautiful look. For the *Full Recipe*, check the earlier section to gather all the ingredients and their exact measurements. To get creamy cheesecake, start with soft cream cheese. Leave it out for at least an hour before mixing. This helps it blend smoothly. If you’re in a hurry, cut it into smaller pieces to soften faster. When whipping your cream, avoid over-mixing. Stop as soon as you see stiff peaks. If you mix too long, the cream can turn grainy. Gently fold the whipped cream into the cream cheese mixture. This keeps it light and airy. Biscoff cheesecake pairs well with coffee or tea. A glass of cold milk also works great. For gatherings, cut small slices. This way, everyone can enjoy a taste. You can serve it on a pretty platter for a nice touch. Make your cheesecake look special with creative plating. Use a squeeze bottle to drizzle Biscoff spread in fun patterns. You can also add whole Biscoff cookies on top for a nice look. This adds a nice crunch and a pop of color. {{image_4}} You can switch up the crust flavor by using different cookies. Try Oreos, graham crackers, or even gingersnaps. Each option adds its own unique taste. For the cheesecake filling, mix in flavors like almond extract or cocoa powder for a twist. You can also add a splash of coffee for a mocha vibe. The key is to balance the flavors with the Biscoff spread. If you need a gluten-free version, use gluten-free cookies for the crust. Many brands offer gluten-free options that taste just as good. For a vegan approach, substitute cream cheese with a plant-based cream cheese. Use coconut cream or a vegan whipped topping instead of heavy cream. These swaps keep the dessert creamy without dairy. Adding fresh fruits makes the cheesecake more vibrant. Sliced strawberries or blueberries add a pop of color and flavor. For the holidays, top with festive decorations. Use crushed candy canes in winter or caramel drizzle in fall. You can create a theme for any season with these fun toppings. To store leftovers properly, cover the cheesecake tightly with plastic wrap or foil. This keeps it fresh and prevents it from absorbing other odors. You can also use an airtight container. For short-term storage, a glass or plastic container works great. Make sure it seals well to keep moisture in. Can you freeze Biscoff cheesecake? Yes, you can! First, let the cheesecake cool completely. Then, slice it into pieces. Wrap each slice in plastic wrap and then in foil. This helps prevent freezer burn. To thaw, place the slices in the fridge overnight. For serving, I recommend letting it sit at room temperature for about 15 minutes. In the refrigerator, Biscoff cheesecake lasts about 4 to 5 days. Keep an eye on it and check for signs of spoilage. Look for changes in texture or odor. If it smells sour or has a watery layer, it’s time to toss it out. Enjoy your creamy dessert delight while it’s fresh! Making Biscoff cheesecake takes about 20 minutes of prep time. You must chill it for at least 4 hours. For the best taste, I suggest letting it chill overnight. This wait allows the flavors to mix well and the cheesecake to set perfectly. Yes, you can use homemade Biscoff cookies! They add a personal touch to your cheesecake. Just make sure they are similar in flavor and texture to store-bought ones. If you bake your own, let them cool completely before using them in the crust. Biscoff spread is a creamy spread made from crushed Biscoff cookies. It has a sweet, spiced flavor that pairs well with many desserts. You can use it in baking, as a topping, or even in smoothies. It adds a delicious richness to your cheesecake. To make a no-bake version, you can skip the oven. Just mix the filling as usual and set it in the fridge. You may want to increase the amount of whipped cream to help it hold its shape. This makes the cheesecake even creamier and easier to prepare. You can find Biscoff cookies and spread at most grocery stores. They are often located in the baking aisle or snack section. You can also buy them online at sites like Amazon. Look for special deals or bulk options for the best prices. This blog post covered everything you need to make a delicious Biscoff cheesecake. From gathering ingredients to tips for perfect texture, I aimed to give you clear steps to follow. Remember, it’s not just about taste; presentation matters too. Feel free to experiment with variations and adapt the recipe to your needs. Storing leftovers is important, so use proper guidelines. There’s joy in creating and sharing this dessert. Enjoy each slice and make sweet memories with family and friends!

Biscoff Cheesecake Creamy Dessert Delight

Are you ready to indulge in a creamy dessert delight? My Biscoff Cheesecake is a showstopper that merges rich flavors

- 4 salmon fillets (approximately 6 ounces each) - 1 tablespoon olive oil - Salt and black pepper, to taste - 1 teaspoon garlic powder - 1 teaspoon smoked paprika - Juice of 1 lime (for marinating) - 1 ripe mango, diced into small cubes - 1 small red onion, finely chopped - 1 red bell pepper, diced - 1 jalapeño, deseeded and minced finely - 1/4 cup fresh cilantro, chopped - 2 tablespoons lime juice (for salsa) - Additional salt, to taste The salmon is the star of this dish. I love using fresh salmon fillets. They are juicy and tender. The olive oil helps to keep the fish moist. It also adds a nice flavor. Salt and black pepper are key for taste. For the marinade, I rely on garlic powder and smoked paprika. These two spices add depth and warmth. The lime juice brightens everything. It gives a zesty kick that complements the salmon. Now, let’s dive into the mango salsa. The ripe mango is sweet and refreshing. Dicing it into small cubes makes it easy to eat. The red onion adds a sharp contrast. Diced red bell pepper brings in more color and crunch. I like to add a jalapeño for a touch of heat. It’s important to deseed it first. This way, the salsa won't be too spicy. Fresh cilantro ties all the flavors together. The lime juice in the salsa balances the sweetness of the mango. A pinch of salt enhances the overall taste. You can find the full recipe in the Tropical Salmon Delight section. This recipe is not just easy; it is also packed with flavors and healthy ingredients. - Preheat grill or skillet over medium-high heat. - Create marinade with olive oil, seasonings, and lime juice. Start by heating your grill or skillet. This step gets your cooking surface hot, which is key for great salmon. In a small bowl, mix together one tablespoon of olive oil, one teaspoon of garlic powder, one teaspoon of smoked paprika, and the juice of one lime. Add salt and black pepper to taste. This marinade adds so much flavor to the salmon. - Apply marinade to salmon and cook each side 4-5 minutes. - Check for doneness at 145°F (63°C). Take your salmon fillets and brush the marinade on both sides. Place the fillets on your hot grill or skillet. Cook them for about 4 to 5 minutes on each side. To know when they are done, check the internal temperature. It should reach 145°F (63°C). The salmon will be flaky and tender when cooked right. - Combine mango, onion, bell pepper, jalapeño, cilantro, and lime juice. - Toss ingredients gently and season with a pinch of salt. While your salmon cooks, let’s make the mango salsa. In a medium bowl, combine one diced ripe mango, one finely chopped small red onion, one diced red bell pepper, one minced jalapeño, and one-quarter cup of chopped cilantro. Drizzle with two tablespoons of lime juice and add a pinch of salt. Toss everything gently to mix. This salsa will brighten up your dish! Once the salmon is cooked, serve it with a generous scoop of mango salsa on top. Enjoy the fresh flavors! For the full recipe, refer to the Tropical Salmon Delight section. To get perfectly cooked salmon, start with a hot grill or skillet. This helps seal in moisture. Apply the marinade to both sides of the fillets. Cook each side for about 4-5 minutes. Use a fork to check if the salmon flakes easily. The internal temperature should reach 145°F (63°C). If it’s not done, give it another minute. Adding spices can boost the flavor of your salmon. Consider using cumin or cayenne for extra warmth. For the mango salsa, feel free to swap ingredients. You can use diced avocado instead of mango for a creamy texture. Pineapple adds a sweet twist, too. Adjust the heat by adding more jalapeño or using a milder pepper. Plating salmon with mango salsa can be fun and creative. Serve the salmon on a bed of mixed greens. This gives a nice pop of color. Add lime wedges on the side for a fresh touch. For a vibrant look, sprinkle extra cilantro on top. A drizzle of olive oil can add shine and flavor. Want more ideas? Check the Full Recipe for inspiration! {{image_4}} You can switch salmon for chicken or tofu. Both will taste great with mango salsa. For chicken, use boneless breasts or thighs. Cook them until they reach 165°F (74°C). Tofu is a good choice for a plant-based meal. Choose firm tofu for the best texture. Cook it until golden brown for added flavor. Feel free to mix up your salsa! You can add diced avocado or even pineapple. Avocado brings creaminess, while pineapple adds sweetness. Both will enhance the freshness of the dish. To adjust spice levels, try different peppers. Use mild bell peppers for no heat or jalapeños for a kick. You can also change the seasoning for new flavors. Fresh herbs like dill or basil work well. They add a bright taste that pairs nicely with fish. Different citrus juices can also change the vibe. Try lemon or orange for a fresh twist. Explore global spice blends, like za'atar or curry powder, for a unique flavor. To keep your salmon and mango salsa fresh, put leftovers in airtight containers. This helps prevent odors from mixing in the fridge. Store the salmon separately from the salsa. The salmon stays good for 3 days, while the salsa lasts about 2 days. Can you freeze salmon with mango salsa? Yes, but it's best to freeze the salmon alone. Wrap the salmon tightly in plastic wrap and then in foil. You can store it in the freezer for up to 3 months. Mango salsa does not freeze well due to its texture. When ready to use, thaw the salmon in the fridge overnight before cooking. To reheat salmon, place it in a skillet over low heat. Cover it with a lid to keep moisture in. This helps it stay flaky and juicy. For salsa, you can enjoy it cold straight from the fridge. If you prefer warm salsa, give it a quick stir in a pan over low heat. Avoid cooking it for too long to keep the fresh flavors. For more details on this dish, check the Full Recipe. Yes, you can use frozen salmon. Just make sure to thaw it first. Place it in the fridge overnight. If you need it fast, seal it in a bag and submerge it in cold water. This helps keep the fish fresh and tasty. You have great options for sides! Here are some ideas: - Steamed rice or quinoa pairs well. - A fresh green salad adds crunch. - Roasted vegetables bring extra flavor. Each of these sides complements the dish nicely. Store your leftover salmon in an airtight container. It can last up to three days in the fridge. For the mango salsa, eat it within two days for the best taste. Always check for any signs of spoilage before eating. If you don’t have lime juice, use lemon juice instead. It offers a similar tangy flavor. You can also try vinegar, like apple cider vinegar, for a different twist. Just remember to adjust the amount to taste. This blog post covered a delicious salmon recipe paired with fresh mango salsa. You learned about the key ingredients, simple cooking steps, and tips to enhance flavor. I shared ideas for variations and how to store leftovers properly. Cooking salmon can be easy and fun. With the right spices and fresh ingredients, you can impress anyone. Enjoy your meal, and don't be afraid to experiment with flavors. Happy cooking!

Salmon with Mango Salsa Flavorful and Easy Recipe

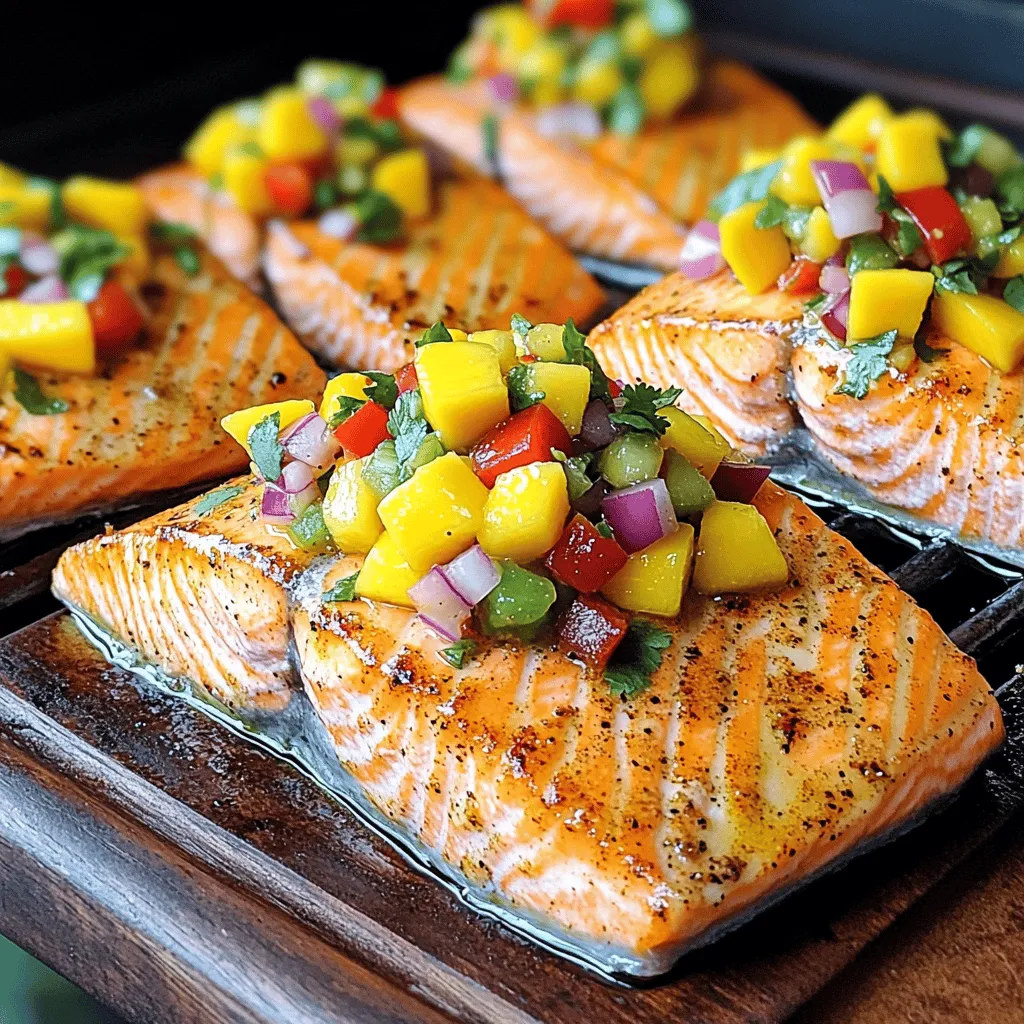
Are you ready to elevate your dinner game? This Salmon with Mango Salsa recipe is not only flavorful but also

To create the perfect mini chocolate tarts, gather the following ingredients: - 1 ½ cups all-purpose flour - ½ cup unsweetened cocoa powder - ½ cup powdered sugar - ½ cup unsalted butter, cold and diced into small cubes - 1 large egg yolk - 3 tablespoons ice water - 1 cup dark chocolate chips - 1 cup heavy cream - 1 tablespoon vanilla extract - Pinch of salt - Fresh raspberries for garnish - Fresh mint leaves for garnish These simple ingredients come together to form a rich and creamy dessert. Each element plays a key role in the final taste and texture. The all-purpose flour and cocoa powder create a sturdy yet tender crust. The butter ensures a flaky and rich base. The dark chocolate chips and heavy cream form a silky ganache that melts in your mouth. When you gather your ingredients, make sure to use high-quality chocolate. This choice will elevate your tarts to a whole new level. If you want to impress your guests or family, use fresh raspberries and mint leaves for garnish. They add a pop of color and a refreshing taste that balances the richness of the chocolate. If you follow the full recipe, you will find it easy to make these delightful treats at home. Enjoy the process and let your creativity shine! - Preparing the crumb mixture: Start by placing the all-purpose flour, cocoa powder, and powdered sugar in a food processor. Pulse until the mix is fine. This creates a rich base for your tarts. - Forming the dough: Next, add the cold, diced butter to the crumb mix. Pulse again until it looks like coarse crumbs. Then, add the egg yolk and ice water. Pulse until the dough starts to come together. If it feels too dry, add more ice water, a teaspoon at a time. - Chilling in the refrigerator: Take the dough and shape it into a disk. Wrap it tightly in plastic wrap. Chill it in the fridge for at least 30 minutes. This step helps the dough firm up. - Preheating the oven: While the dough chills, preheat your oven to 350°F (175°C). This ensures your tarts bake evenly. - Rolling out and shaping the tart shells: After chilling, roll out the dough on a floured surface to about 1/8 inch thick. Cut out circles that fit your mini tart pan or molds. Press the dough circles into the molds firmly. Use a fork to prick the bottoms, preventing puffing. - Heating the cream: In a medium saucepan, heat the heavy cream over medium heat. Watch for it to simmer, then take it off the heat. - Mixing with chocolate and flavorings: Stir in the dark chocolate chips, vanilla extract, and a pinch of salt. Let it sit for one minute before mixing until smooth. This creates a rich, creamy ganache. - Filling the shells with ganache: Carefully pour the ganache into the cooled tart shells. Fill each one about ¾ full for a perfect balance. - Chilling to set: Place the filled tarts in the fridge for at least one hour. This helps the ganache set nicely, making your tarts firm and ready to serve. Make sure to check the Full Recipe for more details. Enjoy creating these delightful mini chocolate tarts! - Ensuring perfect tart shells: Start with cold butter. This helps create a nice flaky texture. Don’t overwork the dough. Mix just enough to combine. Chill your dough well. This makes it easier to roll out. - Avoiding soggy bottoms: Prick the bottom of each shell with a fork. This allows steam to escape during baking. You can also use pie weights or dried beans for a crispier crust. Bake until the edges are firm but not browned. - Artful plating: Use a nice platter to show off your tarts. Place them in a neat row or a circle. This makes a great visual impact. Drizzle some extra ganache on the plate for flair. - Garnishing suggestions: Fresh raspberries and mint leaves add color and flavor. You can also sprinkle cocoa powder for a touch of elegance. A dusting of powdered sugar can give a sweet look. - What to avoid while making chocolate tarts: Don’t skip chilling the dough. This step is key for a perfect crust. Avoid using warm ganache; it can make the crust soggy. Lastly, don’t rush the setting time. Chilling is vital for the tarts to hold their shape. These tips ensure you create the perfect mini chocolate tarts. For more details, check the Full Recipe. Enjoy your baking! {{image_4}} You can add fun twists to your mini chocolate tarts. Here are a couple of great ideas: - Fruit-infused ganache: You can mix in pureed fruits. Raspberries, oranges, or even espresso create exciting flavors. Start by heating your cream with the fruit puree, then add chocolate chips. The result is a luscious and fruity filling. - Nut-based variations: Swap in nut butters or chopped nuts for a rich taste. Almond or hazelnut spreads add creamy texture. You can also fold in crushed nuts like pecans or walnuts. This gives your tarts a delightful crunch. Toppings can make your mini chocolate tarts even more special. Here are some options: - Alternative toppings and textures: Try whipped cream, chocolate shavings, or crushed cookies. Each adds a unique layer of flavor and texture. Consider sprinkling sea salt on top for a sweet-salty combo. - Seasonal flavor combinations: Use seasonal fruits to keep it fresh. Top with strawberries in spring, peaches in summer, or pumpkin in fall. These add color and brightness to your tarts. For the full recipe, check the detailed steps to create these delightful treats! To keep your mini chocolate tarts fresh, store them in the refrigerator. First, place them in an airtight container. This will stop them from drying out or picking up other smells. You can stack them carefully, but use parchment paper between layers if needed. For longer storage, you can freeze the tarts. Wrap each tart tightly in plastic wrap. Then, place them in a freezer-safe bag or container. This helps prevent freezer burn. When you’re ready to enjoy them, thaw them in the fridge overnight. Mini chocolate tarts can last about 3-4 days in the fridge. If you freeze them, they can stay good for about 2-3 months. Just remember to check for any changes in texture or taste before serving. Enjoy your delicious dessert with confidence! For the complete process, refer to the Full Recipe. You start by making the tart crust. Mix all-purpose flour, cocoa powder, and powdered sugar. Then, add cold diced butter, pulsing until it’s crumbly. Next, add an egg yolk and ice water. Pulse again until the dough comes together. Chill this dough for 30 minutes. After chilling, roll it out, cut rounds, and press them into tart molds. Bake until firm, then cool completely. For the ganache, heat heavy cream until it simmers. Stir in dark chocolate chips and vanilla until smooth. Fill the cooled tart shells and chill until set. For the full recipe, click [here](#Full Recipe). Yes, you can! Dark chocolate works best for a rich flavor, but you can try milk or white chocolate. Just remember, milk chocolate will make the ganache sweeter. Adjust the sugar in your crust if needed. Each type of chocolate gives a unique taste and texture to your tarts. Fresh raspberries and mint leaves make great garnishes. They add color and flavor. You can also drizzle melted chocolate on top. For a twist, try adding crushed nuts or edible flowers. These little touches make your tarts look fancy and inviting! To keep your tarts balanced, use dark chocolate for the ganache. It has less sugar and a deeper flavor. You can also reduce the powdered sugar in the crust. Taste the ganache before filling the tarts. Adjust the sweetness to your liking by adding a pinch of salt or a splash of espresso. Yes! You can replace all-purpose flour with a gluten-free flour blend. Almond flour works well too. Just make sure to check that your cocoa powder and chocolate are gluten-free. These swaps keep the crust delicious while making it safe for those with gluten sensitivities. You learned how to make mini chocolate tarts from scratch. We covered every step, from creating the tart crust to making rich ganache. You discovered tips for perfect results and how to present your tarts beautifully. You can try different fillings and toppings to mix things up. Remember to store your tarts right to keep them fresh. These sweet treats are perfect for any occasion. Enjoy making and sharing them!

Mini Chocolate Tarts Irresistible Dessert Delight

If you’re craving a sweet treat that’s easy to make and oh-so-delicious, look no further! Mini chocolate tarts are the

For a tasty Mediterranean Chicken Pasta Salad, gather these main ingredients: - 2 cups cooked penne pasta - 1 cup cooked and shredded chicken breast - 1/2 cup cherry tomatoes, halved - 1/2 cup cucumber, diced - 1/4 cup red onion, finely chopped - 1/3 cup Kalamata olives, pitted and sliced - 1/4 cup feta cheese, crumbled - 1/4 cup extra-virgin olive oil - 2 tablespoons red wine vinegar (optional) - 1 teaspoon dried oregano - Salt and freshly ground black pepper to taste - Fresh parsley, finely chopped for garnish These ingredients create a fresh and flavorful blend. The cooked penne pasta provides a hearty base. Adding shredded chicken gives it protein and heartiness. The vegetables add crunch and brightness. Kalamata olives and feta cheese add salty and rich flavors. You can also add some optional ingredients to customize your salad: - Additional vegetables: bell peppers, spinach - Protein options: grilled shrimp, chickpeas - Cheese variations: mozzarella or goat cheese These add-ins enhance the salad's flavor and texture. Feel free to mix and match based on what you love or have on hand. Want a vegetarian option? Chickpeas are a great choice! Looking for a seafood twist? Add grilled shrimp for a tasty change. For the full recipe, don’t forget to check out the recipe link! First, I cook the penne pasta in salted water. I boil it until it's al dente, which means it's firm but not hard. This usually takes about 10 minutes. After draining, I let it cool. Next, I shred the cooked chicken breast with two forks. This makes it easy to mix into the salad. In a big bowl, I combine the cooled pasta and shredded chicken. I stir until they mix evenly. Then, I add in the halved cherry tomatoes, diced cucumber, finely chopped red onion, and sliced Kalamata olives. I fold these in gently so they stay intact. In a smaller bowl, I whisk together the extra-virgin olive oil, red wine vinegar, and dried oregano. I add a pinch of salt and pepper for flavor. This dressing adds a nice zing. After whisking, I drizzle it over the pasta mixture. I use a spatula to toss everything gently, ensuring each piece gets coated. I sprinkle crumbled feta cheese on top of the salad. I stir carefully to mix it in without breaking it too much. Then, I taste the salad to see if it needs more salt or pepper. I let it rest for about 20 minutes at room temperature. This time helps the flavors blend nicely. Just before serving, I garnish it with chopped parsley for a fresh look. For the full recipe, check out the guide above. When making Mediterranean chicken pasta salad, a few tips can really make it shine. - Herbs and spices: Use fresh parsley, oregano, or basil for a great taste. You can also try a pinch of red pepper flakes for heat. - Resting time: Let the salad rest for 20 minutes before serving. This helps the flavors mix and become more vibrant. - Serving tips: Serve the salad in a shallow bowl. This not only looks nice but makes it easy to scoop. - Garnishing ideas: Add lemon wedges and extra parsley on top. This gives your salad a bright, fresh look. - Overcooking pasta: Cook the penne just until it’s al dente. This keeps it firm and tasty. - Not seasoning adequately: Don’t forget to taste your salad. Add salt and pepper to bring out the flavors. Follow these tips to create a salad that is not only fresh and flavorful but also a feast for the eyes! For the complete recipe, check out the [Full Recipe]. {{image_4}} You can easily switch up the pasta type in this salad. Try fusilli or farfalle for fun shapes. Whole wheat pasta adds fiber, while gluten-free options keep it light and friendly for everyone. If you want to change the protein, consider grilled shrimp or chickpeas. They each add a unique taste. You can also use rotisserie chicken for a quick fix. Each choice gives you a new twist on the classic flavor. A simple vinaigrette works great, but creamy dressings can add richness. Mix yogurt with herbs for a fresh, tangy option. To add zest, try lemon juice or a bit of mustard. These ingredients brighten the dish and enhance its flavors. You can adjust the dressing to suit your taste, making it more personal. This salad is not just for a bowl. You can turn it into a wrap using large lettuce leaves or tortillas. It makes for a fun lunch or picnic treat. You can also serve the salad as a side dish alongside grilled meats or fish. It works well as a light main course too, especially on warm days. Each serving style adds to the meal’s appeal and makes it versatile. For the full recipe, check out the Full Recipe section above. To keep your Mediterranean Chicken Pasta Salad fresh, store it in an airtight container. Refrigerate it right after serving. This helps lock in the flavors and keeps it safe to eat. You can enjoy it for up to three days in the fridge. When you're ready to serve, give it a good stir to mix the ingredients again. Can you freeze Mediterranean Chicken Pasta Salad? Yes, but it's best to freeze only the pasta and chicken mix. Avoid freezing the fresh veggies, as they can become mushy. To freeze, place the salad in a freezer-safe bag. Remove as much air as possible before sealing. To defrost, move it to the fridge overnight. Serve it cold or let it sit at room temperature for about 30 minutes. How long does it last in the fridge? Your pasta salad will stay fresh for about three days. What are the signs the salad has gone bad? Look for a sour smell, discoloration, or slimy texture. If you notice any of these, it's best to toss it out. Enjoy your Mediterranean Chicken Pasta Salad while it's fresh for the best taste! You can use many proteins instead of chicken. Here are some great options: - Grilled shrimp - Cooked turkey - Canned tuna - Chickpeas - Tofu These choices add new flavors and protein to your dish. Each one brings its own unique taste. Don't hesitate to mix and match! Yes, this salad can be gluten-free! You just need to choose the right pasta. Here are some gluten-free options: - Brown rice pasta - Quinoa pasta - Chickpea pasta - Lentil pasta These pastas work well and taste great. They keep the dish light and fresh. Making this salad vegetarian is easy. Simply skip the chicken and use these ideas: - Add more veggies like bell peppers or zucchini - Use beans like black beans or kidney beans for protein - Toss in nuts or seeds for crunch These swaps keep the salad tasty and filling. You won’t miss the meat! Yes, you can prepare it ahead of time! Here are some tips for meal prep: - Make the salad a day in advance. - Store it in an airtight container in the fridge. - If using fresh herbs, add them just before serving. This helps keep the flavors bright and fresh. Enjoy your Mediterranean Chicken Pasta Salad anytime! For the full recipe, check out the Full Recipe section. This Mediterranean Chicken Pasta Salad combines flavors, colors, and textures. You start with cooked penne and chicken, then add fresh veggies, olives, and feta. The dressing ties it all together. Remember to let it rest to build flavor. Try different ingredients and make it your own. Store leftovers properly to enjoy later. Whether for lunch or dinner, this salad is sure to please. Enjoy every bite of your new favorite dish!

Mediterranean Chicken Pasta Salad Fresh and Flavorful

Welcome to your new favorite meal: Mediterranean Chicken Pasta Salad! Packed with bright flavors and fresh ingredients, this dish is

For this drink, I love using fresh strawberries. They bring a sweet taste and bright color. You’ll need about 2 cups of strawberries. Make sure to hull and slice them first. This step helps the strawberries blend better and release their juicy flavor. Next, you need lemon juice. Freshly squeezed juice is best for this drink. You will need 1 cup, which comes from about 4 to 6 lemons. The tartness of lemon juice balances the sweetness of the strawberries. It adds a zesty kick that makes this drink refreshing. Sugar is essential for sweetness. You’ll need 3/4 cup of granulated sugar. You can change the amount based on your taste. If you want it sweeter, add more sugar. For water, use 4 cups of cold water. This helps blend all the flavors and makes the drink smooth. These ingredients come together to create a bright and refreshing drink. For the full recipe, check out the detailed instructions. To make the strawberry puree, start by washing the strawberries. Remove the green tops and slice them. You want about two cups of fresh strawberries. Place these sliced strawberries in a blender. Add one cup of cold water to help blend. Blend on high until the mix is smooth. The puree should look velvety and bright red. Next, you need to strain the puree. Take a fine-mesh sieve and place it over a large pitcher. Pour the blended strawberries into the sieve. Use the back of a spoon to press down. This helps push the juice through while leaving the seeds behind. Keep pressing until you extract as much juice as you can. This step is key for a smooth drink. Now it's time to mix everything together. In the pitcher with the strained strawberry juice, add the freshly squeezed lemon juice. You will need about one cup, which comes from 4 to 6 lemons. Next, add three-quarters cup of granulated sugar. Stir well until the sugar dissolves completely. Slowly pour in three cups of cold water. Stir again to blend all the flavors. Taste your lemonade; if it’s not sweet enough, add more sugar. After mixing, place the pitcher in the refrigerator. Let it chill for at least 30 minutes. This waiting time enhances the flavors and makes it very refreshing. When ready, serve over ice and enjoy this sweet and zesty drink. Check the full recipe for all the details! You can make your strawberry lemonade just right for your taste. After mixing, taste it. If it's too tart, add more sugar. If you like it less sweet, add more lemon juice. Stir well each time you change it. This helps you find the perfect balance. Serve your lemonade cold and fresh. Use clear glasses to show off the beautiful color. Fill glasses with ice first. Then pour the lemonade on top. It looks great and stays cool longer. For a fun twist, serve it in mason jars. They give a cute, rustic feel. Garnishes can make your drink even better. Add lemon slices on the rim of your glass. This looks pretty and adds flavor. Fresh mint leaves also work well. Just place a few on top or stir them in. You can even add whole strawberries for a pop of color. These touches make your drink stand out. {{image_4}} If you want to add a cool twist, try mint. Mint gives a fresh taste. Simply add a handful of fresh mint leaves to your strawberry puree. Blend it all together. The mint flavor will mix well with the strawberries and lemons. You can also garnish each glass with more mint leaves. This makes the drink look pretty and taste bright. You can mix in other fruits for fun flavors. Raspberries and blueberries work great. They add color and taste. For raspberries, blend them with the strawberries. For blueberries, mash them a bit before adding. This way, you'll get a fruity punch. You can even create a fruit medley by combining several fruits. Experiment and see what you like best. Want a healthier drink? You can make sugar-free strawberry lemonade. Use a sugar substitute like stevia or monk fruit. Start with a small amount, then taste and adjust. You can also use extra strawberries for natural sweetness. This way, you can enjoy your lemonade without added sugar. It’s a tasty option for everyone. For the full recipe, check the Sweet & Zesty Strawberry Lemonade section above. To keep your homemade strawberry lemonade fresh, store it in a pitcher or jar. Use something with a tight lid to keep the flavor intact. Place it in the fridge right after making it. This drink tastes best cold, so don't skip the chilling step. If you plan to store it for later, keep the garnishes separate. Add mint leaves and lemon slices just before serving to keep them fresh. Homemade strawberry lemonade lasts about 3 to 5 days in the fridge. After that, the flavor may fade, and the lemonade could taste flat. Always check for any changes in smell or color before drinking. If you notice any odd signs, it’s best to toss it out. You can freeze strawberry lemonade for later use. Pour the lemonade into ice cube trays or freezer-safe containers. This way, you can make frozen lemonade cubes to add to drinks later. Just remember to leave some space in the container. The liquid will expand as it freezes. When you're ready to enjoy it, thaw it in the fridge or blend it for a slushy treat. Yes, you can use frozen strawberries! They work great in this recipe. Just thaw them first. This will help them blend smoothly. Frozen strawberries are often picked at peak ripeness. They can give you a tasty lemonade too! To make sparkling strawberry lemonade, simply replace regular water with sparkling water. Mix the strawberry puree and lemon juice as before. Then, add the sparkling water just before serving. This will give your drink a fun fizz! It’s perfect for parties or a refreshing treat. Yes, homemade strawberry lemonade is often healthier than store-bought. You control the sugar amount in your drink. You can also choose fresh ingredients, which are better for you. Store-bought drinks can have added preservatives and artificial flavors. So, making your own is a smart choice! For a full recipe, check the full recipe section. In this article, we explored making homemade strawberry lemonade with fresh ingredients. We discussed key elements like strawberries, lemon juice, and sugar, providing easy steps for preparation, mixing, and chilling. Our tips covered adjusting sweetness and serving ideas, while variations included exciting flavors with mint and other fruits. Finally, we shared how to store your lemonade and addressed some common questions. This refreshing drink not only tastes great but also brings a burst of summer to any day. Enjoy your homemade strawberry lemonade!

Homemade Strawberry Lemonade Refreshing Summer Drink

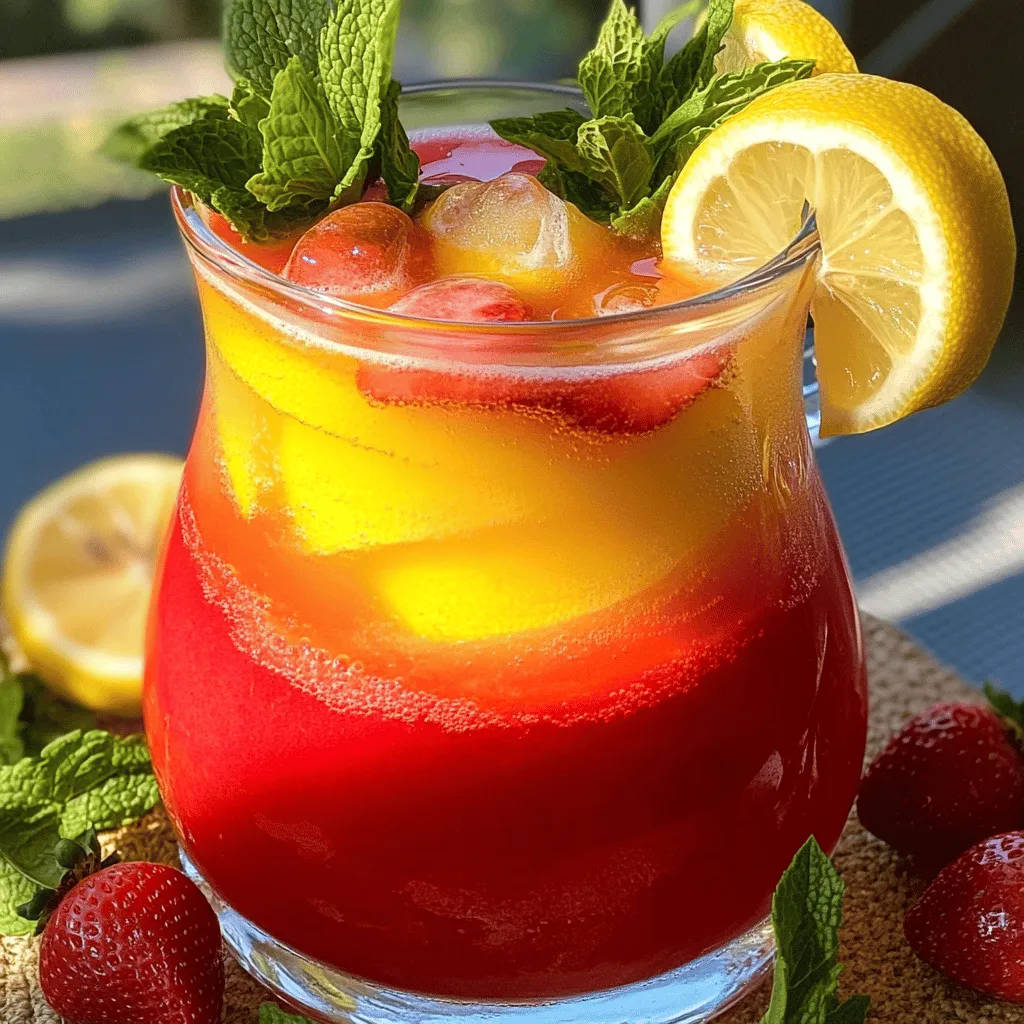
Beat the heat this summer with a glass of homemade strawberry lemonade. It’s easy to make and bursting with fresh

To make the Malibu Sunset Mocktail, you need fresh and tasty ingredients. Here is what you will need: - Freshly Squeezed Pineapple Juice - Rich Coconut Cream - Freshly Squeezed Orange Juice - Vibrant Grenadine Syrup - Ice Cubes - Garnishes: Fresh Orange Slices, Maraschino Cherries, Fresh Mint Leaves Each ingredient plays a key role in creating the perfect drink. Freshly squeezed juices give a bright flavor. Rich coconut cream adds creaminess and a tropical touch. Vibrant grenadine syrup brings sweetness and a stunning sunset look. Using the best ingredients makes your drink shine. As you gather them, think about how they blend together. The colors and flavors will create a refreshing summer delight. For the full recipe, check the detailed steps that follow. Enjoy crafting this beautiful drink! Making a Malibu Sunset Mocktail is fun and easy. You will blend juices and cream, layer them, and add grenadine. This creates a beautiful drink that looks like a sunset. Gather your ingredients and let’s get started! - Blending the Base Mixture Start by adding 1 cup of freshly squeezed pineapple juice and 1/2 cup of rich coconut cream into a blender. Blend on high speed until the mix is smooth and creamy. This will be the base of your mocktail. - Layering the Drinks for Effect Pour 1/2 cup of freshly squeezed orange juice into a tall glass. Let it settle at the bottom. Next, take the blended mixture and slowly spoon it over the back of a spoon. This helps keep the layers separate and creates a stunning visual. - Adding the Grenadine for Sunset Effect Now, it’s time for the magic touch! Drizzle 1/4 cup of vibrant grenadine syrup into the glass. Watch it sink and create a lovely gradient that mimics a sunset. This is what makes your drink truly special. For a refreshing finish, add ice cubes to the glass. Then, garnish with a slice of fresh orange, a maraschino cherry, and some mint leaves. These details make your mocktail not only tasty but also a feast for the eyes. Check out the Full Recipe for more detailed instructions! For a stunning Malibu Sunset Mocktail, presentation matters. Start by using tall, clear glasses. This way, everyone can see those lovely layers. A colorful straw adds a fun touch. You can also use a small cocktail umbrella for a tropical vibe. Garnish your drink with a slice of fresh orange and a maraschino cherry. Add some mint leaves for a pop of color and freshness. This makes your drink look amazing and taste even better! You can prepare some ingredients ahead of time. Squeeze your pineapple and orange juices the day before. Store them in the fridge for quick use. You can also mix the coconut cream with pineapple juice ahead of time. Just blend and store. This saves time when you want to enjoy the mocktail. Keep grenadine separate until you are ready to serve. This helps keep that beautiful sunset effect. Quality ingredients make a big difference. Always use fresh juices for the best taste. Bottled juices can be okay, but they often lack flavor. Choose rich coconut cream for a creamy texture. Look for brands that use real coconut. This adds depth to your drink. Fresh fruits and herbs are key, too. They enhance the taste and give your mocktail a vibrant look. Enjoy the process of making it, and your Malibu Sunset Mocktail will shine! {{image_4}} You can change up the Malibu Sunset Mocktail by using different fruit juices. Instead of pineapple juice, try mango or passion fruit. These fruits add a sweet and tropical twist. For a tart flavor, use cranberry juice or pomegranate juice. Each juice gives a unique taste and look to your drink. If you want a vegan or non-dairy option, focus on the coconut cream. Many brands offer coconut cream that is dairy-free. You can also use almond milk or oat milk for a lighter drink. Just make sure to adjust the amount to keep the same creamy texture. Want to turn your mocktail into a cocktail? It's simple! Just add a splash of rum or vodka. For a tropical touch, go for coconut rum. This addition enhances the flavors and gives it a fun kick. Just remember to adjust the other ingredients to balance the taste. For more on how to mix these variations, check out the Full Recipe. Pineapple juice and coconut cream can spoil quickly. For best results, store them in the fridge. Keep pineapple juice in a tight container. It lasts up to five days. Coconut cream should also go in an airtight jar. It can stay fresh for about a week. If you notice any changes in smell or color, toss them out. To keep your Malibu Sunset Mocktail fresh, store it in the fridge. Use a covered pitcher to keep it sealed. This helps prevent the flavors from fading. Drink it within 24 hours for the best taste. If the mocktail separates, stir it gently before serving. Can you freeze components? Yes, you can freeze some ingredients! Pineapple juice works well in ice cube trays. Just pour the juice in and freeze it. Coconut cream can also freeze well. Pour it into a freezer-safe bag and flatten it. When ready to use, thaw it in the fridge overnight. However, avoid freezing the whole mocktail, as it may lose its texture. A Malibu Sunset Mocktail is a fun, fruity drink. It combines tropical flavors with vibrant colors. The main ingredients are pineapple juice, coconut cream, and orange juice. Grenadine syrup gives it a lovely sunset look. This drink is alcohol-free, so everyone can enjoy it. Yes, you can use store-bought juices. They work well if you're short on time. Just pick high-quality options for the best taste. Fresh juice does add a special touch, but store-bought is still tasty. To reduce sweetness, cut back on the grenadine syrup. You can also add more citrus juice, like lime or lemon. This adds a tangy flavor that balances sweetness. Another idea is to use unsweetened coconut cream. This mocktail is perfect for summer parties or barbecues. It's refreshing and looks great on a table. Serve it at birthday parties or family gatherings. It’s also a fun drink for kids and non-drinkers at adult events. This post covered how to make a delicious Malibu Sunset Mocktail. We explored fresh ingredients, detailed steps for preparation, and garnishing tips. I shared variations to suit different tastes and dietary needs. Storing leftovers was addressed, ensuring you maximize freshness. In conclusion, the Malibu Sunset is perfect for any gathering or relaxing day. Enjoy crafting this drink and impressing your friends with your skills!

Malibu Sunset Mocktail Refreshing Summer Delight

Summer is the perfect time to cool off with a refreshing drink. Let me introduce you to the Malibu Sunset

To make a tasty pesto potato salad, gather these key ingredients: - 2 pounds baby potatoes, halved - 1 cup fresh basil pesto (store-bought or homemade) - 1 cup cherry tomatoes, halved - 1/2 cup finely diced red onion - 1/4 cup pine nuts, lightly toasted - 1/2 cup feta cheese, crumbled - Salt and freshly ground pepper, to taste - 2 tablespoons extra virgin olive oil - 1 tablespoon freshly squeezed lemon juice You can add more flavors to your salad. Consider these options: - Arugula or spinach for a fresh green touch - Black olives for a briny kick - Grilled corn for sweetness and crunch Choosing fresh ingredients makes a big difference. Here’s how: - Potatoes: Look for firm, smooth baby potatoes. Avoid any with sprouts or green spots. - Basil: Select bright green basil. It should smell sweet and fragrant. - Tomatoes: Pick ripe cherry tomatoes. They should feel slightly soft but not mushy. - Pine nuts: Choose nuts that are light in color. They should smell nutty, not bitter. Using fresh, high-quality ingredients ensures your pesto potato salad shines. For the full recipe, check out the details above! First, gather your ingredients. You need 2 pounds of baby potatoes. Halve them to make cooking easier. Place the potatoes in a large pot. Cover them with cold water. Add a good pinch of salt to the water. Bring it to a rolling boil over high heat. Once boiling, turn the heat down to medium-low. Let the potatoes simmer for about 10 to 15 minutes. They should be fork-tender when ready. This means a fork goes in easily. After cooking, drain the potatoes in a colander. Allow them to cool for a few minutes. This is key to keeping the pesto fresh. Now, get a large mixing bowl. Add the warm potatoes to it. Pour in 1 cup of fresh basil pesto. You can use store-bought or homemade. Gently toss the potatoes with a spatula. Make sure every piece is covered in pesto. Next, add 1 cup of halved cherry tomatoes, 1/2 cup of finely diced red onion, and 1/4 cup of lightly toasted pine nuts. Stir carefully so you don’t break the potatoes. Drizzle 2 tablespoons of extra virgin olive oil and 1 tablespoon of lemon juice over the salad. Season with salt and freshly ground pepper to taste. Finally, fold in 1/2 cup of crumbled feta cheese. Be gentle here; you don’t want to mash it. Once mixed, cover the bowl with plastic wrap. Refrigerate the salad for at least 30 minutes. This chilling time helps the flavors blend. You’ll enjoy the taste much more after it sits. The pesto will soak into the potatoes, making each bite delicious. For an extra touch, you can serve the salad in a colorful dish. Garnish with fresh basil leaves and extra toasted pine nuts for a lovely presentation. Enjoy this fresh and flavorful potato salad at your next gathering! For the complete guide, check out the Full Recipe. To get the best potatoes for your salad, choose baby potatoes. They are small and tender. Start by rinsing them well. Cut each potato in half for even cooking. Place them in a pot and cover with cold water. Add salt to the water to enhance the flavor. Cook them until they are fork-tender, which takes about 10-15 minutes. This method keeps the potatoes creamy inside. After draining, let them cool briefly. This prevents the pesto from wilting. To add extra flavor to your pesto potato salad, consider adding fresh herbs. Chopped parsley or chives can brighten the dish. You can also sprinkle some lemon zest for a fresh zing. If you like spice, diced jalapeños can give it a kick. Toasted nuts, like walnuts or almonds, add crunch and depth. You can also swap feta for goat cheese for a creamier texture. Each of these additions can make your salad unique. When serving, presentation matters. Use a large, colorful bowl to showcase your salad. A sprinkle of fresh basil leaves on top adds a pop of color. For added texture, place extra toasted pine nuts around the edges. This salad is perfect for summer gatherings or picnics. It pairs well with grilled meats or can stand alone as a light meal. Chill the salad before serving for a refreshing experience. For the full recipe, check out the detailed instructions above. {{image_4}} You can make this salad vegan! Swap the feta cheese for a plant-based option. Use vegan pesto, too. You can make it from fresh basil, nuts, and olive oil. This keeps the bright taste and texture. The flavor stays rich and delightful without dairy. Want extra protein? Add chickpeas! They are tasty and filling. You can also use white beans or lentils. These ingredients mix well with the potatoes. They boost nutrition while keeping the dish light. Try different dressings to change it up. A vinaigrette made with balsamic works well. You can also use a simple lemon and olive oil mix. For extra crunch, add bell peppers or cucumbers. These add a fresh twist and keep the salad exciting. For the full recipe, check out the details provided in the main article. To keep your pesto potato salad fresh, place it in an airtight container. Make sure it is tightly sealed to prevent air from entering. Store it in the fridge for up to three days. If you notice any browning on the potatoes or wilting of the basil, it’s time to toss it out. You can freeze pesto potato salad, but it may lose some texture. To freeze, scoop the salad into a freezer-safe container. Leave some space at the top to allow for expansion. It can last up to two months in the freezer. When you're ready to eat it, transfer it to the fridge to thaw overnight. When ready to enjoy the salad, gently mix it after thawing. If it seems dry, add a splash of olive oil or more pesto. This helps refresh the flavors. You can also add fresh herbs or a squeeze of lemon juice to enhance its taste. Enjoy your flavorful dish! Yes, you can use store-bought pesto. It saves time and still offers great flavor. Just check the ingredients to ensure it’s fresh and high-quality. A good pesto will enhance your potato salad. You can easily find it in most grocery stores. I recommend baby potatoes for this dish. They are tender and creamy when cooked. You can also use red or Yukon gold potatoes. These varieties hold their shape well and add a nice texture. Pesto potato salad can last about three to five days in the fridge. Make sure to store it in an airtight container. If you notice any discoloration or off smells, it’s best to toss it. Yes, you can make it a day ahead. Chilling the salad overnight improves the flavors. Just keep it covered in the fridge. This makes it a perfect dish for parties or picnics. Absolutely! You can add ingredients like bell peppers or olives for extra flavor. Feel free to experiment with your favorite veggies. Just remember to balance flavors so that the pesto shines through. Yes, pesto potato salad is gluten-free. Just make sure any added ingredients are gluten-free too. This makes it a safe choice for those with gluten sensitivities. Serve it cold or at room temperature. A colorful serving dish makes it look appealing. You can also garnish it with fresh basil or extra pine nuts for a nice touch. Yes, you can substitute feta with goat cheese or Parmesan. Each cheese adds a different taste. Choose the one you enjoy most for your salad. Store leftover pesto in an airtight container. You can also drizzle a bit of olive oil on top to prevent browning. It will keep in the fridge for about a week. Yes! You can use vegan pesto and skip cheese for a vegan version. This lets everyone enjoy the salad without worry. You learned about key ingredients for pesto potato salad and how to prepare it. I shared tips to ensure your potatoes are cooked just right and how to elevate flavors. You also discovered ways to make it vegan and how to store leftovers properly. Pesto potato salad is a versatile dish that’s simple to make. Enjoy creating your own unique version and savor every bite. Keep experimenting with flavors to make it your own!

Pesto Potato Salad Fresh Flavorful Summer Dish

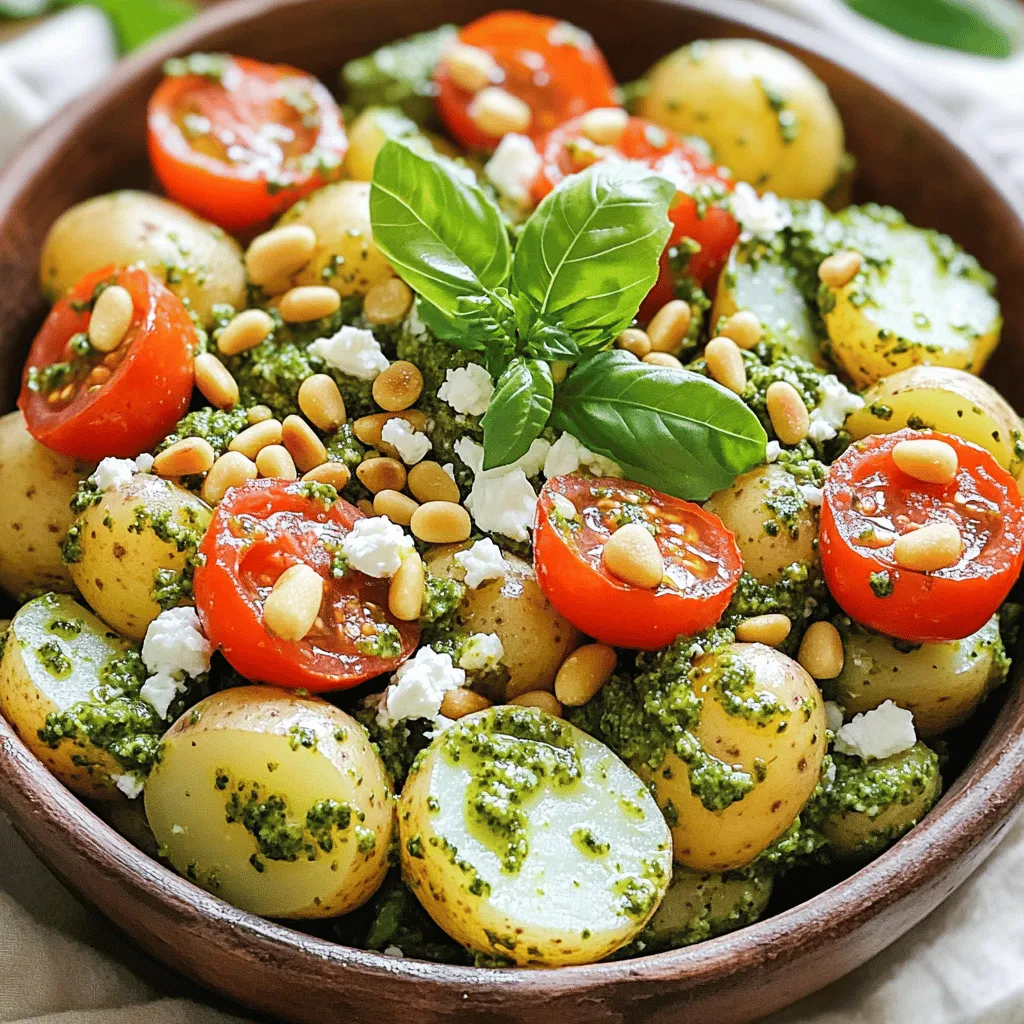
Looking for a fresh and tasty dish for summer? This Pesto Potato Salad is just what you need! With vibrant

To build a vibrant and healthy salad bowl, you need the right ingredients. Here are the key components I recommend: - 1 cup quinoa, thoroughly rinsed - 2 cups water or vegetable broth for enhanced flavor - 1 cup assorted mixed berries (including strawberries, blueberries, and raspberries) - 1 cup cucumber, diced into bite-sized pieces - 1 cup cherry tomatoes, halved for freshness - 1/2 cup red bell pepper, diced for crunch - 1/4 cup red onion, finely chopped for sweetness - 1 ripe avocado, diced for creaminess - 1/4 cup fresh mint leaves, finely chopped for a refreshing touch - 1/4 cup feta cheese, crumbled (optional, for a savory finish) - 3 tablespoons extra virgin olive oil for richness - 1 tablespoon fresh lemon juice for brightness - Salt and freshly cracked black pepper to taste Each of these ingredients adds unique flavor and health benefits. Quinoa serves as a great base, packed with protein and fiber. Mixed berries add a burst of sweetness and antioxidants. Fresh veggies like cucumber and cherry tomatoes bring crunch and hydration. Avocado offers healthy fats, while mint gives a refreshing note. Finally, a drizzle of olive oil and lemon juice ties everything together with zest and richness. You can check the Full Recipe for precise measurements and cooking instructions. First, rinse 1 cup of quinoa under cold water. This step removes any bitter taste. Next, in a medium pot, combine the rinsed quinoa with 2 cups of water or vegetable broth. Bring it to a boil over medium-high heat. Once it boils, reduce the heat to low and cover the pot. Let it simmer for about 15 minutes. You want the quinoa to look fluffy and all the liquid should be gone. After cooking, remove the pot from heat and let the quinoa cool down. While the quinoa cools, it’s time to prepare the fresh ingredients. Start by dicing 1 cup of cucumber, 1 cup of red bell pepper, and 1 ripe avocado. Next, halve 1 cup of cherry tomatoes to keep them juicy. Lastly, chop 1/4 cup of fresh mint leaves for a burst of flavor. These fresh ingredients will add color and taste to your salad. In a large mixing bowl, combine the cooled quinoa, diced cucumber, halved cherry tomatoes, diced red bell pepper, and the chopped mint. You can also add 1 cup of assorted mixed berries like strawberries and blueberries for sweetness. Toss all these ingredients gently to mix them well. Now, let’s make the dressing. In a small bowl, whisk together 3 tablespoons of extra virgin olive oil, 1 tablespoon of fresh lemon juice, and salt and pepper to taste. Drizzle this dressing over the salad and toss everything gently again. If you want a savory touch, sprinkle some crumbled feta cheese on top. Enjoy the vibrant flavors and colors of your healthy summer salad bowl! - Choosing ripe avocados for creaminess: Look for avocados that yield slightly to gentle pressure. A ripe avocado will add a smooth texture to your salad. Cut it just before serving to keep it fresh. - Opting for seasonal berries for the best taste: Use berries that are in season. They taste sweeter and are juicier. Strawberries, blueberries, and raspberries are great choices. Try to pick berries that are plump and firm. - Maximizing freshness with proper ingredient storage: Store your salad ingredients in the fridge. Keep berries in their original containers. Wrap cut veggies in damp paper towels to keep them crisp. This way, they stay fresh for your salad. - Use a large, shallow bowl for serving: A wide bowl helps show off the vibrant colors. It also allows for easy mixing and serving. - Garnish with mint leaves and whole berries: Add a few mint leaves on top. Sprinkle whole berries for a pop of color. This makes your salad look more appealing. - Create colorful layers for visual appeal: Layer your ingredients in the bowl. Start with quinoa, then add veggies, and top with berries. This adds depth and showcases the salad’s vibrant colors. For the full recipe, check out the Refreshing Quinoa & Berry Bliss Salad. {{image_4}} You can easily boost your salad's protein. Try adding grilled chicken or shrimp. These proteins are tasty and filling. If you prefer plant-based options, chickpeas are a great choice. Incorporating cooked beans adds fiber too. They help you feel full and satisfied. Changing your dressing can change the whole dish. Balsamic vinaigrette gives a sweet tang. Yogurt-based dressings add creaminess without much fat. Herbs can enhance the flavor too. Fresh basil or cilantro brings a burst of freshness. Feel free to experiment with different kinds. Using seasonal ingredients makes your salad even better. Zucchini is perfect in summer salads. It adds a nice crunch and is low in calories. You can also mix in nuts or seeds. They add crunch and healthy fats. Walnuts or sunflower seeds can be great choices. To keep your leftover salad fresh, store it in an airtight container. Make sure to separate the dressing from the salad. This way, the greens stay crisp and the flavors remain bright. If you mix the dressing in, your salad will get soggy fast. You can store the salad for up to three days. However, it’s best when eaten within a day or two. Preparing ingredients ahead of time makes assembly easy. Cook your quinoa and let it cool. Chop cucumbers, bell peppers, and onions in advance. Store these in separate containers. This setup allows you to quickly assemble your salad during the week. You can keep the components fresh for up to five days. For quick meal solutions, mix and match your ingredients. Use different fruits or veggies each day to keep it exciting. With this approach, your healthy summer salad bowls will always feel fresh and vibrant. Remember, this salad is all about fun and creativity. Enjoy making it your own! To meal prep these salad bowls, start by cooking your quinoa. Rinse it well, then boil it in water or broth. Let it simmer until fluffy. While it cooks, chop your veggies and berries. Store each ingredient in separate containers. This way, you can grab them easily when you want to assemble your salad. Yes, you can make this salad a day in advance. If you want the salad to stay fresh, keep the dressing separate. Combine the salad ingredients and the dressing only when you are ready to eat. This keeps everything crisp and tasty. You can add many leafy greens to your salad. Spinach and arugula work great. They add extra nutrients and a nice crunch. You might also try kale or mixed greens. Each option brings a unique flavor and texture to your bowl. Yes, quinoa is gluten-free. It comes from a seed, not a grain like wheat. This makes it a great choice for people who cannot eat gluten. Quinoa is also high in protein, making it a healthy option for everyone. To make this salad vegan, simply skip the feta cheese. You can also use a plant-based dressing. Try mixing olive oil with lemon juice and herbs. This adds flavor without any dairy. Some tasty side dishes to serve with your salad include grilled vegetables or whole-grain bread. You could also serve a light soup, like tomato or vegetable. These sides complement the freshness of the salad well. For the full recipe, check out the "Refreshing Quinoa & Berry Bliss Salad." This salad is a great way to enjoy summer flavors and healthy ingredients. Healthy summer salad bowls combine fresh ingredients that nourish and delight. We explored key ingredients like quinoa, berries, and veggies that contribute to taste and health. I shared step-by-step instructions, tips for flavor and presentation, and variations to suit your preferences. Proper storage is vital for keeping your salad fresh. With careful meal prep, you can enjoy this salad anytime. Explore the full recipe for a refreshing twist on your next meal. Embrace creativity in your kitchen and enjoy delicious, nutritious meals all summer long.

Healthy Summer Salad Bowls Fresh and Vibrant Delight

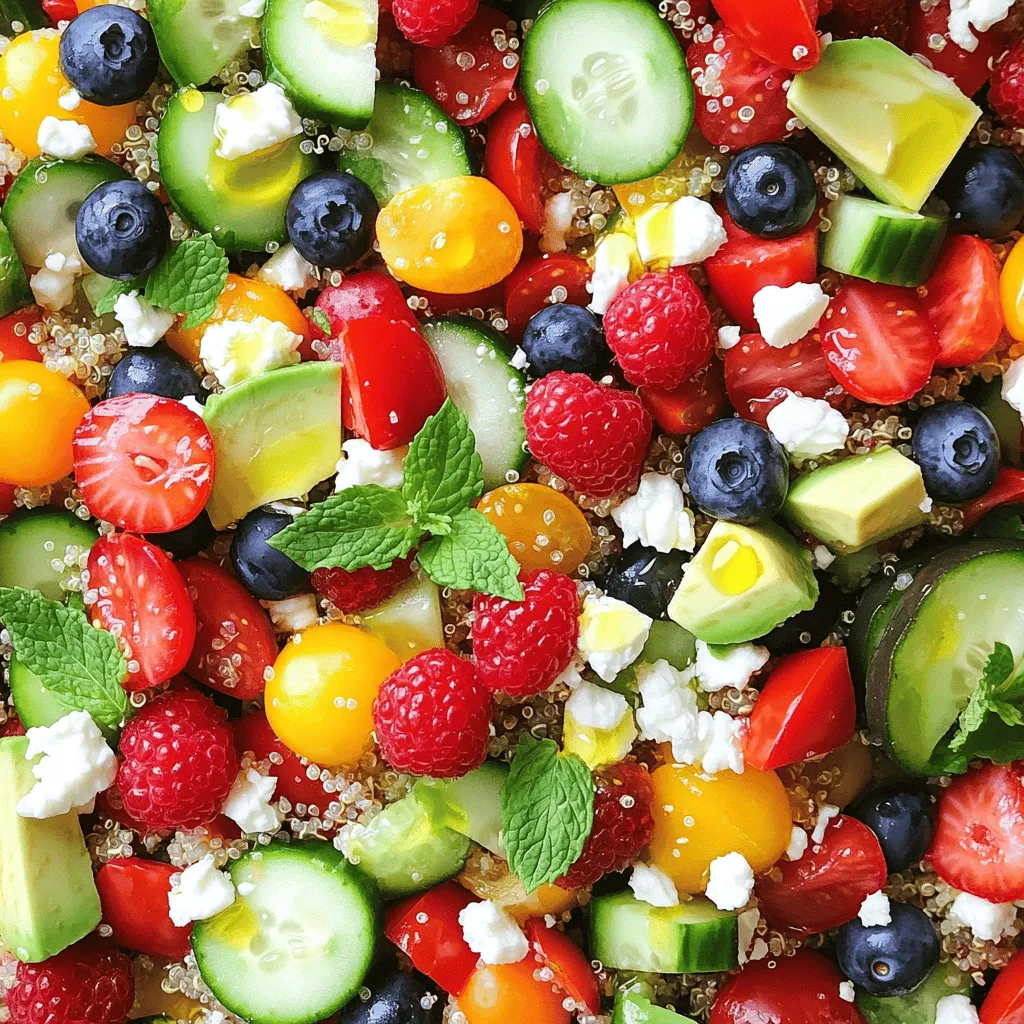
Summer is here, and it’s time to embrace fresh, vibrant flavors! In my latest post, I’ll share how to create

- 2 cups seedless green grapes - 1 cup water - 1/2 cup granulated sugar - 1/4 cup citric acid - 1 teaspoon freshly squeezed lemon juice - Pinch of salt - Optional: Food coloring Gathering the right ingredients is key to making Vegan Sour Patch Grapes a hit. Start with fresh, seedless green grapes. These grapes provide a nice crunch and sweetness. The water helps create a simple syrup that coats the grapes. Granulated sugar adds sweetness to balance the sour. Citric acid gives that tangy kick, making these grapes exciting. Fresh lemon juice enhances the flavor and freshness. A pinch of salt rounds out the taste, making it more vibrant. If you want your grapes to look fun, use food coloring! This simple touch can make your snack more appealing, especially for kids. For the full recipe, you’ll see how these ingredients come together to create a delicious treat. Enjoy the process of preparing this tasty snack! First, wash the grapes under cold water. Make sure you remove dirt and any residue. After washing, dry them gently with a clean kitchen towel. This step is key. You want them dry before freezing. Once dry, spread the grapes in a single layer on a baking sheet. Make sure they are not touching each other. Now, transfer the baking sheet to the freezer. Freeze the grapes for about 2 hours. They should feel firm when you touch them. Next, let’s make the sour coating. In a medium saucepan, mix the water and granulated sugar. Place the saucepan on medium heat. Stir the mixture until the sugar fully dissolves. This creates a simple syrup. Once the sugar is dissolved, take the saucepan off the heat. Allow the syrup to cool for a few minutes. Cooling is important. It helps the coating stick better to the grapes. After the syrup cools, it’s time to add flavor. Mix in the citric acid and fresh lemon juice. Add a pinch of salt, too. This balance gives a great taste. If you want your grapes to look extra fun, add a few drops of food coloring. Stir until everything blends well. This step is where the magic happens! Now, let’s coat those frozen grapes! Take them out of the freezer. One by one, dip each grape into the cooled syrup. Make sure each grape gets fully coated. After dipping, roll the grape in the citric acid-sugar mix. This gives the signature sour patch taste. It’s a fun process, and you’ll see them transform! Once you coat all the grapes, lay them back on the baking sheet. They should be in a single layer again. Let the coating set at room temperature for about 10 minutes. This helps the coating firm up. For the best taste, serve your Vegan Sour Patch Grapes chilled. They are a delightful treat! For the full recipe, check below. To make your Vegan Sour Patch Grapes even tastier, adjust the citric acid. This ingredient gives the grapes their tangy kick. If you want them more sour, add a bit more citric acid. If you prefer less, use less. You can also switch up the grapes. Green grapes are great, but red or black grapes can add a different taste. Try different types to find your favorite! Freezing the grapes is key. It makes them firm and refreshing. Make sure to freeze them for at least two hours. This gives you that nice crunch. When you coat the grapes, be sure each grape gets a full layer of syrup. A good coating helps the sour mix stick well. This ensures every bite is bursting with flavor. For storing your Vegan Sour Patch Grapes, keep them in an airtight container. This helps maintain their freshness. Place them in the fridge to keep them cool. They taste best fresh, but you can store them for up to three days. If they sit too long, the coating may get soggy. Always check for quality before enjoying your snack. {{image_4}} You can swap grapes for other fruits. Berries like strawberries or blueberries work great. Cherries also make a fun choice! They all have that juicy bite and can carry the sour coating well. Using seasonal fruit adds a twist to your snack. Try peaches in summer or apples in fall. Each fruit brings its own flavor and texture. Want to change the taste? Infuse your sour coating with other citrus flavors. Lime or orange juice can add a fresh zing. You can also add spices or extracts for a unique touch. A pinch of cinnamon or a few drops of vanilla can turn this snack into something new and exciting. If you want a sugar-free version, use a sugar substitute. Stevia or monk fruit sweetener can work well. For those who need gluten-free options, this recipe is naturally gluten-free. You can also opt for organic ingredients for a healthier snack. It’s all about making this treat fit your diet while still being tasty. Remember, these variations keep your Vegan Sour Patch Grapes fun and exciting! For the complete recipe, check the Full Recipe. Grapes are small but mighty! They pack vitamins C and K. These vitamins help support your immune system and keep your bones strong. Grapes also have antioxidants. These protect your body from harm. Vegan Sour Patch Grapes fit into a low-calorie snack plan. They are refreshing and tasty. You can enjoy them without guilt. They’re perfect for kids and adults alike. Making Vegan Sour Patch Grapes at home is fun and easy. You know exactly what goes into them. This beats store-bought snacks that may have hidden ingredients. When you make your own, you avoid artificial colors and flavors. Homemade snacks taste better and feel fresher. Your friends and family will notice the difference. Plus, you can customize the flavor to your liking. Eating a vegan diet helps the planet. It reduces animal farming and supports kinder choices. Making snacks like Vegan Sour Patch Grapes also cuts down on waste. Instead of tossing old fruit, you can turn it into a fun treat. This way, you waste less food. You get to enjoy a delightful snack and help the Earth at the same time! You can use frozen grapes, but fresh ones work best. Fresh grapes have a better texture. If you only have frozen grapes, let them thaw a bit before coating them. You can store these grapes for about 3 days in the fridge. Keep them in an airtight container to maintain freshness. If they get too soggy, they lose their crunch. This recipe is mostly safe for common diets. However, check for sugar allergies. Some citric acid can come from corn. If corn is a concern, look for non-corn sources. Yes, you can prepare these grapes a day in advance. Just make sure to store them in the fridge. They taste best when served cold. Citric acid is a natural souring agent. It comes from citrus fruits. You can find it in the baking aisle of most grocery stores. Look for it next to the baking soda and cream of tartar. This blog post covered how to make Vegan Sour Patch Grapes from scratch. You learned about the ingredients, step-by-step instructions, and tips for the best results. I also shared variations and health benefits, highlighting how fun and easy this snack can be. With simple steps and natural ingredients, you can enjoy a tasty treat that's both delicious and good for you. Try out different fruits or flavors to keep it fresh. Enjoy making your own snacks and feel proud of your healthy choices!

Vegan Sour Patch Grapes Tangy and Tasty Snack

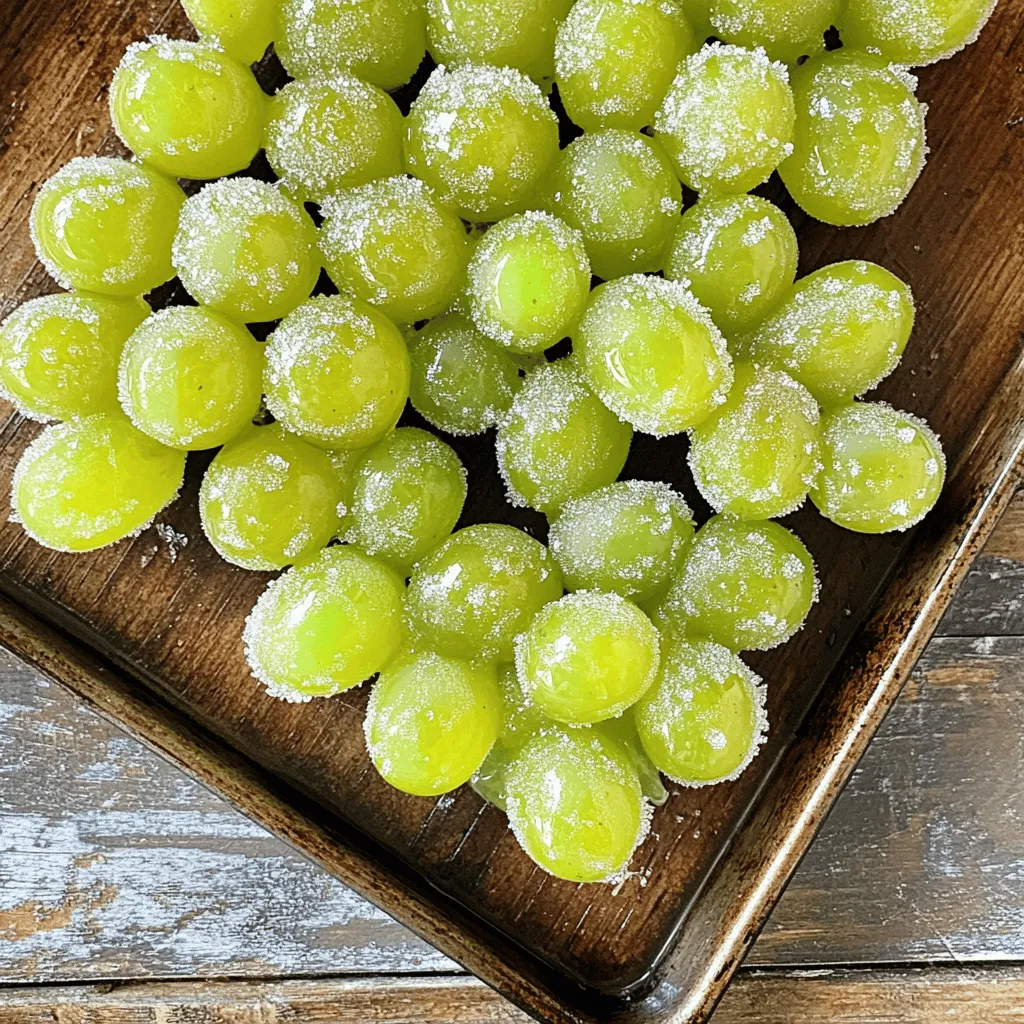
Looking for a fun, tangy snack that’s vegan and easy to make? Vegan Sour Patch Grapes are your answer! With

- 1 lb skirt steak - 2 tablespoons olive oil - 2 tablespoons fresh lemon juice - Zest of 1 lemon - 2 cloves garlic, minced - 1 teaspoon smoked paprika - Salt and pepper to taste - 1 cup couscous - 1 ¼ cups vegetable broth - 1 cup cherry tomatoes, halved - ½ cup cucumber, diced - ¼ cup fresh parsley, chopped - ¼ cup fresh mint, chopped - ½ teaspoon cumin - Extra lemon wedges for serving Choosing good ingredients makes a big difference in taste. For the skirt steak, look for bright red color and good marbling. This helps keep the meat juicy and tender. When picking olive oil, choose one that smells fresh. Fresh lemon juice adds a bright, zesty flavor. Use firm, ripe tomatoes and crisp cucumbers for the couscous salad. Fresh herbs like parsley and mint add a burst of flavor. - Common Measurements: - 1 tablespoon = 3 teaspoons - 1 cup = 8 fluid ounces - 1 pound = 16 ounces - Tips on Selecting Fresh Ingredients: - For herbs, choose vibrant green leaves without wilting. - Select cucumbers that are firm and smooth. - Look for tomatoes with a rich red color and no blemishes. Getting the right measurements helps ensure your dish turns out well. Always use fresh ingredients for the best flavor. For more cooking ideas, check the Full Recipe for Sizzling Citrus Skirt Steak with Herbed Couscous. Marinating is key to a tasty skirt steak. It helps the meat soak in flavors. Aim for at least 30 minutes, but 2 hours is better. To coat the steak, use a resealable bag or a shallow dish. Pour the marinade over the steak and seal it well. Make sure every part of the steak gets coated. This step ensures a juicy and flavorful dish. Start by bringing 1 ¼ cups of vegetable broth to a boil. Once it boils, take it off the heat. Add 1 cup of couscous, stirring quickly. Cover the pot and let it sit for 5 minutes. This allows the couscous to absorb the broth. After 5 minutes, fluff it with a fork. It should be light and fluffy. Next, add chopped cherry tomatoes, diced cucumber, parsley, mint, and cumin. Toss everything together, and season with salt and pepper. For grilling, preheat your grill to medium-high heat. Remove the skirt steak from the marinade and let the extra drip off. Grill it for about 3-4 minutes per side for medium-rare. Adjust the time if you want it more or less cooked. After grilling, let the steak rest for 5 minutes. This helps the juices stay inside, making it tender. When ready, slice it thinly against the grain for the best texture. Enjoy the grilled skirt steak with your lemon herb couscous! Check out the Full Recipe for detailed ingredients and steps. For extra flavor, consider adding these ingredients to the marinade: - 1 tablespoon of soy sauce - 1 tablespoon of honey - A pinch of red pepper flakes These additions bring depth and a hint of sweetness. When marinating, let the steak soak for at least 30 minutes. For best results, marinate for up to 2 hours. This allows the flavors to really soak in. Use a resealable bag or a shallow dish. Make sure the steak is covered in the marinade. To make your couscous fluffier, use a fork to fluff it after resting. This separates the grains and adds lightness. If you want to change up the flavor, try using chicken broth instead of vegetable broth. You can also add a bit of olive oil to the boiling broth for richness. To get nice grill marks, preheat your grill or grill pan. Sear the skirt steak for about 3-4 minutes on each side. Do not move the steak around; let it sit for those minutes. If you use a grill pan, you can still get those marks, but an outdoor grill often gives a better char. Follow these tips, and you will enjoy a meal that impresses everyone. For the complete recipe, check the Full Recipe section. {{image_4}} If you want to swap out skirt steak, try flank steak or hanger steak. Both cuts have great flavor and work well with the same marinade. For a lighter option, use chicken breast. Just remember to adjust the cooking time; chicken takes longer to cook. For a vegetarian twist on couscous, use quinoa or farro. These grains offer tasty and healthy options. You can also add chickpeas for extra protein. They blend perfectly with the lemon herb flavor. Feel free to play with herbs and spices. Fresh basil or cilantro can add a different taste. You might also try adding chili flakes for a little heat. When it comes to citrus, lime or orange juice can change the entire profile of the dish. Try using lime juice instead of lemon for a zesty kick. You can even mix citrus juices for a unique flavor. Plating can enhance the meal. Try stacking the sliced steak on top of the couscous. This makes a beautiful presentation. Another idea is to serve the steak on a wooden board with couscous in a bowl next to it. As for side dishes, consider a fresh green salad or grilled vegetables. These pair well with the steak and couscous. The bright colors and flavors will make your meal pop! For the full recipe, check out the complete instructions to create this delicious dish. To keep your grilled skirt steak and couscous fresh, follow these tips: - Allow the food to cool to room temperature. - Place the steak and couscous in airtight containers. - Store in the fridge within two hours of cooking. This will help keep flavors intact. In the fridge, skirt steak can last about 3 to 4 days. Couscous will stay good for about the same time. Always check for any signs of spoilage before eating. When it comes to reheating, you want to keep your steak juicy. The best methods are: - Use a microwave on low power for the steak. - Heat couscous in a saucepan with a splash of water. To avoid dryness, cover the steak with a damp paper towel in the microwave. For couscous, a bit of water will help it steam back to life. Stir both while reheating for even warmth. Yes, you can freeze leftovers! Here’s how: - Wrap the skirt steak tightly in plastic wrap. - Place couscous in a freezer-safe bag, removing as much air as possible. To thaw, place the steak in the fridge overnight. For couscous, you can reheat it directly from frozen, adding a little water if needed. This method keeps your meal tasty for up to three months. The best way to cook skirt steak is on a grill. Heat your grill to medium-high. Marinate the steak for at least 30 minutes. This step adds flavor and tenderizes the meat. When ready, place the steak on the grill for about 3-4 minutes per side. This timing gives you a medium-rare result. You can adjust the time for your preferred doneness. A quick sear locks in juices and gives a nice crust. To check if your steak is cooked right, use a meat thermometer. Insert the thermometer into the thickest part of the steak. Aim for 130°F for medium-rare. You can also use visual cues. Look for juices running clear and a nice brown crust. Another trick is to feel the steak. A tender steak means it is done. Yes, you can make couscous ahead of time. Cook it and let it cool completely. Store it in an airtight container in the fridge. It will stay fresh for up to three days. When ready to serve, you can reheat it gently. Sprinkle a bit of water to add moisture. This way, you save time on busy days. Follow the Full Recipe for perfect couscous every time! In this blog post, we explored how to create a delicious dish featuring skirt steak and couscous. We discussed ingredient selection, marinating techniques, and grilling tips to elevate your meal. Remember to use fresh herbs and spices for the best flavors. Keep your couscous fluffy with the right cooking methods. Cooking is fun and rewarding. You can always adjust flavors and ingredients to match your taste. Try different proteins and serving styles to keep things exciting. Enjoy your cooking journey!

Grilled Skirt Steak with Lemon Herb Couscous Delight

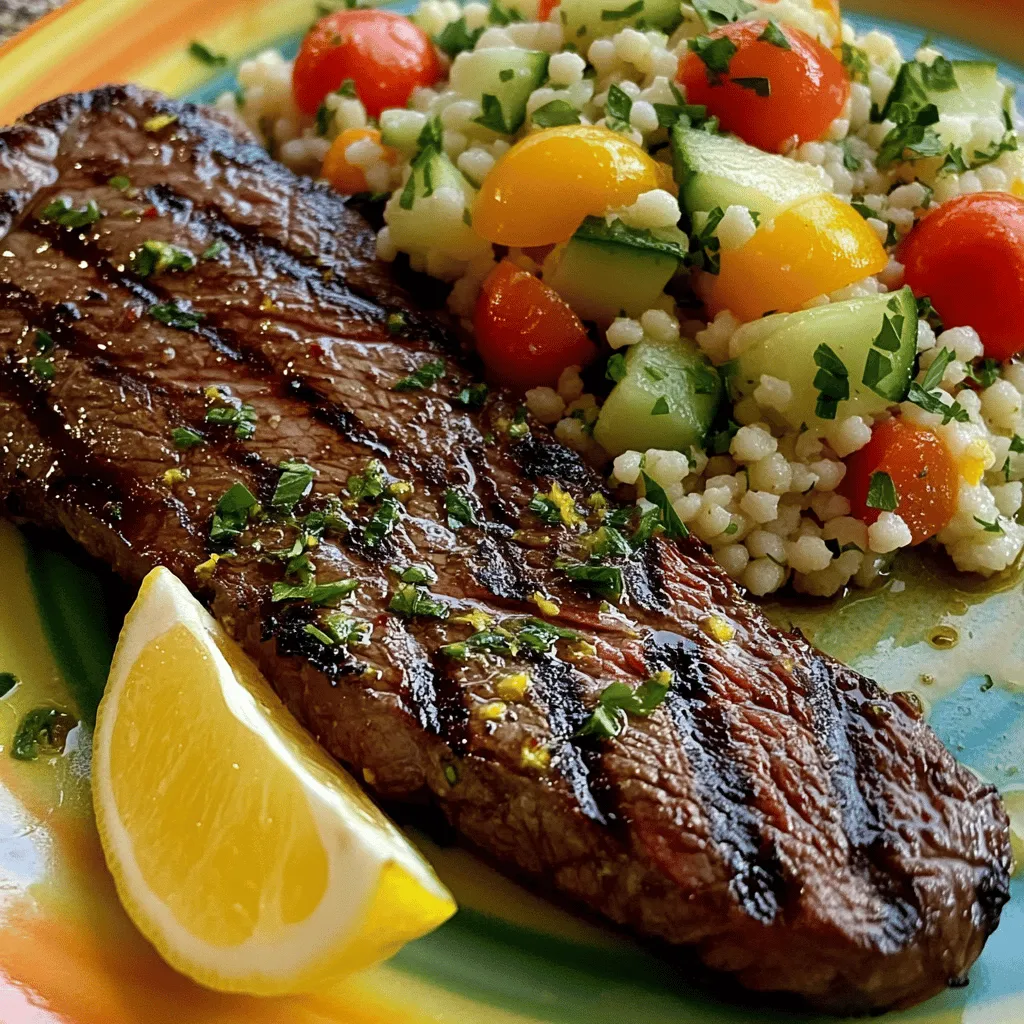
Ready to impress your taste buds? My Grilled Skirt Steak with Lemon Herb Couscous Delight is the dish you need!

Older posts
Newer posts
← Previous Page1 … Page21 Page22 Page23 … Page75 Next →

dsad

© 2025 lazychefmagic • Built with GeneratePress

Our Policies

  • Copyright Policy
  • Cookie Policy
  • GDPR Policy
  • Privacy Policy
  • Disclaimer
  • Terms Of Use

More Information

  • Home
  • About
  • Contact
  • Appetizers
  • Dessert
  • Dinner
  • Drinks
©2025, lazychefmagic About Back To Top