Skip to content
DisclaimerTerms Of UseGDPR PolicyCookie Policy

lazychefmagic

  • Home
  • Drinks
  • Appetizers
  • Dinner
  • Dessert
  • About
  • Contact
  • Privacy Policy
DisclaimerTerms Of UseGDPR PolicyCookie Policy

Amanda

To create a delicious Caramelized Corn and Cherry Salsa, you need fresh and vibrant ingredients. Each one plays a key role in building flavor. Here’s what you will need: - Fresh corn kernels - Cherries - Red onion - Jalapeño - Extra virgin olive oil - Honey - Lime juice - Fresh cilantro - Salt and pepper Using fresh corn kernels is vital. They give a sweet crunch. Cherries add a unique twist with their juicy sweetness. Red onion provides a nice bite, while jalapeño adds heat. Extra virgin olive oil helps to caramelize the corn, creating a rich flavor. Honey balances the heat and acidity. Lime juice brightens the whole dish. Fresh cilantro brings freshness and aroma. Finally, salt and pepper enhance all the flavors. For the full recipe, check the details above. With these ingredients, you can create a salsa that bursts with flavor and color. Enjoy the process of making your salsa! First, gather your skillet and heat it up. Pour in the extra virgin olive oil. Wait until the oil is hot. Then add the fresh corn kernels. Cook the corn for about 8 to 10 minutes. Stir it every now and then. This will help the corn get that nice golden color. The heat brings out the sweet taste of the corn. Now, it’s time to add the diced red onion. Toss it into the skillet with the corn. Keep cooking for 2 to 3 minutes. Watch for the onion to turn translucent. The sweet smell of the onion will fill your kitchen. Next, add the minced jalapeño. This will add a nice kick. Cook for one more minute. After cooking, take the skillet off the heat. Carefully move the corn mixture to a mixing bowl. Let it cool for a bit. Once it’s cool, mix in the chopped cherries, honey, and lime juice. Don’t forget the fresh cilantro! Finally, season with salt and pepper. Stir everything well. Each bite should burst with flavor. Let the salsa sit for at least 15 minutes. This will help all the flavors blend perfectly. For the full recipe, check it out [Full Recipe]. For great caramelization, set your heat to medium-high. This helps the corn cook evenly. Stir the corn every two to three minutes. This way, it cooks well and browns nicely. Watch closely; too high heat can burn it. You want a golden color, which means it’s sweet and tasty. Want a sweeter taste? Add a drizzle of honey. This simple step enhances the flavor. If you prefer heat, chop up a jalapeño. It adds a nice kick. Just remember to remove the seeds first. Adjusting these flavors makes the salsa unique to your taste. Presentation is key when serving salsa. Use a bright bowl to show off those colors. Garnish with fresh cilantro leaves for a pop of green. You can also add lime wedges on the side. This gives your guests a fresh squeeze option. Serve the salsa with grilled chicken or tortilla chips for a fun mix! {{image_4}} You can change the fruits in your salsa. Instead of cherries, use diced peaches or mangoes. Both add sweetness and a tropical flair. If you want a twist, try adding diced strawberries for a fresh taste. Herbs also make a big difference. While cilantro is great, you can swap it for fresh basil or mint. These herbs will give your salsa a new twist. Each herb brings its own unique flavor that can brighten the dish. This salsa pairs well with many proteins. Serve it on top of grilled chicken or fish. The sweet and spicy notes enhance the meat's flavor. You can also use it as a topping for tacos or burritos. If you're in a snack mood, enjoy it as a dip. Serve it with tortilla chips for a crunchy bite. The salsa's vibrant flavor makes it a hit at parties. You can even use it as a topping for nachos to elevate your snack experience. Using seasonal produce can make your salsa even better. In summer, fresh corn and cherries shine. In fall, swap cherries for apples or pears to match the season. Each fruit adds its own special taste. You can adjust flavors for different seasons too. In winter, add roasted red peppers for warmth. In spring, mix in fresh herbs like dill or chives. This keeps your salsa fresh and exciting all year long. To keep your Caramelized Corn and Cherry Salsa fresh, store it in an airtight container. This helps keep flavors locked in. Place it in the fridge right after you finish enjoying it. The cool temperature helps slow down spoilage. The salsa lasts about 3 to 5 days in the fridge. However, it tastes best within the first few days. After that, the flavors may dull. Always check for any off smells or changes in texture before using it. When you have leftovers, serving them can be easy and fun. You can enjoy the salsa cold or at room temperature. If you want to warm it up, gently heat it on the stove. Use low heat and stir often to avoid burning. To refresh the salsa, add a squeeze of fresh lime juice. This brightens the flavors and makes it taste fresh again. You can also toss in more chopped cilantro for a vibrant touch. Enjoy your Caramelized Corn and Cherry Salsa with tortilla chips or as a topping for grilled meats. Caramelized Corn and Cherry Salsa can last 3 to 5 days in the fridge. To keep it fresh, store it in an airtight container. This helps prevent the salsa from absorbing other odors in the fridge. Always make sure to check for any signs of spoilage before enjoying it again. Yes, you can make this salsa a day in advance. Preparing it ahead of time allows the flavors to develop more. Just remember to store it in the fridge in an airtight container. Take it out about 15 minutes before serving, so it warms up slightly. This will enhance the taste and freshness when you serve it. This salsa pairs well with many dishes. Here are some ideas: - Grilled chicken: The sweetness of the salsa complements the smoky flavors. - Fish tacos: The fresh taste adds a vibrant twist. - Tortilla chips: It makes a great dip for a fun snack. - Tacos or burritos: Use it as a topping for added flavor. - Quesadillas: The salsa adds a refreshing contrast. You can also serve it as an appetizer with cheese or crackers. The possibilities are endless! For the full recipe, check out the instructions above. This post covered how to make a delicious Caramelized Corn and Cherry Salsa. We explored the ingredients, cooking steps, tips for flavor, and ways to store it. You can customize it to fit your taste. Whether you want it sweet, spicy, or both, the options are many. This salsa works well as a dip or a topping for proteins. Enjoy making and sharing this tasty treat.

Caramelized Corn and Cherry Salsa Vibrant Flavor Burst

Are you ready for a flavor explosion? Caramelized Corn and Cherry Salsa combines sweet, juicy cherries and rich, golden corn.

- Baby potatoes - Dill pickles - Mayonnaise - Red onion - Celery - Dijon mustard - Apple cider vinegar - Fresh or dried dill - Hard-boiled egg Gathering the right ingredients is key to making a great Dill Pickle Potato Salad. The main ingredients include baby potatoes, dill pickles, and mayonnaise. The baby potatoes give this salad a nice texture. I recommend using small potatoes because they cook evenly and stay firm. The dill pickles add a tangy punch that makes every bite exciting. Next, you have the additional ingredients. Red onion and celery bring crunch and flavor. I love the pop of color from the red onion. Celery adds a refreshing crispness that balances the creaminess of the mayo. Dijon mustard is a must for depth; it enhances the overall flavor. For extra flair, consider optional ingredients like apple cider vinegar, fresh or dried dill, and hard-boiled egg. The vinegar adds a nice acidity. Fresh dill gives a herbal note, while the egg can make the salad richer. This combination of flavors and textures creates a refreshing summer dish. You can find the full recipe to help you make this delightful salad easily. To start, we need to boil the potatoes. Take 2 pounds of baby potatoes and cut them in half. In a large pot, fill it with salted water. Add the halved potatoes and bring the water to a boil over medium-high heat. Once it boils, lower the heat to a simmer. Cook the potatoes for 10-12 minutes. They should be fork-tender but not mushy. After boiling, drain the potatoes and let them cool to room temperature. While the potatoes cool, you can prepare your mix-ins. Dice 1 cup of dill pickles, chop 1/2 cup of red onion, and dice 1/2 cup of celery. In a large mixing bowl, combine the cooled potatoes with the diced vegetables. Stir gently to mix them well without breaking the potatoes. Now, let’s make the dressing. In a small bowl, whisk together 1 cup of mayonnaise, 2 tablespoons of Dijon mustard, and 1 tablespoon of apple cider vinegar. Add a pinch of salt and pepper to taste. Keep whisking until the dressing is smooth and creamy. Drizzle the dressing over the potato and vegetable mix. Toss everything together gently. Make sure the potatoes and vegetables are well-coated in the dressing. If you want, you can add 1 chopped hard-boiled egg at this stage. Just fold it in gently to avoid breaking it apart. Chilling is key! Cover the bowl with plastic wrap and place it in the fridge. Let the salad chill for at least 1 hour before serving. This time allows all the flavors to meld together, making each bite taste even better. To get the best flavor, taste your salad after mixing. If it needs more zing, add salt, pepper, or even a touch of vinegar. These small tweaks can make a big difference. If you want more flavor, try mixing in a bit of garlic powder or even some chopped fresh herbs. These can boost the taste and make it more fun! Presentation matters! Serve your potato salad in a bright bowl to draw attention. Add fresh dill sprigs on top for a lovely touch. You can also place colorful cherry tomatoes or radish slices around the edges. For sides, this salad pairs well with grilled chicken or burgers. It’s a great dish for summer BBQs! Want to save time? Cook the potatoes a day in advance. Store them in the fridge. This lets you mix the salad quickly later. For busy days, use pre-diced pickles and veggies. This saves chopping time and keeps things simple. Enjoy your Dill Pickle Potato Salad without the hassle! Don’t forget to check the Full Recipe for more tips. {{image_4}} If you want a vegan version of this dish, it is easy to make. You can swap mayonnaise for a plant-based mayo. These options taste great and keep the creamy texture. When choosing plant-based ingredients, try using chickpeas or silken tofu. Both can bring a lovely richness. You can also add a splash of lemon juice for a fresh twist. For a flavor boost, consider adding crispy bacon or shredded cheese. Bacon adds a nice crunch and saltiness. Cheese brings creaminess and depth. You can also play with herbs and spices. Try adding garlic powder or smoked paprika for a fun twist. Fresh herbs like chives or parsley can brighten the dish. Dill pickle potato salad has many styles worldwide. In some places, people add hard-boiled eggs or even green peas. These ingredients can change the texture and flavor. You can also substitute ingredients based on what you have. For example, swap dill pickles for sweet pickles for a different taste. Or, use red potatoes instead of baby potatoes for a heartier salad. For more details, check the Full Recipe for all the ingredients and steps! To keep your Dill Pickle Potato Salad fresh, use airtight containers. Glass or plastic containers with tight lids work best. Before sealing, ensure the salad is cool. This step helps prevent moisture build-up, which can spoil your dish. Store the salad in the fridge. It keeps well when chilled. Your potato salad lasts about three to five days in the fridge. Check for signs of spoilage before eating. If you see mold or an off smell, it’s best to toss it out. Safety first! Always trust your senses when it comes to food. Can you freeze potato salad? Yes, but it may change texture. If you want to freeze it, do so before adding mayo or eggs. Store in a freezer-safe container. Leave some space for expansion. When you’re ready to enjoy it, thaw in the fridge overnight. Stir well before serving to bring it back to life. For a detailed guide on making this dish, check out the Full Recipe. Yes! Making this salad early helps the flavors blend. I recommend letting it chill for at least an hour. However, it tastes even better after a full night in the fridge. The longer it sits, the more the dill and pickle flavors come through. I love using baby potatoes for this salad. They cook evenly and have a nice texture. You can also use Yukon Gold or red potatoes. These varieties hold their shape well and add a creamy taste. This recipe is naturally gluten-free! Just check your mayonnaise and mustard labels to confirm. Some brands add gluten, but many do not. Always read the ingredient list to be safe. Absolutely! You can use Greek yogurt instead of mayonnaise for a lighter option. Adding more veggies, like bell peppers or cucumbers, boosts nutrition too. You can also skip the hard-boiled egg for fewer calories. You can keep this salad in the fridge for about three to five days. Store it in an airtight container to keep it fresh. Always check for any off smells or changes in texture before eating. Dill Pickle Potato Salad is a mix of flavors from different places. It became popular in the U.S. during the mid-20th century. It reflects a love for pickles in American cuisine. Many families enjoy it at barbecues and picnics, making it a true summer favorite! Dill pickle potato salad is simple and tasty. We explored key ingredients like baby potatoes, dill pickles, and mayo. I shared how to cook the potatoes and mix in the veggies. Making the dressing adds flavor, while chilling lets everything blend nicely. Consider your preferences with tips on seasoning, serving, and time-saving tricks. You can also try variations to fit your style. Remember, storing is important for freshness. Enjoy crafting this dish, and make it your own!

Dill Pickle Potato Salad Refreshing Summer Delight

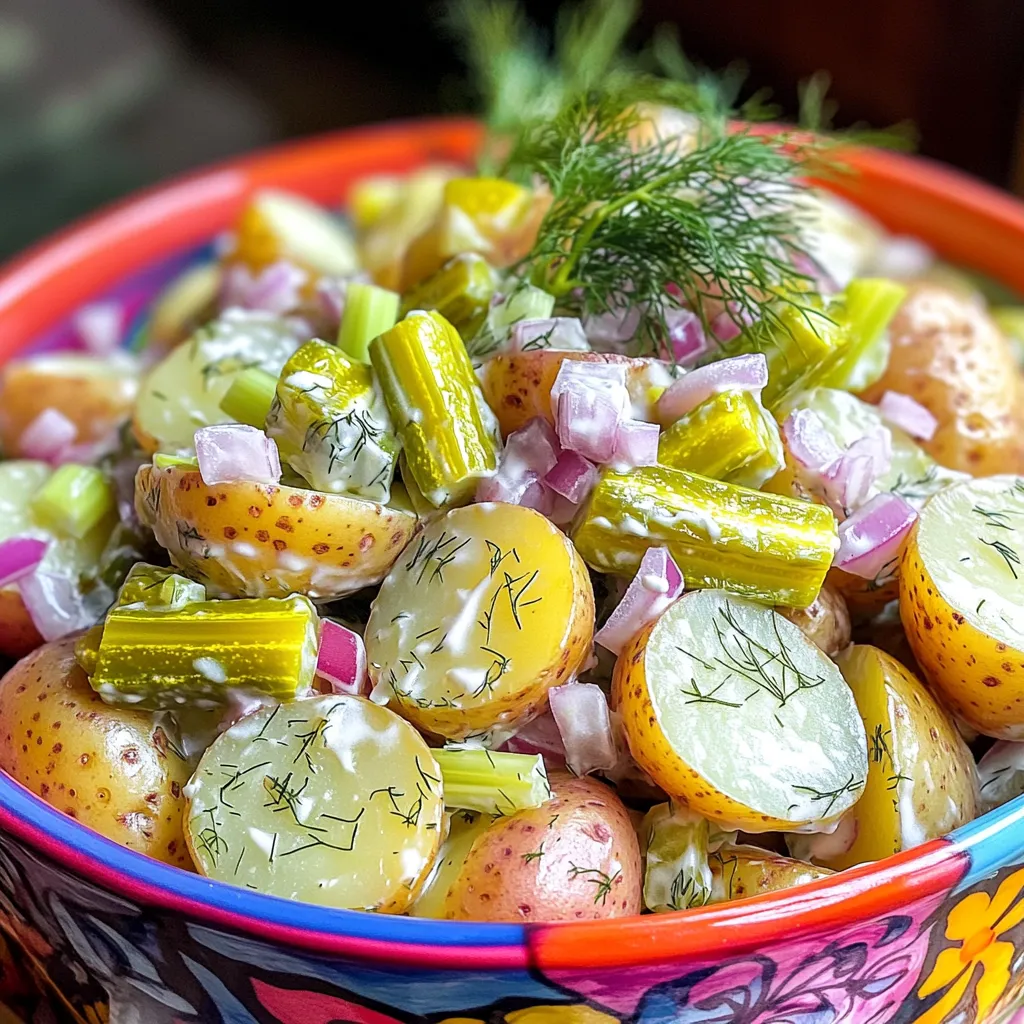
Looking for a fun twist on classic potato salad? Let me introduce you to Dill Pickle Potato Salad—a refreshing summer

To make Cherry Balsamic Burrata Crostini, you need just a few fresh items. Here’s the list: - Baguette - Fresh cherries - Balsamic vinegar - Honey - Burrata cheese - Extra virgin olive oil - Salt and pepper - Fresh basil leaves Each ingredient plays a key role in the flavor and texture of this dish. The baguette will give you a nice crunch. Fresh cherries add sweetness and color. Balsamic vinegar and honey create a lovely tangy-sweet mix. Burrata cheese adds creaminess, making it rich and satisfying. Extra virgin olive oil helps with the toasting process, enhancing the taste. Salt and pepper balance the flavors. Finally, fresh basil leaves add a pop of freshness and aroma. Using high-quality ingredients is key. Choose ripe cherries and fresh burrata for the best results. This simple yet tasty treat will impress anyone who tries it! For the full recipe, check out the detailed instructions. 1. Preheating the oven: Start by setting your oven to 400°F (200°C). This heat will give the crostini a perfect crisp. 2. Preparing the baguette slices: Slice your baguette into ½ inch rounds. This size is just right for a bite-sized treat. 3. Baking the crostini: Place the baguette slices on a baking sheet in a single layer. Brush each side with extra virgin olive oil. Bake for 8-10 minutes until they turn golden brown and crispy. Let them cool slightly after baking. 1. Combining cherries with balsamic and honey: In a bowl, mix the halved cherries with 1 tablespoon of balsamic vinegar and 1 tablespoon of honey. 2. Marinating to enhance flavors: Add a pinch of salt and freshly ground black pepper. Toss gently to coat the cherries. Let them marinate for 5-10 minutes. This brings out their sweet and tangy taste. 1. Layering burrata cheese: Take each toasted crostini and place a generous dollop of burrata cheese on top. This creamy cheese melts perfectly with the cherries. 2. Adding the cherry topping: Spoon the marinated cherry mixture over the burrata. Let the juices flow over the cheese for added flavor. 3. Garnishing with fresh basil: Tear some fresh basil leaves and sprinkle them over each crostini. This adds a lovely aroma and bright color to your dish. For the complete details, check the Full Recipe. To make the best crostini, aim for a golden color. Start with a fresh baguette. Slice it into ½ inch rounds. Brush the slices with extra virgin olive oil. Bake at 400°F (200°C) for 8-10 minutes. Flip them halfway for even crispiness. Watch them closely; oven times can vary. Spreading burrata cheese can be tricky. To make it smooth, let the cheese sit at room temperature. This softens it and makes spreading easy. Use a spoon to dollop it on each crostini. Start with a small amount and add more if needed. You can personalize the cherry topping easily. Add spices like cinnamon for warmth. Try using different fruits, like figs or peaches, for variety. Mix in chopped nuts for crunch. This adds a nice texture that contrasts with the creamy burrata. For the balsamic glaze, consider making your own. Simply simmer balsamic vinegar until it thickens. It gives a rich flavor and a touch of sweetness. You can also buy a good quality glaze from a store. Just make sure it has simple ingredients. Serving your crostini on a rustic wooden board looks great. Arrange them in a neat row or a circular pattern. You can drizzle extra balsamic glaze over the top for flair. This adds a beautiful shine and highlights the flavors. Garnishes can enhance your dish's visual appeal. Use torn basil leaves to add color and aroma. Consider using whole cherries around the edges for a pop of color. This creates a vibrant presentation that’s sure to impress. {{image_4}} You can swap burrata for other cheeses. Try using goat cheese or cream cheese. These cheeses offer different flavors and textures. They still work well with cherries and balsamic. You can also play with fruits. If cherries aren't your favorite, use figs or peaches. Both fruits pair nicely with the sweetness of honey and balsamic. Their unique tastes will change the crostini in fun ways. If you need gluten-free options, look for gluten-free baguettes. Many stores now sell these. They allow everyone to enjoy crostini without worry. For vegan alternatives, consider using a nut-based cheese. These cheeses can mimic the creaminess of burrata. They offer a tasty option for those who avoid dairy. Want to add some flair? Try adding fresh herbs like chives or thyme. These herbs can enhance the flavor and make your dish pop. Pair your crostini with other appetizers. They go well with olives or a fresh salad. This creates a fun dinner party spread. You can make your meal interesting and varied! To keep your leftover crostini fresh, store them in an airtight container. Make sure to layer them with parchment paper to prevent sticking. This method keeps them crisp and tasty. If you want to maintain their crunch, avoid adding toppings until you are ready to eat. To reheat your crostini, use your oven for the best results. Preheat the oven to 350°F (175°C). Place the crostini on a baking sheet in a single layer. Heat them for about 5-7 minutes. This will keep them crunchy and warm without making them soggy. The crostini will stay fresh for about 3 days when stored properly. Look out for signs of spoilage, like mold or a stale smell. If your crostini feel soft or chewy, it's best to toss them. Enjoy your Cherry Balsamic Burrata Crostini fresh for the best flavor! Remember to check the Full Recipe for more tips. To make this dish, follow these steps: 1. Prepare the baguette: Preheat your oven to 400°F. Slice the baguette into ½ inch rounds. Brush both sides with olive oil. 2. Bake the crostini: Place the slices on a baking sheet. Bake for 8-10 minutes until golden brown. 3. Make the cherry topping: In a bowl, mix halved cherries with balsamic vinegar, honey, salt, and pepper. Let it marinate for 5-10 minutes. 4. Assemble the crostini: Spread burrata cheese on each crostini. Top with the marinated cherries. 5. Garnish: Add torn basil leaves for color and flavor. This is how you create a tasty Cherry Balsamic Burrata Crostini. For the full recipe, check the details above. Yes, you can prepare crostini in advance. Here are some best practices: - Make the crostini: Bake the bread slices ahead of time. Store them in an airtight container. They stay crispy for a few hours. - Prepare the cherry topping: Mix the cherry topping a few hours before serving. Keep it in the fridge to stay fresh. - Assemble just before serving: For the best taste, assemble the crostini right before serving. This keeps the bread crispy. Pair these crostini with: - Wine: A light white wine or sparkling wine complements the dish well. - Salads: A simple arugula salad adds a nice touch. - Other appetizers: Serve with olives, cheese platters, or charcuterie boards. These pairings enhance the meal and make it more enjoyable! This blog post covered making Cherry Balsamic Burrata Crostini. We explored fresh ingredients and simple steps that lead to a delightful snack. I shared tips for perfecting your crostini, ideas for variations, and how to store them. Remember, experimenting with flavors can make this dish truly unique. Enjoy crafting this tasty treat, and don't hesitate to make it your own! You will impress your friends and family every time. Get ready to savor these bites and share the joy of good food!

Cherry Balsamic Burrata Crostini Simple and Tasty Treat

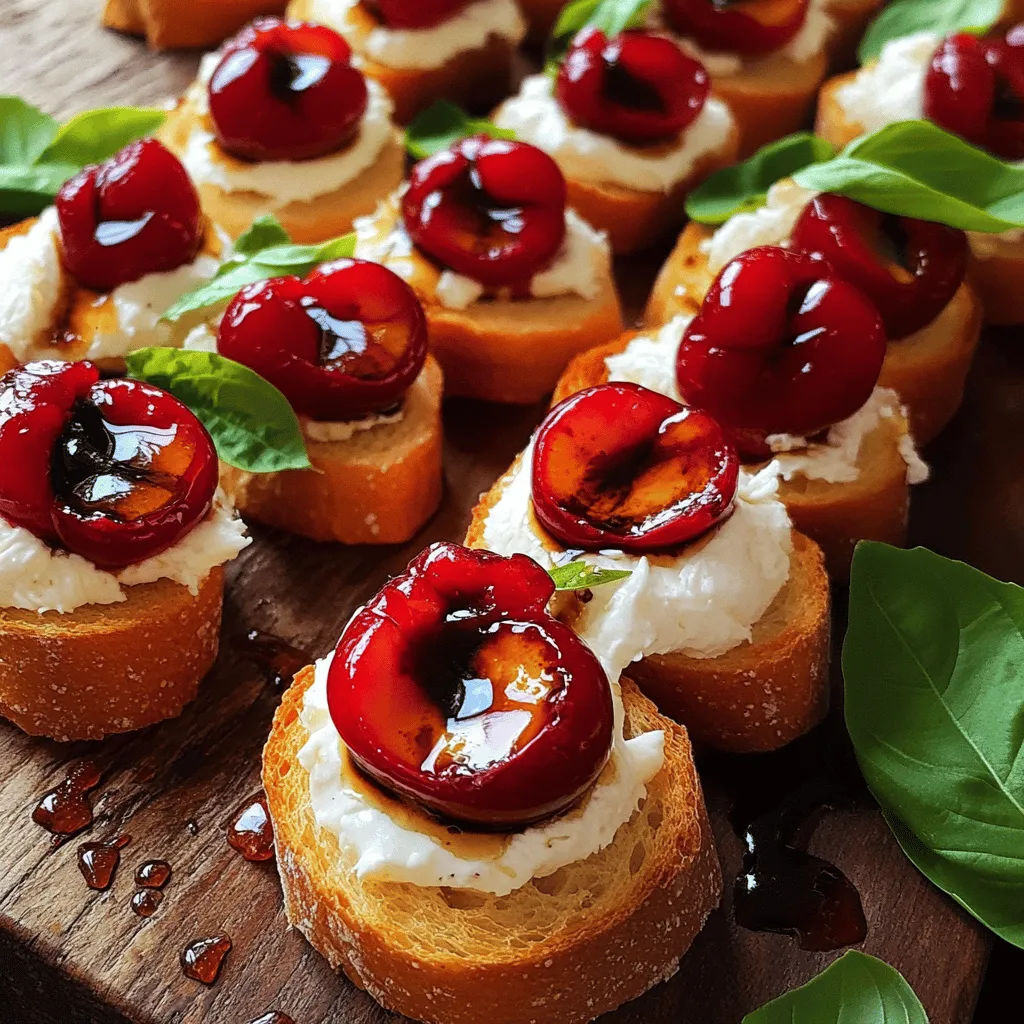
If you’re looking for a simple and tasty treat, you’ve found it! Cherry Balsamic Burrata Crostini combines fresh cherries, creamy

To make Mango Pickle Tacos, gather these key ingredients: - 2 cups corn tortillas - 1 ripe mango, peeled and diced into small cubes - 1/2 cup mango pickle, chopped if necessary - 1/2 cup black beans, rinsed and drained - 1 ripe avocado, sliced - 1/4 cup red onion, finely chopped - 1 jalapeño, sliced (optional for added heat) - 1/4 cup fresh cilantro, chopped - 1 tablespoon lime juice - Salt to taste Each ingredient adds a unique flavor. The ripe mango brings sweetness. The mango pickle offers a tangy kick. Black beans add protein and texture. You can enhance your tacos with these optional ingredients: - Crumbled queso fresco for creaminess - Fresh lime wedges for extra zing - Sliced radishes for crunch - Diced tomatoes for freshness These additions can elevate your dish. Experiment with what you like best! Making your own mango pickle is simple. Here’s a quick guide: 1. Choose your mango: Use firm, green mangoes. Their tartness works well. 2. Spices: Mix salt, turmeric, chili powder, and mustard seeds. 3. Combine: Cut mango into cubes and mix with the spices. 4. Marinate: Let it sit for a day to develop flavors. Homemade mango pickle adds a personal touch. It also allows you to control the spice level. Use this pickle in your tacos for that extra burst of flavor! For the full recipe, check the details above and get cooking! First, you need to prep the mango. If you use a fresh mango, peel the skin off. Then, cut the fruit and dice it into small cubes. This makes it easier to eat. If you have mango pickle, check the size of the pieces. If they are big, chop them into smaller bits. This helps them mix well later. Now, let's make the filling. In a medium bowl, combine the rinsed black beans, diced mango, and lime juice. Stir in a pinch of salt to add flavor. Mix gently so you don’t mash the mango. Let this sit for a few minutes. This time helps the flavors blend. The sweet mango will match well with the savory black beans. Next, we will warm the tortillas. Heat a non-stick skillet over medium heat. Place one corn tortilla in the skillet. Warm it for about 30 seconds on each side. This will make it soft and easy to fold. Stack the warm tortillas on a plate and cover them with a clean kitchen towel to keep them warm. Now, it’s time to assemble the tacos. Take a warm tortilla and place it on a plate. Spoon a generous amount of the black bean and mango mixture into the center. Top it with slices of avocado and a sprinkle of red onion. If you like heat, add some jalapeño slices. Finally, add the mango pickle on top. This gives your taco a tangy kick. Don’t forget to sprinkle chopped cilantro for freshness. Repeat this process for the other tortillas. Serve the tacos right away with lime wedges on the side for extra flavor. For the full recipe, check the details above. Enjoy your tasty mango pickle tacos! Warming tortillas makes them soft and tasty. Use a non-stick skillet for best results. Heat it on medium. Place one tortilla in the skillet and warm it for about 30 seconds. Flip it and warm the other side for 30 seconds too. Keep the tortillas warm by stacking them and covering them with a kitchen towel. This keeps them flexible for filling. Toppings add great flavor and texture to your tacos. Start with fresh avocado slices for creaminess. Use red onions for a crunchy bite. If you like heat, add jalapeño slices. Fresh cilantro brings a bright taste. You can also drizzle some lime juice on top for extra zing. Each topping adds its own special touch. Serve your tacos right after you assemble them. This keeps them fresh and warm. Arrange them on a colorful platter. Add lime wedges on the side for an extra burst of flavor. You can also decorate with sprigs of cilantro around the tacos. This way, your dish looks as good as it tastes. Enjoy the mango pickle tacos with family or friends for a fun snack! For the complete recipe, check out the Full Recipe. {{image_4}} You can easily make these tacos vegan. Swap the black beans with chickpeas. Use a plant-based yogurt instead of avocado for creaminess. You can also add fresh spinach for extra nutrients. This makes the dish colorful and tasty. If you want more protein, try adding grilled chicken or shrimp. Both options pair well with mango and pickle. You can also use tofu for a hearty, plant-based choice. Just marinate the tofu to boost flavor. Get creative with your tacos! Add some diced bell peppers for crunch. You might also mix in some corn for sweetness. A sprinkle of feta cheese can give a nice salty kick. For heat, include fresh chili or a splash of hot sauce. These little changes can make your tacos unique and delightful. To store leftover tacos, I suggest you keep them separate. This keeps the tortillas soft and the fillings fresh. Place the tortillas in a sealed bag or container. Store the filling in a different container. Make sure it is airtight. This helps maintain flavor and texture. The ingredients in mango pickle tacos last for different times. Corn tortillas can last about a week in the fridge. Black beans stay fresh for 3 to 5 days. Fresh mango and avocado should be eaten within 2 days for the best taste. Mango pickle can last several weeks if stored well. When reheating, focus on keeping flavors bright. Warm the tortillas in a skillet briefly. This keeps them soft. For the filling, heat it in a pan over low heat. Stir gently until warm. Avoid using the microwave as it can make tortillas chewy. Enjoy the mango pickle tacos fresh for the best flavor! For the full recipe, check the details above. The best mango for tacos is the ripe Ataulfo mango. This mango has a creamy texture and sweet flavor. It also has fewer fibers, making it easy to enjoy in tacos. You want your mango to be soft but not mushy. This ensures it blends well with other ingredients. If Ataulfo is not available, you can use Haden or Tommy Atkins mangoes. They also provide a good taste and texture. Yes, you can easily make these tacos gluten-free. Just choose corn tortillas, as they are naturally gluten-free. Many brands offer gluten-free options, so check the packaging. Always read the labels to ensure no gluten ingredients are present. You can also make your own tortillas using masa harina for a fresh taste. This way, you can enjoy these tacos without gluten. You can find pre-made mango pickle in many grocery stores. Look in the international or condiment aisle. Indian or Asian markets often have a wide range of mango pickles. You can also buy it online from sites like Amazon or specialty food stores. When choosing a mango pickle, look for one with natural ingredients. This adds a better flavor to your tacos. For a homemade option, check out the Full Recipe for easy steps to create your own! These mango pickle tacos are a fun and tasty dish. We explored key ingredients and how to prepare them. We also shared tips for warming tortillas and enhancing flavors with toppings. You can make these tacos vegan or try new flavors with unique ingredients. Store leftovers well, so they stay fresh. In short, enjoy the joy of creating and sharing these delicious tacos. They’re sure to bring smiles to your table!

Mango Pickle Tacos Flavorful and Easy to Make Snack

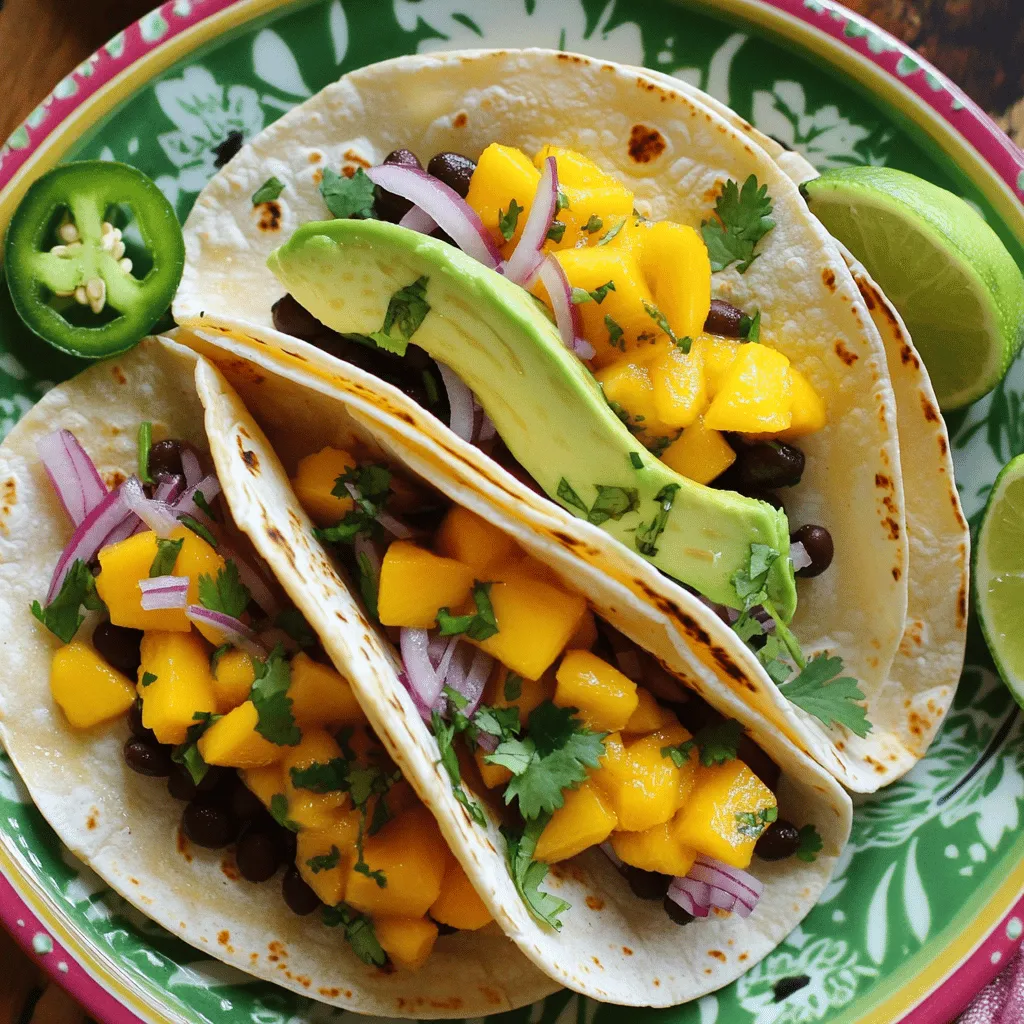
Are you ready to spice up your snack game? Mango Pickle Tacos are a burst of flavor you don’t want

To make these delightful cream soda donut holes, you need a mix of simple ingredients. This full recipe yields 24 delicious donut holes. Here’s what you will need: - 2 cups all-purpose flour - 3/4 cup granulated sugar - 1 tablespoon baking powder - 1/2 teaspoon salt - 2 large eggs - 1/2 cup whole milk - 1 cup cream soda - 1/2 cup unsalted butter, melted - 1 teaspoon vanilla extract - 1 cup powdered sugar (for coating) - Sprinkles for decoration (optional) Each ingredient plays a role in creating that sweet, fluffy texture. The cream soda adds a fun burst of flavor, making these treats unique. If you can’t find an ingredient, don’t worry! Here are some easy swaps: - For all-purpose flour, use gluten-free flour for a gluten-free option. - Instead of whole milk, almond milk or oat milk work well. - You can replace unsalted butter with coconut oil for a dairy-free version. - Use a sugar substitute for a lower-calorie treat. These substitutions keep the fun of making cream soda donut holes while catering to different diets. Enjoy the process! To make these cream soda donut holes, start by gathering your ingredients. You need: - 2 cups all-purpose flour - 3/4 cup granulated sugar - 1 tablespoon baking powder - 1/2 teaspoon salt - 2 large eggs - 1/2 cup whole milk - 1 cup cream soda - 1/2 cup unsalted butter, melted - 1 teaspoon vanilla extract - 1 cup powdered sugar (for coating) - Sprinkles for decoration (optional) First, preheat your oven to 350°F (175°C). Prepare a mini muffin tin or donut hole pan by greasing it well. This step helps keep the donut holes from sticking. In a large bowl, whisk the flour, sugar, baking powder, and salt together until they blend nicely. In another bowl, beat the eggs, milk, cream soda, melted butter, and vanilla. Make sure this mix is smooth. Pour the wet mix into the dry mix. Stir gently until just combined. Lumpy batter is key for fluffy donut holes. Next, fill each cavity in your pan about two-thirds full with the batter. This allows the donut holes to rise without spilling over. Place the pan in your oven and bake for 12 to 15 minutes. To check if they are done, insert a toothpick. If it comes out clean, they are ready! Once they are baked, let the donut holes cool in the pan for about 5 minutes. Then, move them to a wire rack to cool completely. While they are still warm, roll each donut hole in powdered sugar. This gives them a sweet coating. If you like, add colorful sprinkles for fun! You can serve these delicious cream soda donut holes warm or at room temperature. They make a great treat for any day. For the full recipe, check out the earlier section. To get fluffy donut holes, mix the batter gently. Over-mixing makes them dense. You want lumps in the batter; they help create a light texture. Use a light hand when filling the pan. Aim for two-thirds full to allow them to rise perfectly. A few mistakes can ruin your donut holes. First, avoid using cold ingredients. Cold eggs or milk can lead to uneven baking. Second, do not skip the greasing step. This step is crucial to prevent sticking. Lastly, check the baking time. Donut holes can overbake quickly, so watch them closely. These donut holes shine when served warm. They are perfect for parties or casual snacks. Arrange them on a tiered stand for a fun look. You can add a bowl of extra sprinkles on the side. Guests love to customize their treats! For a twist, serve with chocolate sauce or fruit dips. Enjoy these delightful bites with family and friends! {{image_4}} You can change the flavor of your cream soda donut holes easily. Try using vanilla extract for a classic taste. You can also swap in chocolate extract for a rich twist. For a fruity note, add orange or lemon zest to the batter. Each flavor brings a new vibe to your treat. Just ensure you stick to the same base recipe for the best results. If you need a gluten-free version, it is simple! Use a 1:1 gluten-free flour blend instead of regular flour. This swap keeps the donut holes soft and fluffy. Be sure to check that your baking powder is gluten-free too. This way, everyone can enjoy that sweet, creamy goodness. Toppings make your donut holes even more fun. A simple glaze adds a shiny finish. Mix powdered sugar with a bit of milk or cream soda for a sweet glaze. You can also roll them in cinnamon sugar for a cozy feel. Want some crunch? Add chopped nuts like pecans or almonds. Sprinkles are always a hit too! They add color and make your treats pop. To store your leftover donut holes, place them in an airtight container. This keeps them fresh and moist. You can store them at room temperature for up to two days. If you want to keep them longer, place the container in the fridge. They will last about a week this way. Just make sure they cool completely before storing. If you want to enjoy warm donut holes again, reheating is easy. Preheat your oven to 350°F (175°C). Place the donut holes on a baking sheet. Heat them for about five to seven minutes. You can also use a microwave for quick reheating. Just warm them for 10 to 15 seconds. Avoid overheating, or they may become tough. You can make donut holes ahead of time for special events. Prepare the dough and fill the muffin tin. Cover and refrigerate the filled pan for up to 24 hours. When ready, bake as usual. This method saves time and lets you enjoy fresh donut holes without the last-minute rush. For the best taste, I recommend rolling them in powdered sugar just before serving. Yes, you can freeze cream soda donut holes. First, let them cool completely. Then, place them in a single layer on a baking sheet. Freeze them for about an hour. After that, transfer them to a freezer bag. This way, they will stay fresh for up to three months. When you're ready to eat them, let them thaw at room temperature. You can also reheat them in the oven for a few minutes. This brings back their fluffy texture. Adding fillings to donut holes is easy. After baking, let them cool slightly. Use a small knife or a piping bag to create a small hole in the center. Fill it with your favorite treat, like jam, cream, or chocolate. If you want a surprise, try using a sweet filling like Nutella or raspberry jam. Just be careful not to overfill, or they might burst! You can find pre-made cream soda donut holes at some specialty bakeries. Check local shops that focus on unique treats. Some grocery stores may also carry them in their bakery section. If you want a quick option, consider searching online. Many bakeries ship their goodies, making it easy to enjoy these sweet treats at home. This blog post covered how to make delicious cream soda donut holes. We looked at key ingredients and how to substitute them. The step-by-step guide outlined preparation, baking, and cooling. I shared tips to avoid mistakes and achieve the right texture. Flavor variations and storage tips offered even more ideas. Making these treats is fun and easy. Experiment with flavors and toppings to make them your own. Enjoy sharing them with friends and family; they’re sure to love them. Happy baking!

Cream Soda Donut Holes Irresistible Sweet Treat

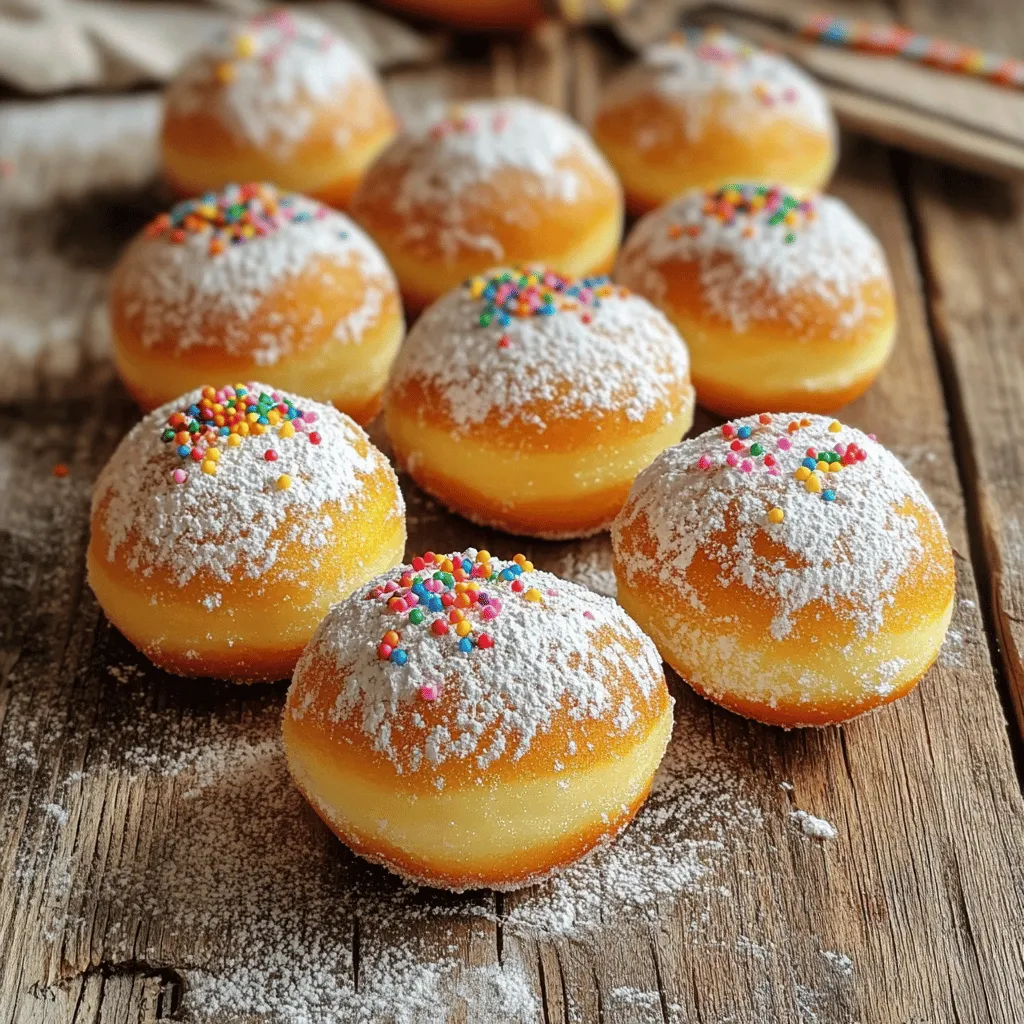
Are you ready to take your sweet treats to the next level? Cream soda donut holes are the perfect blend

To make the best cookie dough bars, you need some key ingredients. Each plays a part in creating that rich, creamy flavor. Here’s what you will need: - 1 cup unsalted butter, softened - 3/4 cup packed brown sugar - 1/4 cup granulated sugar - 2 teaspoons pure vanilla extract - 2 cups all-purpose flour - 1/2 teaspoon fine sea salt - 1 can (14 oz) sweetened condensed milk - 1 cup mini chocolate chips - 1/2 cup chopped nuts (optional) - 1 cup dark chocolate chips (for topping) The butter gives the bars a rich base. The sugars add sweetness and moisture. Vanilla extract enhances the flavor. Flour helps to bind it all together. Sea salt balances the sweetness. Sweetened condensed milk makes the dough creamy. Chocolate chips add bursts of chocolate goodness. If you like, you can add nuts for crunch. Finally, dark chocolate on top makes it all come together beautifully. When you gather these ingredients, you set the stage for a delicious treat. This recipe is simple and lets you enjoy the joy of cookie dough in a new way. For the full recipe, check the section below. 1. Creaming the butter and sugars Start by placing the softened butter in a large bowl. Add the packed brown sugar and granulated sugar. Use an electric mixer to beat them together. Mix until the mixture is light and fluffy. This takes about 2-3 minutes. 2. Mixing in the wet ingredients Next, pour in 2 teaspoons of pure vanilla extract. Blend this in until it is fully mixed. This step adds great flavor to your bars. 3. Incorporating flour and salt Gradually sift in 2 cups of all-purpose flour. Sprinkle in 1/2 teaspoon of fine sea salt. Mix just until combined. Be careful not to overmix, as this can make your bars tough. 1. Adding sweetened condensed milk Slowly pour in 1 can (14 oz) of sweetened condensed milk. Mix on low speed or by hand until the dough is smooth and creamy. This gives the bars their rich texture. 2. Folding in chocolate chips and nuts Gently fold in 1 cup of mini chocolate chips and 1/2 cup of chopped nuts, if you like. Make sure they are evenly distributed throughout the dough. 3. Pressing the dough into the baking dish Take a 9x9 inch baking dish and line it with parchment paper. Leave some paper hanging over the sides. This helps lift the bars out later. Use a spatula to press the dough evenly into the dish. Make sure the surface is smooth. 1. Melting dark chocolate chips In a microwave-safe bowl, add 1 cup of dark chocolate chips. Heat them in 30-second bursts. Stir well in between until the chocolate is completely smooth. 2. Spreading melted chocolate over the bars Carefully pour the melted chocolate over the pressed cookie dough layer. Use a spatula to spread it evenly across the top. This gives a delicious finish. 3. Refrigeration time Cover the baking dish with plastic wrap. Place it in the fridge for at least 2 hours. This helps the bars become firm. Once they set, lift them out using the overhanging parchment paper. Cut into 16 squares and enjoy! For the Full Recipe, refer back to the main article for all the details. How to avoid overmixing To avoid overmixing, mix the dough just until you see no dry flour. This keeps the bars soft and chewy. Stir gently when adding the sweetened condensed milk. Ensuring the right dough texture Your dough should be smooth and creamy. If it feels too thick, you can add a splash of milk. If it seems too thin, add a bit more flour. Tips for a smooth chocolate topping Melt your dark chocolate chips slowly. Use short bursts in the microwave, stirring in between. This helps prevent burning and gives you a nice, glossy finish. Plating and presentation ideas Place the cookie dough bars on a bright plate. You can dust them with powdered sugar for a nice touch. Adding a few mini chocolate chips on top makes them look fancy. Pairing options with beverages These bars pair well with milk, coffee, or even hot chocolate. The sweet dough and rich chocolate make a perfect match with any of these drinks. Suggestions for flavor add-ins You can add a pinch of cinnamon or a dash of nutmeg for warmth. A splash of almond extract gives a nice twist too. Using different types of chocolate Try using milk chocolate or white chocolate chips for a different flavor. You can mix and match types of chocolate for a fun taste experience. For more details, check out the Full Recipe for Cookie Dough Bliss Bars. {{image_4}} You can easily change up the flavors in cookie dough bars. Here are three tasty ideas: - Brownie cookie dough bars: Mix cocoa powder into the dough. Add chocolate chunks for a rich taste. You’ll get a brownie-like flavor that’s irresistible. - Peanut butter cookie dough bars: Replace some butter with creamy peanut butter. This will add a nutty twist that many love. You can also add chopped peanuts for extra crunch. - Oatmeal cookie dough bars: Stir in oats and a dash of cinnamon. This gives a chewy texture and a warm flavor. You can even add raisins or chocolate chips for fun. You can enjoy cookie dough bars even if you have dietary needs: - Gluten-free version: Swap all-purpose flour with almond or coconut flour. This makes the bars gluten-free and adds a nice flavor. Just make sure to follow the same measurements. - Vegan alternatives: Use vegan butter and replace sweetened condensed milk with coconut cream. This way, you keep the creamy texture while making the bars vegan-friendly. Toppings can take your cookie dough bars to the next level: - Drizzled caramel or ganache: Melt caramel or chocolate for a tasty drizzle. This adds richness and makes the bars look fancy. - Sprinkled candy or sprinkles: Add colorful candy or sprinkles on top. This is a fun way to make the bars festive and appealing to kids. These variations let you customize your cookie dough bars. You can make them fit your taste and dietary needs easily! To keep your cookie dough bars fresh, use airtight containers. Glass or plastic containers work well. Line the container with parchment paper to avoid sticking. Seal the container tightly. This keeps air out and moisture in. You can store cookie dough bars for about one week at room temperature. If you keep them in the fridge, they can last up to two weeks. Check for signs of spoilage like a strange smell or mold. If you see these, it's time to toss them. To freeze cookie dough bars, cut them into squares. Place them in a single layer on a baking sheet. Freeze for about two hours. Once frozen, transfer them to a freezer bag. This way, they won't stick together. For best results, eat them within three months. To thaw, simply leave them at room temperature for a few hours. You can also microwave for 15-20 seconds for a quick fix. For the full recipe, visit the detailed section. How to make cookie dough bars without eggs? To make cookie dough bars without eggs, simply leave them out. You can use sweetened condensed milk instead. This gives a creamy texture and sweetness. Can I use other types of flour? Yes, you can use other flours. Almond flour or oat flour works well. Just remember, different flours may change the taste and texture. Where can I find premade cookie dough bars? You can find premade cookie dough bars at most grocery stores. Look in the frozen section or the snack aisle. Some bakeries may also sell them fresh. How to customize cookie dough bars for special occasions? To customize cookie dough bars, add fun toppings. You can use sprinkles, crushed cookies, or even colored chocolate chips. These add color and fun to your treats. Are cookie dough bars safe to eat if they contain raw flour? Raw flour can have harmful bacteria. To make cookie dough bars safe, heat the flour first. Spread it on a baking sheet and bake at 350°F for 5 minutes. Let it cool before using it in your recipe. For the Full Recipe, check out the detailed steps and ingredients I provided earlier! Making cookie dough bliss bars is a fun and easy process. First, you cream the butter and sugars together. This makes the mix light and fluffy. Next, you blend in the vanilla extract. Then, gradually sift in the flour and salt. Mix until just combined. After that, you slowly add the sweetened condensed milk. This step gives the dough its creamy texture. Next, fold in the mini chocolate chips and nuts if you want. The nuts add a nice crunch. Prepare a 9x9 inch baking dish by lining it with parchment paper. This makes it easy to lift out the bars later. Press the dough evenly into the dish. Make sure the surface is smooth. Now, melt the dark chocolate chips in a microwave-safe bowl. Heat in 30-second intervals, stirring well until smooth. Pour this melted chocolate over the pressed cookie dough. Spread it evenly with a spatula. Cover the dish and refrigerate for at least 2 hours. This helps the bars set properly. After they are firm, lift the bars out using the parchment paper. Place them on a cutting board and slice into 16 squares. You can serve them chilled or at room temperature. This simple recipe is great for any occasion. You can find the full recipe to guide you step-by-step as you create these delightful treats. You now have all you need to make delicious cookie dough bars. We covered the key ingredients, step-by-step instructions, and helpful tips. You learned about flavor variations and how to store your bars for freshness. With this recipe, you can create a treat that delights everyone. These bars are fun, easy, and perfect for sharing. Enjoy making them your own, and let your creativity shine. The sweet taste of success is just a bake away!

Cookie Dough Bars Simple and Delicious Treat Recipe

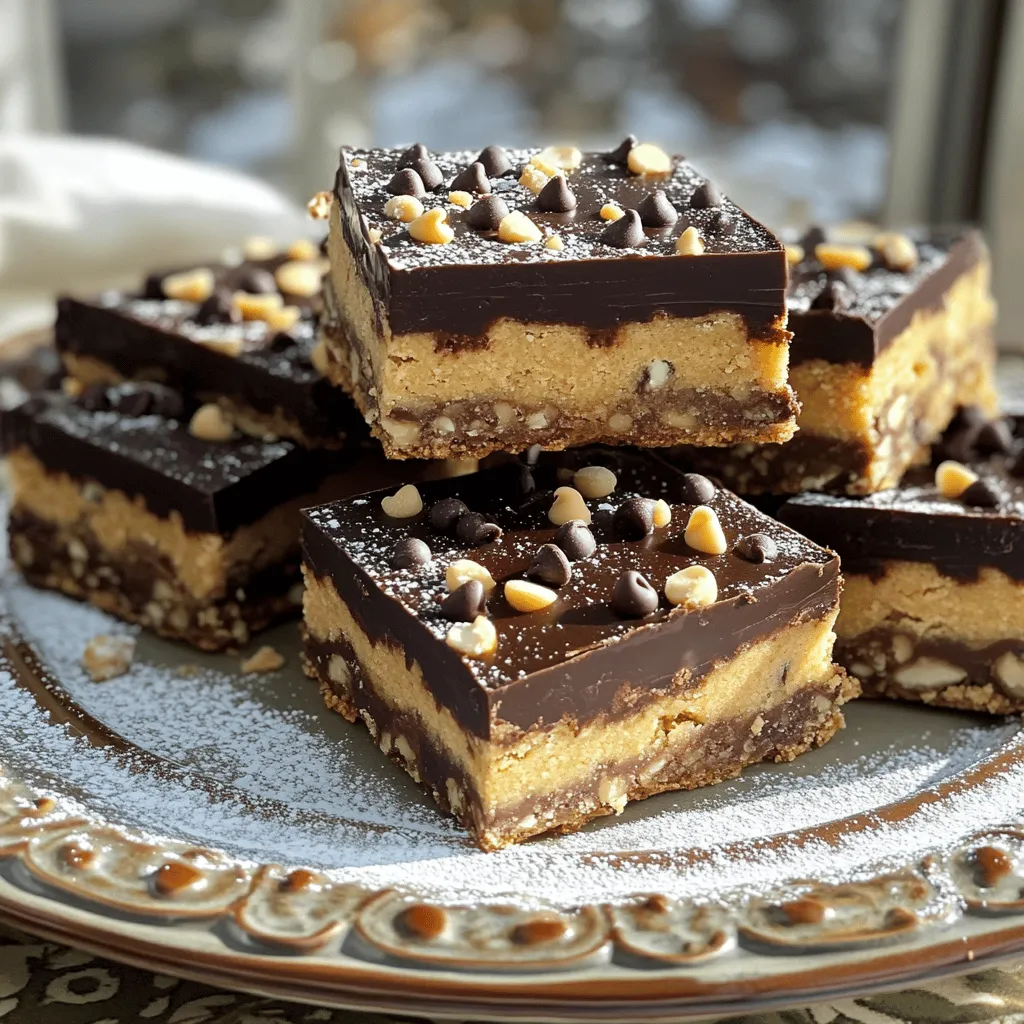
Looking for a sweet treat that’s simple to whip up? You’ll love these Cookie Dough Bars! They’re creamy, chocolatey, and

- Salmon fillets - Red miso paste - Fresh cherries or cherry preserves The star of the dish, salmon fillets, are rich in omega-3s. I love using red miso paste for its deep flavor. Fresh cherries add a sweet touch, but cherry preserves work just as well. - Honey - Soy sauce - Fresh ginger Honey balances the savory notes of the miso. Soy sauce adds an umami kick. Fresh ginger enhances the glaze with its zesty warmth. - Green onions - Sesame seeds - Lemon wedges Green onions give a fresh crunch. Sesame seeds add texture and a nutty flavor. Lemon wedges bring brightness and a zesty finish to the dish. For the full recipe, check out the [Full Recipe]. To start, gather your ingredients. In a medium bowl, combine: - 1/4 cup red miso paste - 1/4 cup fresh cherries, pureed - 2 tablespoons honey - 1 tablespoon soy sauce - 1 teaspoon sesame oil - 1 tablespoon fresh ginger, grated Whisk these together until you have a smooth blend. This glaze brings a sweet and savory flavor. Set aside a small amount for later. Next, take your four salmon fillets and place them in a shallow dish. Season both sides with salt and pepper. Then, pour most of the miso cherry glaze over the fillets. Make sure each fillet gets coated evenly. Cover the dish with plastic wrap and put it in the fridge for at least 30 minutes. If you can wait longer, let it sit for one to two hours. This step really boosts the flavor. Now it’s time to heat your grill. Preheat it to a medium-high setting. If you're using a grill pan, lightly brush it with oil so the salmon won’t stick. Once the grill is hot, take the salmon out of the marinade. Let any extra glaze drip off. Place the fillets skin-side down on the grill. Cook them for about 5 to 6 minutes. Don’t move them; you want those nice grill marks. After that, gently flip the fillets and grill for another 4 to 5 minutes. The salmon should be cooked through and flaky. In the last minute, brush the salmon with the glaze you saved for an extra flavor boost. Now you're ready to enjoy your Miso Cherry Glazed Grilled Salmon! Check the full recipe for more details. - Ideal marination time for deep flavor: Marinate the salmon for at least 30 minutes. For the best taste, let it sit for 1-2 hours. The longer it marinates, the more the flavors soak in. - How to prevent excessive sticking on the grill: Always preheat the grill well. Use oil on the grill grates or brush the salmon with a little oil before grilling. This helps prevent sticking and keeps your fillets intact. - Recommended grill temperature for best results: Heat your grill to a medium-high setting, around 375°F to 425°F. This range cooks the salmon evenly and gives it nice grill marks. - Tips for achieving perfect grill marks: Place the salmon skin-side down on the grill. Let it cook without moving it for 5-6 minutes. This helps form those beautiful grill marks. Flip it gently to avoid breaking the fillet. - Pairing sides for a complete meal: Serve your salmon with sides like steamed asparagus, rice, or a fresh salad. These pair nicely with the sweet and savory glaze. - Creative plating ideas for enhanced visual appeal: To make your dish pop, place the salmon on a bed of sautéed greens. Add lemon wedges on the side for a colorful touch. Drizzle some reserved glaze on top for extra flair. For the complete recipe, check out the [Full Recipe]. {{image_4}} You can change the glaze for your salmon. Try using purees from other fruits. Peach and apricot work great. They add a different taste and aroma. You can adjust the sweetness and saltiness to your liking. If you want it sweeter, add more honey. For saltiness, use a bit more soy sauce. Experiment until you find what you love. You can bake or grill your salmon. Grilling gives a nice char and smoky taste. If you bake, set your oven to 400°F. Place the salmon in a baking dish and cover with glaze. Bake for about 15-20 minutes. If you want to cook indoors, try pan-searing. Heat oil in a skillet over medium-high heat. Cook the salmon skin-side down for about 6 minutes, then flip and cook for another 4-5 minutes. If you need a gluten-free option, use tamari instead of soy sauce. For a low-sugar glaze, reduce the honey. You can also use a sugar substitute if you prefer. These changes keep the dish tasty while meeting your needs. To keep grilled salmon fresh, place it in a shallow dish. Cover it tightly with plastic wrap or aluminum foil. You can also use an airtight container. This helps seal in moisture and flavor. Always refrigerate leftovers within two hours of cooking. Grilled salmon will stay good in the fridge for up to three days. To reheat grilled salmon, use the oven or stovetop. Preheat your oven to 275°F. Place the salmon on a baking sheet, cover it with foil, and heat for 15 minutes. This helps keep the fish moist. Avoid microwaving, as it can dry out the salmon. If you must use a microwave, do it on low heat and check often. To freeze grilled salmon, let it cool completely. Wrap each piece in plastic wrap, then place it in a freezer bag. Squeeze out as much air as possible. Grilled salmon is best frozen for up to three months. For best taste, thaw it in the fridge overnight before using. This keeps the texture and flavor intact. Yes, you can use frozen salmon. Just make sure to thaw it first. Place the salmon in the fridge overnight or run it under cold water. Frozen salmon can be just as tasty as fresh. It often has the same nutrients and flavor when cooked right. If you lack miso paste, you can try other ingredients. Consider using tahini or peanut butter for a nutty taste. Soy sauce can add saltiness, while honey gives sweetness. You can also mix some yogurt with a bit of soy sauce for creaminess and flavor. To check if the salmon is done, look for color changes. It should change from bright pink to a more opaque shade. Use a fork to see if it flakes easily. The internal temperature should reach 145°F. If you press down gently, the fish should feel firm but not tough. This blog shared a tasty salmon recipe using red miso and cherries. You learned how to prepare the glaze, marinate, and grill the salmon perfectly. We also discussed variations, storage, and reheating tips. Cooking should be fun and creative, and this dish offers many options. Enjoy the flavors and make it your own. With practice, you’ll create great meals every time. Happy cooking!

Miso Cherry Glazed Grilled Salmon Healthy and Tasty Dish

If you want a dish that’s both healthy and bursting with flavor, look no further than Miso Cherry Glazed Grilled

When making Caprese stuffed peppers, fresh and vibrant ingredients play a key role. Here’s what you need: - Bell Peppers: Choose 4 large bell peppers. You can use red, yellow, green, or orange. Each color adds a unique taste and visual charm. - Vegetables and Cheese: For the filling, you need 1 cup of cherry tomatoes, halved. Add 1 cup of fresh mozzarella balls, also known as bocconcini. If the mozzarella is large, cut them in half. - Herbs and Seasonings: Fresh basil is a must! Use 1/2 cup of roughly chopped basil. You can also add 2 tablespoons of balsamic vinegar for depth. Drizzle in 2 tablespoons of extra virgin olive oil. Season with sea salt and black pepper to taste. If you like herbs, toss in 1 teaspoon of dried oregano or Italian seasoning. To finish, use 1/4 cup of toasted pine nuts for extra crunch. These ingredients mix well, creating a colorful and hearty dish. For the full recipe, click here. 1. Preheating the Oven Start by preheating your oven to 375°F (190°C). This step gets the oven ready while you prep the peppers. 2. Preparing the Bell Peppers Take your large bell peppers and cut off the tops. Set the tops aside. Remove the seeds and membranes inside. Make sure the peppers are hollow. Place them upright in a baking dish, so they stay stable. 3. Make the Caprese Filling In a big mixing bowl, combine halved cherry tomatoes, mozzarella balls, and chopped basil. Add balsamic vinegar and olive oil. Season with sea salt and black pepper. If you want, sprinkle in dried oregano or Italian seasoning. Gently mix everything until well combined. 1. Stuffing the Peppers Now, scoop the Caprese filling into each hollowed-out bell pepper. Pack the mixture slightly to fill them well. 2. Baking Process: Cover and Uncover Cover the baking dish with aluminum foil. This keeps moisture inside. Put it in the preheated oven and bake for 25 minutes. This step softens the peppers. After 25 minutes, carefully remove the foil. Spread toasted pine nuts on top of each stuffed pepper. Return the dish to the oven, uncovered, and bake for another 10 minutes. This creates a nice char and melts the cheese. 1. Plating Options Once done, use oven mitts to take the dish out of the oven. Let the peppers cool for a few minutes. Serve them warm for the best taste. 2. Additional Drizzle Ideas For extra flavor, drizzle more balsamic glaze on top before serving. This adds a sweet touch that complements the dish. You can find the full recipe for these delicious Caprese stuffed peppers to make your cooking experience even easier. How to Choose Fresh Ingredients When you pick bell peppers, look for shiny skin. The peppers should feel firm and heavy. Choose colors that catch your eye, like red or yellow. They often taste sweeter than green ones. For the best tomatoes, go for bright and plump cherry tomatoes. Fresh mozzarella should be smooth and soft. If it smells fresh, it is fresh! Ensuring Peppers Stay Upright To keep your peppers upright, cut a thin slice off the bottom. This helps them balance in the baking dish. Make sure you don’t cut too deep; you want to keep the peppers hollow. Placing them tightly together in the dish also helps them stand tall while baking. Using Aged Balsamic Vinegar Aged balsamic vinegar adds a rich, sweet flavor to your dish. It has a thicker texture and deeper taste than regular balsamic. Drizzle it over your filling for the best results. This simple step makes a big difference. Adding Extra Herbs or Spices You can make your Caprese stuffed peppers even better! Adding dried oregano or Italian seasoning boosts flavor. Fresh herbs, like thyme or parsley, can add nice notes too. Don’t be afraid to experiment with spices that you enjoy. They can transform the dish into something special. {{image_4}} You can easily change the cheese in your Caprese stuffed peppers. Feta cheese adds a tangy flavor. Cheddar gives a sharp taste that many love. Both options work well with the other ingredients. Feel free to add more veggies too. Spinach or zucchini can add freshness. Chopped olives can bring a salty kick. Experiment with what you like best! You can make vegan Caprese stuffed peppers. Swap mozzarella for a plant-based cheese. Use cashew cream for a rich, creamy texture. This keeps the dish tasty and vegan-friendly. If you're gluten-free, this recipe is already safe! All the ingredients are naturally gluten-free. Enjoy your meal without worry. To keep your Caprese stuffed peppers fresh, store them in an airtight container. Place parchment paper between layers if stacking. This helps them stay moist. Refrigerate them right after they cool down. How long do they last? In the fridge, they stay good for about 3 to 4 days. After that, the peppers might lose their crunch. If you want to keep them longer, consider freezing. When it's time to eat the leftovers, reheat them gently. The best method is to use the oven. Preheat it to 350°F (175°C). Place the peppers on a baking sheet and cover with foil. This keeps them moist while warming. To maintain texture, avoid microwaving them. Microwaving can make the peppers soggy. If you must use the microwave, heat them for short bursts and check often. Enjoy your delicious Caprese stuffed peppers warm. For the full recipe, check the section above! Can I Make Caprese Stuffed Peppers Ahead of Time? Yes, you can prepare Caprese stuffed peppers ahead of time. Stuff the peppers and store them in an airtight container. They can stay fresh in the fridge for up to two days. When ready to cook, just bake them as usual. This saves time on busy days. What Are the Nutritional Values? Caprese stuffed peppers are healthy and tasty. Each serving has about 250 calories. They are rich in vitamins A and C, thanks to the bell peppers and tomatoes. The mozzarella adds protein and calcium. These peppers fit a balanced diet well. How Can I Add Protein? You can add protein easily. Cooked chicken or turkey works great. For a vegetarian option, try chickpeas or lentils. Mix them into the filling with the mozzarella. This adds texture and keeps you full longer. Pairing Suggestions Caprese stuffed peppers pair well with a fresh salad. A simple arugula salad with lemon dressing works great. You might also enjoy some crusty bread on the side. This adds a nice crunch and complements the dish. Ideal Sides for Caprese Stuffed Peppers For sides, roasted vegetables are fantastic. Try zucchini or asparagus. You can also serve a light pasta dish. A garlic and olive oil spaghetti is a delightful choice. This keeps the meal light and fresh. You can find the full recipe in the article for more details. This guide covered everything you need for Caprese stuffed peppers. You learned how to choose fresh ingredients, prepare the filling, and bake to perfection. Adding your favorite herbs can boost flavor. Remember to try swaps for dietary needs, like vegan options or different cheeses. Store leftovers properly to enjoy later. This dish is versatile, so get creative when serving it. Follow these steps, and you’ll impress everyone with a delicious meal. Happy cooking!

Caprese Stuffed Peppers Flavorful and Hearty Dish

Are you ready to savor a delightful dish? Caprese stuffed peppers bring fresh flavors to your table! These colorful bell

- 1 cup pickled jalapeños, diced - 1 cup ripe tomatoes, diced - 1/2 cup red onion, finely chopped - 1/2 cup fresh cilantro, roughly chopped - 1 medium avocado, diced - 1 tablespoon fresh lime juice - Sea salt, to taste - 8 crispy tostada shells - 1 cup crumbled queso fresco (or your favorite cheese) - Sliced radishes, for garnish Each ingredient plays a key role in creating the amazing taste of Pickle De Gallo Tostadas. The pickled jalapeños give a spicy kick that wakes up your taste buds. Ripe tomatoes add sweetness and moisture, while red onions bring a nice crunch. Fresh cilantro adds a bright note, making every bite fresh. The avocado adds creaminess, balancing the heat. Lime juice brightens the flavors and adds zing. Sea salt enhances all the tastes, making them pop. The crispy tostada shells provide a satisfying crunch. Finally, queso fresco adds a salty richness. You can use your favorite cheese if you prefer. These ingredients work together to create a delicious dish that is fun to eat. You can find the full recipe to learn how to make this tasty treat. First, take a medium mixing bowl. Add the diced pickled jalapeños, diced tomatoes, finely chopped red onion, and roughly chopped cilantro. These fresh ingredients create a bright and zesty flavor. Next, drizzle fresh lime juice over the mixture. Lime juice adds a tangy kick that brightens the dish. Then, season it with sea salt to taste. Carefully toss all the ingredients together until they are evenly mixed. This step helps all the flavors blend well. Now, preheat your oven to 350°F (175°C). This temperature ensures the tostadas become perfectly crispy. Arrange the tostada shells in a single layer on a baking sheet. Bake them for about 5 to 7 minutes. Keep an eye on them until they turn golden brown and crispy. Once done, remove them from the oven. Let them cool slightly on a wire rack. This keeps them from getting soggy. Now it’s time to put everything together. Generously spoon the pickle de gallo mixture onto each tostada. Spread it to the edges for the best flavor in every bite. Next, top the mixture with diced avocado. This adds a creamy texture that balances the tanginess of the pickle de gallo. After that, evenly sprinkle crumbled queso fresco on each tostada. This cheese adds a delightful salty contrast. For a pop of color and crunch, garnish with thin slices of radishes. These steps create a vibrant and tasty dish, perfect for sharing! To get the best flavor in your pickle de gallo, use fresh ingredients. Fresh tomatoes, onions, and cilantro bring the dish to life. I always choose ripe tomatoes for their sweetness. Diced pickled jalapeños add zest and crunch. Mix them well to let the flavors combine. A splash of fresh lime juice brightens up the mix and adds tang. Baking is my go-to method for making crispy tostadas. It’s healthier than frying and easier too. Preheat your oven to 350°F (175°C) and bake for about 5-7 minutes. Watch them closely to avoid burning. For the shells, choose ones that are sturdy and not too thin. This way, they hold the toppings without breaking. For an attractive dish, use colorful servingware. A bright plate makes the colors pop. Layer the pickle de gallo generously on each tostada. Top with diced avocado for creaminess. Sprinkle crumbled queso fresco on top for a salty kick. Finish with thin radish slices for a crisp touch. Serve them right away for the best taste and texture. Enjoy your vibrant and flavorful tostadas! {{image_4}} You can switch up the cheese on your tostadas for a new taste. Try using crumbled feta or shredded cheddar. Both add a different flavor. You can also add more veggies, like corn or bell peppers. Chopped black beans or grilled chicken make great protein options. Mix and match to find your favorite combo! For a vegan option, skip the cheese or use a plant-based alternative. There are many vegan cheeses that melt well. If you need gluten-free tostadas, look for corn-based shells. They are usually safe for gluten-free diets. You can also use lettuce leaves instead of shells for a fresh twist. Want to spice things up? Add diced serrano peppers or cayenne pepper to the mix. If you enjoy fresh herbs, try adding chopped mint or dill. These can change the taste in a fun way. For a tangy kick, a splash of hot sauce can elevate the flavors even more. Experiment with your favorite spices and herbs! To keep your tostadas crispy, store them in an airtight container. Place parchment paper between layers to avoid sogginess. Keep toppings separate to maintain freshness. This way, your tostadas stay crunchy and tasty. If you mix everything, the shells can get soft. Store leftover tostadas in the fridge for up to three days. The toppings last about two days. Look for any browning on the avocado or mushy tomatoes. These signs mean it's time to toss them out. Always check for freshness before eating. To reheat tostadas, preheat your oven to 350°F (175°C). Place them on a baking sheet for about five minutes. This keeps them crispy and warm. For toppings, you can microwave them, but be careful not to overheat. Enjoy the fresh flavors again! Pickle De Gallo Tostadas are crispy corn shells topped with a fresh and zesty mixture. The mix includes pickled jalapeños, tomatoes, onions, and cilantro. Each bite offers a crunch, tang, and freshness. You can find a detailed recipe in the Full Recipe section. Yes, you can prepare the Pickle De Gallo ahead of time. Just mix the ingredients and store them in the fridge. This lets the flavors blend well. However, wait to assemble the tostadas until you are ready to serve. This keeps the shells crisp. These tostadas shine as a snack or appetizer. Pair them with a creamy dip, like guacamole or sour cream, for extra flavor. You can also serve them alongside a fresh salad or grilled meats for a full meal. Yes, you can swap some ingredients based on your taste. Use fresh peppers instead of pickled ones for less heat. If you want a different cheese, try feta or cheddar. For a vegan option, skip the cheese altogether or use a nut-based cheese. Pickle De Gallo Tostadas come from Mexican cuisine. They reflect local ingredients and flavors. The dish combines traditional salsa recipes with crispy shells, creating a popular street food item in Mexico. Absolutely! To adjust the spice, use fewer pickled jalapeños. If you enjoy more heat, add fresh sliced jalapeños or a dash of hot sauce. Taste as you go to find your ideal level of spice. Pickle De Gallo Tostadas blend fresh ingredients and vibrant flavors for a tasty treat. We discussed the main ingredients, preparation, and steps to create them perfectly. Remember to keep your ingredients fresh for the best taste. Feel free to try different toppings or adjustments to suit your needs. Enjoy experimenting with flavors and sharing these tostadas with friends and family. With these tips, you'll create a dish that impresses everyone. Let the crunch and flavor bring joy to your table!

Pickle De Gallo Tostadas Flavorful and Easy Recipe

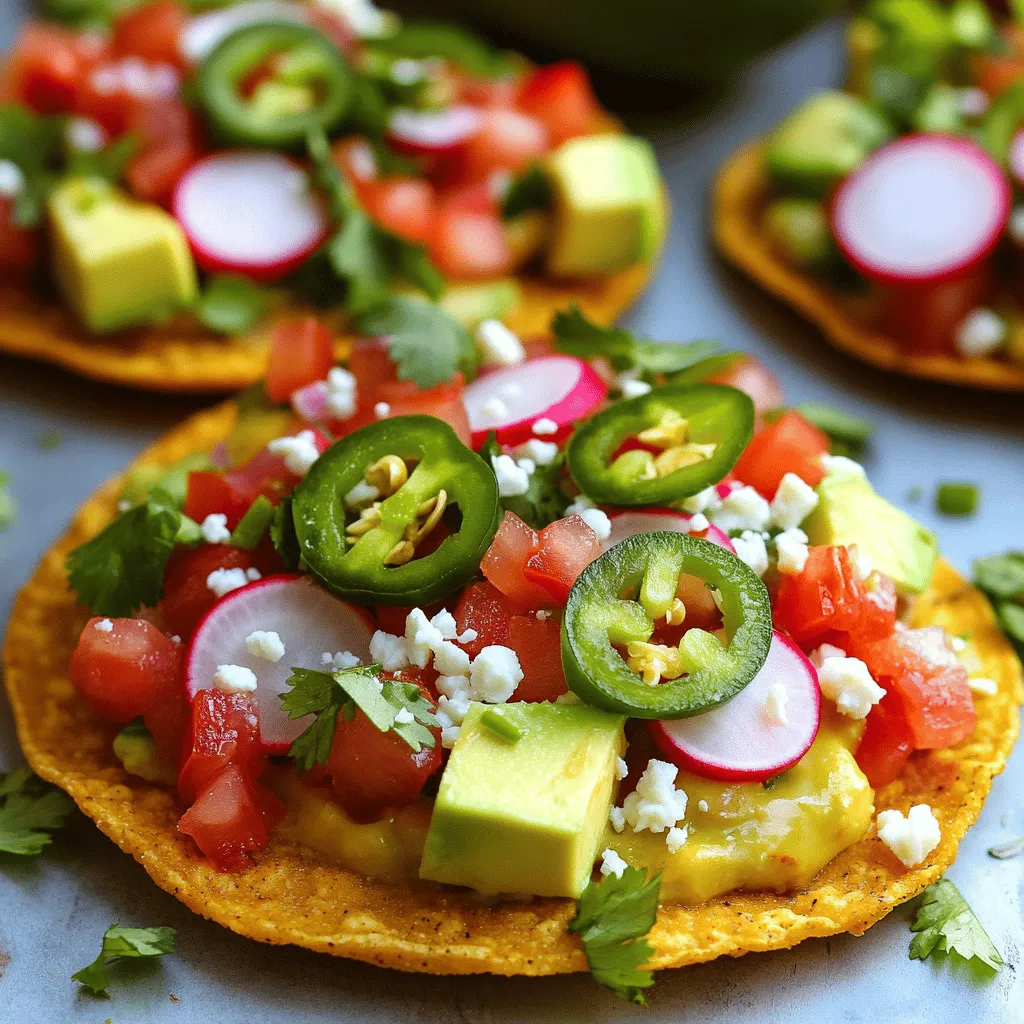
Are you ready to whip up a dish that bursts with flavor? Pickle De Gallo Tostadas are not just tasty;

For the Chocolate Covered Cherries with Pistachio Dust, you will need a few simple ingredients. Each plays a key role in making this treat delightful. - 12 fresh cherries with stems - 200g dark chocolate (70% cocoa) - 50g shelled and unsalted pistachios - 1 tablespoon coconut oil - Sea salt, for a sprinkle on top - Optional: 1 teaspoon vanilla extract for added aroma Using fresh cherries with stems adds beauty and makes them easy to dip. Dark chocolate gives a rich taste that pairs well with cherries. The coconut oil helps the chocolate melt smoothly. Shelled pistachios add a nice crunch and color. You can add vanilla for extra aroma, enhancing the overall flavor. This combination creates a wonderful balance of sweet, salty, and nutty flavors, making each bite a joy. You can find the full recipe [here](#). Let's gather these ingredients and prepare for a tasty treat! Start by rinsing the cherries gently under cool water. This helps remove any dirt. After washing, dry them well with a paper towel. It is important to get rid of all moisture. If the cherries are wet, the chocolate won't stick. In a small saucepan, combine dark chocolate and coconut oil. Use low heat and stir until smooth. The coconut oil helps the chocolate melt evenly. If you like, add vanilla extract for extra flavor. It makes the chocolate even more delicious. Take shelled pistachios and place them in a food processor. Pulse them until they turn into fine crumbs. Be careful not to blend too long. You want a crumbly texture, not a paste. This gives your treat a nice look and crunch. Once your chocolate is melted, dip each cherry into the chocolate. Make sure each cherry is fully coated. Use a fork to lift them out. Tap the fork gently on the pan to remove extra chocolate. While the chocolate is warm, sprinkle pistachio dust and a pinch of sea salt on top. This adds a tasty contrast. Place the dipped cherries onto a parchment-lined baking sheet. Make sure to leave space between them. This stops them from sticking together. Once all cherries are on the sheet, put them in the refrigerator. Chill for about 30 minutes, or until the chocolate is firm. For the full recipe, check the details in the previous section. To get the best chocolate coating, start with dry cherries. Water can cause clumping, which ruins your coating. Make sure to pat them dry well. When melting chocolate, use a low heat. Stir it often to keep it smooth. Add coconut oil for a shiny finish. This helps the chocolate glide on easily. If the chocolate thickens, gently reheat it. This keeps it workable. A smooth coat makes your cherries look stunning. You can add a teaspoon of vanilla extract while melting the chocolate. This gives a warm aroma to your cherries. For other flavors, think about adding spices like cinnamon or cardamom. They can bring a new twist. You can also try different toppings. Toasted coconut or crushed almonds can add extra crunch. When serving, arrange the cherries on a nice platter. This makes them look fancy. Before serving, sprinkle a few more crushed pistachios on top. This adds color and texture. A light dusting of sea salt will enhance the flavor. For more fun, try using different plates or bowls. The right dish can make your treat even more appealing. {{image_4}} You can play with different types of chocolate. Milk chocolate is sweet and creamy. It pairs well with cherries. Dark chocolate has a rich taste and a slight bitterness. I love using dark chocolate, as it balances the sweetness of the cherries. If you want something unique, try white chocolate. It adds a sweet, vanilla-like flavor that makes the cherries feel special. Want to spice things up? You can infuse your chocolate with flavors. Adding a pinch of cinnamon gives a warm touch. You can also try a few drops of almond extract for a nutty twist. If you like citrus, a bit of orange zest will brighten the flavor. Mix and match to find your favorite! Pistachios are great, but you can switch things up. Try almonds or hazelnuts for a different crunch. Chopped walnuts add a rustic feel, while cashews offer a creamy taste. You can also use other toppings. Shredded coconut or colorful sprinkles can make your treats pop. Get creative and have fun with it! To keep your chocolate-covered cherries fresh, store them in an airtight container. This helps maintain their taste and texture. I recommend using a container that seals tightly. Place a piece of parchment paper between layers to avoid sticking. Store them in the refrigerator to keep the chocolate firm. These treats can last in the refrigerator for about a week. You can freeze them for longer storage, but the texture may change. If you freeze them, wrap each cherry in plastic wrap. Place them in a freezer-safe bag. This way, they stay tasty for up to three months. Just remember to thaw them in the fridge before enjoying! If you're curious about how to make these delicious treats, check out the Full Recipe. Yes, you can use frozen cherries. However, the texture may change. Frozen cherries tend to be softer. They may also release more juice when thawed. This can make the chocolate coating less smooth. If you use frozen cherries, dry them well before dipping. To help the chocolate harden, keep it at the right temperature. Melt the chocolate slowly over low heat. If it's too hot, it may not set well. After dipping the cherries, chill them in the fridge for about 30 minutes. This helps the chocolate firm up nicely. If you don’t have coconut oil, don’t worry! You can use other oils like vegetable oil or shortening. These will help the chocolate melt smoothly. Just use the same amount as you would coconut oil. The texture will remain similar. Yes, you can make these ahead of time. They stay fresh for about 3 days in the fridge. Just store them in an airtight container. This keeps them from drying out. You can also freeze them for a longer shelf life. Just remember to thaw them in the fridge before serving. These chocolate-covered cherries are simple to make and great for sharing. You learned how to prepare fresh cherries, melt chocolate, and coat them in pistachio dust. We also discussed variations, storage, and tips to perfect your treats. Remember, you can switch nuts or chocolates to match your taste. These sweets are perfect for parties or just a tasty snack. Try them out, and enjoy your delicious creation!

Chocolate Covered Cherries with Pistachio Dust Treat

Indulge your sweet tooth with my easy Chocolate Covered Cherries with Pistachio Dust. These treats blend juicy cherries, rich dark

Older posts
Newer posts
← Previous Page1 … Page8 Page9 Page10 … Page75 Next →

dsad

© 2025 lazychefmagic • Built with GeneratePress

Our Policies

  • Copyright Policy
  • Cookie Policy
  • GDPR Policy
  • Privacy Policy
  • Disclaimer
  • Terms Of Use

More Information

  • Home
  • About
  • Contact
  • Appetizers
  • Dessert
  • Dinner
  • Drinks
©2025, lazychefmagic About Back To Top