Skip to content
DisclaimerTerms Of UseGDPR PolicyCookie Policy

lazychefmagic

  • Home
  • Drinks
  • Appetizers
  • Dinner
  • Dessert
  • About
  • Contact
  • Privacy Policy
DisclaimerTerms Of UseGDPR PolicyCookie Policy

Amanda

- 2 cups mixed nuts (almonds, pecans, walnuts) - 1 cup pumpkin seeds (pepitas) - 1 cup dried cranberries (or your favorite dried fruit) - 1 cup mini pretzels (traditional or flavored) - 1 cup chocolate chips (milk or dark) - 2 tablespoons pumpkin spice - 2 tablespoons pure maple syrup - 1 tablespoon vegetable oil - 1/2 teaspoon salt Gathering these ingredients for your Harvest Pumpkin Snack Mix is simple. I suggest using a mix of nuts for a great crunch. Almonds, pecans, and walnuts all bring different flavors to the mix. Pumpkin seeds, or pepitas, add a lovely nutty taste and give a seasonal vibe. Dried cranberries add a sweet chewiness. You can swap them with any dried fruit you enjoy for a twist. Mini pretzels bring a salty crunch that balances the sweetness. Choose traditional or flavored pretzels to kick it up a notch. Lastly, chocolate chips add a touch of indulgence. You can pick milk or dark chocolate based on your taste. For flavor, pumpkin spice is essential. It brings warmth and depth to the mix. Pure maple syrup adds sweetness without being overpowering. A little vegetable oil helps the flavors blend together. Finally, salt enhances all the other tastes, making each bite more enjoyable. You can find the full recipe for this delicious mix to get started on your fall treat! 1. Preheating the Oven: Start by preheating your oven to 325°F (165°C). This step ensures your snack mix bakes evenly. 2. Mixing Dry Ingredients: In a large bowl, mix together the following: - 2 cups mixed nuts (almonds, pecans, walnuts) - 1 cup pumpkin seeds (pepitas) - 1 cup dried cranberries (or your favorite dried fruit) - 1 cup mini pretzels (traditional or flavored) - 1 cup chocolate chips (milk or dark) Stir the ingredients gently. Make sure they blend well. 3. Whisking the Pumpkin Mixture: In a small bowl, whisk together: - 2 tablespoons pumpkin spice - 2 tablespoons pure maple syrup - 1 tablespoon vegetable oil - 1/2 teaspoon salt Mix until smooth. This tasty blend adds flavor and helps bind the snack mix. 1. Drizzling and Tossing the Mix: Drizzle the pumpkin mixture over the dry ingredients. Use a spatula or wooden spoon to toss everything. Make sure all pieces get a nice coating. 2. Spreading on Baking Sheet: Line a large baking sheet with parchment paper. Spread the snack mix evenly in a single layer. This helps it roast evenly. 3. Roasting Time and Stirring: Place the baking sheet in your preheated oven. Bake for 15-20 minutes. Stir the mix halfway through. This step ensures the nuts toast nicely. When done, the mix will smell amazing and be golden in color. Follow these steps, and you'll have a delightful Harvest Pumpkin Snack Mix. Enjoy this tasty fall treat! For the full recipe, feel free to check the earlier section. To make your Harvest Pumpkin Snack Mix perfect, adjust the pumpkin spice. You can add more or less spice based on your taste. If you love a stronger flavor, add an extra half tablespoon. For sweetness, consider substitute options. Honey or agave syrup works well instead of maple syrup. You can even try brown sugar for a deeper, richer taste. Each choice adds its unique twist to the mix. Stirring halfway through baking is key. This simple step helps the nuts roast evenly. It also prevents any burning and ensures all flavors mix well. Don’t skip this part! Cooling the mix is just as important. Once you take it out of the oven, let it cool on the sheet. This step helps the chocolate chips firm up. It also allows the flavors to blend beautifully. The right texture makes every bite a delight. {{image_4}} You can easily swap nuts and seeds in this recipe. If you prefer, use cashews or pecans instead of almonds or walnuts. You can also try sunflower seeds or chia seeds for a different crunch. For dried fruits, cranberries are great, but you can use raisins, apricots, or even dried apples. These swaps keep your snack mix fresh and exciting. Adding spices can enhance the taste of your snack mix. A pinch of cinnamon or nutmeg adds warmth and depth. If you like savory flavors, try adding cheese crackers. They add a nice contrast to the sweet elements. You can mix and match these ideas to create your perfect blend. Experiment and find what you love most! To keep your Harvest Pumpkin Snack Mix fresh, use the right containers. I recommend glass jars or plastic bins. These options help maintain crunchiness and flavor. Make sure the containers are clean and dry before use. For optimal freshness, store your snack mix in airtight containers. This prevents air from getting in and keeps the mix tasty for longer. If you have leftover mix, seal it tightly to lock in the flavors. Your Harvest Pumpkin Snack Mix can last about one to two weeks. This time frame depends on how you store it. If you keep it in a cool, dry place, it stays fresh longer. To extend freshness, try to avoid moisture. Do not leave it out in the open air. Instead, always return it to its container after snacking. This simple step helps keep it crunchy and delicious. For longer storage, consider freezing the mix in a freezer-safe bag. Just make sure to thaw it completely before enjoying! Can I make this mix in advance? Yes, you can make this mix ahead of time. It stays fresh for several days. Just store it in an airtight container. Make sure it cools completely before sealing. How do I store leftovers? Store leftovers in a cool, dry place. An airtight container works best. This keeps the snack mix crunchy and fresh. Avoid keeping it in direct sunlight or heat. What can I serve this mix with at gatherings? You can serve this mix in bowls or small cups. It pairs well with apple slices or cheese. It also makes a great topping for yogurt or oatmeal. Can I use different nuts? Absolutely! Feel free to swap nuts based on your taste. Almonds, cashews, or hazelnuts work great. Use what you enjoy most for a personal touch. Is it possible to make this nut-free? Yes, you can make this mix nut-free. Substitute nuts with more seeds or crunchy snacks. Sunflower seeds or pumpkin seeds are great options. How to adjust serving sizes? To adjust serving sizes, simply scale the ingredients. If you want more, double the recipe. For fewer servings, halve the amounts. This mix is easy to customize! You now have a complete guide to making a tasty Harvest Pumpkin Snack Mix. We covered ingredients, preparation steps, baking tips, and storage methods. Remember to customize your mix with different nuts or dried fruits. This mix is easy to prepare and perfect for sharing at gatherings. Try it out, and enjoy the flavor! Your snack time just got a lot better.

Harvest Pumpkin Snack Mix Tasty Fall Treat Recipe

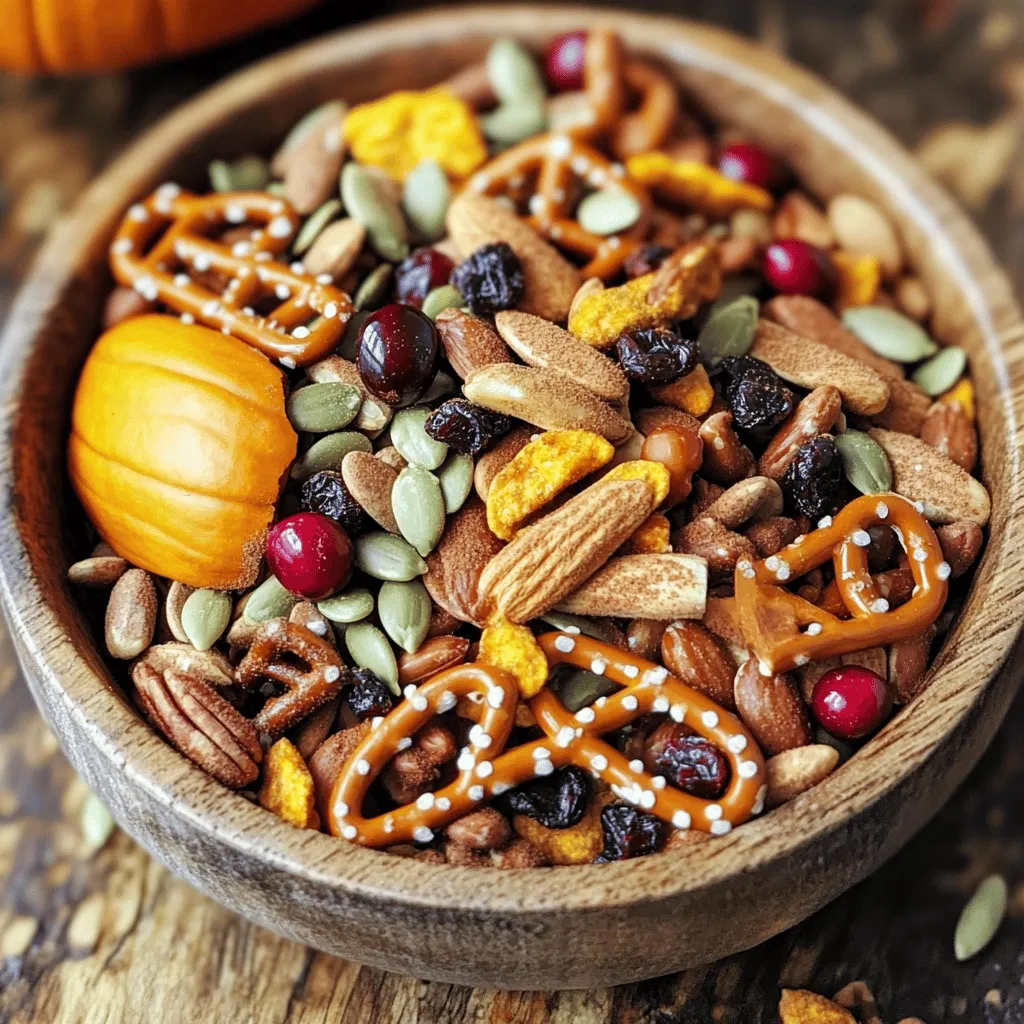
Who doesn’t love a tasty fall treat? This Harvest Pumpkin Snack Mix combines nuts, seeds, and sweet flavors, making it

To make this tasty pumpkin cheesecake dip, gather these ingredients: - 8 oz cream cheese, softened to room temperature - 1 cup pure pumpkin puree (not pumpkin pie filling) - 1/2 cup powdered sugar, sifted - 1 teaspoon pure vanilla extract - 1 teaspoon pumpkin pie spice blend - 1/2 teaspoon ground cinnamon - 1 cup whipped topping (like Cool Whip or homemade) - Assorted dippers: graham crackers, fresh apple slices, or crunchy pretzels Not all ingredients are strict rules. You can mix it up! - Use mascarpone cheese instead of cream cheese for a richer taste. - Swap the pumpkin puree with sweet potato puree for a different flavor. - If you don’t have powdered sugar, granulated sugar works too; just blend longer. - You can use coconut whipped topping for a dairy-free version. The dippers make this dip fun and tasty! Here are my favorites: - Graham crackers add a nice crunch and sweetness. - Fresh apple slices give a crisp and juicy contrast. - Crunchy pretzels offer a salty bite to balance the sweet dip. - Vanilla wafers or shortbread cookies also work well for a sweet treat. Feel free to explore with different dippers to find your favorite combo! Check out the Full Recipe to see how to put it all together. To make this dip, start with the cream cheese. Place 8 oz of softened cream cheese in a large bowl. Beat it using an electric mixer. Mix on medium speed until it's smooth, which takes about 1-2 minutes. Next, add in 1 cup of pure pumpkin puree, 1/2 cup of sifted powdered sugar, 1 teaspoon of vanilla extract, 1 teaspoon of pumpkin pie spice, and 1/2 teaspoon of ground cinnamon. Mix this until it's fluffy, which should take around 2-3 minutes. Once everything is mixed, it's time to add the whipped topping. Pour in 1 cup of whipped topping. Use a spatula or wooden spoon to fold it in gently. This step is key for a light and airy dip. Make sure you mix it until you see no white streaks. This means the whipped topping is fully integrated. Now that your dip is ready, transfer it to a serving bowl. Use a spatula to smooth the top. For a nice touch, sprinkle some extra pumpkin pie spice or cinnamon on top. Serve it with assorted dippers. Good options include graham crackers, fresh apple slices, or crunchy pretzels. If you want to chill the dip, place it in the fridge for about an hour. This will enhance the flavors even more! Check out the Full Recipe for complete details. To store your pumpkin cheesecake dip, place it in an airtight container. This keeps it fresh and tasty. You can store it in the fridge for up to five days. If you want to keep it longer, consider freezing it. But remember, the texture may change a bit after thawing. For a smooth dip, make sure your cream cheese is soft. Let it sit at room temperature for about 30 minutes. When you mix the ingredients, do it slowly at first. This helps everything blend well. Folding in the whipped topping gently adds air, making it light and fluffy. You can make this dip a day before your event. Just follow the full recipe and store it in the fridge. This waiting time lets the flavors meld together. When ready to serve, give it a quick stir to bring it back to life. Serve it cold or let it sit at room temperature for a few minutes. {{image_4}} You can change the taste of pumpkin cheesecake dip easily. Try adding chocolate chips for sweetness. You can also mix in caramel sauce for a rich flavor. Add a pinch of sea salt to enhance sweetness. For a spicier kick, include cayenne pepper or extra cinnamon. While graham crackers are classic, you can try many dippers. Fresh apple slices pair well with the dip's creaminess. Crunchy pretzels add a fun salty twist. You can also use vanilla wafers or even soft ginger cookies for a unique flavor. Each dipper brings its own taste and texture. Make this dip special for different seasons. In fall, add chopped nuts for crunch or use maple syrup for sweetness. During the holidays, mix in a splash of eggnog for festive flair. In spring, lighten it up with fresh berries mixed in or on top. Each twist keeps the dip fresh and exciting. For the full recipe, refer to the section above. I love to make my pumpkin cheesecake dip look appealing. Start by choosing a nice bowl. You can use a clear glass bowl to show off the dip's lovely color. Set it on a wooden board or a festive tablecloth. Arrange your dippers around the bowl. Think about using graham crackers, fresh apple slices, or crunchy pretzels. This setup makes it fun and easy for everyone to grab a dipper. You can also serve it in small cups for a cute twist. Each cup can hold a scoop of dip with a few dippers next to it. To make your dip shine, sprinkle a bit of pumpkin pie spice or cinnamon on top. This adds a nice touch of flavor and color. You could also add some mini chocolate chips or chopped nuts for crunch. Fresh mint leaves can make it look fancy too. Just a few leaves on top will make your guests smile. If you want extra color, add a few slices of colorful fruit like strawberries or kiwi. These small details make your dip look lovely and inviting. Think about using themed bowls for different seasons. For fall, a pumpkin-shaped bowl is perfect. It adds a fun twist to your table. In winter, a snowman or snowflake bowl can bring holiday cheer. For summer, use a bright and colorful bowl that matches your summer vibe. These themed bowls make your dip stand out and fit the occasion. You can also match your dippers to the theme. For example, use colorful sprinkles on your dippers for a party. Try to create a visual feast that everyone will enjoy. You can store pumpkin cheesecake dip in the fridge for up to five days. Just keep it in an airtight container. This way, it stays fresh and tasty for your next snack. Yes, you can make this dip a day ahead. It actually tastes better after sitting for a while. Just store it in the fridge until you are ready to serve. If you want a different taste, try mascarpone cheese or Greek yogurt. Both options give a creamy texture and can add a unique flavor to your dip. Yes, pumpkin cheesecake dip is gluten-free! Just make sure your dippers, like graham crackers or pretzels, are also gluten-free. You can find many gluten-free options in stores. It is not best to freeze pumpkin cheesecake dip. Freezing changes the texture and can make it watery. It’s better enjoyed fresh or chilled from the fridge. For the full recipe, check out the details above! This blog post showed you how to make delicious pumpkin cheesecake dip. We covered the key ingredients, helpful substitutions, and the best dippers. You learned simple steps for preparation and mixing, along with serving tips. I shared tricks for storing leftovers and perfecting texture. We explored fun variations and creative presentation ideas. With these insights, you are ready to impress. Enjoy making this tasty dip for any occasion!

Pumpkin Cheesecake Dip Tasty and Simple Delight

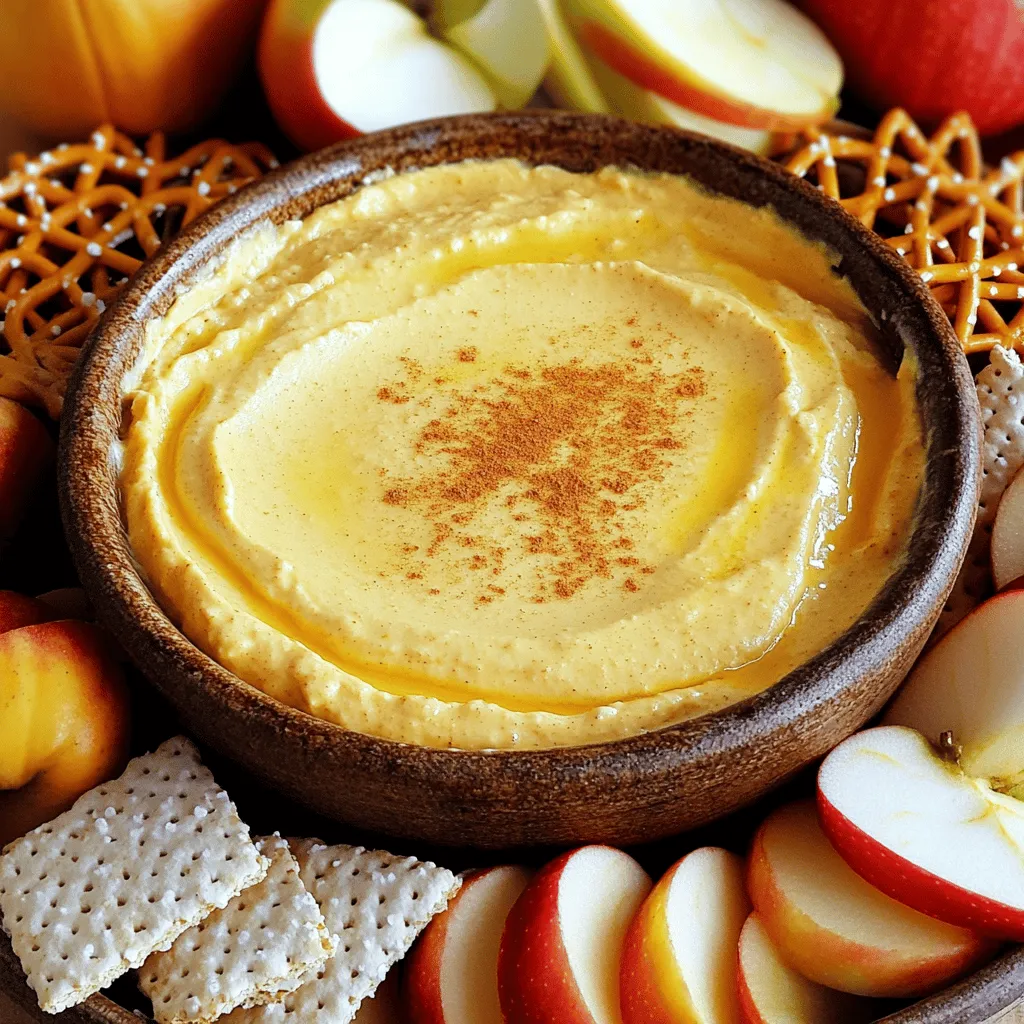
Looking for a tasty fall treat that’s simple to make? This Pumpkin Cheesecake Dip will wow your friends and family!

To make these tasty bites, gather these simple ingredients: - 1 cup rolled oats - 1/2 cup pumpkin puree - 1/3 cup almond butter (or any nut butter of your choice) - 1/4 cup honey or maple syrup - 1 teaspoon pumpkin pie spice - 1/2 teaspoon vanilla extract - 1/4 cup ground flaxseed - 1/4 cup mini chocolate chips or chunks of dark chocolate (optional) - A pinch of salt Each ingredient offers great health perks. Here’s a quick look: - Rolled oats: They provide fiber and help keep you full longer. - Pumpkin puree: This is rich in vitamins A and C, which boost your immune system. - Almond butter: It is packed with healthy fats, protein, and vitamin E. - Honey or maple syrup: These natural sweeteners add energy without refined sugars. - Pumpkin pie spice: It adds flavor and contains antioxidants, which are good for your health. - Ground flaxseed: This ingredient is high in omega-3 fatty acids and fiber. - Mini chocolate chips: They can satisfy your sweet tooth while adding a touch of joy. If you lack some ingredients, don’t worry! Here are some swaps: - Rolled oats: Use quick oats or gluten-free oats if needed. - Pumpkin puree: Swap with mashed banana or applesauce for a different flavor. - Almond butter: Sunflower seed butter works well for nut-free options. - Honey or maple syrup: Use agave nectar or brown rice syrup if you prefer. - Pumpkin pie spice: A mix of cinnamon, nutmeg, and ginger can replace it. - Ground flaxseed: Chia seeds can be used instead for similar health benefits. - Mini chocolate chips: Skip them for a healthier treat or use dried fruit for sweetness. With these simple swaps, you can make this recipe fit your needs! For the full recipe, check the details above. To make pumpkin spice energy bites, start with simple steps. First, gather your ingredients. You need rolled oats, pumpkin puree, almond butter, honey, and spices. Measure each item before you begin. This makes mixing easier and faster. Mixing is key to great energy bites. Use a large bowl for the dry ingredients. Combine the rolled oats and ground flaxseed well. In another bowl, mix the wet ingredients until smooth. This includes the pumpkin puree and almond butter. Once blended well, add in the spices and honey. When you combine the wet and dry ingredients, stir slowly. Make sure everything blends evenly. If you want chocolate, fold it in gently. This keeps the chips whole and tasty. Shaping the bites is fun and easy. Take about one tablespoon of the mixture. Roll it into a ball with your hands. Make sure to press it firmly, so it holds its shape. Place the formed bites on a parchment-lined plate. This prevents sticking. After you shape all the bites, chill them. Refrigerate for at least 30 minutes. This helps them firm up. When they are ready, you can enjoy these tasty treats. For more details, check out the Full Recipe. You can change the recipe to fit your taste. Want a nut-free option? Use sunflower seed butter instead of almond butter. You can also swap honey for agave syrup if you prefer. To add a crunch, toss in chopped nuts or seeds. For a fruity twist, try adding dried cranberries or raisins. Get creative and make it your own! Store your energy bites in an airtight container. This keeps them fresh and tasty. If you plan to eat them soon, keep them in the fridge. For longer storage, place them in the freezer. They last well in the freezer for up to three months. Just remember to label the container with the date. To make your bites even better, try adding spices. A pinch of cinnamon or nutmeg can add warmth. If you want a sweeter taste, add more honey or maple syrup. For a chewier texture, mix in shredded coconut. You can also use different types of chocolate for varied flavor. Each tweak can bring a fun surprise to your next snack! {{image_4}} You can change the taste of your pumpkin spice energy bites. Try adding different spices like cinnamon or nutmeg. You could also mix in dried fruits like cranberries or apricots for a fruity twist. For a nutty flavor, chop up walnuts or pecans and fold them in. Each change gives a new flavor, keeping your snacks fun and exciting. If you want vegan energy bites, swap honey for maple syrup. This keeps the recipe plant-based. For gluten-free bites, ensure your oats are certified gluten-free. You don't need to change much else. Just make sure all your ingredients fit your diet. These small tweaks help everyone enjoy these tasty treats. Need a protein boost? Add a scoop of your favorite protein powder to the mix. This helps make the bites more filling, perfect for a post-workout snack. Start with one tablespoon and mix it in well. You can also try using Greek yogurt for creaminess while adding protein. These small changes can make your energy bites even better for your health. For the full recipe, check out the earlier sections. Enjoy your cooking! After making your pumpkin spice energy bites, use an airtight container for storage. This keeps them fresh and tasty. You can also use a zip-top bag. Make sure to press out as much air as you can before sealing it. Store them in the fridge for the best taste and texture. Your energy bites last about one week in the fridge. If you want to keep them longer, freeze them! They can stay fresh for up to three months in the freezer. To freeze, place them in a single layer on a baking sheet. Once they are firm, transfer them to an airtight container or bag. Use glass or BPA-free plastic containers to store your bites. Glass containers do not hold odors and keep flavors intact. If you use plastic, choose high-quality, food-safe options. This way, your energy bites stay fresh and flavorful for longer periods. Pumpkin spice energy bites last about one week in the fridge. Store them in an airtight container. If you freeze them, they can last up to three months. Just thaw them in the fridge before eating. Yes, you can make these energy bites in advance. They are perfect for meal prep. Just shape and chill them, then grab one when you need a snack. They are quick and easy to have on hand. Pumpkin puree is very versatile. You can use it in many ways: - Add it to smoothies for creaminess and flavor. - Mix it into pancake or waffle batter. - Stir it into soups for a rich texture. - Bake it into muffins or bread for added moisture. Pumpkin puree can elevate many dishes. Try it in your favorite recipes! For the full recipe of pumpkin spice energy bites, check the earlier sections. In this post, we covered how to make pumpkin spice energy bites. We explored the best ingredients, their health benefits, and possible substitutions. You learned the simple steps to prepare and shape these bites. We also shared tips to customize and store them well. In the end, these energy bites are fun to make and enjoy. You can adjust them to fit your taste or diet. Make a batch, enjoy the flavors, and share them with friends. They are a treat you should try!

Pumpkin Spice Energy Bites Simple and Tasty Treat

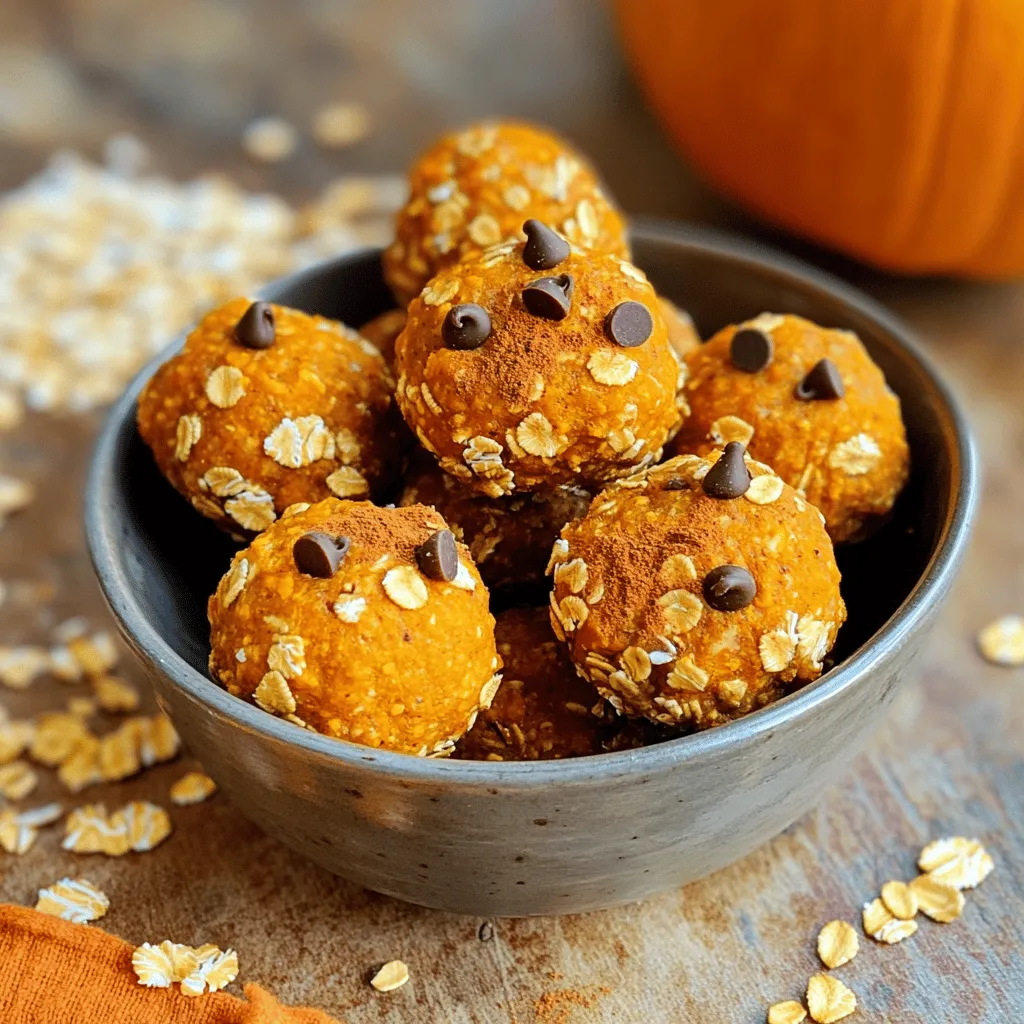
Are you ready for a fall-inspired snack that’s both simple and delicious? In this post, I’ll share my favorite recipe

- 1 cup pumpkin puree - 1 frozen banana - 1/2 cup almond milk - 1 teaspoon vanilla extract - 1 teaspoon pumpkin pie spice - 1 tablespoon maple syrup - 1/4 cup rolled oats The main ingredients form the heart of this pumpkin pie smoothie bowl. Each one plays a key role in giving flavor and texture. 1. Pumpkin puree gives that rich, earthy taste. You can use canned or homemade. 2. Frozen banana adds natural sweetness and creaminess. It also helps chill the smoothie. 3. Almond milk provides a smooth base. You can swap it for any milk you like. 4. Vanilla extract enhances the flavors and gives warmth. A little goes a long way. 5. Pumpkin pie spice is a blend of cinnamon, nutmeg, and ginger. It brings the fall flavor. 6. Maple syrup adds sweetness. You can adjust it to your taste. 7. Rolled oats help make the smoothie filling and add fiber. - Crunchy granola - Chopped walnuts - Pumpkin seeds - Coconut flakes - Cinnamon Toppings make your smoothie bowl special. They add texture, flavor, and fun. - Crunchy granola gives a nice crunch and extra fiber. - Chopped walnuts add healthy fats and a nutty taste. - Pumpkin seeds offer a nice crunch and are packed with nutrients. - Coconut flakes add a touch of sweetness and tropical flavor. - Cinnamon dusted on top ties everything together with that warm spice. With these ingredients and toppings, you can create a smoothie bowl that tastes just like pumpkin pie. For the full recipe, check out the details in the main article. Enjoy this creamy and delicious delight any time of the day! To start, gather the main ingredients. You will need: - 1 cup pumpkin puree - 1 frozen banana - 1/2 cup almond milk - 1 teaspoon vanilla extract - 1 teaspoon pumpkin pie spice - 1 tablespoon maple syrup - 1/4 cup rolled oats Now, combine these ingredients in a blender. Make sure to add them in the order listed. This helps the blender work better. If you want a thicker smoothie, use less almond milk. For a thinner one, add more milk. Blend the mixture on high speed for about 30 to 60 seconds. You want it smooth and creamy. If it looks clumpy, stop the blender. Use a spatula to scrape down the sides. This ensures every bit gets blended well. If it’s too thick for your liking, add a splash of almond milk and blend again. Once blended, carefully pour the smoothie into a bowl. Use a spatula to get every drop out. Now comes the fun part—topping it! Start with a layer of crunchy granola. Then add chopped walnuts and pumpkin seeds. Next, sprinkle on some coconut flakes. Finish it off with a dusting of cinnamon for extra flavor. For the best look, arrange the toppings in neat sections. Enjoy your creamy pumpkin pie smoothie bowl right away! To make your Pumpkin Pie Smoothie Bowl shine, start by adjusting the sweetness. If you find it too bland, add a touch more maple syrup. This small change can make a big difference. Taste as you blend to find your perfect balance. For the best results, use a high-powered blender. It creates a smooth texture quickly. Brands like Vitamix or Ninja work well for this recipe. Their power helps blend dense ingredients like pumpkin and oats. Choosing the right bowl is key to a stunning presentation. Opt for a wide, shallow bowl. This shape allows for a beautiful display of toppings. A colorful bowl can also enhance the visual appeal. Get creative with your topping arrangements. Start with a layer of granola in the center. Then, place walnuts and pumpkin seeds in neat rows around it. Finish with a sprinkle of coconut flakes and a dusting of cinnamon. This attention to detail makes your bowl Instagram-ready! A serving of this smoothie bowl has about 300 calories. It's a nutritious choice packed with vitamins. Pumpkin is high in fiber and vitamin A, great for your eyes and skin. Bananas add potassium, important for heart health. Almond milk is low in calories and dairy-free. This smoothie bowl is not just tasty; it’s also a healthy option. Enjoy it for breakfast or as a snack. You get a delicious treat that nourishes your body! {{image_4}} You can make this smoothie bowl dairy-free and vegan by changing the milk. Instead of almond milk, try coconut, oat, or soy milk. Each choice brings a unique taste and texture. For sweetness, use agave nectar or date syrup. Both options work well in place of maple syrup. If you're gluten-free, pick toppings that fit your diet. Try gluten-free granola or nuts. Adding protein helps too. You can mix in protein powder or Greek yogurt. This gives your smoothie a boost after a workout. Spices can change the flavor of your smoothie. Nutmeg or ginger adds warmth and zest. You can also top your bowl with seasonal fruits. Fresh apples or pears in fall add crunch and sweetness. Enjoy creating your own unique twist! To store your leftover smoothie base, pour it into an airtight container. This keeps it fresh in the fridge for up to 24 hours. If you want to keep it longer, freeze it in ice cube trays. Once frozen, pop the cubes into a freezer bag. You can use these smoothie cubes later in other drinks or future bowls. For toppings, store granola in a sealed bag or container. This keeps it crunchy. Keep nuts and seeds in separate containers to avoid sogginess. If you mix them together, they may lose their texture. Store coconut flakes in a cool, dry place to maintain their freshness longer. For the best flavor and nutrition, consume your smoothie bowl within 24 hours. If you freeze the smoothie base, use it within one month. Toppings taste best when fresh, so add them right before serving. Enjoy the vibrant taste of your pumpkin pie smoothie bowl for the best experience! To make your smoothie bowl thicker, try these tips: - Use less almond milk. Start with 1/4 cup instead of 1/2 cup. - Add more rolled oats. A little extra helps thicken it up. - Include a frozen banana for creaminess. Make sure it is well-frozen. - Blend less. Over-blending can make it too thin. If you want a thicker texture, adjust these ingredients in small amounts. Blend until you reach your desired thickness. Yes, you can prep this smoothie bowl ahead of time. Here’s how: - Make the smoothie base and store it in the fridge. - Use an airtight container to keep it fresh. - It is best eaten within a day. For toppings, keep them separate. This keeps them crunchy and fresh. Add toppings just before serving. If you don’t have pumpkin puree, try these options: - Use sweet potato puree. It has a similar texture and flavor. - Butternut squash puree works well too. Cook it first, then blend. - You can even use applesauce for a sweeter taste. Adjust spices to fit the substitute you choose. Each option gives a unique twist to the flavor! This blog post covered how to make a tasty pumpkin pie smoothie bowl. We discussed key ingredients, blending instructions, and creative toppings. I shared tips for presentation and nutritional benefits. You can adjust the recipe for dietary needs and seasonal flavors. Try different toppings and enjoy this healthy treat whenever you want! Enjoy your delicious smoothie bowl!

Pumpkin Pie Smoothie Bowl Creamy and Delicious Delight

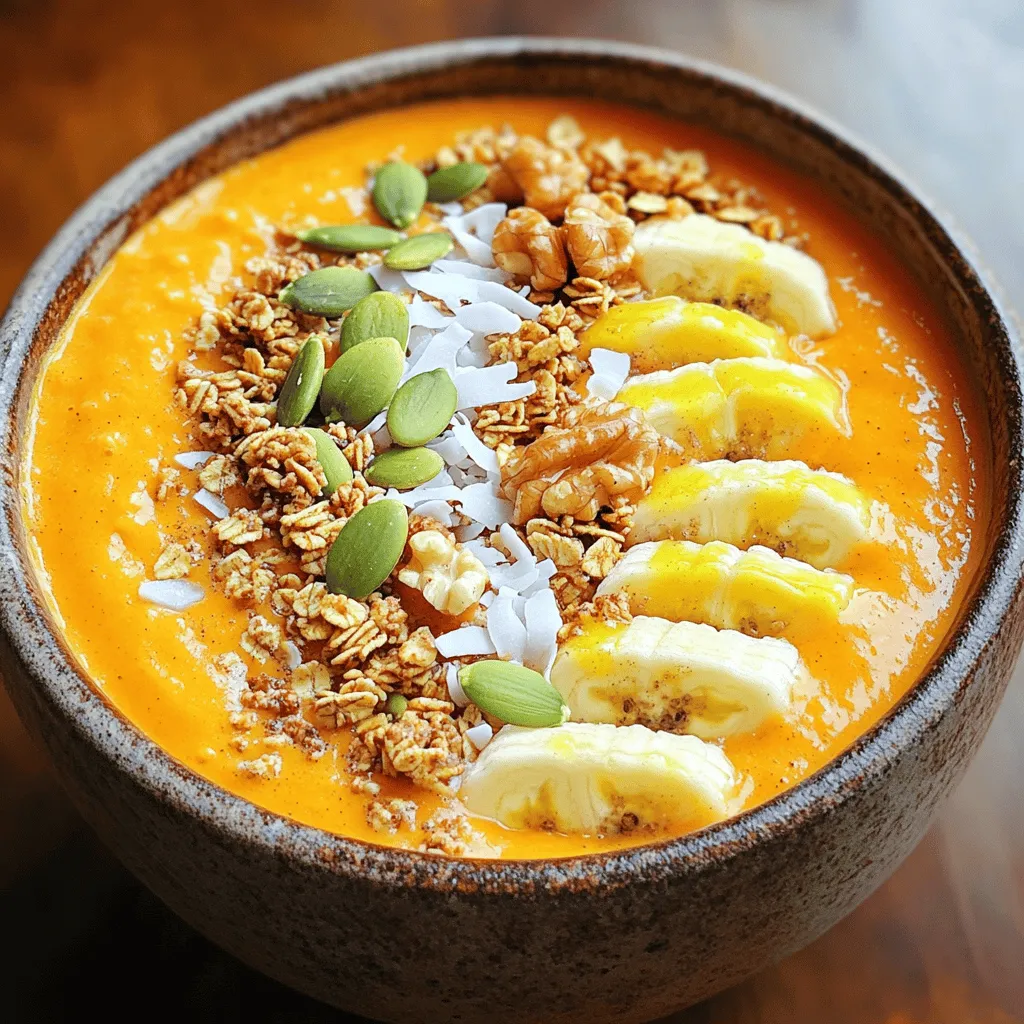
Are you ready to enjoy a taste of fall any time of year? This Pumpkin Pie Smoothie Bowl combines creamy

- 1 cup rolled oats - 1 cup almond milk (or any milk of your choice) - 1/2 cup pure pumpkin puree - 1 tablespoon maple syrup (or honey for sweetness) - 1/2 teaspoon pure vanilla extract - 1 teaspoon pumpkin pie spice - 1/4 teaspoon fine salt - 1/4 cup Greek yogurt (optional for a richer texture) - Chopped pecans or walnuts for topping - A dusting of ground cinnamon for garnish - Variations for sweeteners (like agave or stevia) - Alternative toppings (such as granola or dried fruit) - Caloric breakdown and health benefits - Fiber and protein content Gather these ingredients for a tasty start. Each item plays a role in making pumpkin pie overnight oats delicious and healthy. The rolled oats provide fiber and a chewy texture. Almond milk adds creaminess without dairy. Pumpkin puree gives the dish its signature flavor and color. Maple syrup or honey sweetens the mix naturally. Pumpkin pie spice brings warmth and nostalgia. A pinch of salt helps balance flavors. Greek yogurt adds protein and creaminess, but it’s not a must. Nuts on top give a nice crunch. Lastly, a sprinkle of cinnamon makes it feel cozy. You can swap sweeteners based on your taste. Try agave or stevia if you want. For toppings, feel free to get creative. Granola or dried fruit can add extra flavor and texture. In terms of nutrition, these oats pack a punch. They are rich in fiber, which aids digestion. The oats also provide good protein, especially if you add Greek yogurt. Each serving gives you a healthy start to your day. For the full recipe, check out the delightful pumpkin spice overnight oats section. 1. Start by taking a medium-sized mixing bowl. Add 1 cup of rolled oats, 1 cup of almond milk, and 1/2 cup of pure pumpkin puree. Stir gently until mixed well. 2. Next, sprinkle in 1 teaspoon of pumpkin pie spice and 1/4 teaspoon of fine salt. Mix thoroughly so that all flavors blend together. 3. If you want a creamier texture, fold in 1/4 cup of Greek yogurt. Make sure it is evenly distributed. 1. After mixing, divide the mixture evenly into two jars or airtight containers. Leave some headspace for expansion. 2. Seal each container tightly. This step is key to keeping your oats fresh. 1. The soaking time matters. It lets the oats absorb the flavors and soften. Aim for at least 4 hours, but overnight is best. 2. For best results, store the jars in the fridge. This keeps the oats cool and ready for breakfast. Enjoy making this simple and tasty Pumpkin Pie Overnight Oats recipe! Check the Full Recipe for all the details. To get the right thickness, adjust the milk amount. If you want thicker oats, use less milk. If you like them creamy, add more. A splash of milk in the morning can help too. For creaminess, try adding Greek yogurt. It makes a big difference in texture. For extra flavor, add spices. Nutmeg or cloves can brighten your oats. You can also mix in seasonal items like diced apples or cranberries. These will add fun tastes and textures. There are many ways to enjoy your oats. You can eat them for breakfast or as a snack. They taste great straight from the fridge or warmed up. Top with chopped nuts or a drizzle of maple syrup for extra yum. Want to make it special? Serve with a dollop of whipped cream. This pumpkin pie overnight oats recipe is versatile and fun! {{image_4}} You can boost flavor and nutrition with fun add-ins. Try adding nuts like almonds or seeds such as chia. They add crunch and healthy fats. You can also swap pumpkin for other fruits. Consider using apple or banana puree for a change. Both add sweetness and flavor while keeping it creamy. If you're vegan, swap Greek yogurt for a plant-based option. Almond or coconut yogurt works well. For gluten-free diets, use certified gluten-free oats. To lower sugar, cut back on maple syrup. You can use stevia or monk fruit sweetener instead for a healthier touch. Make this dish festive by adding holiday flavors. During fall, you can mix in cranberries or pecans. In winter, try a hint of peppermint extract or cocoa powder. For spring and summer, fresh fruits like berries or peaches brighten it up. Each season brings a unique twist to your overnight oats. You can keep your pumpkin pie overnight oats in the fridge for up to 5 days. To avoid sogginess, use less liquid if you plan to store them for a while. This helps the oats stay firm and tasty. You can freeze your overnight oats for longer storage. Pour the oats into freezer-safe containers. Make sure to leave some space at the top for expansion. When you want to eat them, thaw them in the fridge overnight. Stir well before serving. Use glass jars or plastic containers with tight-fitting lids. This keeps your oats fresh. An airtight seal is key to preventing freezer burn or spoilage. Choose containers that fit your fridge well for easy access. How long can I store pumpkin pie overnight oats? You can store them in the fridge for up to five days. Use a tight lid to keep them fresh. Can I use other types of milk for this recipe? Yes! You can use any milk you like. Almond, oat, or cow's milk all work well. Is it necessary to include Greek yogurt? No, it is not necessary. The oats still taste great without it. However, it adds creaminess. Can I make this recipe ahead for the week? Absolutely! You can prepare several jars at once. Just remember to store them in the fridge. What can I substitute for pumpkin puree? You can use sweet potato puree or even applesauce. They will change the taste but still be yummy. What to do if the mixture is too thick? If it's too thick, simply add more milk. Stir it in until you reach your desired texture. How to balance flavors if it's too sweet or savory? If too sweet, add a pinch of salt or more pumpkin spice. If too savory, try adding maple syrup. For more details, you can check out the Full Recipe. In this blog post, we explored how to make delicious pumpkin pie overnight oats. We covered the key ingredients, preparation steps, and tips for perfecting your recipe. You can adjust flavors and toppings to make it your own. Remember to store your oats properly so they stay fresh. Whether you enjoy them for breakfast or a snack, these oats are a nutritious option. Try different variations to keep it exciting. Enjoy your healthy and tasty creation!

Pumpkin Pie Overnight Oats Tasty and Easy Recipe

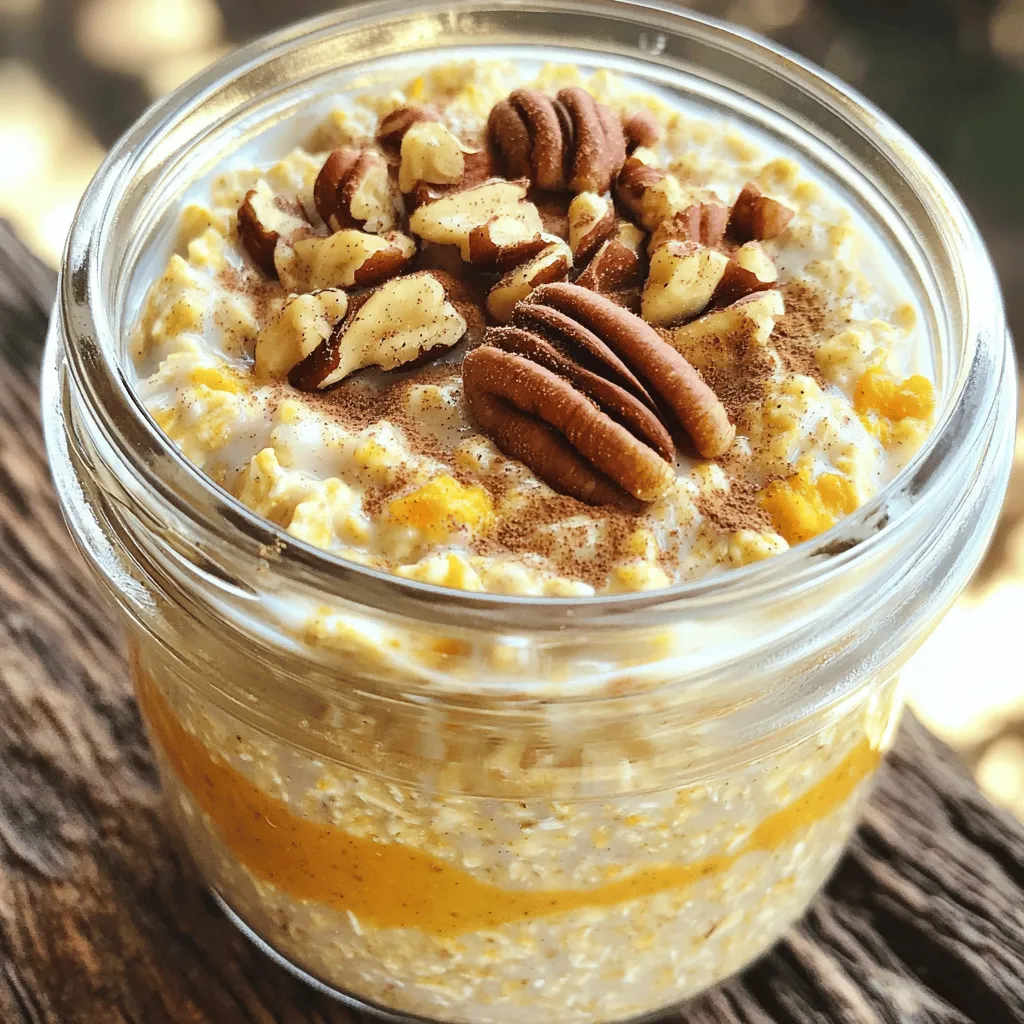
Are you ready to enjoy a fall favorite any time of year? Pumpkin Pie Overnight Oats are not just tasty;

- 1 cup unsweetened cocoa powder - 1 cup all-purpose flour - 1 cup granulated sugar - 1/2 cup packed brown sugar - 1/2 cup unsalted butter, melted - 3 large eggs - 1 teaspoon pure vanilla extract - 1/2 teaspoon baking powder - 1/4 teaspoon salt - 1 cup pumpkin puree - 8 oz cream cheese, softened - 1/2 cup powdered sugar - 1 teaspoon pumpkin pie spice When making Pumpkin Cheesecake Brownies, use quality ingredients. The cocoa powder gives rich flavor. The all-purpose flour helps create a good texture. Mixing granulated sugar with brown sugar adds depth to the sweetness. Using unsalted butter keeps control over salt levels. You also need three eggs for moisture and binding. Pure vanilla extract is key for flavor. Baking powder helps the brownies rise, while salt enhances all flavors. Pumpkin puree brings that classic autumn taste. For the cream cheese layer, use softened cream cheese. This helps it mix smoothly. Powdered sugar adds sweetness without graininess. Pumpkin pie spice gives that warm, cozy feel. Follow the Full Recipe for step-by-step guidance. Enjoy the blend of flavors in each bite! - Preheat the oven to 350°F (175°C). - Grease a 9x9-inch baking pan and line with parchment paper. - Whisk together melted butter, granulated sugar, and brown sugar until smooth. - Incorporate eggs and vanilla extract. - Combine dry ingredients and mix gently. - Pour half the brownie batter into the baking pan. - Prepare the cream cheese mixture by mixing cream cheese, powdered sugar, pumpkin puree, and pumpkin pie spice until smooth. - Dollop this mixture onto the brownie layer. - Swirl with a knife for a marbled effect and top with remaining brownie batter. - Bake brownies for 30-35 minutes. - Cool in the pan for 15 minutes, then transfer to a wire rack. These steps will guide you to perfect Pumpkin Cheesecake Brownies, as detailed in the Full Recipe. Enjoy the rich flavors of pumpkin and chocolate. To make the best pumpkin cheesecake brownies, avoid overmixing. This helps keep your brownies fudgy and moist. When you blend the wet and dry ingredients, mix just until you see no dry flour. Overmixing can lead to a tougher texture. When your brownies are baking, check for doneness with a toothpick. Insert it into the center of the brownies. If it comes out mostly clean with a few moist crumbs, they're ready to come out of the oven. This ensures you don't end up with dry brownies. You can boost the flavor by adding chocolate chips or nuts. These add-ins give your brownies a nice crunch and richness. Feel free to use semi-sweet or dark chocolate chips for an extra touch of decadence. Spices can also elevate your brownies. Experiment with different spices like cinnamon or nutmeg. These warm flavors complement the pumpkin beautifully and add depth to your dessert. Serve your brownies warm for the best experience. A dollop of whipped cream can add a light touch. Drizzling caramel sauce over the top makes it even more special. For a delightful contrast, pair your brownies with a scoop of vanilla ice cream. The cold ice cream balances the warm, rich brownies perfectly. Enjoy this treat with friends or family during autumn gatherings! {{image_4}} You can easily make these brownies gluten-free. Simply substitute all-purpose flour with a gluten-free blend. This keeps the rich texture while making it safe for those with gluten sensitivities. Make sure to check the blend you choose for the best results. Want a vegan version? It's simple! Use flax eggs instead of regular eggs. For the cream cheese layer, use dairy-free cream cheese. This way, you still enjoy the creamy goodness without any animal products. Your friends will love this plant-based twist! Looking to spice things up? Incorporate mint extract or orange zest into the batter. Just a little can create a unique flavor twist that surprises your taste buds. These small changes can turn a classic treat into a delightful surprise! For the full recipe, check out the original instructions and enjoy experimenting with these variations! Store your pumpkin cheesecake brownies in an airtight container. They will stay fresh at room temperature for up to 3 days. This makes it easy to grab a treat whenever you want. If you want your brownies to last longer, refrigerate them. They can stay good for up to a week. You can also freeze the brownies for up to 3 months. Make sure to wrap them well to prevent freezer burn. This way, you can enjoy them later! When you're ready to enjoy your brownies again, you can warm them up. Use the microwave for a quick heat or the oven for a fresh-baked taste. Just a few seconds in the microwave or a few minutes in the oven can bring back their deliciousness. For the full recipe, check out Pumpkin Cheesecake Brownies Delight. Yes, just ensure it’s well-drained and not overly watery. Fresh pumpkin can add a bright flavor and nice texture to your brownies. If you choose fresh, cook the pumpkin first to soften it. Then, blend it until smooth and strain any excess liquid. This will make your brownies taste fresh and seasonal! A toothpick inserted in the center should come out with moist crumbs, not wet batter. This means the brownies are set but still rich and fudgy. If the toothpick comes out clean, you may have baked them too long. Keep an eye on them during the last few minutes of baking, as ovens vary. Yes, you can prepare the batter and bake it later, or bake ahead and store. If you want to bake later, cover the batter tightly and refrigerate it. This works well if you want fresh brownies for a gathering. You can also bake them in advance and store them in an airtight container for a quick dessert later. Use a sharp knife and clean it between cuts for neat squares. After every cut, wipe the knife with a damp cloth. This helps maintain clean edges and gives your brownies a more professional look. Let the brownies cool completely before cutting; this makes them easier to handle. This recipe blends rich brownie and pumpkin cheesecake layers into a tasty treat. You learned how to prepare the batter and bake it perfectly. Remember to avoid overmixing and feel free to experiment with flavors. Store your brownies to keep them fresh, and you can even make them gluten-free or vegan. This dessert is sure to impress anyone you share it with. Enjoy making these brownies and delight in every bite!

Pumpkin Cheesecake Brownies Indulging Autumn Treat

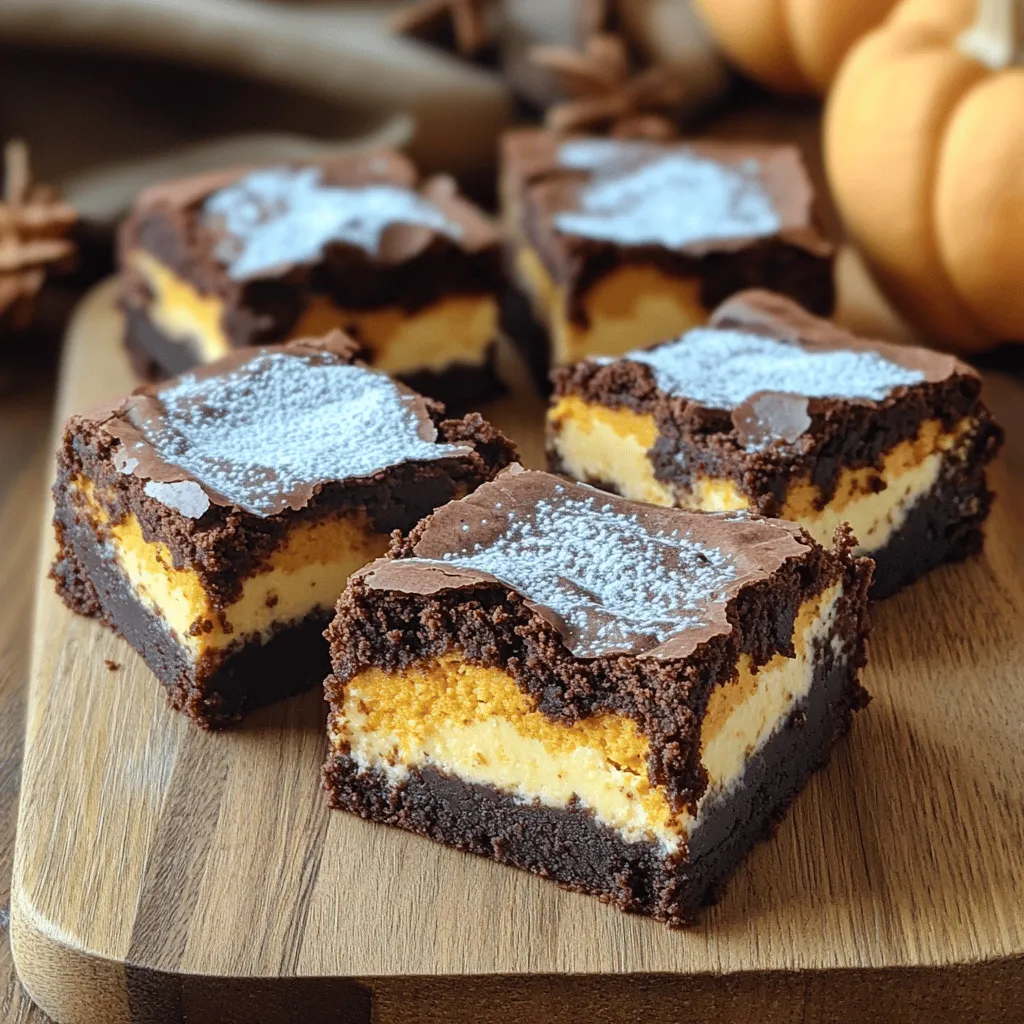
Autumn is here, and that means it’s time for cozy treats! Get ready for a delicious blend of rich chocolate

To make pillowy pumpkin dinner rolls, you need a few simple ingredients. Each one plays a key role in creating soft and fluffy rolls. Here’s what you will need: - 2 cups all-purpose flour, plus additional for dusting - 1 cup pumpkin puree (canned or homemade) - 1/4 cup warm milk (approximately 110°F) - 1/4 cup unsweetened applesauce - 2 tablespoons granulated sugar - 1 tablespoon active dry yeast - 1/2 teaspoon salt - 1/2 teaspoon ground cinnamon - 1/4 teaspoon ground nutmeg - 1/4 teaspoon ground ginger - 1/4 cup unsalted butter, melted - 1 egg (for egg wash) Each ingredient adds flavor and texture. The pumpkin puree gives the rolls a rich color and moistness. The warm milk helps the yeast wake up and grow. Applesauce adds sweetness and keeps the rolls soft. The spices—cinnamon, nutmeg, and ginger—create a warm, cozy flavor. Finally, the butter adds richness. You can find the full recipe to guide you through the steps to make these delightful rolls. Enjoy the process and the delicious results! 1. Start by combining warm milk and sugar in a small bowl. 2. Sprinkle active dry yeast over the mixture and let it sit for 5 to 10 minutes. 3. You want it to froth. This shows the yeast is alive and ready. 1. In a large bowl, mix together pumpkin puree, applesauce, and melted butter. 2. Add the frothy yeast mixture to this bowl. Blend until smooth and well combined. 1. In a separate bowl, mix all-purpose flour, salt, cinnamon, nutmeg, and ginger. 2. Gradually add the dry mixture to the pumpkin mixture. 3. Stir gently until just combined. 4. Transfer the dough to a floured surface and knead for about 5 to 7 minutes. 5. If the dough feels sticky, add a bit more flour while kneading. 1. Shape the kneaded dough into a ball and place it in a greased bowl. 2. Cover the bowl with a kitchen towel. Let it rise in a warm place for about 1 hour, or until it doubles in size. 3. Once risen, punch the dough down gently. 4. Turn it out onto a floured surface and divide it into 12 equal pieces. 5. Shape each piece into a ball. 1. Place the dough balls on a greased baking sheet. Make sure they are spaced out. 2. Cover with a towel and let them rise again for about 30 minutes. 3. Preheat your oven to 350°F (175°C). 4. Beat an egg in a small bowl and brush it over the tops of the rolls. 5. Bake the rolls for 15 to 20 minutes, or until golden brown and puffed. 6. Once baked, let them cool slightly before serving. If you want to explore this tasty recipe in full detail, please check the Full Recipe. Kneading is key for soft and fluffy rolls. It helps develop gluten, which gives dough its strength. Knead for about 5 to 7 minutes until smooth. Don't rush this step. The rising environment matters too. Find a warm spot, like near a sunny window or an oven set to low. Cover the dough with a towel to keep it warm and moist. This helps the dough rise well. You can enhance flavor with extra spices. Try adding a pinch of allspice or cloves for warmth. A touch of maple syrup can also add sweetness. Experiment to find your perfect mix. Serving ideas are fun, too! These rolls are great with butter or honey. A sprinkle of sea salt or cinnamon on top makes them even more special. Watch for signs of over-proofed dough. If the dough looks too puffy or collapses when you poke it, it’s over-proofed. This means it won’t rise well in the oven. Underbaking is another common issue. Check for a golden-brown color on top. If the rolls feel soft and doughy inside, they need more time. Trust your senses; they guide you well! {{image_4}} You can make your pumpkin dinner rolls even sweeter. Consider adding chocolate chips for a delightful surprise. Aim for about 1/2 cup of chips mixed into the dough. Dried fruit also works well, like raisins or cranberries. They add a nice chewiness and burst of flavor. Spices can change the taste of your rolls too. Try adding a pinch of cardamom or a hint of vanilla extract. These additions can give your rolls a fun twist. Remember, experimenting with flavors is part of the fun! Want to turn these rolls into a savory treat? Add fresh herbs like rosemary or thyme to the dough. A tablespoon of chopped herbs should do the trick. This adds a lovely aroma and flavor. Cheese is another great addition. You could fold in shredded cheese, like cheddar or mozzarella. Alternatively, try a cheese topping before baking. It melts beautifully and adds richness. If you need gluten-free rolls, swap the all-purpose flour for a gluten-free blend. Make sure the blend has xanthan gum to help with structure. You can replace the butter with a plant-based option for a vegan version. Use almond milk instead of regular milk. For the egg wash, brush the tops with almond milk or a bit of coconut milk. These swaps keep the rolls soft and tasty without any animal products. For the full recipe, check out the complete guide on making these delicious rolls. Enjoy your baking adventure! To keep your rolls fresh at room temperature, place them in a bread box or a large zip-top bag. Make sure they are completely cool before sealing. This helps keep the moisture in while preventing them from getting soggy. If you need to refrigerate them, wrap each roll in plastic wrap, then place them in a sealed container. This keeps them fresh for a few days. For long-term storage, freezing is the best option. Let the rolls cool completely, then place them in a zip-top bag. Make sure to remove as much air as possible before sealing. They will stay fresh in the freezer for up to three months. When you’re ready to enjoy them, take out the rolls and let them thaw at room temperature. To reheat, pop them in a preheated oven at 350°F (175°C) for about 10 minutes. This will revive their soft, fluffy texture. When stored correctly, these rolls can last about 3 to 5 days at room temperature. In the fridge, they can last for up to a week. However, if you notice any mold, an off smell, or a dry texture, it's best to toss them. Always trust your instincts about food safety. Enjoy these pillowy delights while they are at their best! Yes, you can prepare these rolls ahead of time. Here are some tips: - Make the dough: You can mix and knead the dough a day ahead. - First rise: Let it rise in the fridge overnight instead of at room temp. - Shape the rolls: After the first rise, shape them into balls. - Second rise: Let them rise at room temp before baking. This way, you save time on baking day. You can use several alternatives for pumpkin flavor: - Butternut squash puree: This gives a similar texture and taste. - Sweet potato puree: It adds a sweet flavor that works well. - Carrot puree: This option offers a different twist to the rolls. Look for these signs to know your rolls are done: - Color: They should be golden brown on top. - Size: The rolls will puff up and look fluffy. - Tap test: Tap the bottom; it should sound hollow if they are done. Absolutely! You can double the recipe: - Ingredients: Just use twice the amount of each ingredient. - Mixing: You might need a larger bowl for mixing. - Baking time: Keep an eye on baking time; larger batches may need extra time. These rolls go well with many meals: - Soups: Try them with a warm bowl of pumpkin or minestrone soup. - Salads: They complement fresh salads, adding a nice touch. - Roasted meats: They pair beautifully with turkey, chicken, or ham. Yes, you can use whole wheat flour: - Mix it: Try a mix of half all-purpose and half whole wheat flour. - Hydration: Whole wheat flour absorbs more liquid; add a bit more milk if needed. - Texture: The rolls will be denser but still delicious. For the full recipe, check out the detailed instructions. Enjoy baking! In this post, we covered how to make delicious pumpkin dinner rolls from scratch. You learned about the key ingredients, step-by-step instructions, and valuable tips for perfecting your rolls. We also explored tasty variations and proper storage to keep them fresh. Remember, baking is fun, and a little practice makes you better. Don’t fear mistakes; they help you learn. Enjoy baking these soft, flavorful rolls and share them with friends and family!

Pillowy Pumpkin Dinner Rolls Soft and Fluffy Treat

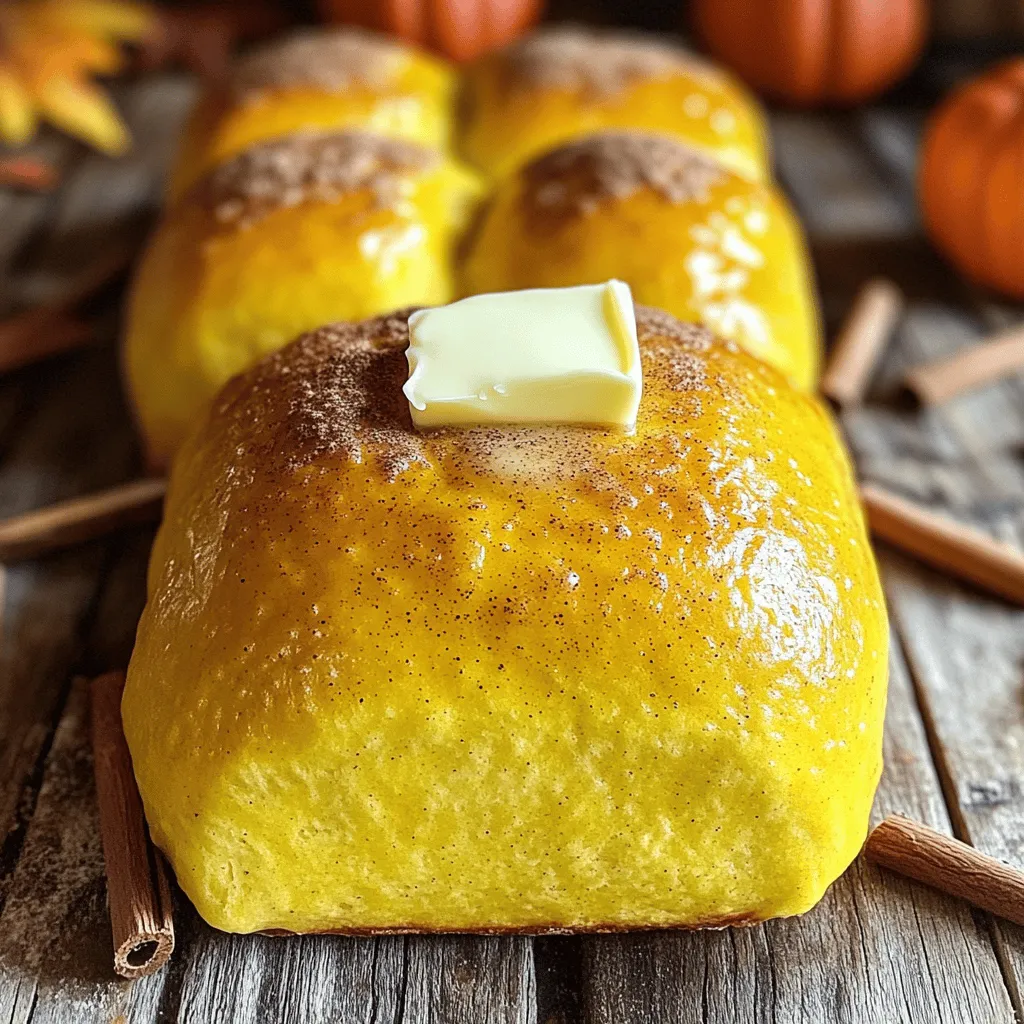
Imagine sinking your teeth into warm, fluffy rolls bursting with pumpkin flavor. My *Pillowy Pumpkin Dinner Rolls* are not only

- 1 cup pumpkin puree - 1/2 cup cream cheese, softened to room temperature - 1/2 cup granulated sugar - 1/2 cup packed brown sugar - 2 large eggs - 1 teaspoon vanilla extract - 1/2 cup vegetable oil - 1 1/2 cups all-purpose flour - 1 teaspoon baking powder - 1 teaspoon baking soda - 1 teaspoon ground cinnamon - 1/2 teaspoon ground nutmeg - 1/2 teaspoon salt - 1 cup semi-sweet chocolate chips - Optional: Pumpkin seeds for topping Pumpkin puree brings a rich flavor and moisture. It is the star of these muffins. Choose canned or fresh puree. Both work well in this recipe. Cream cheese adds a creamy texture. It gives each muffin a delightful surprise. Make sure it is softened for easy mixing. Granulated sugar and brown sugar sweeten the muffins. The brown sugar gives a deeper flavor. It allows for a lovely caramel note. Eggs bind the ingredients together. They also help the muffins rise. Use large eggs for the best results. Vanilla extract adds warmth and depth. It enhances the other flavors. Vegetable oil keeps the muffins moist. It also helps to create a tender crumb. All-purpose flour is the base for the batter. It provides structure and stability. Baking powder and baking soda are leavening agents. They help the muffins rise and become fluffy. Spices like ground cinnamon and nutmeg give warmth. They create that cozy, fall flavor. A pinch of salt balances the sweetness. Semi-sweet chocolate chips add richness. They melt slightly as the muffins bake, creating pockets of chocolate. Optional pumpkin seeds can be added on top. They offer a crunchy texture that contrasts with the soft muffin. This detailed ingredient list helps you gather everything you need. For the full recipe, check out the complete instructions to create these delicious muffins. 1. First, preheat your oven to 350°F (175°C). This helps the muffins bake evenly. 2. Next, prepare your muffin tin. You can use paper liners or grease it with non-stick spray. This will keep the muffins from sticking. 3. In a large bowl, mix the pumpkin puree and cream cheese together. Combine them until smooth and creamy. 4. Add the granulated sugar and brown sugar to the bowl. Beat the mixture well until everything blends nicely. 5. Now, crack in the eggs and pour the vanilla extract. Stir until the mixture is well combined. 6. Slowly add the vegetable oil while mixing. This keeps the muffins moist and rich. 1. In another bowl, whisk together the dry ingredients. This includes flour, baking powder, baking soda, cinnamon, nutmeg, and salt. 2. Once mixed, slowly fold the dry ingredients into the wet mixture. Be gentle and stop mixing when everything is just combined. Overmixing can make your muffins tough. 3. Gently add the semi-sweet chocolate chips to the batter. Stir carefully to ensure they are evenly distributed. 1. Using a scoop or spoon, fill each muffin cup about two-thirds full with the batter. 2. If you want, sprinkle some pumpkin seeds on top. This adds a nice crunch. 3. Bake the muffins in your preheated oven for 18-20 minutes. Check for doneness by inserting a toothpick into a muffin. It should come out clean with a few moist crumbs. 4. Once baked, let the muffins cool in the pan for 5 minutes. Then, transfer them to a wire rack to cool completely. For the full recipe, refer to the earlier section. Enjoy your delightful muffins! To make the best chocolate chip pumpkin cream cheese muffins, avoid overmixing. When you mix the batter, stop as soon as the flour blends in. This keeps your muffins light and fluffy. Overmixing creates tough muffins, which we do not want! Accurate ingredient measurements are key too. Use a kitchen scale for precision. If you measure with cups, spoon the flour into the cup, then level it off. This helps avoid adding too much flour, which can make your muffins dense. Want to boost flavor? Adjust the spices! You can add more ground cinnamon or nutmeg if you love warm spices. A pinch of ground ginger adds a nice kick, too. Feel free to add extras like nuts or dried fruits. Chopped walnuts or pecans bring crunch. Dried cranberries or raisins add sweetness and chewiness. Just fold them in gently to keep your batter airy. When it comes to serving, presentation matters. Serve your muffins warm with a dusting of powdered sugar. It makes them look special and inviting. You can also add a dollop of whipped cream on the side for an extra treat. Pair your muffins with a warm drink. A cup of coffee or spiced chai complements the flavors well. If you prefer tea, choose something mild like chamomile. Enjoy your tasty creation! For the full recipe, check out the link to make these muffins at home. {{image_4}} You can change the flavor of your muffins easily. Instead of semi-sweet chocolate chips, try using white or dark chocolate. Each type gives a unique taste. White chocolate adds a sweet creamy touch. Dark chocolate gives a rich, bold flavor. You can also add seasonal spices like ginger or cloves. These spices pair well with pumpkin. They add warmth and depth to your muffins. Just a pinch can make a big difference. If you need a gluten-free option, swap all-purpose flour for gluten-free flour. Look for brands that measure like regular flour. This keeps your muffins fluffy and tasty. For a dairy-free choice, replace cream cheese with a dairy-free cream cheese. Many brands offer great alternatives. These swaps let everyone enjoy these muffins. You can make mini muffins or standard muffins. Mini muffins are perfect for snacks or kids. They bake faster, so check them at around 12-15 minutes. Standard muffins take about 18-20 minutes to bake. Adjusting the baking time helps you get the best results for any size. Keep an eye on them to avoid overbaking. To keep your chocolate chip pumpkin cream cheese muffins fresh, store them in air-tight containers. This prevents moisture loss and keeps them soft. Line the container with a paper towel to absorb any extra moisture. Place the muffins in a single layer. If you stack them, add more paper towels between layers to protect them. Freezing muffins is easy! Start by letting them cool completely. Wrap each muffin tightly in plastic wrap or aluminum foil. Then, place them in a freezer-safe bag or container. This method protects them from freezer burn. You can freeze muffins for up to three months. To thaw, leave them in the fridge overnight or let them sit at room temperature for a few hours. Reheating muffins is simple and quick. You can use the microwave or oven. For the microwave, place a muffin on a plate and heat it for about 15 to 20 seconds. If you want a little crispiness, use the oven. Preheat it to 350°F (175°C), and heat the muffins for 5 to 10 minutes. This keeps the muffins moist and tasty. Enjoy your muffins warm for the best flavor! How can I make my muffins more moist? To make your muffins moist, use fresh pumpkin puree. You can also add a bit more cream cheese. This adds richness and moisture. Make sure not to overmix the batter. Overmixing can lead to dry muffins. What can I use instead of pumpkin puree? If you don't have pumpkin puree, try using applesauce. It offers moisture and sweetness. You can also use mashed banana for a tasty twist. Both options will change the flavor slightly but still taste great. Can I use frozen pumpkin puree in this recipe? Yes, you can use frozen pumpkin puree. Just make sure to thaw it first. Drain any excess water that may form during thawing. This ensures your muffins won't be too watery. Why did my muffins sink? Muffins may sink if the batter is too heavy. This can happen if you overmix or add too much liquid. Make sure to follow the recipe closely. Also, check that your baking powder and baking soda are fresh. What should I do if the muffins are too dense? If your muffins are dense, try adding more leavening agents. You can add an extra half teaspoon of baking powder. Also, ensure your ingredients are at room temperature. This helps the batter mix better and rise more. How do I know how many muffins I should serve for a party? For a party, plan for about two muffins per person. If it's a larger gathering, consider serving a few extra. Muffins are usually a hit and disappear fast! How can I adjust the recipe if I want to make a smaller batch? To make a smaller batch, simply halve the recipe. Use one cup of pumpkin puree and reduce the other ingredients accordingly. This will give you six perfect muffins. Enjoy the delicious treat without too many leftovers! You now have all the steps to make perfect pumpkin muffins. From selecting quality ingredients to mastering baking techniques, each part matters. Remember to measure carefully and avoid overmixing for the best results. Don’t hesitate to customize your muffins with spices or toppings. Store them properly to keep them fresh, and enjoy them at breakfast or with coffee. These muffins can bring joy to any occasion. Now, it’s your turn to bake and share your delicious creations!

Chocolate Chip Pumpkin Cream Cheese Muffins Delight

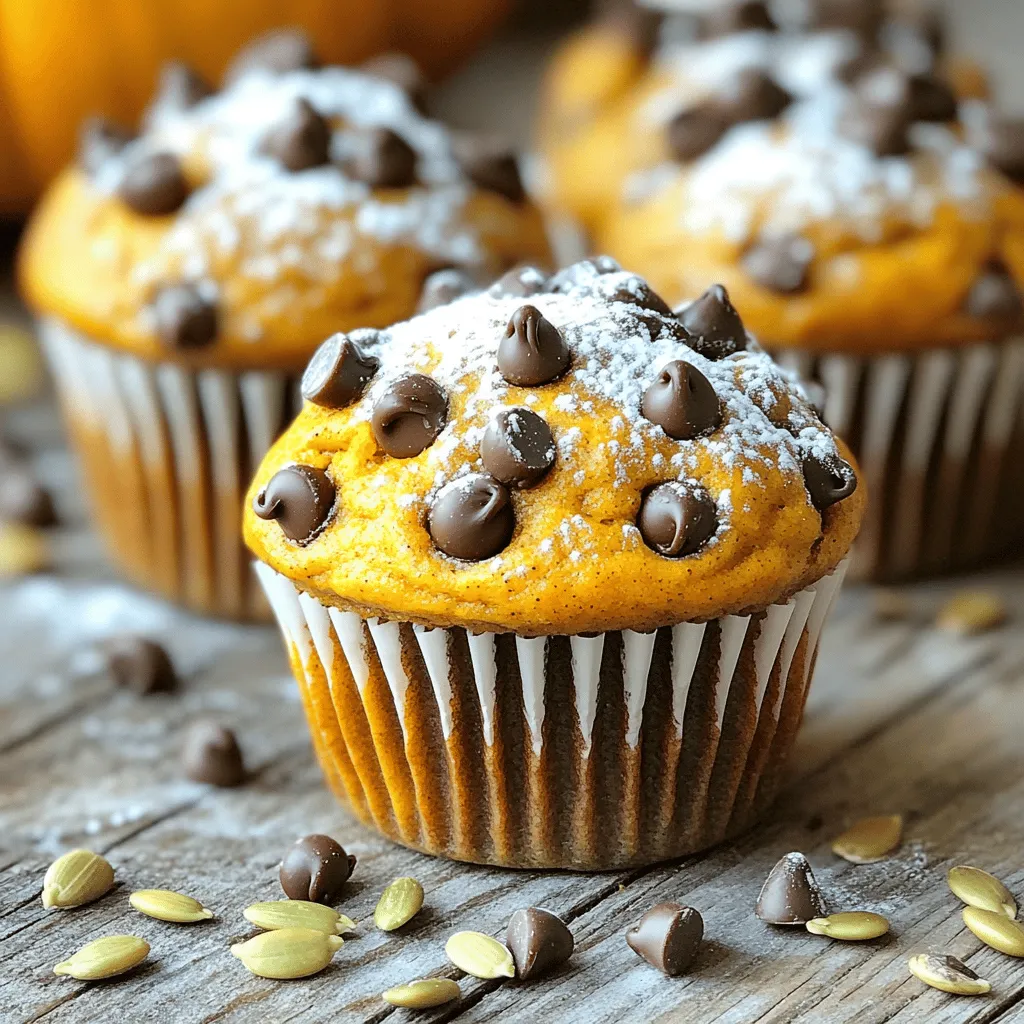
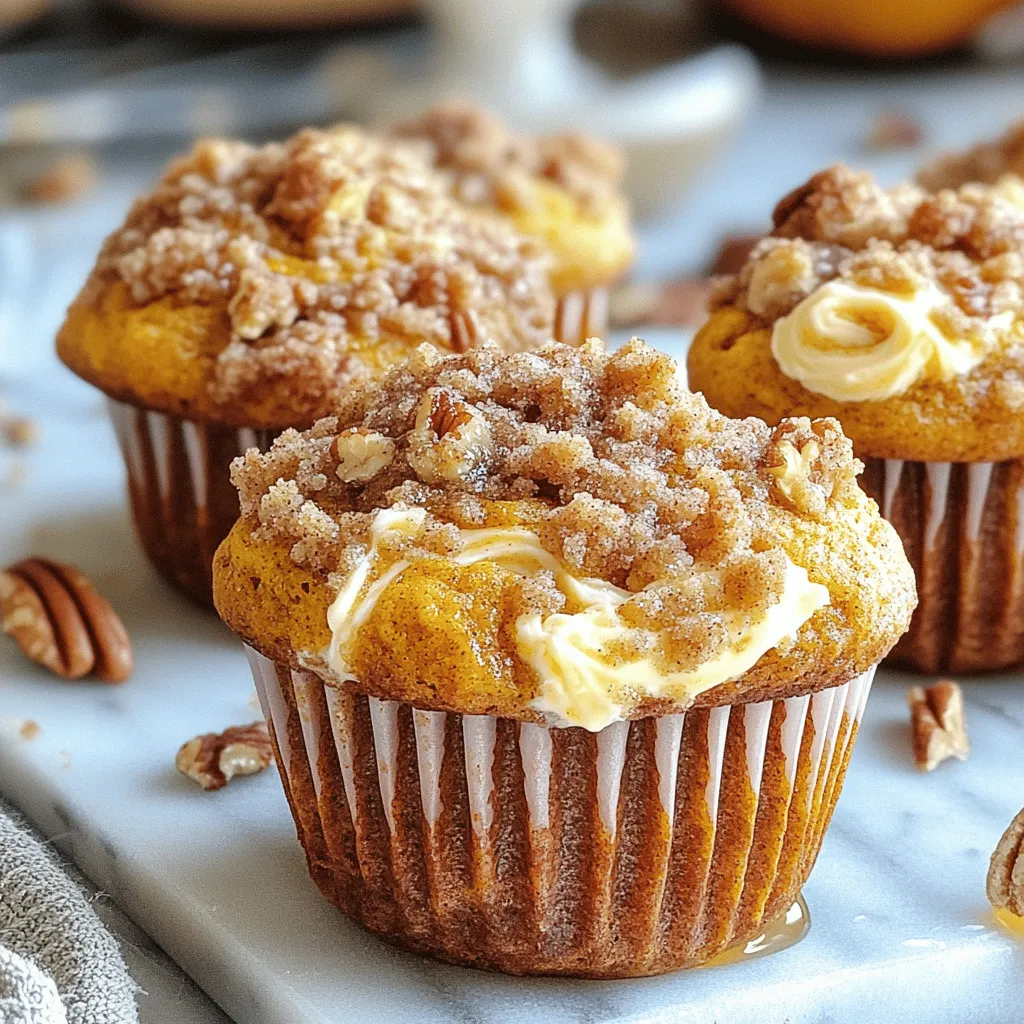
Ready to take your baking to the next level? These Chocolate Chip Pumpkin Cream Cheese Muffins are the perfect blend

- 1 ½ cups all-purpose flour - 1 teaspoon baking powder - 1 teaspoon baking soda - ½ teaspoon salt - 1 teaspoon ground cinnamon - ½ teaspoon ground nutmeg - ½ teaspoon ground ginger - 1 cup canned pumpkin puree - ½ cup vegetable oil - 2 large eggs - ½ cup granulated sugar - ½ cup packed brown sugar - 1 teaspoon vanilla extract - 4 oz cream cheese, softened to room temperature - 1 tablespoon powdered sugar - ½ cup chopped pecans (optional) The combination of these ingredients creates a rich and flavorful muffin. The dry ingredients bring structure, while the wet ones add moisture and sweetness. The cream cheese filling gives a delightful surprise in each bite. Using canned pumpkin puree makes it easy to enjoy that rich pumpkin flavor without the fuss. You can find it in most grocery stores. The spices—cinnamon, nutmeg, and ginger—add warmth and depth. For the cream cheese filling, make sure it’s soft. This helps it blend well with the powdered sugar. You can add chopped pecans for a crunchy streusel topping if you like. To make these muffins, gather all your ingredients. Each plays a key role in making them a delicious treat. Check out the Full Recipe for specific amounts and instructions to create this cozy delight. - Preheat oven to 350°F (175°C). - Prepare muffin tin with paper liners. Before you start, set your oven. This helps muffins rise well. I always use paper liners. They make cleanup easy and help with sticking. - Combine dry and wet ingredients separately. - Fold in wet ingredients into dry mixture. In one bowl, mix flour, baking powder, baking soda, salt, and spices. In another bowl, whisk together the sugars, pumpkin, oil, eggs, and vanilla. Now, gently add the wet mix to the dry mix. Stir until just combined. It’s okay if it’s a bit lumpy! - Whip cream cheese and powdered sugar. - Assemble muffins with pumpkin batter and cream cheese. In a small bowl, beat the cream cheese with powdered sugar until smooth. Next, fill each muffin liner halfway with pumpkin batter. Spoon in some cream cheese, then add more batter. Aim for about ¾ full in each liner. - Prepare streusel topping. - Sprinkle streusel on filled muffin liners. For the streusel, mix flour, brown sugar, and butter in a small bowl. Use a fork to combine until crumbly. If you like, add chopped pecans for crunch. Now, sprinkle this topping over the muffins. - Bake muffins and check doneness. - Cool down before serving. Put the muffin tin in the oven and bake for 20-22 minutes. Check doneness with a toothpick. If it comes out clean, they are ready! Let them cool in the tin for 5 minutes. Then, move them to a wire rack to cool completely. Enjoy your delicious muffins! For more details, check the Full Recipe. To make the best streusel pumpkin cream cheese muffins, focus on two key points. First, avoid overmixing the batter. This keeps your muffins light and fluffy. Stir just until you see no dry flour. A few lumps are okay; they help keep the muffins tender. Second, ensure the cream cheese is at room temperature. Soft cream cheese blends well with sugar, making a smooth filling. Cold cream cheese will form lumps, which you want to avoid. Once your muffins are baked, think about how to serve them. A drizzle of honey or maple syrup adds sweetness and moisture. This little touch brings out the pumpkin flavors. You can also garnish with a sprinkle of cinnamon. It not only looks nice but adds a warm spice aroma that fits perfectly. To boost the flavor of your muffins, use fresh spices. Ground spices can lose their strength over time. Freshly ground cinnamon, nutmeg, and ginger will make a big difference. You can also consider alternative sweeteners for the filling. Honey or agave syrup can give a different taste. These tweaks will make your muffins stand out even more. For the full recipe, check out the instructions provided. {{image_4}} You can easily change the taste of these muffins. Add chocolate chips for a sweet twist. Dried cranberries also give a nice tart flavor. You could even try different nuts. Walnuts or almonds work well. Just chop them up and mix them in. If you prefer gluten-free muffins, use gluten-free all-purpose flour. This swap keeps the muffins tasty. You might need to adjust the baking time slightly. Keep an eye on them to avoid overbaking. Want a different filling? Swap the cream cheese for ricotta or mascarpone. Both make the muffins rich and creamy. You can also try flavored cream cheese. This adds a fun twist to the classic recipe. For the full recipe, check the details above. Store your muffins in an airtight container at room temperature. This keeps them fresh and tasty. Enjoy them within 2-3 days for the best quality. If you want to keep them longer, refrigerate the muffins for up to a week. For even more time, freeze them. They can last for up to 3 months in the freezer. When you're ready to enjoy a muffin, warm it up in the microwave or the oven. If you freeze them, let them thaw first. This refreshes their texture and makes them taste fresh again. For the full recipe, check out the section above. Yes, you can prepare the batter a day in advance. Store the batter in the fridge. When you are ready to bake, take it out to warm slightly. This helps the muffins rise well. You can also bake them and keep them in an airtight container for a few days. If you want a different filling, try ricotta or mascarpone cheese. Greek yogurt can work too, though it may be a bit tangy. Just mix it with some sugar to sweeten it up. This keeps the muffins moist and tasty. To check for doneness, insert a toothpick into the center of a muffin. If it comes out clean, they are ready. If it has wet batter on it, bake a few more minutes. Keep an eye on them, so they don’t overbake. Yes, you can use fresh pumpkin puree. First, cook the pumpkin until soft, then mash or blend it. You may need a bit more or less than the canned version, so adjust the liquid in the recipe. Watch the baking time, as it may change. If your muffins turn out dense, try these tips. Make sure to measure your flour correctly. Overmixing can also cause this, so stir gently. Adding a bit more baking powder may help as well. This will make your muffins lighter and fluffier. This blog post guides you through making delicious pumpkin muffins with cream cheese filling. We explored dry and wet ingredients, including canned pumpkin and spices. You learned step-by-step instructions for mixing and baking, plus tips for perfect muffins. Variations let you customize flavors, while storage tips keep them fresh. In the end, these muffins are not just tasty; they’re fun to make. Enjoy sharing them with friends and family!

Streusel Pumpkin Cream Cheese Muffins Delightful Treat

Fall is here, and that means it’s time for warm, comforting treats! If you’re craving something sweet and spiced, these

- 1 cup pure pumpkin puree - 1/2 cup cream cheese, softened - 1/2 cup granulated sugar - 1/2 cup packed brown sugar - 2 large eggs - 1/2 cup vegetable oil - 1 teaspoon pure vanilla extract - 1 1/2 cups all-purpose flour - 1 teaspoon baking powder - 1 teaspoon baking soda - 1 teaspoon ground cinnamon - 1/2 teaspoon ground nutmeg - 1/4 teaspoon sea salt - 1/2 cup chopped walnuts or pecans - Additional toppings (whipped cream cheese, cinnamon dust) When making Easy Pumpkin Cream Cheese Muffins, gather these key ingredients first. You want to use pure pumpkin puree, not pumpkin pie filling. This gives your muffins a true pumpkin taste. Cream cheese adds a rich and smooth texture. The mix of granulated and brown sugar gives sweet depth. Eggs are essential for binding and moisture. Vegetable oil keeps the muffins soft. Finally, vanilla extract adds warmth to the flavor. Next, focus on your dry ingredients. All-purpose flour is your base. Baking powder and baking soda help the muffins rise. Ground cinnamon and nutmeg add that warm, cozy flavor we love. A pinch of sea salt balances all the sweetness. You can also add optional ingredients for extra fun. Chopped walnuts or pecans bring a nice crunch. If you like, top your muffins with whipped cream cheese or a sprinkle of cinnamon for a lovely finish. For the full recipe, check out the complete instructions. Enjoy baking these delightful muffins! - Preheat oven to 350°F (175°C). - Prepare muffin tin with liners or grease. Start by getting your oven hot. This step ensures that your muffins bake evenly. While the oven heats, grab your muffin tin. You can use paper liners or grease the tin lightly. This helps the muffins come out easily after baking. - Beat cream cheese until smooth. - Combine with pumpkin puree, sugars, eggs, oil, and vanilla. Next, take a bowl and beat the cream cheese until it is smooth. This makes it easy to mix later. Add the pumpkin puree, both sugars, eggs, oil, and vanilla extract. Stir everything together until it is well blended. The mixture should be creamy and thick. - Mix dry ingredients in a separate bowl. - Combine wet and dry mixtures without overmixing. In another bowl, mix the dry ingredients. This includes flour, baking powder, baking soda, cinnamon, nutmeg, and salt. Make sure everything is evenly mixed. Now, slowly add the dry mixture to the wet ingredients. Stir gently until just combined. Don’t overmix; it’s okay if some lumps remain. - Portion batter into muffin cups. - Fill each cup two-thirds full. Using a spoon or a scoop, fill each muffin cup with batter. Aim to fill them about two-thirds full. This gives the muffins room to rise without spilling over. - Bake for 18-22 minutes. - Check doneness with a toothpick test. Place the muffin tin in the oven and bake for 18 to 22 minutes. To check if they are done, insert a toothpick into the center of a muffin. If it comes out clean, they are ready. Once baked, let them cool in the tin for about 5 minutes. Then, move them to a wire rack to cool completely. For the full recipe, you can refer to the earlier sections. Enjoy your baking! - Use room temperature cream cheese: This helps it blend smoothly, making your muffins rich. - Don't overmix the batter: Mix just until combined. A few lumps will not hurt. - Check the muffins a few minutes before the timer goes off: Your oven may bake faster or slower. - Ensure ingredients are accurately measured: Too much or too little can change the muffins' texture. - Do not skip cooling the muffins in the tin: This prevents sticking and helps them set properly. - Serve warm with a dollop of whipped cream cheese: This adds creaminess and enhances flavor. - Dust with cinnamon for an inviting look: A sprinkle adds visual appeal and a touch of spice. These simple tips help make your Easy Pumpkin Cream Cheese Muffins truly delightful. For a complete recipe, check the Full Recipe section. Enjoy your baking! {{image_4}} - Add chocolate chips for a sweeter twist. This gives your muffins a fun surprise. - Incorporate dried fruit like cranberries or raisins. These add a chewy texture and extra flavor. - Substitute coconut oil for vegetable oil. This adds a slight coconut taste and healthy fats. - Use whole wheat flour for a healthier option. Whole wheat adds fiber and a nutty flavor. - Create gluten-free muffins with almond flour. This swap makes them safe for gluten-free diets. - Make vegan muffins using applesauce instead of eggs. This keeps the muffins moist and delicious. Explore these variations to make your pumpkin cream cheese muffins truly unique. For the full recipe, visit the original source. To keep your muffins fresh, place them in an airtight container at room temperature. This method keeps them soft for a few days. If you want them to last longer, refrigerate them. The cold air helps prevent spoilage and keeps them tasty for about a week. If you have extra muffins, freezing is a great option. First, wrap each muffin tightly in plastic wrap. Then, place them in a freezer bag or container. This keeps them fresh for about three months. When you're ready to enjoy them, thaw at room temperature or pop them in the microwave for a minute or two. For a warm, fresh taste, reheat your muffins in the oven. Set the oven to 350°F (175°C) and warm the muffins for about 5-10 minutes. This method revives their soft texture. If you're in a hurry, use the microwave. Heat them for about 15-20 seconds for a quick fix. Enjoy your Easy Pumpkin Cream Cheese Muffins at their best! You can change the sugar levels in the recipe. If you want less sweetness, cut back on the granulated sugar and brown sugar. You can also use natural sweeteners, like honey or maple syrup. Just remember that this may change the texture. Taste as you mix to find the right balance for you. Pumpkin pie filling is not the same as pumpkin puree. It has added sugar and spices. If you use it, reduce the sugar in your recipe. This will help keep the muffins from being too sweet. The best way to check is with a toothpick. Stick it into the center of a muffin. If it comes out clean, your muffins are ready. You can also look for a golden brown top and a firm feel. These muffins are best enjoyed fresh. They will stay good for about 3-4 days at room temperature. Store them in an airtight container to keep them moist. For longer shelf life, put them in the fridge. In this post, we explored how to make easy pumpkin cream cheese muffins. We discussed the essential and optional ingredients, along with simple steps for making them. I shared helpful tips to avoid common mistakes and ways to customize your muffins. Remember to store the leftovers correctly to enjoy later. These muffins are a delicious treat for any occasion. You can also try the variations for exciting new flavors. Happy baking!

Easy Pumpkin Cream Cheese Muffins Delightful Recipe

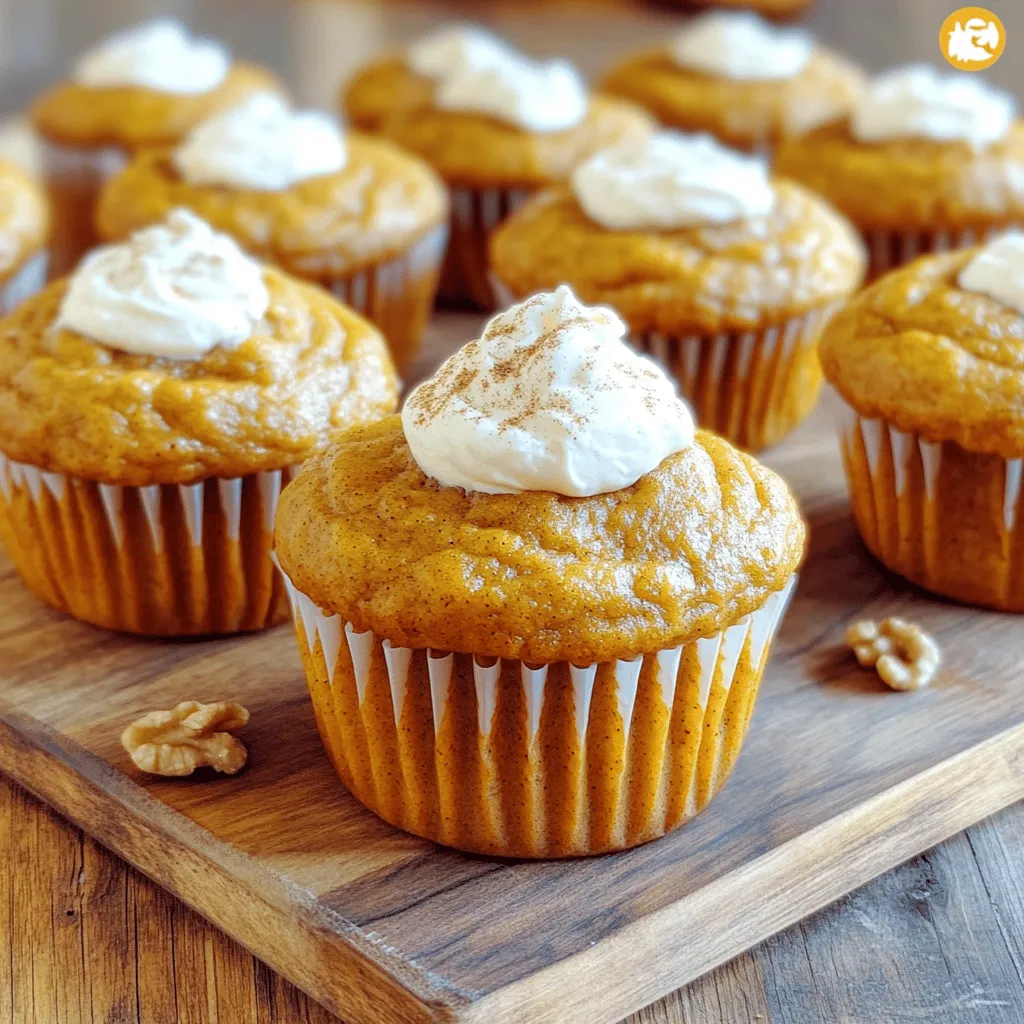
Get ready to enjoy the fall favorite: Easy Pumpkin Cream Cheese Muffins! Packed with warm spices and creamy goodness, these

Older posts
Newer posts
← Previous Page1 Page2 Page3 … Page73 Next →

dsad

© 2025 lazychefmagic • Built with GeneratePress

Our Policies

  • Copyright Policy
  • Cookie Policy
  • GDPR Policy
  • Privacy Policy
  • Disclaimer
  • Terms Of Use

More Information

  • Home
  • About
  • Contact
  • Appetizers
  • Dessert
  • Dinner
  • Drinks
©2025, lazychefmagic About Back To Top