Skip to content
DisclaimerTerms Of UseGDPR PolicyCookie Policy

lazychefmagic

  • Home
  • Drinks
  • Appetizers
  • Dinner
  • Dessert
  • About
  • Contact
  • Privacy Policy
DisclaimerTerms Of UseGDPR PolicyCookie Policy

Amanda

- 1 lb baby potatoes, thoroughly washed and halved - 3 tablespoons olive oil - 4 cloves garlic, finely minced - 1 cup heavy cream - 1 teaspoon dried thyme - 1 teaspoon dried rosemary - Salt and freshly cracked black pepper to taste - ¼ cup grated Parmesan cheese - Fresh parsley, chopped, for garnish To make creamy garlic sauce baby potatoes, you need fresh ingredients for the best taste. Baby potatoes are small and tender, perfect for this dish. The olive oil adds richness, while minced garlic brings a strong flavor. Heavy cream makes the sauce smooth and creamy. Dried thyme and rosemary add warmth and depth to the dish. Salt and black pepper enhance all the flavors. Grated Parmesan cheese gives a nice cheesy touch. Finally, fresh parsley adds color and freshness. Using these ingredients, you will create a tasty and creamy sauce that coats the potatoes beautifully. You can find the full recipe to guide you through the cooking steps. Bring a large pot of water to a boil. Add a pinch of salt to enhance the flavor. Carefully add the halved baby potatoes to the pot. Cook them for about 15-20 minutes. You want them tender enough to pierce with a fork. Once done, drain the potatoes and set them aside to cool a little. In a spacious skillet, heat the olive oil over medium heat. Once the oil shimmers, add the minced garlic. Sauté it for about 1-2 minutes. Stir the garlic often to keep it from burning. Burned garlic will make your sauce bitter. Lower the heat and slowly pour in the heavy cream. Stir this mixture well to combine it with the garlic and oil. Add the dried thyme and rosemary. Season with salt and freshly cracked black pepper to taste. Let the sauce simmer for 3-4 minutes. This helps it thicken and blend the flavors. Gradually stir in the grated Parmesan cheese. Mix until it melts and the sauce becomes rich and creamy. Now, introduce the cooked baby potatoes into the skillet. Gently toss them in the creamy garlic sauce. Make sure they are well coated. Let everything simmer together for an extra 2-3 minutes. This allows the potatoes to absorb the wonderful sauce. The result is a dish bursting with flavor. For the full recipe, check out the section above. Enjoy your creamy garlic sauce baby potatoes! To get a smooth and creamy sauce, add cream and cheese slowly. This helps blend the flavors well. Start with medium heat when cooking garlic. Too high heat can burn the garlic and ruin the taste. Stir the garlic often to keep it from browning. Using fresh herbs adds a bright touch to your dish. If you use dried herbs, make sure they are fresh, too. Adjust the salt and pepper to fit your taste. You can even experiment with other herbs like basil or dill for different flavors. For a stunning look, serve the creamy garlic sauce baby potatoes in a shallow platter. This way, everyone can see the vibrant colors. Drizzle any extra garlic sauce over the potatoes. Finish with a sprinkle of fresh parsley. This makes the dish inviting and beautiful. For the full recipe, refer to the earlier section. {{image_4}} You can make creamy garlic sauce baby potatoes even heartier. Adding protein like grilled chicken or sautéed shrimp works well. Cook the protein separately, then toss it with the creamy potatoes. This adds flavor and makes the dish a full meal. For grilled chicken, season it with garlic and herbs for a nice touch. Sautéed shrimp can soak up the creamy sauce, adding a delightful taste. If you enjoy some heat, consider a spicier twist. Adding red pepper flakes or jalapeños can enhance the dish. Start with a pinch of red pepper flakes in the sauce. If you like it spicier, add more to taste. For jalapeños, slice them thin and sauté them with the garlic. This will give a nice kick while balancing the creaminess of the sauce. For a plant-based version, you can easily swap some ingredients. Replace heavy cream with coconut milk or cashew cream. Use nutritional yeast instead of Parmesan cheese for a cheesy flavor. Ensure the potatoes are cooked in vegetable broth instead of water. This way, you keep the creamy texture and rich taste without any animal products. To keep your creamy garlic sauce baby potatoes fresh, place them in an airtight container. This helps to lock in moisture and flavor. Always let the potatoes cool before sealing them. Store the container in the fridge. They will stay good for about three to four days. Reheating can be tricky. You want to keep that creamy texture. The best way is to use the stovetop. Place the potatoes in a skillet over low heat. Stir them gently until warmed through. If you're in a hurry, you can use a microwave. Heat them in short bursts of 30 seconds. Stir in between to avoid hot spots. Freezing creamy garlic sauce baby potatoes is not ideal. The sauce may separate and lose its creamy texture when thawed. If you must freeze them, use a freezer-safe container. Make sure to leave some space for expansion. When ready to eat, thaw them in the fridge overnight and reheat gently on the stovetop. Creamy garlic sauce baby potatoes will last about 3 to 5 days in the fridge. Store them in an airtight container. Make sure the dish is fully cooled before sealing. This helps keep the flavors fresh and the texture intact. If you notice any off-smells or changes in color, it’s best to discard them. Yes, you can prepare creamy garlic sauce baby potatoes ahead of time. To do this, cook the potatoes and sauce separately. Store them in separate containers in the fridge. When ready to eat, reheat them together. This keeps the potatoes from becoming too soggy. You can also make the sauce a day prior to save time. These creamy potatoes pair well with many dishes. You can serve them with grilled chicken for protein. They also go great with roasted vegetables for a colorful plate. A simple green salad adds freshness and crunch to the meal. For a heartier option, try them alongside steak or fish. This recipe for creamy garlic sauce baby potatoes is a true delight. We covered the key ingredients, step-by-step cooking, and helpful tips. You learned how to reach a perfect creamy texture and enhance flavor. Plus, we explored fun variations and smart storage methods. Experiment with proteins or spices to match your taste. Don't forget to try making it vegan if you prefer. Enjoy serving this dish to family and friends, and get ready for compliments!

Creamy Garlic Sauce Baby Potatoes Savory Side Dish

Looking for a side dish that pops with flavor? Try my creamy garlic sauce baby potatoes! With a few simple

When I make Honey Garlic Shrimp and Broccoli, I love using fresh and simple ingredients. Here’s what you’ll need for this savory delight: - 1 lb (450g) large shrimp, peeled and deveined - 2 cups broccoli florets - 1 tablespoon olive oil - 4 cloves garlic, finely minced - 1/4 cup honey - 1 tablespoon low-sodium soy sauce - 1 teaspoon sesame oil - 1 tablespoon fresh ginger, grated - Salt and freshly ground black pepper, to taste - Toasted sesame seeds, for garnish - Chopped green onions, for garnish Each ingredient plays a key role. The shrimp provide protein and a nice texture. Broccoli adds color and crunch. Honey gives a sweet touch, while garlic and ginger bring bold flavors. I always use low-sodium soy sauce to keep things healthier. Sesame oil adds a nutty flavor that makes all the difference. For garnish, I love toasted sesame seeds and chopped green onions. They not only look great but also add extra taste. If you want to make this dish, check out the Full Recipe for all the details! To sauté shrimp perfectly, start with a large skillet or wok. Heat the olive oil over medium heat until it shimmers. This helps the shrimp cook evenly. Next, add minced garlic and ginger. Sauté them for about one minute. You want them fragrant but not burnt. Now, raise the heat to high and add the shrimp. Cook them for 2-3 minutes. Stir them frequently. They should turn pink and opaque. This color means they are ready. For the broccoli, you can steam or blanch it. I prefer blanching because it keeps the bright color. Boil water in a pot and add the florets. Cook for 2-3 minutes. The broccoli should be tender-crisp. Drain it right away and set it aside. This method preserves both color and texture. Now, let’s create the honey garlic sauce. In a small bowl, mix honey, soy sauce, and sesame oil. Whisk until smooth. Once the shrimp are cooked, pour the sauce over them. Stir to coat evenly. Let it simmer for one minute. Next, gently add the steamed broccoli to the skillet. Toss everything together. Heat it through for an additional minute. Finally, adjust the seasoning. Add salt and freshly ground black pepper to taste. For the full recipe, check back to the ingredients section. To make the best honey garlic shrimp, focus on cooking techniques. Start with fresh shrimp. Look for shrimp that feel firm and smell sweet, not fishy. When you cook shrimp, the key is to avoid overcooking. Overcooked shrimp turn rubbery. You want them to be pink and opaque. Cook them for just 2-3 minutes. Common mistakes include cooking shrimp with too much heat. High heat can burn the garlic and ginger. Always add these first in a hot pan to unleash their flavor. Stir them often and watch closely. Remove them from heat as soon as they smell great. For extra flavor, add spices and herbs. Ginger adds warmth and depth. You can also use crushed red pepper for a kick. Fresh herbs like cilantro or basil bring a bright note. Choosing the right soy sauce matters. Low-sodium soy sauce works best for this dish. It adds saltiness without overpowering other flavors. You can also use tamari for a gluten-free option. A splash of rice vinegar can brighten the flavors, too. For the complete recipe, check out the [Full Recipe]. {{image_4}} You can switch the shrimp for chicken or tofu. Chicken gives a nice taste and is easy to cook. Tofu is great for a plant-based meal. Just cut it into bite-sized pieces. For veggies, try bell peppers, snap peas, or carrots. Each brings a new crunch and color. You can mix and match to keep things fun. Want more heat? Add red pepper flakes or a splash of hot sauce. Start with a little, then taste. You can always add more but can't take it out. To change the sweetness, add more honey or a splash of orange juice. For tang, a little rice vinegar works well. Just a dash can brighten the dish. Explore these options to make the recipe your own. The full recipe is a great starting point, but these ideas let you get creative! To keep your honey garlic shrimp and broccoli fresh, follow these tips: - Refrigeration: Place leftovers in an airtight container. This keeps moisture in and prevents odors. They stay good for 2-3 days. - Freezing: For longer storage, freeze in a freezer-safe bag. Squeeze out the air before sealing. This helps prevent freezer burn. You can store it for up to 3 months. When you want to enjoy your dish again, here are some easy methods: - Stovetop: Heat in a skillet over low heat. Stir often to warm evenly. - Microwave: Place in a microwave-safe dish. Cover it loosely to avoid spills. Heat in short bursts, stirring in between. To ensure food safety, always check that shrimp reaches 165°F when reheating. This keeps your meal safe and tasty. Cooking honey garlic shrimp takes about 10 minutes. If you sauté shrimp, it takes 2-3 minutes. You want them pink and firm. Steaming or blanching broccoli adds another 2-3 minutes. So, in total, you can have a tasty meal in just 15 minutes. Yes, you can prepare honey garlic shrimp in advance. Cook the shrimp and broccoli, then let them cool. Store them in a sealed container in the fridge for up to two days. When ready to eat, just reheat them gently on the stove. This keeps them fresh and tasty. Honey garlic shrimp pairs well with many sides. Here are some ideas: - Steamed rice for a classic touch - Fluffy quinoa for a healthy option - Noodles for a filling meal - A fresh green salad for balance - Stir-fried vegetables for extra crunch These sides will enhance your meal and make it even more enjoyable. For more details, check the full recipe. This guide showed you how to make honey garlic shrimp. We covered the ingredients, cooking steps, and storage tips. You now have useful tips to enhance flavor and try variations. Making this dish is simple and rewarding. Enjoy cooking and sharing it with others. Your meals can be full of flavor and nutrition. Trust in your skills and creativity in the kitchen. With practice, you’ll serve amazing dishes every time. Keep exploring new recipes and enjoy the process!

Honey Garlic Shrimp and Broccoli Savory Delight

Are you ready to take your taste buds on a delightful journey? Today, I’ll share a quick and easy recipe

To make a No-Bake Chocolate Eclair Cake, you will need: - 1 box (14 oz) Graham crackers - 2 packages (3.4 oz each) instant vanilla pudding mix - 4 cups chilled milk - 1 container (8 oz) whipped topping (like Cool Whip) - 1 cup powdered sugar - 1/2 cup unsweetened cocoa powder - 1/2 cup unsalted butter, softened - 1 tablespoon pure vanilla extract - A pinch of salt You can easily swap some ingredients if needed. Here are a few ideas: - Graham crackers: You can use digestive biscuits or vanilla wafers for a different base. - Instant vanilla pudding: Try chocolate pudding for a richer flavor. - Whipped topping: If you prefer homemade, use heavy cream whipped to soft peaks. - Unsalted butter: Salted butter works too; just skip the added salt. - Powdered sugar: You can blend granulated sugar to make your own powdered sugar. To create this tasty dessert, gather these tools: - A spacious mixing bowl - A whisk for blending - A spatula for folding and spreading - A 9x13 inch baking pan for layering - Plastic wrap to cover the cake - A knife for cutting the cake into squares These ingredients and tools will help you make a delicious No-Bake Chocolate Eclair Cake. For the full recipe, check out the details above. Start by grabbing a big mixing bowl. Add the instant vanilla pudding mix and chilled milk. Whisk these together until they blend well. This step is important to avoid lumps. Let the mixture sit for about 2-3 minutes. It will thicken into a creamy pudding. Once it’s ready, take a spatula and gently fold in the whipped topping. This makes it light and fluffy. Set this vanilla pudding mixture aside for later. Now, let’s make the chocolate frosting. In a medium bowl, combine softened butter, powdered sugar, cocoa powder, vanilla extract, and a pinch of salt. Use a mixer to beat these ingredients together. Mix until fluffy and smooth. This frosting adds a rich, chocolatey flavor to your cake. Make sure it’s well mixed, so every bite is tasty. Now comes the fun part: layering! Start by lining the bottom of a 9x13-inch baking pan with a layer of Graham crackers. This forms a solid base. Next, spread half of the vanilla pudding mixture over the crackers. Smooth it out to cover evenly. Place another layer of Graham crackers on top of the pudding. Add the rest of the vanilla pudding mixture and smooth it again. Top this with one last layer of Graham crackers. Finally, spread the chocolate frosting over the last layer. Make sure it’s even and smooth. Cover the pan tightly with plastic wrap and chill it in the fridge for at least 4-6 hours. For best results, let it sit overnight. This lets all the flavors blend. When it’s time to serve, slice it into squares. Enjoy your delicious no-bake chocolate eclair cake! For the full recipe, check out the earlier section. To get the best texture for your cake, follow these steps: - Whisk the instant pudding mix with cold milk well. - Let it sit for 2-3 minutes to thicken. - Gently fold in the whipped topping. This keeps it light and fluffy. - Avoid over-mixing; this can make the mixture too runny. Here are some common errors that can ruin your cake: - Not letting the pudding thicken properly before mixing. - Skipping the cooling time in the fridge. This step is crucial. - Using warm milk instead of chilled milk, which can affect the pudding. - Overloading on frosting can make it too sweet. Balance is key! Making your cake look great adds to the joy of eating it: - Use a decorative platter to show off the layers. - Dust the top with cocoa powder for a nice touch. - Add chocolate shavings for a fun twist. - Serve with a dollop of whipped topping for extra flair. For a full recipe with detailed steps, check the [Full Recipe]. {{image_4}} You can brighten your No-Bake Chocolate Eclair Cake with fruits. Berries are a great choice. Strawberries, raspberries, or blueberries add color and taste. Just layer the fruit between the Graham crackers and pudding. You can also top the cake with fresh fruit before serving. This makes it look pretty and adds a fresh flavor. Think about mixing flavors for a unique twist. Try chocolate pudding instead of vanilla for a richer taste. You could also use coffee-flavored pudding for a mocha vibe. For a tropical touch, use coconut cream or pineapple pudding. Each option brings a new taste to the cake, keeping it exciting. You can make this cake fit different diets. For a gluten-free version, swap the Graham crackers for gluten-free cookies. There are many tasty options available. To make it dairy-free, use almond or coconut milk in the pudding. Also, choose a dairy-free whipped topping. These changes allow everyone to enjoy this dessert. Check the [Full Recipe] for more details on ingredients. After making your No-Bake Chocolate Eclair Cake, store it in the fridge. Cover the cake tightly with plastic wrap or foil. This keeps it fresh and prevents it from absorbing other flavors. The cake needs to chill for at least 4-6 hours, but overnight is best. This allows the layers to soften and blend well. If stored properly in the fridge, your cake will last for about 3-5 days. Keep an eye on it for any signs of spoilage. If you notice any off smells or changes in texture, it’s best to toss it. You can freeze the No-Bake Chocolate Eclair Cake, but it might change the texture. To freeze, cut the cake into pieces. Wrap each piece tightly in plastic wrap and then in foil. This helps avoid freezer burn. It can last for up to 2 months in the freezer. When ready to eat, thaw it in the fridge overnight. Enjoy the Full Recipe for all the details! Yes, you can use different types of pudding. Chocolate pudding will give a richer taste. You might also try butterscotch or banana pudding for a fun twist. Each option offers a unique flavor. Just remember to match the pudding with your favorite toppings. To make this cake ahead of time, prepare it a day in advance. Follow all the steps, then cover it tightly. Place it in the fridge overnight. The longer it chills, the better the flavors blend. This way, you save time on the day you want to serve it. You can serve this cake with fresh fruit like berries or sliced bananas. A scoop of vanilla ice cream pairs well too. For a special touch, drizzle chocolate or caramel sauce on top. These add flavor and make the dessert look stunning. You can make your own whipped cream if you prefer. Just whip heavy cream with a little sugar and vanilla. This adds a fresh taste and texture. If you use Cool Whip, it’s quick and easy, giving a nice creamy layer. Both options work well in this recipe. You've learned how to make a delicious No-Bake Chocolate Eclair Cake. We covered the key ingredients, simple steps, and helpful tips. You can add variations like fruits or alternative flavors to make it your own. Remember to store it correctly for the best taste later. Enjoy sharing this delightful cake at your next gathering! Your guests will love it, and you’ll feel proud of your creation. Keep experimenting and have fun in the kitchen!

No-Bake Chocolate Eclair Cake Easy and Delicious Recipe

Craving a sweet treat that’s both simple and indulgent? Let me introduce you to my No-Bake Chocolate Eclair Cake! This

- 12 large sea scallops, thoroughly patted dry - 2 tablespoons high-quality olive oil - Salt and freshly ground black pepper, to taste - Zest of 1 lemon - Juice of 1 lemon - 1 tablespoon unsalted butter - 2 cloves garlic, finely minced - 2 tablespoons fresh parsley, finely chopped - 1 tablespoon fresh chives, finely chopped - Microgreens for garnish (optional) For my version of Gordon Ramsay’s pan-seared scallops, I focus on quality. Start with large sea scallops. They should be dry, so pat them with paper towels. This helps create a nice crust when cooking. You will need olive oil for cooking. I recommend high-quality oil for the best flavor. Salt and freshly ground black pepper are key for seasoning. For brightness, add the zest and juice of one lemon. This balances the dish well. Butter and garlic add richness. The butter helps to baste the scallops, making them juicy and flavorful. Fresh herbs like parsley and chives give a pop of color and fresh taste. Microgreens are optional but they look great as a garnish. This simple list creates a delicious, elegant dish. For the full recipe, check the provided link. Enjoy cooking! To start, you need to dry the scallops thoroughly. Use paper towels and press gently. This step is key for a great sear. After they are dry, season both sides with salt and black pepper. This simple seasoning enhances their natural flavor. Next, set up your cooking space. Choose a large, heavy skillet. This type of pan holds heat well, which is important for searing. Add two tablespoons of high-quality olive oil to the skillet. Heat it over medium-high heat until it shimmers. This shows the oil is hot and ready for the scallops. Now, it’s time to sear the scallops. Carefully place them in the hot skillet. Make sure not to overcrowd the pan. If your pan is small, cook in batches. This helps them sear properly. Let the scallops cook without moving them. Sear for about 2-3 minutes. You want to see a nice, golden crust form. After this time, gently flip the scallops over using tongs or a spatula. This ensures they cook evenly on both sides. To add depth to the dish, you will infuse flavor with garlic and butter. Once you flip the scallops, add one tablespoon of unsalted butter and two minced garlic cloves to the pan. As the butter melts, it creates a rich sauce. Use a spoon to baste the scallops with the garlic butter. This technique allows the scallops to soak up the flavors. Keep cooking for another 1-2 minutes, then drizzle fresh lemon juice over the scallops. Finish with lemon zest for a bright touch. When done, the scallops should feel firm yet springy. Remove them from the skillet and place them on a plate. Pour the remaining garlic herb butter over the top. For a lovely finish, sprinkle with fresh parsley and chives. You can even add microgreens for a pop of color. You can find the full process in the Full Recipe, which guides you through each step beautifully. How do you know when scallops are done? Scallops cook quickly. Look for a golden crust on the outside and a firm but springy center. They should feel moist, not dry. If you cook them too long, they turn rubbery. Trust your touch and the color. How can you avoid common mistakes? First, always dry your scallops well. Moisture prevents a good sear. Second, don’t overcrowd the pan. This traps steam and ruins the crust. Lastly, resist the urge to flip them too soon. Let them sear for 2-3 minutes before turning. What pans and utensils are best for searing scallops? A heavy-bottomed skillet works best. Cast iron or stainless steel pans are great choices. They hold heat well and create a nice crust. Use silicone or wooden utensils to avoid scratching the pan. Why is high-quality oil important? Good oil has a high smoke point. This means it can handle heat without burning. Olive oil is perfect for scallops. It adds flavor and helps with browning. Always choose extra virgin for the best taste. What are some elegant serving suggestions? Serve scallops on a bed of sautéed spinach or arugula. This adds color and flavor. You can also use a drizzle of lemon butter sauce for a shiny finish. Garnish with herbs like parsley and chives for extra flair. What complementary sides enhance the dish? Pair scallops with light sides. Think about asparagus, green beans, or a fresh salad. A simple risotto or creamy polenta also works well. Choose sides that won’t overpower the delicate taste of scallops. {{image_4}} You can change the flavor of scallops by using different herbs and spices. Instead of parsley and chives, try dill or tarragon for a fresh twist. You can also add a pinch of red pepper flakes for some heat. These options add depth without overpowering the scallops' natural taste. Citrus can also play a big role. If you want a change from lemon, try lime or orange zest. Both options brighten the dish and give a unique twist. You could even mix citrus juices for a fun flavor blend. Pairing your scallops with sides can elevate the meal. Consider serving them with creamy risotto or a light salad. Both options complement the scallops well. You can also add roasted vegetables for a colorful plate. For plating, think about height and color. Stack scallops on a bed of sautéed spinach or arrange them around a scoop of pureed peas. Use microgreens for a nice touch that adds freshness. These details make your dish stand out and look appealing. For the full recipe, follow the steps given. Enjoy creating your gourmet scallops! To store leftover scallops, cool them first. Place them in an airtight container. Put them in the fridge. They will stay fresh for up to two days. When reheating, use low heat to keep them tender. A skillet works best. Add a splash of water or broth to help with moisture. This way, you won’t lose their great flavor. Yes, you can freeze scallops. However, fresh scallops work best. If they are cooked, cool them down first. Then, wrap them tightly in plastic wrap. After that, place them in a freezer bag or container. This step helps avoid freezer burn. When you want to use them, thaw them in the fridge overnight. Avoid thawing them in warm water, as this can change their texture. Scallops cook quickly. You need about 2-3 minutes per side. Heat your pan to medium-high. This helps create a nice golden crust. Overcooking makes them rubbery. Look for a firm texture. They should feel springy when done. Yes, you can use frozen scallops. But fresh ones are best. If using frozen, thaw them first. Place them in the fridge overnight or use cold water. After thawing, pat them dry. This helps get a good sear. Remember, frozen scallops may have more water, so be careful. Pair scallops with light sides. Think sautéed spinach or arugula. These add color and flavor. You could also try a citrus salad. A white wine like Sauvignon Blanc works great too. It complements the scallops nicely. You can find Gordon Ramsay's full pan-seared scallops recipe online. It includes all steps and tips for success. The Full Recipe will guide you to make delicious scallops at home. In this blog post, we covered everything you need for perfect pan-seared scallops. You learned about key ingredients, preparation steps, and cooking methods. I shared tips to avoid common mistakes and enhance flavor. We explored variations and creative plating ideas. Storing leftovers and freezing techniques were also discussed. Mastering scallops elevates your cooking skills and impresses guests. Enjoy experimenting with these methods and tips to create delicious meals!

Gordon Ramsay’s Pan-Seared Scallops Flavorful Dish

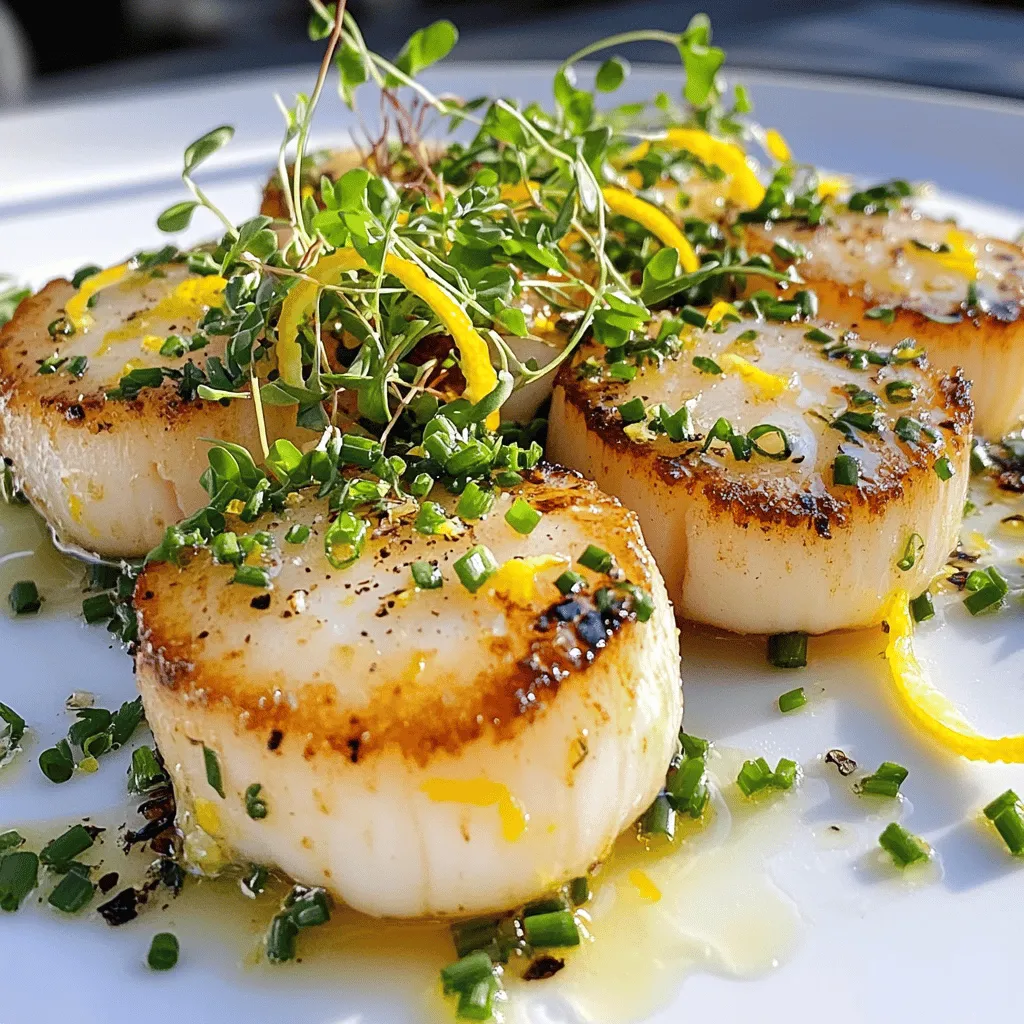
If you want to impress your friends with a restaurant-quality dish, you need to try Gordon Ramsay’s pan-seared scallops. This

To make Huli Huli chicken, you need simple yet flavorful ingredients. Here’s what you will need: - 4 chicken thighs, skinless and boneless - 1/2 cup soy sauce - 1/4 cup packed brown sugar - 1/4 cup fresh pineapple juice - 2 tablespoons apple cider vinegar - 2 tablespoons sesame oil - 3 cloves garlic, minced - 1 tablespoon fresh ginger, grated - 1/2 teaspoon freshly ground black pepper These ingredients combine to create a sweet and savory taste that is truly unique. The marinade is key to the flavor of Huli Huli chicken. The soy sauce adds saltiness, while the brown sugar gives sweetness. Fresh pineapple juice brightens the taste. Apple cider vinegar adds a hint of tang, and sesame oil brings a nutty aroma. Garlic and ginger enhance the mix with their bold flavors. Each component works together to create a deep, rich taste. To make your dish even better, consider adding garnishes. You can use: - 2-3 green onions, finely sliced - 1 whole fresh pineapple, cut into rings, for grilling Grilled pineapple adds a sweet contrast to the savory chicken. Sliced green onions add color and freshness. Serve the chicken on a big platter with grilled pineapple on the side for a beautiful presentation. Check out the Full Recipe for more tips! To start, gather your ingredients. You will need soy sauce, brown sugar, pineapple juice, apple cider vinegar, sesame oil, garlic, ginger, and black pepper. In a large bowl, mix these ingredients. Use a whisk to blend until the sugar dissolves. This creates a smooth marinade that adds great flavor to the chicken. Next, take your chicken thighs and place them in a resealable bag or a shallow dish. Pour the marinade over the chicken. Make sure every piece is well coated. Seal the bag or cover the dish tightly. Refrigerate for at least one hour, but overnight is best. This wait allows the chicken to soak up all the tasty flavors. When you're ready to grill, preheat your grill to medium-high heat. Remove the chicken from the marinade and toss the leftover marinade away. Place the chicken on the grill. Cook for about 6-7 minutes on each side. The chicken is done when it reaches 165°F (75°C). To add a fun twist, grill fresh pineapple rings for 2-3 minutes on each side. This caramelizes the sugars and enhances the flavor. After grilling, let the chicken rest for a few minutes for the best taste. Slice it, serve with the grilled pineapple, and enjoy your delicious Huli Huli chicken! To make your Huli Huli chicken shine, start with the marinade. It blends sweet, salty, and tangy. Use these tips: - Fresh Ingredients: Always use fresh garlic and ginger. These add depth. - Marination Time: Marinate for at least one hour. Overnight is even better. - Balance Flavors: Adjust the brown sugar or vinegar to suit your taste. Cooking chicken safely is key. Here’s how: - Preheat the Grill: Set your grill to medium-high heat before cooking. - Use a Thermometer: Check the chicken's internal temp. It should reach 165°F (75°C). - Avoid Cross-Contamination: Discard the marinade after use. Never reuse it. A good look adds to the taste. Make your dish pop: - Plate Artfully: Slice the chicken into strips. Arrange it neatly on a platter. - Add Color: Place grilled pineapple rings around the chicken. Use bright green onions on top. - Garnish Smartly: A sprinkle of green onions adds freshness and crunch. These tips will help you make a flavorful and safe Huli Huli chicken meal that looks as good as it tastes. For the complete recipe, check the Full Recipe. {{image_4}} You can switch chicken for other proteins. Try pork, beef, or shrimp. Each protein brings a unique taste. For a vegetarian option, use tofu or tempeh. Marinate them just like you would the chicken. The flavors will soak in and create a delicious dish. Feel free to mix up the marinade. Add spicy elements like chili flakes or sriracha for heat. You can also play with sweeteners. Use honey or maple syrup instead of brown sugar. For a tropical twist, add coconut milk or lime juice too. These changes can elevate your Huli Huli chicken experience. Huli Huli chicken is versatile when it comes to serving. Serve it over rice for a filling meal. You can also pair it with a fresh salad. The crunch of veggies balances the juicy chicken. For a fun touch, serve it in a taco or wrap. The options are endless! For the full recipe, check out the details above. To keep your leftover Huli Huli chicken tasty, store it in the fridge. Place it in an airtight container. Make sure it's cool before sealing it. This helps prevent moisture loss. Huli Huli chicken can last up to four days in the fridge. If you want to enjoy it later, freezing is a great option. When freezing Huli Huli chicken, use freezer-safe bags. Remove as much air as possible before sealing. Label the bags with the date. This way, you know when you made it. You can freeze the chicken for up to three months. When you’re ready to eat, just thaw it overnight in the fridge. To reheat Huli Huli chicken, use the oven or stovetop for the best results. Preheat your oven to 350°F (175°C). Place the chicken in a baking dish and cover it with foil. Heat for about 15-20 minutes. If using the stovetop, warm it in a pan over medium heat. Add a splash of water or broth to keep it moist. Avoid the microwave, as it can make the chicken dry. Enjoy your flavorful leftovers! Huli Huli Chicken comes from Hawaii. The name "Huli Huli" means "turn" in Hawaiian. This dish started in the 1950s. It was created by a local chef, Ernest Morgado. He grilled chicken with a sweet and savory sauce. The sauce uses soy sauce, sugar, and pineapple juice. This blend gives the chicken a unique taste. The dish became popular at Hawaiian luaus and gatherings. Today, people love it all over the world. To add heat to Huli Huli Chicken, include spicy ingredients. You can mix in crushed red pepper flakes or hot sauce. Adding fresh chili peppers also works well. Another option is to use spicy mustard in the marinade. Start with a small amount. Taste as you go to find the right heat level. This way, you can enjoy a spicy kick without overpowering the dish. The best Huli Huli Chicken is often found in Hawaii. Local food trucks and restaurants serve it fresh. Try places that specialize in Hawaiian cuisine. Some festivals and fairs also feature Huli Huli Chicken stands. If you can’t travel to Hawaii, look for recipes online. You can make your own at home using the Full Recipe. This way, you can enjoy a taste of Hawaii anytime! Huli Huli chicken offers a delicious blend of flavors and techniques. We covered its essential ingredients, how to marinate and grill it, plus tips for safety and style. Don't forget the fun variations and storage tips to enjoy this dish later. With a few simple steps, you can create a tasty meal. Take your time and savor the process. Enjoy cooking, and let this dish bring joy to your table!

Huli Huli Chicken Hawaiian Delicacy Flavor Explosion

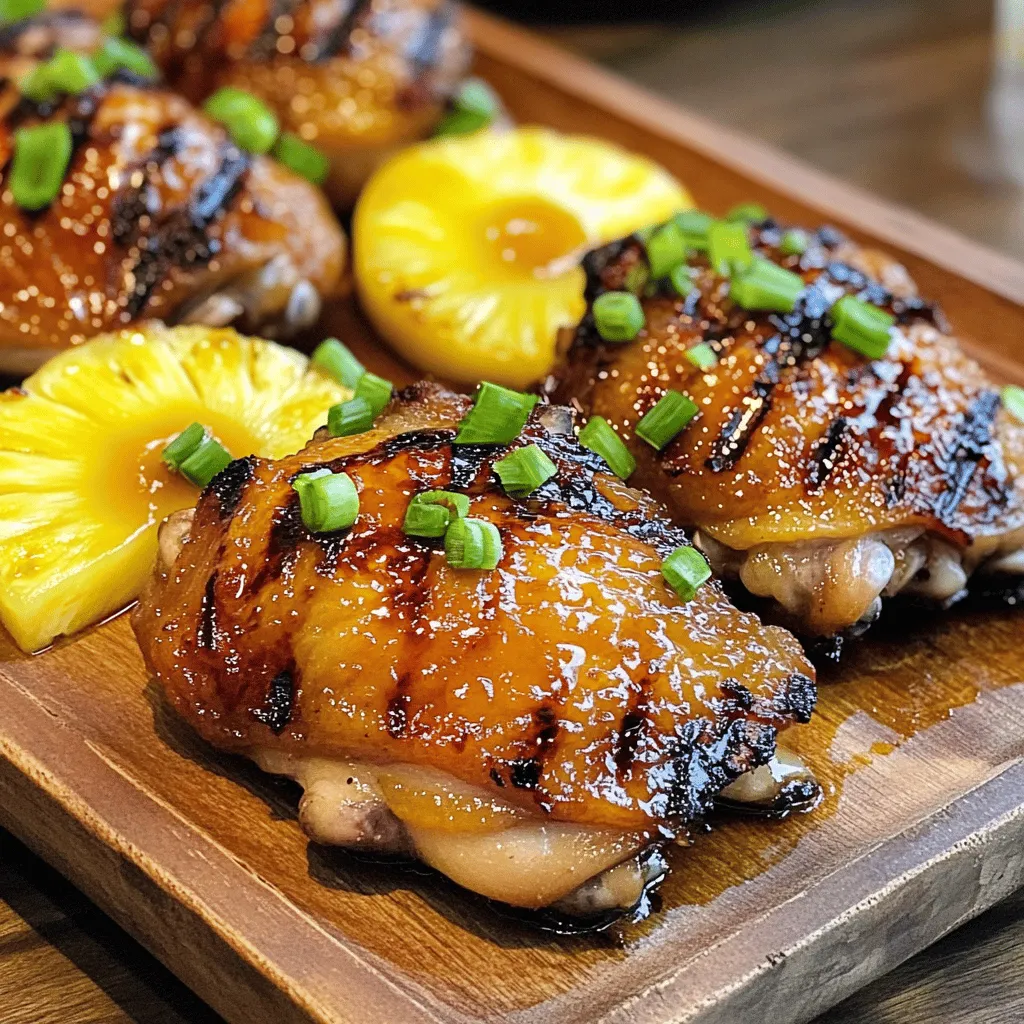
Are you ready to experience the flavor explosion of Huli Huli Chicken? This Hawaiian dish brings rich, savory notes that

- 1 pound large shrimp, peeled and deveined - 4 medium zucchinis, spiralized into noodles - 4 cloves garlic, minced - 2 tablespoons olive oil - 1 tablespoon unsalted butter - 1 cup cherry tomatoes, halved These main ingredients create the heart of the dish. The shrimp provide a nice protein boost. Zucchini noodles are a great low-carb alternative to pasta. They soak up the flavors well, making them a perfect base. Garlic adds a rich aroma and taste, while cherry tomatoes bring a sweet burst of freshness. - 1 tablespoon fresh lemon juice - 1 teaspoon red pepper flakes (adjust to taste) - Salt and pepper to taste - Fresh parsley, finely chopped (for garnish) - Zest of 1 lemon (for an extra zing) Seasonings elevate the dish. Fresh lemon juice brightens the flavors. Red pepper flakes add a nice kick. Salt and pepper are essential for balancing flavors. Garnishing with parsley adds a pop of color and freshness. Lemon zest enhances the overall taste, making each bite lively. - A splash of white wine - A sprinkle of grated Parmesan cheese - A handful of spinach or kale These optional ingredients can make your dish even better. Adding white wine brings depth and richness. Parmesan cheese adds a creamy, salty note. Spinach or kale can boost the veggie content and bring more nutrients. Feel free to mix and match based on what you like! To start, you need to make the zucchini noodles. Grab four medium zucchinis. Use a spiralizer to turn them into noodle shapes. If you don’t have a spiralizer, a vegetable peeler works too. Just make thin, ribbon-like strips instead. After spiralizing, set the noodles aside. This step is quick and easy, and it keeps your dish light and fresh. Now, let’s move to the skillet. Pour 2 tablespoons of olive oil and add 1 tablespoon of unsalted butter to a large skillet. Heat it over medium heat until the butter melts. Next, add 4 minced garlic cloves. Stir for about 30 seconds, so it gets fragrant. Watch closely to avoid burning. Burnt garlic can ruin your dish. Then, add 1 pound of large, peeled, and deveined shrimp. Season with salt, pepper, and 1 teaspoon of red pepper flakes. Cook for 2-3 minutes until the shrimp turn pink and opaque. Now, it’s time to add flavor. Toss in 1 cup of halved cherry tomatoes. Cook for another 2 minutes, allowing them to soften. This will add a nice sweetness to your dish. Once the tomatoes soften, gently fold in the zucchini noodles. Mix everything well, cooking for another 2-3 minutes. You want the noodles to heat through but still stay slightly crunchy. After that, remove the skillet from heat. Drizzle with 1 tablespoon of fresh lemon juice and the zest of 1 lemon. Toss it all together to blend the flavors. Before serving, taste your dish. Adjust the seasoning with more salt, pepper, or red pepper flakes as needed. Plate your shrimp scampi in shallow bowls. Garnish with finely chopped parsley for color and extra flavor. Enjoy your meal! To spiralize zucchini, you need a spiralizer. Place the zucchini in the tool and twist. This will create long, noodle-like strips. Make sure to press down gently. If you don’t have a spiralizer, use a vegetable peeler. Cut thin, wide strips instead. This method takes a bit longer but will still give you creamy noodles. Cooking shrimp takes just a few minutes. Heat your skillet on medium heat. Add olive oil and butter, then garlic. Once the garlic smells great, add shrimp. Keep an eye on the color. Cook until they turn pink and opaque. Remove them as soon as they are done. Overcooked shrimp turn rubbery. Serve your skinny shrimp scampi in shallow bowls. This makes the dish look fancy. You can add a lemon wedge on the side. This adds freshness and a burst of flavor. Pair this dish with a crisp salad or whole-grain bread. These sides complement the lightness of the scampi well. For more fun, check out the Full Recipe for extra tips! {{image_4}} If you want to mix things up, try different veggies. You can use spaghetti squash for a similar texture. Cauliflower rice also works great and adds fiber. Carrots can be spiralized too, giving a sweet twist. Each of these choices brings new flavors and crunch to your dish. While shrimp shines in this dish, you can switch proteins easily. Chicken breast is a lean choice and cooks well in the same sauce. Scallops provide a sweet taste that pairs nicely. For a plant-based option, try chickpeas, which add protein and make the dish hearty. Herbs and spices can elevate your shrimp scampi. Fresh basil adds a nice touch, giving it an Italian flair. For a kick, use cayenne pepper in place of red pepper flakes. You might also enjoy adding fresh thyme for a subtle earthiness. Feel free to experiment with flavors that you love! After enjoying your skinny shrimp scampi, you might have some leftovers. To store them, use an airtight container. Place the shrimp and zucchini noodles together or separately, but it's best to keep them in the same dish for flavor. Make sure to cool the food to room temperature before sealing the container. This step helps prevent moisture and keeps your dish fresh. Store it in the fridge for up to three days. To reheat your leftovers, the stovetop is the best option. Heat a skillet on medium-low heat. Add a splash of olive oil or a little water to the pan to prevent sticking. Place the leftovers in the skillet. Stir gently until heated through. This method keeps the shrimp tender and the zucchini noodles firm. Avoid the microwave if you can; it often makes shrimp rubbery and zucchini too soft. If you want to save your dish for a later date, freezing is a good choice. First, let the dish cool completely. Then, portion it into freezer-safe containers. You can also use freezer bags for easier storage. Be sure to remove as much air as possible. Your skinny shrimp scampi can last for up to three months in the freezer. When you're ready to enjoy it, thaw it overnight in the fridge before reheating. For an easy meal, have the Full Recipe on hand to recreate the magic! Zucchini noodles, or "zoodles," are made from fresh zucchini. They are a great low-carb substitute for regular pasta. Zoodles have a light, fresh taste and a crunchy texture. They absorb flavors well and cook quickly. Unlike wheat pasta, they have fewer calories and carbs, making them a healthier choice. You can spiralize zucchini with a tool or a peeler. This dish tastes great with shrimp and the other ingredients in the recipe. Yes, you can prepare parts of this dish ahead of time. You can spiralize the zucchini and store it in the fridge for a few hours. The shrimp can also be prepped and marinated in advance. However, I recommend cooking the dish fresh for the best taste. Zoodles can become soggy if left too long after cooking. If you must store leftovers, keep them in an airtight container in the fridge for up to two days. To change the spice level, you can adjust the red pepper flakes. Start with a smaller amount if you prefer less heat. You can always add more later. You can also add other spices like black pepper for extra warmth or even a pinch of cayenne for a bolder kick. Just remember to taste as you go to find the right balance for your palate. You can find the Full Recipe for Skinny Shrimp Scampi with Zucchini Noodles in the article above. It includes all the ingredients and step-by-step instructions to make this healthy and tasty dish. Enjoy your cooking! In this blog post, I covered how to make Skinny Shrimp Scampi with zucchini noodles. You learned about key ingredients, cooking steps, and tips for the best results. I also shared variations and storage methods to help you enjoy your meal later. By following these steps, you can create a healthy and tasty dish. Experiment with flavors and enjoy the new ways to cook shrimp. Don't be afraid to make this recipe your own!

Skinny Shrimp Scampi with Zucchini Noodles Delight

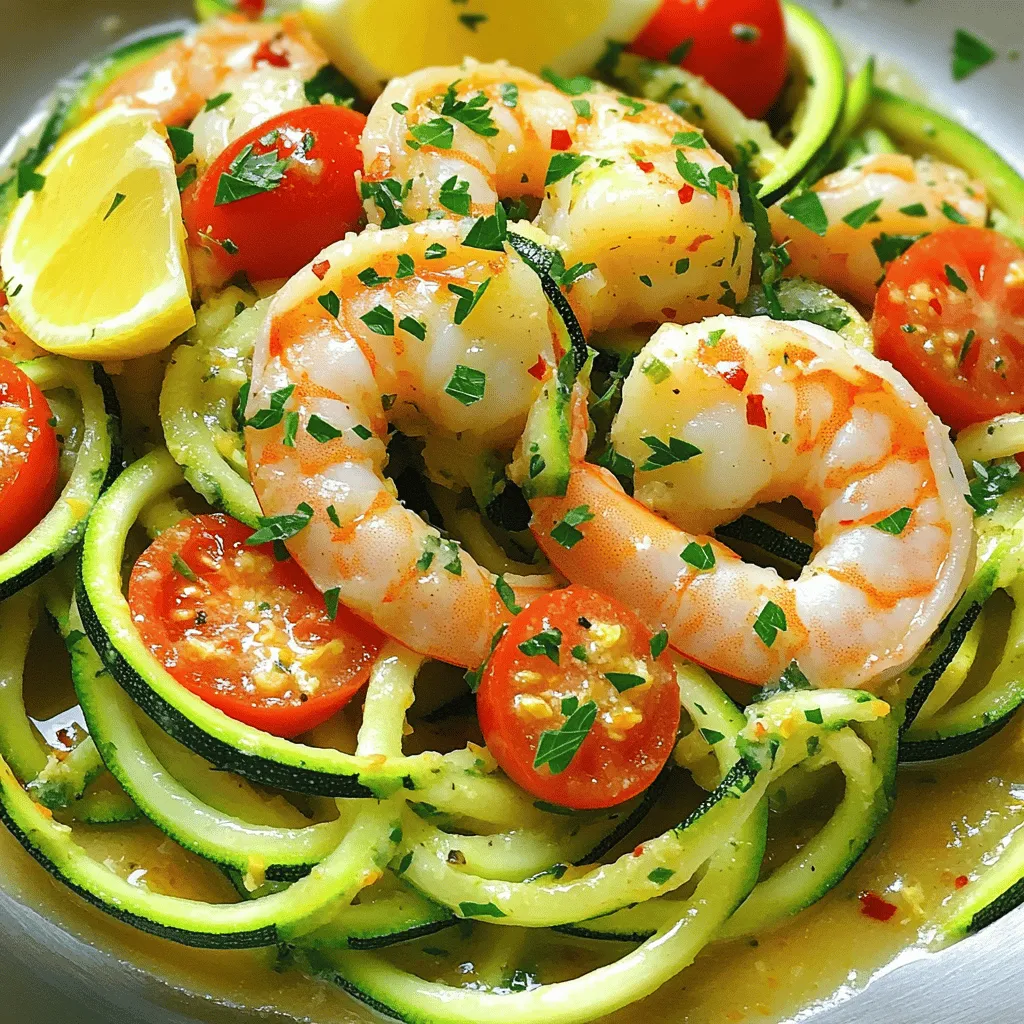
Welcome to a light and tasty take on a classic dish: Skinny Shrimp Scampi with Zucchini Noodles! If you love

- Boneless, skinless chicken breasts - Extra virgin olive oil - Garlic cloves - Smoked paprika - Creamy Greek yogurt - Mayonnaise - Fresh lemon juice - Fresh parsley - Onion powder - Dried oregano - Sea salt and cracked black pepper - Skewers When I make grilled chicken bites, I start with fresh, high-quality chicken. I prefer boneless, skinless chicken breasts for their tenderness. They cook evenly and absorb flavors well. Next, I use extra virgin olive oil as a base for my marinade. It adds a rich flavor and helps keep the chicken moist. Fresh garlic cloves are a must. Minced garlic gives the chicken a nice kick. I also add smoked paprika for a hint of smokiness. For the garlic sauce, I love creamy Greek yogurt. It makes the sauce tangy and rich. I mix in mayonnaise for creaminess and fresh lemon juice for brightness. Fresh parsley adds color and a bit of freshness. I season the chicken with onion powder and dried oregano. Sea salt and cracked black pepper enhance the flavors. Lastly, I use skewers to grill the chicken bites. Soaking wooden skewers in water prevents burning on the grill. This ingredient blend creates a flavor-packed dish. You can find the full recipe in the main article. - In a large bowl, combine 4 tablespoons of olive oil, 1 teaspoon of smoked paprika, 1 teaspoon of onion powder, and 1 teaspoon of dried oregano. - Add a pinch of sea salt and freshly cracked black pepper to taste. - Finally, add 3 minced garlic cloves. Whisk everything together until well mixed. - Toss 1.5 lbs of bite-sized chicken pieces into the marinade. - Gently mix until the chicken is fully coated. - Cover the bowl with plastic wrap and refrigerate for at least 30 minutes. This helps the flavors soak in. - In a separate bowl, whisk together 1/4 cup of creamy Greek yogurt, 1 tablespoon of mayonnaise, and 2 tablespoons of freshly squeezed lemon juice. - Add 2 teaspoons of finely chopped fresh parsley and 1 minced garlic clove. - Season with a pinch of sea salt and cracked black pepper. Adjust the taste to your liking. - Preheat your grill to medium-high heat. - Carefully thread the marinated chicken pieces onto soaked skewers, leaving space between each piece. - Place the skewers on the grill and cook for 10-12 minutes, turning occasionally. The chicken should be cooked through with nice grill marks. - After grilling, let the chicken rest for about 5 minutes. - Serve the warm grilled chicken bites drizzled with the garlic sauce or with the sauce on the side for dipping. For the full recipe, check out the detailed instructions above. Enjoy your cooking! To get the best grilled chicken bites, set your grill to medium-high heat. This keeps the chicken juicy while giving it nice grill marks. To check for doneness, use a meat thermometer. The chicken should reach 165°F (75°C). If you don't have a thermometer, cut one piece open. The meat should be white and juices should run clear. For the best flavor, marinate the chicken for at least 30 minutes. If you have time, let it sit for 2 hours or more. This helps the chicken soak up the spices. You can also try adding spices like chili powder or cumin for a twist. They bring more depth to the dish. To make your dish look tempting, arrange the skewers on a large platter. Place them in a circle or line for a neat display. Add lemon wedges and fresh parsley around the chicken for color. For extra flair, serve the zesty garlic sauce in a small bowl in the center. This invites guests to dip their chicken bites. {{image_4}} You can add many vegetables to your chicken skewers. Here are some great options: - Bell peppers - Zucchini - Cherry tomatoes - Red onion - Mushrooms These veggies add color and flavor. They also cook well with chicken. To grill vegetables, cut them into even pieces. This helps them cook at the same rate. Brush them with olive oil and sprinkle with salt before grilling. This enhances taste and helps with sticking. You can mix up the flavors with different marinades. Try these options: - Lemon and herbs - Honey and soy sauce - Yogurt and spices You can also make it spicy. Add red pepper flakes or hot sauce to the marinade. These changes can give your chicken a whole new taste. Want to keep it light? You can swap some ingredients. Use these healthier options: - Replace mayonnaise with low-fat yogurt - Use less oil in the marinade - Add more herbs instead of salt For grilling, try using a grill pan or air fryer. These methods can help reduce added fats. You can still enjoy tasty chicken bites without the extra calories. To keep your grilled chicken bites fresh, use airtight containers. Glass or plastic containers work well. Make sure they are clean and dry before storing. Place the chicken in a single layer if possible. This helps it cool and stay fresh longer. Store the chicken in the fridge for up to four days. If you want to keep it longer, consider freezing it. Wrap the chicken tightly in plastic wrap and place it in a freezer-safe bag. This way, it can last up to three months. To reheat without drying out, use low heat. The oven or stovetop works best. If using the oven, preheat it to 350°F (175°C). Place the chicken on a baking sheet. Cover it with foil to keep moisture in. Heat for about 10-15 minutes or until warm. If using a skillet, add a splash of water. Cover and cook on low heat. This also keeps the chicken juicy. Avoid using the microwave, as it can make chicken rubbery. Enjoy your flavorful grilled chicken bites again! You can serve grilled chicken bites with many tasty sides. Here are some great options: - Fresh garden salad - Roasted vegetables - Steamed rice or quinoa - Garlic bread - Coleslaw - Crispy potato wedges These sides add color and flavor to your meal. They also balance the savory taste of the chicken bites. Yes, you can use thighs! Chicken thighs have more fat than breasts. This means they can be juicier and more flavorful. The texture is also a bit different. Thighs may take longer to cook. Keep an eye on them to avoid overcooking. You can marinate chicken for 30 minutes to 24 hours. For short marinating, 30 minutes is enough. For deeper flavor, marinate for several hours or overnight. Make sure to keep the chicken in the fridge while it marinates. This keeps it safe to eat. No, the garlic sauce is not spicy. It has a creamy and tangy flavor. The garlic adds a nice kick, but it’s not hot. If you want some heat, you can add red pepper flakes or hot sauce. This way, you can adjust the spice level to your taste. This post walked you through making tasty grilled chicken bites. We covered key ingredients, step-by-step instructions, and helpful tips. I shared ways to store leftovers and answer common questions. Perfecting grilled chicken is all about simple steps and flavor. Enjoy your meal with friends or family. Trying new variations can make it even better. Embrace your creativity in the kitchen, and happy grilling!

Grilled Chicken Bites with Garlic Sauce Delight

Get ready to indulge in a dish that’s both tasty and fun to make! My Grilled Chicken Bites with Garlic

- 500g boneless, skinless chicken thighs, cut into bite-sized pieces - 1/3 cup pure honey - 2 tablespoons low-sodium soy sauce - 1 tablespoon rice vinegar - 2 cloves garlic, finely minced - 1 teaspoon fresh ginger, finely grated - 1 tablespoon cornstarch - 1 tablespoon water - 2 tablespoons sesame oil - Sea salt and freshly cracked black pepper, to taste - Toasted sesame seeds and chopped green onions, for garnish For this sticky honey chicken recipe, the main flavors come from chicken thighs, honey, and soy sauce. The chicken thighs are juicy and tender, making them perfect for this dish. Honey adds sweetness, while soy sauce gives a savory touch. The additional ingredients enhance the flavor. Rice vinegar adds a bit of tang. Garlic and ginger bring warmth and depth. Cornstarch mixed with water helps thicken the sauce, making it stick to the chicken. For garnishing, sesame oil gives a rich finish. Sea salt and black pepper balance the taste. Finally, toasted sesame seeds and green onions add crunch and color. These simple yet flavorful ingredients create a dish you’ll love. You can find the complete recipe in the Full Recipe section. Seasoning the chicken Start by cutting your chicken thighs into bite-sized pieces. This helps them cook evenly. Season the chicken well with sea salt and freshly cracked black pepper. Make sure every piece is coated. This step is vital because it builds flavor. Making the sauce In a medium bowl, combine the honey, soy sauce, rice vinegar, minced garlic, and grated ginger. Use a whisk to mix these ingredients until they are well blended. The sauce should smell amazing, and it will add a sweet and tangy flavor to the chicken. Sautéing the chicken Heat sesame oil in a large skillet over medium-high heat. Once the oil is hot and shimmering, add the seasoned chicken pieces. Sauté the chicken for about 5-7 minutes. Stir occasionally to ensure they cook evenly. You want them to turn golden brown and be cooked through. Thickening the sauce Next, lower the heat to medium. Pour the honey sauce you made earlier over the cooked chicken. Gently stir to coat each piece with the sauce. In a small bowl, mix cornstarch with 1 tablespoon of water to create a smooth slurry. Gradually add this to the skillet while stirring. Keep stirring for 2-3 minutes until the sauce thickens nicely. Finishing cooking Let the dish cook for one more minute. This ensures the chicken is heated through and fully coated in the sticky, rich sauce. The aroma will fill your kitchen and make your mouth water. Serving suggestions Remove the skillet from heat. Transfer the sticky honey chicken to a serving platter. For a lovely presentation, garnish with toasted sesame seeds and chopped green onions. Pair this dish with steamed jasmine rice or stir-fried veggies for a complete meal. Enjoy every bite! If you want more details, check out the Full Recipe. - Best practices for seasoning: Always season your chicken thighs well. Use sea salt and fresh black pepper. This makes the chicken tasty and helps it brown nicely. - Tips for achieving perfect caramelization: Heat your skillet first. Use sesame oil until it shimmers. Add chicken in a single layer. Avoid overcrowding the pan for even browning. - How to make the sauce stick better: Make a cornstarch slurry. Mix cornstarch with water until smooth. Add this to the sauce while stirring. It thickens and helps the sauce cling. - Adjusting sweetness or saltiness: Taste the sauce before serving. If too sweet, add a bit of soy sauce. If too salty, balance it with a little more honey. - Presentation ideas: Use a bright plate to show off the chicken. Garnish with green onions and sesame seeds. This adds color and texture to your dish. - Suggested side dishes: Pair with steamed jasmine rice or stir-fried vegetables. These sides complement the rich, sticky sauce and create a well-rounded meal. For the full recipe, see the Sticky Honey Chicken Delight. {{image_4}} You can change the protein in this dish. Chicken thighs work well, but you can also use chicken breasts. If you want something different, try using shrimp or tofu. Each option brings its own flavor and texture. For a gluten-free option, swap regular soy sauce for tamari. Tamari has a similar taste, and it works well in this recipe. You can also use coconut aminos for a sweeter flavor. Want a kick? Add some chili flakes or sriracha to the sauce. This will give your sticky honey chicken a spicy twist. You could also try adding chopped jalapeños for a fresh heat. Experiment with aromatics. Instead of garlic, try adding shallots for a milder flavor. You can also use lemongrass for a zesty touch that pairs nicely with honey. If you're watching carbs, use a sugar substitute like erythritol. This keeps the sweetness without the extra carbs. You can also skip the cornstarch if you want a lighter sauce. For a vegan version, replace chicken with firm tofu or tempeh. Use maple syrup instead of honey for the sweet flavor. This way, you can enjoy the same great taste while keeping it plant-based. To keep your sticky honey chicken fresh, store it in an airtight container. Place the chicken in the fridge as soon as it cools. It can last about 3-4 days this way. If you want to store it for longer, try freezing it. First, let it cool completely. Then, place it in a freezer-safe bag or container. It can stay good in the freezer for about 2-3 months. When you’re ready to enjoy your leftovers, you can reheat them in two ways: the microwave or the stovetop. If you use the microwave, place the chicken in a bowl and cover it. Heat it in 30-second intervals until warm. This is quick but may make the chicken a bit softer. If you prefer the stovetop, heat a skillet over medium heat. Add a splash of water to help steam the chicken. Stir it often until heated through. This keeps the texture better and brings back that sticky sauce. Sticky honey chicken can last in the fridge for about 3-4 days. If you freeze it, it can last 2-3 months. Always check for signs of spoilage. Look for an off smell or any change in color. If it seems off, it’s best to toss it. Enjoy your cooking and make sure to check out the full recipe for more details! Can I use chicken breast instead of thighs? Yes, you can use chicken breast. It will cook faster. Chicken breasts may be less juicy than thighs. For best results, cut them into similar-sized pieces. This helps them cook evenly. How can I make it spicier? To add heat, mix in red pepper flakes. You can also use sriracha or hot sauce. Start with a small amount, then taste and adjust. This way, you control the spice level. What type of honey is best for this recipe? I recommend pure, raw honey for the best flavor. It gives a richer taste. You can use clover or wildflower honey as good alternatives. Avoid honey blends with added sugars. Can I use bottled minced garlic instead of fresh? Yes, bottled minced garlic works if you're short on time. One teaspoon of bottled garlic equals one clove of fresh garlic. Keep in mind that fresh garlic has a brighter flavor. How do I know when the chicken is fully cooked? Check the chicken's internal temperature with a meat thermometer. It should reach 165°F (75°C). If you cut a piece, the juices should run clear. No pink should be visible. What to do if my sauce is too thick? If the sauce is too thick, add a little water. Stir well to combine. You can also add more soy sauce or vinegar for flavor. Adjust gradually until you reach your desired consistency. This blog post covered how to make sticky honey chicken with clear steps and tips. You learned the main and additional ingredients, seasoning, and cooking methods. I shared best practices for getting the perfect flavor and texture. You also found variations and storage tips for leftovers. Remember, cooking is about fun and creativity. Don’t be afraid to experiment with flavors and make this dish your own! Enjoy your cooking journey!

Sticky Honey Chicken Sensation Quick Recipe to Try

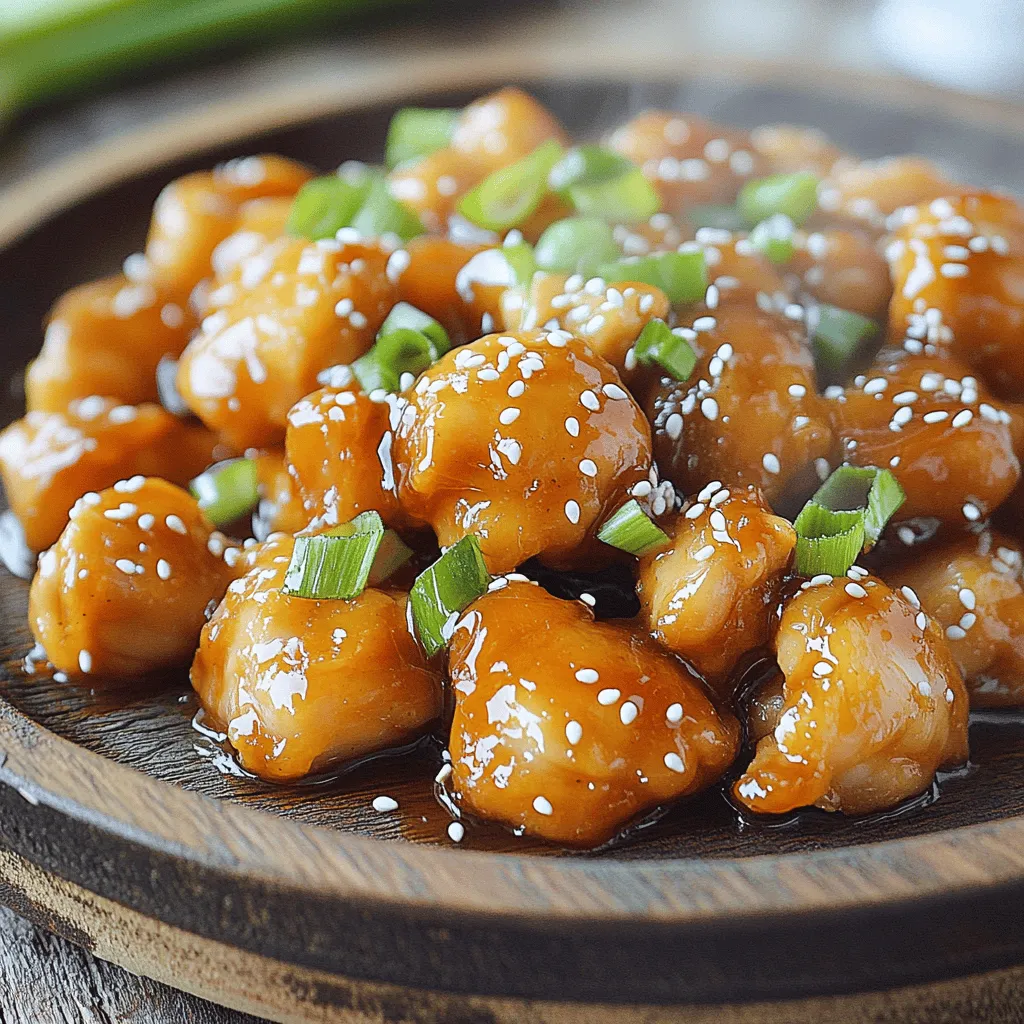
Looking for a quick and tasty recipe? Try this Sticky Honey Chicken! With just a few simple ingredients like chicken

- 1 cup jasmine rice - 2 cups coconut milk - 1 cup whole milk or almond milk To make this pudding, start with jasmine rice. This rice gives a nice texture and flavor. Coconut milk adds that rich, creamy taste. You can also use whole milk or almond milk for a dairy-free version. - 1/2 cup granulated sugar - 1 teaspoon vanilla extract - 1/2 teaspoon ground cinnamon For sweetness, granulated sugar works best. You can adjust this to your liking. Vanilla extract adds a lovely aroma, while ground cinnamon gives warmth and spice. - 1/4 cup shredded coconut - Fresh mango slices - Assorted berries Toppings make it fun! Shredded coconut adds crunch. Fresh mango slices bring sweetness. You can also use berries like strawberries or blueberries for a burst of color. For the complete recipe, visit the [Full Recipe]. Enjoy making this delightful dish! Begin by rinsing the jasmine rice under cold water. Place the rice in a fine-mesh strainer. Rinse it until the water runs clear. This step is key. It removes excess starch. Removing the starch helps the rice cook evenly and keeps it fluffy. In a medium saucepan, combine the rinsed rice with coconut milk, whole milk, sugar, and sea salt. Stir the mixture well to blend all the ingredients. Set the heat to medium and bring it to a simmer. You will see small bubbles forming on the surface. Once you reach this point, lower the heat and cover the saucepan. Let it cook for 20 to 25 minutes. Stir occasionally. This prevents the rice from sticking to the bottom. The rice will become tender, and the pudding will thicken. After cooking, remove the saucepan from the heat. Stir in pure vanilla extract and ground cinnamon. These ingredients add a wonderful aroma and depth of flavor. Cover the saucepan and let it sit for 5 minutes. This resting time allows the flavors to meld beautifully. Now, you're ready to serve! Dish out the rice pudding warm or chilled. Top it with toasted shredded coconut and fresh mango slices or berries. For the complete recipe, check the Full Recipe section. Choosing the right rice is key. I recommend jasmine rice for its soft texture. It absorbs the coconut milk well and brings a lovely aroma. Cooking techniques matter, too. Start by rinsing the rice under cold water. This step removes excess starch, which helps keep the pudding creamy and fluffy. Sweetening to taste is important. You can adjust the sugar based on your liking. If you want a richer flavor, add more sugar. For toppings, use fresh or toasted coconut. Toasting enhances the taste and adds a crunchy texture. You can also try fresh fruit like mango or berries for extra flavor. You can serve this pudding warm or chilled. Warm pudding feels cozy, while chilled is refreshing. For plating, use a clear bowl to show off the layers. Garnish with toasted coconut and fresh fruit for a beautiful presentation. This adds visual appeal and elevates the dessert experience. For the full recipe, check out the detailed instructions above! {{image_4}} You can easily make this coconut rice pudding dairy-free. Just swap whole milk with almond or more coconut milk. This keeps the pudding creamy and rich. To maintain flavor, use full-fat coconut milk. It gives a nice texture and taste. Want to jazz up your pudding? You can add spices like nutmeg or cardamom. These spices pair well with coconut. They add warmth and depth to the flavor. You can also play with tropical flavors. Think about adding pineapple or passion fruit for a fun twist. Garnishing your pudding can make it pop! Use fresh fruits like mango, strawberries, or blueberries. They add color and sweetness. You can also turn the pudding into a parfait. Layer rice pudding with fruits and whipped cream for a fun treat. This makes for a beautiful dessert that everyone will love. Coconut rice pudding lasts about 4 to 5 days in the fridge. To store it, let the pudding cool down first. Once cool, transfer it to an airtight container. This helps keep the pudding fresh and prevents it from drying out. Yes, you can freeze coconut rice pudding! It stays good for about 2 months in the freezer. To freeze, place it in a freezer-safe container, leaving some space at the top. When you’re ready to enjoy it, move it to the fridge for a slow thaw. To refresh the texture, stir in a little coconut milk or whole milk before serving. This adds creaminess back to the pudding. You can also sprinkle on more toasted coconut or fresh fruit like mango slices or berries for a tasty twist. These toppings add color and flavor, making your pudding look and taste even better. Enjoy your creamy delight! Coconut milk and coconut cream come from the same fruit but differ in texture. Coconut milk is thinner and creamier. It works well in soups and curries. Coconut cream is thick and rich. It’s great for desserts and making whipped toppings. In this recipe, I use coconut milk for a smooth pudding. Yes, you can use brown rice, but it will change the dish. Brown rice takes longer to cook, about 40-50 minutes. It also gives a chewier texture, unlike the soft jasmine rice. Rinse the brown rice the same way and adjust your cooking time accordingly. To lower the sugar, you can use natural sweeteners. Consider using honey or maple syrup. Use half the amount of sweetener to start. You can always add more if needed. This keeps the pudding tasty without being too sweet. This blog post shared how to make delicious coconut rice pudding. We discussed key ingredients like jasmine rice, coconut milk, and sweeteners. I explained steps to cook the pudding and tips for perfect texture. You learned about flavor variations and how to store leftovers. Now, you can create a tasty treat that suits your style. Enjoy experimenting with toppings and flavors. Trust me, you'll love sharing this pudding with family and friends!

Coconut Rice Pudding Disney Copycat Creamy Delight

If you’re craving a sweet, creamy treat, I have a delightful solution for you: Coconut Rice Pudding! This Disney copycat

- 8 oz rotini pasta - 1 cup cooked crab meat (fresh or canned) - 1/2 cup cherry tomatoes, halved - 1/2 cup sweet corn (canned or frozen) - 1/2 cup diced cucumber - 1/4 cup red onion, finely chopped - 1/4 cup mayonnaise - 1 tablespoon Dijon mustard - 1 tablespoon freshly squeezed lemon juice - Salt and freshly ground black pepper to taste - Fresh parsley or dill, for garnish When I make my Super Easy Crab Pasta Salad, I keep these ingredients close. First, I grab the rotini pasta. It holds sauces well and adds a fun twist. I then choose crab meat, which can be fresh or canned. Both options taste great. Adding halved cherry tomatoes gives a sweet pop of flavor. Next, I include sweet corn for a touch of sweetness. Diced cucumber adds crunch, while red onion gives depth. For the dressing, I mix mayonnaise with Dijon mustard and lemon juice. This blend is creamy yet tangy. I finish with salt and pepper to boost the flavors. I always use fresh parsley or dill as a garnish. It makes the dish look pretty. For the full recipe, check out the instructions. Enjoy the taste of this easy dish! - Bring salted water to a boil. - Cook rotini pasta until al dente, about 8-10 minutes. Start by filling a large pot with water. Add a good amount of salt. This helps flavor the pasta. Once the water bubbles, add the rotini. Stir it gently. You want it to cook evenly. Check the package for timing. Al dente means the pasta is firm but tender. After cooking, drain the pasta. Rinse with cold water to stop cooking and cool it down. - Combine crab meat, tomatoes, corn, cucumber, and onion. - Gently fold the ingredients. In a large mixing bowl, add the cooked crab meat. I like to use fresh crab, but canned works too. Then, add the halved cherry tomatoes. Toss in the sweet corn, diced cucumber, and chopped red onion. Use a spatula to mix gently. You want to keep the crab meat in larger pieces. - Whisk together mayo, Dijon, and lemon juice. - Season to taste with salt and pepper. In a small bowl, combine the mayonnaise, Dijon mustard, and lemon juice. Whisk until it’s smooth and creamy. This dressing adds a nice tang. Taste it and adjust the salt and pepper as you like. I often add a bit more lemon juice for brightness. - Add cooled pasta to the salad mix. - Drizzle dressing and toss gently. Now, take the cooled rotini pasta and add it to the salad mix. Pour the dressing over everything. Use a large spoon to toss gently. This helps coat all the ingredients well. Make sure everything is mixed but avoid breaking the crab meat. - Cover and refrigerate for flavors to meld. - Recommended resting time of 30 minutes. Cover the bowl with plastic wrap or a lid. Place it in the fridge for at least 30 minutes. Chilling lets the flavors blend together. It makes the salad taste even better when served cold. - Toss before serving. - Garnish with parsley or dill. Before serving, give the salad a light toss. This ensures all ingredients are mixed. For a nice touch, sprinkle some chopped parsley or dill on top. It adds color and a fresh taste. Enjoy your Super Easy Crab Pasta Salad! For the complete list of steps, check the Full Recipe. When making crab pasta salad, you can use either fresh or canned crab meat. Fresh crab meat tastes great but can be pricey. Canned crab meat is a great choice for a quick meal. It is also easy to find. Look for lump crab meat for a nice texture. You can use different types of crab meat in salads. Blue crab, Dungeness, and King crab all work well. Each type has its own flavor and texture. Choose what you like best! Rotini pasta is the classic choice for this salad. It holds the dressing well and pairs nicely with crab. However, you can try other pasta shapes too. Fusilli, penne, or farfalle are all fun options. If you need a gluten-free option, look for gluten-free pasta. Many brands offer great flavors and textures. You can find them in most grocery stores. To add depth to your crab pasta salad, think about extra ingredients. Chopped bell peppers, avocado, or olives can give your dish a fresh twist. You could also add some herbs like basil or chives for more flavor. For the dressing, you can spice it up too. Add a dash of hot sauce for heat, or include zest from a lemon for brightness. A little garlic can also enhance the taste. Feel free to mix and match to find your favorite flavors! For the full recipe, check out the Super Easy Crab Pasta Salad section. {{image_4}} You can easily add more veggies to this crab pasta salad. Vegetables boost flavor and nutrition. Here are some ideas: - Bell Peppers: Diced red or yellow bell peppers add crunch and sweetness. - Spinach: Fresh spinach gives a nice green color and taste. - Peas: Sweet peas can add a pop of color and sweetness. For seasonal variations, try: - Asparagus in spring. Just steam and chop it. - Zucchini in summer. Raw or grilled, it works well. - Roasted Brussels Sprouts in fall. They add a unique flavor. If you want to switch from crab, there are plenty of options. - Shrimp: Cooked shrimp is a great seafood option. It adds a nice bite. - Lobster: For a touch of luxury, try lobster meat. - Tuna: Canned tuna is easy and quick, and it adds a robust taste. For a meat-free salad, consider: - Chickpeas: They add protein and fiber, making the dish hearty. - Tofu: Firm tofu can be cubed and mixed in for a plant-based option. - Avocado: Creamy avocado gives healthy fats and a delicious flavor. The dressing can change the whole dish. You can choose between creamy or vinaigrette styles. - Creamy Dressing: Use more mayonnaise or add sour cream for richness. - Vinaigrette Dressing: Mix olive oil, vinegar, and herbs for a lighter taste. For unique dressings, try: - Thai Peanut Sauce: This gives a fun twist with a nutty flavor. - Cilantro-Lime Dressing: This adds a fresh burst of flavor. - Honey Mustard: A sweet and tangy mix can brighten up the salad. Feel free to explore these options. They can make your crab pasta salad even more exciting! For the full recipe, check out the Super Easy Crab Pasta Salad section. After making your crab pasta salad, store it in the fridge. Use an airtight container to keep it fresh. This salad will stay good for about 3 to 4 days. Always check for any changes in smell or appearance before eating. You can freeze crab pasta salad, but it might change in texture. If you want to freeze it, place it in a freezer-safe container. Leave some space for expansion. To thaw, move it to the fridge for a few hours or overnight. Avoid thawing it at room temperature to keep it safe. If you prefer warm pasta, reheat it gently. Place the salad in a microwave-safe bowl. Heat it in short bursts, about 30 seconds at a time. Stir in between to ensure even warming. Avoid overheating, as it can dry out the crab and ruin the flavor. Crab pasta salad lasts about 3 to 5 days in the fridge. Store it in a sealed container for best results. Make sure to check for freshness before serving. If it smells off or looks strange, it’s best to toss it. Yes, you can use many types of pasta. Rotini works well, but penne, fusilli, or even bowtie pasta are great too. Just choose a pasta shape you like. The cooking time may vary, so follow the package instructions. This recipe is great for meal prep! You can make it ahead and store it in the fridge. Just keep the dressing separate if you want it fresh. Mix the dressing in right before you eat for the best taste. Fresh crab meat is the best option for flavor. If fresh is not available, canned crab works well too. Look for lump crab meat for a nice texture. It adds a sweet, rich taste to the salad. Absolutely! You can make this salad up to a day ahead. Just store it in the fridge with a lid. The flavors get better as they sit. Just give it a gentle toss before serving to mix it well. You can find the full recipe in the article to guide you. This crab pasta salad is a delightful mix of fresh ingredients and flavors. We covered the essential components, from cooking rotini to making a creamy dressing. Remember, you can customize it with extra veggies or other proteins. Storing leftovers is easy, and you can even freeze them. Whether you choose fresh or canned crab, enjoy the process and share this tasty dish. Dive in, get creative, and let your salad shine.

Super Easy Crab Pasta Salad Quick and Tasty Dish

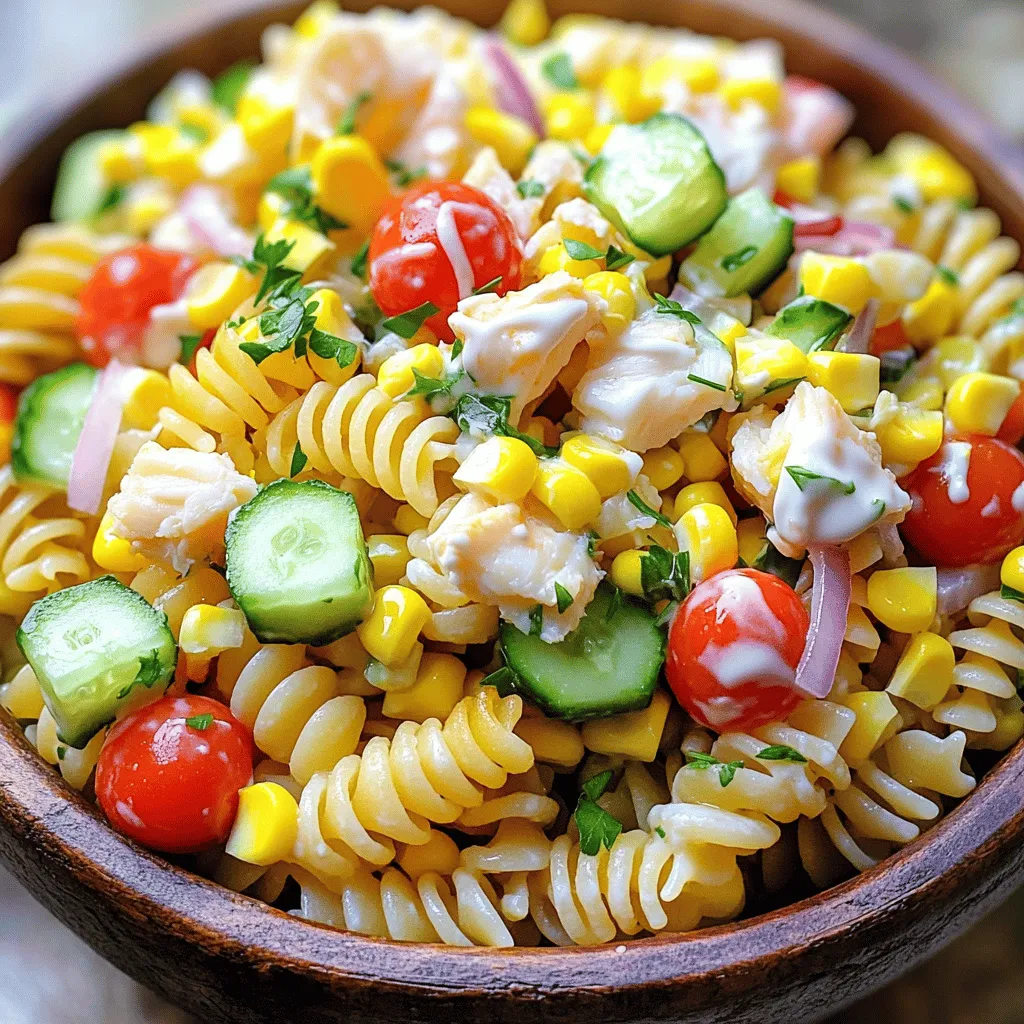
If you’re looking for a quick and tasty dish, this Super Easy Crab Pasta Salad is for you! With just

Older posts
Newer posts
← Previous Page1 … Page27 Page28 Page29 … Page44 Next →

dsad

© 2025 lazychefmagic • Built with GeneratePress

Our Policies

  • Copyright Policy
  • Cookie Policy
  • GDPR Policy
  • Privacy Policy
  • Disclaimer
  • Terms Of Use

More Information

  • Home
  • About
  • Contact
  • Appetizers
  • Dessert
  • Dinner
  • Drinks
©2025, lazychefmagic About Back To Top