Skip to content
DisclaimerTerms Of UseGDPR PolicyCookie Policy

lazychefmagic

  • Home
  • Drinks
  • Appetizers
  • Dinner
  • Dessert
  • About
  • Contact
  • Privacy Policy
DisclaimerTerms Of UseGDPR PolicyCookie Policy

Amanda

When making a creamy banana dessert, you need fresh and simple ingredients. Here’s what you will use: - Ripe bananas - Mascarpone cheese - Greek yogurt - Sweeteners (honey or maple syrup) - Vanilla extract - Ground cinnamon Each ingredient plays a key role. Ripe bananas add natural sweetness and a smooth texture. Mascarpone cheese gives a rich and creamy base. Greek yogurt adds tang and lightness. Sweeteners balance flavors, while vanilla and cinnamon enhance the overall taste. You might wonder, why use ripe bananas? When bananas ripen, they become sweeter and softer. This makes them perfect for desserts. Using mascarpone cheese is great because it is thick and creamy. It pairs well with Greek yogurt, which adds creaminess and protein. Honey or maple syrup can be adjusted to your taste. You can use one or both! Don’t forget the spices! Vanilla extract brings warmth, while ground cinnamon adds depth. By combining these ingredients, you set the stage for a delightful treat. Check the full recipe to see how to put it all together! 1. Mixing creamy ingredients: Start by gathering your ingredients. In a medium bowl, mix the mascarpone cheese, Greek yogurt, honey, vanilla extract, and ground cinnamon. I recommend using a whisk. It helps create a smooth texture. Blend until no lumps remain. This step makes the dessert creamy. 2. Layering bananas and cream mixture: Take your sliced bananas. Place half of them at the bottom of each serving bowl. This layer adds flavor and sweetness. Next, spoon half of the creamy mixture over the bananas. Spread it evenly with a spatula. Repeat this process with the remaining bananas and cream. This layering gives the dessert a nice look and taste. 3. Refrigeration for optimal texture: After layering, cover the bowls with plastic wrap. Chill them in the fridge for about 30 minutes. This time allows the flavors to mingle. It also helps the dessert firm up a bit. A well-chilled dessert tastes better and feels more refreshing. 1. Presentation ideas for guests: When ready to serve, consider using clear cups. This adds a fun twist and showcases the beautiful layers. Guests will enjoy seeing the bananas and cream. Presentation matters when impressing friends and family. 2. Using clear cups for visual appeal: Clear cups also make it easy to serve. You can prepare these in advance. This method saves time when guests arrive. Plus, it looks fancy without extra effort. 3. Mint garnish as a finishing touch: Just before serving, add a fresh mint leaf on top. This simple touch adds color and a hint of freshness. It makes your creamy banana dessert even more inviting. Enjoy your delightful treat! 1. Overmixing the creamy mixture: Mix until just smooth. Overmixing can make it too runny. 2. Improper layering techniques: Layer evenly to keep the dessert beautiful and balanced. 3. Chilling time for flavor melding: Chill for at least 30 minutes. This helps the flavors blend well. 1. Adding spices or extracts: Try a pinch of nutmeg or a splash of almond extract for extra depth. 2. Incorporating chocolate or nuts: Add chocolate chips or chopped nuts for a delightful crunch. 3. Creative ways to use leftover ingredients: Use leftover bananas in smoothies or oatmeal for a tasty boost. Enjoy these tips for making your creamy banana dessert even better! For the full recipe, check the complete guide. {{image_4}} You can explore different takes on this creamy banana dessert. Here are a few fun ideas: - Banana pudding variation: Swap the mascarpone cheese for vanilla pudding. Layer it with sliced bananas and whipped cream. This gives you a classic banana pudding in a new form. - Banana cream pie version: Use a pie crust instead. Layer the bananas and creamy filling into a pie shell. Top it with whipped cream for a delightful twist. - Vegan alternative using coconut cream: Replace the mascarpone cheese and Greek yogurt with coconut cream. This gives a rich, creamy texture while keeping it plant-based. When making your dessert, you can change a few ingredients to suit your needs or tastes: - Substituting Greek yogurt with plant-based options: Try almond yogurt or soy yogurt for a dairy-free version. These options still keep the dessert creamy. - Different sweetener choices: While honey works well, you can use agave syrup or stevia. This allows you to adjust sweetness to your liking. - Using dairy-free cream alternatives: Almond cream or cashew cream can replace mascarpone cheese. They add a rich flavor without dairy. Feel free to mix and match these ideas. Your creamy banana dessert can be as unique as you want! For more detailed instructions and a full list of ingredients, check out the Full Recipe. To keep your creamy banana dessert fresh, place any leftovers in the fridge. Use an airtight container to lock in moisture. This will help maintain the creamy texture. If you don’t have an airtight container, cover your bowl tightly with plastic wrap. Avoid letting the dessert sit out for too long. The bananas can turn brown, and the cream may get watery. To prevent sogginess, layer the granola on top just before serving. This keeps it crunchy and delightful. You can freeze the prepared dessert if you want to save some for later. First, spoon the dessert into freezer-safe containers. Leave some space at the top of the container for expansion. Cover it tightly to prevent freezer burn. When you're ready to enjoy it, thaw the dessert in the fridge overnight. Avoid thawing it at room temperature, as this can change the texture. Be aware that freezing may make the bananas softer. They might lose some of their fresh taste, but the dessert will still be tasty. For more ideas and tips, check out the [Full Recipe]. To ripen bananas fast, you can use a few simple tricks. Place them in a brown paper bag. This traps ethylene gas, speeding up the ripening. You can also place bananas near apples or avocados. These fruits also release ethylene. Make sure to store bananas at room temperature. Avoid the fridge unless they are very ripe. Cold can stop the ripening process. Yes, ripe bananas work best for this dessert. Their sweetness makes the dish taste great. Ripe bananas also blend well, giving a smooth texture. If your bananas are overripe, don't worry! You can use them in smoothies or pancakes. They are perfect for baked goods, like banana bread. This dessert is great for kids! It has healthy ingredients, like bananas and yogurt. Bananas give kids energy and are full of vitamins. You can make it sweeter by adding more honey or using chocolate. Just keep in mind that some kids may prefer less spice. Adjust the cinnamon to suit their taste. For the full recipe, check out the Creamy Banana Bliss section above! This blog gave you a tasty overview of making a delicious banana dessert. We covered key ingredients like ripe bananas and mascarpone cheese. You learned step-by-step instructions for mixing and layering. Tips helped you avoid common mistakes and enhance flavor. We also explored fun variations and best storage practices. Now, you can impress guests with your new dessert skills. Remember to use ripe bananas for the best taste. Enjoy experimenting with flavors and make this dish your own!

Creamy Banana Dessert Delight Easy and Delicious Treat

Craving a sweet treat that’s easy to make? Look no further! This creamy banana dessert delight is a crowd-pleaser, packed

- 2 cups all-purpose flour - 1 tablespoon baking powder - ½ teaspoon garlic powder - ½ teaspoon onion powder - 1 teaspoon salt - ½ teaspoon black pepper - ½ cup cold unsalted butter, cubed - 1 cup shredded sharp cheddar cheese - ¾ cup buttermilk - 1 cup lump crab meat - ⅓ cup cream cheese - 1 tablespoon fresh lemon juice - 2 tablespoons chopped fresh parsley - 1 tablespoon Old Bay seasoning For this recipe, each ingredient plays a key role. The all-purpose flour gives structure. Baking powder helps the biscuits rise. Garlic and onion powders add flavor. Salt and black pepper enhance the taste. Cold butter keeps the biscuits flaky. Sharp cheddar cheese gives a rich flavor. Buttermilk adds moisture and tang. Lump crab meat is the star of the show. Cream cheese adds creaminess to the filling. Lemon juice brightens the flavors. Fresh parsley adds color and freshness. Old Bay seasoning gives that classic seafood kick. - Alternatives for crab meat: You can use shrimp or lobster if you prefer. - Vegan options for cream cheese: Look for plant-based cream cheese at your local store. - Gluten-free flour choices: Use a gluten-free all-purpose blend for a similar texture. These substitutions keep the dish tasty for various diets. You still get delicious flavors and a fun meal. Enjoy experimenting with these options! To start, preheat your oven to 425°F (220°C). This heat will help your biscuits rise and get golden. Next, line your baking sheet with parchment paper. This will keep your biscuits from sticking. Now, let’s mix the dry ingredients. In a big bowl, whisk together: - 2 cups all-purpose flour - 1 tablespoon baking powder - ½ teaspoon garlic powder - ½ teaspoon onion powder - 1 teaspoon salt - ½ teaspoon black pepper Make sure everything is mixed well. This step is important for even flavor in your biscuits. Now, it’s time to add some rich flavor. Take your cold, cubed butter, about ½ cup, and mix it into the flour mixture. You can use a pastry cutter or your fingers. Mix until the texture feels like coarse crumbs. You want to see small pieces of butter. Next, stir in 1 cup of shredded sharp cheddar cheese. Make sure it spreads throughout the flour mix. It adds a nice cheesy flavor. Then, pour in ¾ cup of buttermilk. Mix gently until your dough forms. Don’t overmix! You want it to be soft but not sticky. Now, let's make the crab filling. In a separate bowl, combine: - 1 cup lump crab meat - ⅓ cup cream cheese - 1 tablespoon fresh lemon juice - 2 tablespoons chopped fresh parsley - 1 tablespoon Old Bay seasoning Gently fold these ingredients together. Be careful not to break the crab meat too much. Next, lightly flour a clean surface. Turn out your biscuit dough and knead it a few times until smooth. Roll it out to about ¾-inch thick. Using a round cutter, cut out biscuit shapes. You should get about 10 biscuits. Place half on your baking sheet. Spoon a generous tablespoon of the crab mixture onto each biscuit. Then, place the remaining biscuit rounds on top. Press the edges gently to seal them. Bake in your preheated oven for 15-18 minutes. Look for golden tops and cooked-through biscuits. For a tasty finish, brush melted butter on top after baking. Enjoy your crab stuffed cheddar bay biscuits warm, bursting with flavor! For the complete details, check the Full Recipe for all instructions and tips. To make flaky biscuits, keep your butter cold. This helps create layers in the dough. Use a pastry cutter to mix in the butter. Do not overmix the dough. It should be soft but not sticky. For timing, bake at 425°F (220°C). This high heat gives a nice rise. Check them after 15 minutes. If they are golden brown, they are ready. Every oven is different, so watch closely. To boost flavor, try adding spices. A pinch of cayenne pepper adds a nice kick. Fresh herbs like thyme or dill can brighten the taste. Consider adding a bit of lemon zest for a fresh twist. To elevate the crab flavor, use high-quality crab meat. Lump crab gives more texture. You can also add a splash of Worcestershire sauce to the crab mix for depth. Serve the biscuits warm on a nice platter. Garnish with chopped parsley for color. Lemon wedges add a fresh touch and flavor boost. Pair these biscuits with a creamy dip. A simple garlic aioli or lemon butter sauce pairs well. It enhances the crab flavor and makes each bite special. If you follow the Full Recipe, you’ll impress your guests with both taste and presentation. {{image_4}} You can easily change the filling. Try using shrimp or lobster instead of crab. Both seafood options bring new tastes. Lobster adds a rich, sweet flavor. Shrimp gives a nice texture and is quick to cook. For a vegetarian twist, use chopped mushrooms or spinach. Cream cheese and herbs can create a creamy filling. This way, everyone can enjoy a tasty biscuit! You can also play with the biscuit base. Swap out the cheddar for other cheese types. Gruyère or pepper jack can add unique flavors. They both melt well and pair nicely with crab. For a fun twist, make mini biscuits. These make great appetizers for parties. Just cut the dough into smaller rounds and fill them with your favorite stuffing. Let’s explore flavors from different cuisines. Adding spices like curry or cumin can transform the dish. You can also try using fresh herbs like basil or cilantro. Each herb brings its own special taste to the biscuits. Seasonal variations can include vegetables, too. Try adding roasted corn or diced bell peppers. This keeps the dish fresh and exciting all year round! To keep your crab stuffed cheddar bay biscuits fresh, store them properly. Place any leftovers in an airtight container. Make sure they cool down before sealing. This way, they won't get soggy. For freezing biscuit dough, wrap it well in plastic wrap. Then, put it in a freezer bag. This helps avoid freezer burn. You can freeze the dough for up to three months. When you're ready to bake, just thaw in the fridge overnight. To reheat your biscuits, the oven is your best friend. Preheat it to 350°F (175°C). Place the biscuits on a baking sheet. Heat them for about 10-15 minutes. This keeps them crispy. If you're in a hurry, the microwave works too. Heat them for about 30 seconds. But remember, the texture may change. The oven gives better results. In the fridge, these biscuits last about 3 days. Make sure they're in a sealed container. In the freezer, they can last up to three months. Watch out for signs of spoilage. If you see mold or notice a bad smell, it's time to toss them. Always trust your senses when it comes to food safety. How to make the biscuits fluffier? To make your biscuits fluffier, use cold butter. Cold butter helps create air pockets. When you mix it in, stop when you see pea-sized lumps. Also, don’t overmix the dough. Just mix until it comes together for the best results. What’s the best way to pick crab meat? When picking crab meat, look for lump crab meat. Check for shells and cartilage. Gently break apart the meat with your fingers. This keeps the meat in larger pieces for better texture in your dish. Why are my biscuits too dense? If your biscuits are dense, you may have overmixed the dough. Mix just until combined. Also, ensure your baking powder is fresh. Old baking powder can cause biscuits to rise poorly. What to do if the crab filling is too salty? If your crab filling is too salty, add more cream cheese. This will help balance the flavors. You can also add a squeeze of lemon juice for a fresh taste that cuts through the salt. Can I make these biscuits ahead of time? Yes, you can make the biscuit dough ahead of time. Just wrap it tightly and store it in the fridge. When you’re ready, roll it out and fill it with crab mixture before baking. How can I modify the recipe for dietary restrictions? To make these biscuits gluten-free, use a gluten-free flour blend. For a dairy-free option, find a vegan butter and cream cheese. These changes let everyone enjoy this tasty treat! For the full recipe, check out the Full Recipe section above! This blog shared everything you need to create delicious crab biscuits. We covered ingredients, step-by-step instructions, and helpful tips for great results. You learned about variations, storage, and how to troubleshoot common issues. Crab biscuits are tasty and versatile. Use different seafood or cheese to mix things up. Enjoy these treats fresh, or store leftovers wisely. I hope you take these ideas and make your own crab biscuits soon!

Crab Stuffed Cheddar Bay Biscuit Delightful Recipe

Crab Stuffed Cheddar Bay Biscuits are a tasty twist on a classic favorite. Imagine biting into a warm, flaky biscuit,

To make this delightful cheesecake, you need the following ingredients: - 1.5 cups graham cracker crumbs - 1/2 cup unsalted butter, melted - 2 cups cream cheese, softened to room temperature - 1 cup powdered sugar - 1 cup heavy whipping cream - 1/2 cup freshly squeezed orange juice (if available) - Zest of 1 medium-sized orange - 1 teaspoon pure vanilla extract - Pinch of salt These ingredients blend together to create a creamy and zesty cheesecake. The graham cracker crumbs make a perfect, crunchy crust that pairs well with the smooth filling. To make your cheesecake look and taste even better, consider these optional garnishes: - Fresh orange slices - Whipped cream These add a nice touch and enhance the overall flavor. They make each slice pop with color and freshness. You will need a few tools to make the process easier: - 9-inch springform pan - Large mixing bowls - Electric mixer - Spatula - Measuring cups and spoons Using the right tools helps in mixing and pouring the ingredients smoothly. This setup ensures you create a beautiful No-Bake Orange Creamsicle Cheesecake that everyone will love. For the full recipe, be sure to check the detailed steps provided. To start, gather your graham cracker crumbs and melted butter. In a large bowl, mix them well using a fork. You want all the crumbs to get coated in butter. This step is key for a tasty crust. Next, press this mixture into a 9-inch springform pan. Use your hand or a measuring cup to pack it tightly. Once it looks even, pop it in the fridge for about 15 minutes. This chill time helps the crust hold its shape. Now, let’s focus on the filling. In a fresh bowl, beat your softened cream cheese and powdered sugar with an electric mixer. Mix until it is smooth and creamy. You shouldn’t see any lumps! Next, slowly add in the orange juice, zest, vanilla, and a pinch of salt. Keep blending until everything is well mixed. In a separate bowl, whip the heavy cream until it forms stiff peaks. Be careful here; you want it fluffy but not over-beaten. Now, gently fold the whipped cream into the orange mixture. Do this slowly so you keep that light texture. Once your filling is ready, pour it into the chilled crust. Smooth the top with a spatula to make it look nice. Cover the cheesecake with plastic wrap and chill it in the fridge for at least 4 hours, or overnight if you can wait! When ready to serve, undo the springform clasp and remove the sides. Slice into pieces and add a dollop of whipped cream and a fresh orange slice on top. Enjoy this fresh delight! For the full recipe, check out the details provided. When making the cream cheese mixture, start with room temperature cream cheese. This helps it blend smoothly. Use an electric mixer on medium speed. Mix until it is silky and free of lumps. Gradually add the powdered sugar. This helps to keep everything mixed well. Don't rush this step, as it is key to a creamy filling. To whip cream well, use a chilled bowl and beaters. This keeps the cream cold and helps it whip better. Start on low speed and then increase to medium-high. Stop mixing once you see stiff peaks form. Be careful not to over-whip; you want it fluffy, not grainy. Fold it gently into the cream cheese mixture to keep the air in. For a beautiful presentation, slice the cheesecake carefully. Use a sharp knife dipped in hot water for clean cuts. Garnish each slice with a dollop of whipped cream and a slice of fresh orange. You can also drizzle chocolate or caramel sauce on top for extra flair. A sprinkle of orange zest adds color and a nice touch. For the full recipe, check back on the earlier sections. {{image_4}} You can play with flavors in this cheesecake. Here are some ideas: - Lemon Creamsicle: Swap orange juice with lemon juice for a tangy twist. - Berry Bliss: Use pureed berries like strawberries or raspberries in place of orange juice. - Chocolate Orange: Add cocoa powder to the filling for a chocolatey flavor. - Tropical Delight: Mix in coconut cream for a tropical flair. Want a healthier cheesecake? Consider these swaps: - Greek Yogurt: Replace cream cheese with Greek yogurt for lower fat. - Honey or Maple Syrup: Use these instead of powdered sugar for natural sweetness. - Whole Wheat Crust: Swap graham cracker crumbs for whole wheat crumbs for more fiber. - Low-Fat Cream: Choose low-fat heavy cream to cut down on calories. Make your cheesecake shine with these ideas: - Fruit Toppings: Top with fresh fruit like berries or orange slices. - Chocolate Drizzle: Add a drizzle of chocolate or caramel sauce for richness. - Nut Crust: Use crushed nuts instead of graham crackers for a crunchy base. - Individual Portions: Serve in small cups for easy sharing. For the complete step-by-step process, check out the Full Recipe. To keep your cheesecake fresh, wrap it tightly. Use plastic wrap or foil. This helps to keep it moist and tasty. You can also place it in an airtight container. Make sure to store it in the fridge. If you want to save some for later, freezing is a great option. First, let the cheesecake cool completely. Then, wrap it tightly in plastic wrap. After that, place it in a freezer-safe container. It can stay in the freezer for up to three months. To enjoy, just take it out and let it thaw in the fridge overnight. In the fridge, your cheesecake will last about five days. If you freeze it, it can last up to three months. Always check for any off smells or changes in texture before eating. Keeping your cheesecake stored right will help it taste fresh and delicious! For the complete recipe, check the Full Recipe. Yes, you can! Try lemon, lime, or even berry flavors. Just swap the orange juice and zest for the new fruit. For berries, use puree to keep the flavor strong. The process stays the same, and you can create a new favorite. No problem at all! You can use any round cake pan. Just line it with parchment paper for easy removal. Once set, run a knife around the edge to help release the cheesecake. This way, you can still enjoy a tasty treat. You can substitute cream cheese with a dairy-free version made from nuts. Use coconut cream instead of heavy cream too. Make sure the powdered sugar is vegan, and you have a delicious dairy-free dessert. It’s that simple! For the full recipe, check out the detailed steps to make this delightful dessert! This blog post covered how to make a No-Bake Orange Creamsicle Cheesecake. We explored the key ingredients, tools, and step-by-step instructions needed for a smooth crust and rich filling. I shared tips for perfect whipped cream and eye-catching presentation. We also discussed flavor variations and storage tips. In closing, this cheesecake is simple, fun, and sure to impress. Experiment with flavors and enjoy!

No-Bake Orange Creamsicle Cheesecake Fresh Delight

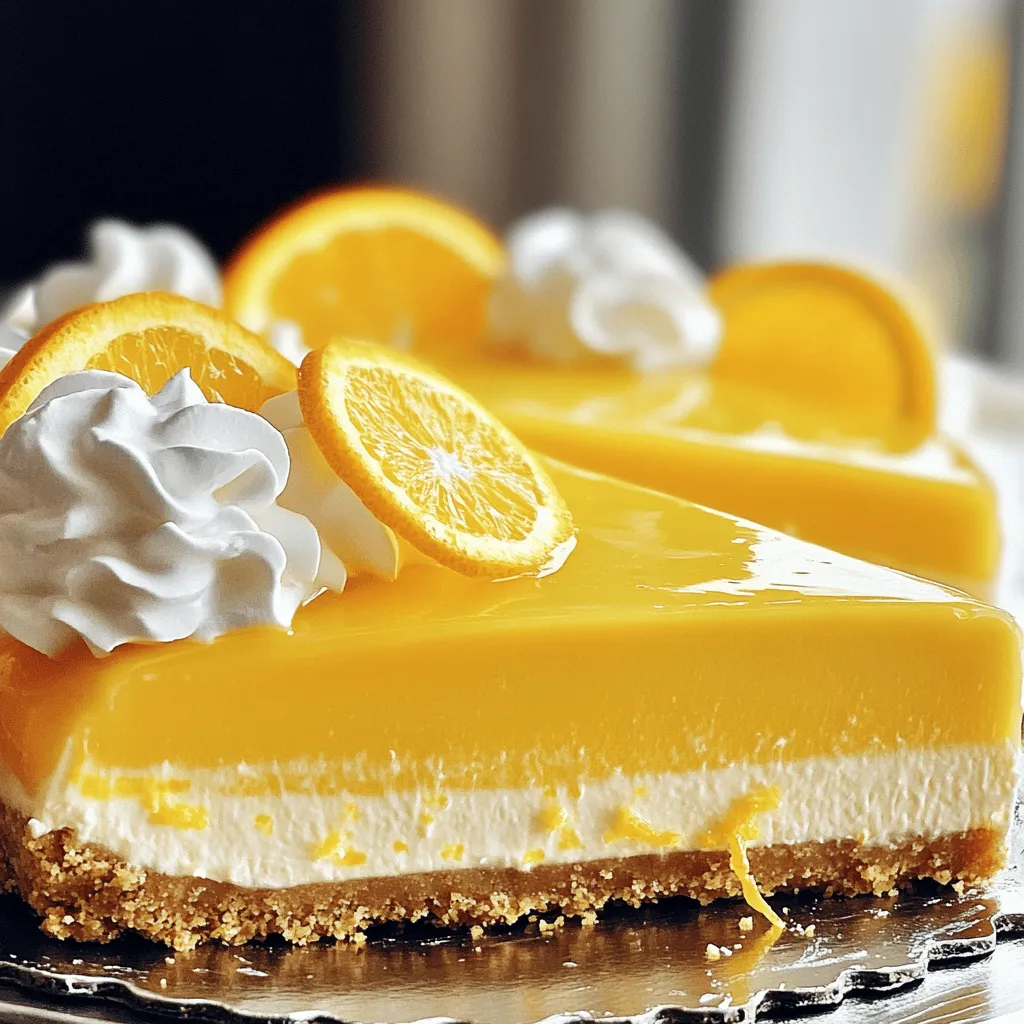
Craving a light, sweet treat? This No-Bake Orange Creamsicle Cheesecake offers a burst of creamy flavor that takes you back

- 12 oz ziti pasta - 2 cups cooked, shredded chicken - 1 (8 oz) package cream cheese, softened The main ingredients set the stage for this tasty dish. Ziti pasta gives it a hearty base. Cooked, shredded chicken adds protein and flavor. Cream cheese makes the sauce creamy and rich. Together, they create a comfort food classic. - 1 cup ranch dressing - 1 cup chicken broth - 2 cups shredded cheddar cheese - 1 cup shredded mozzarella cheese Next, we add flavor with ranch dressing. This adds a tangy kick to the dish. Chicken broth keeps it moist and enhances the taste. The shredded cheddar and mozzarella cheeses create a bubbly, cheesy topping that everyone loves. - 1 tsp garlic powder - 1 tsp onion powder - Salt and pepper to taste - Fresh parsley, chopped (for garnish) Seasoning brings everything to life. Garlic powder and onion powder add depth to the flavors. Salt and pepper balance the taste. Finally, fresh parsley is perfect for garnish. It adds color and a touch of freshness. For the full recipe, check out the details in the section above! 1. Start by boiling salted water in a large pot. 2. Add 12 oz of ziti pasta to the water. Cook the pasta until it is al dente, about 8-10 minutes. 3. Once cooked, drain the pasta well. Set it aside while you mix the other ingredients. 1. In a big mixing bowl, combine 2 cups of cooked, shredded chicken, 1 package of softened cream cheese, and 1 cup of ranch dressing. 2. Add 1 cup of chicken broth, 1 tsp of garlic powder, 1 tsp of onion powder, and salt and pepper to taste. 3. Use a whisk or spatula to blend the mixture until it is smooth and well combined. 1. Gently fold the drained pasta into the chicken mixture. Make sure every piece of ziti is coated well. 2. Spoon half of this mixture into your prepared baking dish. 3. Layer half of the shredded cheddar and mozzarella cheese on top. 4. Add the remaining ziti mixture and spread it out evenly. 5. Top it with the rest of the cheddar and mozzarella cheese. 6. Cover the dish tightly with aluminum foil. This helps the dish steam as it bakes. 7. Place the dish in your preheated oven at 375°F (190°C) and bake for 25 minutes. 8. After 25 minutes, carefully take off the foil. Bake for another 10-15 minutes until the cheese is bubbly and golden. 9. When done, let it cool for 5-10 minutes. Garnish with fresh parsley before serving. Enjoy your Crack Chicken Baked Ziti! Check out the Full Recipe for more details. To ensure your Crack Chicken Baked Ziti is creamy, use soft cream cheese. Mix it well with the ranch dressing and chicken broth. This mix gives a smooth and rich texture. Prevent sogginess by cooking the ziti just until al dente. This keeps the pasta firm. Drain it well and avoid letting it sit in water. For added flavor, you can try spices like paprika, cayenne, or Italian herbs. These spices add depth to the dish. You can also mix in some cooked vegetables like spinach or bell peppers for more taste. Pair this dish with a fresh salad or garlic bread. The crispness of a salad balances the creamy ziti. To serve, use shallow bowls. This allows the cheese to stretch when you scoop it out. A sprinkle of fresh parsley on top brightens the dish. You can also add some crushed red pepper flakes for a pop of color and a hint of spice. Enjoy presenting this tasty meal to your family and friends! {{image_4}} You can easily adapt Crack Chicken Baked Ziti for different diets. - Gluten-free ziti options: Use gluten-free ziti pasta. Many brands offer great taste and texture. Just cook it like regular pasta. - Low-carb substitutes: Instead of pasta, try using zucchini noodles or cauliflower. They are fresh and reduce carbs. You can change the flavor by adding new ingredients. - Adding vegetables for nutrition: Mix in spinach, bell peppers, or mushrooms. They boost nutrition and add color. Just sauté them first for best results. - Different cheese combinations: Swap cheddar or mozzarella for pepper jack or gouda. Each cheese brings a unique taste. You can even mix several types for extra flavor! Try different ways to make this dish. - Slow cooker version of Crack Chicken Baked Ziti: Combine all your ingredients in a slow cooker. Cook on low for 4-6 hours for a creamy and tasty dish. - Instant Pot instructions: Use the Instant Pot for quick prep. Add all the ingredients, close the lid, and cook on high pressure for 10 minutes. Quick and easy! Feel free to explore these variations to suit your taste and dietary needs. For more details and the complete process, check the Full Recipe. To keep your Crack Chicken Baked Ziti fresh, use airtight containers. Glass or plastic containers work well. Make sure to cool the dish to room temperature before storing. This helps prevent moisture build-up. Store it in the fridge for up to four days. When it's time to enjoy leftovers, you can use either the oven or microwave. If you use the oven, preheat it to 350°F (175°C). Place the ziti in an oven-safe dish and cover it with foil. Bake for about 20 minutes or until heated through. If you choose the microwave, place a portion in a microwave-safe bowl. Heat it for 1-2 minutes, stirring halfway through. This helps keep the texture nice. If you notice it’s dry, add a splash of chicken broth or water. To freeze Crack Chicken Baked Ziti, first, let it cool completely. Place the dish in a freezer-safe container. You can also wrap it tightly in plastic wrap and then foil. This protects it from freezer burn. It can last up to three months in the freezer. When you're ready to eat, thaw the ziti in the fridge overnight. Reheat it in the oven or microwave, following the instructions above. This way, you maintain its creamy goodness and flavor. For the full recipe, check the main article! Crack Chicken is a creamy, cheesy dish made with shredded chicken. It has a rich flavor from ranch dressing and cream cheese. This dish is hearty and comforting, perfect for any dinner. The blend of cheddar and mozzarella gives it a lovely cheesy pull. Each bite is full of savory goodness that keeps you coming back for more. Yes, you can use rotisserie chicken! It saves time, and it's super tasty. The chicken is already cooked and seasoned. Just shred it and mix it into the sauce. Using rotisserie chicken makes the prep quick and easy. It’s a great way to enjoy a homemade meal without the fuss. You can store Crack Chicken Baked Ziti in the fridge for 3 to 4 days. Make sure to place it in an airtight container. Always check for any signs of spoilage before eating. If it smells off or looks strange, it’s best to throw it out. Keeping it properly stored helps keep it safe to eat. Yes, you can make this recipe ahead of time! Prepare the dish and store it in the fridge before baking. Just cover it well to keep it fresh. When ready to eat, bake it straight from the fridge. It may need a few extra minutes to heat through. This is a great way to save time on busy days. Check out the Full Recipe for more details! Crack Chicken Baked Ziti combines simple ingredients for a unique dish. We explored key ingredients, step-by-step instructions, and storage tips. You can customize it with different flavors or cooking methods. Whether you want a quick dinner or something to impress guests, this recipe works! Enjoy the creamy goodness and make it your own.

Crack Chicken Baked Ziti Tasty and Easy Dinner Treat

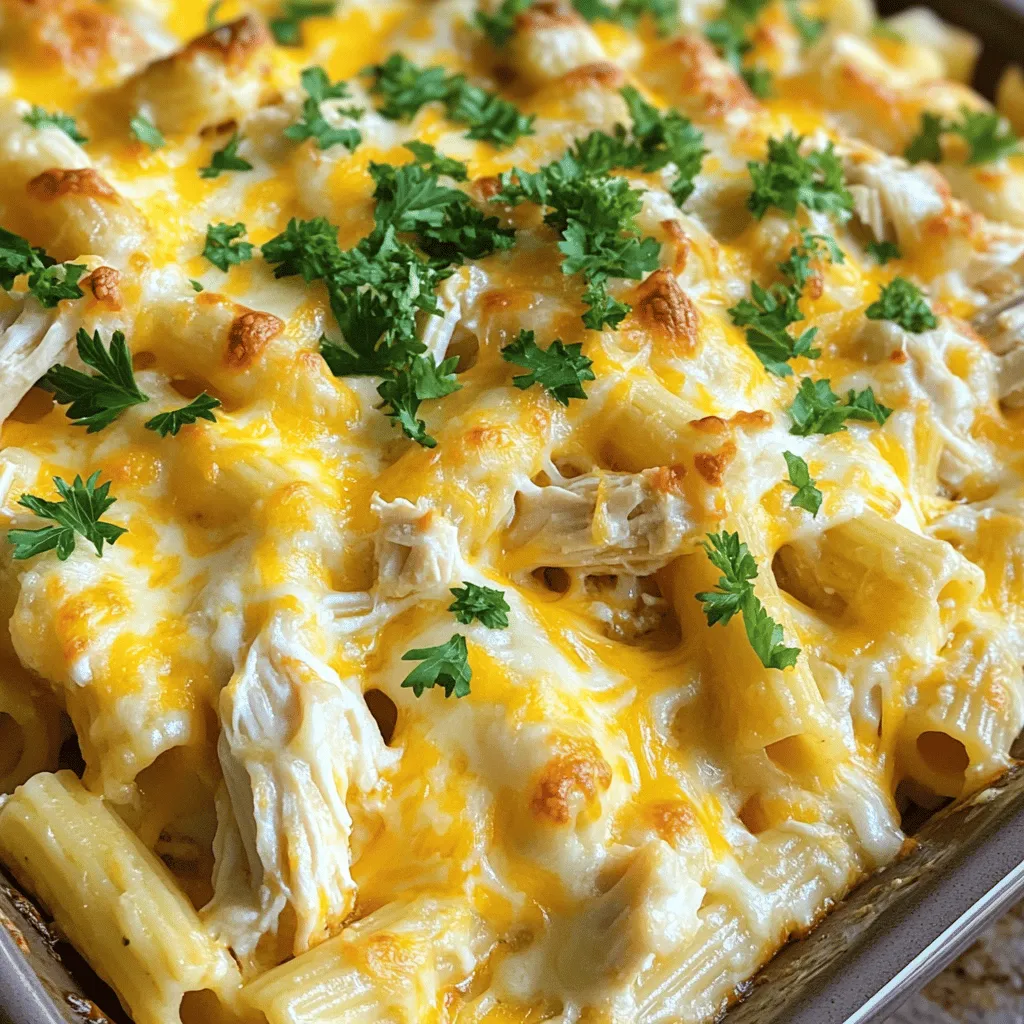
If you’re searching for a quick and tasty dinner, I have just the dish for you: Crack Chicken Baked Ziti!

For this delightful dish, gather these fresh ingredients: - 1 pound large shrimp, peeled and deveined - 2 tablespoons extra virgin olive oil - 2 cloves garlic, finely minced - 1 teaspoon red pepper flakes (adjust to taste) - Juice of 1 fresh lime - Salt and freshly cracked black pepper to taste - 1 cup cooked quinoa (white, red, or a mix) - 1 cup cherry tomatoes, each cut in half - 1 ripe avocado, sliced into wedges - 1 cup mixed greens (such as spinach and arugula) - Fresh cilantro sprigs, for garnish - Optional: Lime wedges, for serving You will need a few tools to make this dish: - Medium-sized mixing bowl - Whisk or fork - Grill or grill pan - Wooden skewers (if needed) - Tongs for flipping shrimp - Serving bowls This Grilled Shrimp Bowl is not only tasty but also nutritious. Each serving provides: - Calories: Approximately 450 - Protein: 30 grams - Carbohydrates: 40 grams - Fat: 20 grams - Fiber: 8 grams - Vitamin C: High from lime and tomatoes This bowl packs a punch of flavor and good nutrients. With the full recipe, you can easily make this dish at home. Enjoy the fresh and zesty taste! First, gather your ingredients. You need olive oil, minced garlic, red pepper flakes, lime juice, salt, and pepper. In a medium bowl, mix the olive oil and garlic. Add the red pepper flakes, lime juice, salt, and pepper. Whisk it all together until smooth. This will be your tasty marinade. Now it's time to add the shrimp. Make sure they are peeled and deveined. Toss the shrimp in the marinade gently. Each shrimp needs to be well-coated. Let them sit for 15 to 20 minutes. This helps the shrimp soak up all those great flavors. While the shrimp marinate, heat your grill or grill pan. Get it nice and hot over medium-high heat. If you use wooden skewers, soak them in water for about 30 minutes. This stops them from burning. Once ready, thread the shrimp onto the skewers. Don’t overcrowd them. Grill the shrimp for 2-3 minutes on each side. They should turn pink and opaque. When done, take them off the grill. To build your bowl, start with a base of cooked quinoa. Add a handful of mixed greens on top. Next, arrange the grilled shrimp over the greens. Add halved cherry tomatoes and avocado wedges for color and taste. Drizzle any leftover marinade over the dish for extra flavor. Finally, sprinkle fresh cilantro on top. This adds a nice touch before you serve. Enjoy every bite of this delicious dish! For the full recipe, refer to the earlier section. To get the best grilled shrimp, start with fresh, high-quality shrimp. Look for large shrimp, as they hold up well on the grill. When marinating, coat each shrimp evenly. This helps the flavors stick. Make sure your grill is hot before you place the shrimp on it. This creates a nice sear and prevents sticking. Grill shrimp for about 2-3 minutes on each side. Keep an eye on them; they cook fast! You want them to turn pink and opaque. If you overcook them, they will become rubbery. A good tip is to remove them from the grill as soon as they change color. For a beautiful bowl, use colorful ingredients. Start with a base of quinoa. Layer mixed greens on top. Then, add your grilled shrimp, halved cherry tomatoes, and avocado slices. Drizzle leftover garlic marinade over the top. Finish with fresh cilantro for a pop of color. Serve in vibrant bowls to make your dish stand out. For more details, check out the Full Recipe. {{image_4}} You can swap shrimp for other proteins. Grilled chicken works well and adds a nice flavor. Try using firm fish, such as salmon or tuna. These options cook quickly and taste great with garlic sauce. For a meatier bite, consider steak or pork. Each protein brings its own unique taste to the bowl. If you prefer a plant-based meal, tofu is an excellent choice. Firm tofu absorbs flavors well. You can marinate it just like shrimp. Another option is tempeh, which has a nutty taste. For a heartier base, use chickpeas or lentils. These ingredients add protein and texture without meat. You can change the flavor of your bowl by using different dressings. A lemon-tahini dressing adds creaminess and tang. A spicy sriracha sauce can kick things up a notch. For a fresh twist, use a citrus vinaigrette. Each dressing enhances the dish in its own way, so feel free to experiment. For the full recipe and more details, check out the Zesty Grilled Shrimp Bowl with Garlic Burst Sauce . Store leftover grilled shrimp bowls in an airtight container. Keep them in the fridge for up to three days. This helps keep the shrimp fresh and safe to eat. If you have extra garlic sauce, store it separately to avoid soggy ingredients. When you're ready to enjoy your leftovers, reheat them gently. Use a microwave-safe bowl and cover it loosely. Heat in short bursts, checking every 30 seconds. You want the shrimp warm, not overcooked. If you prefer, you can also reheat them on the stove over low heat. You can freeze the shrimp, but it's best to do it before cooking. Place the marinated shrimp in a freezer bag and remove as much air as you can. They can last up to three months in the freezer. To use, thaw them in the fridge overnight before grilling. Avoid freezing the cooked shrimp, as they may lose their texture. For the other bowl ingredients, it’s better to prepare them fresh each time. For a complete guide, check out the Full Recipe. You can serve your grilled shrimp bowl with many tasty sides. Here are some ideas: - Rice: White or brown rice works well. - Salad: A fresh salad adds crunch and color. - Beans: Black beans or pinto beans add protein. - Corn: Grilled corn on the cob adds sweetness. - Bread: Serve with crusty bread for dipping. These sides will make your meal more filling and fun! Shrimp cook quickly. They turn pink and firm when they are done. Here are some tips: - Color: Look for a bright pink color. - Texture: Shrimp should feel firm, not mushy. - Shape: They curl into a C shape when cooked well. If you see these signs, your shrimp are ready to enjoy! Yes, you can make the garlic sauce ahead. It tastes even better after resting. Here’s how: - Prepare: Mix all the sauce ingredients as listed. - Store: Keep it in an airtight container in the fridge. - Use: It stays fresh for up to three days. Just give it a stir before using. Enjoy the rich flavor in your dish! In this post, we explored creating a delicious grilled shrimp bowl. We covered the ingredients, kitchen tools, and nutritional info. You learned step-by-step instructions for preparing, marinating, and grilling the shrimp. I shared tips for perfect grilling and some fun variations too. Lastly, we talked about storing leftovers and answered common questions. Enjoy making this dish and share it with others. You'll impress everyone with your cooking skills!

Grilled Shrimp Bowl with Garlic Sauce Delightful Dish

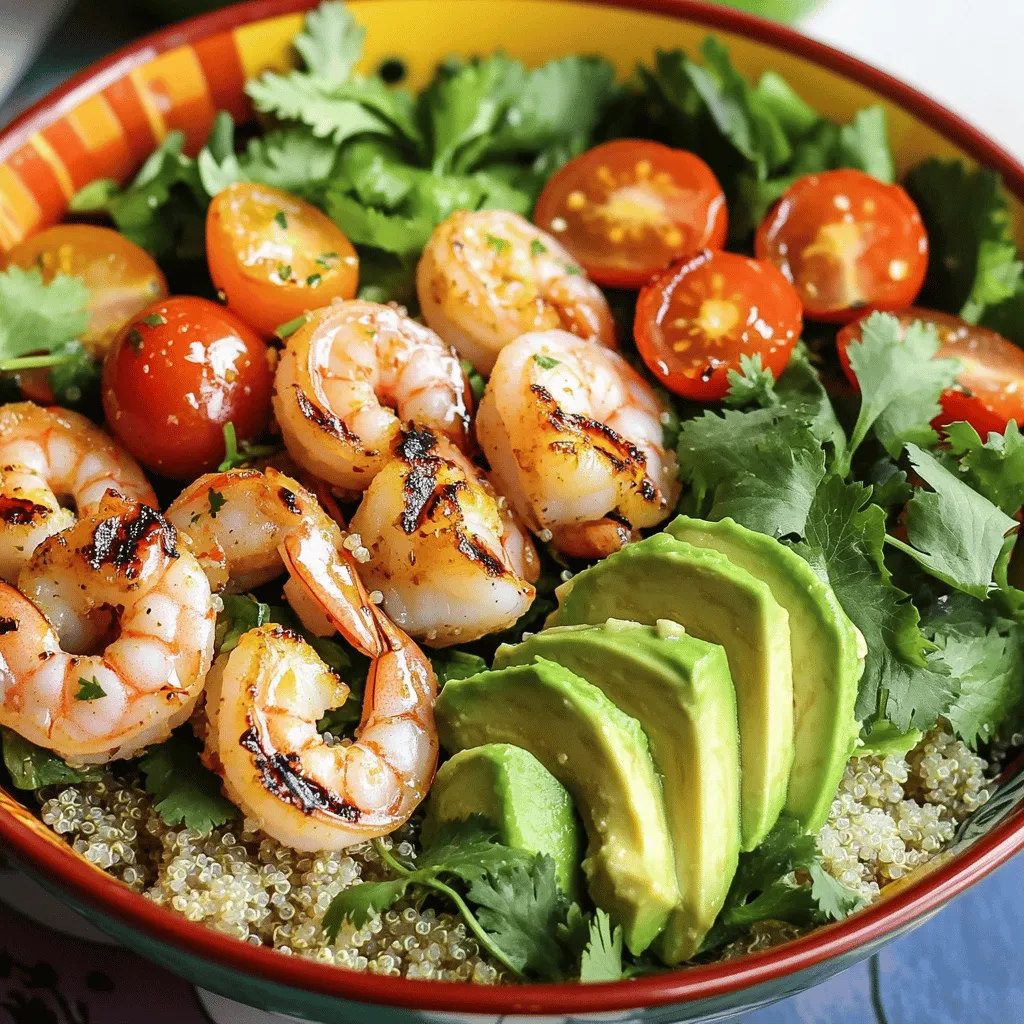
If you’re craving a fresh, flavorful meal, my Grilled Shrimp Bowl with Garlic Sauce is just what you need. It’s

- 2 cups cooked, shredded chicken - 1 can (15 oz) black beans, rinsed and drained - 1 can (15 oz) corn, drained - 1 cup salsa - 1 teaspoon taco seasoning - 2 cups tortilla chips, lightly crushed - 1 cup shredded cheddar cheese - 1 cup sour cream (for topping) - 1/2 cup green onions, finely sliced - Fresh cilantro for garnish Each of these main ingredients plays a key role in the dish. The shredded chicken adds protein and heartiness. Black beans and corn bring texture and fiber. Salsa adds moisture and flavor. Taco seasoning gives the casserole that classic taco taste. Tortilla chips create a crunchy layer, while cheddar cheese melts to form a delicious topping. Sour cream adds creaminess, and green onions and cilantro finish the dish with freshness. - Additional spices or hot sauce to taste - Avocado slices for serving - Jalapeños for added heat Optional ingredients allow you to personalize your casserole. If you like heat, add hot sauce or jalapeños. Avocado slices add creaminess and a fresh touch. Feel free to experiment with spices to create your perfect flavor profile. For the full recipe, check out the detailed steps that will guide you through making this tasty meal. Enjoy the process and the delicious results! - Preheat your oven to 350°F (175°C). - Gather and prepare all ingredients. This makes the process smooth and fun. - Prepare the chicken mixture. In a large bowl, mix shredded chicken, black beans, corn, salsa, and taco seasoning. Stir well until combined. - Layer the tortilla chips and chicken mixture in the baking dish. Grease a 9x13 inch dish. Spread half of the crushed tortilla chips on the bottom. Then, add half of the chicken mixture on top. - Sprinkle cheese and repeat the layering process. Add half of the cheddar cheese over the chicken. Now, layer the rest of the tortilla chips, the remaining chicken mixture, and finish with the last of the cheese. - Cover with foil and start baking. Place the dish in the preheated oven for 20 minutes. This helps all the flavors blend together nicely. - Remove foil to brown the cheese. After 20 minutes, take off the foil and bake for another 10 minutes. Look for bubbly cheese with a golden color. This step makes it look and taste amazing. Check out the [Full Recipe] for all the details! - Use rotisserie chicken for quick prep: This saves time and adds great flavor. Shredded rotisserie chicken is already cooked and seasoned. You can skip the cooking part and get straight to mixing. - Customize spice levels based on salsa used: Choose mild salsa for a gentle taste or spicy salsa for a kick. This lets you control the heat in your dish. You can also add fresh jalapeños or hot sauce if you like it even spicier. - Pair with sides like Mexican rice or a fresh salad: These sides complement the casserole well. The rice adds heartiness, while a salad brings freshness. - Offer various toppings for guests to customize their servings: Set out sour cream, avocado slices, or extra cheese. This way, everyone can make their plate just how they like it. For the full recipe, check out the detailed instructions to create your Chicken Taco Casserole. {{image_4}} You can make this dish your own by switching ingredients. For a different taste, substitute ground beef or turkey for the chicken. This change adds a new flavor while keeping the meal hearty. You can also use different beans. Black beans work well, but pinto or kidney beans can add a twist. Adding extra veggies like bell peppers or zucchini boosts nutrition and flavor. Mix and match to find your favorite combo! If you have dietary needs, this casserole can still work for you. To make it gluten-free, use specific tortilla chips made without gluten. Many brands offer tasty options that fit the bill. If you're dairy-free, try non-dairy cheese and yogurt instead of the regular kinds. These swaps keep the dish creamy and delicious. With these easy adjustments, everyone can enjoy this tasty meal! You can find the full recipe above to guide you through these variations. To store your Chicken Taco Casserole, let it cool down first. Place it in the fridge in a covered container. This helps keep it fresh and safe to eat. I like to use glass or plastic containers with tight lids. You can also wrap it tightly in aluminum foil or plastic wrap. This keeps the flavors locked in, so you enjoy every bite later. When it's time to enjoy your leftovers, you have a couple of good options. The oven is great for reheating. Preheat it to 350°F (175°C). Place the casserole in an oven-safe dish and cover it with foil. Bake it for 20 minutes or until it's hot. This method helps keep the texture nice and the cheese creamy. If you need to use the microwave, that works too! Put a portion in a microwave-safe bowl. Heat it in short bursts of 1-2 minutes, stirring in between. This helps warm it evenly. Just be careful not to overheat, or the texture may change. Enjoy your meal the way it was meant to be! For the full recipe, check the earlier section. Can I make Chicken Taco Casserole ahead of time? Yes, you can prepare Chicken Taco Casserole in advance. Just assemble it but do not bake. You can cover it and store it in the fridge for up to 24 hours. When ready, simply bake it as directed. This saves time on busy nights. How long will the casserole last in the fridge? Chicken Taco Casserole lasts about 3 to 4 days in the fridge. Keep it in an airtight container for best results. Reheat portions in the oven or microwave when you want to enjoy leftovers. Can I freeze Chicken Taco Casserole? Absolutely! You can freeze Chicken Taco Casserole. Just wrap it tightly in foil or use a freezer-safe dish. It will stay good for about 2 to 3 months. Thaw it overnight in the fridge before baking. What are some good sides to serve with Chicken Taco Casserole? Some great sides include Mexican rice, refried beans, or a fresh salad. You can also serve tortilla chips and guacamole for a crunchy contrast. How to make Chicken Taco Casserole spicier? To add heat, use spicy salsa or add jalapeños to the mix. You can also sprinkle crushed red pepper flakes on top before baking for extra spice. What can I substitute for sour cream? If you want a substitute for sour cream, try Greek yogurt. It has a similar texture and tangy flavor. For a dairy-free option, use cashew cream or dairy-free yogurt. This article covered how to make a tasty Chicken Taco Casserole. We began with the key ingredients, from shredded chicken to cheesy goodness. I shared clear steps to prepare, bake, and serve your dish. You can swap ingredients or make it fit different diets. Don’t forget the tips for storing and reheating leftovers. This casserole is quick to make and delicious to eat. Enjoy this dish with friends and family for a fun meal!

Chicken Taco Casserole Flavorful and Easy Recipe

Craving a meal that’s both tasty and easy? Let me introduce you to my Chicken Taco Casserole—your new go-to dish!

To make sweet cornbread, you need simple and fresh ingredients. Here is what you need: - 1 cup cornmeal - 1 cup all-purpose flour - 1/3 cup granulated sugar - 1 tablespoon baking powder - 1/2 teaspoon salt - 1 cup buttermilk - 2 large eggs - 1/4 cup unsalted butter, melted - 1/4 cup honey (plus extra for drizzling) These ingredients create a sweet, fluffy texture that melts in your mouth. You can add extra flavors to make your cornbread more exciting. Here are some ideas: - 1/2 cup corn kernels (fresh or frozen) - 1/2 cup shredded cheese for a cheesy twist - Jalapeños for a spicy kick - Chopped herbs like chives or cilantro for freshness Adding these ingredients can enhance the taste and make it your own. If you don’t have some ingredients, don’t worry! You can swap them for something else. Here are some good swaps: - Use almond or oat milk instead of buttermilk - Replace all-purpose flour with a gluten-free blend - Use brown sugar instead of granulated sugar for a richer flavor These substitutions still lead to a tasty cornbread while meeting your dietary needs. For the full recipe, check the link above! Start by preheating your oven to 400°F (200°C). This temperature ensures that the cornbread cooks evenly. While the oven heats, prepare an 8-inch square baking dish. Grease it with butter or oil. You can also line it with parchment paper for easy removal later. In a large mixing bowl, combine these dry ingredients: - 1 cup cornmeal - 1 cup all-purpose flour - 1/3 cup granulated sugar - 1 tablespoon baking powder - 1/2 teaspoon salt Use a whisk to blend the ingredients thoroughly. This step helps the baking powder distribute evenly. In a separate medium bowl, whisk together: - 1 cup buttermilk - 2 large eggs - 1/4 cup melted unsalted butter - 1/4 cup honey Keep whisking until the mixture is smooth. The honey adds a lovely sweetness to the cornbread. Now, pour the wet mixture into the bowl with the dry ingredients. Use a spatula or wooden spoon to mix them gently. Stir until just combined. It's fine if the batter has some lumps. If you're using corn kernels, fold them in carefully. Transfer the batter into your prepared baking dish. Use a spatula to spread it evenly. Place the dish in the oven and bake for 20-25 minutes. The cornbread is done when it turns golden brown. A toothpick inserted in the center should come out clean. After removing the cornbread from the oven, let it cool for a few minutes. Drizzle some extra honey on top for added sweetness. Cut the cornbread into squares and serve it warm. For a beautiful presentation, serve it on a rustic board with whipped butter on the side. This recipe allows you to enjoy a tasty treat in just 35 minutes. For the complete details, check the Full Recipe. To get that soft and fluffy cornbread, focus on mixing. Combine your dry and wet ingredients carefully. You want to mix just until everything is moist. If you see a few lumps, that's okay! Overmixing will make your cornbread tough. Aim for a light batter for the best texture. When your cornbread is warm, it’s a treat. I love drizzling honey on top. It adds sweet flavor and a nice shine. You can use a spoon or a squeeze bottle for fun designs. Serve slices warm, and let everyone add their honey. It makes each bite special. Always start with dry ingredients in one bowl and wet in another. This keeps things neat. When you pour the wet into the dry, use a spatula to fold gently. This helps blend without overmixing. If you want to add corn kernels, do it last. Folding them in carefully keeps the batter light. {{image_4}} I love adding jalapeños to my sweet cornbread. The spice balances the sweetness. Chop 1-2 fresh jalapeños, and fold them into the batter after mixing. You can remove the seeds for less heat. This twist adds flavor and a fun kick that wakes up your taste buds! Fruits can make sweet cornbread even more delightful. Blueberries add a burst of sweetness, while peaches bring a juicy texture. For blueberries, fold in 1 cup fresh or frozen berries just before baking. If using peaches, chop 1 cup of ripe peaches and mix them in. Both options brighten the flavor and add moisture. You can easily make this recipe gluten-free. Replace the all-purpose flour with a gluten-free blend. Look for blends that have xanthan gum; this helps with texture. Ensure your cornmeal is also gluten-free. This way, everyone can enjoy the warm, sweet cornbread without worry. For the full recipe, check out the Sweet Cornbread with Honey Drizzle . Enjoy experimenting with these variations! To keep your leftover cornbread fresh, store it in an airtight container. Place it at room temperature for up to two days. If you want it to last longer, wrap it tightly in plastic wrap or foil. This helps prevent it from drying out. You can freeze cornbread for later use. First, let it cool completely. Then, slice it into squares and wrap each piece in plastic wrap. Place the wrapped slices in a freezer bag. Cornbread can stay frozen for up to three months. When you are ready to eat it, just take out a slice. To reheat your cornbread, the oven works best. Preheat your oven to 350°F (175°C). Place the cornbread on a baking sheet and cover it with foil. Heat for about 10-15 minutes until warm. You can also use the microwave. Just heat it for about 15-20 seconds. Be careful not to overheat it, or it may become dry. Enjoy your sweet cornbread with a drizzle of honey for extra flavor! To make sweet cornbread from scratch, gather your ingredients. You need cornmeal, flour, sugar, baking powder, salt, buttermilk, eggs, melted butter, and honey. Mix the dry and wet ingredients in separate bowls. Then, combine them gently. Pour the batter into a greased baking dish. Bake at 400°F for 20-25 minutes. Check for doneness with a toothpick. For the full recipe, refer to the earlier sections. Sweet cornbread pairs well with many dishes. Try serving it with chili or soup. It also goes great with barbecue meats. For a sweet touch, serve it alongside honey butter or jam. A fresh salad can balance the sweetness nicely too. Sweet cornbread stays fresh for about 2-3 days at room temperature. Store it in an airtight container to keep it moist. If you want it to last longer, place it in the fridge for about a week. Just be sure to warm it up when you’re ready to eat! Yes, you can make sweet cornbread in advance. Bake it the day before your meal. Allow it to cool and store it in an airtight container. This way, you save time and still enjoy fresh cornbread. Just warm it up before serving. The main difference is in the sugar content. Sweet cornbread has sugar or honey, giving it a sweet taste. Savory cornbread often contains cheese, herbs, or spices. This makes it more savory and less sweet. Both types are delicious but serve different flavor cravings! To make sweet cornbread, gather your ingredients and mix them carefully. Start with dry and wet ingredients, then fold them together for a rich texture. You can add fun flavors with fruits or spices. Store any leftovers properly, so they stay fresh. Sweet cornbread pairs well with many dishes and can be made ahead of time. Remember, the key to great cornbread is in the mixing and baking. Enjoy your baking journey!

Sweet Cornbread Simple and Tasty Recipe Guide

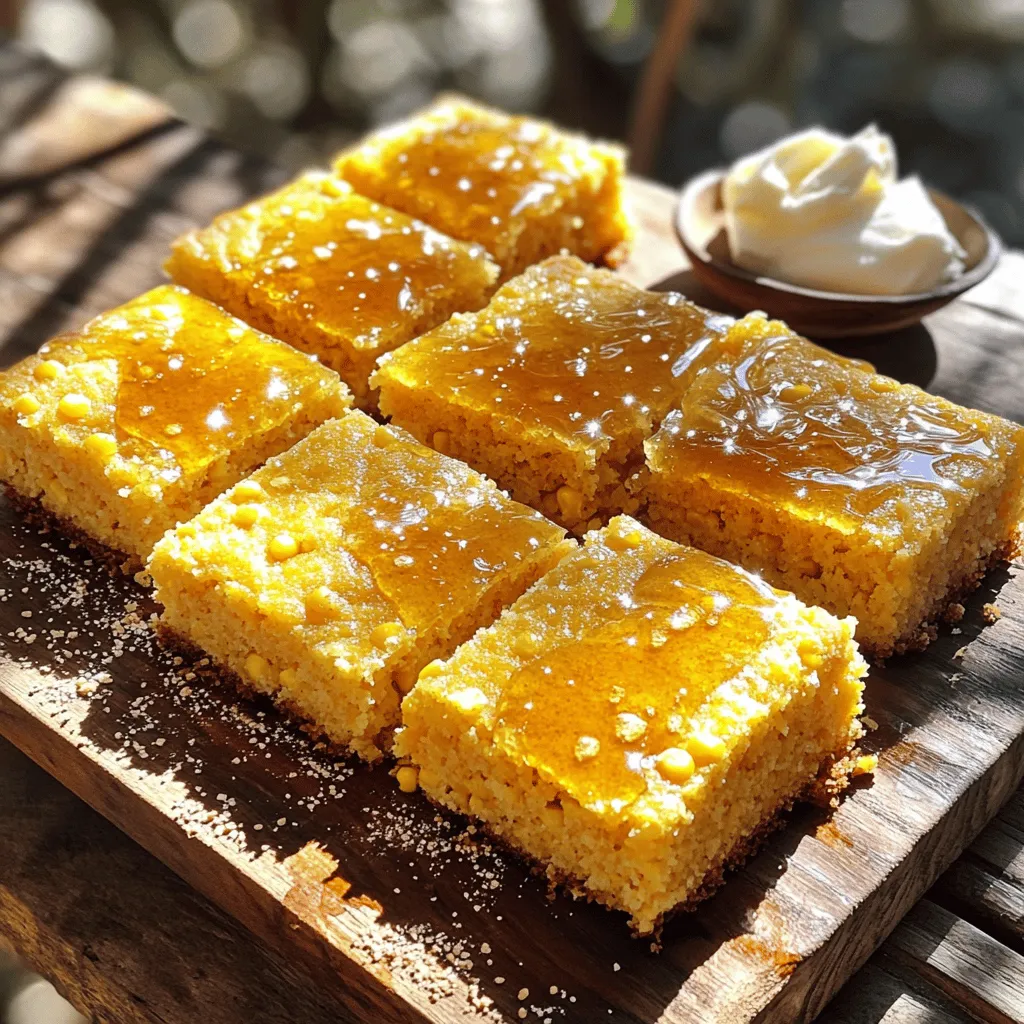
Get ready to enjoy a delightful treat with my sweet cornbread recipe! This simple, tasty guide will help you bake

- 2 cups all-purpose flour - 1/4 cup granulated sugar - 1 packet instant yeast (2 1/4 teaspoons) - 1/2 teaspoon salt - 1/2 cup milk - 1/4 cup unsalted butter - 1 large egg - 1 cup cream cheese - 1/2 cup powdered sugar - 1 teaspoon vanilla extract - 1 1/2 cups fresh strawberries - 1 egg wash (1 egg whisked with 1 tablespoon water) - Optional: Whipped cream for serving Gather these ingredients before starting. You want everything ready to go. The flour gives the rolls structure. Sugar adds sweetness. Yeast makes the dough rise. Salt balances the flavors. Milk and butter keep the rolls soft. The egg binds the dough. Cream cheese makes the filling rich. Powdered sugar sweetens the filling and the drizzle. Vanilla adds depth. Fresh strawberries give a burst of flavor. The egg wash creates a golden crust. Whipped cream is a fun touch when serving. These ingredients combine to create a warm, sweet treat. You will love how they come together in the Full Recipe. To start, I combine warm milk, melted butter, and granulated sugar in a medium bowl. I sprinkle yeast on top and let it sit for about five minutes. This step wakes up the yeast, making it frothy and bubbly. Next, I whisk together flour and salt in a large bowl. I make a well in the center and pour in the yeast mix and a large egg. I stir it with a spatula until the dough forms. Then, I transfer the dough to a floured surface. I knead it for five to seven minutes until it feels smooth. After kneading, I shape the dough into a ball and place it in a greased bowl. I cover it with a towel and let it rise in a warm spot for about an hour. While the dough rises, I prepare the cheesecake filling. In a medium bowl, I mix cream cheese, powdered sugar, and vanilla extract. I blend these until the mixture is creamy and smooth. Once mixed, I gently fold in diced strawberries. This adds a fresh burst of flavor that pairs perfectly with the creaminess of the cheese. I set this mixture aside for later. Once the dough has risen, I punch it down to release any air bubbles. On a floured surface, I roll the dough into a rectangle about 12 by 18 inches. Now, I spread the cheesecake filling evenly over the dough, avoiding the edges. Starting from one long edge, I roll the dough tightly away from me. I use a sharp knife to slice the log into twelve equal pieces. Next, I arrange the rolls cut side up in a greased baking dish, leaving space for them to grow. I preheat my oven to 350°F (175°C). Before baking, I brush the tops of the sweet rolls with an egg wash. This gives them a lovely golden color. I then place the baking dish in the oven and bake for 25 to 30 minutes. I know they are done when they turn golden brown. After baking, I let the rolls cool for about ten minutes. For a sweet touch, I drizzle a simple icing made from powdered sugar and a splash of milk over the top before serving. For the full recipe, check the detailed instructions earlier. To make the best dough, always use warm ingredients. Warm milk and butter help the yeast work well. This gives the rolls a nice rise. Knead the dough properly too. Kneading builds elasticity, which makes the rolls soft and fluffy. Aim for about 5 to 7 minutes of kneading. Want more flavor? Try adding lemon zest to the dough or filling. This gives a bright taste that pairs well with strawberries. You can also garnish the rolls with fresh mint. Mint adds a fresh twist and looks great on the plate. When serving, arrange the sweet rolls on a nice platter. Add fresh strawberries around them for color. A dollop of whipped cream on the side makes it even better. For drinks, I suggest a cup of hot tea or cold milk. Both drinks complement the sweet rolls well. For all the details on how to make these delightful rolls, check out the Full Recipe. {{image_4}} You can change the flavors in your sweet rolls for a fun twist. For a blueberry cheesecake sweet roll, swap out strawberries for fresh blueberries. Make sure to mash them slightly for a nice spread. The sweet, tart flavor of blueberries blends well with the creamy filling. Another option is the chocolate-strawberry fusion roll. Add cocoa powder to the dough for a chocolate base. You can also fold in chocolate chips into the cheesecake filling. This mix creates a rich, decadent treat. If you need gluten-free options, use almond flour or a gluten-free blend. This keeps the rolls soft and tasty. Just check that the flour mix includes xanthan gum for the right texture. For vegan adaptations, replace the egg with a flax egg. Mix one tablespoon of ground flaxseed with three tablespoons of water. Let it sit until it thickens. Use plant-based cream cheese and dairy-free milk. These swaps keep the rolls light and fluffy. These variations and modifications allow everyone to enjoy strawberry cheesecake sweet rolls. Check out the Full Recipe for all the details. To keep your strawberry cheesecake sweet rolls fresh, store them in an airtight container. Place parchment paper between the rolls to prevent sticking. This method keeps them soft for about three days. If you want to enjoy these rolls later, freezing is a great option. Wrap each roll tightly in plastic wrap. Then, place them in a freezer bag. They can last up to three months. When you’re ready to eat, just thaw them in the fridge overnight. To restore softness, reheat the rolls gently. Preheat your oven to 350°F (175°C). Place the rolls on a baking sheet and cover them with foil. Heat for about 10-15 minutes. This keeps them warm and fluffy. You can also use a microwave on low power for 15-20 seconds if you’re in a hurry. Enjoy your sweet rolls warm and tasty! Yes, you can use frozen strawberries. They work well in the filling. Just remember to thaw them first. Drain any excess liquid to avoid a soggy filling. Fresh strawberries give a brighter taste, but frozen ones can be handy. They may be softer, but they still taste great in the rolls. You can make these rolls ahead of time. Prepare the dough and filling, then assemble the rolls. Cover them tightly and store in the fridge for up to 24 hours. When ready to bake, let them sit at room temperature for 30 minutes. This helps them rise before baking. You can also freeze the unbaked rolls. Just thaw and let them rise before baking. If your dough doesn’t rise, check a few things. First, make sure your yeast is fresh. Old yeast may not activate. Next, the warm milk should be around 110°F (43°C). Too hot or too cold will kill the yeast. Lastly, make sure you cover the dough in a warm spot. If it still doesn’t rise, you can try again with new ingredients. Yes, you can make the filling without cream cheese. Use ricotta cheese or mascarpone for a lighter option. You can also mix in a bit of yogurt for tanginess. For a sweeter taste, consider using whipped cream instead. Each option offers a different flavor and texture, so feel free to experiment! You now have a clear plan for making sweet rolls with a cheesecake twist. We covered the ingredients, step-by-step instructions, and tips to get the best results. Flavor variations and storage tips ensure you can share these rolls with friends. Remember, baking is all about having fun and experimenting. Enjoy each bite, and try different flavors along the way. Your kitchen will soon smell amazing, and your taste buds will thank you!

Strawberry Cheesecake Sweet Rolls Delightful and Warm

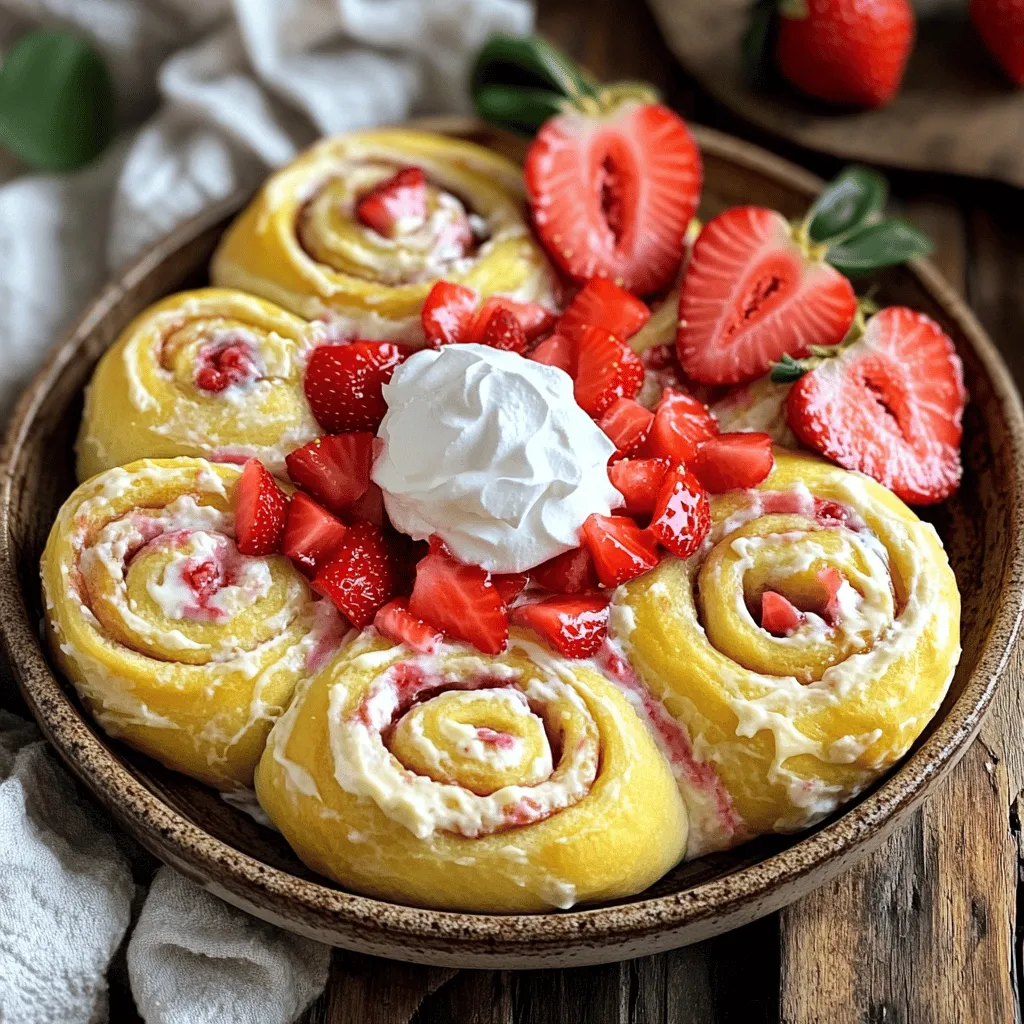
Imagine waking up to the heavenly scent of warm strawberry cheesecake sweet rolls. You can make this dream a reality

To create a hearty Dwarven Feast stew, gather the following fresh ingredients: - 1 pound beef stew meat, cubed - 1 pound lamb shoulder, cubed - 4 large carrots, peeled and chopped - 3 medium potatoes, diced - 2 medium onions, finely chopped - 4 cloves garlic, minced - 1 cup beef broth - 1 cup vegetable broth - 2 tablespoons high-quality olive oil - 2 teaspoons dried thyme - 2 teaspoons smoked paprika - Salt and pepper to taste - Fresh parsley for garnish - 1 cup roasted chestnuts, roughly chopped Each ingredient plays a vital role in building flavor. The beef and lamb create a rich base. Carrots and potatoes add sweetness and heartiness. Onions and garlic provide depth. Broths help blend everything together. Spices like thyme and smoked paprika add warmth and earthiness, while chestnuts bring a unique texture. Fresh parsley brightens the dish as a garnish. For the full recipe, follow my detailed instructions to bring this stew to life. Start by getting your ingredients ready. Chop the vegetables first. Peel four large carrots and cut them into thick rounds. Dice three medium potatoes into chunks. Finely chop two medium onions and mince four cloves of garlic. Next, cube one pound of beef stew meat and one pound of lamb shoulder into bite-sized pieces. This prep work makes cooking much easier. Now, let’s cook. In a large, heavy pot, heat two tablespoons of high-quality olive oil over medium heat. Once it shimmers, add the onions and garlic. Sauté them for about four to five minutes until the onions turn translucent. Stir often to avoid burning. Next, raise the heat to medium-high and add the cubed beef and lamb. Brown the meat on all sides for about eight to ten minutes. Make sure not to overcrowd the pot; you want a good sear. If needed, do this in batches. Once the meat is brown, it's time to combine everything. Add the chopped carrots, diced potatoes, and one cup of roasted chestnuts to the pot. Stir well to mix all the ingredients. Pour in one cup of beef broth and one cup of vegetable broth. Make sure the liquid covers the ingredients by about an inch. This helps create a rich, tasty stew. Next, add two teaspoons of dried thyme and two teaspoons of smoked paprika. Season with salt and freshly cracked pepper. Stir to coat everything evenly. Now, raise the heat until it boils. Once it boils, reduce the heat to low. Cover the pot and let it simmer for one and a half to two hours. Stir occasionally. If the stew gets too thick, add more broth or water. After the time is up, taste the stew. Adjust the seasoning with more salt and pepper if needed. Serve hot, garnished with fresh chopped parsley for a great finish. For a true Dwarven experience, serve it in rustic bowls with crusty bread on the side. Enjoy this hearty meal! To make your Dwarven Feast even better, consider these seasoning ideas: - Add a splash of red wine for depth. - Use smoked salt for a more robust taste. - Experiment with different spices like cumin or coriander. When it comes to herbs, fresh herbs bring vibrant flavors. Fresh parsley or thyme can brighten your stew. Dried herbs work well too, but they may need more time to release their flavors. If using dried herbs, add them earlier in the cooking process. Browning the meat properly is key. Use a heavy pot and heat it well before adding meat. This creates a nice crust and locks in flavors. Brown the meat in batches if needed. Overcrowding the pot leads to steaming, not browning. For the right stew consistency, aim for a thick, hearty texture. If your stew is too thick, add more broth or water. If it's too thin, let it simmer longer with the lid off. Stir often to prevent sticking. Serve your Dwarven Feast in rustic bowls or on wooden platters. This adds to the hearty feel of the dish. For a lovely touch, use a sprig of fresh parsley on top. Pair your stew with crusty bread for dipping. This classic combo not only fills the belly but also enhances the meal's warmth and comfort. Enjoy the rich flavors and cozy vibes! {{image_4}} You can switch out the beef and lamb in this stew. Chicken works well. It adds a lighter taste. Pork also makes a great option. If you want a vegetarian meal, use hearty mushrooms. They give a nice texture. For a vegan option, try tofu or tempeh. Both soak up flavors well. Seasonal vegetables can really change the stew. Use root veggies like parsnips or turnips in winter. In summer, add zucchini or bell peppers for freshness. You can also swap broths. Try chicken broth for a lighter flavor. For more depth, use a rich mushroom broth. Experimenting will keep your stew exciting! Spices can enhance the stew's taste. Try adding a pinch of cayenne for heat. A splash of soy sauce or Worcestershire sauce adds umami. You might also stir in some herbs like rosemary or bay leaves. Grains can be a great addition too. Barley or lentils will make it heartier. They also soak up the broth nicely. To store leftovers safely, let the stew cool first. Once cooled, spoon it into airtight containers. Glass or plastic containers work well. Be sure to label them with the date. This way, you know when to eat them. Leftovers can last in the fridge for up to three days. Freezing stew is easy. Use freezer-safe bags or containers. Leave some space for the stew to expand as it freezes. For best results, freeze it in single-serving portions. When you're ready to eat, thaw it overnight in the fridge. This keeps the flavor fresh and tasty. Reheat the stew on the stove for best taste. Use a medium heat setting and stir often. This helps keep the stew’s texture intact. You can also use a microwave for quick heating. Just be sure to cover it to avoid splatters. Enjoy your warm Dwarven Feast! A Dwarven Feast is a hearty meal often shared among friends and family. It has roots in Dwarven culture, known for its love of rich flavors and communal dining. Traditionally, these feasts celebrate bounty and togetherness, featuring robust dishes like stews, meats, and breads. The Dwarven Feast reflects a deep bond with the earth, sourcing ingredients from the land. This meal promotes warmth and connection, making it perfect for gatherings. Preparing a Dwarven Feast takes about 20 minutes for prep. The total cooking time is around 2 hours. You will need to sauté vegetables and brown meat before simmering the stew. This slow cooking method helps the flavors develop and ensures tender meat. Patience is key to achieving that rich, deep taste. Yes, you can make Dwarven Feast ahead of time. Stews often taste better the next day. The flavors blend and deepen overnight. Store the stew in the fridge and reheat when ready to serve. Making it in advance saves time and allows you to enjoy the feast with less stress. Serve Dwarven Feast in rustic bowls or on wooden platters. This adds a touch of charm. Pair the stew with crusty bread for dipping. A sprinkle of fresh parsley on top elevates the dish visually. A side of pickles or roasted vegetables also complements the flavors well. Absolutely, you can customize the Dwarven Feast recipe. Swap meats or add different vegetables based on your taste. Use chicken or a mix of mushrooms for a vegetarian option. Adjust the spices to create your own flavor profile. The key is to maintain the heartiness while making it your own. Check the Full Recipe for ideas on ingredient swaps. The Dwarven Feast recipe combines rich meats, hearty vegetables, and bold flavors. We explored ingredient preparation, cooking steps, and essential tips to enhance your stew. I shared variant options, from meat swaps to vegan choices. Storing and reheating methods ensure you enjoy every bite later. Now, you can create this warming dish for any gathering. Embrace your creativity and make it your own. Enjoy the comfort of the Dwarven Feast!

Dwarven Feast Hearty and Flavorful Stew Recipe

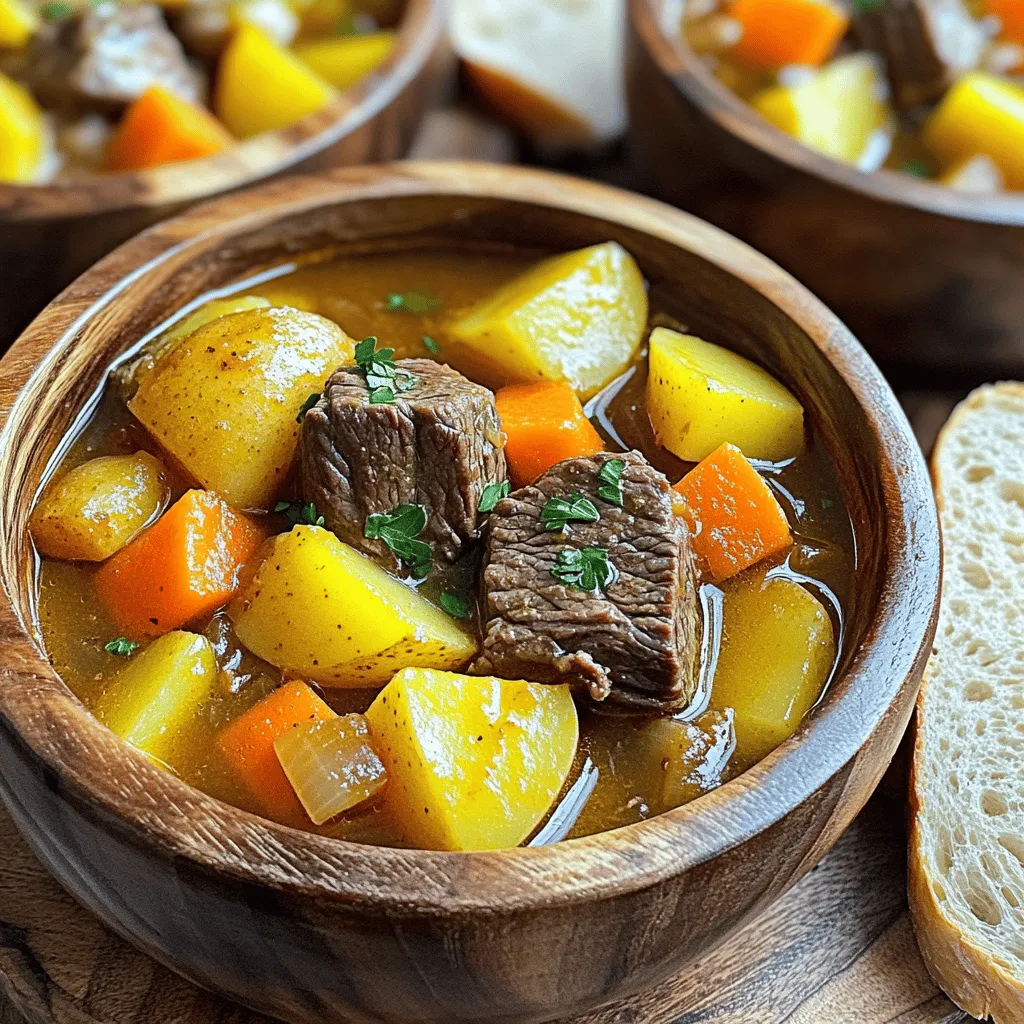
Welcome to my cozy kitchen! Today, I will share my favorite Dwarven Feast recipe. This hearty and flavorful stew brings

- 2 cups cooked chicken, shredded - 8 oz cream cheese, softened to room temperature - 1 cup shredded cheddar cheese, divided - 1 cup sour cream - 1 can (10 oz) enchilada sauce, divided - 8 small flour tortillas - 1 teaspoon garlic powder - 1 teaspoon ground cumin - ½ teaspoon chili powder - Salt and pepper to taste - Fresh cilantro leaves, for garnish To make these Easy Cream Cheese Chicken Enchiladas, you will first need the main ingredients. Shredded chicken gives you a great base. You can use leftover chicken or rotisserie chicken. Cream cheese brings creaminess. The cheddar adds a nice cheesy flavor. Sour cream helps bind everything together. The enchilada sauce adds spice and moisture. Next, you will want to mix in the seasonings. Garlic powder gives a rich taste. Ground cumin adds warmth. Chili powder brings a touch of heat. Adjust salt and pepper to your liking. Finally, don't forget the garnish! Fresh cilantro adds color and a burst of freshness. It makes the dish look and taste even better. You can find the full recipe above for step-by-step guidance on making these delicious enchiladas. - Preheat the Oven: Set your oven to 350°F (175°C). - Prepare the Baking Dish: Spread about ¼ cup of enchilada sauce on the bottom of a 9x13-inch baking dish. This helps keep the enchiladas from sticking. - Combine Ingredients: In a bowl, mix together the cooked chicken, softened cream cheese, ½ cup of shredded cheddar cheese, sour cream, garlic powder, cumin, chili powder, and a pinch of salt and pepper. - Mix Thoroughly: Stir until everything blends into a creamy filling. This part is key for great flavor. - Fill & Roll Tortillas: Take a flour tortilla and place about ¼ cup of the chicken mixture in the center. Roll it up tightly and place it seam-side down in the baking dish. - Arrange in Baking Dish: Repeat this process until all tortillas are filled and snugly fit in the dish. - Add Remaining Sauce and Cheese: Pour the rest of the enchilada sauce over the rolled tortillas. Make sure all are well covered. Then sprinkle the remaining cheddar cheese on top. - Baking Time: Bake in the oven for 25-30 minutes, until the cheese is bubbly and golden brown. - Cool and Slice: Once baked, take the dish out and let it cool for a few minutes. This makes it easier to slice. - Garnish and Serve: Before serving, add fresh cilantro on top for a nice touch. Follow these steps for a tasty meal! For full details, check out the Full Recipe. - Flour vs. Corn Tortillas: Which to use? I prefer flour tortillas for these enchiladas. They are soft and easy to roll. Corn tortillas are good too, but they can break. If you love corn, use them! - How to warm tortillas for easier rolling To warm tortillas, heat them in a pan for 10-15 seconds each side. You can also wrap them in a damp paper towel and microwave for 30 seconds. This makes them soft and easy to roll. - Adding Spice: Optional ingredients for heat If you like heat, add jalapeños or cayenne pepper to the filling. You can also use spicy enchilada sauce. This adds a nice kick! - Using Different Cheeses: Variations for cheese lovers Try mixing different cheeses for fun flavors. Pepper jack cheese adds spice. Mozzarella makes it super gooey. Experiment with what you love! - Substitutions: Low-fat cream cheese or chicken alternatives For a lighter dish, use low-fat cream cheese. You can also use shredded turkey for a leaner option. Both keep the creaminess but cut calories. - Add Vegetables: Mix in spinach or peppers Adding veggies boosts the nutrition. Spinach, bell peppers, or zucchini mix in well. You can sneak in extra greens without losing flavor. For more cooking tips, check out my [Full Recipe]. {{image_4}} - Replace Chicken with Beans: You can use black beans or pinto beans. This makes a tasty, meatless option. - Additional Veggies: Add zucchini, mushrooms, or bell peppers for extra flavor and nutrition. These veggies blend well with the creamy filling. - Adding Jalapeños: Slice fresh or pickled jalapeños into the filling. This adds a nice heat and flavor to your enchiladas. - Spicy Enchilada Sauce: Use a spicy store-bought sauce or make your own. A homemade blend can include tomatoes, chili powder, and garlic for a kick. - Extra Cheese Options: Try using pepper jack or mozzarella cheese. These cheeses melt beautifully and add depth to the dish. - Cheese Sauce Topping: For an ultra-creamy touch, drizzle cheese sauce over the enchiladas before baking. This option is great for cheese lovers! Feel free to mix and match these ideas to create your perfect enchiladas! You can explore more about these options in the Full Recipe. To store leftovers, place the enchiladas in an airtight container. This keeps them fresh and tasty. You can also cover them tightly with plastic wrap. Store them in the fridge. For the best taste, eat them within 3 to 4 days. The flavors will stay good, but the texture may change over time. If you want to keep the enchiladas longer, freezing is a great option. Wrap each enchilada in foil or plastic wrap. Place them in a freezer-safe bag. Make sure to remove as much air as possible. You can freeze them for up to 3 months. When you are ready to enjoy, simply thaw them overnight in the fridge. To reheat, you can bake them straight from frozen. Cover with foil and heat at 350°F (175°C) for about 30-40 minutes. If they are thawed, bake for 20 minutes until warm. These methods help keep your Easy Cream Cheese Chicken Enchiladas delicious and ready to eat! Yes, you can prepare these enchiladas in advance. Just follow these tips: - Assemble the enchiladas but do not bake them yet. - Cover the dish tightly with foil or plastic wrap to keep them fresh. - Store them in the fridge for up to 24 hours. When you are ready, uncover and bake them as directed. To create a balanced meal, consider these sides: - Mexican rice brings a nice texture. - Refried beans add protein and fiber. - Guacamole offers a creamy contrast. - Corn salad gives freshness and color. These options will make your meal fun and tasty. Absolutely! You can use other proteins like: - Ground turkey for a lighter option. - Shredded beef for a hearty flavor. - Black beans for a vegetarian choice. These alternatives fit well in this easy recipe. You can make your own enchilada sauce with simple ingredients. Here’s a quick recipe: - 1 can of tomato sauce - 1 tablespoon chili powder - 1 teaspoon cumin - Salt and pepper to taste Mix these and simmer for about 10 minutes. You can also use salsa if you need a quick substitute. Yes! You can easily make these enchiladas gluten-free: - Use corn tortillas instead of flour. - Check your enchilada sauce for gluten. Many brands are gluten-free. With these swaps, everyone can enjoy this dish. This recipe for Easy Cream Cheese Chicken Enchiladas offers tasty flavors with simple steps. We covered each ingredient, from the chicken to the spices, and how to assemble and bake the dish. I shared tips for storage, making it ahead of time, and even variations like vegetarian options. Whether you're feeding a crowd or just yourself, these enchiladas are sure to please. Enjoy the satisfaction of creating a delicious meal everyone will love!

Easy Cream Cheese Chicken Enchiladas Simple Recipe

Are you ready to make a delicious meal that’s easy and quick? My Easy Cream Cheese Chicken Enchiladas Simple Recipe

Older posts
Newer posts
← Previous Page1 … Page28 Page29 Page30 … Page44 Next →

dsad

© 2025 lazychefmagic • Built with GeneratePress

Our Policies

  • Copyright Policy
  • Cookie Policy
  • GDPR Policy
  • Privacy Policy
  • Disclaimer
  • Terms Of Use

More Information

  • Home
  • About
  • Contact
  • Appetizers
  • Dessert
  • Dinner
  • Drinks
©2025, lazychefmagic About Back To Top