Skip to content
DisclaimerTerms Of UseGDPR PolicyCookie Policy

lazychefmagic

  • Home
  • Drinks
  • Appetizers
  • Dinner
  • Dessert
  • About
  • Contact
  • Privacy Policy
DisclaimerTerms Of UseGDPR PolicyCookie Policy

Amanda

For these tasty tacos, you need just a few main ingredients: - 1 large head of cauliflower, cut into bite-sized florets - 8 small corn or flour tortillas, warmed - 1 ripe avocado, sliced into thin wedges - 1 cup red cabbage, finely shredded - 1/2 cup fresh cilantro, chopped - 1 lime, cut into wedges To make the cauliflower flavorful, use these seasonings: - 2 tablespoons extra virgin olive oil - 1 teaspoon smoked paprika - 1 teaspoon ground cumin - 1/2 teaspoon garlic powder - 1/2 teaspoon onion powder - Salt and freshly ground black pepper to taste The combination makes the cauliflower shine. When you roast it, these flavors will blend beautifully. Feel free to add some fun toppings: - Hot sauce for a spicy kick - Additional lime wedges for extra zest You can serve the tacos on a bright platter. Adding more cilantro on top makes it look great. This dish is simple but so satisfying. For the full recipe, check out the instructions above. First, set your oven to 425°F (220°C). This high heat helps the cauliflower roast well. While the oven warms, prepare your ingredients. Cut the cauliflower into bite-sized florets. Place them in a large bowl for seasoning. Drizzle 2 tablespoons of extra virgin olive oil over the florets. Sprinkle in 1 teaspoon of smoked paprika, 1 teaspoon of ground cumin, 1/2 teaspoon of garlic powder, and 1/2 teaspoon of onion powder. Add salt and pepper to taste. Toss them well until each floret is coated. Line a baking sheet with parchment paper for easy cleanup. Spread the cauliflower in a single layer on the sheet. Roast for 25-30 minutes. Stir halfway through for even browning. The cauliflower should be tender and golden brown when done. While the cauliflower roasts, heat a skillet over medium heat. Take your tortillas and warm each side for about 30 seconds. This makes them soft and flexible. You want them just warm enough to hold your tasty filling. Once the cauliflower is roasted, grab your warm tortillas. On each tortilla, place a generous scoop of the roasted cauliflower. Add sliced avocado, a handful of shredded red cabbage, and a sprinkle of chopped cilantro. Serve with lime wedges for a zesty touch. If you like it spicy, add some hot sauce on the side. For the full recipe, check out the section above. Enjoy your beautiful, tasty tacos! To make cauliflower tacos great, start by cutting the cauliflower into small, even florets. This helps them cook evenly. Roasting at 425°F (220°C) gives you a nice, crispy texture. I like to toss the florets with olive oil and spices. This coating helps them get golden and flavorful. Stir them halfway through roasting. This ensures every piece cooks well and develops a nice color. These tacos shine when served with fresh sides. I love adding a simple salad with greens and a zesty dressing. You can also try black beans for protein. They add a nice contrast in flavor and texture. If you want something crunchy, add tortilla chips with salsa. For a cooling touch, a dollop of vegan sour cream works well too. For the perfect meal, consider pairing these tacos with rice. Cilantro lime rice adds a nice twist. You can also serve roasted vegetables for added nutrients. If you enjoy a bit of heat, spicy pickled jalapeños can give your meal a kick. These additions make the meal more exciting and satisfying. For the full recipe, dive deeper into these delicious vegan cauliflower tacos! {{image_4}} You can switch up the filling to keep things fresh. Try using roasted chickpeas or black beans for added protein. Both options pack a flavor punch and add texture. You could also use jackfruit for a pulled meat-style taco. It absorbs seasonings well and gives a meaty feel. Each option brings new taste and nutrition to your meal. If you need gluten-free tacos, corn tortillas are the best choice. They are tasty and safe for those with gluten issues. You can also use lettuce wraps for a crunchy, low-carb option. Just remove the stems from large lettuce leaves. Fill them with roasted cauliflower, and you have a fresh, gluten-free taco. Want to spice things up? Add more heat with jalapeños or a spicy salsa. You could also use different seasonings like chili powder or curry powder for a unique twist. For a smoky flavor, try chipotle powder or smoked salt. Mix and match to create your perfect bite. Each change offers a new taste adventure! Check the Full Recipe for more ideas. After enjoying your vegan cauliflower tacos, you may have some leftovers. To store them, place the tacos in an airtight container. Make sure to keep the tortillas and fillings separate. This helps prevent sogginess. Store the container in the fridge for up to three days. When you're ready to enjoy your leftover tacos, reheating is simple. Heat a skillet over medium heat. Place the taco fillings in the pan and warm them for about 5 minutes. For the tortillas, you can wrap them in foil and place them in the oven at 350°F (175°C) for 10 minutes. This keeps them soft and warm. If you want to save your tacos for later, freezing is an option. To freeze, prepare the taco fillings but do not warm the tortillas. Place the cooled filling in a freezer-safe bag. Squeeze out the air and seal it tightly. You can freeze the filling for up to two months. When you're ready to eat, thaw the filling in the fridge overnight. Then, warm it up and serve it with fresh tortillas. Enjoy your tasty vegan cauliflower tacos straight from your freezer! Check out the Full Recipe for more details. Cauliflower is packed with nutrients. It is low in calories but high in fiber. This makes it great for digestion and weight loss. It also has vitamins C and K, which help your body fight illness. Cauliflower contains antioxidants, which protect your cells from damage. Plus, it is a good source of folate, which supports healthy cell growth. Yes, you can prepare these tacos ahead. Roast the cauliflower and store it in the fridge for up to three days. When you are ready to eat, reheat the cauliflower in the oven or microwave. Warm the tortillas just before serving. This way, you can enjoy fresh-tasting tacos in no time. You can easily adjust the recipe for various diets. For gluten-free eaters, use corn tortillas instead of flour. You can also swap cauliflower with other veggies like mushrooms or sweet potatoes. If you want more protein, add black beans or lentils to the filling. Make sure to check the seasoning to keep it flavorful. If you want to change up the tortillas, try lettuce wraps for a low-carb option. You could also use rice paper for a unique twist. If you prefer a grain base, use quinoa or brown rice. Each option brings its own taste and texture, making your tacos fun and exciting. These vegan cauliflower tacos offer a fun and tasty meal. We covered main ingredients, seasoning, and toppings. I shared step-by-step instructions for roasting and assembling. You learned tips for the best texture and meal pairings. We explored variations, storage methods, and even answered common questions. In closing, enjoy creating these delicious tacos. Mix and match ingredients to make them your own. Cooking should be fun and easy!

Vegan Cauliflower Tacos Flavorful and Simple Meal

Tired of the same old taco night? How about spicing things up with vegan cauliflower tacos? These flavorful and simple

- 1 pound boneless, skinless chicken thighs, cut into 1-inch cubes - 1/4 cup coconut milk - 2 tablespoons soy sauce - 2 tablespoons honey - 1 tablespoon sriracha sauce (adjust to your spice preference) - 1 tablespoon fish sauce - 1 teaspoon freshly grated ginger - 2 garlic cloves, finely minced - 1 teaspoon fresh lime juice For this recipe, I love using boneless, skinless chicken thighs. They stay juicy and tender when grilled. The marinade is where the magic happens. Coconut milk gives a creamy base, while soy sauce adds umami. Honey brings sweetness, and sriracha adds heat. Fish sauce adds depth to the flavor. - A handful of fresh cilantro leaves, for garnish - Lime wedges, for an additional zing Garnishes make a big difference in how your dish looks and tastes. Fresh cilantro adds a burst of color and freshness. Lime wedges give a tangy kick that brightens the flavors of the skewers. I always encourage you to use them! - Wooden or metal skewers - Grill or grill pan You can use either wooden or metal skewers, but if you choose wooden ones, soak them in water first. This stops them from burning on the grill. A grill or grill pan is essential for that perfect char on the chicken. It gives the skewers a delicious smoky flavor that everyone will love. For the full recipe, check out the details above! To make the chicken juicy and tasty, we need a good marinade. Start by mixing these ingredients in a bowl: - 1/4 cup coconut milk - 2 tablespoons soy sauce - 2 tablespoons honey - 1 tablespoon sriracha sauce - 1 tablespoon fish sauce - 1 teaspoon freshly grated ginger - 2 garlic cloves, finely minced - 1 teaspoon fresh lime juice Whisk them well until smooth. Next, add 1 pound of cubed chicken thighs to the marinade. Stir to coat the chicken evenly. Cover the bowl and put it in the fridge. Marinate for at least 1 hour for good flavor. If you have time, let it sit for up to 4 hours. This wait makes the chicken more flavorful and tender. If you’re using wooden skewers, soak them in water for 30 minutes. This step stops them from burning on the grill. While they soak, preheat your grill to medium-high heat. Once soaked, take the skewers out of the water. Start threading the marinated chicken pieces onto the skewers. Make sure to leave a small gap between each piece. This gap helps the chicken cook evenly. Now it's time to grill! Place the skewers on the hot grill. Grill for about 10 to 12 minutes. Be sure to turn them occasionally. This helps them cook evenly and get those nice grill marks. To check if the chicken is done, use a meat thermometer. The chicken should reach an internal temperature of 165°F. When it is cooked, take the skewers off the grill and let them rest for a few minutes. This resting time makes the chicken juicy and delicious. Serve your sweet and spicy Thai chicken skewers with garnishes like fresh cilantro and lime wedges. Enjoy these tasty bites! For the full recipe, check out the detailed instructions above. To get the best taste, marinate the chicken for at least one hour. For deeper flavors, aim for four hours. This lets the chicken soak up the marinade. If you like more heat, add extra sriracha. Just a little can boost the spice without overpowering the dish. If grilling isn’t an option, you can bake or broil the skewers. Baking works well at 400°F for about 20 minutes. Broiling gives a nice char; just keep an eye on them. Make sure to turn the skewers halfway through cooking. This ensures even cooking and great flavor. For a festive look, serve the skewers on a bright plate. Arrange lime wedges and cilantro around them. This adds color and freshness. You can also use skewers to create shapes or patterns on the plate. Garnishes like sesame seeds or sliced chilies can add a fun touch, too. {{image_4}} You can switch up the protein for a new taste. Shrimp or tofu work great in this recipe. Shrimp cooks quickly and adds a nice flavor. Tofu soaks in the marinade well and is perfect for a vegetarian option. If you want to change the marinade, you can try a peanut sauce. Just mix peanut butter, soy sauce, and a bit of lime juice. This adds a creamy texture and nutty flavor to your skewers. Or, use a teriyaki sauce for a sweeter taste. Both options keep the dish exciting and fresh. These skewers pair well with rice or noodles. Serving them on a bed of jasmine rice soaks up the sauce. You can also toss them with stir-fried noodles for a hearty meal. Adding vegetables to the skewers makes them colorful and healthy. Bell peppers, onions, or zucchini work well. Just cut them into bite-sized pieces and add them to the skewers. This not only adds flavor but also makes the dish more appealing. You can find the full recipe [here]. After enjoying your sweet and spicy Thai chicken skewers, you may have some leftovers. First, let the skewers cool down to room temperature. This step is important. Placing hot food directly into the fridge can raise the temperature inside, which is not safe. For storage, use airtight containers. Glass or plastic containers work well. Make sure they are sealed tightly to keep the chicken fresh. Store the skewers in the fridge for up to three days. If you want to keep them longer, consider freezing them. Wrap each skewer in plastic wrap and place them in a freezer bag. They can last up to three months in the freezer. To enjoy your leftover skewers, reheating them properly is key. The best method is to use an oven or an air fryer. Preheat your oven to 350°F. Place the skewers on a baking sheet. Heat them for about 10-15 minutes. This method keeps the chicken juicy. If you use an air fryer, set it to 350°F as well. Heat the skewers for about 5-7 minutes. Both methods help maintain the texture and flavor of your chicken skewers. Avoid using a microwave, as it can make the chicken rubbery. For extra flavor, drizzle a bit of lime juice over the reheated skewers. This simple touch can brighten the dish and enhance the taste. Yes, you can use chicken breast. Chicken breast is leaner, so it cooks faster. This means it can dry out if overcooked. Chicken thighs are juicier and more forgiving. They stay tender and flavorful, even if cooked a bit longer. If you choose breast, watch the cooking time closely. You can marinate the chicken for 1 to 4 hours. Marinating for at least 1 hour lets the flavors soak in. For a bolder taste, go for 4 hours. However, don’t marinate for more than 12 hours. The meat can become too soft and mushy if left too long. These skewers pair well with many sides. Here are some tasty options: - Jasmine rice or coconut rice - Stir-fried veggies or a fresh salad - Peanut sauce or sweet chili sauce for dipping - Cold beer or Thai iced tea to drink For a full recipe, check out the Sweet and Spicy Thai Chicken Skewers. Enjoy! You now know how to make delicious sweet and spicy Thai chicken skewers. Start with boneless chicken thighs and a tasty marinade of coconut milk, honey, and sriracha sauce. After marinating, grill your skewers and add fresh garnishes like cilantro and lime. Remember, you can swap ingredients and pair them with rice or veggies. Store leftovers carefully and reheat to keep them tasty. Enjoy making this dish for any occasion. Your friends and family will love it!

Sweet and Spicy Thai Chicken Skewers Easy Recipe

Are you ready to fire up your grill and treat your taste buds? These Sweet and Spicy Thai Chicken Skewers

To make creamy mushroom risotto, you need a few key ingredients. These items create the rich flavors and creamy texture you crave. - 1 cup Arborio rice - 4 cups vegetable broth - 2 cups mushrooms (cremini or button), sliced thinly - 1 small onion, finely diced - 2 cloves garlic, minced - 1 cup fresh spinach, roughly chopped - 1 cup grated Parmesan cheese (or for a vegan option, substitute with nutritional yeast) - 2 tablespoons olive oil - 2 tablespoons butter (or vegan butter if preferred) - Salt and freshly ground black pepper to taste - Fresh parsley, chopped, for garnish These ingredients come together to create a dish that's both delicious and simple. Each one plays an important role in building the flavors. For example, Arborio rice is essential for a creamy texture, while the broth adds depth. Mushrooms bring an earthy taste, and Parmesan cheese or nutritional yeast provides richness. When you combine these ingredients in the right way, you make a warm and filling meal. This creamy mushroom risotto is perfect for any occasion. You can find the Full Recipe if you need a detailed guide on how to put everything together. Warming the broth is key for great risotto. If the broth is cold, it slows down cooking. Use a medium saucepan over low heat. Keep it hot, but don’t let it boil. This warmth helps the rice cook evenly and absorb flavors well. Start by heating olive oil in a large skillet. Add one tablespoon of butter as it melts. Dice the onion finely and add it to the pan. Sauté for about three to four minutes. You want the onion soft and clear. Next, add minced garlic and sliced mushrooms. Cook this mix for five to seven minutes. Stir often until the mushrooms are tender and their moisture is released. Now, it’s time to toast the Arborio rice. Pour the rice into the skillet and stir well. You want each grain coated in oil and butter. Toast the rice for one to two minutes. This step enhances flavor and prepares the rice for cooking. Use the ladle method to add broth. Pour one ladle of warm broth into the rice mixture. Stir it often, letting the rice soak up most of the liquid before adding more. This gradual process is essential for creamy risotto. Continue this for about 18 to 20 minutes. The rice should be creamy but still firm, or al dente. In the last five minutes, fold in chopped spinach and the remaining butter. Stir until the spinach wilts into the risotto. Remove the skillet from heat and mix in grated Parmesan cheese. This makes the risotto rich and creamy. Taste and add salt and pepper to your liking. Finish with a sprinkle of fresh parsley for color. Enjoy your creamy mushroom risotto! For the Full Recipe, check the detailed instructions above. To make creamy risotto, stir often while you cook. This helps the rice release its starches, making it creamy. Add broth one ladle at a time. Wait until the rice absorbs most of the liquid before adding more. This method ensures even cooking. Check the rice for doneness. You want it to be al dente. Al dente means the rice is firm but not hard. It should have a slight bite when you chew it. This texture keeps the risotto interesting. One big mistake is overcooking the rice. If you cook it too long, it turns mushy. Keep an eye on your cooking time and the rice's texture. Another common error is using cold broth. Always warm your broth before adding it. Cold broth slows down cooking and affects the risotto's creaminess. Presentation matters when serving risotto. Use individual bowls for a nice touch. Drizzle a little olive oil on top for shine. You can also sprinkle extra Parmesan and parsley for color. For sides, pair your risotto with a fresh salad or grilled veggies. It goes well with a crisp white wine, like Sauvignon Blanc. This combination enhances the dish’s flavors. {{image_4}} For a fun twist, try different mushrooms in your risotto. You can use shiitake, portobello, or oyster mushrooms. Each type brings its own flavor. Mixing mushrooms can create a rich taste. Just remember to slice them thinly for even cooking. If you want a vegan risotto, substitute Parmesan cheese with nutritional yeast. It gives a cheesy taste without dairy. You can also use coconut cream or cashew cream for a rich texture. These options ensure your risotto stays creamy without animal products. Feel free to add more veggies for color and nutrition. Peas and asparagus work well and add a nice crunch. You can also mix in cooked chicken or shrimp for added protein. Just stir them in during the last few minutes of cooking. This makes your risotto heartier and even more delicious. How do you store leftover risotto? Place leftover risotto in an airtight container. Make sure it is cool before sealing. Store it in the fridge. It can stay fresh for up to three days. What are the best practices for reheating? To reheat, add a splash of broth or water. Heat it in a pan over low heat. Stir often to keep it creamy. You can also use a microwave. Just cover it and heat in short bursts. Can you freeze risotto? Yes, you can freeze risotto. However, it may lose some creaminess when thawed. What are the instructions for freezing and thawing? To freeze, let the risotto cool completely. Then, place it in a freezer-safe container. Label it with the date. For thawing, move it to the fridge overnight. Reheat gently on the stove, adding broth to restore creaminess. How long does creamy mushroom risotto last? When stored properly, risotto lasts about three days in the fridge. If frozen, it can last for about two months. What are the signs of spoilage to look out for? Look for off smells or a dry texture. If it has an unusual color, it's best to throw it away. Always trust your senses when it comes to food safety. No, you cannot use regular rice. Arborio rice is special. It has a high starch content. This starch gives risotto its creamy texture. Regular rice does not have this quality. It will not absorb liquid the same way. You will not achieve that rich, smooth feel. Stick with Arborio rice for the best results. To reheat risotto, use low heat on the stove. Add a splash of broth or water. Stir it often to keep it creamy. You can also use the microwave. Add a bit of liquid and cover it. Heat it in short bursts, stirring in between. This keeps your risotto from drying out. The secret lies in patience and stirring. Add broth slowly, one ladle at a time. Stir often to keep the rice moving. This helps release the starch. It creates that creamy texture we love. Taste the rice to ensure it is al dente. To make risotto ahead, cook it until just al dente. Let it cool completely before storing. Place it in an airtight container. When ready to eat, reheat it gently. Add broth to restore creaminess. This way, you save time without losing flavor. For detailed steps and measurements, check the Full Recipe. It guides you through each phase with ease. You’ll have a delicious dish to serve! Making creamy mushroom risotto is both fun and rewarding. You learned about key ingredients like Arborio rice, broth, and mushrooms. I guided you step-by-step, from warming the broth to adding finishing touches. Remember to avoid common mistakes, such as using cold broth or overcooking the rice. You can play with variations too, adding different veggies for taste. Lastly, proper storage keeps leftovers tasty for longer. Enjoy your delicious creation!

Creamy Mushroom Risotto Delicious and Simple Recipe

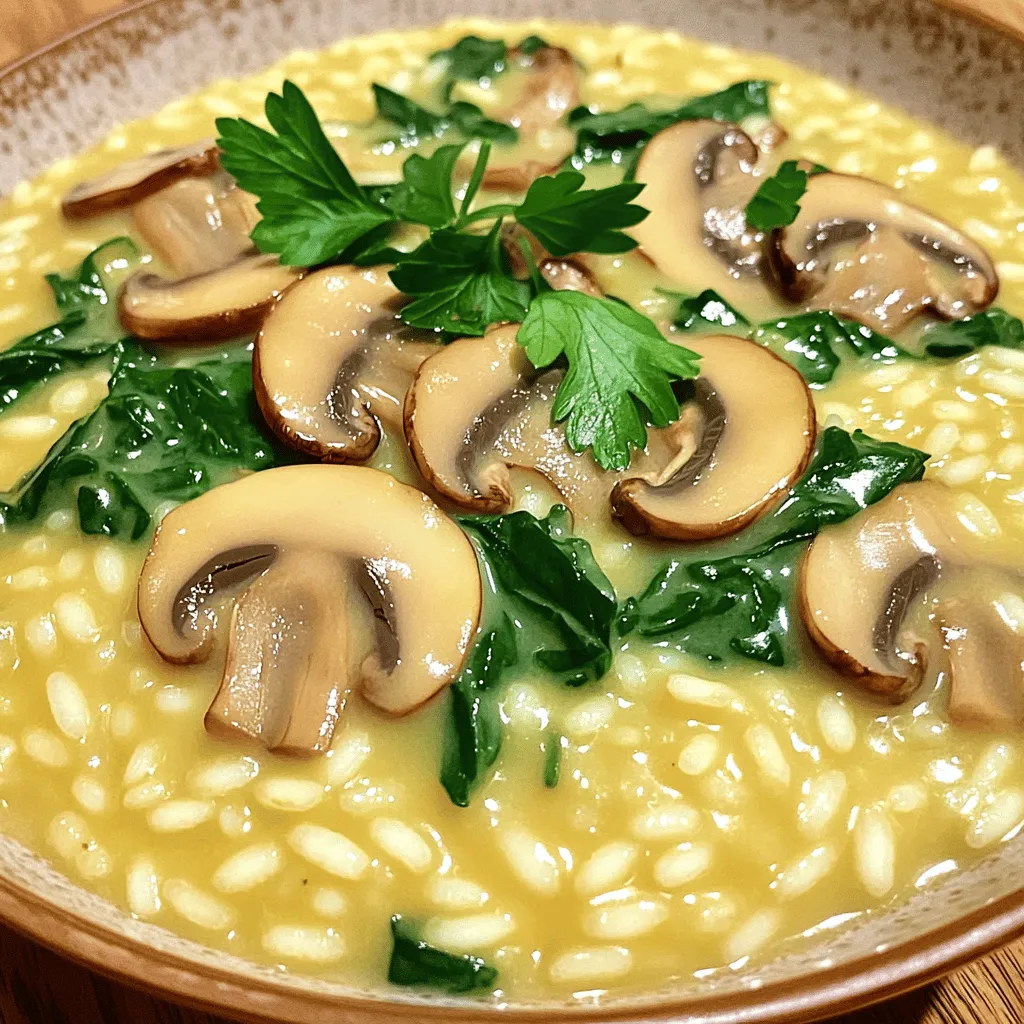
Looking for a comforting dish that’s both delicious and easy to make? My Creamy Mushroom Risotto hits all the right

- 1 cup all-purpose flour: This is the base for your pancakes. It gives them structure. - 1 tablespoon granulated sugar: This adds sweetness and helps the pancakes brown. - 1 tablespoon baking powder: This is key for making your pancakes light and fluffy. - 1/2 teaspoon fine sea salt: This enhances the flavors in your pancakes. - 1 cup whole milk: It adds moisture. You can use almond or oat milk if preferred. - 1 large egg: It binds the ingredients together and adds richness. - 2 tablespoons unsalted butter: This adds flavor and moisture. Use coconut oil for a dairy-free option. - 1 teaspoon pure vanilla extract: This gives a lovely aroma and taste. - 1 cup fresh blueberries: They add natural sweetness and vibrant color. Frozen blueberries work too; just thaw and drain them. - Additional butter or oil: For greasing the pan to prevent sticking. - Maple syrup and whipped cream: These are optional but make for a delicious topping. - Always choose fresh blueberries; look for plump, firm ones. - For flour, choose unbleached all-purpose for better flavor. - Buy organic milk and eggs for the best quality and taste. - If possible, get local butter for freshness. - To make gluten-free pancakes, swap all-purpose flour for gluten-free flour. - Use almond milk or coconut milk for a dairy-free version of this recipe. - Replace sugar with honey or maple syrup for a natural sweetener option. Using these tips, you can create the perfect fluffy pancakes with blueberries that fit your taste and dietary needs. Enjoy every bite! To make fluffy pancakes, start with your dry ingredients. Measure 1 cup of all-purpose flour, 1 tablespoon of granulated sugar, 1 tablespoon of baking powder, and 1/2 teaspoon of fine sea salt. Place these in a large mixing bowl. Whisk them together until no lumps remain. This helps the pancakes rise. Next, prepare your wet ingredients. In another bowl, combine 1 cup of whole milk, 1 large egg at room temperature, 2 tablespoons of melted unsalted butter, and 1 teaspoon of pure vanilla extract. Whisk until smooth. Mixing wet ingredients well ensures a uniform batter. Now, it’s time to cook! Preheat your non-stick skillet over medium heat. You want it hot but not smoking. Lightly grease the skillet with butter or oil. For each pancake, pour about 1/4 cup of batter onto the skillet. Watch for bubbles to form on the surface. This process takes about 2-3 minutes. When the edges look set, it’s time to flip. Use a spatula and carefully turn the pancake over. Cook for another 1-2 minutes until golden brown. Once cooked, transfer pancakes to a warm plate. If you’re making more, keep them warm in an oven set to low heat. For serving, stack the pancakes high. Garnish with extra blueberries and a sprinkle of powdered sugar. Drizzle with maple syrup or top with whipped cream for a treat. Enjoy your fluffy blueberry pancakes! For the full recipe, refer to the section above. To make fluffy pancakes, do not overmix the batter. Mixing too much breaks the bubbles that create fluffiness. Stir the batter gently until you see a few lumps. This will help keep your pancakes light and airy. Use the right amounts of ingredients too. The baking powder helps the pancakes rise. If you want taller pancakes, add a little extra baking powder. When choosing blueberries, fresh is best. They are juicy and burst with flavor. If you use frozen blueberries, thaw and drain them first. This keeps the batter from turning purple. To avoid bursting your blueberries, fold them in gently. Do not stir too hard or too fast. This keeps the berries whole and adds nice pops of flavor in every bite. For cooking, choose a non-stick skillet or griddle. This helps the pancakes cook evenly and slide off easily. Preheat it on medium heat before adding batter. Keep your surface well greased with butter or oil. This prevents sticking and helps the pancakes brown nicely. If the surface gets too hot, lower the heat to avoid burning. {{image_4}} You can change the fruits in this recipe. Bananas or strawberries work well. Both fruits add sweetness and flavor. If you need gluten-free pancakes, use almond flour or oat flour. For dairy-free options, try almond milk or oat milk. These swaps keep the pancakes tasty for everyone. You can add spices to make your pancakes special. A hint of lemon zest brightens the flavor. A sprinkle of cinnamon brings warmth. You can also mix in nuts or seeds. Chopped walnuts or sunflower seeds add crunch and make the pancakes even better. Pancakes don't have to be sweet. You can make savory pancakes too. Add cheese and herbs for a fun change. You can serve pancakes stacked high with fresh fruit on top. Drizzle honey or syrup for a sweet touch. You can add yogurt on the side for a creamy finish. Don't forget to explore the Full Recipe for more ideas! To keep your pancakes fresh, let them cool on a wire rack. This helps avoid sogginess. Once cooled, stack them with parchment paper in between each pancake. Use an airtight container for storage. This method keeps them from sticking together. Store them in the fridge for up to three days. You can reheat pancakes in several ways. The microwave is quick but may make them soggy. Heat each pancake for about 20 seconds. For a crispier texture, use a skillet. Heat the skillet on low and add a little butter. Place the pancake in the skillet for about one minute on each side. Toasting is another option. Just pop them in the toaster for a couple of minutes. This keeps them fluffy and warm. To freeze pancakes, stack them with parchment paper. Wrap the stack tightly in plastic wrap, then place it in a freezer bag. This method prevents freezer burn. They can stay fresh for up to three months. When you want to eat them, take them out and let them thaw in the fridge overnight. You can also heat them straight from frozen using the microwave or skillet. This way, you enjoy warm, fluffy pancakes anytime. What makes pancakes fluffy? Pancakes get fluffy from the leavening agents in the batter. In this recipe, baking powder is key. It creates air pockets when mixed with wet ingredients, helping the pancakes rise. The secret is to not overmix. This keeps the batter light and airy. Small lumps are okay! They help make the pancakes tender. Can I make the batter ahead of time? Yes, you can make the batter ahead. Just mix it and cover it. Store it in the fridge for up to 2 hours. If you wait longer, the pancakes might not be as fluffy. The baking powder loses its power over time. When ready to cook, give it a gentle stir. Why are my pancakes too flat? Flat pancakes often mean the batter is overmixed or the baking powder is old. Overmixing breaks down the air bubbles, making them dense. Check your baking powder for freshness. If it’s old, buy new. A good rule is to replace baking powder every six months. How do I fix overcooked pancakes? If pancakes become too brown, lower the heat next time. You want a medium heat for golden pancakes. If they are already overcooked, try serving them with toppings. Maple syrup or whipped cream can help with dryness. What goes well with blueberry pancakes? Blueberry pancakes pair well with maple syrup and whipped cream. Fresh fruit like strawberries or bananas also adds a nice touch. For a twist, try yogurt or a sprinkle of nuts for crunch. Can I add toppings to the batter? Absolutely! You can add toppings like chocolate chips or nuts right into the batter. Just fold them in gently. This gives your pancakes a fun surprise in every bite. Enjoy experimenting with flavors! This article covered the key steps to making perfect pancakes. We discussed ingredients, preparation, cooking, and storage. You learned how to create fluffy textures and flavorful variations. Whether you prefer fresh fruit or unique spices, you can customize your pancakes to suit your taste. Remember, practice makes perfect. Keep experimenting with different techniques until you find your ideal pancake recipe. Enjoy your cooking and share your delicious results!

Fluffy Pancakes with Blueberries Simple and Tasty Recipe

Get ready to transform your breakfast with my simple and tasty recipe for fluffy pancakes with blueberries! These pancakes are

- 1 can (15 oz) chickpeas - 1 medium onion - 3 cloves garlic - 1 tablespoon fresh ginger - 2 medium tomatoes - 1 can (14 oz) coconut milk - 2 tablespoons curry powder - 1 teaspoon turmeric powder - 1 teaspoon cumin seeds - 1 teaspoon red chili flakes - 2 tablespoons vegetable oil - Salt to taste - Fresh cilantro for garnish - Juice of 1 lime To make a spicy chickpea curry, you need a few simple ingredients. Start with one can of chickpeas. Drain and rinse them well. This helps remove excess sodium. Next, chop one medium onion into small pieces. Dice three cloves of garlic and grate one tablespoon of fresh ginger. These add flavor to your curry. You’ll also need two medium tomatoes, chopped up. They bring freshness and moisture to the dish. Grab one can of coconut milk for creaminess. Then, gather two tablespoons of curry powder and one teaspoon each of turmeric and cumin seeds. These spices give the curry its warmth and depth. Add one teaspoon of red chili flakes if you want extra heat. For cooking, use two tablespoons of vegetable oil. Don’t forget salt to taste. Finally, you’ll need fresh cilantro for garnish and the juice of one lime to brighten the flavors. - Additional spices (e.g., garam masala) - Vegetables (e.g., spinach, bell peppers) - Protein additions (e.g., chicken, tofu) You can customize the curry with optional ingredients. Try adding spices like garam masala for more depth. Include vegetables like spinach or bell peppers for extra nutrition. If you want more protein, add chicken or tofu. These options make the dish heartier. Feel free to mix and match based on your taste! For the full recipe, check out the link provided above. - Prepare the beans and vegetables: Start by draining and rinsing the chickpeas. Dice the onion finely. Chop the tomatoes into small pieces. - Measure out spices and coconut milk: Gather your curry powder, turmeric, cumin seeds, and red chili flakes. Open the can of coconut milk. - Sizzle the spices in oil: Heat vegetable oil in a large pan over medium heat. Add cumin seeds and let them pop for about 30 seconds. - Sauté onions, garlic, and ginger: Add the diced onion and cook until golden brown, about 5-7 minutes. Then stir in minced garlic and grated ginger for 1-2 minutes. - Incorporate tomatoes and spices: Add chopped tomatoes and stir for about 5 minutes. Then mix in curry powder, turmeric, and red chili flakes. Let it cook for 2 minutes. - Add chickpeas and coconut milk: Stir in the rinsed chickpeas. Pour in the coconut milk and mix well. - Simmer and adjust seasoning: Bring the curry to a gentle simmer and cook uncovered for 15-20 minutes. Taste and add salt as needed. - Garnish and serve: Remove from heat and garnish with chopped cilantro. Serve warm over rice or with naan. For more details, check the Full Recipe. - Adjusting spice levels to taste: Start with less chili. You can always add more. This way, you control the heat. Use red chili flakes to spice up the dish as you cook. - Ensuring a smooth sauce texture: Blend the coconut milk well before adding it. This helps mix the sauce evenly. Stir continuously when you pour it in to avoid lumps. - Keeping ingredients for optimal freshness: Use fresh garlic and ginger for the best flavor. Store leftovers in airtight containers. This keeps them tasty for later use. - Serving suggestions for best flavor combinations: Serve your curry over fluffy rice. It soaks up the sauce well. You can also pair it with warm naan for a great meal. - Garnishing ideas to enhance visuals: Use fresh cilantro on top for a pop of color. Lime wedges add a bright touch and a fresh flavor. These simple garnishes make your dish look inviting. {{image_4}} You can easily adapt this recipe to fit vegan and vegetarian diets. If you want to swap out the coconut milk, try using almond milk or oat milk. These alternatives still provide a creamy texture. Adding more vegetables boosts the nutrients too. Consider spinach, bell peppers, or sweet potatoes for added color and vitamins. For those who want a heartier meal, adding chicken or beef works well. Simply cook the meat with the onions before adding the spices. If you prefer plant-based protein, try adding lentils or quinoa. These options keep the dish filling and nutritious. The beauty of curry lies in its spices. You can explore different curry spices based on your taste. For a milder flavor, reduce the chili flakes. To turn up the heat, add more. You can also experiment with spices like garam masala or curry leaves. This way, you can customize the dish to suit your palate. To store your spicy chickpea curry, wait until it cools down. Transfer it to an airtight container. Place it in the fridge. It will last for about 3 to 5 days. For longer storage, you can freeze it. Use a freezer-safe container or bag. Be sure to remove as much air as possible. The curry can stay fresh in the freezer for up to 3 months. Just label the container with the date. When you are ready to enjoy your curry again, there are a few good ways to reheat it. The best method is to use a stovetop. Pour the curry into a pan over low heat. Stir often to prevent it from sticking. You can also use a microwave. Place the curry in a microwave-safe bowl. Cover it loosely with a lid or paper towel to avoid splatters. Heat it in short intervals, stirring between each. To refresh the dish before serving, add a splash of coconut milk or lime juice. This helps bring back the flavor and creaminess. Enjoy your tasty leftovers! Can I use dried chickpeas instead of canned? Yes, you can use dried chickpeas. Soak them overnight and cook until soft. This may take 1-2 hours. What can I serve with Spicy Chickpea Curry? I love to serve this curry with fluffy rice or warm naan. You can also add a side salad for freshness. How can I make this dish spicier? To amp up the heat, add more red chili flakes. You can also use fresh chilies or hot curry powder. How long does it take to cook chickpeas from scratch? Cooking dried chickpeas from scratch takes about 1-2 hours after soaking. It’s best to check them for doneness. Is Spicy Chickpea Curry gluten-free? Yes, this dish is gluten-free! All the ingredients are safe for a gluten-free diet. Can I prepare this dish ahead of time? Absolutely! You can make it a day ahead. Just store it in the fridge and reheat before serving. For the full recipe, check out the recipe section. This blog post guides you in making a flavorful Spicy Chickpea Curry. We covered essential ingredients, step-by-step cooking instructions, and tips to enhance your dish. You can customize the curry to fit your taste or dietary needs. Proper storage and reheating methods ensure you enjoy leftovers too. Remember, cooking is about creativity. Add your favorite spices and ingredients. Enjoy the process and share your delicious curry with others!

Spicy Chickpea Curry Flavorful and Easy Recipe

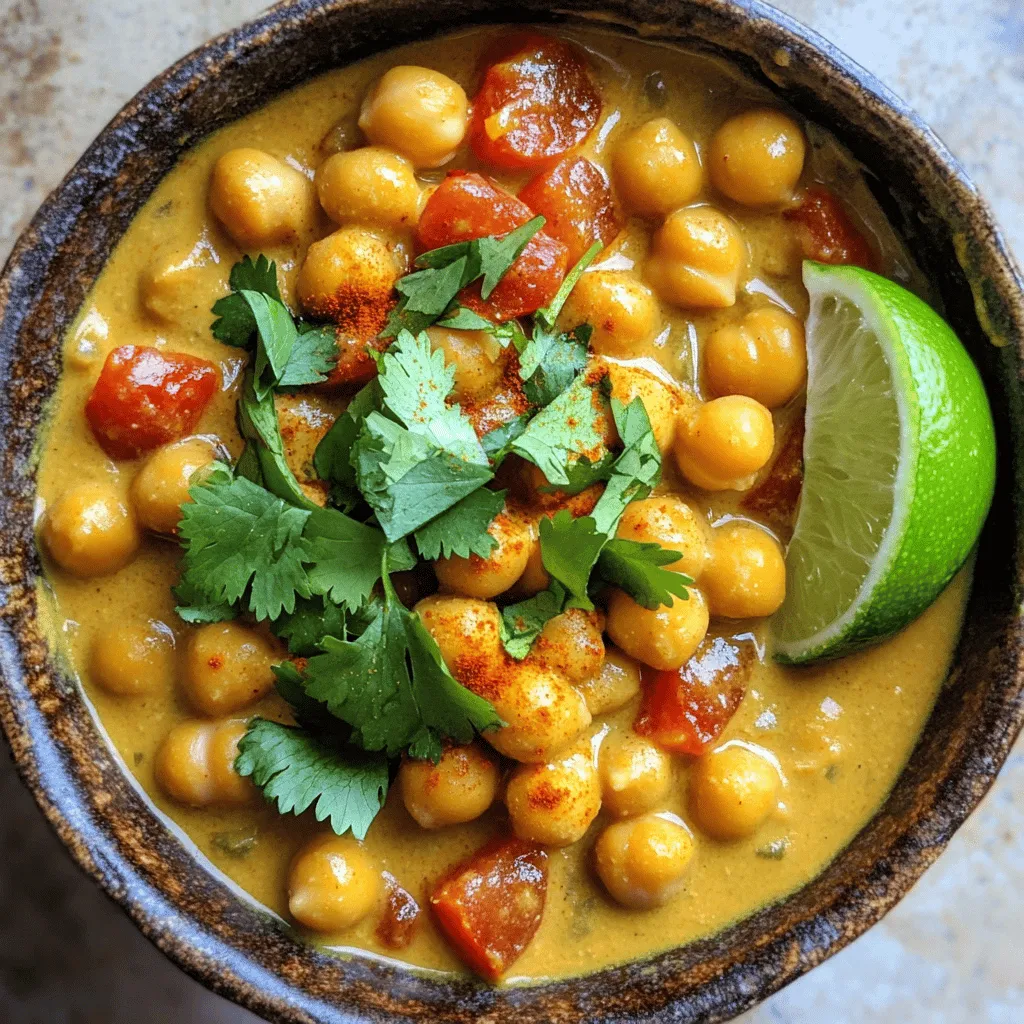
Craving a dish that’s both bold and simple? Look no further than this Spicy Chickpea Curry! Packed with flavor and

- 1 cup semi-sweet chocolate chips - 1 cup mini marshmallows - 1/2 cup graham cracker crumbs - 2 tablespoons unsalted butter, melted - 1/2 teaspoon vanilla extract - Pinch of sea salt - Extra graham crackers or fresh fruit for dipping To make the best S'mores Dip, gather all your required ingredients. You cannot skip the chocolate chips or marshmallows. They make it gooey and sweet. The graham cracker crumbs form a nice base. Melted butter helps bind everything together. A touch of vanilla adds a warm flavor. Just a pinch of sea salt balances the sweetness. Don't forget the extra graham crackers or fruit for dipping! - Substitute for chocolate chips: Use dark or white chocolate chips. - Alternatives for graham cracker crumbs: Try crushed cookies like Oreo or digestive biscuits. - Flavoring suggestions: Add a splash of peppermint extract for a minty twist. If you want to switch things up, you can substitute the chocolate chips. Dark or white chocolate can change the taste. For the graham cracker crumbs, crushed cookies work too. They can add a different texture and flavor. You might also think about flavoring your dip. A hint of mint extract makes it refreshing and fun! 1. First, preheat your oven to 350°F (175°C). This is key for a great bake. 2. In a mixing bowl, combine the graham cracker crumbs, melted butter, and a pinch of sea salt. Mix until everything is coated. The mixture should feel like wet sand. 3. Grab a small baking dish, about 8x8 inches. Spread the crumb mixture evenly on the bottom. Press it down to form a nice crust. 4. Now, sprinkle the semi-sweet chocolate chips over the crust. Make sure to cover it completely. 5. Next, layer the mini marshmallows on top of the chocolate. Spread them out for that classic s’mores look. 6. Carefully place the dish in the oven. Bake for 10-12 minutes. Watch for the marshmallows to turn golden brown. The chocolate should be melted and gooey. 7. After baking, take the dish out. Let it cool for a few minutes. This helps set the layers. 8. Serve warm with extra graham crackers or sliced fresh fruit. This adds a fun mix of flavors and textures. For a charming look, serve the dip right in the baking dish. Top with whole marshmallows or chocolate chunks for a delightful touch. Offer a plate of graham crackers and some fruit slices on the side. Enjoy this indulgent treat! To save time, prepare all your ingredients first. Measure the chocolate chips, marshmallows, and graham cracker crumbs. This way, you can layer them quickly. For gooey marshmallows, keep an eye on the oven. Bake them until golden brown, about 10-12 minutes. This creates a lovely, soft texture that melts in your mouth. The best dippers for S'mores Dip are graham crackers and fresh fruit. Sliced strawberries or bananas add a nice touch. To keep the dip warm, serve it right out of the oven. You can also place the dish on a warming tray. This way, everyone can enjoy the dip while it’s still gooey and warm. One common mistake is overbaking the dip. Keep a close watch on the marshmallows. If they burn, the dip loses its charm. Another mistake is using the wrong ingredient ratios. Stick to the Full Recipe for the best balance. Too much chocolate can make it too sweet, while too few marshmallows may not give that classic feel. {{image_4}} You can easily change up the classic S'mores Dip. One great way is by adding peanut butter. Just stir in a half cup of creamy peanut butter before baking. This adds a rich flavor and a nutty twist. Another fun idea is to make a mint chocolate S'mores Dip. Just mix in a few drops of mint extract with the chocolate chips. This gives a fresh taste that makes each dip special. If you want a vegan version, swap out the butter for coconut oil. Use vegan chocolate chips and marshmallows too. This way, everyone can enjoy the dip without any animal products. For those needing gluten-free options, look for gluten-free graham crackers. Many brands now offer tasty alternatives. This makes it easy for everyone to enjoy the creamy goodness. You can serve S'mores Dip in many fun ways. Try using a chocolate fountain. Guests can dip fruits and treats into the warm melted chocolate and marshmallow mix. It adds a lively touch to any gathering. For a more personal touch, use ramekins. Bake individual servings for each guest. This makes serving easier and adds a cute presentation. Just adjust baking time to match the smaller portions. To keep your S'mores Dip fresh, let it cool first. Then, transfer it to an airtight container. This helps lock in moisture and flavor. You can store it in the fridge for up to three days. If you want to keep it longer, consider freezing it. In the freezer, it stays good for about a month. When it's time to enjoy leftovers, reheat the dip gently. You can use the oven or microwave. If using the oven, set it to 350°F (175°C). Place the dip in a safe dish, cover it with foil, and heat for about 10 minutes. In the microwave, heat in short bursts of 30 seconds. Stir in between to make sure it warms evenly. This way, the marshmallows stay fluffy, and the chocolate melts just right. Enjoy your warm dip with fresh graham crackers or fruit! Can I make S'mores Dip ahead of time? Yes, you can prepare the layers ahead. Just store them separately. Combine them right before baking. This keeps the dip fresh and tasty. What can I use instead of graham crackers? You can use vanilla wafers or digestive biscuits. They give a similar taste and texture. Try crushed cookies for a fun twist! Can I add nuts to the S'mores Dip? Absolutely! Chopped nuts like pecans or walnuts add a nice crunch. Just sprinkle them on top of the chocolate before adding marshmallows. How to avoid burning marshmallows? Watch the dip closely while it bakes. Take it out when the marshmallows are golden brown. If they brown too fast, cover with foil. Is it possible to microwave S'mores Dip? Yes, you can microwave it! Use a microwave-safe bowl and heat in short bursts. Check every 30 seconds until melted and gooey. How many servings does this recipe yield? This recipe makes about 4 to 6 servings. It’s perfect for sharing during gatherings or cozy nights in. Can S'mores Dip be frozen for later use? I do not recommend freezing S'mores Dip. The texture does not hold up well after thawing. Enjoy it fresh for the best taste! This blog post covered all the key parts to making S'mores Dip. We explored required and optional ingredients, plus easy steps for preparation and baking. The tips and tricks ensure that your dip turns out gooey and delicious every time. We also looked at fun variations and smart storage methods. In the end, making S'mores Dip is simple and fun. Enjoy creating your own tasty versions!

S’mores Dip Indulgent and Simple Dessert Recipe

Looking for an easy yet indulgent treat? S’mores Dip is the perfect dessert to satisfy your sweet cravings. With just

Cooking Coconut Lime Chicken is easy and fun! Here’s what you need for a tasty meal. - 4 boneless, skinless chicken breasts - 1 can (13.5 oz) coconut milk - 3 tablespoons fresh lime juice - Zest of 1 lime - 2 tablespoons honey - 2 cloves garlic, minced - 1 teaspoon grated ginger - 1 teaspoon ground coriander - Salt and freshly ground pepper to taste - 2 tablespoons olive oil - Fresh cilantro leaves for garnish - Lime wedges for serving These ingredients combine to create a bright and zesty dish. The coconut milk gives the chicken a creamy texture. Lime juice adds a fresh, tangy kick. Honey balances the flavors with a touch of sweetness. Garlic and ginger bring depth to each bite. When you gather these ingredients, think about freshness. Fresh lime juice tastes best. It brightens the dish and makes it pop. If you can, use organic ingredients. They often have better flavors. This dish serves four people. It’s perfect for a family dinner or a small gathering. You can find the full recipe above to see how to bring these ingredients together. - In a medium bowl, combine the coconut milk, lime juice, lime zest, honey, minced garlic, grated ginger, ground coriander, and a sprinkle of salt and pepper. - Whisk everything together until the mixture is creamy and smooth. This creamy texture helps the flavors blend well. - Place the chicken breasts in a large zip-top bag or shallow dish. - Pour the coconut lime marinade over the chicken, making sure each piece is coated. - Seal the bag or cover the dish and refrigerate for at least 1 hour, or overnight for the best flavor infusion. Longer marination allows the chicken to soak up all the goodness. - Preheat your grill or a large skillet over medium-high heat. If using a skillet, add olive oil and wait until it shimmers. - Remove the chicken from the marinade, reserving any leftover marinade. - Grill the chicken for about 6-7 minutes on each side, or until fully cooked. The internal temperature should reach 165°F (75°C). For skillet cooking, aim for a deep golden color and ensure it's cooked through. - In a small saucepan, bring the reserved marinade to a gentle boil. - Lower the heat and let it simmer for about 5 minutes. This helps to thicken the sauce and enhance its flavor. - After cooking, transfer the chicken to a cutting board and let it rest for a few minutes. This step keeps the chicken juicy. - Slice the chicken and arrange it on a serving platter. Drizzle the thickened sauce over the top. Garnish with fresh cilantro leaves for a vibrant look. Serve with lime wedges for extra citrus flavor. For the complete process, check out the Full Recipe. To get the best flavor from your Coconut Lime Chicken, marinate the chicken for at least one hour. For deeper taste, go for overnight marination. This allows the chicken to soak up every bit of that creamy coconut and zesty lime. Balancing sweetness and acidity is key. The honey adds a sweet touch, while lime juice brightens the dish. Adjust these to your taste for a perfect blend. Cook your chicken at medium-high heat. This helps it cook evenly and keeps it juicy. Use a meat thermometer to check that the inside reaches 165°F (75°C). To prevent the chicken from drying out, don’t overcook it. Keep an eye on the time and be ready to remove it once it’s fully cooked. If you’re using a skillet, cover it with a lid for better heat retention. When plating, make it look fun and colorful! Arrange the chicken on a big platter. Drizzle the thickened sauce over it for a shiny finish. Scatter fresh cilantro leaves around the edges for a pop of green. Lime wedges can be positioned artistically on the side. This adds a bright touch and gives your guests a chance to squeeze more lime juice on their chicken. For more ideas, check the Full Recipe. {{image_4}} For grilled coconut lime chicken, adjust your cooking method. Start by preheating your grill to a medium-high setting. Marinate the chicken as described in the full recipe. When ready, remove the chicken from the marinade and let it sit for a few minutes. This helps the flavors stick better. To enhance the smoky taste, add a few wood chips to your grill. Soak them in water for about 30 minutes before using. This will create a nice aroma while grilling. Cook each side for about 6-7 minutes. Check the internal temperature to ensure it reaches 165°F (75°C). If you prefer baked coconut lime chicken, use your oven instead. Preheat your oven to 400°F (200°C). After marinating the chicken, place it in a baking dish. Pour any leftover marinade over the chicken for extra flavor. Bake for about 25-30 minutes. Use a meat thermometer to check the internal temperature. This method keeps the chicken juicy while allowing the flavors to meld beautifully. For vegan or vegetarian options, you can substitute chicken with tofu or tempeh. Press the tofu to remove excess water and cut it into cubes. Use the same marinade for flavor. For a plant-based twist, try using chickpeas or cauliflower. Adjust the marination time to about 30 minutes for these options. They will absorb the coconut and lime flavors well. This way, everyone can enjoy the taste of coconut lime goodness! To keep your leftover Coconut Lime Chicken fresh, follow these tips: - Refrigeration: Place the chicken in an airtight container. This helps prevent dryness and keeps flavors intact. - Cooling: Let the chicken cool to room temperature before sealing it. This avoids steam build-up, which can make the chicken soggy. If you want to save some for later, freezing is a great option. Here’s how: - Freezing Steps: First, make sure the chicken is fully cooled. Then, wrap each piece tightly in plastic wrap. Place the wrapped pieces in a freezer bag. This helps keep out air, which can cause freezer burn. - Reheating Tips: When you’re ready to eat, thaw the chicken in the fridge overnight. Reheat it in a skillet over medium heat. Add a splash of coconut milk to keep it moist and flavorful. Following these storage and freezing tips will help you enjoy Coconut Lime Chicken at its best, even days later! For the complete recipe, refer to the Full Recipe section. Yes, you can marinate the chicken overnight. Marinating longer lets the flavors soak in better. The coconut milk and lime juice work together to tenderize the meat. This makes the chicken more juicy and flavorful. Overnight marination can elevate your dish to a new level. You have many options for side dishes. Here are some great choices: - Steamed jasmine rice - Quinoa salad - Grilled vegetables - Fresh green salad - Cilantro-lime rice These sides pair well with the bright flavors of the chicken. They add color and texture to your meal. Yes, you can use other meats. Chicken thighs can be a tasty option. Pork tenderloin also works well with this marinade. If you prefer seafood, shrimp can soak in the flavors nicely too. Just remember to adjust cooking times based on the meat you choose. To check if the chicken is done, use a meat thermometer. The internal temperature should reach 165°F (75°C). You can also cut into the thickest part. The juices should run clear, not pink. This way, you ensure the chicken is safe to eat and perfectly cooked. This post covered how to make Coconut Lime Chicken, with a focus on great flavor. We discussed the key ingredients and detailed steps for marinating and cooking. Remember, the marination time is important for flavor. Consider grilling for a smoky taste or trying a plant-based option for variety. With these tips and tricks, you can enjoy your meal and impress your family. Keep your leftovers in the fridge for quick meals later. Enjoy every bite!

Coconut Lime Chicken Flavorful and Simple Recipe

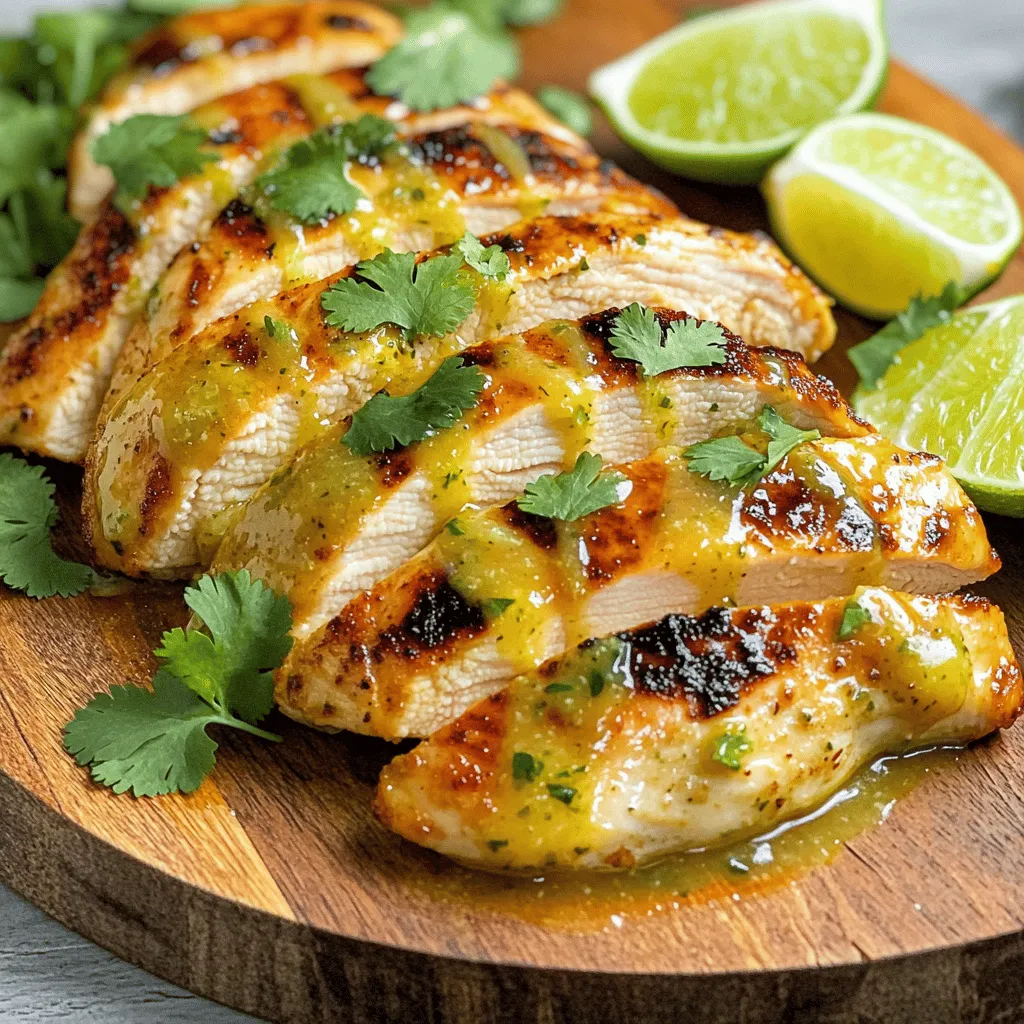
Are you ready to transform dinner with a burst of tropical flavor? My Coconut Lime Chicken recipe is not only

- 1 cup natural peanut butter - 1/2 cup rolled oats - 1/4 cup honey or maple syrup - 1/4 cup unsweetened shredded coconut - 1/4 cup mini chocolate chips - 1/4 cup ground flaxseed - 1 teaspoon pure vanilla extract - A pinch of fine sea salt These ingredients work together to create a tasty and healthy snack. The natural peanut butter gives it a rich flavor and healthy fats. Rolled oats add fiber, making these bliss balls filling. Honey or maple syrup provides sweetness without refined sugar. Unsweetened shredded coconut adds texture and a hint of tropical flavor. Mini chocolate chips give a delightful surprise in each bite. Ground flaxseed is packed with nutrients and helps bind the mixture. Pure vanilla extract enhances the overall taste. Finally, fine sea salt balances the sweetness and boosts flavor. If you need alternatives, here are some ideas: - Peanut Butter Alternatives: You can use almond butter or sunflower seed butter if you're allergic to peanuts. - Sweeteners: If you want a different sweet flavor, try agave nectar or date syrup. - Mix-Ins: Feel free to add dried fruits, nuts, or seeds for extra nutrition and taste. These substitutions can help you make bliss balls that fit your diet and taste preferences. To start, grab a medium mixing bowl. Add 1 cup of natural peanut butter, 1/4 cup of honey or maple syrup, and 1 teaspoon of pure vanilla extract. Use a spatula or whisk to mix until smooth. This step is key for a creamy texture. Next, stir in 1/2 cup of rolled oats, 1/4 cup of unsweetened shredded coconut, 1/4 cup of ground flaxseed, and a pinch of fine sea salt. Mix well, making sure all dry ingredients blend in. Finally, gently fold in 1/4 cup of mini chocolate chips. Once mixed, cover the bowl with plastic wrap. Chill the mixture in the fridge for about 30 minutes. This makes it easier to handle. When the mixture is chilled, it's time to roll. Wet your hands slightly to avoid sticking. Take small portions and roll them into balls about 1 inch in diameter. Aim for uniform sizes. This way, each bliss ball has the same great flavor. Place the rolled balls on parchment paper or a plate. After rolling, put them back in the fridge for 15-20 minutes. This helps them firm up, making them even more enjoyable. For a fun presentation, arrange the bliss balls on a colorful platter. You can drizzle some extra peanut butter on top for flair. Pair these with a refreshing glass of almond milk or your favorite drink. This makes for a tasty treat that’s perfect for any time of day. You can find the Full Recipe to keep making these delightful snacks! To make great Peanut Butter Bliss Balls, you need even mixing. Start by blending the peanut butter, honey, and vanilla extract until it's smooth. Use a spatula or whisk to help with this. Next, add your dry ingredients. This includes oats, coconut, flaxseed, and salt. Mix until everything is well combined. Chilling the mixture is also key. After mixing, cover the bowl and refrigerate for about 30 minutes. This step firms up the mixture, making it easier to roll into balls. A well-chilled mixture helps you achieve the perfect texture. You can easily change these bliss balls to fit your taste. Want more protein? Add a scoop of protein powder or superfoods like chia seeds. If you want to make them nut-free, swap peanut butter for sun butter or seed butter. For a vegan option, just use maple syrup instead of honey. Watch out for overmixing the ingredients. Mixing too much can make the bliss balls dense. Just mix until everything is combined and no dry bits remain. Also, don’t skip the chilling step. If you don’t chill the mixture long enough, your bliss balls will be too soft to roll. Make sure to chill for at least 30 minutes for best results. {{image_4}} You can make Peanut Butter Bliss Balls even more fun by adding flavors. Try mixing in cinnamon for warmth or cocoa powder for a chocolate twist. Both spices enhance the taste without adding extra sugar. You can also toss in dried fruits like raisins or cranberries for sweetness. Nuts can give a nice crunch, too. Almonds or walnuts work great! If you need gluten-free bliss balls, use certified gluten-free oats. They give the same texture and taste without the gluten. For a sugar-free treat, replace honey or maple syrup with stevia or erythritol. This keeps the bliss balls sweet while fitting your diet. Get creative with seasonal bliss balls! Add pumpkin spice in the fall for a cozy flavor. For holidays, you can roll the bliss balls in colored sprinkles or drizzle melted chocolate on top. These themed decorations make them perfect for parties or gifts. You can find the Full Recipe above to start making these tasty treats today! To keep your Peanut Butter Bliss Balls fresh, store them in the fridge. Use an airtight container to prevent them from drying out. They will stay good for up to one week. When you need a quick snack, grab one from the container. Enjoy their rich flavor and energy boost! If you want to keep your bliss balls longer, freezing is a great option. Place them in a single layer on a baking sheet. Freeze until firm, then transfer them to a freezer-safe bag. These bliss balls can last up to three months in the freezer. When you're ready to eat, just thaw at room temperature. Check your bliss balls for changes. If they smell off or have mold, toss them out. A change in texture or color is also a sign they may not be good. Always trust your senses. When in doubt, it’s safer to discard them. Enjoy your bliss balls while they are fresh! Peanut butter bliss balls last about one week in the fridge. Store them in an airtight container. The cold keeps them firm and fresh. After a week, check for any off smells or changes in texture. If they seem okay, they are likely still good. Yes, you can use crunchy peanut butter! It adds a nice texture to the bliss balls. The crunchiness gives each bite a fun twist. Just make sure to mix it well with the other ingredients. Peanut butter bliss balls are quite healthy! They pack protein and healthy fats from the peanut butter. The oats offer fiber, while flaxseed adds omega-3s. When made with honey or maple syrup, they still provide natural sweetness without refined sugars. They make a great snack or energy boost. Absolutely! Doubling the recipe is easy. Just use two cups of peanut butter and adjust the other ingredients accordingly. Make sure you have enough space in your fridge for the extra bliss balls. They are perfect for sharing or for meal prep! If you need a substitute for oats, try using ground almonds or almond flour. You can also use coconut flour, but use less since it absorbs more moisture. Another option is to use puffed rice for a lighter texture. Each of these options will change the taste a bit, so pick what you like best! You now have a complete guide to making Peanut Butter Bliss Balls. We covered the key ingredients, substitutions, and step-by-step instructions. With tips for customization and storage, you can create these treats to fit any taste or dietary need. Remember to avoid common mistakes like overmixing or skipping the chill time. Enjoy experimenting with flavors and themes. Your delightful bliss balls are sure to impress!

Peanut Butter Bliss Balls Energizing Healthy Snack

Looking for a quick snack that packs a tasty punch? Peanut Butter Bliss Balls are your answer! These simple treats

- 1 cup dried green or brown lentils, thoroughly rinsed and drained - 1 medium onion, finely chopped - 2 cloves garlic, minced - 1 large carrot, diced into small cubes - 1 celery stalk, diced - 1 red bell pepper, diced - 1 can (14 oz) diced tomatoes, undrained - 4 cups vegetable broth (or more for desired consistency) When making this spicy lentil soup, I start with dried lentils. I love using green or brown lentils. They hold their shape well and add a nice texture. I also chop fresh vegetables. Onion, garlic, carrots, celery, and red bell pepper bring a lot of flavor. Canned tomatoes add richness, while vegetable broth gives the soup a deeper taste. - 1 tablespoon curry powder - 1 teaspoon ground cumin - 1 teaspoon smoked paprika - 1/2 teaspoon cayenne pepper (or to taste for spice level) - Salt and freshly cracked pepper to taste Spices are key to the soup's character. I use curry powder, cumin, smoked paprika, and cayenne pepper for heat. The right amount of cayenne pepper can make it just spicy enough. I always taste as I go, adding salt and pepper to enhance the flavors. - 2 cups fresh spinach or kale, roughly chopped - Juice of 1 fresh lime - Fresh cilantro leaves for garnish For the finishing touch, I add fresh greens. Spinach or kale adds color and nutrients. A squeeze of lime juice brightens the dish. Finally, I top it with cilantro leaves for a fresh burst of flavor. If you want the full recipe, check out the Full Recipe section. - Rinse and drain lentils - Chop vegetables: onion, carrot, celery, and bell pepper Start by rinsing the lentils well. This step removes dust and small stones. Drain them and set aside. Next, chop your vegetables. Dice the onion, carrot, celery, and red bell pepper into small pieces. This will help them cook evenly. - Sauté vegetables and spices - Simmer lentils with broth and tomatoes In a large pot, heat olive oil over medium heat. Add the chopped onion, carrot, and celery. Sauté them for about 5-7 minutes. Keep stirring until they soften. Then, add minced garlic and diced red bell pepper. Sprinkle in the spices: curry powder, cumin, smoked paprika, and cayenne pepper. Mix well and cook for 2 more minutes. Now, add the rinsed lentils, canned tomatoes, and vegetable broth to the pot. Stir everything together, and bring it to a boil. Once boiling, reduce the heat to low. Cover the pot and let it simmer for 30-35 minutes. Check the lentils for tenderness. - Add greens and lime juice - Adjust seasonings before serving When the lentils are soft, stir in chopped spinach or kale. Let them wilt for about 5 minutes. Finally, add fresh lime juice and season with salt and pepper. Taste the soup and adjust the spices to your liking. For the full recipe, check out the details above. Enjoy your warm, hearty bowl of spicy lentil soup! Adjusting cayenne pepper gives you control over the heat. Start with a small amount and taste as you go. If you want less spice, add more vegetables or a splash of cream. To balance heat, use lime juice or a touch of honey. Both add brightness and depth to your soup. Sauté your vegetables in olive oil first. Heat the oil over medium heat before adding onions, carrots, and celery. Cook them until soft, about 5-7 minutes. This builds a strong flavor base. When simmering lentils, keep the heat low and cover the pot. Check them after 30 minutes. They should be tender but not mushy. Serve the soup in deep, colorful bowls. This makes the dish look inviting. Garnish with fresh cilantro for a pop of green. A lime wedge on the side adds a nice touch. For creaminess, consider a dollop of yogurt on top. This adds flavor and makes the dish even more comforting. {{image_4}} To keep this soup plant-based, focus on fresh veggies and lentils. Here are the key ingredients: - 1 cup dried green or brown lentils - 1 medium onion - 2 cloves garlic - 1 large carrot - 1 celery stalk - 1 red bell pepper - 1 can diced tomatoes - 4 cups vegetable broth For added protein, consider using chickpeas or quinoa instead of lentils. You can mix in 1 can of drained chickpeas or 1 cup of cooked quinoa for a hearty boost. You can change the flavor by adding different spices. Try adding turmeric for a warm, earthy taste. Here’s how to switch it up: - Add 1 teaspoon of turmeric for a golden hue. - Use chili powder for a different kick. Each region has its own take on lentil soup. For example, in India, you might find lentil soup with curry and coconut milk. In Middle Eastern cuisine, spices like coriander and cumin shine through. Pair your spicy lentil soup with some crusty bread or a fresh salad. It makes a complete meal. I often serve it with: - Slices of sourdough or whole-grain bread. - A light green salad with lemon vinaigrette. For toppings, you can add a dollop of yogurt, which gives a creamy texture. Avocado slices also add richness and flavor. Try garnishing with fresh cilantro for a pop of color and taste. Feel free to explore the [Full Recipe] for more detailed steps! After you finish your spicy lentil soup, let it cool to room temperature. Pour it into an airtight container. This way, it stays fresh. You can refrigerate it for up to five days. If you want it to last longer, freezing is a great option. To freeze the soup, use freezer-safe containers. Leave some space at the top for expansion. It’s best to freeze it in small portions. This makes it easy to thaw just what you need. When you are ready to eat, place it in the fridge overnight to thaw. You can also use the microwave for quick thawing. When reheating, make sure it reaches a hot temperature throughout. Batch cooking this soup is smart for busy days. You can make a large pot and divide it into portions. It works great for lunches or quick dinners. Add it to your meal plan as a main dish or a side. Pair it with a salad or crusty bread for a complete meal. You can also try adding different toppings, like yogurt or avocado, for a fun twist. For the full recipe, check out the Fiery Lentil Delight Soup. I love using green or brown lentils in spicy lentil soup. Both types are hearty and hold their shape well. Green lentils have a slightly peppery taste, while brown lentils are mild and earthy. You can use either, but green lentils add a nice pop of color. They also cook to a firm texture, making your soup feel more substantial. Yes, you can make this soup in a slow cooker! To do this, you will first sauté the vegetables and spices in a pan. This step builds a strong flavor base. Once done, transfer everything to your slow cooker. Add the lentils, tomatoes, and broth. Cook on low for 6-8 hours or on high for 3-4 hours. The lentils will be tender and the spices will meld beautifully. If you want to skip tomatoes, try using extra vegetable broth or coconut milk instead. This keeps the soup rich and creamy. You can also add more veggies like zucchini or squash for extra flavor. For a little tang, add lemon juice or vinegar. These options make the soup just as tasty without tomatoes. This blog post covered everything about making spicy lentil soup. We explored the main ingredients, including lentils, fresh veggies, and various spices. You learned step-by-step instructions for preparation and cooking. We discussed tips for adjusting spice levels and presentation ideas. Plus, I shared variations and storage tips to keep your soup fresh. In short, making this flavorful soup is simple and fun. Enjoy experimenting with different spices and serving it your way. You'll soon have a go-to recipe that warms the heart and delights the taste buds.

Spicy Lentil Soup Hearty and Flavorful Comfort Dish

Looking for a comforting dish that warms both body and soul? This Spicy Lentil Soup is your solution! Packed with

- 1 pound large shrimp, peeled and deveined - 3 tablespoons extra virgin olive oil - 4 cloves garlic, finely minced - 1 tablespoon fresh lemon juice - Zest of 1 lemon - 1 tablespoon fresh parsley, finely chopped - 1 tablespoon fresh basil, finely chopped - 1 teaspoon dried oregano - 1/2 teaspoon red pepper flakes (optional for heat) - Salt and freshly ground pepper to taste - Skewers (if using wooden skewers, soak in water for 30 minutes) To make Garlic Herb Grilled Shrimp, you need fresh and simple ingredients. Start with large shrimp, as they cook well on the grill. Olive oil gives flavor and helps the shrimp not stick. Garlic adds a strong taste that pairs well with shrimp. Fresh lemon juice and zest brighten the dish. Herbs like parsley and basil give it a fresh lift. The red pepper flakes are optional, but they add a nice kick. Don’t forget to season with salt and pepper. If you use wooden skewers, soaking them in water helps prevent burning on the grill. You can find the full recipe in the article above. This dish is not only easy but also fun to make. Enjoy grilling! To start, I whisk together a few simple ingredients to make the marinade. In a large bowl, I pour in 3 tablespoons of extra virgin olive oil. Then, I add 4 cloves of finely minced garlic, 1 tablespoon of fresh lemon juice, and the zest of 1 lemon. This mix gives the shrimp a bright flavor. Next, I stir in 1 tablespoon each of fresh parsley and fresh basil, along with 1 teaspoon of dried oregano. For a little kick, I might add 1/2 teaspoon of red pepper flakes. Finally, I season the mix with salt and freshly ground pepper. I whisk everything until it blends well. This marinade is the heart of the dish. Now, it’s time to coat the shrimp. I take 1 pound of large shrimp, already peeled and deveined, and gently toss them in the marinade. I make sure each shrimp gets a nice coat. For the best taste, I let the shrimp sit in the marinade. I suggest marinating for at least 30 minutes, but 2 hours gives better flavor. I place the bowl in the fridge. This waiting time allows the shrimp to soak in all those tasty flavors. When I’m ready to grill, I preheat the grill to medium-high heat. I aim for a temperature of 375°F to 450°F. While the grill heats, I take the marinated shrimp and thread them onto skewers. I usually go for 4-5 shrimp per skewer, spacing them out. This helps them cook evenly. Once the grill is hot, I carefully place the skewers on it. I cook the shrimp for about 2-3 minutes on each side. I watch closely to avoid overcooking. The shrimp should turn pink and opaque when done. After grilling, I remove the skewers and let them rest for a minute. This helps keep the juices in. For extra flavor, I might garnish them with fresh herbs. For the full recipe, check the link! To enhance flavor, play with herbs. Try adding cilantro or dill for a twist. You can also swap lemon juice for lime juice for a fresh taste. Remember, marinating is key. Let the shrimp soak for at least 30 minutes, but up to 2 hours gives the best flavor. Control the grill heat by adjusting the flames. For medium-high heat, aim for about 375°F to 450°F. Avoid overcrowding the grill; this helps shrimp cook evenly. To prevent overcooking, watch closely. Cook for only 2-3 minutes on each side. When shrimp turn pink and opaque, they are done. To plate your shrimp, arrange them on a bed of greens like arugula. Drizzle with olive oil or fresh lemon juice for added flair. Garnish with extra herbs for a fresh look. Serve with lemon wedges to add color and flavor. This makes your dish not just tasty but also visually appealing. {{image_4}} Want to turn up the heat? You can add chili powder or cayenne pepper. These spices bring warmth without losing flavor. You can also try using sriracha in the marinade. This adds a nice kick and a bit of sweetness too. If you want to switch up the marinade, use lime juice instead of lemon. Lime gives a fresh twist. You can also mix in some soy sauce for an umami boost. Grilled shrimp makes a great taco filling. Just chop the shrimp into smaller pieces after grilling. Warm up some corn tortillas for a soft base. Then, fill each tortilla with the shrimp. Top your tacos with fresh avocado, salsa, and cilantro. Shredded cabbage adds crunch. A squeeze of lime juice brightens every bite. Grilled shrimp can make a lovely salad. Add the shrimp to a bed of mixed greens. You can use spinach, arugula, or romaine. For dressing, a light vinaigrette works well. Try mixing olive oil, vinegar, and a touch of honey. This adds sweetness and balances the savory shrimp. You can also add cherry tomatoes and cucumber for a refreshing touch. If you want the full recipe, check it out here: [Full Recipe]. To keep grilled shrimp fresh, place them in an airtight container. Refrigerate them right away. The shrimp will stay good for 2-3 days. Always check for off smells or discoloration before eating. If you notice these signs, it’s best to throw them away. To freeze your grilled shrimp, first let them cool completely. Spread them out in a single layer on a baking sheet. Freeze for about 1-2 hours, until firm. Then, transfer the shrimp to a freezer bag. Remove as much air as possible before sealing. This helps prevent freezer burn. You can keep them frozen for 2-3 months. When you are ready to eat the shrimp, thaw them in the fridge overnight. For quicker thawing, place the bag under cold running water. Avoid using hot water, as it may cook the shrimp. Once thawed, you can reheat them in a pan or enjoy them cold in a salad. For more details, check the Full Recipe. You can marinate shrimp for 30 minutes to 2 hours. This range gives you great flavor. If you go over 2 hours, the shrimp can get mushy. The acid from lemon juice breaks down the shrimp's texture. Aim for a balance of flavor and texture. Yes, you can use frozen shrimp. Just make sure to thaw them first. Place them in the fridge overnight or run them under cold water. After thawing, pat them dry before marinating. Adjust your cooking time slightly. Frozen shrimp may need a minute more on the grill. Garlic herb grilled shrimp goes well with fresh salads. You can serve it with a citrus or a green salad. Rice or quinoa also works great. Try it with roasted vegetables for a hearty meal. Corn on the cob adds a nice touch too. Cooked shrimp turn pink and opaque. They curl into a C-shape when done. If they stay straight, they might be overcooked. Aim for 2-3 minutes on each side. Use a timer to avoid overcooking. For the best results, check them closely while grilling. This blog post shared easy steps for making Garlic Herb Grilled Shrimp. We covered ingredients, marinade preparation, grilling techniques, and tips for presenting your dish. You can even try variations like spicy shrimp tacos or a refreshing shrimp salad. Enjoy experimenting with flavors and impressing others with your cooking. Remember, practice makes perfect, so don’t be afraid to try new ideas. Happy grilling!

Garlic Herb Grilled Shrimp Tasty and Simple Recipe

If you crave a quick yet delicious meal, Garlic Herb Grilled Shrimp is for you! This simple recipe packs big

Older posts
Newer posts
← Previous Page1 … Page31 Page32 Page33 … Page42 Next →

dsad

© 2025 lazychefmagic • Built with GeneratePress

Our Policies

  • Copyright Policy
  • Cookie Policy
  • GDPR Policy
  • Privacy Policy
  • Disclaimer
  • Terms Of Use

More Information

  • Home
  • About
  • Contact
  • Appetizers
  • Dessert
  • Dinner
  • Drinks
©2025, lazychefmagic About Back To Top