Crispy Baked Chickpeas Flavorful and Easy Snack Recipe
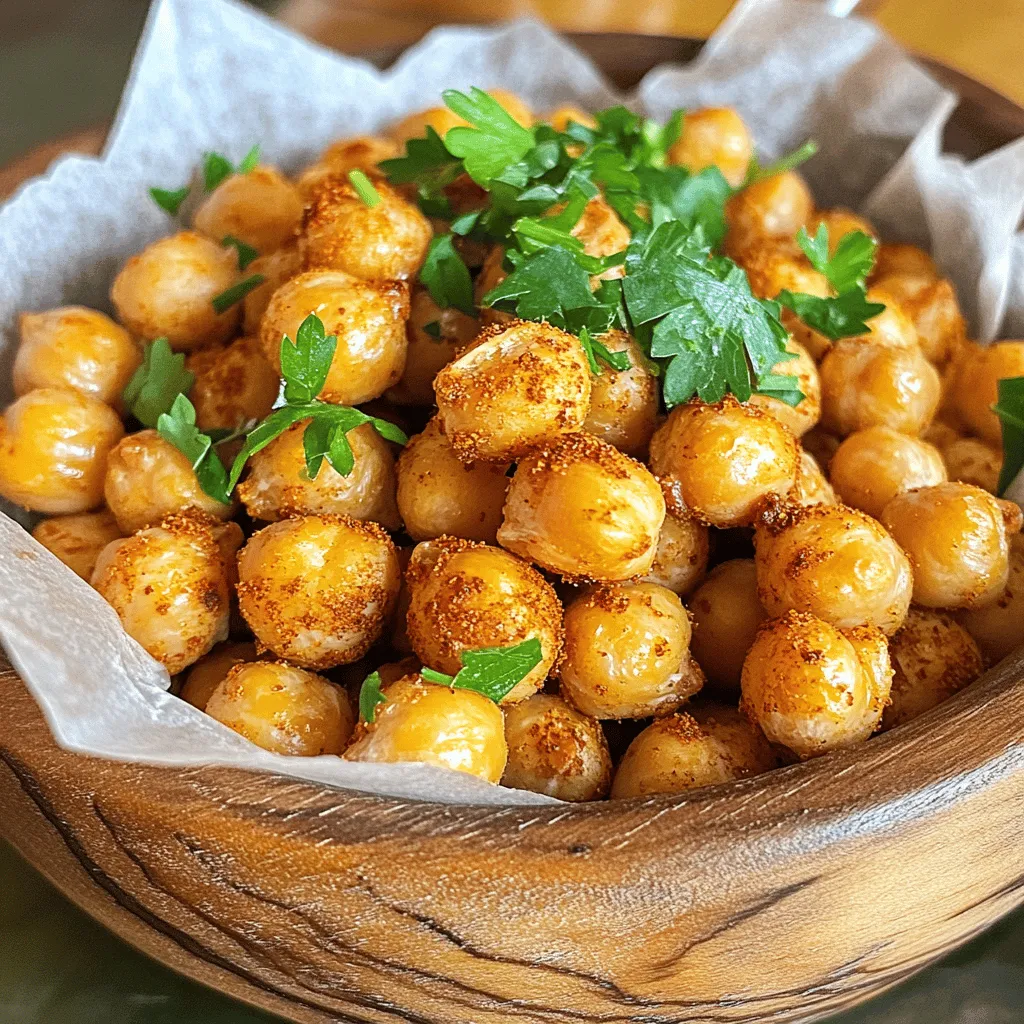
Looking for a tasty snack that’s both easy and healthy? You’re in the right place! Crispy baked chickpeas are crunchy,
Looking for a tasty snack that’s both easy and healthy? You’re in the right place! Crispy baked chickpeas are crunchy,

Craving a warm, cheesy dish that brings comfort and smiles? Look no further! This Cheesy Taco Pasta Bake is your
. To make the best skillet creamed spinach, start with fresh spinach. Rinse it well and chop it roughly. This helps the leaves cook evenly. Use a heavy skillet for better heat control. Heat the olive oil until it shimmers. This means it's hot enough for sautéing. Sauté the onion until it is soft and sweet. Add the garlic just before the spinach, so it stays fragrant. When you add the spinach, stir it continuously. This ensures it wilts down nicely without burning. For that creamy texture, mix in the cream cheese slowly. Let it melt before adding the sour cream and Parmesan. This way, you avoid lumps. Lastly, sprinkle fresh nutmeg for a warm, earthy flavor. One common mistake is overcooking the spinach. This makes it slimy and loses its bright color. Another mistake is not seasoning enough. Always taste and adjust salt and pepper as needed. When adding cream cheese, don't rush. Mix it until it fully melts, or you’ll get lumps. Also, avoid cooking at high heat. This can burn the garlic and onion, giving a bitter taste. Finally, don’t skip the toasted pine nuts. They add a crunchy texture that balances the creaminess. Skillet creamed spinach pairs well with many dishes. Try it with grilled chicken or fish for a complete meal. You can also serve it with steak for a rich flavor combo. For a vegetarian option, pair it with roasted vegetables or quinoa. This dish also goes great with crusty bread, perfect for scooping up the creamy goodness. If you're feeling adventurous, serve it alongside pasta for a unique twist. {{image_4}} You can boost your skillet creamed spinach with protein. Chicken is a great choice. Cook diced chicken in the skillet before adding spinach. Shrimp also works well. Sauté shrimp until pink, then add the spinach mix. For a heartier meal, add cooked sausage. Slice it and mix it in during the last few minutes of cooking. To make this dish vegan, swap out the cream cheese and sour cream for cashew cream or firm tofu. Blend soaked cashews with a bit of water until smooth. This gives a nice creamy texture. Use nutritional yeast in place of Parmesan for a cheesy flavor. This way, you enjoy rich taste without dairy. Add a squeeze of lemon juice for brightness. It lifts the flavors and adds freshness. You can also try adding a pinch of cayenne pepper for a spicy kick. Fresh herbs such as basil or thyme bring extra depth. Mix them in right before serving to keep their taste vibrant. You can find the Full Recipe in our article for more details. You can keep your creamed spinach in the fridge for up to three days. Store it in an airtight container for best results. Make sure the spinach is cool before sealing it. This helps keep the flavor fresh. When ready to eat, check for any off smells or changes in color. To freeze creamed spinach, first let it cool completely. Place it in freezer-safe bags or containers. It can last for about two months in the freezer. When freezing, try to remove as much air as possible. This helps prevent freezer burn. Label the bags with the date, so you know when to use them. When you’re ready to enjoy your creamed spinach, thaw it in the fridge overnight if frozen. You can reheat it on the stove over low heat. Stir often to avoid sticking. If it seems dry, add a splash of milk or cream. You can also use the microwave, heating in short bursts, stirring in between. This keeps the texture creamy and smooth. For the full recipe, refer to Skillet Creamed Spinach Delight. Enjoy your cooking! Skillet creamed spinach can last about 3 to 5 days in the fridge. Store it in an airtight container to keep it fresh. Before serving leftovers, check for any off smells or changes in texture. Reheat it gently on the stove or in the microwave. Yes, you can use frozen spinach. It is a great time-saver. Just thaw it first and squeeze out excess water. This prevents the creamed spinach from being too watery. You may need to adjust the cooking time slightly, but the flavor will still be delicious. Skillet creamed spinach pairs well with many dishes. It goes great with grilled chicken or fish. You can also serve it with steak or pork chops for a hearty meal. For a lighter option, serve it alongside roasted vegetables or a fresh salad. Check out the Full Recipe for more ideas. In this blog post, we covered all you need to know about skillet creamed spinach, from ingredients to storage. We explored ingredient swaps and garnish options to customize your dish. You learned step-by-step cooking instructions and tips to make it perfect. Plus, we looked at variations, storage methods, and answered your common questions. Skillet creamed spinach can be a delightful side dish. With the right methods, it can shine at any meal. Enjoy making this dish your own!](https://lazychefmagic.com/wp-content/uploads/2025/05/df15bd05-d910-4420-9760-d3f388fe148c.webp)
Are you ready to elevate your side dish game? My Skillet Creamed Spinach recipe is simple, quick, and packed with

Are you ready for a flavor explosion? These Sweet and Spicy Chicken Wings are easy to make and perfect for
![To make these bites, you need simple ingredients that blend well. Here’s what you need: - 1 cup rolled oats - 1/2 cup natural peanut butter - 1/4 cup honey or maple syrup - 1/2 cup dark chocolate chips - 1/4 cup ground flaxseed - 1/2 teaspoon pure vanilla extract - 1/4 teaspoon fine sea salt These ingredients create a tasty snack that gives you energy. The oats provide fiber, while peanut butter adds protein. Honey or maple syrup brings sweetness. Dark chocolate chips add a rich flavor, and flaxseed offers healthy fats. You can customize your energy bites with fun add-ins. Consider these options: - 1/4 cup unsweetened shredded coconut - Chopped nuts (like almonds or walnuts) - Dried fruit (like cranberries or raisins) - Chia seeds for extra nutrients These add-ins make your bites even more exciting. They also add texture and more flavor. Mix and match to find your favorite combination! If you have dietary needs, you can adjust the recipe. Here are some ideas: - Use almond butter or cashew butter instead of peanut butter for nut allergies. - Swap honey for agave syrup to keep it vegan. - For gluten-free bites, ensure your oats are certified gluten-free. These substitutions keep the energy bites tasty and safe for everyone. Enjoy experimenting with different options! For the full recipe, check out the detailed instructions. Start by gathering your ingredients. In a large bowl, mix 1 cup of rolled oats, 1/4 cup of ground flaxseed, and 1/4 teaspoon of fine sea salt. Stir these dry ingredients well. In another bowl, add 1/2 cup of natural peanut butter, 1/4 cup of honey (or maple syrup), and 1/2 teaspoon of pure vanilla extract. Whisk these together until the mix is smooth. Pour the creamy peanut butter mix into the dry ingredients. Stir until everything is well coated. Now comes the fun part! With clean hands, take small bits of the mixture. Roll them into bite-sized balls about 1 inch wide. Place each ball on a parchment-lined baking sheet. You should have around 12-15 bites when you finish shaping the mixture. If you want, fold in 1/2 cup of dark chocolate chips and 1/4 cup of unsweetened shredded coconut for extra flavor. Pop the baking sheet into the refrigerator. Let the energy bites chill for at least 30 minutes. This helps them firm up. After chilling, transfer the bites to an airtight container. Store them in the fridge for up to a week. They make a great snack when you need an energy boost. For a fancy touch, serve them on a decorative plate with a sprinkle of coconut. Enjoy your Choco-Peanut Power Bites! For the complete recipe, check out the [Full Recipe]. To get the ideal texture for your energy bites, use fresh ingredients. Old oats or peanut butter can lead to a dry mix. Make sure to mix the wet and dry ingredients well. You want them to blend together smoothly. If the mixture feels too dry, add a splash of water or more honey. This small tweak helps bind everything nicely. You can enjoy these bites in many ways. They make a great snack for kids after school. Pair them with fresh fruit like apples or bananas for a fun snack platter. You can even pack them in lunch boxes for a healthy treat. Try serving them on a colorful plate with a sprinkle of shredded coconut for a fancy look. If you need to swap ingredients, it's easy! You can use almond butter instead of peanut butter for a nut-free option. Maple syrup works well if you want a vegan version. For added crunch, consider using chopped nuts or seeds in place of chocolate chips. Just remember to keep the ratios similar to maintain texture. This way, your energy bites will still taste amazing! For the complete recipe, check out the [Full Recipe]. {{image_4}} You can change the flavor of your energy bites easily. Try adding nuts like almonds or walnuts for crunch. Dried fruits like cranberries or raisins add sweetness. You might even add spices like cinnamon or nutmeg for warmth. If you love coconut, toss in some shredded coconut. Mixing these extras can keep your bites fresh and fun! These energy bites shine in their no-bake form. They come together fast, and you can eat them right away. If you crave something warm, you can bake them. Baking changes the texture and flavor. It gives a chewy, cookie-like bite. Just shape them and place them on a baking sheet, then bake at 350°F for about 10-12 minutes. Cool them before enjoying! Get kids involved by making fun shapes. Use cookie cutters to create stars or animals. You can also dip the bites in chocolate or yogurt for a treat. Let kids choose their mix-ins, like mini chocolate chips or colorful sprinkles. This makes them excited to help and eat healthy snacks. Remember, these bites are not just for adults; they can be a hit with kids too! To keep your Chocolate Peanut Butter Energy Bites fresh, store them in an airtight container. This helps lock in their flavor and moisture. You can place them in the fridge for easy access. If you have leftover bites, feel free to layer them with parchment paper in the container. This prevents sticking. These energy bites stay good for about one week in the fridge. After that, they may dry out or lose flavor. Make sure to check for any signs of spoilage before enjoying them. If you notice any changes, it’s best to toss them out. For longer storage, you can freeze your energy bites. Just place them on a baking sheet first. Freeze them for about an hour until firm. Then, transfer them to a freezer-safe container or bag. They can last up to three months in the freezer. When you’re ready to eat, just thaw them in the fridge overnight. Enjoy your delicious treat anytime! Chocolate peanut butter energy bites are small, no-bake snacks. They mix oats, peanut butter, honey, and chocolate. These bites are great for a quick snack or energy boost. They taste amazing and are easy to make. You can whip them up in just 10 minutes. These bites are perfect for both kids and adults. They pack a lot of flavor in a small bite. Yes, you can use other nut butters! Almond butter, cashew butter, or sunflower seed butter work well. Each nut butter gives a different flavor, but they all taste great. Just keep the same amount as the peanut butter in the recipe. If you have nut allergies, go for seed butters. They will keep the bites tasty and safe. To make these energy bites vegan, simply swap honey for maple syrup. Use natural nut butter that contains no added ingredients. Check the chocolate chips to ensure they are dairy-free. By making these small changes, you can enjoy a tasty vegan treat. The texture and taste will stay just as good! Yes, you can find ready-made chocolate peanut butter energy bites in stores. Many brands offer similar snacks. Just look for ones made with natural ingredients. Read the labels to check for added sugars or artificial ingredients. Homemade bites are often fresher and tastier, but packaged ones are convenient for busy days. If you want to try something new, check out the Full Recipe for homemade bites! You learned about making Chocolate Peanut Butter Energy Bites with versatile ingredients. The blog covered the steps from mixing to chilling and storage. I shared tips for the best texture and serving ideas. You can explore flavor variations and find ways to make kid-friendly versions. Remember, these bites are easy to store and last a while. Enjoy creating these tasty snacks! They are fun, quick, and healthy options for everyone.](https://lazychefmagic.com/wp-content/uploads/2025/05/bb47c677-cc0b-4e1b-8bc1-84d9dd9d9300.webp)
Looking for a quick, tasty snack? Chocolate Peanut Butter Energy Bites are your answer! These bites pack a punch of
. Choosing the Right Potatoes For garlic Parmesan roasted potatoes, I prefer baby potatoes. They have a creamy texture and crisp skin. Their small size helps them cook evenly and fast. You can use red or yellow baby potatoes for great flavor. Ensuring Even Coating To coat the potatoes evenly, place them in a large bowl. Add olive oil, garlic, and seasonings. Use your hands to mix them well. Make sure every piece gets covered. This step is key for flavor and crispiness. Customizing Seasonings While garlic and Parmesan are classic, feel free to add your twist. Try adding herbs like rosemary or basil. You can also adjust the amount of garlic for more flavor. Experiment with spices too, such as cayenne for heat. Garlic Alternatives If you want a milder taste, use garlic powder instead of fresh garlic. You can also try roasted garlic for a sweet, rich flavor. Just mash it and mix it in with the potatoes. Using a Convection Oven A convection oven can help your potatoes cook faster and more evenly. The hot air circulates around the food, giving it a nice crisp. If you use this type of oven, check them a little earlier than the recipe states. Benefits of Parchment Paper Using parchment paper is a game-changer. It stops the potatoes from sticking to the pan. It also makes cleanup easy. Just line your baking sheet before adding the potatoes. {{image_4}} You can take Garlic Parmesan Roasted Potatoes to new heights with simple tweaks. - Spicy Garlic Parmesan: Add a pinch of red pepper flakes for heat. This spice warms up the dish. It pairs well with the garlic and cheese. You can adjust the heat to your taste. More flakes mean more spice! - Herb-Infused Versions: Mix in fresh herbs like rosemary or basil. These herbs add a fragrant note. Fresh herbs boost the flavor and make your dish pop. Try this twist for a garden-fresh taste. You can make Garlic Parmesan Roasted Potatoes fit your needs. - Gluten-Free Options: All the ingredients are naturally gluten-free. Enjoy this dish without worry. It fits well with most diets. - Vegan Substitutes: For a vegan twist, swap Parmesan cheese for a plant-based option. Nutritional yeast can add a cheesy flavor too. It’s a great way to keep the taste while avoiding dairy. Get creative with your ingredients! - Different Types of Cheese: You can use other cheeses, like cheddar or feta. Each cheese brings a new flavor. Experiment to find your favorite combination. - Using Sweet Potatoes: Try sweet potatoes instead of regular ones. They add a touch of sweetness and color. Plus, they are full of nutrients. This swap gives a unique twist to the classic recipe. For the full recipe, check out the detailed steps in the earlier section. Refrigeration Guidelines After enjoying your Garlic Parmesan Roasted Potatoes, store leftovers in an airtight container. This keeps them fresh and tasty. Place them in the fridge within two hours of cooking. They can last for up to three days. Make sure to label the container with the date. This helps you track how long they’ve been stored. Freezing Tips If you want to keep them longer, freezing is a great option. First, let the potatoes cool completely. Then, place them in a freezer-safe bag or container. Remove as much air as possible to prevent freezer burn. They can be frozen for up to three months. When you're ready to eat, thaw them in the fridge overnight. Best Methods for Reheating To reheat your Garlic Parmesan Roasted Potatoes, use the oven for the best results. Preheat your oven to 350°F (175°C). Spread the potatoes on a baking sheet. Heat for about 10-15 minutes or until they are warm. You can also use a microwave. Place them in a microwave-safe dish and cover with a damp paper towel. Heat in short bursts of 30 seconds, stirring in between. Maintaining Crispiness For crispy potatoes, the oven is the way to go. If you want to use the microwave, try to finish them in a hot skillet for a few minutes. This helps regain that wonderful crispiness. Avoid reheating them too long, as they can become soggy. How Long They Last in the Fridge In the fridge, your Garlic Parmesan Roasted Potatoes will last about three days. If they sit longer than that, it’s best to toss them. Always check for freshness before eating. Signs of Spoilage Look out for signs of spoilage before eating leftovers. If they smell off or have a slimy texture, do not eat them. Also, if you notice any mold, that’s a sure sign they’re bad. Always trust your senses when it comes to food safety. Can I make Garlic Parmesan Roasted Potatoes in advance? Yes, you can prepare them ahead of time. Cook the potatoes and let them cool. Store them in the fridge. When you are ready to eat, reheat them in the oven. This keeps them tasty and warm. What can I serve with Garlic Parmesan Roasted Potatoes? These potatoes pair well with many dishes. Try serving them with grilled chicken or steak. They also go great alongside a fresh salad or steamed veggies. You can mix and match to fit your meal. How do I make them crispy? To get crispy potatoes, make sure to cut them evenly. The smaller the pieces, the crispier they will get. Use enough olive oil to coat them well. Roast them at a high temperature, and don’t crowd the baking sheet. What is the best type of potato for roasting? I recommend using baby potatoes. They are small and cook evenly. You can also use Yukon Gold or red potatoes. Both have great flavor and texture when roasted. Can I use powdered garlic instead of fresh? You can use powdered garlic, but fresh garlic gives better taste. If you use powdered garlic, reduce the amount. About 1 teaspoon of powder equals 4 cloves of fresh garlic. How to adjust cooking time for larger potatoes? If you use larger potatoes, cut them into smaller pieces. This helps them cook more evenly. If you keep the potatoes whole, add about 10 to 15 minutes to the cooking time. Keep an eye on them while they roast. Garlic Parmesan roasted potatoes are simple and delicious. We used baby potatoes, garlic, and olive oil, then added Parmesan for flavor. The steps were easy: preheat, mix, and roast. Remember, you can adjust the seasonings and make variations to suit your taste. Whether you store leftovers or try new flavors, you’ll enjoy this dish anytime. Happy cooking!](https://lazychefmagic.com/wp-content/uploads/2025/05/90862281-0ed1-4d2f-8bcb-e7dcc30772e8.webp)
If you want a side dish that wows everyone, try my Garlic Parmesan Roasted Potatoes! This easy recipe combines crispy
![- 2 cups rolled oats - 1 cup fresh or frozen blueberries - 1 medium ripe banana, mashed - 2 cups almond milk (or any milk of your choice) - 1/4 cup maple syrup (or honey as a substitute) - 1/4 cup almond butter (or peanut butter) - 2 teaspoons baking powder - 1 teaspoon pure vanilla extract - 1 teaspoon ground cinnamon - 1/4 teaspoon sea salt - 1/4 cup chopped nuts (walnuts or pecans) (optional) - Extra blueberries for garnish (optional) Gathering the right ingredients is key to this recipe. The rolled oats serve as a hearty base. They provide fiber and keep you full. Fresh or frozen blueberries add a burst of flavor and antioxidants. A ripe banana gives natural sweetness and binds the mixture. Almond milk or any milk of your choice keeps it creamy. Maple syrup adds sweetness but you can use honey as well. Almond butter gives a nutty taste, though peanut butter works too. Baking powder helps it rise, while vanilla extract and cinnamon add warmth. Sea salt balances the flavors. If you like, add chopped nuts for crunch. You can also top it with extra blueberries for a beautiful finish. Each serving gives you a healthy dose of energy. It contains about 180 calories, with 7 grams of fat. You also get 6 grams of protein and 30 grams of carbohydrates. Fiber content is around 4 grams per serving. This makes it a filling snack or breakfast option. If you want to change things up, consider using different sweeteners. Coconut sugar or agave syrup can work well. For the nut butter, any kind will do, like cashew or sunflower. If you need a gluten-free option, use certified gluten-free oats. This recipe is flexible, so feel free to experiment with what you like! For the full recipe, check out the [Full Recipe]. - Preheat oven to 350°F (175°C). - Grease a 9x9 inch baking dish. Start by turning on your oven. A warm oven helps the oatmeal bake rise nicely. Use a small amount of cooking spray or coconut oil to grease your baking dish. This step ensures it won’t stick. - Combine oats, baking powder, cinnamon, and salt. In a large bowl, mix the oats, baking powder, ground cinnamon, and sea salt. This blend gives the dish a great texture and flavor. Stir it well so everything combines evenly. - Whisk together banana, almond milk, syrup, almond butter, and vanilla. In another bowl, mash the ripe banana. Add the almond milk, maple syrup, almond butter, and vanilla extract. Whisk them together until smooth. This mix adds moisture and sweetness to the bake. - Incorporate wet mixture into dry ingredients and fold in blueberries. Now, pour the wet mixture into the bowl with dry ingredients. Gently stir until just combined. It’s important not to overmix. Then, fold in the blueberries carefully. This keeps them whole and tasty. - Spread mixture in baking dish and add nuts. - Bake for 30-35 minutes and check with a toothpick. Transfer the mixture to your greased baking dish. Spread it evenly. If you like, sprinkle some chopped nuts on top for crunch. Now, place it in the oven and bake for 30 to 35 minutes. Use a toothpick to check if it’s done. It should come out clean when the bake is ready. - Cool for 10 minutes before slicing. - Tips for presentation. Once baked, take it out of the oven. Let it cool for about 10 minutes. This cooling time helps set the bake. After cooling, slice it into squares. For a lovely touch, serve it warm with extra blueberries on top and a drizzle of maple syrup. Enjoy your delicious blueberry oatmeal bake! To get the best texture, avoid overmixing. Mix the dry ingredients first. In a separate bowl, blend the wet ingredients well. When you combine both, stir gently. This keeps the oats fluffy and light. Fold in the blueberries with care. This way, they stay whole and juicy. You can add spices to boost flavor. Ground nutmeg pairs well with cinnamon. You might also try cardamom for a unique twist. If you want more sweetness, consider using agave syrup instead of maple syrup. You can also mix in chocolate chips or shredded coconut for extra fun. Bake at 350°F (175°C) for 30-35 minutes. Check for doneness using a toothpick. If it comes out clean, it’s ready. If you want a firmer texture, add a few extra minutes. Keep an eye on the top; it should be golden brown. {{image_4}} You can change up the flavor of your blueberry oatmeal bake. Add chocolate chips for a sweet twist. Dried fruits, like cranberries or apricots, also work well. Nuts can add extra crunch. Try adding coconut flakes for a tropical feel. Each addition makes your bake special. If you want a vegan option, simply replace the almond milk with a plant-based milk. Use maple syrup instead of honey. You can swap almond butter for sunflower seed butter for a nut-free version. For gluten-free needs, use certified gluten-free oats. This way, everyone can enjoy it. Serving your oatmeal bake is fun! Pair it with a dollop of yogurt for creaminess. Nut butter adds a rich texture and flavor. Fresh fruit on top adds color and taste. You can drizzle more maple syrup for extra sweetness. These ideas make your dish even better. To keep your Blueberry Oatmeal Bake fresh, let it cool first. Then, cut it into squares. Place the squares in an airtight container. You can store them in the fridge for up to 5 days. If you want to keep them longer, freeze the squares. Wrap each piece in plastic wrap before placing them in a freezer bag. This helps prevent freezer burn. When you're ready to enjoy your leftovers, you can reheat them easily. For the best texture, use an oven or toaster oven. Preheat it to 350°F (175°C). Place the square on a baking sheet and warm for about 10 minutes. If you're in a hurry, use the microwave. Heat it for 30 seconds to 1 minute, checking to ensure it's warm throughout. In the fridge, your Blueberry Oatmeal Bake stays good for about 5 days. If you freeze it, it can last for up to 3 months. Just be sure to label your container with the date. This way, you know when to use it by. Eating it within these time frames ensures the best flavor and texture. Yes, you can use quick oats. However, the texture will change. Quick oats cook faster and absorb more liquid. This may make the bake softer and less chewy. If you prefer a firmer texture, stick to rolled oats. To make this recipe gluten-free, choose certified gluten-free oats. Regular oats may contain gluten from cross-contamination. Many brands now offer gluten-free options that are safe to use. Just check the label before buying. Absolutely! Frozen blueberries work well in this recipe. Just toss them straight into the mix without thawing. This helps them hold their shape better during baking. You may need to bake a bit longer to ensure everything is cooked through. You can serve your oatmeal bake with various toppings. Here are some ideas: - A dollop of Greek yogurt - A drizzle of honey or maple syrup - Fresh fruit like banana slices or more blueberries - A sprinkle of nuts for crunch This blog post covers a delicious recipe using simple ingredients. You learned how to combine oats, fruit, and nut butter to make a tasty dish. We shared tips for baking, storing, and serving, plus variations to try. Remember, cooking should be fun and creative. Feel free to adjust ingredients to suit your taste. Enjoy your baking adventure!](https://lazychefmagic.com/wp-content/uploads/2025/05/591de02d-0588-42da-94e5-dbe744036fa9.webp)
Looking for a healthy and tasty snack? Try my Blueberry Oatmeal Bake! Packed with nutritious ingredients, this delightful dish is
. After enjoying your veggie loaded quiche, store leftovers properly. First, let the quiche cool down. Then, wrap it tightly in plastic wrap or foil. You can also place it in an airtight container. This helps keep it fresh and prevents it from drying out. For freezing, slice the quiche into portions. Wrap each slice in plastic wrap, followed by foil. This way, you can take out only what you need. Freeze the quiche for up to three months. When it’s time to eat again, you should reheat it in the oven. Set the oven to 350°F (175°C). Place the quiche on a baking sheet and cover it with foil. Heat for about 15-20 minutes, or until warmed through. This method helps keep the crust crispy. In the fridge, your veggie loaded quiche lasts about three to four days. After that, you should check for signs of spoilage. Look for a sour smell or an unusual texture. If it looks or smells off, throw it out. For meal prep, divide the quiche into individual portions. Store each portion in a separate airtight container. This lets you grab a slice for lunch or dinner without fuss. Always label your containers with the date to keep track of freshness. A veggie loaded quiche is a savory pie filled with eggs, milk, and fresh vegetables. It often includes spinach, peppers, and onions, which add color and taste. This dish is baked in a pie crust, making it easy to slice and serve. It’s versatile and can be enjoyed for breakfast, lunch, or dinner. You can find my full recipe for veggie loaded quiche to try it yourself! Yes, you can make quiche ahead of time. It stores well in the fridge and tastes great the next day. Just cook it, let it cool, and cover it tightly. When ready to eat, you can reheat it in the oven. This makes it a perfect option for busy days. If you need an egg substitute, you can use silken tofu, chickpea flour, or flaxseed meal mixed with water. Each option adds a different flavor and texture. Silken tofu creates a creamy base. Chickpea flour offers a slight nutty taste. Flaxseed meal gives a nice binding effect. To avoid a soggy crust, bake the pie crust before adding the filling. Pre-baking helps set the crust and keeps it crisp. Also, make sure to drain any excess moisture from your vegetables. This keeps the filling from making the crust wet. Yes, this recipe is perfect for meal prep. You can make a large quiche and slice it into portions. It stores well in the fridge for several days. You can grab a slice for a quick breakfast or lunch. Just reheat it, and you have a tasty meal ready to go. This blog post covered how to make a tasty veggie quiche. You learned about the best crust options, cheese types, and vegetables to use. We explored effective cooking methods for vegetables and how to mix the egg base properly. I shared tips on perfect baking, serving, and storing your quiche. In the end, quiche offers great ways to be creative. You can change ingredients based on your tastes. Enjoy the process and savor each bite!](https://lazychefmagic.com/wp-content/uploads/2025/05/c0f3fc8b-c2ac-40cc-bfd9-dd99211b5f9c.webp)
Are you craving a delicious meal that’s easy to make? This Veggie Loaded Quiche recipe has you covered! Packed with
![- 1 lb baby carrots, whole - 3 tablespoons honey - 2 tablespoons olive oil - 3 cloves garlic, minced - 1 teaspoon fresh thyme leaves (or ½ teaspoon dried thyme) - Salt and pepper to taste - 1 tablespoon balsamic vinegar - Fresh parsley, chopped for garnish Using these ingredients will make your honey garlic roasted carrots shine. Baby carrots are sweet and tender. Honey adds a lovely glaze, while garlic gives depth. Olive oil helps everything roast well. Thyme adds a nice herb touch. Salt and pepper enhance all the flavors. The balsamic vinegar adds a tangy kick, balancing the sweetness. These carrots are not just delicious; they also have health benefits. Carrots are rich in vitamins and antioxidants. They promote good vision and support healthy skin. So, you get a tasty dish that’s good for you too! For the full recipe, check out my detailed instructions. You'll love how simple it is! - Preheat your oven to 400°F (200°C). This helps cook the carrots evenly. - In a bowl, mix honey, olive oil, minced garlic, thyme, balsamic vinegar, salt, and pepper. Whisk until smooth. This will be your honey garlic glaze. - Add the whole baby carrots to the bowl with the glaze. - Toss the carrots gently in the honey garlic mixture. Make sure each carrot gets a nice, even coating for full flavor. - Line a baking sheet with parchment paper for easy cleanup. - Spread the coated carrots in a single layer on the baking sheet. This helps them roast nicely. - Roast the carrots for 20-25 minutes. Halfway through, toss them gently to promote even cooking. They should be tender and slightly caramelized when done. For the full recipe, check the detailed instructions above. Enjoy your delicious dish! To get the best results, always spread the carrots in a single layer. This helps them roast evenly. If they overlap, some will cook faster than others. Midway through roasting, toss the carrots gently. This ensures all sides get that nice caramel color. You can add more herbs or spices to boost the taste. Try using rosemary or a pinch of cumin for a different twist. For pairing, these honey garlic roasted carrots go well with chicken or pork. They also complement grain dishes like quinoa or rice perfectly. For more ideas, check out the Full Recipe. {{image_4}} You can swap honey for maple syrup. This change gives a nice, sweet flavor. Maple syrup adds a unique touch that many enjoy. If you want a spicy kick, try adding ginger. Fresh ginger brings warmth and zest to the dish. Just a little will make a big difference. If you want to use an air fryer, it’s easy! Set it to 375°F (190°C). Cook the carrots for about 15-20 minutes. Shake the basket halfway through for even cooking. This method gives a great crispy texture. Grilling is another fun option. Toss the carrots in the honey garlic glaze. Then, place them on the grill over medium heat. Grill for about 10-15 minutes, turning often. This method gives a smoky flavor that enhances the dish. For the complete recipe, check out the [Full Recipe]. Enjoy trying these variations! To keep your honey garlic roasted carrots fresh, store any leftovers in an airtight container. This will help prevent moisture loss and keep them tasty. You can refrigerate them up to four days. If you want to keep them longer, consider freezing them. Place the cooled carrots in a freezer-safe bag. Remove as much air as possible to prevent freezer burn. For the best texture when reheating, the oven is your best friend. Preheat your oven to 350°F (175°C). Place the carrots on a baking sheet and cover them loosely with foil. Heat for about 10-15 minutes. This method helps keep the carrots tender and delicious. If you are in a hurry, you can use the microwave. Put the carrots in a microwave-safe bowl and cover them. Heat in 30-second intervals until warm. However, be careful not to overheat them, as this can make them mushy. For more details on how to make this dish, check the Full Recipe. Yes, you can use regular carrots. They will need some prep. Cut them into sticks or rounds. This helps them cook evenly. Baby carrots are sweet and tender. Regular carrots have a more robust flavor. If you use regular ones, adjust the cooking time. They may need a few more minutes to roast. To make this dish vegan, replace honey with maple syrup. Maple syrup gives a nice sweetness. You can also try agave nectar. Both options work well in the glaze. Use olive oil and keep the other ingredients the same. This way, you still enjoy rich flavors without any animal products. These carrots pair well with many dishes. They complement roasted chicken or pork nicely. You can also serve them with quinoa or rice. For a vegetarian option, try them with lentils. A fresh salad on the side adds a nice crunch. They make a great addition to any meal. For the full recipe, check out the details above. This blog post highlights a tasty recipe for honey garlic roasted carrots. We covered the key ingredients and their health benefits, plus how to prepare and roast them perfectly. You now have tips for enhancing flavors and variations to try. Remember, these carrots are not just good for you; they also taste great. So grab your ingredients and start cooking. Enjoy your meal while getting valuable nutrients at the same time!](https://lazychefmagic.com/wp-content/uploads/2025/05/089f6def-2a35-48b6-b449-0a89715219a5.webp)
Looking for a tasty side dish that’s both simple and healthy? Honey Garlic Roasted Carrots are your answer! This delightful
![- 4 boneless, skinless chicken breasts - 1/2 cup balsamic vinegar - 1/4 cup honey - 2 tablespoons olive oil - 4 cloves garlic, minced - 1 teaspoon Dijon mustard - 1/2 teaspoon salt - 1/4 teaspoon black pepper - 1 teaspoon dried Italian herbs (or fresh if available) - Fresh basil leaves for garnish - Optional: 1 cup cherry tomatoes, halved Using these ingredients makes the dish rich in flavor. Balsamic vinegar adds a tangy taste, while honey balances it with sweetness. The chicken breasts are tender and juicy when cooked right. Garlic and Dijon mustard enhance the overall flavor profile. You can easily adjust the recipe. Try adding different herbs or spices to suit your taste. Fresh basil and cherry tomatoes add color and freshness. They also make the dish look appealing. For the full recipe, check out the detailed steps. This will make it easy for you to create this delightful meal! Start by grabbing a medium-sized bowl. In it, combine: - 1/2 cup balsamic vinegar - 1/4 cup honey - 2 tablespoons olive oil - 4 cloves garlic, minced - 1 teaspoon Dijon mustard - 1/2 teaspoon salt - 1/4 teaspoon black pepper - 1 teaspoon dried Italian herbs Whisk these ingredients together until they blend well. You will create a fragrant marinade that will coat your chicken perfectly. Next, take your chicken breasts and place them in a resealable plastic bag or a shallow dish. Pour the marinade over the chicken. Make sure each piece is well coated. Seal the bag tightly, or cover the dish with plastic wrap. Let your chicken marinate in the fridge for at least 30 minutes. If you have time, marinating for up to 4 hours will deepen the flavors. Marinating is key. It allows the chicken to soak up all the delicious flavors of the marinade, making it tender and juicy. Now it's time to cook! Preheat your grill or a large skillet over medium heat. If you use a skillet, add a little olive oil to help with sticking. Remove the chicken from the marinade, letting the excess drip off. Set aside the leftover marinade for later use. Cook the chicken for about 6-7 minutes on each side. To check if it's done, the internal temperature should reach 165°F. The juices should run clear when you cut into it. Using these steps, you will create a flavorful balsamic glazed chicken that impresses every time. For the full recipe, check out the details above! To get the best flavors, marination is key. Use a large mixing bowl. Combine balsamic vinegar, honey, olive oil, minced garlic, Dijon mustard, salt, black pepper, and dried herbs. Whisk until smooth. This mix creates a tasty marinade. Make sure to coat each chicken breast well. Place the chicken in a sealed bag or shallow dish. Let it marinate for at least 30 minutes. If you can, let it sit for up to 4 hours. The longer it sits, the better the taste. After marinating, don’t throw away the leftover marinade. You can use it to make a glaze. Heat it in a saucepan. Simmer it gently to thicken. This adds more flavor to your dish. Resting chicken is very important. It helps keep the meat juicy and tender. After cooking, let the chicken rest for about 5 minutes. This time allows the juices to spread out inside the chicken. If you skip this step, the meat can dry out. So, be patient. The wait will make a big difference when you serve it. Presentation makes your meal look special. To plate the chicken, slice it into pieces. Arrange the slices on a large platter. Drizzle the thickened balsamic glaze over the chicken. You can add halved cherry tomatoes around the chicken for color. A few fresh basil leaves on top give a nice touch. Serve with steamed veggies or a light salad for a complete, inviting meal. Enjoy creating this delightful dish with these tips! For the full recipe, check out the [Full Recipe] section. {{image_4}} You can change the taste of balsamic glazed chicken easily. Adding different herbs or spices can bring new life to the dish. For instance, try rosemary or thyme for a strong, earthy flavor. You can also use paprika for a smoky hint. Incorporating citrus is another great way to add zest. Squeeze fresh lemon or orange juice into the marinade. This brightens the flavors and adds a fresh twist. Citrus balances the sweetness of the honey and the tang of the balsamic vinegar. Pairing your chicken with side dishes makes a complete meal. Steamed vegetables, like broccoli or green beans, work well. They add color and nutrition to your plate. You could also serve it with a fluffy rice or creamy polenta for a comforting touch. Transforming the chicken into a salad is a fun option, too. Slice the cooked chicken and toss it on a bed of mixed greens. Add cherry tomatoes and sliced cucumbers for crunch. Drizzle the balsamic glaze on top for a fresh and tasty salad. You can use the balsamic glaze in other dishes. It works well on roasted vegetables or grilled fish, adding a sweet and tangy flavor. Drizzle it over a cheese platter or use it to marinate shrimp for a quick meal. Creative leftovers ideas can also make the dish last longer. Chop leftover chicken and mix it into pasta or quinoa. You can make a hearty sandwich with the chicken, adding lettuce and tomato for freshness. These ideas keep your meals exciting and reduce waste. To keep your leftover chicken fresh, follow these best practices: - Refrigeration: Place the chicken in an airtight container. This keeps it moist and prevents odors. Store it in the fridge within two hours of cooking. - Freezing: If you have more leftovers, wrap the chicken tightly in plastic wrap and then in aluminum foil. This helps prevent freezer burn. You can freeze it for up to three months. When reheating your chicken, you want to keep it moist. Here are some methods: - Oven: Preheat your oven to 350°F (175°C). Place the chicken in a baking dish with a splash of water or broth. Cover it with foil to trap steam. - Microwave: Use a microwave-safe dish. Add a little water and cover it with a damp paper towel. This will help keep moisture in. Reheat the chicken until it reaches an internal temperature of 165°F (75°C). Leftover balsamic glazed chicken can last in the fridge for about 3 to 4 days. Here are signs of spoilage to watch for: - Off-smell: If it smells sour or strange, it’s best to toss it. - Texture changes: If the chicken feels slimy or sticky, that’s a bad sign. - Color changes: If you see any green or gray spots, discard the chicken immediately. By following these storage tips, you can enjoy your balsamic glazed chicken for days to come! For the full recipe, check out the Balsamic Glazed Chicken Delight. To make balsamic glazed chicken, follow these key steps: 1. Mix the Marinade: Combine balsamic vinegar, honey, olive oil, minced garlic, Dijon mustard, salt, pepper, and herbs in a bowl. 2. Marinate the Chicken: Place chicken breasts in a bag, pour the marinade over, and refrigerate for at least 30 minutes. 3. Cook the Chicken: Heat a grill or skillet and cook the chicken for 6-7 minutes per side. 4. Reduce the Marinade: Simmer the leftover marinade to make a glaze. 5. Serve: Slice the chicken and drizzle with the balsamic glaze. This process creates a juicy, flavorful dish that’s sure to impress. Yes, you can use different vinegars. Here are some options: - Red Wine Vinegar: Offers a similar tang. - Apple Cider Vinegar: Adds a fruity note. - Rice Vinegar: Provides a milder taste. Adjust the sweetness by adding more honey if you use a sharper vinegar. This keeps your dish balanced and tasty. Balsamic glazed chicken pairs well with many sides. Here are some popular choices: - Steamed Vegetables: Broccoli or green beans add color and nutrition. - Rice or Quinoa: These grains soak up the glaze nicely. - Light Salad: A fresh salad with greens and vinaigrette complements the dish well. Feel free to mix and match your favorites for a delightful dinner. Balsamic glazed chicken is a simple and tasty dish. You learned the main ingredients: chicken, balsamic vinegar, and honey. We walked through steps for marinating, cooking, and making it flavorful. Remember to rest the chicken for juiciness and try fun variations for unique flavors. Store leftovers properly to enjoy later. This dish shines with sides that balance its sweetness. Now, you can make a meal that impresses everyone! Enjoy cooking and make your flavor journey fun!](https://lazychefmagic.com/wp-content/uploads/2025/05/4837835d-a26b-40a5-838d-c2f4a501785d.webp)
Looking for a tasty dinner idea? You’re in the right place! My Balsamic Glazed Chicken is easy, juicy, and full
