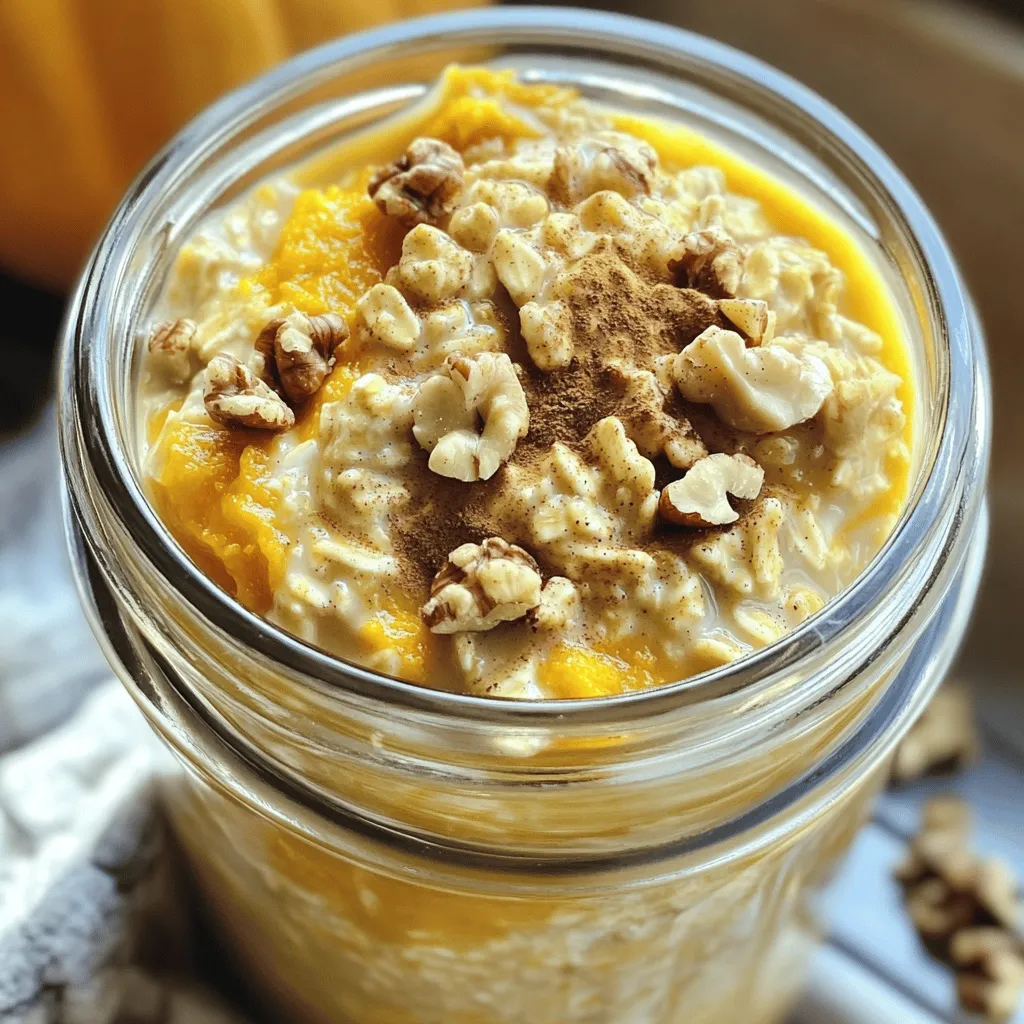
Pumpkin Spice Overnight Oats Tasty Morning Boost
Are you ready to start your mornings with a delicious twist? Pumpkin Spice Overnight Oats are the perfect blend of
Are you ready to start your mornings with a delicious twist? Pumpkin Spice Overnight Oats are the perfect blend of
![- 2 ripe avocados, peeled and pitted - 1/3 cup unsweetened cocoa powder - 1/4 cup maple syrup or honey - 1/4 cup almond milk (or plant-based alternative) - 1 teaspoon pure vanilla extract - A pinch of sea salt - Optional garnishes: dark chocolate shavings, fresh mint leaves For this chocolate avocado mousse, I love using ripe avocados. They give the mousse a rich, creamy texture. The cocoa powder provides a deep chocolate flavor. Maple syrup or honey adds just the right sweetness. Almond milk helps create a smooth blend. A pinch of sea salt balances out the flavors. Optional garnishes like dark chocolate shavings and fresh mint leaves make the dish pop. They add a lovely touch and extra flavor. You can find all these ingredients at your local store. For the full recipe, check out the details above. Enjoy making this creamy and decadent treat! - Step 1: Prepare the avocados Start by peeling and pitting the ripe avocados. The avocados should be soft but not overripe. This ensures a smooth texture. - Step 2: Measure dry and wet ingredients Gather all your ingredients. You will need cocoa powder, maple syrup or honey, almond milk, vanilla extract, and a pinch of salt. Measure them out to avoid any mess. - Step 3: Combine all ingredients in a blender Place the prepared avocados in your blender. Add the cocoa powder, maple syrup or honey, almond milk, vanilla extract, and salt. This mix brings together rich flavors. - Step 4: Blend until smooth and creamy Blend the mixture on high speed. Stop to scrape down the sides as needed. Blend until the mousse is completely smooth and creamy. This step is crucial for that perfect texture. - Step 5: Adjust sweetness and consistency After blending, taste the mousse. If it needs more sweetness, add a touch of maple syrup or honey. If it feels too thick, add a splash of almond milk for creaminess. - Step 6: Spoon mousse into serving dishes Carefully spoon the mousse into individual serving dishes. Using clear glasses is a great idea. It highlights the lovely, dark color of the mousse. - Step 7: Chill before serving Place the mousse in the fridge for at least 30 minutes. This chilling time helps the flavors mix and the mousse firm up. It’s worth the wait! For the full recipe, refer to the section above. To achieve the ideal creaminess in your chocolate avocado mousse, use ripe avocados. Look for avocados that yield slightly to gentle pressure. This means they are ready to blend into a silky texture. Blend the avocados until they are completely smooth. Stop to scrape the sides of the blender often. If the mousse feels too thick, add a bit more almond milk. Adjusting sweetness is simple. Start with the suggested maple syrup or honey. After blending, taste the mousse. If you want more sweetness, add a little more syrup. Blend again to mix it well. This way, you control the flavor to suit your taste buds. For more flavor, consider adding spices. A pinch of cinnamon or a dash of espresso powder can enhance the chocolate taste. You can also fold in a teaspoon of nut butter for extra richness. Pairing suggestions include fresh berries or nuts. Fresh raspberries or strawberries add a nice tartness. Chopped nuts like almonds or hazelnuts give a great crunch. You can also serve the mousse with a dollop of coconut whipped cream for a creamy touch. Eye-catching serving ideas make your mousse stand out. Use clear glass cups or parfait glasses to show off the rich, dark color. For a fancy touch, top each serving with dark chocolate shavings. A sprig of fresh mint adds a pop of color and freshness. Best types of dishes for serving mousse include small bowls or dessert cups. You can also use shot glasses for a fun, bite-sized treat. Each option allows you to display your beautiful mousse while keeping it easy to enjoy. {{image_4}} For a vegan twist on chocolate avocado mousse, we can easily swap ingredients. Instead of honey, use maple syrup. Maple syrup is a great plant-based sweetener. Almond milk works well here, but you can use coconut milk or oat milk too. Both add creaminess. You can also try using silken tofu. It gives a smooth texture while keeping it vegan. Blend silken tofu with the avocado and cocoa for a rich dessert. Want to change up the flavor? You can add different types of chocolate. Dark chocolate gives a deep taste, while milk chocolate is sweeter. You could even use white chocolate for a unique spin! Adding fruits can make it fun too. Try mixing in pureed bananas or berries. They add a nice fruity touch. Spices like cinnamon or chili can also spice things up. Just a pinch can create a warm flavor profile that surprises your taste buds. For a crunch in your mousse, add nuts like almonds or hazelnuts. Just chop them finely and fold them in after blending. This adds a nice contrast to the creamy texture. If you want a lighter mousse, try folding in whipped aquafaba. Aquafaba is the liquid from canned chickpeas. Whipping it gives a fluffy texture. Carefully add it to your mix to keep it airy. This makes the mousse feel light and fluffy while still tasting rich. Try these variations to make your chocolate avocado mousse even more exciting! You can find the full recipe [Full Recipe]. To keep your chocolate avocado mousse fresh, store it in the fridge. Use an airtight container to prevent it from absorbing other smells. Make sure to cover the mousse with plastic wrap or a lid. This way, it stays creamy and tasty. If you want to save it for longer, you can freeze it. Put the mousse in a freezer-safe container, leaving some space at the top for expansion. You can freeze it for up to three months. The mousse can last in the fridge for about three days. After that, it may start to lose its creamy texture. Look for discoloration or an off smell. If the mousse starts to turn brown or smells strange, it's best to toss it. Always check before you enjoy this delicious treat. Can I use regular cocoa powder instead of unsweetened? No, unsweetened cocoa powder works best for this mousse. Regular cocoa has added sugar, which can alter the taste. The unsweetened kind gives a rich chocolate flavor without extra sweetness. How can I make this recipe nut-free? You can easily make this mousse nut-free. Just swap almond milk for oat milk or soy milk. Both options keep the mousse creamy and delicious without nuts. Is there a way to make this mousse sugar-free? Yes! You can use a sugar substitute like stevia or erythritol. Both sweeteners can replace maple syrup or honey. Just adjust the amount to meet your taste. Avocados are a superfood. They are high in healthy fats, which help your heart. They also contain fiber, which aids digestion. One avocado has about 250 calories, but it packs a lot of nutrients! Each serving of this mousse has: - Healthy fats from avocados - Antioxidants from cocoa powder - Fiber from avocados and optional sweeteners What can you serve with chocolate avocado mousse? Try fresh berries or a sprinkle of sea salt to balance the flavors. You can also top it with whipped coconut cream for extra richness. This mousse is perfect for many occasions. Serve it at dinner parties, birthdays, or when you simply need a treat. It impresses guests while being healthy and easy to make. For the full recipe, check out the previous section! This blog covered everything you need to make chocolate avocado mousse. We listed the ingredients, shared simple steps, and provided tips for the best texture. You can explore variations, vegan options, and storage advice too. In the end, this dessert is both tasty and healthy. Try it for special events or a sweet treat. Enjoy creating your delicious chocolate mousse!](https://lazychefmagic.com/wp-content/uploads/2025/04/61d6baee-71fe-4f39-b831-18fe990818c9.webp)
Are you ready to indulge in a healthy dessert? My Chocolate Avocado Mousse is rich, creamy, and utterly delicious! With
![To create this flavor explosion, you need the right ingredients. Here’s what you will need: - 1 pound Brussels sprouts, trimmed and halved - 3 tablespoons extra virgin olive oil - 4 cloves garlic, minced - Zest and juice of 1 medium lemon - 1 teaspoon honey or maple syrup (for a vegan option) - Salt and freshly cracked black pepper to taste - 1/4 cup grated Parmesan cheese (optional for non-vegans) - Fresh parsley, chopped for garnish Each ingredient plays a vital role. The Brussels sprouts give a hearty base. They have a unique, nutty flavor that shines when roasted. The olive oil adds richness and helps with crisping. Garlic brings a bold kick, while lemon zest and juice brighten the dish. Honey (or maple syrup) enhances the natural sweetness of the sprouts. Salt and pepper are essential for balancing flavors. If you choose to use Parmesan cheese, it adds a savory depth that many love. Finally, the parsley not only looks great but also adds a fresh touch. For the full recipe, be sure to check out the [Full Recipe]. - Preheat your oven to 400°F (200°C). - Prepare the Brussels sprouts by trimming and halving them. Getting the oven hot helps the sprouts roast well. By trimming and halving them, you allow the flavors to soak in. You want them to be tender on the inside and crisp on the outside. - Combine Brussels sprouts with olive oil, garlic, lemon zest, lemon juice, honey, salt, and pepper. In a large bowl, mix the halved sprouts with olive oil and minced garlic. The lemon zest and juice add a fresh kick. Honey gives a hint of sweetness. Add salt and pepper to taste. Toss everything well until the sprouts are coated evenly. This step is key for maximum flavor. - Line a baking sheet with parchment paper. - Spread Brussels sprouts in a single layer and roast for 20-25 minutes. - Stir halfway through for even browning. - Optional: Add Parmesan cheese in the last 5 minutes. Using parchment paper makes cleanup easy. Spread the sprouts out, giving them space to roast. Stir them halfway for that perfect golden-brown color. If you enjoy cheese, sprinkle Parmesan in the last minutes. It will melt into a lovely crust. For the full recipe, check the earlier sections. Enjoy the burst of flavor in each bite! - Coat the Brussels sprouts evenly with olive oil and seasonings. This step is key for great flavor. - Spread the Brussels sprouts out on the baking sheet. This helps them crisp up nicely. Overcrowding can lead to steaming, which makes them soggy. - Try adding a pinch of red pepper flakes for some heat. It pairs well with garlic and lemon. - Fresh herbs like thyme or rosemary can boost the flavor. They bring a lovely aroma and freshness. - For a twist, sprinkle some chopped walnuts or almonds on top. They add crunch and richness. - Serve the roasted Brussels sprouts in a colorful bowl. A rustic wooden bowl brings warmth and charm. - Drizzle extra lemon juice over the top before serving. It brightens the dish and enhances the flavor. - Add lemon wedges around the bowl for a pop of color. It also gives guests an option to add more zest. - Garnish with fresh parsley for a vibrant finish. It adds a nice touch and a hint of freshness. For the full recipe, check out the detailed steps to create this delicious dish. {{image_4}} You can make simple tweaks to keep this dish vegan. First, swap out Parmesan cheese for nutritional yeast. This will give you a cheesy flavor without any dairy. You can also use different sweeteners. Try agave syrup instead of honey for a vegan option. These changes keep the dish tasty while meeting dietary needs. Want to mix it up? Add other veggies! Carrots or sweet potatoes can bring new flavors. They roast well and will add a nice touch. You can also experiment with spices. Try adding paprika for a smoky flavor or red pepper flakes for heat. These swaps can elevate your Brussels sprouts to new heights. Looking for extra crunch? Consider adding nuts or seeds. Toasted almonds or sunflower seeds can bring a delightful texture. If you want to switch up the citrus flavor, try lime or orange juice. Both can add a bright twist to your dish. These flavor additions can make your Brussels sprouts even more exciting. For the full recipe, check out the details above. After you roast your Brussels sprouts, let them cool. Store leftovers in an airtight container. This keeps them fresh and tasty. You can keep them in the fridge for up to three days. To reheat your Brussels sprouts, use the oven or a skillet. For the oven, set it to 350°F (175°C) and bake for about 10 minutes. If using a skillet, heat it on medium. Add a splash of olive oil and warm them until hot. To keep them crispy, avoid the microwave. You can freeze the cooked Brussels sprouts. First, let them cool completely. Then, place them in a freezer-safe bag. Squeeze out as much air as you can. They will last up to three months in the freezer. When ready to eat, thaw them in the fridge overnight. To reheat, use the oven for best results. For a quick option, use a skillet on low heat. This way, they stay tasty and not mushy. You can pair these Brussels sprouts with many tasty dishes. They go well with: - Grilled chicken - Roasted salmon - Quinoa salad - Garlic mashed potatoes - Steak or pork chops These sides enhance the flavor and round out your meal. Try these options for a balanced plate. Yes, you can prepare this dish ahead of time. Here are some tips: - Roast your Brussels sprouts earlier in the day. - Store them in an airtight container in the fridge. - Reheat in the oven for best texture. This method saves time and gives you a quick side dish ready to serve. Look for a few signs to know they are done: - They should be crispy and golden-brown on the outside. - The insides should be tender and easy to pierce with a fork. - A nice aroma should fill your kitchen. These signs show that your sprouts are perfectly roasted. Absolutely! Lemon Garlic Roasted Brussels Sprouts work great for meal prep. Here’s how to include them: - Roast a large batch on the weekend. - Divide them into portions for the week. - Pair them with proteins or grains for easy meals. This makes healthy eating simple and quick. You can use frozen Brussels sprouts, but some adjustments are needed: - Thaw them first to avoid excess water. - Roast them for a bit longer to get that crispy texture. - Skip the initial olive oil coating and use a bit more on the baking sheet. These changes help maintain the flavor and texture you want in this dish. Check out the full recipe for more details! This blog post shared a great recipe for Lemon Garlic Roasted Brussels Sprouts. You learned what ingredients to use and how to prepare the dish step-by-step. I provided tips on roasting and serving, plus variations for different tastes. Storing and reheating leftovers was also discussed to minimize waste. Try this tasty side dish today. You can experiment with flavors or add your twist. Enjoy the blend of garlic and lemon, and share this dish with friends or family!](https://lazychefmagic.com/wp-content/uploads/2025/04/3e1832b4-3b69-47a3-9731-020d5482969c.webp)
Are you ready to transform Brussels sprouts into a dish that excites your taste buds? My Lemon Garlic Roasted Brussels
. 1. Boiling Water and Adding Salt Fill a large pot with water. Add a good pinch of salt. This helps flavor the pasta. Bring the water to a rolling boil. 2. Cooking Time for Fettuccine Add the fettuccine to the boiling water. Cook it for about 8 to 10 minutes. Test it to make sure it’s al dente. 3. Draining and Reserving Pasta Water Before draining, reserve about ½ cup of the pasta water. Drain the fettuccine and set it aside. 1. Heating Olive Oil and Butter in Skillet In a large skillet, heat 2 tablespoons of olive oil and 1 tablespoon of butter over medium heat. Wait until the butter melts and bubbles a bit. 2. Cooking Time for Mushrooms Add the sliced mushrooms to the skillet. Sauté them for about 5 to 7 minutes. Stir them often until they turn golden brown. 3. Adding Minced Garlic Add 4 cloves of minced garlic to the mushrooms. Cook for another 1 to 2 minutes. Stir frequently to avoid burning the garlic. 1. Incorporating Heavy Cream Lower the heat and pour in 1 cup of heavy cream. Stir it well with the mushrooms and garlic. 2. Adding Parmesan and Thyme Gradually add 1 cup of grated Parmesan cheese and 1 teaspoon of dried thyme. Stir continuously until the cheese fully melts. 3. Achieving Desired Sauce Consistency Keep stirring until the sauce is smooth and creamy. If it’s too thick, add a bit of the reserved pasta water. 1. Mixing Cooked Fettuccine with Sauce Add the drained fettuccine to the skillet. Toss it gently to coat the pasta with the creamy sauce. 2. Adjusting Thickness with Pasta Water If the sauce seems thick, add more reserved pasta water a little at a time. This helps reach your preferred sauce consistency. 1. Tasting and Adjusting Seasoning Taste your creamy pasta and add salt and freshly cracked black pepper as needed. 2. Optional Spicy Twist with Red Pepper Flakes For a hint of heat, sprinkle in some crushed red pepper flakes. This step is optional but adds a nice kick. 1. Presentation Tips Serve the pasta in bowls or plates. Top with extra grated Parmesan and chopped parsley for color. 2. Pairing with Garlic Bread Enjoy your creamy garlic mushroom pasta with warm garlic bread. This makes a delicious meal even better. For the full recipe, check out Creamy Garlic Mushroom Fettuccine . - Cooking Pasta Al Dente: Always cook the fettuccine until it is al dente. This means it should be firm when you bite it. To achieve this, check the package for the cooking time. Start tasting the pasta a minute or two before the time is up. If it feels slightly firm but not hard, it’s ready. - Importance of Reserved Pasta Water: Before you drain the pasta, save about half a cup of the cooking water. This starchy water helps to thicken the sauce and makes it cling better to the pasta. It can also adjust the sauce's texture if it feels too thick. - Using Fresh Ingredients: Always opt for fresh mushrooms and garlic. They add a pop of flavor that dried or pre-packaged versions can’t match. Fresh ingredients make a big difference in taste. Look for mushrooms that feel firm and have a clean smell. - Adjusting Seasonings to Taste: Don’t be afraid to taste your dish as you cook. This helps you adjust the salt, pepper, and other seasonings. If you want a stronger flavor, add more garlic or thyme. You can also sprinkle in some crushed red pepper flakes for heat. - Preparing Ingredients in Advance: Before you start cooking, chop your garlic and slice your mushrooms. This makes it easier to cook quickly. Having everything ready also helps keep the cooking process smooth and fun. - Utilizing One-Pan Cooking: Consider cooking everything in one pan. After sautéing the mushrooms and garlic, you can add the cream right into the same pan. This cuts down on dishes and keeps all the flavors together. It’s efficient and makes cleaning up easier. Try these tips to create a creamy garlic mushroom pasta dish that shines with flavor and comfort. For the full recipe, check out Creamy Garlic Mushroom Fettuccine . {{image_4}} You can make creamy garlic mushroom pasta even heartier by adding protein. Grilled chicken or shrimp works well. Just cook them separately and toss them with the pasta. If you prefer vegetarian options, try using tofu. Firm tofu adds great texture and soaks up the flavors. Adding more veggies brightens up the dish. Spinach, peas, or broccoli are great choices. You can add them while the pasta cooks. Seasonal vegetables also work well. Think about using zucchini or asparagus when they are fresh. You can switch up the pasta for a new twist. Penne or rigatoni are great substitutes. They hold the creamy sauce nicely. If you need gluten-free options, look for gluten-free pasta brands. They cook similarly and taste great in this dish. For the full recipe, check out Creamy Garlic Mushroom Fettuccine . - Best Containers for Storage: Use airtight containers to keep your pasta fresh. Glass containers work well for this. They help avoid moisture and bad smells. - Refrigeration Guidelines: Store the pasta in the fridge. It will last about three to four days. Make sure it cools down before sealing it. - Methods for Reheating Fettuccine: You can reheat the pasta in a skillet or microwave. If using a skillet, add a splash of water to help steam it. If using a microwave, cover it to keep moisture in. - Maintaining Creaminess: To keep the sauce creamy, add a bit of heavy cream or reserved pasta water. Stir well to blend it in. - Freezing Sauce and Pasta Separately: For longer storage, freeze the sauce and pasta separately. Use freezer-safe bags or containers. This helps maintain their textures. - Thawing and Reheating Frozen Pasta: Thaw the sauce in the fridge overnight. Reheat it slowly in a skillet. For pasta, you can microwave it or boil it briefly to warm it up. Using these tips will help you enjoy your creamy garlic mushroom fettuccine for days. For the full recipe, check out the Creamy Garlic Mushroom Fettuccine . Yes, you can make creamy garlic mushroom pasta vegan. Use plant-based cream instead of heavy cream. For cheese, try nutritional yeast or a vegan cheese substitute. These options give you the creamy texture without dairy. To keep your sauce smooth, avoid high heat when cooking. Stir the sauce gently as you add the cream and cheese. If the sauce seems too thick, add a bit of reserved pasta water. This helps emulsify and blend everything well. This pasta pairs well with a fresh green salad. Garlic bread is another great choice. You can also serve it with roasted vegetables. Each side adds a nice touch to the meal. If you like heat, add crushed red pepper flakes. You can also toss in some sliced jalapeños or a dash of hot sauce. Adjust the spice level to your taste for a zesty kick. Absolutely! You can use any mushrooms you like. Shiitake, portobello, or oyster mushrooms all work well. Each type brings its own flavor and texture to the dish. You can find the full recipe for creamy garlic mushroom fettuccine [here](https://www.example.com). This includes all the steps and tips to make this delicious dish. This blog post detailed how to create a creamy garlic mushroom fettuccine dish. You learned about the key ingredients, step-by-step cooking methods, and helpful tips. The recipe can adapt to your taste with added proteins or vegetables. Store your leftovers properly for the best results. Feel free to experiment with flavors and pasta types. Cooking can be simple and fun, so enjoy every bite! Now, go ahead and make this delicious meal for yourself or share it with others.](https://lazychefmagic.com/wp-content/uploads/2025/04/e131dbcb-6184-44d6-912a-c1ad2e20707a.webp)
Are you ready to dive into a dish that’s both creamy and bursting with flavor? My Creamy Garlic Mushroom Pasta
![- 1 cup rolled oats - 2 cups almond milk (or your preferred milk) - 2 ripe bananas, sliced (plus extra for topping) - 1/4 cup creamy peanut butter - 2 tablespoons honey or maple syrup - 1/2 teaspoon vanilla extract - 1/2 teaspoon ground cinnamon - A pinch of salt - Chopped nuts - Chia seeds - Extra banana slices - Drizzle of peanut butter The ingredients are simple and easy to find. You can adjust the sweetness with honey or maple syrup. For creaminess, almond milk works great, but feel free to use your favorite milk. The rolled oats are the base, soaking up all the delicious flavors. Sliced bananas add natural sweetness and texture. Creamy peanut butter ties everything together, giving each bite a rich taste. When you mix in vanilla and cinnamon, you create a warm flavor that makes breakfast special. For toppings, the options are endless! You can add chopped nuts for crunch, chia seeds for extra nutrients, or more banana slices for a fresh touch. A drizzle of peanut butter on top adds a nice finishing touch. This recipe is not only tasty but also customizable. You can mix and match to suit your taste. For the full recipe, check out the instructions that guide you through each step with ease. First, grab a large bowl or an airtight container. In it, combine 1 cup of rolled oats with 2 cups of almond milk. This mix creates a creamy base. Next, add in 1/4 cup of creamy peanut butter, 2 tablespoons of honey or maple syrup, 1/2 teaspoon of vanilla extract, 1/2 teaspoon of ground cinnamon, and a pinch of salt. Each ingredient adds flavor and richness to your oats. Now it's time to mix! Whisk the ingredients together until they are well-combined. Make sure the peanut butter gets evenly mixed throughout the oats. This step is key for great flavor. After mixing, gently fold in most of the banana slices. Save a few for topping later. This adds freshness and sweetness to your dish. Once mixed, cover the bowl with a lid or plastic wrap. Place it in the refrigerator overnight. This soaking process helps the oats absorb the milk and flavors. In the morning, take it out and give it a good stir. If the mixture seems too thick, add a splash of almond milk to adjust the consistency. Now your Peanut Butter Banana Overnight Oats are ready to serve! Enjoy them topped with the reserved banana slices, nuts, chia seeds, and a drizzle of peanut butter for extra yum! For the full recipe, check out the above section. To make the best peanut butter banana overnight oats, start with a good container. Use an airtight container for storage. This keeps your oats fresh and tasty. Next, mix the peanut butter well. A smooth blend ensures you get that creamy flavor in every bite. Sometimes, the oats can get too thick. If this happens, simply add more milk. This helps you reach your desired consistency. You can also adjust sweetness. If you like it sweeter, add more honey or maple syrup. Taste as you go to find what you love. Presentation matters! Serve your oats in clear glass jars. This way, you can see the lovely layers of oats and toppings. To make it look even better, garnish with banana slices and nuts. A little extra effort here makes breakfast more exciting. {{image_4}} You can easily change the flavor of your Peanut Butter Banana Overnight Oats. One fun option is to make Chocolate Peanut Butter Banana Overnight Oats. Just add two tablespoons of cocoa powder to the mix. This gives a rich, chocolatey taste. You can also add chocolate chips for extra sweetness. Another idea is to include Fruit and Nut Mix-Ins. Toss in some berries, diced apples, or chopped nuts. This adds texture and flavor. You get to enjoy different tastes each time. For those who follow a vegan diet, you can swap honey with maple syrup. This keeps your oats sweet without using animal products. It’s an easy change that works great. If you need gluten-free options, replace rolled oats with certified gluten-free oats. Always check the labels to ensure they meet your needs. This way, everyone can enjoy a tasty and safe breakfast. Toppings can take your oats to new heights. Consider adding yogurt or granola on top. This gives a creamy or crunchy texture. You can also layer your oats with some yogurt for a delightful treat. Seasonal fruits are a fun way to change it up. Use fresh strawberries in spring or apples in fall. Adding different fruits keeps your meal fresh and exciting. You can mix and match to suit your taste. For the full recipe, check out [Full Recipe]. To keep your Peanut Butter Banana Overnight Oats fresh, store them in an airtight container. The oats will stay good for up to five days in the fridge. Just make sure to cover them tightly to prevent any smells from seeping in. You can prepare these oats in bulk for the week. Make several jars at once and mix different flavors. Consider adding berries, chocolate, or nuts for future variations. This way, you have quick breakfasts ready to go. If you prefer warm oats, you can reheat them in the microwave. Heat in short bursts, stirring in between. This helps keep the texture creamy. If they seem a bit thick, add a splash of almond milk to revive them. Enjoy your tasty breakfast! Peanut Butter Banana Overnight Oats can last up to five days in the fridge. Store them in airtight containers. The oats keep well, and the flavors develop nicely. After a few days, the oats may become softer but still taste great. I recommend eating them within three days for the best texture. Yes, you can use other types of milk. Try cow's milk, soy milk, or oat milk. Each milk brings a different flavor and creaminess. If you prefer nut-free options, go for oat or soy milk. The key is to pick a milk that you enjoy. You can use agave syrup, brown sugar, or stevia. Each substitute adds sweetness. If you're vegan, agave syrup is a great choice. Brown sugar gives a warm flavor, while stevia is low-calorie. Adjust the amount based on your taste preference. You can also skip sweeteners if you like it less sweet. This blog post explored the easy steps to make Peanut Butter Banana Overnight Oats. You learned about the main and flavoring ingredients, how to prepare and mix them, and tips for storage and serving. These oats are fun to customize for your taste. They are healthy, quick, and perfect for meal prep. Try different toppings or variations to keep things exciting. This dish fits any diet and is great for breakfast or snacks. Enjoy your tasty creation, and make it your own!](https://lazychefmagic.com/wp-content/uploads/2025/04/085c0ab1-aa45-437b-9ff7-de22d98cf910.webp)
Looking for a quick and healthy breakfast? You’ll love these Peanut Butter Banana Overnight Oats! They are easy to make,
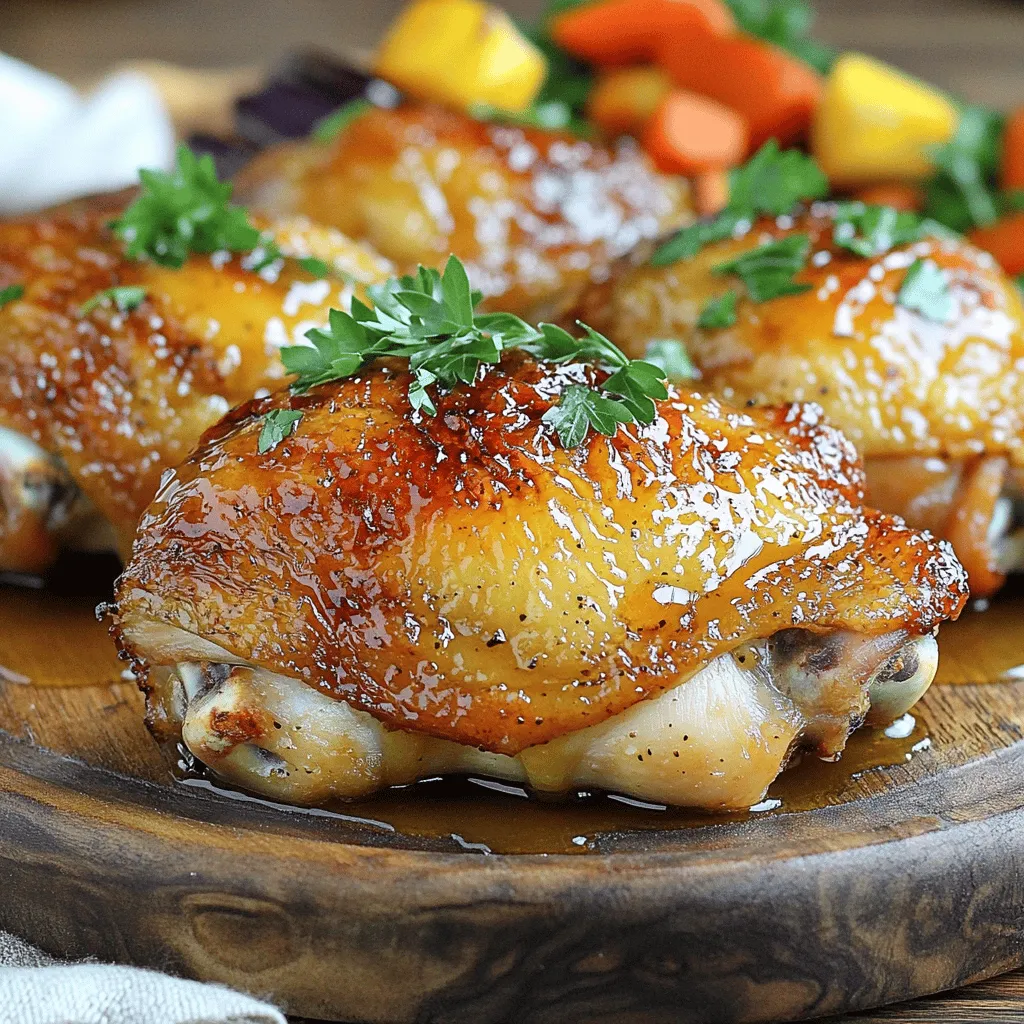
Are you ready to impress your family with an easy, tasty dinner? Honey Mustard Chicken Thighs offer a perfect blend
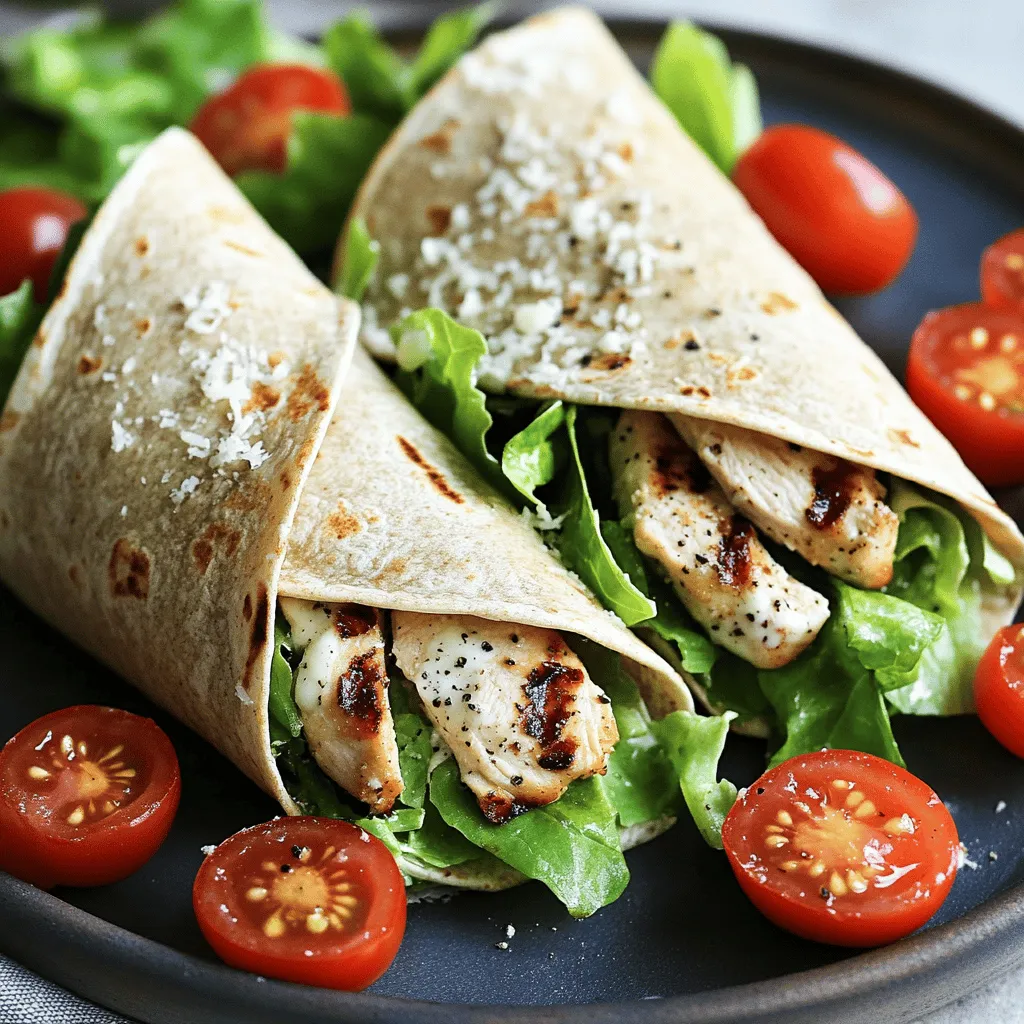
Looking for a tasty meal that’s quick and easy? You’ve found it! Grilled Chicken Caesar Wraps are packed with flavor
. To make zoodles, you can use a spiralizer or a simple vegetable peeler. A spiralizer gives you long, curly noodles. A peeler creates flat, ribbon-like strips. Both options work well. After cutting the zucchinis, place them in a colander. This step helps to drain excess moisture. Zucchini has a lot of water, and we want our zoodles to stay firm. For a tasty pesto, grab a food processor. Add fresh basil leaves, toasted pine nuts, and minced garlic. Pulse the mixture until it is finely chopped. This step releases great flavor. Next, turn on the processor and slowly add extra virgin olive oil. This will make the mixture smooth. Add grated Parmesan cheese and lemon zest. Mix well and season with salt and pepper for taste. Heat a large skillet over medium heat. Add one tablespoon of olive oil. Once it is warm, add the zoodles. Sauté them for about 2-3 minutes. Stir gently to keep their shape. You want them tender but still crisp. Avoid cooking too long, or they will become mushy. Once the zoodles are ready, take the skillet off the heat. Immediately add your fresh pesto sauce. Toss gently until all the zoodles are evenly coated. Serve the zoodles on plates or a big platter. For extra flavor, garnish with halved cherry tomatoes and sliced black olives if you like. You can also drizzle more olive oil and sprinkle additional Parmesan cheese on top. For the full recipe, check the details above! To make your zoodles shine, you can adjust the ingredients. If you want a nut-free pesto, swap the pine nuts for sunflower seeds. For a creamier sauce, add more cheese or a splash of cream. Common mistakes include overcooking the zoodles. They only need a few minutes of heat. If they become too soft, they lose their crunch. Drain excess moisture to keep them firm. You need a few tools for this recipe. A spiralizer is great for making zoodles. It creates long, fun noodles. A vegetable peeler works too, but the noodles will be wider. Using a spiralizer gives you better texture and shape. It also speeds up the process. A peeler requires more time and effort. Choose what works best for you! {{image_4}} You can switch up the pesto to suit your needs. If you want a nut-free option, use sunflower seeds instead of pine nuts. For a vegan pesto, replace Parmesan cheese with nutritional yeast. Both options taste great! Feel free to add other veggies for more color and flavor. Try bell peppers, carrots, or spinach. These vegetables can boost nutrition and make the dish more exciting. Toppings can make your zucchini noodles shine. Consider adding toasted nuts, fresh herbs, or a sprinkle of red pepper flakes. These will add depth and texture. For protein, grilled chicken or shrimp pairs well with zoodles. You can also try chickpeas for a plant-based option. This makes the meal filling and balanced. For the complete recipe, check out the Full Recipe section above. To keep your leftover zoodles fresh, use airtight containers. Glass or BPA-free plastic containers work best. They help keep moisture out and keep zoodles crisp. Store them in the fridge for up to three days. When you're ready to eat, gently reheat them in a skillet. Use low heat and stir often. This keeps their texture nice and firm. If you want to save zoodles for later, freezing is a great option. Start by blanching the zoodles in boiling water for one minute. This helps keep their color and texture. Then, cool them in ice water to stop cooking. Drain and pack them in freezer bags, removing as much air as possible. You can store them in the freezer for up to three months. For the pesto, pour it into ice cube trays and freeze. Once frozen, transfer the cubes to a bag. This way, you can grab just what you need for future meals. Yes, you can use store-bought pesto. It saves time and effort. However, it may not taste as fresh as homemade. Here are some pros and cons: - Pros: Quick to use, consistent flavor, and no prep work. - Cons: Often has added preservatives and may lack freshness. If you decide to go this route, I recommend brands like Barilla or Classico. They offer good flavors and quality. To keep zoodles firm, follow these tips: - Cook briefly: Sauté for only 2-3 minutes. - High heat: Use medium heat to cook quickly. - Drain well: Let them sit in a colander before cooking. These steps help maintain the right texture, making your dish more enjoyable. You can pair zoodles with various sides or proteins. Some ideas include: - Grilled chicken for added protein. - Shrimp sautéed in garlic for a seafood twist. - A simple salad for freshness. These options complement the zoodles and enhance your meal. Yes, you can prepare some elements in advance. Here’s how: - Zoodles: Spiralize and store them in the fridge for up to 2 days. - Pesto: Make it ahead and keep it in an airtight container for about a week. When ready to serve, just cook the zoodles and mix them with the pesto. Enjoy your healthy meal with ease! This blog post covers how to make delicious zucchini noodles with pesto. We discussed the ingredients, steps for preparing zoodles, and tips to avoid common mistakes. We also explored variations and storage ideas to enhance your dish. Remember, cooking is about experimenting and having fun. Try adding your favorite flavors or veggies. With practice, you’ll master this healthy meal. Enjoy making your zoodles and pesto!](https://lazychefmagic.com/wp-content/uploads/2025/04/4f9d0370-99b1-47cf-a2b8-e82b1301c11f.webp)
Looking for a healthy, delicious meal that’s quick to whip up? Zucchini noodles with pesto is the answer! This light
. Enjoy making this tasty side! This blog post covers how to make Maple Glazed Brussels Sprouts. You learned the key ingredients, step-by-step instructions, and several tips. These sprouts are simple to prepare and taste great with many meals. Remember, you can change flavors or use different nuts. Don't hesitate to try new cooking methods, too. Enjoy this dish with friends and family. It's delicious, healthy, and easy to make. Happy cooking!](https://lazychefmagic.com/wp-content/uploads/2025/04/9a32e05c-14f3-4b83-b878-a1c47b5d6cb5.webp)
If you’re searching for a side dish that’s both simple and bursting with flavor, look no further. Maple glazed Brussels
![To make these tasty stuffed bell peppers, gather these ingredients: - 4 large bell peppers (red, yellow, green, or orange) - 1 cup quinoa, rinsed - 2 cups vegetable broth (or water) - 1 can (15 oz) black beans, rinsed and drained - 1 cup corn kernels (fresh or thawed if frozen) - 1 small red onion, diced - 2 cloves garlic, minced - 1 teaspoon ground cumin - 1 teaspoon smoked paprika - ½ teaspoon chili powder - Salt and pepper, to taste - 1 cup diced tomatoes (fresh or drained canned) - 1 cup shredded cheese (cheddar, Monterey Jack, or a mix) - Fresh cilantro or parsley, chopped, for garnish You can customize your stuffed peppers with some fun add-ins: - Swap quinoa for brown rice or couscous. - Add ground turkey or beef for protein. - Use different beans like kidney or pinto beans. - Toss in chopped spinach or zucchini for extra veggies. - Try different cheeses like feta or goat cheese. These stuffed bell peppers offer a healthy meal packed with nutrients. Each serving includes: - Protein from quinoa and beans - Fiber from vegetables and grains - Vitamins A and C from bell peppers and tomatoes - Healthy fats from olive oil and cheese (if used) This dish is not just colorful; it's good for you, too! For the full recipe, check out the [Full Recipe]. Start by preheating your oven to 375°F (190°C). This step warms the oven for baking later. Next, take your bell peppers and slice off the tops. Be careful not to cut too deep. Remove the seeds and membranes inside. You can save the tops for later use or garnish. Set the cleaned peppers aside on a baking dish. In a medium pot, combine 1 cup of rinsed quinoa with 2 cups of vegetable broth. Bring this mix to a boil. Once boiling, turn down the heat to low. Cover the pot and let it simmer for about 15 minutes. This time allows the quinoa to soak up the broth. When it’s done, remove it from heat and fluff with a fork. Perfectly cooked quinoa adds great texture to your dish. In a large skillet, heat a tablespoon of olive oil over medium heat. Add in 1 small diced red onion. Sauté for 3-4 minutes until it turns soft and clear. Then, add 2 minced garlic cloves, 1 teaspoon of ground cumin, 1 teaspoon of smoked paprika, and ½ teaspoon of chili powder. Stir this mix for about a minute until the garlic smells nice. Next, add the cooked quinoa, 1 can of black beans, 1 cup of corn, and 1 cup of diced tomatoes to the skillet. Stir well and cook for about 5 more minutes until everything is heated through. Finally, mix in half of the shredded cheese until it melts. Now, it’s time to fill the bell peppers! Take the quinoa mix and fill each pepper generously. Press down lightly to pack it in. Place the stuffed peppers upright in your baking dish. Top each one with the remaining cheese. Cover the dish with foil and bake for 25 minutes. After that, take off the foil and bake for another 10-15 minutes. You want the peppers to be soft and the cheese bubbly. Once baked, let them cool for a few minutes. Garnish with fresh cilantro or parsley for a vibrant finish. For the full recipe, check out the vibrant quinoa-stuffed bell peppers! To enhance the flavor of your stuffed bell peppers, focus on seasoning. Use fresh herbs like cilantro or parsley for brightness. Try adding lime juice for a zesty kick. If you like heat, toss in some diced jalapeños or a dash of hot sauce. Mixing different cheeses can also add depth. Experiment until you find your perfect blend. The goal is to balance the flavors of the quinoa, beans, and spices. Cooking times may differ based on your oven and the size of the peppers. Always check for doneness by poking the peppers with a fork. They should be tender but still hold their shape. If you prefer softer peppers, you can bake them longer. Just be careful not to overcook, or they may lose their structure. Keep an eye on the cheese; it should be bubbly and golden. Select firm and vibrant bell peppers for stuffing. Each color has a unique taste; red is sweet, green is slightly bitter, and yellow or orange are mild. Look for peppers with smooth skin and no blemishes. If you want a fun twist, try using mini bell peppers for smaller servings. They can be great for parties or snacks. The right pepper enhances your dish and makes it visually appealing. For the full recipe, refer to the vibrant quinoa-stuffed bell peppers section. {{image_4}} You can easily make stuffed bell peppers vegetarian or vegan. For a vegetarian option, use cheese in the filling. Just choose a cheese like mozzarella or cheddar. To make it vegan, skip the cheese. You can substitute it with nutritional yeast for a cheesy flavor. For creaminess, add some mashed avocado on top before serving. Both options taste amazing! Want to pack in more protein? Add cooked lentils or chickpeas to the quinoa mixture. Ground turkey or beef works great too if you prefer meat. For a fun twist, try adding cooked sausage or shrimp. These additions enhance the flavor and make your meal heartier. Quinoa is naturally gluten-free, so your dish is safe for gluten-free eaters! If you want extra crunch, toss in some nuts like walnuts or almonds. You can also use gluten-free breadcrumbs mixed with the filling. This gives your stuffed peppers a nice texture. Enjoy exploring these variations! For the full recipe, check the earlier section. You can keep your stuffed bell peppers in the fridge. Place them in an airtight container. They stay fresh for about 3 to 5 days. Before serving, check for any signs of spoilage. Always trust your senses! Freezing stuffed peppers is a great way to save them for later. Allow the peppers to cool completely first. Wrap each pepper tightly in plastic wrap. Then, place them in a freezer-safe bag. They can last up to 3 months in the freezer. When you're ready to eat, just thaw them overnight in the fridge. To reheat your stuffed peppers, you can use the oven or microwave. For the oven, preheat it to 350°F (175°C). Place the peppers in a baking dish and cover with foil. Heat for about 20-25 minutes. If using the microwave, place a pepper on a microwave-safe plate. Heat for 2-3 minutes or until hot. Enjoy your meal! For more details, refer to the Full Recipe. Yes, you can use brown rice instead of quinoa. Brown rice adds a nice chewiness. However, it takes longer to cook. You should adjust the cooking time to about 40-45 minutes. Make sure to use twice the water for brown rice. This way, it will absorb the liquid and become tender. You can tell the peppers are done when they are tender. They should look slightly wrinkled. The cheese on top should be bubbly and golden. A fork should pierce through the flesh easily but not too soft. Let them cool for a few minutes before serving. I love to serve stuffed peppers with a side salad. A fresh green salad adds crunch. You can also pair them with avocado slices or a dollop of sour cream. For extra zest, add a lime wedge on the plate. This makes the dish pop with flavor! You can customize this recipe in many ways. For a vegan version, skip the cheese or use vegan cheese. If you want a low-carb option, try using cauliflower rice instead of quinoa. For extra protein, add cooked lentils or ground turkey. Adjust spices to suit your taste! Stuffed bell peppers are simple and fun to make. We covered all the essential ingredients, from the main ones to tasty add-ins. You learned how to prep and assemble the peppers step-by-step. Plus, we discussed useful tips to enhance flavors and cooking times. Don’t forget about the variations for different diets! Store leftovers properly for later meals. Enjoy this dish as a healthy option that fits various needs. Cooking can be easy and rewarding.](https://lazychefmagic.com/wp-content/uploads/2025/04/2f72089f-f380-4b39-a829-20c1d07266c0.webp)
If you’re looking for a tasty, healthy meal that’s easy to make, stuffed bell peppers with quinoa are a great
