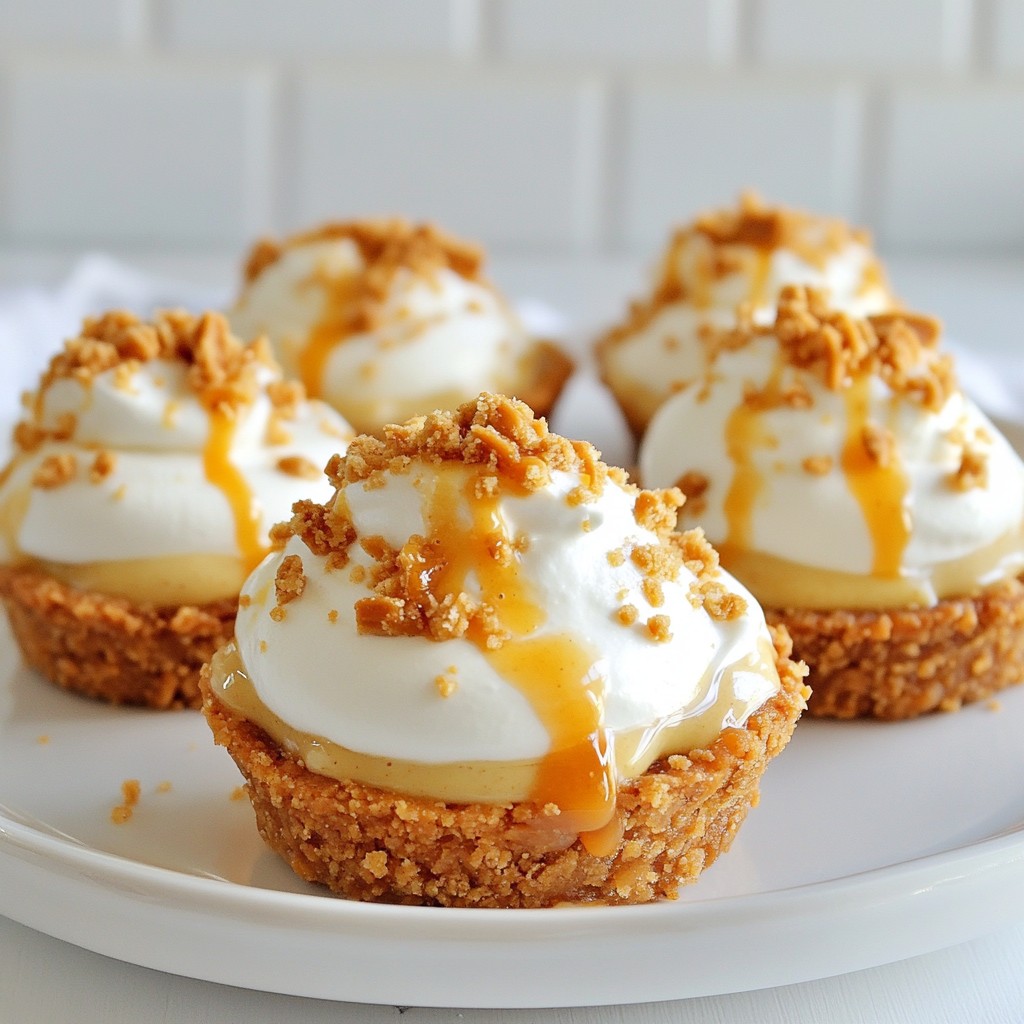
If you love sweet treats, you're in for a treat! These Butterfinger Caramel Crunch Mini Pies are simple to make and packed with flavor. With creamy peanut butter, drizzled caramel, and crushed Butterfinger candy, each bite melts in your mouth. Whether for a special occasion or just a snack, this recipe is sure to delight everyone. Let me guide you on how to whip up this easy, delicious dessert!
Why I Love This Recipe
- Decadent Flavor: The combination of creamy peanut butter, rich caramel, and crunchy Butterfinger creates an indulgent treat that satisfies any sweet tooth.
- Easy to Make: With just a few simple ingredients and straightforward steps, these mini pies can be whipped up quickly, making them perfect for any occasion.
- Perfect Portion Control: These mini pies are just the right size for a sweet snack or dessert, allowing everyone to enjoy a treat without overindulging.
- Chill Factor: Chilling the pies not only helps them set perfectly but also enhances the flavors, making each bite refreshing and delightful.
Ingredients
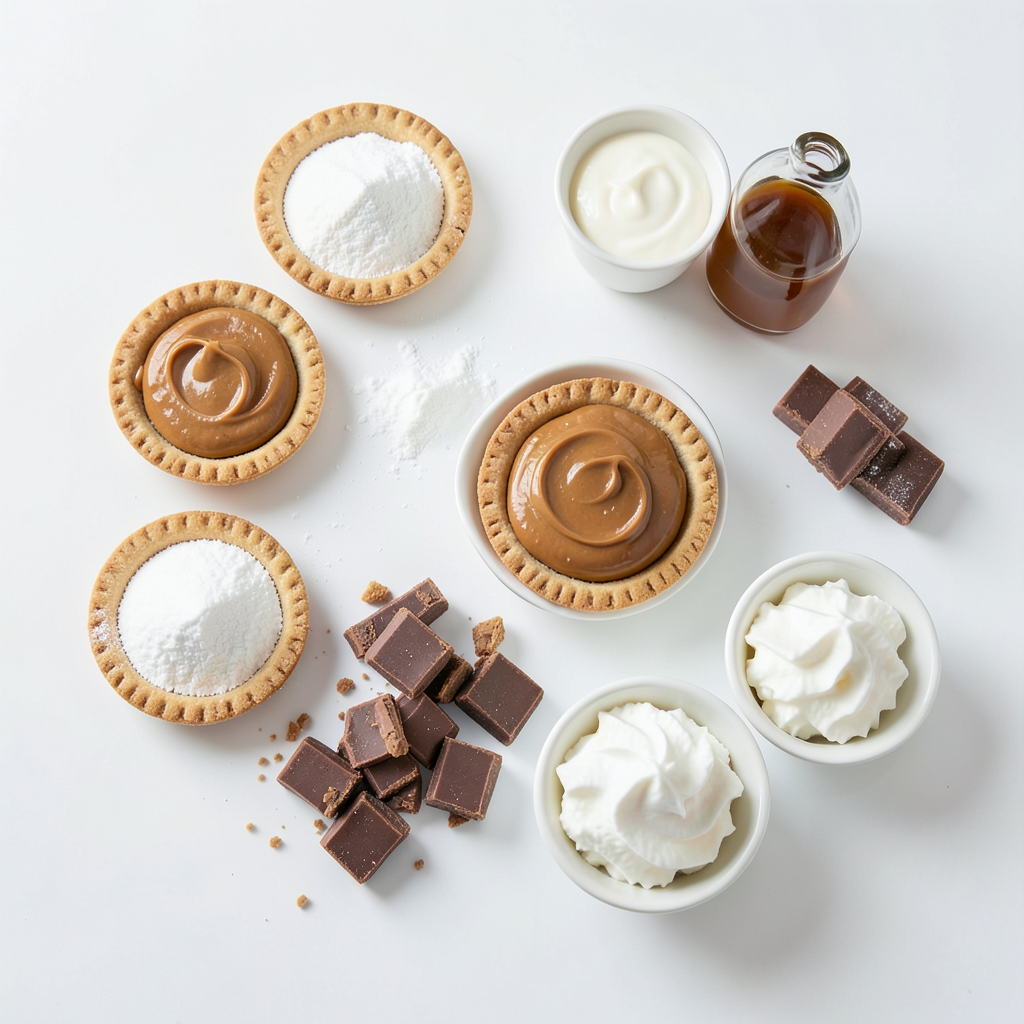
List of Ingredients
- Mini graham cracker pie crusts
- Creamy peanut butter
- Powdered sugar
- Heavy cream
- Caramel sauce
- Butterfinger candy bars
- Vanilla extract
- Whipped cream (optional)
- Additional crushed Butterfinger (for garnish)
These ingredients come together to create the perfect sweet treat. The mini graham cracker pie crusts serve as a crunchy base. Creamy peanut butter adds rich, nutty flavor, while powdered sugar gives sweetness. Heavy cream brings a light, airy texture, making the filling smooth.
Caramel sauce adds that sticky, sweet touch. The crushed Butterfinger candy bars give a delightful crunch that surprises your taste buds. A dash of vanilla extract enhances all the flavors. If you like, top with whipped cream for extra creaminess. A sprinkle of crushed Butterfinger on top finishes the pie with flair.
Gather these ingredients, and you are ready to make a delicious dessert that everyone will love.
Step-by-Step Instructions
Preparation of Peanut Butter Filling
First, take a medium bowl. Add 1 cup of creamy peanut butter and 1 cup of powdered sugar. Mix them together. Use a spatula or mixer to blend until smooth. Make sure there are no lumps. A smooth filling is key for great taste.
Whipping the Cream
Next, grab a separate bowl and pour in 1 cup of heavy cream. Use an electric mixer on medium-high speed. Whip the cream for about 3 to 5 minutes. Stop when you see soft peaks form. Then, gently fold in 1 teaspoon of vanilla extract. This adds a nice flavor.
Mixing the Components
Now, transfer the whipped cream into the peanut butter mixture. Use a folding motion to combine them. Be gentle, so you don’t deflate the whipped cream. You want a smooth and creamy mix. This will make your pies light and fluffy.
Assembling the Mini Pies
Take the mini graham cracker crusts. Use a spoon or piping bag to fill each crust. Make sure to fill them generously. Level the tops with a spatula or spoon. This will help them look nice and even.
Adding Caramel and Butterfinger
Pour a swirl of caramel sauce on top of the peanut butter filling. Let it seep slightly into the filling. Next, sprinkle 1 cup of crushed Butterfinger candy bars on top. This adds a great crunch and flavor.
Chilling the Pies
Place the filled pies in the refrigerator. They need to chill for at least 1 to 2 hours. This step is important for them to set well. A good chill helps the flavors blend too.
Serving Suggestions
When you are ready to serve, top each mini pie with whipped cream. Add a sprinkle of crushed Butterfinger on top as a garnish. This makes each bite even more delicious and fun!
Tips & Tricks
Storage and Shelf Life
To keep your Butterfinger Caramel Crunch Mini Pies fresh, place them in an airtight container. Store them in the fridge for up to five days. If you want to keep them longer, you can freeze them. Just wrap each pie tightly in plastic wrap before placing them in a freezer-safe bag. They can last about three months in the freezer. Thaw them in the fridge overnight before serving.
Variations in Ingredients
Feel free to switch up the ingredients! If you want a nut-free version, try sunflower seed butter instead of peanut butter. For the crust, you can use chocolate cookie crumbs or an Oreo crust. Both options add a fun twist to the classic flavor.
Serving Recommendations
These mini pies pair well with a scoop of vanilla ice cream or a drizzle of chocolate sauce. For drinks, serve them with milk or a rich coffee. You can also add fresh fruit, like strawberries or raspberries, to bring a fresh taste to your dessert plate.
Pro Tips
- Chill the Cream: Ensure your heavy cream is well-chilled before whipping. This helps achieve better volume and stability for your whipped cream.
- Use a Piping Bag: For a cleaner and more precise filling of the mini pies, consider using a piping bag to dispense the peanut butter mixture into the crusts.
- Layering Flavors: For an extra burst of flavor, try adding a pinch of salt to the peanut butter mixture to enhance the sweetness of the dessert.
- Let Them Set: Allowing the mini pies to chill for longer than 2 hours can improve their texture and make them easier to cut and serve.
Variations
Customized Flavor Profiles
You can easily switch up the flavors in these mini pies. Try adding different candies or toppings to make them your own. Here are some fun ideas:
- Snickers: Substitute Butterfinger with crushed Snickers for a rich, nutty twist.
- M&Ms: Add colorful M&Ms on top for a fun crunch and extra sweetness.
- Coconut Flakes: Sprinkle toasted coconut on top for a tropical hint.
- Chopped Nuts: Use crushed peanuts or almonds for an extra crunch.
These small changes can create a whole new dessert experience.
Gluten-Free Options
If you need gluten-free mini pies, you can easily adapt the crust. Here are some substitutes for the graham cracker crust:
- Almond Flour Crust: Combine almond flour with coconut oil and a touch of honey for a tasty crust.
- Rice Cracker Crust: Crush rice crackers and mix with melted butter for a simple crust.
- Oreo Crust: Use gluten-free Oreos for a chocolatey twist on the crust.
These options keep your dessert gluten-free without losing flavor.
Non-Dairy Alternatives
For those who prefer non-dairy options, you can make these mini pies vegan. Here are some substitutes for cream and peanut butter:
- Coconut Cream: Use coconut cream instead of heavy cream for a rich, creamy texture.
- Nut Butters: Swap creamy peanut butter with almond or cashew butter for a different taste.
- Maple Syrup: Instead of powdered sugar, use maple syrup for a natural sweetness.
These swaps help you enjoy a delicious treat while meeting dietary needs.
Storage Info
Best Practices for Refrigeration
You can store Butterfinger Caramel Crunch Mini Pies in the fridge for up to 5 days. Keep them in an airtight container to maintain their fresh taste. This helps prevent any odors from other foods in your fridge from affecting the pies. Remember to chill them for at least 1 to 2 hours before serving so they set perfectly.
Freezing Instructions
If you want to keep these mini pies longer, you can freeze them. Wrap each pie tightly in plastic wrap. Then, place them in a freezer-safe bag or container. They can last in the freezer for up to 3 months. When you’re ready to eat them, just take them out of the freezer and let them thaw in the fridge overnight.
Reheating Guidelines
After freezing, you don’t need to heat these mini pies. Serve them cold for the best taste. If you want a warm treat, you can microwave them for 10 to 15 seconds. Just be careful not to overheat them, as this can change their texture. Top with whipped cream and crushed Butterfinger just before serving for a delightful finish.
FAQs
How long can I store Butterfinger Caramel Crunch Mini Pies?
You can store these mini pies in the fridge for up to five days. Keep them in an airtight container for best results. This way, they stay fresh and tasty. If you plan to keep them longer, consider freezing them. Just wrap each pie tightly in plastic wrap.
Can I make these mini pies ahead of time?
Yes, you can make these mini pies a day ahead. Just follow the recipe and chill them overnight. This will give the flavors time to blend. Plus, it makes serving easier for parties or gatherings. Just remember to add whipped cream and extra crushed Butterfinger right before serving.
What can I substitute for heavy cream?
If you need an alternative to heavy cream, try using coconut cream. It works well and gives a nice flavor. You can also use almond milk mixed with a little cornstarch for thickening. If dairy is not a concern, half-and-half is a good option, too.
Where can I buy Butterfinger candy bars?
You can find Butterfinger candy bars at most grocery stores. They are usually in the candy aisle or checkout counter. For online options, check sites like Amazon or Walmart. You can also find them at convenience stores and gas stations for a quick grab.
In this blog post, I explored how to make Butterfinger Caramel Crunch Mini Pies. We started with the key ingredients, including creamy peanut butter and caramel sauce. I provided step-by-step instructions, from preparing the filling to chilling the pies. I also shared helpful tips for storage and variations. These mini pies are a fun treat! You can customize them to fit your taste. Enjoy making these treats with friends and family. Try different toppings to make them even more exciting!