Are you ready for the ultimate snack that’s both cheesy and fun? These Cheesy Pizza Bombs pack all your favorite pizza flavors into a tasty bite-sized treat. With gooey cheese, savory toppings, and a crunchy crust, they make the perfect quick snack for game nights or gatherings. Follow my simple steps, and you'll have these delicious bites ready in no time. Let’s dive into the cheesy goodness!
Why I Love This Recipe
- Easy to Make: This recipe is incredibly simple, perfect for a quick snack or party appetizer that anyone can whip up in no time.
- Customizable: Feel free to get creative with your toppings; whether it's veggies, different cheeses, or meats, you can make them just the way you like!
- Cheesy Goodness: Who doesn't love gooey, melted cheese? These pizza bombs deliver a delightful cheesy explosion in every bite!
- Perfect for Dipping: Serve these pizza bombs with a side of pizza sauce for dipping, making them even more irresistible and fun to eat!
Ingredients
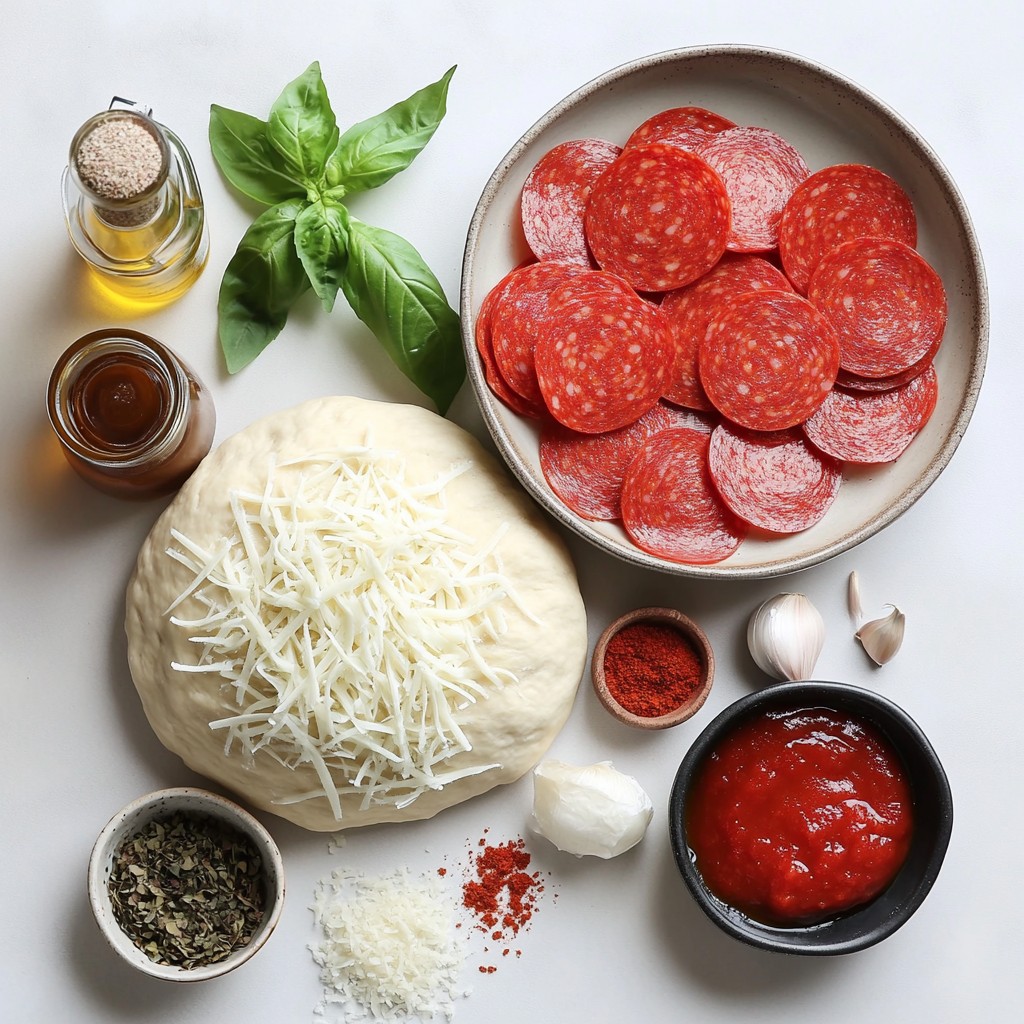
List of Required Ingredients
- Refrigerated pizza dough
- Shredded mozzarella cheese
- Pepperoni slices or preferred toppings
- Pizza sauce for dipping
- Italian seasoning and other spices
To make cheesy pizza bombs, you will need some simple ingredients. First, grab a can of refrigerated pizza dough. This dough makes the perfect base. Next, you need about one cup of shredded mozzarella cheese. This cheese melts wonderfully and makes each bite cheesy.
You can choose pepperoni slices as your topping, or you can use anything you like. Some people enjoy bell peppers or cooked sausage. The choice is yours!
Don't forget to have pizza sauce on hand for dipping. A good sauce adds extra flavor. Lastly, gather Italian seasoning and other spices, such as garlic powder and salt, to enhance your pizza bombs.
These ingredients create a tasty snack that is fun and easy to make. You can mix and match toppings to suit your taste. Enjoy crafting your cheesy pizza bombs!
Step-by-Step Instructions
Preparation Steps
1. Preheat your oven to 400°F (200°C). This heat makes the pizza bombs rise and get golden.
2. Take the refrigerated pizza dough and roll it out on a lightly floured surface. Aim for about 1/4 inch thick. This helps with even cooking.
3. Use a knife or pizza cutter to slice the dough into 2-inch squares. Each square will hold the cheesy goodness.
4. In the center of each square, place a spoonful of shredded mozzarella cheese. This is the heart of your pizza bomb.
5. Add pepperoni slices or your favorite toppings on top of the cheese. You can use diced bell peppers or cooked sausage too.
6. Fold each corner of the dough square towards the center. Pinch the seams tightly to keep the cheese inside. This step is key for a cheesy explosion!
Baking Process
1. Mix olive oil, garlic powder, and Italian seasoning in a small bowl. This will add great flavor to your pizza bombs.
2. Use a pastry brush to coat each pizza bomb with the olive oil mixture. This step makes them extra tasty.
3. Arrange the bombs on the baking sheet. Leave space between each one for rising.
4. Place the baking sheet in the preheated oven. Bake for 12-15 minutes. They should puff up and turn golden brown when done.
Serving Suggestions
1. Serve the pizza bombs warm with a side of pizza sauce for dipping. This adds even more flavor.
2. For a great look, arrange the pizza bombs on a wooden board or colorful platter.
3. Garnish with fresh basil leaves for a pop of color. The sauce in the center draws everyone in!
Tips & Tricks
Perfecting Your Pizza Bombs
To make the best cheesy pizza bombs, start with the dough. Ensure it seals well. Pinch the seams tightly. This helps keep the cheese inside. You don’t want any cheesy mess on the baking sheet!
Next, choose the right cheese and toppings. I love using shredded mozzarella. It melts perfectly and gives that gooey stretch. For toppings, pepperoni is a classic choice. But you can also mix it up! Try diced bell peppers or cooked sausage for extra flavor.
Oven Settings and Alternatives
Adjust the baking time based on your taste. If you like them crispier, bake for a few extra minutes. Keep an eye on them during the last few minutes for that perfect golden brown.
You can also use an air fryer. It cooks them faster and gives a nice crunch. Set it to 375°F and check them after about 8-10 minutes. Adjust the time as needed. Whether you bake or air fry, you’ll love the results!
Pro Tips
- Use Fresh Ingredients: Always opt for the freshest ingredients you can find, especially the cheese and toppings, to enhance the flavor of your pizza bombs.
- Experiment with Fillings: Don’t limit yourself to mozzarella and pepperoni; try different cheeses like cheddar or gouda, or add vegetables like spinach or mushrooms for a unique twist.
- Perfect the Seal: Ensure each pizza bomb is tightly sealed to avoid any cheese leakage during baking. A well-sealed bomb will give you that delightful cheesy explosion when bitten into.
- Serve Immediately: These pizza bombs are best enjoyed fresh out of the oven. If you need to prepare them in advance, reheat them to maintain their gooey texture.
Variations
Different Cheese Options
For cheesy pizza bombs, the cheese is key. The best cheese for melting is mozzarella. It gets gooey and stretches nicely. You can mix mozzarella with cheddar for a bolder taste. Provolone also melts well and adds a nice flavor.
Combining cheese types makes each bite special. Try using gouda for a smoky twist or cream cheese for a rich, creamy filling. Mixing different cheeses gives your pizza bombs a fun and unique flavor profile.
Alternative Toppings
You can customize pizza bombs to fit any taste. For vegetarians, use veggies like bell peppers, mushrooms, and olives. Add spinach for a nutritious boost.
Meat lovers can load up on pepperoni, sausage, or bacon. You can also try unique combinations. BBQ chicken with mozzarella makes a tasty option. A veggie medley with garlic and herbs offers fresh flavors.
Dough Alternatives
While pizza dough is classic, you can switch it up. Crescent rolls make a flaky, fun alternative. They add a buttery taste that pairs well with the cheese. Biscuit dough is another option. It has a soft texture and absorbs flavors nicely.
Experimenting with different types of dough keeps things exciting. Each dough brings its own unique taste and texture to the pizza bombs.
Storage Info
How to Store Leftover Pizza Bombs
To keep your cheesy pizza bombs fresh, you can store them in the fridge or freezer. If you have leftovers, let them cool first. Place them in an airtight container. They will stay good in the fridge for 3-4 days. For longer storage, freeze them. Wrap each bomb in plastic wrap and then place them in a freezer bag. They can last for up to 2 months in the freezer. When you want to enjoy them again, just thaw in the fridge before reheating.
Reheating Tips
Reheating pizza bombs is simple. The best way to keep them crispy is in the oven. Preheat your oven to 350°F (175°C). Place the pizza bombs on a baking sheet. Heat them for about 10-15 minutes. Check that they are warm inside. You can also use an air fryer. Set it to 350°F and cook for 5-7 minutes. This method keeps them crispy and delicious. Avoid using the microwave, as it can make them soggy. Enjoy your tasty pizza bombs as if they were freshly baked!
FAQs
Common Questions about Cheesy Pizza Bombs
Can I make pizza bombs ahead of time? Yes, you can make pizza bombs ahead of time. Prepare them up to the baking step. Then, cover them and store them in the fridge. When you are ready to bake, just pop them in the oven!
What other fillings can I use in pizza bombs? You have many options! Try using cooked sausage, mushrooms, or olives. You can also add veggies like bell peppers or spinach. The choice is yours, so get creative!
How do I prevent leaking cheese during baking? To avoid leaking cheese, seal the dough tightly. Pinch the edges well after folding. Ensure no cheese is visible outside the dough. This will help keep that gooey cheese inside.
Can I bake pizza bombs on a grill? Yes, you can grill pizza bombs! Just wrap them in foil to prevent burning. Place them on the grill for about 10-12 minutes. Check them often to make sure they cook evenly.
Nutritional Information
Caloric breakdown and portion sizes Each pizza bomb contains about 150 calories. If you eat two, that’s a nice snack at 300 calories. Remember, portion control helps keep things balanced.
Dietary considerations for different eaters For gluten-free eaters, use gluten-free pizza dough. For dairy-free options, try vegan cheese. Always check labels to ensure all ingredients meet dietary needs.
You’ve learned how to make delicious pizza bombs from scratch. We covered the key ingredients, preparation steps, baking process, and serving ideas. You can customize your pizza bombs with different cheeses and toppings. Storing and reheating leftovers is easy too. Remember to seal the dough well to avoid mess. Enjoy your tasty treat and share it with friends. Making pizza bombs is simple, fun, and always a crowd-pleaser! Try different flavors to find your favorite. Happy cooking!