Chocolate Covered Orange Creams Delightful Treat Recipe

WANT TO SAVE THIS RECIPE?

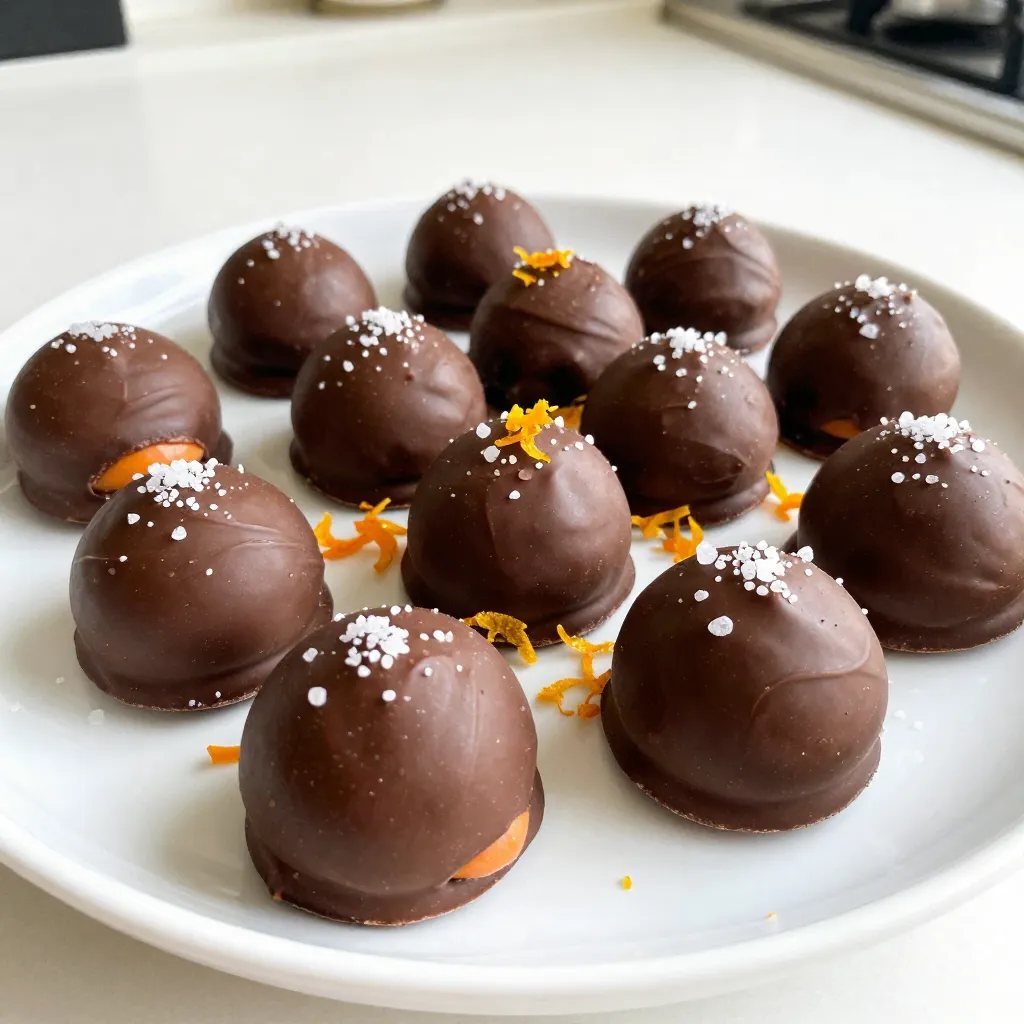
Are you ready to treat yourself to a sweet delight? Chocolate Covered Orange Creams combine the bright taste of orange with rich chocolate for a perfect dessert. This easy recipe uses simple ingredients that you probably have at home. I’ll guide you through each step, making it fun and simple. Let’s dive into this tasty treat, and soon, you’ll impress everyone with your new chocolate-making skills!

Why I Love This Recipe

  1. Bright Flavor: The combination of fresh orange juice and zest brings a vibrant citrusy flavor that perfectly contrasts with the rich chocolate.
  2. Easy to Make: This recipe requires minimal ingredients and simple steps, making it accessible for bakers of all skill levels.
  3. Perfect for Gifting: These delightful treats can be beautifully packaged, making them an ideal gift for friends and family during special occasions.
  4. Customizable: You can experiment with different shapes and even add toppings to create a personalized touch!
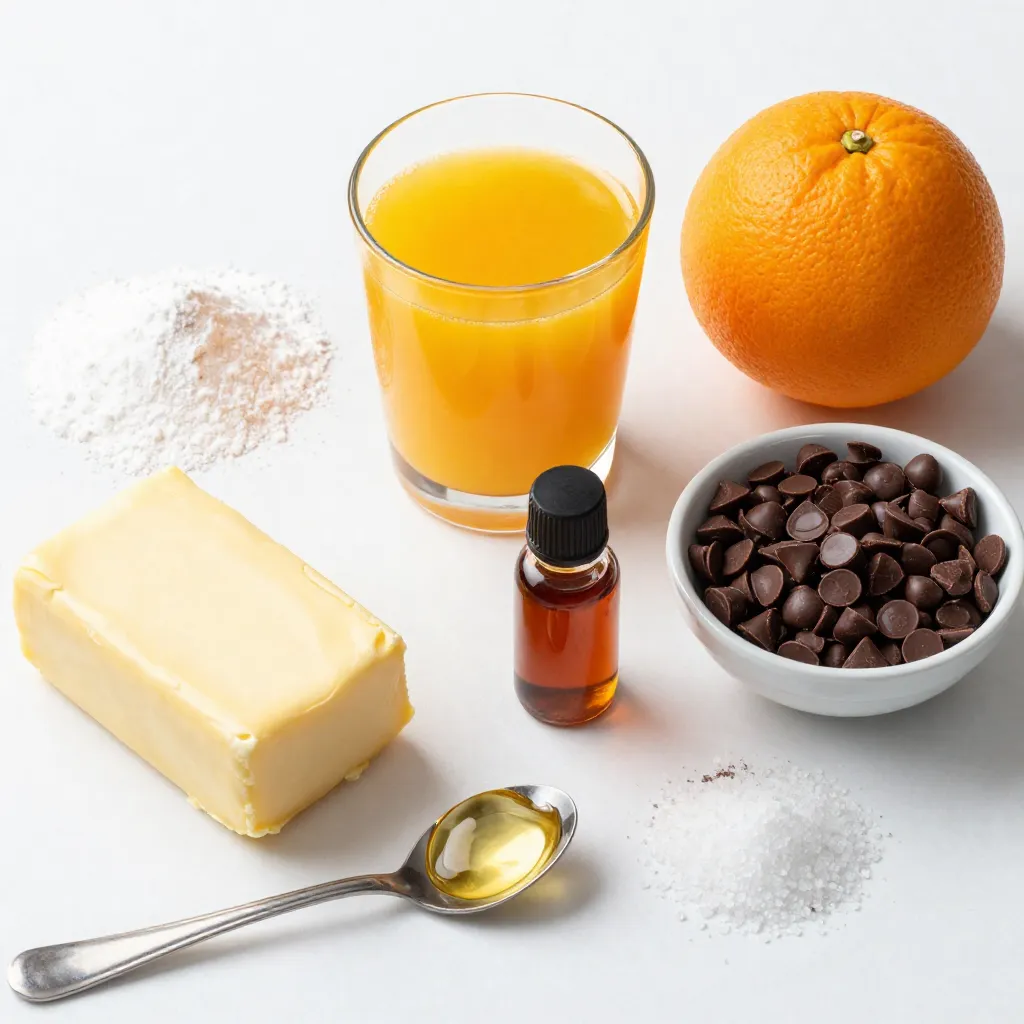
Ingredients

List of Ingredients

– 1 cup freshly squeezed orange juice

– Zest of 1 large orange

– 1 cup powdered sugar, sifted

– 1/4 cup unsalted butter, softened to room temperature

– 1 teaspoon pure vanilla extract

– 1 1/2 cups semi-sweet chocolate chips

– 1 tablespoon coconut oil

– Sea salt for optional garnish

The key to making great chocolate covered orange creams lies in the ingredients. Fresh orange juice gives your creams a bright and lively flavor. The zest adds an extra burst of citrus aroma.

Use powdered sugar to create a smooth, sweet cream. Softened butter helps blend it effortlessly. Pure vanilla extract enhances the overall taste with its warm notes.

For the chocolate coating, semi-sweet chocolate chips work best. They balance the sweetness of the orange cream. Adding coconut oil makes the chocolate easier to melt and coat.

You can also sprinkle sea salt on top for a nice contrast to the sweet chocolate. This small touch can elevate the flavor.

Gather these ingredients before you start. Each one plays a vital role in creating this delightful treat.

Step-by-Step Instructions

Detailed Recipe Steps

Mixing the Orange Cream Base

Start by taking a medium bowl. Add 1 cup of fresh orange juice, the zest of 1 large orange, and 1/4 cup of softened unsalted butter. Whisk these together until you have a smooth mix. Then, slowly add 1 cup of sifted powdered sugar. Mix it in one cup at a time. If the mix is too thick, add a tablespoon of orange juice. Keep whisking until it is creamy and well mixed.

Chilling and Shaping the Cream

Next, use a spatula to spread the orange cream on a lined baking sheet. Make sure it’s about 1/4 inch thick. Smooth it out well. Now, put the baking sheet in the freezer for about 30 minutes. This will help the cream firm up. Once it’s set, take it out and use a cookie cutter or knife to cut it into fun shapes. Put the cut pieces back in the freezer for another 15 minutes.

Melting Chocolate for Coating

While the creams chill, it’s time to melt the chocolate. Take 1 1/2 cups of semi-sweet chocolate chips and 1 tablespoon of coconut oil. Place these in a microwave-safe bowl. Heat them in the microwave for 30 seconds at a time. Stir well after each heating until the mix is smooth and glossy.

Dipping and Setting the Chocolates

Now it’s time to coat the orange creams. Take each piece out of the freezer. Dip it into the melted chocolate, making sure it’s fully covered. Allow any extra chocolate to drip back into the bowl. Place the coated creams back on the parchment-lined sheet. If you want, sprinkle a little sea salt on top before the chocolate sets. Once all are coated, return the baking sheet to the fridge. Let the chocolate harden for 30 to 45 minutes. Enjoy your tasty treats chilled or at room temperature!

Tips & Tricks

Achieving the Perfect Orange Creams

Tips for Consistency of Mixture

Start with fresh orange juice. This gives the best flavor. Make sure your butter is soft. Cold butter makes mixing hard. When you add powdered sugar, do it slowly. Mix well after each cup. If it feels too thick, add a bit of juice. This helps reach a creamy texture.

Best Practices for Melting Chocolate

Use a microwave-safe bowl for melting chocolate. Combine the chocolate chips with coconut oil. The oil helps the chocolate melt smoothly. Heat in 30-second bursts. Stir well after each burst. This keeps the heat even and avoids burning. You want the chocolate to be glossy and smooth.

Optional Garnishing Ideas

Before the chocolate sets, sprinkle a tiny bit of sea salt on top. This adds a nice touch. You can also add orange zest on top for color and flavor. For a fancy look, serve on a nice plate with orange slices or mint leaves.

Pro Tips

  1. Use Fresh Ingredients: Always use freshly squeezed orange juice and freshly grated zest for the richest flavor in your orange creams.
  2. Chill Properly: Ensure that the orange cream mixture is adequately chilled before cutting. This makes it easier to handle and dip in chocolate.
  3. Chocolate Tempering: For a glossy finish, consider tempering the chocolate before dipping. This will give your chocolates a professional sheen and better snap.
  4. Experiment with Flavors: Feel free to add a splash of other citrus juices like lemon or lime to the orange mixture for a unique twist on flavor.

Variations

Recipe Modifications

You can change this recipe in fun ways. Here are some ideas to try:

Using Dark Chocolate Instead of Semi-Sweet

Dark chocolate gives a deep, rich taste. It pairs well with the orange flavor. Choose a dark chocolate with 70% cocoa for a nice balance of sweet and bitter. The dark chocolate also adds health benefits, like antioxidants.

Adding Different Citrus Zests

Try adding zests from other fruits. Lemon, lime, or grapefruit can give a unique twist. Mix these with the orange zest for a bright taste. Each zest brings its own flavor notes, making each bite special.

Incorporating Flavor Enhancers

You can improve the orange cream mix by adding a pinch of sea salt. It enhances the sweetness of the chocolate. Other flavor enhancers include almond extract or even a bit of espresso powder. Each twist can make your treat stand out even more.

These variations let you customize your chocolate-covered orange creams. Enjoy experimenting with flavors to find your favorite!

Storage Info

Proper Storage Techniques

Best Containers for Storing Chocolates

To keep your chocolate covered orange creams fresh, use airtight containers. Glass jars or plastic containers work well. Avoid containers that let air in. This will help keep them from drying out.

How Long the Treats Will Last

These treats can last up to two weeks at room temperature. If you store them in the fridge, they can last up to three weeks. Always check for signs of spoilage before eating.

Tips for Freezing Orange Creams

If you want to freeze them, first wrap each piece in plastic wrap. Then place them in a freezer bag. They can stay fresh for up to three months in the freezer. When ready to eat, let them thaw in the fridge for a few hours. This keeps them tasty and fresh.

FAQs

Common Questions About Chocolate Covered Orange Creams

Can I use orange extract instead of juice?

Yes, you can use orange extract. It gives a strong flavor. Use about 1 tablespoon of extract. If you do this, skip the juice.

What if I don’t have coconut oil?

No worries! You can use any fat. Try butter or vegetable oil. They help the chocolate melt smooth.

Are these candies gluten-free?

Yes! These chocolate covered orange creams are gluten-free. They have no flour or gluten ingredients.

How do I prevent the chocolate from cracking?

To avoid cracks, let the chocolate cool slightly. Dip the creams when the chocolate is warm but not hot. Also, keep them in a cool place after coating.

We explored how to make delicious chocolate-covered orange creams. You learned the key ingredients and step-by-step instructions to create this sweet treat. I shared helpful tips for perfecting your orange creams and variations to try. Proper storage methods keep your candies fresh for longer. Remember, you can always experiment with flavors and mix-ins to make this recipe your own. Enjoy making and sharing these tasty delight

- 1 cup freshly squeezed orange juice - Zest of 1 large orange - 1 cup powdered sugar, sifted - 1/4 cup unsalted butter, softened to room temperature - 1 teaspoon pure vanilla extract - 1 1/2 cups semi-sweet chocolate chips - 1 tablespoon coconut oil - Sea salt for optional garnish The key to making great chocolate covered orange creams lies in the ingredients. Fresh orange juice gives your creams a bright and lively flavor. The zest adds an extra burst of citrus aroma. Use powdered sugar to create a smooth, sweet cream. Softened butter helps blend it effortlessly. Pure vanilla extract enhances the overall taste with its warm notes. For the chocolate coating, semi-sweet chocolate chips work best. They balance the sweetness of the orange cream. Adding coconut oil makes the chocolate easier to melt and coat. You can also sprinkle sea salt on top for a nice contrast to the sweet chocolate. This small touch can elevate the flavor. Gather these ingredients before you start. Each one plays a vital role in creating this delightful treat. {{ingredient_image_2}} Mixing the Orange Cream Base Start by taking a medium bowl. Add 1 cup of fresh orange juice, the zest of 1 large orange, and 1/4 cup of softened unsalted butter. Whisk these together until you have a smooth mix. Then, slowly add 1 cup of sifted powdered sugar. Mix it in one cup at a time. If the mix is too thick, add a tablespoon of orange juice. Keep whisking until it is creamy and well mixed. Chilling and Shaping the Cream Next, use a spatula to spread the orange cream on a lined baking sheet. Make sure it's about 1/4 inch thick. Smooth it out well. Now, put the baking sheet in the freezer for about 30 minutes. This will help the cream firm up. Once it’s set, take it out and use a cookie cutter or knife to cut it into fun shapes. Put the cut pieces back in the freezer for another 15 minutes. Melting Chocolate for Coating While the creams chill, it’s time to melt the chocolate. Take 1 1/2 cups of semi-sweet chocolate chips and 1 tablespoon of coconut oil. Place these in a microwave-safe bowl. Heat them in the microwave for 30 seconds at a time. Stir well after each heating until the mix is smooth and glossy. Dipping and Setting the Chocolates Now it's time to coat the orange creams. Take each piece out of the freezer. Dip it into the melted chocolate, making sure it’s fully covered. Allow any extra chocolate to drip back into the bowl. Place the coated creams back on the parchment-lined sheet. If you want, sprinkle a little sea salt on top before the chocolate sets. Once all are coated, return the baking sheet to the fridge. Let the chocolate harden for 30 to 45 minutes. Enjoy your tasty treats chilled or at room temperature! - Tips for Consistency of Mixture Start with fresh orange juice. This gives the best flavor. Make sure your butter is soft. Cold butter makes mixing hard. When you add powdered sugar, do it slowly. Mix well after each cup. If it feels too thick, add a bit of juice. This helps reach a creamy texture. - Best Practices for Melting Chocolate Use a microwave-safe bowl for melting chocolate. Combine the chocolate chips with coconut oil. The oil helps the chocolate melt smoothly. Heat in 30-second bursts. Stir well after each burst. This keeps the heat even and avoids burning. You want the chocolate to be glossy and smooth. - Optional Garnishing Ideas Before the chocolate sets, sprinkle a tiny bit of sea salt on top. This adds a nice touch. You can also add orange zest on top for color and flavor. For a fancy look, serve on a nice plate with orange slices or mint leaves. Pro Tips Use Fresh Ingredients: Always use freshly squeezed orange juice and freshly grated zest for the richest flavor in your orange creams. Chill Properly: Ensure that the orange cream mixture is adequately chilled before cutting. This makes it easier to handle and dip in chocolate. Chocolate Tempering: For a glossy finish, consider tempering the chocolate before dipping. This will give your chocolates a professional sheen and better snap. Experiment with Flavors: Feel free to add a splash of other citrus juices like lemon or lime to the orange mixture for a unique twist on flavor. {{image_4}} You can change this recipe in fun ways. Here are some ideas to try: - Using Dark Chocolate Instead of Semi-Sweet Dark chocolate gives a deep, rich taste. It pairs well with the orange flavor. Choose a dark chocolate with 70% cocoa for a nice balance of sweet and bitter. The dark chocolate also adds health benefits, like antioxidants. - Adding Different Citrus Zests Try adding zests from other fruits. Lemon, lime, or grapefruit can give a unique twist. Mix these with the orange zest for a bright taste. Each zest brings its own flavor notes, making each bite special. - Incorporating Flavor Enhancers You can improve the orange cream mix by adding a pinch of sea salt. It enhances the sweetness of the chocolate. Other flavor enhancers include almond extract or even a bit of espresso powder. Each twist can make your treat stand out even more. These variations let you customize your chocolate-covered orange creams. Enjoy experimenting with flavors to find your favorite! Best Containers for Storing Chocolates To keep your chocolate covered orange creams fresh, use airtight containers. Glass jars or plastic containers work well. Avoid containers that let air in. This will help keep them from drying out. How Long the Treats Will Last These treats can last up to two weeks at room temperature. If you store them in the fridge, they can last up to three weeks. Always check for signs of spoilage before eating. Tips for Freezing Orange Creams If you want to freeze them, first wrap each piece in plastic wrap. Then place them in a freezer bag. They can stay fresh for up to three months in the freezer. When ready to eat, let them thaw in the fridge for a few hours. This keeps them tasty and fresh. Can I use orange extract instead of juice? Yes, you can use orange extract. It gives a strong flavor. Use about 1 tablespoon of extract. If you do this, skip the juice. What if I don't have coconut oil? No worries! You can use any fat. Try butter or vegetable oil. They help the chocolate melt smooth. Are these candies gluten-free? Yes! These chocolate covered orange creams are gluten-free. They have no flour or gluten ingredients. How do I prevent the chocolate from cracking? To avoid cracks, let the chocolate cool slightly. Dip the creams when the chocolate is warm but not hot. Also, keep them in a cool place after coating. We explored how to make delicious chocolate-covered orange creams. You learned the key ingredients and step-by-step instructions to create this sweet treat. I shared helpful tips for perfecting your orange creams and variations to try. Proper storage methods keep your candies fresh for longer. Remember, you can always experiment with flavors and mix-ins to make this recipe your own. Enjoy making and sharing these tasty delights!

Chocolate Covered Orange Creams

Irresistible citrusy treats covered in rich chocolate.
Prep Time 15 minutes
Cook Time 15 minutes
Total Time 1 hour 30 minutes
Course Dessert
Cuisine American
Servings 12
Calories 150 kcal

Ingredients
  

  • 1 cup freshly squeezed orange juice
  • 1 large orange zest
  • 1 cup powdered sugar, sifted
  • 1/4 cup unsalted butter, softened to room temperature
  • 1 teaspoon pure vanilla extract
  • 1 1/2 cups semi-sweet chocolate chips
  • 1 tablespoon coconut oil
  • to taste sea salt for optional garnish

Instructions
 

  • In a medium mixing bowl, thoroughly combine the fresh orange juice, orange zest, and softened butter. Mix using a whisk or electric mixer until the mixture is smooth and well incorporated.
  • Slowly incorporate the sifted powdered sugar into the mixture, adding it in one cup at a time. Mix continuously until the sugar is fully absorbed and a thick, creamy consistency is achieved. If the mixture is too dense, gradually add a tablespoon of orange juice to loosen it up.
  • Using a spatula, spread the orange cream mixture onto a baking sheet lined with parchment paper. Aim for an even layer that is about 1/4 inch thick, smoothing out the surface as best as you can.
  • Carefully place the baking sheet in the freezer and allow the orange cream to chill for about 30 minutes, or until it becomes firm enough to cut into shapes.
  • After 30 minutes, retrieve the sheet from the freezer. Using a cookie cutter or a sharp knife, cut the orange cream into your desired shapes, whether squares or circles. Return the cutouts to the freezer for another 15 minutes to firm up further.
  • Meanwhile, melt the chocolate chips and coconut oil together in a microwave-safe bowl. Heat in 30-second intervals, stirring well after each interval until the mixture is completely smooth and glossy.
  • Once the orange creams are chilled and firm, remove them from the freezer. Dip each piece into the melted chocolate, ensuring they're fully coated while allowing any excess chocolate to drip back into the bowl.
  • Place the coated creams back onto the parchment-lined baking sheet. If you like, sprinkle a tiny pinch of sea salt on top of each chocolate-covered piece before the chocolate sets.
  • After coating all the creams, return them to the refrigerator and allow the chocolate to harden for about 30-45 minutes.
  • Serve the chilled or at room temperature for an irresistible, citrusy treat that’s perfect for any occasion!

Notes

Arrange the chocolates on a decorative plate or in a candy box for gifting. Add some fresh orange slices or mint leaves as garnish for an extra touch of elegance!
Keyword chocolate, dessert, orange, treats

WANT TO SAVE THIS RECIPE?

Leave a Comment

Recipe Rating