Get ready to bring some festive cheer into your kitchen with my recipe for Christmas Chocolate Trees! These delightful treats are not only easy to make but also perfect for sharing with loved ones. In this post, I’ll guide you through the simple steps, the best ingredients, and some fun variations. Whether you’re a baking beginner or a seasoned pro, you’ll impress everyone with these deliciously sweet tree shapes. Let’s get started!
Why I Love This Recipe
- Festive Presentation: These chocolate trees are not only delicious but also visually stunning, making them a perfect centerpiece for your holiday table.
- Customizable Decorations: You can personalize the toppings and decorations to suit your taste or theme, ensuring every batch is unique.
- Fun for All Ages: This recipe is a delightful activity for families to enjoy together, allowing everyone to get creative with their chocolate trees.
- Sweet and Salty Combo: The combination of chocolate, marshmallows, and pretzels creates a delightful mix of flavors and textures that's irresistible.
Ingredients
Detailed List of Ingredients
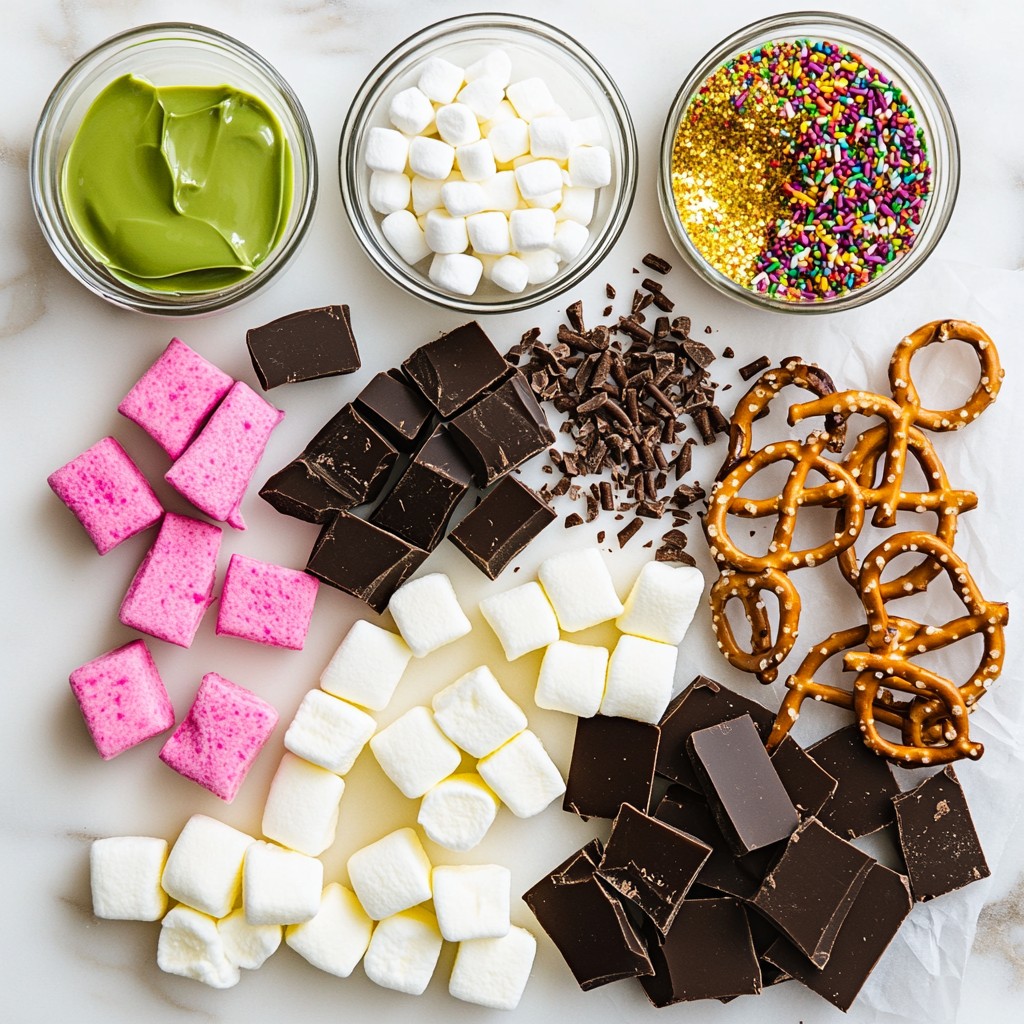
- 200g dark chocolate (at least 70% cocoa), broken into pieces
- 100g white chocolate, chopped
- 1 cup green candy melts
- 1 cup miniature marshmallows, for topping
- 1 cup crushed pretzels, for the base
- Edible glitter or gold dust, for decoration
- Sprinkles, optional, for added decoration
- Parchment paper, for easy removal
Explanation of Ingredient Choices
I chose dark chocolate with at least 70% cocoa for its rich flavor. The high cocoa content gives the trees a deep taste that contrasts well with the sweet toppings. White chocolate adds a lovely drizzle, making the trees look snowy and festive. Green candy melts are perfect for that vibrant tree color. They melt easily and coat well, allowing for a smooth finish. Miniature marshmallows resemble snow on top, adding fun texture. Crushed pretzels create a crunchy base, grounding the trees. Edible glitter or gold dust enhances the holiday look, making them sparkle. Sprinkles offer extra color and joy, but they are optional.
Recommended Brands for Ingredients
For dark chocolate, I recommend using brands like Ghirardelli or Lindt. They have great quality and taste. For white chocolate, Callebaut works well for melting and drizzling. When it comes to green candy melts, Wilton is a reliable choice. Their melts come in vibrant colors and melt smoothly. For fun toppings, consider Kraft marshmallows and Snyder's pretzels. Both brands provide quality and flavor. You can find edible glitter and sprinkles from Wilton or any local baking store. These brands ensure you have the best results for your Christmas chocolate trees.
Step-by-Step Instructions
Melting the Dark Chocolate
To start, grab 200g of dark chocolate. This chocolate should have at least 70% cocoa for rich flavor. Break it into small pieces and place them in a heatproof bowl. Microwave the chocolate in 30-second bursts. Stir well after each interval. Keep heating until the chocolate is smooth and fully melted. Be patient; this step is key for a perfect finish.
Creating the Chocolate Tree Shapes
Next, you will shape the chocolate. Use a piping bag with a small round tip or a small spoon. Pour the melted dark chocolate onto parchment paper. Make tree silhouettes in various sizes. Keep the base thick and let it taper toward the top to look like real trees. This adds a nice touch. Once shaped, put the parchment paper on a baking sheet and refrigerate for 15-20 minutes. This helps the chocolate set and harden.
Coating and Decorating the Trees
While your dark chocolate trees chill, melt 1 cup of green candy melts. Use the same microwave method: heat in 30-second intervals and stir until smooth. Once the dark chocolate trees are firm, dip each one into the green candy melts. Let any excess drip off before placing them back on the parchment paper.
Now, melt 100g of white chocolate in another bowl. Drizzle it over the green-coated trees. This creates a snow-like effect. While the white chocolate is warm, add toppings. Place miniature marshmallows at the top of each tree and crushed pretzels around the base. For a festive sparkle, sprinkle edible glitter or gold dust all over.
Finally, return the trees to the fridge for another 10 minutes to set the toppings. Once they are ready, gently peel them from the parchment paper. Arrange these delightful trees on a serving platter. They will be a charming addition to your holiday treats!
Tips & Tricks
Common Mistakes to Avoid
When making Christmas chocolate trees, some mistakes can ruin your fun. First, don’t rush the melting process. If you heat chocolate too fast, it can seize up. Also, avoid pouring the melted chocolate too thin. This can lead to weak trees that break easily. Lastly, don’t skip the chilling step. If the chocolate isn’t set well, your trees may lose shape.
Best Practices for Melting Chocolate
Melting chocolate requires a gentle touch. Use a microwave-safe bowl and heat in 30-second bursts. Stir after each burst to ensure even melting. If you notice the chocolate looks dull or thick, you might be overheating it. Remember, chocolate should be shiny and smooth when melted. Using a double boiler is another great option. It gives you more control over the heat.
How to Achieve the Perfect Tree Shape
To create a perfect tree shape, use a piping bag or a small spoon. Start with a thicker base for stability. As you go up, make the tree taper. This shape mimics real trees. Vary the sizes to add interest. For an extra touch, you can use a toothpick to add details to your trees. This little trick can make your trees look even more festive and fun!
Pro Tips
- Use Quality Chocolate: Ensure you use high-quality dark and white chocolate for the best flavor and smooth melting consistency.
- Temperature Matters: Make sure your chocolate is not too hot when dipping; otherwise, it may lose its shape. Let it cool slightly if needed.
- Experiment with Shapes: Try creating different tree shapes and sizes to add variety to your presentation; no two trees need to look the same!
- Storage Tips: Store the chocolate trees in a cool, dry place or in the refrigerator to keep them fresh and prevent melting.
Variations
Flavor Alterations
You can change up the flavor of your Christmas chocolate trees easily. Instead of dark chocolate, try using milk chocolate. Milk chocolate adds a sweet, creamy touch that many love. You can also mix in flavors like peppermint or orange for a fun twist. Just melt your chosen chocolate as you would with dark chocolate.
Different Toppings and Decorations
Toppings can make your trees unique! Use different items like colorful sprinkles, mini candies, or nuts. Instead of marshmallows, try using gummy candies for a fun look. Edible glitter adds sparkle, too! You can even use crushed cookies or candy canes for a festive crunch. Let your creativity shine with toppings that match your style.
Ideas for Mini Chocolate Trees
Mini chocolate trees are fun and cute! To make smaller versions, simply pipe less chocolate onto the parchment paper. You can create a whole forest of tiny trees. These mini trees work great as party favors or treats for kids. Try adding a small candy star on top for extra charm. They are perfect for sharing and add a festive touch to any plate.
Storage Info
How to Store Chocolate Trees
To keep your chocolate trees fresh, store them in an airtight container. Line the container with parchment paper before placing the trees inside. This prevents sticking and keeps them safe. Place the lid on securely. Store the container in a cool, dry place. Avoid direct sunlight or heat. This simple step helps maintain the chocolate's shine and texture.
Shelf Life of Finished Treats
The chocolate trees will last about one week at room temperature. If you store them properly in an airtight container, they stay fresh and tasty. However, if you notice any changes in texture or smell, it’s best to toss them out. For the best flavor and texture, eat them within a few days.
Freezing Instructions for Longer Preservation
You can freeze chocolate trees for up to three months. First, place each tree on a baking sheet lined with parchment paper. Freeze them for about 1 hour until they are solid. Then, transfer the trees to an airtight container or freezer bag. Be sure to separate layers with parchment paper to avoid sticking. When you’re ready to enjoy them, thaw in the fridge overnight before serving. This method keeps the flavor intact and ensures they stay beautiful.
FAQs
Can I use different types of chocolate?
Yes, you can use various chocolates. Milk chocolate is sweeter and creamier than dark chocolate. You might enjoy using it for a different taste. White chocolate can also work well, but it may not hold its shape as well. Try combining dark and milk chocolate for a rich flavor mix. Remember to adjust your melting times based on the type of chocolate you choose.
How can I make these trees gluten-free?
To make your chocolate trees gluten-free, ensure all ingredients are gluten-free. Use gluten-free pretzels for the base. You can find many brands that offer gluten-free options. Always check labels to be sure. The candy melts used are usually gluten-free, but confirm with the package. This way, everyone can enjoy your festive treats!
What other decorations can I use for the chocolate trees?
Get creative with decorations! You can use mini candies, nuts, or dried fruits. Colored sugar or edible glitter adds sparkle. Try using crushed candy canes for a minty twist. You can also use fondant shapes or edible markers for fun designs. The best part is that you can tailor your trees to your theme or personal taste!
This blog explains how to make fun chocolate trees using simple steps. We covered the best ingredients and recommended brands to use. You learned to melt chocolate and create cool shapes while avoiding common mistakes. Try different flavors and decorations for unique results. Store your chocolate trees properly to keep them fresh.
Remember, these treats are fun and tasty. Enjoy the process and share with friends!