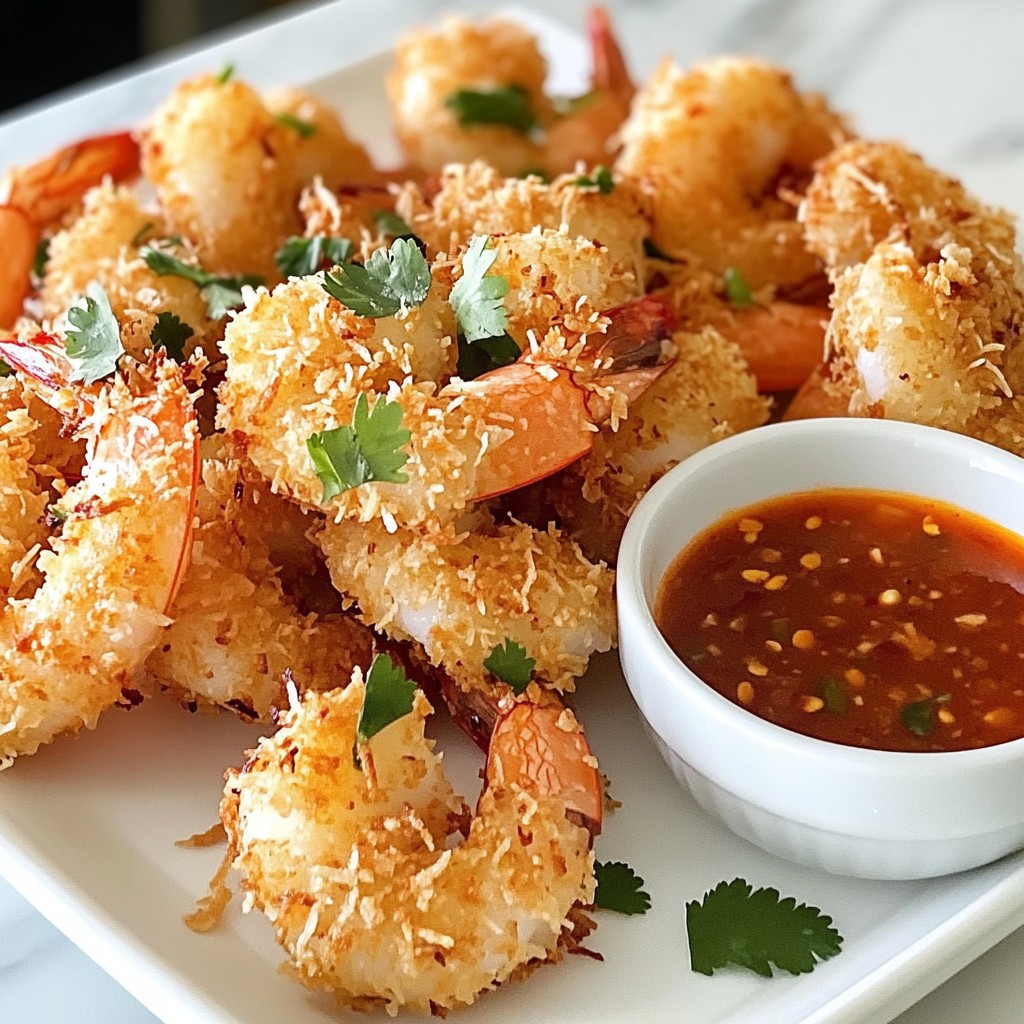
Craving a tasty treat? You’ve found the perfect recipe! This Coconut Shrimp with Chili Sauce combines crispy coconut flavor with a spicy kick. I’ll guide you through simple steps to create this delightful dish at home. From selecting the best ingredients to frying shrimp to golden perfection, you’ll impress everyone at the dinner table. Let’s dive right in and make your next meal a hit!
Why I Love This Recipe
- Crispy Perfection: The crunchy texture from the coconut and panko breadcrumbs creates a delightful contrast with the tender shrimp, making every bite satisfying.
- Flavorful Coating: The combination of garlic powder and smoked paprika adds a depth of flavor that enhances the natural sweetness of the shrimp.
- Quick and Easy: This recipe can be prepared in just 30 minutes, making it a perfect option for a quick weeknight dinner or a fun appetizer for gatherings.
- Versatile Dipping Sauce: The sweet and spicy chili dipping sauce complements the shrimp wonderfully, and you can customize the heat level to your preference.
Ingredients
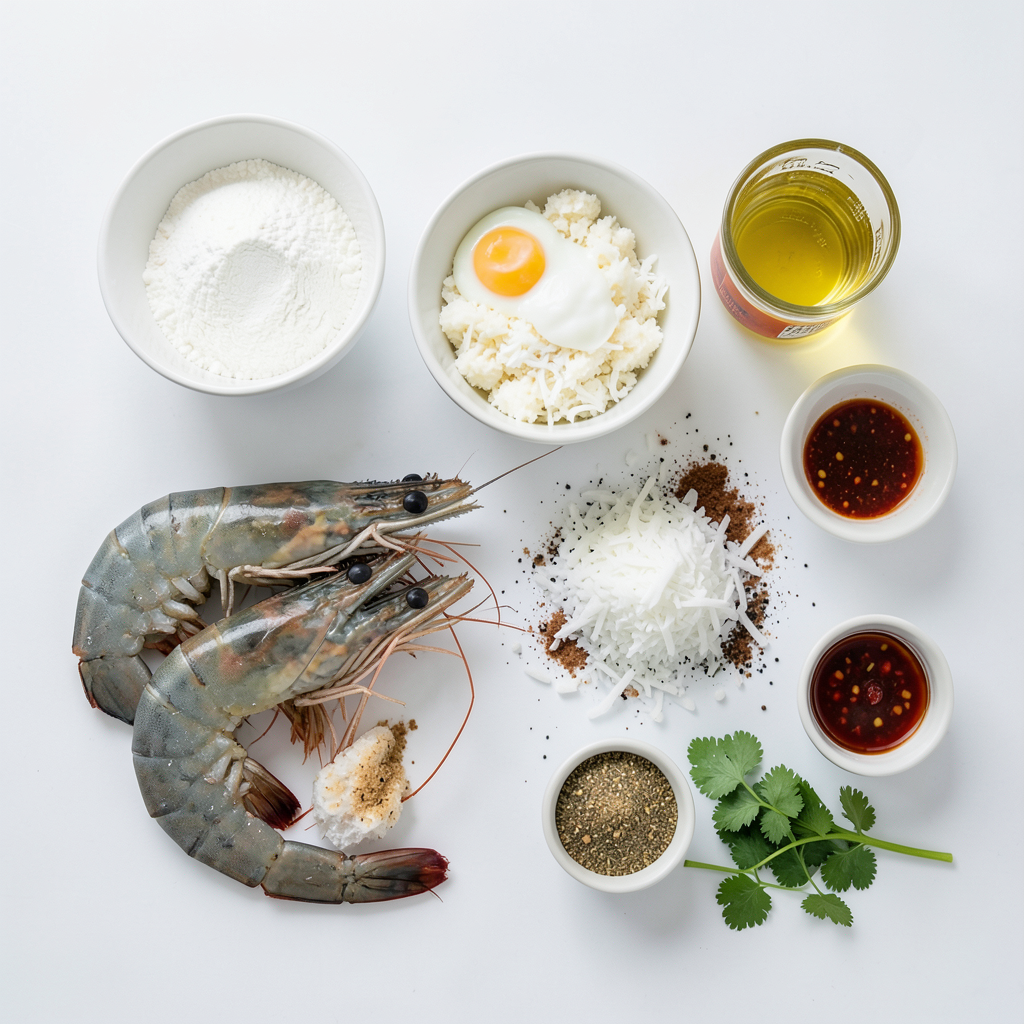
List of Ingredients for Coconut Shrimp
To make the coconut shrimp, gather these items:
- 1 pound large shrimp, peeled and deveined
- 1 cup all-purpose flour
- 2 large eggs, beaten
- 1 cup shredded unsweetened coconut
- 1 cup panko breadcrumbs
- 1 teaspoon salt
- 1/2 teaspoon freshly ground black pepper
- 1/2 teaspoon garlic powder
- 1/2 teaspoon smoked paprika
- Vegetable oil, for frying
Ingredients Required for Chili Dipping Sauce
For the chili dipping sauce, you will need:
- 1/4 cup sweet chili sauce
- 1 tablespoon freshly squeezed lime juice
- 1 teaspoon sriracha (or to taste)
- Fresh cilantro, chopped (for garnish)
Substitutions for Common Ingredients
If you lack some ingredients, here are easy swaps:
- Instead of large shrimp, use medium shrimp or fish.
- You can replace all-purpose flour with rice flour for gluten-free.
- If you don’t have panko, use regular breadcrumbs.
- For the chili sauce, try hot sauce if you like more heat.
- Use lemon juice instead of lime juice for a different taste.
These swaps keep your dish tasty while making it easier!
Step-by-Step Instructions
Preparing the Shrimp
Start by patting the shrimp dry with paper towels. This step is key. Dry shrimp help the coating stick. It also makes them crispy when you fry them. Aim to remove any moisture so they fry well.
Setting Up the Breading Station
Next, create a breading station. Use three shallow dishes. In the first dish, mix flour, salt, black pepper, garlic powder, and smoked paprika. Whisk these ingredients together until they blend well. In the second dish, pour in the beaten eggs. In the last dish, combine shredded coconut and panko breadcrumbs. Mix them to create a nice texture.
Coating the Shrimp Properly
Now, let's coat the shrimp. Take one shrimp and first dredge it in the flour mix. Shake off any extra flour. Then dip it in the beaten eggs. Ensure it’s fully covered. Lastly, press it into the coconut-panko mix. Make sure the coating sticks well. Repeat this for all shrimp.
Frying the Shrimp to Perfection
It's frying time! In a large skillet, pour enough vegetable oil to make about 1 inch deep. Heat the oil over medium-high heat to about 350°F (175°C). Carefully add the breaded shrimp in batches. Do not overcrowd the skillet. Fry each shrimp for about 2-3 minutes on each side. You want them to turn golden brown and crispy.
Making the Chili Dipping Sauce
While the shrimp fry, let’s make the dipping sauce. In a small bowl, mix together sweet chili sauce, lime juice, and sriracha. Adjust the spice by adding more sriracha if you like it hot. Mix until smooth.
Serving Suggestions
Once the shrimp are crispy and golden, use a slotted spoon to remove them from the oil. Let them drain on paper towels. Serve the hot shrimp on a nice plate. Garnish with fresh cilantro. Place a small bowl of chili dipping sauce on the side for easy dipping. Enjoy your meal!
Tips & Tricks
Ensuring Crispy Coconut Shrimp
To make sure your coconut shrimp are crispy, follow these steps:
- Dry the Shrimp: Always pat your shrimp dry before breading. This helps the coating stick.
- Use Panko: Panko breadcrumbs are key for that extra crunch. They have a light texture that fries up well.
- Heat the Oil: Make sure your oil is hot enough, around 350°F. This helps the shrimp fry quickly and stay crispy.
- Do Not Overcrowd: Fry shrimp in small batches. Overcrowding lowers the oil temperature and makes them soggy.
Common Mistakes to Avoid
Here are some mistakes that can ruin your coconut shrimp:
- Skipping the Drying Step: If shrimp are wet, the breading won’t stick.
- Not Seasoning: Don’t forget to season your flour mix. This adds flavor to the shrimp.
- Using Regular Breadcrumbs: Regular breadcrumbs won’t give you the same crispy texture as panko.
- Overcooking: Watch the time. Overcooked shrimp can become tough and chewy.
Best Cooking Oils for Frying
Choosing the right oil for frying is important. Here are some great options:
- Vegetable Oil: This is ideal for frying because it has a high smoke point.
- Canola Oil: Another good choice, it also has a neutral flavor.
- Coconut Oil: For a hint of coconut flavor, try using refined coconut oil.
- Peanut Oil: This oil can add a nice taste and has a high smoke point.
Now, with these tips, you can enjoy perfectly crispy coconut shrimp with chili sauce!
Pro Tips
- Dry Shrimp Thoroughly: Patting the shrimp dry with paper towels before coating helps the breading adhere better and ensures a crispy texture.
- Temperature Check: Use a thermometer to monitor the oil temperature; frying at 350°F (175°C) is key for achieving that perfect golden-brown crust.
- Batch Frying: Fry the shrimp in small batches to avoid overcrowding the skillet, which can lower the oil temperature and lead to soggy shrimp.
- Make Ahead Dipping Sauce: Prepare the chili dipping sauce in advance to let the flavors meld together for a more delicious accompaniment.
Variations
Alternative Dipping Sauces
If you want to change things up, try different dipping sauces. Here are a few ideas:
- Mango Chutney: This sweet sauce pairs well with the shrimp's crunch.
- Honey Mustard: The blend of sweet and tangy works great.
- Garlic Aioli: Creamy and rich, this sauce adds depth.
- Spicy Ketchup: Just mix ketchup with hot sauce for a quick dip.
Flavor Variations for the Coconut Shrimp
You can easily modify the shrimp's flavor. Here are some fun options:
- Coconut Lime: Add lime zest to the shredded coconut for a fresh twist.
- Jerk Spice: Mix in some jerk seasoning for a spicy kick.
- Lemon Pepper: Use lemon zest and black pepper for a zesty flavor.
- Curry Powder: A hint of curry powder can give the shrimp a warm flavor.
Baking vs. Frying Shrimp
Frying gives a crispy texture, but baking is healthier. Here’s how they compare:
- Frying: You get that golden, crunchy outside. It’s fast but uses more oil.
- Baking: You can brush the shrimp with oil and bake at 400°F (200°C) for about 15-20 minutes. This way, you cut down on oil but still get a nice crisp.
- Taste Difference: Fried shrimp are richer, while baked shrimp are lighter and less greasy.
Experiment with both methods to find your favorite!
Storage Information
How to Store Leftover Coconut Shrimp
To store leftover coconut shrimp, first let them cool to room temperature. Place the shrimp in an airtight container. Make sure to separate layers with parchment paper. This helps keep them from sticking together. Store the container in the fridge. Leftovers will stay good for up to three days.
Reheating Tips for Optimal Crispiness
When you reheat coconut shrimp, you want them to stay crispy. The best way to do this is by using an oven. Preheat your oven to 350°F (175°C). Spread the shrimp on a baking sheet in a single layer. Bake for about 10-15 minutes. This method helps restore the crunch. Avoid using a microwave, as it can make them soggy.
Freezing Coconut Shrimp for Later
You can freeze coconut shrimp if you want to save some for later. First, let the shrimp cool completely. Then, place them on a baking sheet in a single layer. Freeze for about an hour until firm. After that, transfer the shrimp to a freezer-safe bag. Remove any air and seal it tightly. Frozen coconut shrimp can last for up to three months. When ready to eat, thaw in the fridge and reheat in the oven.
FAQs
How do you know when coconut shrimp are cooked?
You know coconut shrimp are cooked when they turn golden brown. The shrimp should be opaque and firm to the touch. If you cut one open, it should not be translucent. This usually takes about 2-3 minutes per side in hot oil.
Can I make coconut shrimp in an air fryer?
Yes, you can make coconut shrimp in an air fryer! Preheat your air fryer to 400°F (200°C). Spray the basket with cooking spray. Place the breaded shrimp in a single layer. Cook for about 6-8 minutes, flipping halfway through. They will be crispy and delicious!
What can I serve with coconut shrimp?
Coconut shrimp pairs well with many sides. You can serve it with rice or a fresh salad. Try it with a tangy coleslaw for crunch. You can also add some mango salsa for a fruity touch.
How do I adjust the heat level in the dipping sauce?
To adjust the heat level, simply add more sriracha to the dipping sauce. Start with a small amount, then taste it. Mix well and keep adding until you reach your desired heat.
Is coconut shrimp gluten-free?
Coconut shrimp can be gluten-free if you use gluten-free flour and breadcrumbs. Check the labels on your ingredients to be sure. If you use regular flour and panko, it will contain gluten.
In this blog post, we explored the fun process of making coconut shrimp. You learned about the key ingredients, including a tasty chili dipping sauce and some easy swaps. The step-by-step instructions helped you prepare and fry shrimp to perfection. We shared tips for a crispy finish, common mistakes, and variations for added flavor. You also discovered how to store and reheat leftovers with care.
Coconut shrimp is a delightful treat that anyone can make at home. Enjoy your cooking adventure!