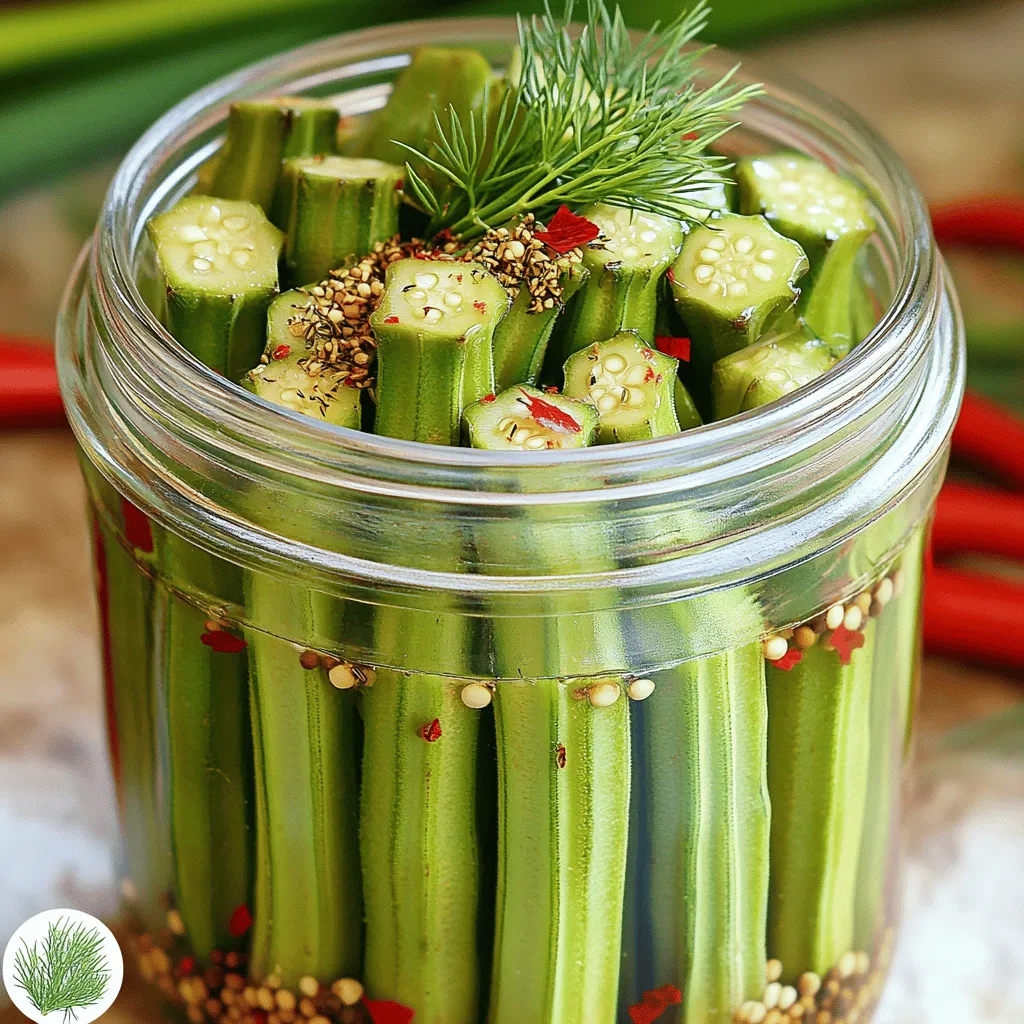
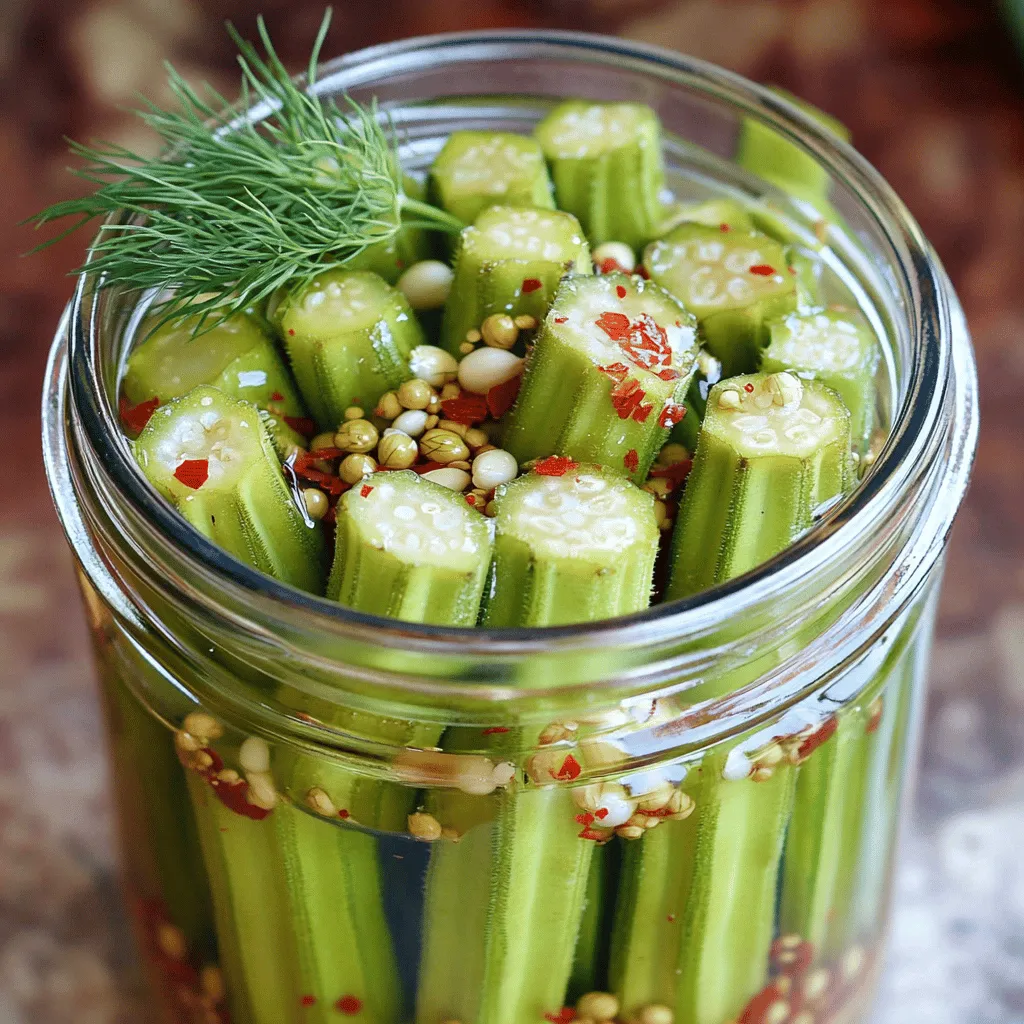
Are you ready to bring a burst of flavor and crunch to your meals? My Crisp Pickled Okra Perfected for Crunchy Flavor recipe will transform this Southern favorite into a zesty side dish that’s hard to resist. With fresh okra, garlic, and a simple pickling solution, you’ll learn how to create perfect pickled okra at home. Join me as we dive into this fun and easy process, ensuring each bite is deliciously crunchy!
Ingredients
Main Ingredients
– 1 pound fresh okra, stems trimmed
– 2 cups distilled white vinegar
– 1 cup water
– 2 tablespoons sea salt
– 2 teaspoons granulated sugar
– 4 cloves of garlic, crushed
– 1 tablespoon dill seeds
– 1 tablespoon black mustard seeds
– 1 teaspoon red pepper flakes
The main star of our dish is fresh okra. Look for firm, bright green pods. They should feel crisp when you touch them. The vinegar adds the right tang, while garlic and spices bring depth. Together, they create a flavor that sings.
Optional Ingredients
– 1 teaspoon pickling spice
– 1 bay leaf
– Adjusting spice level with red pepper flakes
You can add pickling spice for extra flavor. This spice mix often includes herbs like coriander or allspice. If you enjoy heat, add more red pepper flakes. Adjust the amount based on your taste. A little heat can really kick things up!
Step-by-Step Instructions
Preparation of Okra
Start by washing the okra under cool water. Make sure to clean each pod well. Next, trim the stems carefully. Don’t cut too deep, or you risk losing the seeds inside. This step helps keep the okra crunchy. Once washed and trimmed, it’s time to pack the okra in the jar. Use a clean mason jar for this task. Place the okra upright, packing them tightly. This maximizes space and keeps them looking nice.
Making the Pickling Solution
To make the pickling solution, combine vinegar, water, salt, and sugar in a medium saucepan. Use 2 cups of vinegar, 1 cup of water, 2 tablespoons of salt, and 2 teaspoons of sugar. Set the heat to medium. Bring the mixture to a gentle boil. Stir occasionally until the salt and sugar dissolve completely. This step is key to a flavorful brine.
Assembling the Pickles
Once the brine is ready, layer ingredients in the jar. Between the layers of okra, add crushed garlic, dill seeds, black mustard seeds, and red pepper flakes. You can also add a bay leaf for extra flavor. After layering, carefully pour the hot pickling solution over the okra. Ensure all the okra is fully submerged. If you see air pockets, tap the jar gently against a surface to release them. Allow the jar to cool to room temperature without a lid. This prevents condensation. Once cool, seal the jar tightly. For the best flavor, refrigerate the pickled okra for at least 24 hours. However, waiting 3 to 5 days gives you the best taste.
Tips & Tricks
Keeping Your Okra Crisp
To keep your okra crunchy, do not cut too deep when trimming. If you cut too close to the seed, the okra will lose its texture. Focus on just removing the stem.
Another key to crisp okra is refrigeration. After preparing your pickles, let them cool at room temperature. Once cooled, seal the jar and place it in the fridge. The cold helps maintain that satisfying crunch.
Flavor Enhancement Suggestions
Spices can boost the flavor of your pickled okra. I recommend adding dill seeds, garlic, and black mustard seeds. These spices give a nice balance to the okra’s taste.
You can also play with the acidity and sweetness. Use a bit more sugar if you like a sweeter flavor. This balance can enhance the overall taste of your pickles. For more zest, adjust the red pepper flakes based on your spice preference.
Variations
Spicy Pickled Okra
To make your okra pop with heat, add more red pepper flakes. This simple tweak gives a nice kick. If you love spice, try adding jalapeños or other hot peppers. Slice them thin and layer them in the jar with the okra. This change brings bold flavors to your pickles.
Sweet and Spicy Twist
For a fun twist, increase the sugar content. This will balance the sour vinegar taste. You can also mix in unique spices like cinnamon or allspice. These warm spices add depth and warmth to your pickled okra. Each bite will surprise you with sweet and spicy notes, making them even more enjoyable.Enjoy exploring these variations!
Storage Info
How to Store Pickled Okra
To keep your pickled okra fresh and crunchy, choose the right container. A glass jar with a tight lid works best. Make sure it is clean and dry before use. Avoid plastic containers since they can absorb odors and colors.
Store your jar in the fridge. Keep it away from light and heat. Light can change the taste over time. A dark corner in your fridge is perfect.
Shelf Life and Use
Expect your pickled okra to last about 1 to 2 months in the fridge. The flavor gets better over time, but enjoy them before they lose their crunch.
Watch for signs of spoilage. If you see mold or notice an off smell, throw it out. Also, if the okra becomes soft or mushy, it’s time to discard them. Keeping an eye on these signs helps ensure you enjoy the best flavor and texture.
FAQs
How long does it take for pickled okra to develop flavor?
For the best flavor, refrigerate your pickled okra for at least 24 hours. However, I recommend waiting 3 to 5 days. This gives the spices time to blend with the okra, making each bite more delicious. The longer you wait, the better the taste.
Can I use frozen okra for pickling?
You can use frozen okra, but I don’t recommend it. Frozen okra tends to lose its crunch. If you do use it, make sure to thaw and dry it well. This helps reduce moisture, but be aware that the final texture may differ.
Where can I buy pre-made crisp pickled okra?
You can find pre-made crisp pickled okra at local grocery stores. Look in the canned goods aisle or the pickle section. If you prefer online shopping, check websites like Amazon or specialty food stores. They offer a variety of options to suit your taste.
Now that you know how to make pickled okra, you have all the tools for success. You learned about the key ingredients, preparation steps, and storage tips. Keeping your okra crisp is vital, so remember to follow the tips closely. If you want to spice things up, try different flavors or adjust the sweetness. Enjoy your homemade pickled okra and experiment with variations. This simple process leads to tasty results. Happy pickling!