DIY Hot Chocolate Bombs Fun and Easy Step-by-Step Guide

WANT TO SAVE THIS RECIPE?

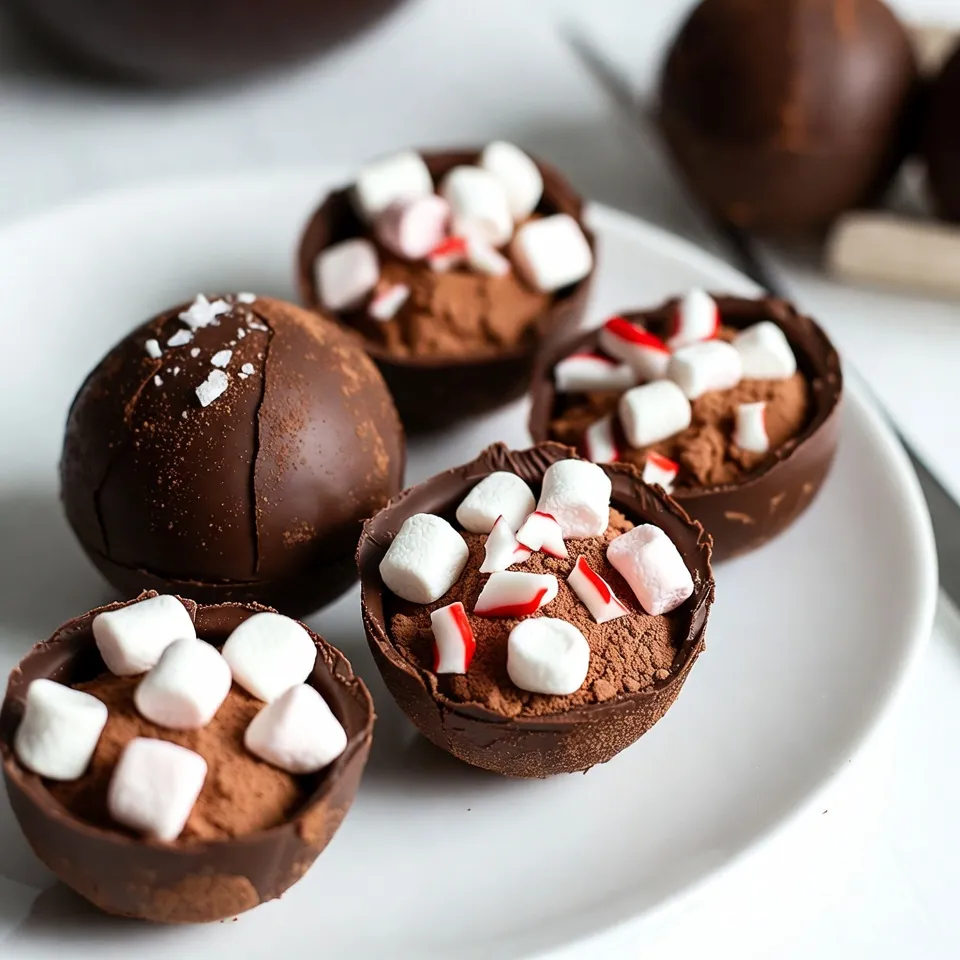
Ready to indulge in a cozy treat? DIY Hot Chocolate Bombs are fun and easy to make! With just a few ingredients like chocolate chips and marshmallows, you can craft these delightful treats. In this step-by-step guide, I’ll show you how to melt chocolate perfectly and avoid common mistakes. Let’s create your own delicious hot chocolate experience that’s perfect for any season!

Why I Love This Recipe

  1. Easy to Make: This recipe is straightforward and requires minimal ingredients, making it accessible for both novice and experienced bakers.
  2. Customizable Flavors: You can easily tweak the ingredients to match your taste, whether by choosing different chocolates or adding unique flavors.
  3. Perfect for Gifting: These hot chocolate bombs make delightful homemade gifts, especially during the winter holidays.
  4. Fun to Watch: Dropping the bomb into hot milk creates an exciting visual experience, making it a fun treat to enjoy with family and friends.

Ingredients

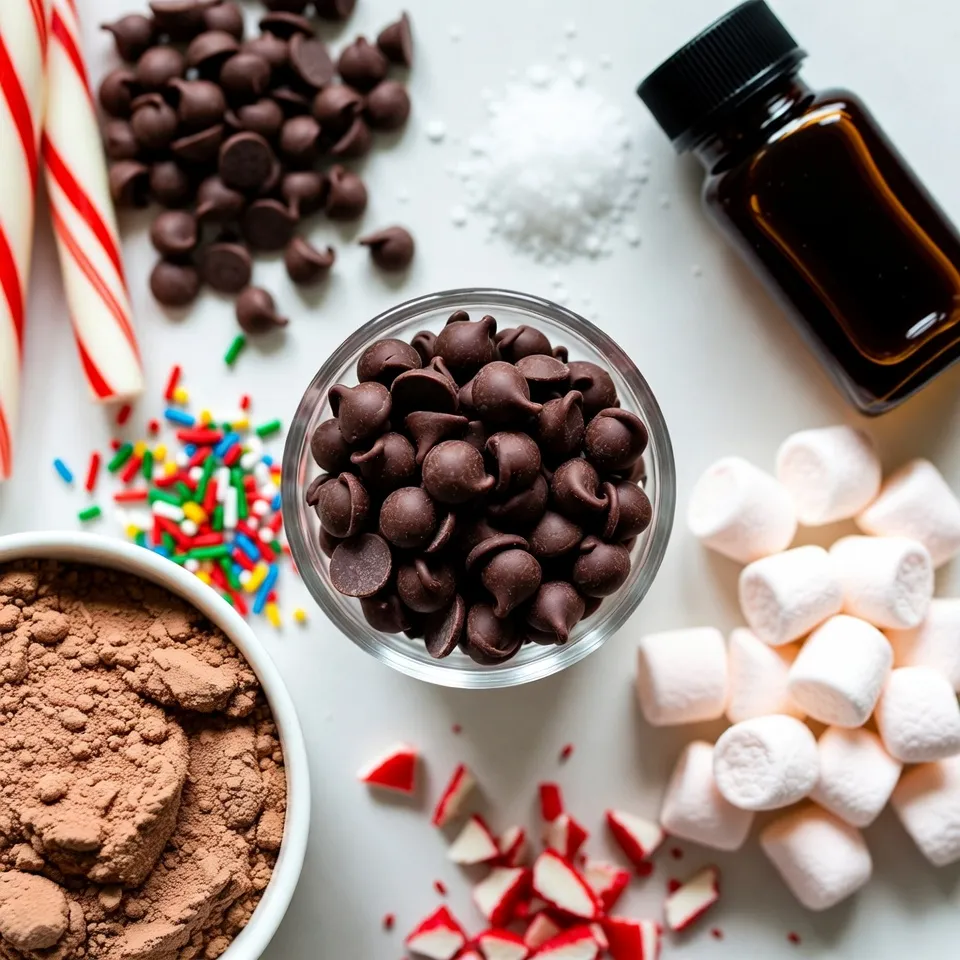
List of Essential Ingredients

– 1 cup dark chocolate chips

– 1/2 cup hot cocoa mix

– 1/4 cup mini marshmallows

– 1 teaspoon pure vanilla extract

– A pinch of sea salt for garnishing

– Optional: Colorful sprinkles or crushed candy canes for festive decoration

Gathering the right ingredients is key. Start with dark chocolate chips. They give a rich base for your bomb. You can also use milk or white chocolate if you prefer. Next, grab hot cocoa mix. This will provide that classic chocolate flavor.

Mini marshmallows add a fun surprise inside. Pure vanilla extract enhances the taste, making it even better. Don’t forget the sea salt. Just a pinch balances the sweetness.

For decoration, you can go wild! Sprinkles add color and fun. Crushed candy canes bring a holiday vibe. Use your favorite toppings to make your bombs unique.

Make sure to measure each item carefully. This ensures your hot chocolate bombs taste amazing. Enjoy the process of picking out your ingredients!

Step-by-Step Instructions

Melting the Chocolate

To melt chocolate, use a microwave-safe bowl. Add your dark chocolate chips. Microwave in 30-second bursts. Stir well between each burst. This helps the chocolate melt evenly. Avoid heating for too long. Overheating can make chocolate lumpy and hard. If you see steam or a burnt smell, stop. Smooth chocolate is key for great bombs.

Preparing the Molds

For molds, I recommend silicone ones. They are flexible and easy to use. You can also use round, hard molds if you have them. Clean the molds first. I wash them with warm, soapy water. Then, dry them well. A damp mold can ruin your chocolate. Use a pastry brush or spoon to coat the inside with melted chocolate.

Filling and Sealing the Chocolate Shells

Once the chocolate shells harden, gently remove them from the molds. Place half of the shells upside down. Add about 1 tablespoon of hot cocoa mix to each shell. Next, add a few mini marshmallows on top. Drizzle some vanilla extract over the marshmallows.

To seal the bombs, warm a plate in the microwave for a few seconds. Take an empty shell and press its edge on the warm plate. This melts it slightly. Quickly press this shell onto the filled shell. Make sure it seals well. This step is very important for a nice hot chocolate experience.

Tips & Tricks

Common Mistakes to Avoid

Overheating chocolate: When melting chocolate, do it slowly. Use a microwave in 30-second bursts. Stir well after each interval. This keeps the chocolate smooth and avoids burning.

Incorrect mold preparation: Make sure your molds are clean and dry. If they are not, the chocolate may stick. Use a pastry brush to coat the molds evenly with melted chocolate.

Enhancing the Flavor

Suggestions for flavoring chocolate: You can add flavor extracts like almond or peppermint. A pinch of cinnamon or espresso powder also adds a nice touch. These flavors mix well with the cocoa.

Choosing the right cocoa mix: Look for high-quality hot cocoa mixes. Some mixes are richer than others. Read the labels to find one that suits your taste. You want a mix that adds depth to your drink.

Decorating Your Hot Chocolate Bombs

Creative decorating ideas: Get fun with toppings! Use colorful sprinkles or crushed candy canes for a festive look. Drizzling melted chocolate over the bombs adds a nice touch too.

Using edible glitter: For a sparkling effect, sprinkle on some edible glitter. It makes the bombs look magical and fun. Just a little can make a big difference!

Pro Tips

  1. Quality Chocolate: Use high-quality chocolate for a richer flavor. Avoid chocolate chips that contain stabilizers, as they may not melt smoothly.
  2. Layering Technique: Ensure each layer of chocolate is thick enough to hold the filling. A second layer not only strengthens the shell but also helps prevent breakage.
  3. Sealing Method: When sealing the bombs, make sure the edges are slightly melted for a strong bond. This prevents any gaps that could lead to leaks.
  4. Creative Fillings: Feel free to experiment with different fillings like crushed cookies, flavored syrups, or even a dash of spices for a unique twist on your hot chocolate bombs.

Variations

Alternative Flavor Combinations

You can change up your hot chocolate bombs in fun ways. Start by using different types of chocolate. You can try milk chocolate or white chocolate for a sweeter taste. Each type gives a unique flavor to your bombs. You can also add spices like cinnamon or nutmeg. Just a pinch can bring warmth and depth to every sip.

Seasonal Decorations

Make your hot chocolate bombs festive with seasonal decorations. For the holidays, consider using holiday-themed sprinkles or candy shapes. You can use stars, snowflakes, or hearts depending on the time of year. Colorful sprinkles can add a fun pop to your bombs. They make your treats look even more inviting and special.

Dietary Modifications

If you or your friends have dietary needs, you can still enjoy hot chocolate bombs. For vegan options, use dairy-free chocolate and a plant-based cocoa mix. This way, everyone can indulge. If you want gluten-free bombs, just check your cocoa mix. Many brands offer gluten-free options, so you can still have delicious treats without worry.

Storage Info

How to Store Hot Chocolate Bombs

Store your hot chocolate bombs in a cool, dry place. Keep them away from heat and moisture. The ideal temperature is around 70°F (21°C). High humidity can cause the chocolate to spoil.

Use an airtight container to keep the bombs fresh. A glass jar or a plastic container works well. You can also layer them with parchment paper to prevent sticking.

Shelf Life

Hot chocolate bombs last about two weeks for best quality. After this time, they may lose flavor and texture. Check for any signs of spoilage before using.

If the chocolate looks dull or has white spots, it may be past its prime. A stale smell is another sign to avoid using them. Always enjoy your hot chocolate bombs fresh for the best taste!

FAQs

What are hot chocolate bombs?

Hot chocolate bombs are fun, round treats. They contain cocoa mix and marshmallows inside. When you drop one in hot milk, it melts and creates a rich drink. It’s a cool way to enjoy hot chocolate.

Can I use other fillings besides marshmallows?

Yes! You can add many tasty fillings. Try mini chocolate chips, crushed cookies, or caramel bits. You can even use flavored syrups for a twist. Just make sure the fillings fit well inside the chocolate shell.

How do I make the hot chocolate bomb melt properly?

To make it melt right, use hot milk. Heat the milk until steaming, but not boiling. Place the hot chocolate bomb in the mug, and pour the milk over it. Stir gently, and watch it melt for a fun show.

Can these be made in advance?

Definitely! You can make hot chocolate bombs ahead of time. After sealing them, store them in an airtight container. Keep them in a cool, dry place. This way, they stay fresh until you’re ready to enjoy them.

In this blog post, we explored how to create delicious hot chocolate bombs. We covered essential ingredients, step-by-step instructions, and tips for success. You also learned about variations, storage options, and common FAQs. Now, you can confidently make these fun treats at home. Don’t hesitate to try different flavors and decorations to make your hot chocolate bombs unique. Enjoy the warming delight they bring, especially during cooler days. Happy craftin

- 1 cup dark chocolate chips - 1/2 cup hot cocoa mix - 1/4 cup mini marshmallows - 1 teaspoon pure vanilla extract - A pinch of sea salt for garnishing - Optional: Colorful sprinkles or crushed candy canes for festive decoration Gathering the right ingredients is key. Start with dark chocolate chips. They give a rich base for your bomb. You can also use milk or white chocolate if you prefer. Next, grab hot cocoa mix. This will provide that classic chocolate flavor. Mini marshmallows add a fun surprise inside. Pure vanilla extract enhances the taste, making it even better. Don’t forget the sea salt. Just a pinch balances the sweetness. For decoration, you can go wild! Sprinkles add color and fun. Crushed candy canes bring a holiday vibe. Use your favorite toppings to make your bombs unique. Make sure to measure each item carefully. This ensures your hot chocolate bombs taste amazing. Enjoy the process of picking out your ingredients! {{ingredient_image_2}} To melt chocolate, use a microwave-safe bowl. Add your dark chocolate chips. Microwave in 30-second bursts. Stir well between each burst. This helps the chocolate melt evenly. Avoid heating for too long. Overheating can make chocolate lumpy and hard. If you see steam or a burnt smell, stop. Smooth chocolate is key for great bombs. For molds, I recommend silicone ones. They are flexible and easy to use. You can also use round, hard molds if you have them. Clean the molds first. I wash them with warm, soapy water. Then, dry them well. A damp mold can ruin your chocolate. Use a pastry brush or spoon to coat the inside with melted chocolate. Once the chocolate shells harden, gently remove them from the molds. Place half of the shells upside down. Add about 1 tablespoon of hot cocoa mix to each shell. Next, add a few mini marshmallows on top. Drizzle some vanilla extract over the marshmallows. To seal the bombs, warm a plate in the microwave for a few seconds. Take an empty shell and press its edge on the warm plate. This melts it slightly. Quickly press this shell onto the filled shell. Make sure it seals well. This step is very important for a nice hot chocolate experience. - Overheating chocolate: When melting chocolate, do it slowly. Use a microwave in 30-second bursts. Stir well after each interval. This keeps the chocolate smooth and avoids burning. - Incorrect mold preparation: Make sure your molds are clean and dry. If they are not, the chocolate may stick. Use a pastry brush to coat the molds evenly with melted chocolate. - Suggestions for flavoring chocolate: You can add flavor extracts like almond or peppermint. A pinch of cinnamon or espresso powder also adds a nice touch. These flavors mix well with the cocoa. - Choosing the right cocoa mix: Look for high-quality hot cocoa mixes. Some mixes are richer than others. Read the labels to find one that suits your taste. You want a mix that adds depth to your drink. - Creative decorating ideas: Get fun with toppings! Use colorful sprinkles or crushed candy canes for a festive look. Drizzling melted chocolate over the bombs adds a nice touch too. - Using edible glitter: For a sparkling effect, sprinkle on some edible glitter. It makes the bombs look magical and fun. Just a little can make a big difference! Pro Tips Quality Chocolate: Use high-quality chocolate for a richer flavor. Avoid chocolate chips that contain stabilizers, as they may not melt smoothly. Layering Technique: Ensure each layer of chocolate is thick enough to hold the filling. A second layer not only strengthens the shell but also helps prevent breakage. Sealing Method: When sealing the bombs, make sure the edges are slightly melted for a strong bond. This prevents any gaps that could lead to leaks. Creative Fillings: Feel free to experiment with different fillings like crushed cookies, flavored syrups, or even a dash of spices for a unique twist on your hot chocolate bombs. {{image_4}} You can change up your hot chocolate bombs in fun ways. Start by using different types of chocolate. You can try milk chocolate or white chocolate for a sweeter taste. Each type gives a unique flavor to your bombs. You can also add spices like cinnamon or nutmeg. Just a pinch can bring warmth and depth to every sip. Make your hot chocolate bombs festive with seasonal decorations. For the holidays, consider using holiday-themed sprinkles or candy shapes. You can use stars, snowflakes, or hearts depending on the time of year. Colorful sprinkles can add a fun pop to your bombs. They make your treats look even more inviting and special. If you or your friends have dietary needs, you can still enjoy hot chocolate bombs. For vegan options, use dairy-free chocolate and a plant-based cocoa mix. This way, everyone can indulge. If you want gluten-free bombs, just check your cocoa mix. Many brands offer gluten-free options, so you can still have delicious treats without worry. Store your hot chocolate bombs in a cool, dry place. Keep them away from heat and moisture. The ideal temperature is around 70°F (21°C). High humidity can cause the chocolate to spoil. Use an airtight container to keep the bombs fresh. A glass jar or a plastic container works well. You can also layer them with parchment paper to prevent sticking. Hot chocolate bombs last about two weeks for best quality. After this time, they may lose flavor and texture. Check for any signs of spoilage before using. If the chocolate looks dull or has white spots, it may be past its prime. A stale smell is another sign to avoid using them. Always enjoy your hot chocolate bombs fresh for the best taste! Hot chocolate bombs are fun, round treats. They contain cocoa mix and marshmallows inside. When you drop one in hot milk, it melts and creates a rich drink. It’s a cool way to enjoy hot chocolate. Yes! You can add many tasty fillings. Try mini chocolate chips, crushed cookies, or caramel bits. You can even use flavored syrups for a twist. Just make sure the fillings fit well inside the chocolate shell. To make it melt right, use hot milk. Heat the milk until steaming, but not boiling. Place the hot chocolate bomb in the mug, and pour the milk over it. Stir gently, and watch it melt for a fun show. Definitely! You can make hot chocolate bombs ahead of time. After sealing them, store them in an airtight container. Keep them in a cool, dry place. This way, they stay fresh until you're ready to enjoy them. In this blog post, we explored how to create delicious hot chocolate bombs. We covered essential ingredients, step-by-step instructions, and tips for success. You also learned about variations, storage options, and common FAQs. Now, you can confidently make these fun treats at home. Don’t hesitate to try different flavors and decorations to make your hot chocolate bombs unique. Enjoy the warming delight they bring, especially during cooler days. Happy crafting!

Delightful Hot Chocolate Bombs

Delicious chocolate spheres filled with hot cocoa mix and marshmallows, perfect for a cozy treat.
Prep Time 30 minutes
Cook Time 30 minutes
Total Time 1 hour
Course Dessert
Cuisine American
Servings 6
Calories 150 kcal

Ingredients
  

  • 1 cup dark chocolate chips
  • 1/2 cup hot cocoa mix
  • 1/4 cup mini marshmallows
  • 1 teaspoon pure vanilla extract
  • a pinch sea salt
  • optional colorful sprinkles or crushed candy canes

Instructions
 

  • Melt the Chocolate: Take a microwave-safe bowl and add the dark chocolate chips. Microwave them in 30-second intervals, stirring thoroughly in between each interval, until the chocolate is smooth and completely melted. Be vigilant to avoid overheating and burning the chocolate.
  • Prepare the Molds: Choose silicone molds specifically made for chocolate bombs or any round molds you have on hand. Ensure that the molds are clean and completely dry. Using a pastry brush or the back of a spoon, evenly coat the inside surfaces of the molds with a layer of the melted chocolate. Place them in the refrigerator for about 10 minutes to let the chocolate set.
  • Create a Second Layer: After the first layer has hardened, repeat the melting process and coat the molds again with another layer of chocolate. This extra layer will ensure that your chocolate shells are sturdy enough to hold the filling. Chill in the refrigerator for another 10 minutes.
  • Fill the Chocolate Shells: Gently remove the hardened chocolate shells from the molds. Place half of the shells upside down on a clean, flat surface. Into each shell, spoon about 1 tablespoon of hot cocoa mix, followed by a few mini marshmallows, and then drizzle a small amount of vanilla extract over them.
  • Seal the Bombs: Warm a plate in the microwave for just a few seconds. Take the open edge of an empty chocolate shell and briefly place it on the warm plate to slightly melt the edge. Quickly press this shell onto the filled shell to securely seal your hot chocolate bomb.
  • Decorate: If you wish, melt a bit of extra chocolate and drizzle it over the outside of the bombs for a beautiful finish. Sprinkle with a pinch of sea salt and decorate with holiday sprinkles or crushed candy canes for extra flair.
  • Chill Again: Place the assembled bombs back into the refrigerator for an additional 15 minutes to ensure they are well sealed and firm to the touch.

Notes

Serve in a festive mug with hot milk for a delightful experience.
Keyword chocolate bombs, dessert, holiday treat, hot chocolate

WANT TO SAVE THIS RECIPE?

Leave a Comment

Recipe Rating