Get ready to impress your friends and family with a festive treat! My Easy Christmas Rock Candy is not only simple to make, but it’s also colorful and fun. With just a few basic ingredients, you can create a delightful holiday candy that looks as good as it tastes. Join me as I guide you through each step, share helpful tips, and offer fun variations to make this candy your own. Let’s sweeten your holiday season!
Why I Love This Recipe
- Festive Flavor Explosion: This rock candy combines the delightful crunch of nuts with vibrant sprinkles, creating a joyful treat that embodies the spirit of the holiday season.
- Customizable Colors: With the option to add food coloring, you can create a stunning visual presentation that matches your holiday decor or personal style.
- Easy to Make: The straightforward steps make this recipe accessible for all skill levels, ensuring everyone can join in on the festive fun.
- Perfect for Gifting: Wrapped in cellophane and tied with a ribbon, these candy pieces make charming gifts that spread holiday cheer to friends and family.
Ingredients
List of Required Ingredients
– 2 cups granulated sugar
– 1 cup corn syrup
– 1 cup water
– 1 teaspoon pure vanilla extract
– 1 cup chopped nuts (almonds or pecans)
– 1 cup vibrant candy sprinkles
– Food coloring (optional, for swirls)
Gathering the right ingredients is key to making easy Christmas rock candy. Start with 2 cups of granulated sugar. This sugar is the main part of our candy. Next, you need 1 cup of corn syrup. This syrup helps the candy stay soft and chewy.
Add 1 cup of water to the mix. This helps dissolve the sugar. You’ll also need 1 teaspoon of pure vanilla extract. This gives our candy a nice, sweet flavor.
For a crunchy touch, use 1 cup of chopped nuts. You can choose either almonds or pecans. Both work great! To make it festive, grab 1 cup of vibrant candy sprinkles. Pick a mix of colors to make your candy pop.
Lastly, if you want colorful swirls, use some food coloring. This is optional, but it makes the candy look extra fun! With these ingredients ready, you’re all set to create a delightful holiday treat.

Step-by-Step Instructions
Mixing the Ingredients
Start by gathering your ingredients. In a medium saucepan, mix together 2 cups of granulated sugar, 1 cup of corn syrup, and 1 cup of water. Stir gently over medium heat. Keep stirring until the sugar fully dissolves. Make sure there are no granules left. This step is key for smooth candy.
Cooking to Hard Crack Stage
Once the sugar is dissolved, turn the heat up to high. Bring the mixture to a boil. Do not stir now. Let it boil until the candy thermometer reads 300°F. This is the hard crack stage. It takes careful watching, so stay close to your pot.
Cooling and Adding Flavor
After reaching 300°F, remove the pot from heat. Let it cool for about 5 minutes. Then, stir in 1 teaspoon of pure vanilla extract. If you want colorful swirls, add food coloring now. Use just a few drops and mix gently. Don’t overmix; you want some color swirls.
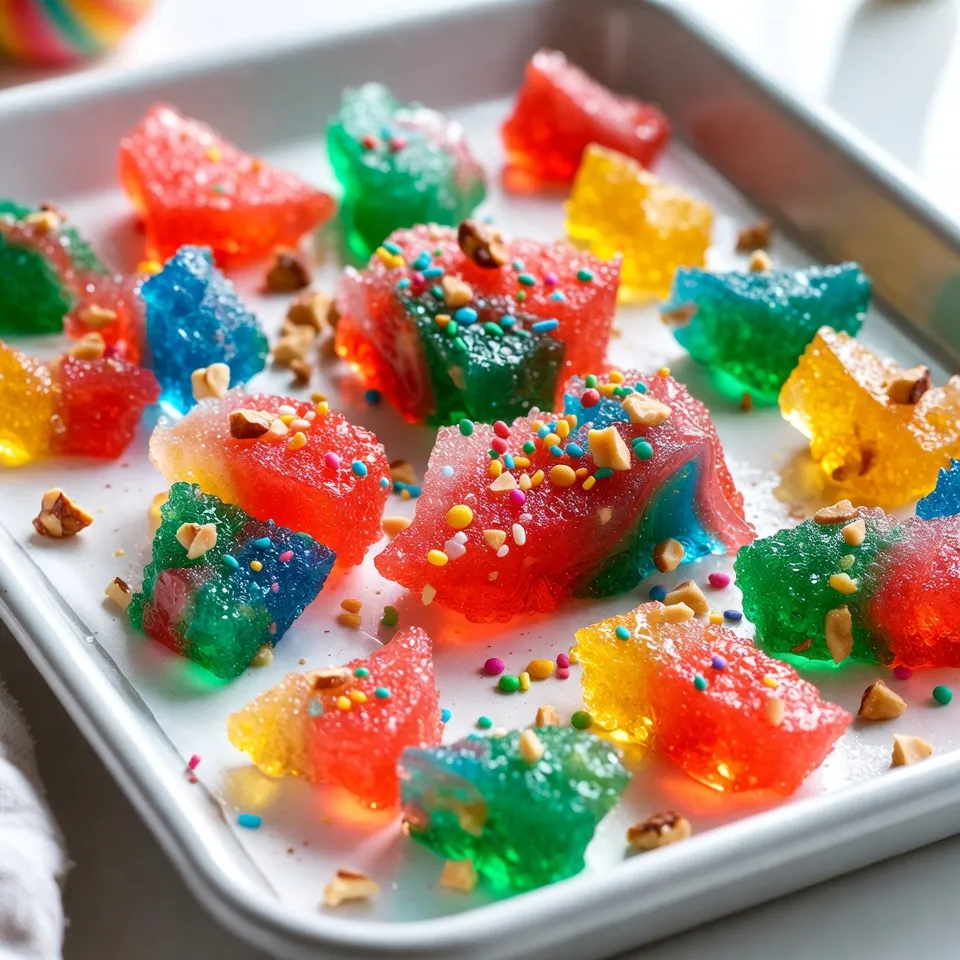
Now, prepare a baking sheet with parchment paper. Pour the hot candy mixture onto the sheet. Use a spatula to spread it out evenly. Aim for a thickness of about 1/4 inch. Before it sets, sprinkle 1 cup of chopped nuts and 1 cup of vibrant candy sprinkles on top. Press them down gently with the spatula.
Let the rock candy cool for about 30 minutes. Once it’s hard, break it into pieces. Enjoy this sweet treat with family and friends!
Tips & Tricks
Ensuring Proper Sugar Dissolution
To make great rock candy, you must dissolve the sugar well. Start by mixing the sugar, corn syrup, and water in a medium pot. Stir gently over medium heat. Keep stirring until you see no sugar granules. This step is key! If the sugar does not dissolve, your candy may not set right.
Achieving the Perfect Hard Crack Temperature
The hard crack stage is crucial for rock candy. You want your mixture to reach 300°F. Use a candy thermometer for accuracy. Once it boils, do not stir! Just let it bubble until it hits that temperature. If you go too high, your candy can burn, and if too low, it will be sticky.
Creative Serving Suggestions
When your rock candy cools, think of fun ways to serve it. Wrap pieces in clear cellophane for gifts. Add a colorful ribbon for a festive touch. You can also stack pieces in a clear jar for a cute table display. This candy looks lovely and makes a sweet treat for holiday gatherings!
Pro Tips
- Temperature Precision: Ensure that you use a reliable candy thermometer to achieve the exact hard crack stage at 300°F for perfect rock candy consistency.
- Color Swirls: When adding food coloring, use gel or paste to avoid altering the mixture’s consistency and create more vibrant colors.
- Nuts and Sprinkles: For an even distribution of nuts and sprinkles, sprinkle them on the candy while it’s still warm, and gently press them down to embed.
- Storage Tips: Store rock candy in an airtight container with a piece of wax paper between layers to prevent sticking and maintain freshness.
Variations
Nut Alternatives: Using Different Nuts
You can switch the nuts in your rock candy for a new taste. Try walnuts for a rich flavor or cashews for a softer crunch. Each nut adds a unique touch. If you’re allergic to nuts, you can skip them altogether. The candy will still taste great without nuts.
Colorful Candy Swirls: Mixing Food Colors
Want to make your rock candy even more fun? Use food coloring to create swirls. Add a few drops of your favorite colors into the hot mixture before pouring it onto the baking sheet. Gently swirl it with a spatula. Don’t overmix, or the colors will blend too much. This makes your candy look festive and bright!
Themed Sprinkles for Different Holidays
Sprinkles can change the whole look of your rock candy. Use red and green for Christmas, pastel colors for Easter, or orange and black for Halloween. You can even find themed sprinkles for birthdays or other special events. This simple change can make your candy perfect for any occasion!
Storage Info
Best Storage Practices
To keep your Christmas rock candy fresh, store it in an airtight container. Choose a container that fits the amount of candy you have. Make sure it seals well to keep out air and moisture. You can layer pieces of candy with parchment paper to prevent sticking. If you live in a humid area, consider adding a small silica gel packet to absorb moisture.
How Long Will It Last?
When stored properly, your rock candy can last for about two weeks. It tastes best when fresh, but it can still be enjoyed after this time. Keep an eye on any changes in texture or flavor. If the candy becomes soft or sticky, it is best to toss it out.
Reheating Tips for Recycling Candy
If you have leftover rock candy that you want to reuse, you can melt it down. Place the candy in a saucepan over low heat. Stir gently until it melts completely. Once melted, you can pour it into a mold to create new shapes or flavors. Add nuts or sprinkles again for a fun twist! Just be careful not to overheat it, as it can burn easily.
FAQs
What is the hard crack stage in candy making?
The hard crack stage is when candy hits 300°F. At this point, the sugar is fully cooked. You can test it by dropping a bit into cold water. It should form hard, brittle threads. Achieving this stage is key for rock candy. It gives the candy its firm texture. If you don’t reach this stage, your candy may stay soft.
Can I substitute corn syrup with another ingredient?
Yes, you can use light molasses or honey instead. Both can work in candy making. They will change the flavor slightly. If you want a clear candy, stick with corn syrup. It helps prevent crystal formation. This keeps your rock candy smooth and shiny.
How can I make rock candy less sweet?
To cut the sweetness, try using less sugar. You can also add a pinch of salt. This helps balance the flavors. Consider using nuts with a savory taste, like pecans. You can also mix in a bit of dark chocolate. This adds depth and lessens the sweetness.
This post gave you a clear path to making candy. We covered the key ingredients, step-by-step instructions, and helpful tips. You learned about variations to keep things fun and creative. We also went over how to store your treats and answered common questions.
Making candy can be a joyful and tasty adventure. With practice, you’ll become a candy pro in no time! Enjoy your sweet creation