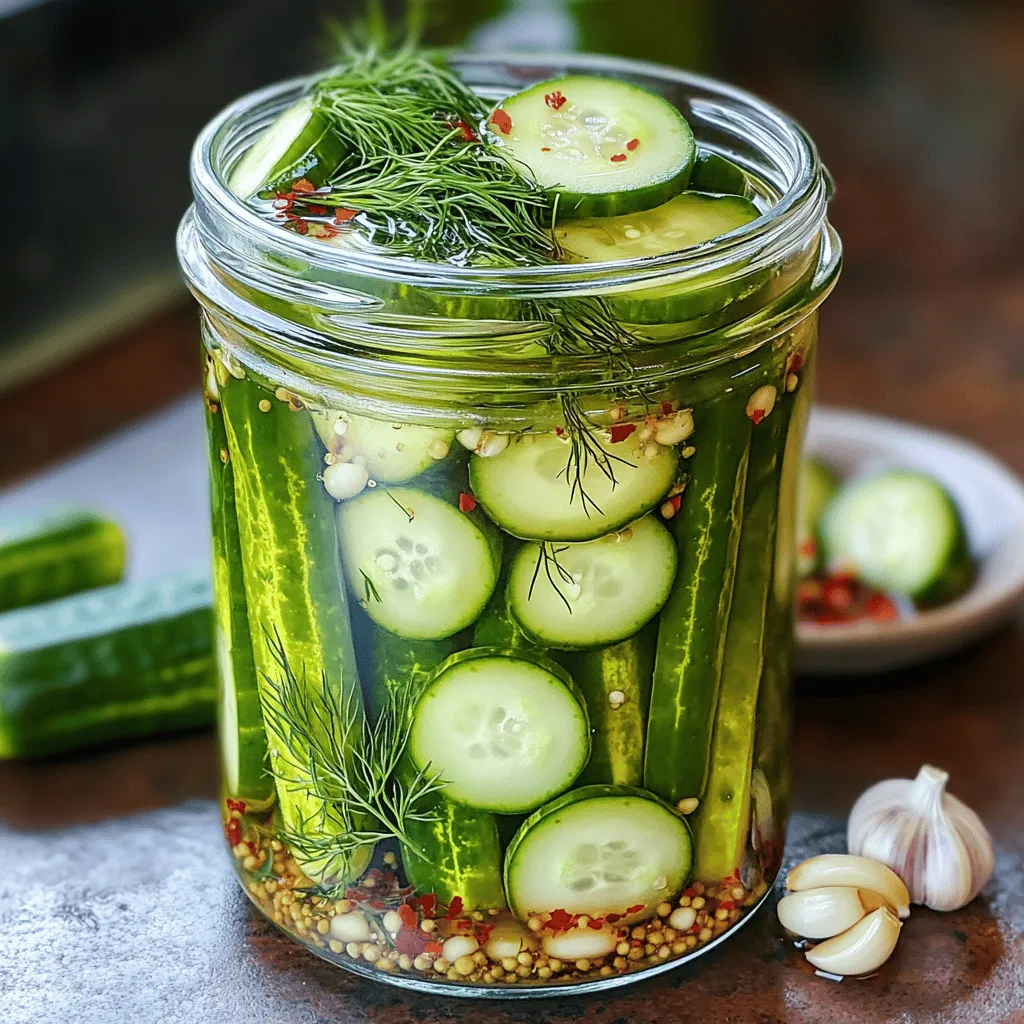
If you’re craving a snack that’s both zesty and crisp, garlic dill refrigerator pickles are your answer! In this simple guide, I’ll share my favorite recipe and tips for making perfect pickles at home. With just a few easy ingredients and steps, you can create delicious, crunchy pickles that brighten up any meal. Let’s dive into the world of pickling and make your next bite unforgettable!
Ingredients
Essential Ingredients for Garlic Dill Refrigerator Pickles
To make garlic dill refrigerator pickles, gather these key ingredients:
– 4 medium cucumbers, sliced into spears or rounds
– 4 cloves garlic, smashed
– 2 tablespoons fresh dill, finely chopped (or 1 tablespoon dried dill)
– 2 cups water
– 1 cup apple cider vinegar
– 1 tablespoon sea salt
– 1 tablespoon sugar
These ingredients form the base of your pickles. The cucumbers give that fresh crunch. Garlic adds a nice punch, while dill gives a lovely herb flavor. The water, vinegar, salt, and sugar create the brine that makes the pickles tangy and sweet.
Optional Ingredients for Customizing Flavor
You can customize your pickles with some optional ingredients:
– 1 teaspoon red pepper flakes (for a spicy kick)
– Other herbs like thyme or coriander
– Whole mustard seeds for extra texture
Adding red pepper flakes can bring heat to your pickles. You can also experiment with other herbs that you love. Just remember to keep the balance of flavors in mind.
Recommended Tools and Equipment
To make this recipe easier, have these tools ready:
– A large mixing bowl
– A whisk or spoon
– A clean quart-sized jar or container with a lid
– A measuring cup and spoons
These tools help you mix and store your pickles safely. A clean jar is key to keeping your pickles fresh.
Step-by-Step Instructions
Preparing the Pickling Brine
To make the brine, you need to mix a few simple ingredients. Start with a large bowl and add:
– 2 cups water
– 1 cup apple cider vinegar
– 1 tablespoon sea salt
– 1 tablespoon sugar
Stir the mix with a whisk or spoon. Keep stirring until the salt and sugar fully dissolve. This step is key for flavor.
Packing the Cucumbers
Next, take your cucumbers. You can slice them into spears or rounds. I like to use about 4 medium cucumbers. Place them snugly in a clean quart-sized jar. Make sure they fit well, as this helps with brining.
Now, add the flavor! Toss in:
– 4 cloves garlic, smashed
– 2 tablespoons fresh dill, finely chopped (or 1 tablespoon dried dill)
– 1 teaspoon red pepper flakes (optional)
Pouring the Brine and Sealing the Jar
After packing the jar, it’s time for the brine. Carefully pour the brine over the cucumbers. Ensure they are fully submerged. If not, add a bit more water.
Once the cucumbers are covered, seal the jar with a lid. Give it a gentle shake to mix the garlic and dill evenly. Now, place the jar in the fridge. Let the pickles sit for at least 24 hours. For the best flavor, wait 3 to 5 days.
Tips & Tricks
How to Ensure Crisp Pickles
To keep your pickles crisp, start with fresh cucumbers. Look for firm ones with no soft spots. Use smaller cucumbers, as they tend to stay crunchier. You can also add a few grape leaves or a pinch of calcium chloride to the jar. These help maintain that satisfying crunch. Make sure to slice your cucumbers evenly, so they pickle uniformly.
Best Storage Practices for Pickles
Store your pickles in a clean glass jar. Use an airtight lid to keep moisture out. Place them in the fridge right after preparing. The cold temperature helps the pickles stay fresh longer. Avoid putting them near foods with strong odors, as they can absorb those smells. Always use a clean utensil when taking pickles from the jar to avoid contamination.
Timing: When Are They Ready to Eat?
Your pickles will be tasty after 24 hours in the fridge. However, for the best flavor, let them sit for 3 to 5 days. This allows the garlic and dill to meld with the cucumbers. The longer they sit, the more flavorful they become. Just remember, they will keep getting better the longer they marinate! Check them every day to see how the flavor develops. Enjoy your homemade pickles as a snack or a side dish!
Variations
Spicy Garlic Dill Pickles
To make spicy garlic dill pickles, add red pepper flakes. This gives each bite a nice kick. You can control the heat by adjusting the amount of flakes. Start with one teaspoon. If you want it hotter, add more. You might also add a sliced jalapeño for extra spice. The heat blends well with the garlic and dill.
Sweet and Spicy Dill Pickles
For sweet and spicy dill pickles, mix in some sugar. Use two tablespoons instead of one. This adds a sweet touch that balances the vinegar’s tang. A sprinkle of crushed red pepper also works here for heat. The sweet flavor makes these pickles a hit at parties. You can enjoy them on sandwiches or burgers.
Herb-Infused Variations
Herb-infused pickles are fun to create. Add fresh herbs like thyme, basil, or oregano to the brine. Each herb gives a unique flavor. You can mix and match to find your favorite. Try adding a few sprigs of rosemary for a bold taste. The herbs will infuse into the pickles as they sit. This creates a fresh and vibrant flavor profile.
By trying these variations, you can customize your garlic dill refrigerator pickles.
Storage Info
Best Way to Store Refrigerator Pickles
The best way to store your garlic dill refrigerator pickles is in the fridge. Place them in a clean jar with a tight lid. Make sure to keep them submerged in the brine. This brine helps keep the pickles crisp and flavorful. Always store them upright to avoid spills. You can also use a glass container if you prefer.
Shelf Life of Garlic Dill Pickles
Garlic dill pickles can last for up to two months in the fridge. After a week, they taste even better as they soak up the flavors. Just check for any signs of spoilage like off smells or changes in color. If you see any of these signs, it’s best to discard them.
How to Revive Wilting Pickles
If your pickles start to wilt, don’t worry! You can revive them. First, soak them in cold water for a few hours. This helps them regain their crunch. You can also add a bit of extra salt to the brine. This will help enhance their texture and flavor. Just give them a day or two to soak. Enjoy your crisp and tasty pickles again!
FAQs
How long do garlic dill refrigerator pickles last?
Garlic dill refrigerator pickles can last up to two months in the fridge. Their flavor improves over time, but they may lose some crunch. Always check for any signs of spoilage before eating. Store them sealed tight to keep them fresh.
Can I use different types of cucumbers?
Yes, you can use different types of cucumbers. Kirby cucumbers are best for pickling due to their firm texture. However, you can also use English or Persian cucumbers. Just keep in mind their size and texture may affect the final crunchiness.
What do I do if my pickles aren’t crunchy?
If your pickles aren’t crunchy, there are a few things to try. First, make sure you use fresh cucumbers. Old cucumbers often turn soft. Also, consider adding a few grape leaves or a pinch of calcium chloride to the brine. These help keep pickles crisp. If they still lack crunch, you can enjoy them in salads or sandwiches instead.
You learned about making tasty garlic dill refrigerator pickles. We covered essential and optional ingredients, tools, and step-by-step instructions. I shared tips for crispness and storage. You also explored fun variations and found answers to common questions.
Now, it’s your turn to try this easy recipe. Enjoy the fresh flavors and get creative. Homemade pickles add a fun twist to any meal!