Gooey S’mores Brownie Bars Indulgent and Easy Recipe

WANT TO SAVE THIS RECIPE?

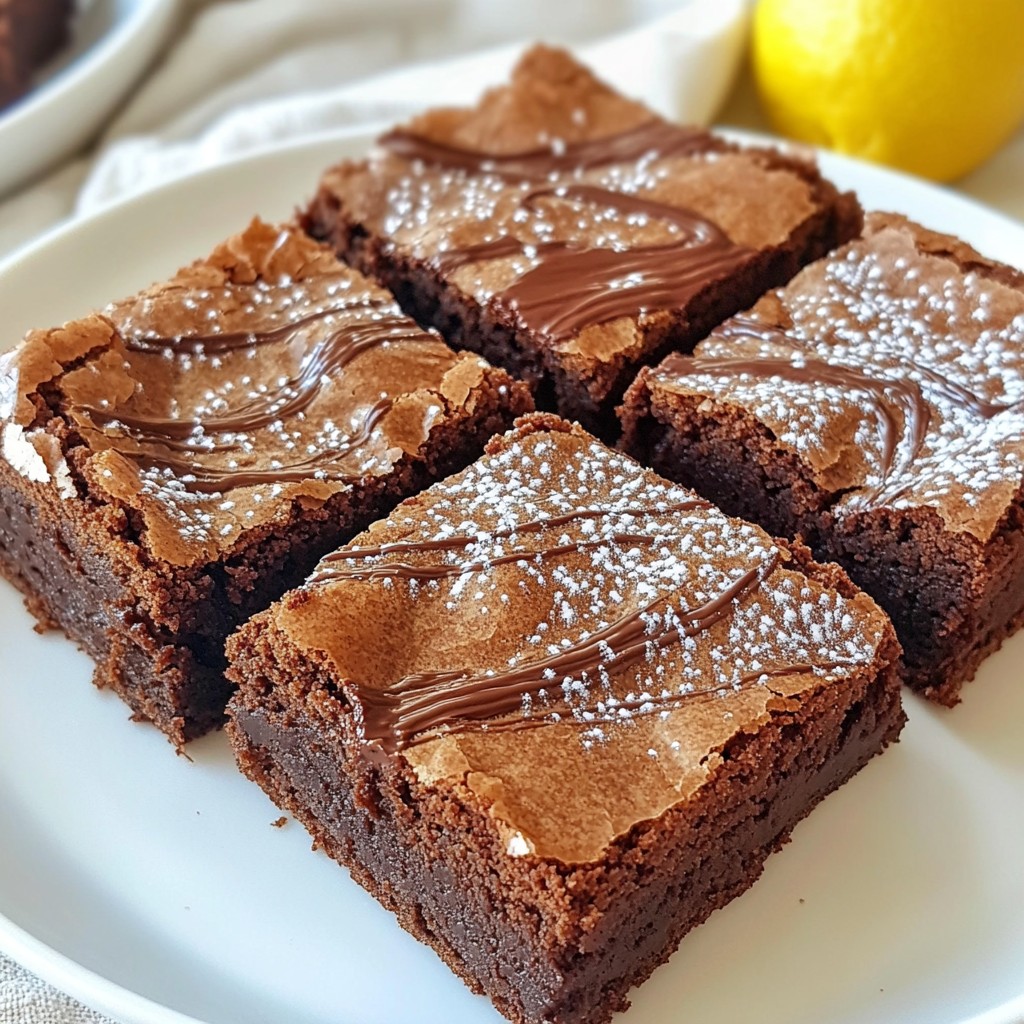
Looking for a treat that combines gooey, rich brownies with classic s’mores flavor? I have just the recipe for you! In this post, I’ll guide you through making indulgent Gooey S’mores Brownie Bars that are easy and fun to prepare. With simple ingredients and clear steps, you’ll impress friends and family in no time. Get ready to satisfy your sweet tooth with this delightful dessert!

Why I Love This Recipe

  1. Decadent Layers: The combination of rich brownie, gooey marshmallows, and crunchy graham crackers creates an irresistible treat that satisfies all cravings.
  2. Easy to Make: This recipe is straightforward, making it a perfect choice for both novice bakers and experienced cooks looking for a quick dessert.
  3. Perfect for Sharing: These brownie bars are cut into convenient squares, making them ideal for parties, picnics, or any gathering where you want to impress.
  4. Customizable: You can easily tweak the ingredients, adding nuts or different types of chocolate to make it your own delicious creation.

Ingredients

Complete List of Ingredients

To make gooey s’mores brownie bars, you’ll need:

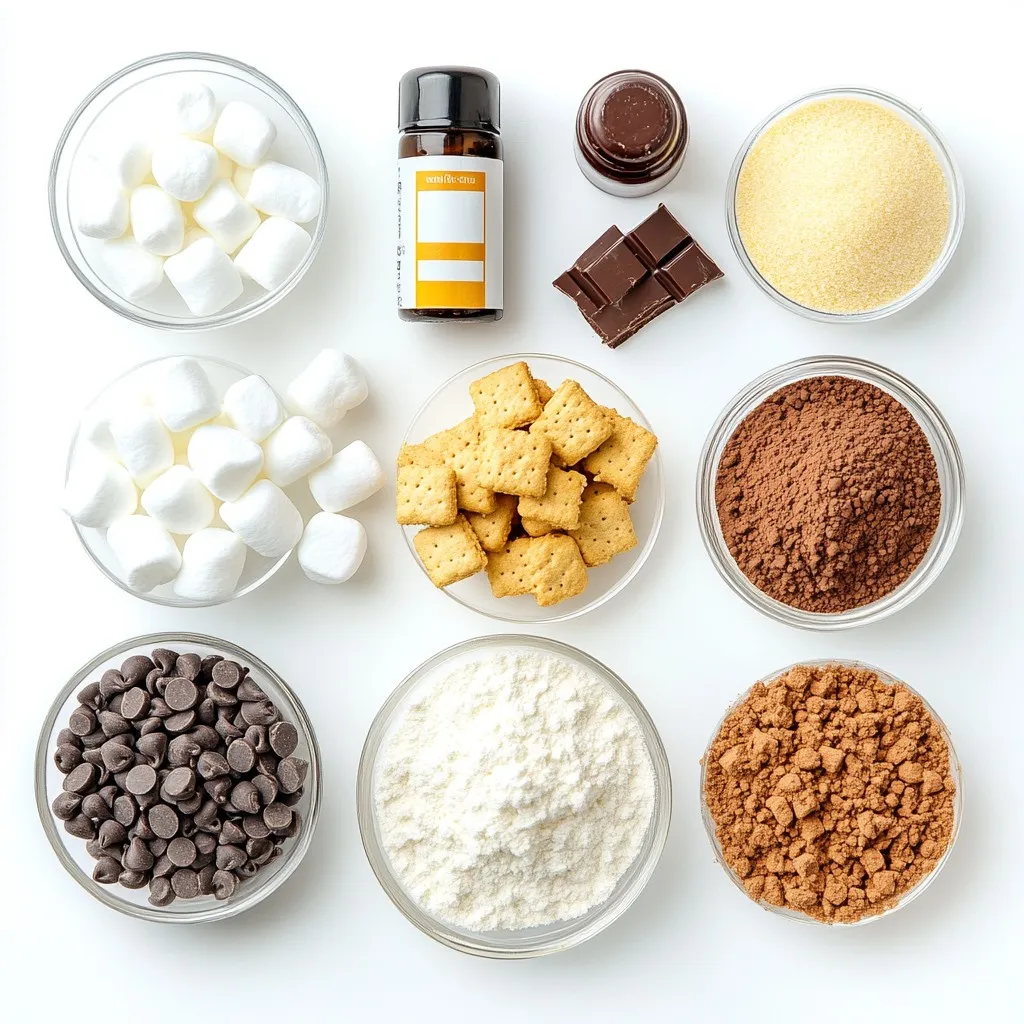
– 1 cup unsalted butter, melted

– 1 1/2 cups granulated sugar

– 1 cup brown sugar, packed down firmly

– 4 large eggs

– 1 teaspoon vanilla extract

– 1 cup all-purpose flour

– 1 cup unsweetened cocoa powder

– 1 teaspoon baking powder

– 1/2 teaspoon fine sea salt

– 1 cup semi-sweet chocolate chips

– 1 cup mini marshmallows

– 1 cup crushed graham crackers

These ingredients blend together to create a rich and gooey treat.

Ingredient Substitutions

You can swap some ingredients if you need to. Here are a few ideas:

– Use coconut oil instead of butter for a dairy-free option.

– Replace granulated sugar with coconut sugar if you want a lower glycemic index.

– Substitute flax eggs for regular eggs for a vegan option. Mix 1 tablespoon ground flaxseed with 2.5 tablespoons water for each egg.

– You can use gluten-free flour instead of all-purpose flour to make these bars gluten-free.

These substitutions can help fit your needs while keeping the taste great.

Variations for Dietary Preferences

You can adjust this recipe for different diets. Here are some fun variations:

Gluten-Free: Use gluten-free flour. Check that your chocolate chips and graham crackers are also gluten-free.

Vegan: Use flax eggs, coconut oil, and dairy-free chocolate chips.

Nut-Free: Ensure all ingredients, especially chocolate and graham crackers, are nut-free.

These variations keep the spirit of the treat while catering to different diets. Enjoy experimenting with ingredients!

Step-by-Step Instructions

Prepping the Oven and Baking Dish

First, you need to set your oven. Preheat it to 350°F (175°C). While it heats, grab a 9×13 inch baking dish. Grease it with non-stick spray or line it with parchment paper. This helps with easy removal later.

Mixing the Wet Ingredients

Now, let’s mix the wet stuff. In a large bowl, add 1 cup of melted unsalted butter, 1 1/2 cups of granulated sugar, and 1 cup of packed brown sugar. Whisk them together until smooth. Next, add 4 large eggs one by one. Mix well after each egg. Finally, pour in 1 teaspoon of vanilla extract and stir until you have a velvety mixture.

Combining Dry Ingredients

In another bowl, sift together 1 cup of all-purpose flour, 1 cup of unsweetened cocoa powder, 1 teaspoon of baking powder, and 1/2 teaspoon of fine sea salt. Slowly add these dry ingredients to the wet mix. Use a spatula to fold them in gently. It’s okay if your batter has a few lumps.

Layering the Brownies

Time to layer! Pour half of the brownie batter into your prepared dish. Use your spatula to spread it evenly in the corners. Next, sprinkle half of the crushed graham crackers, then half of the mini marshmallows. Gently dollop the rest of the brownie batter over this layer. Spread it out carefully. Now, top with the remaining graham crackers, chocolate chips, and mini marshmallows for extra gooeyness.

Baking Time and Cooling Process

Place the dish in your preheated oven. Bake for 25-30 minutes. Check if the edges are set. Insert a toothpick in the center. If it comes out with a few moist crumbs, it’s done! Once baked, take the dish out and let it cool for 10-15 minutes. This helps the bars set before you slice them.

Optional: Toasting the Marshmallows

For an extra treat, toast the marshmallows! You can place the bars under the broiler for 1-2 minutes until they turn golden brown. Keep a close eye on them so they don’t burn. Enjoy your gooey s’mores brownie bars!

Tips & Tricks

Achieving the Perfect Gooey Texture

To get that perfect gooey texture, watch your baking time closely. Bake for 25-30 minutes. You want the edges set but the center soft. A toothpick should have a few moist crumbs when you check it. If you want extra gooeyness, try broiling the bars for one to two minutes. This gives the marshmallows a nice, toasted look.

Best Practices for Layering

Layering is key for the best s’mores brownie bars. Spread half the brownie batter evenly in the pan first. Then, add half the crushed graham crackers and mini marshmallows. This keeps every bite layered with gooey goodness. After adding the remaining batter, finish with the rest of the toppings. This makes for a great visual appeal and a delicious taste.

How to Cut Brownie Bars Neatly

Cutting these bars neatly can be tricky. Let them cool for about 10-15 minutes in the pan. This helps them set. Use a sharp knife to cut them into squares. For cleaner cuts, wipe the knife with a damp cloth between slices. This prevents sticking and keeps the edges sharp.

Recommended Serving Suggestions

These brownie bars are best served warm. Pair them with a scoop of vanilla ice cream. A sprinkle of crushed graham crackers or extra mini marshmallows on top makes a great touch. You can also serve them with chocolate sauce for extra sweetness. Enjoy these bars at parties, family gatherings, or just for a cozy night in!

Pro Tips

  1. Use Room Temperature Eggs: Allow your eggs to sit at room temperature for about 30 minutes before adding them to the batter. This helps create a smoother and more homogenous mixture.
  2. Don’t Overmix the Batter: When combining the dry and wet ingredients, mix until just combined. Overmixing can lead to tough brownie bars, so a few lumps are perfectly fine.
  3. Experiment with Chocolate: Feel free to mix different types of chocolate chips or even chopped chocolate bars for a unique flavor profile. Dark chocolate or white chocolate can add a delicious twist!
  4. Store Properly: Keep any leftovers in an airtight container at room temperature for up to 3 days. For longer storage, refrigerate, and simply warm them up before serving for that gooey texture!

Variations

Gluten-Free Option

You can make these gooey s’mores brownie bars gluten-free. Just swap the all-purpose flour with a gluten-free flour mix. Look for blends that include a starch for the best results. This simple change keeps the bars soft and rich without losing flavor. Always check that your chocolate chips and graham crackers are also gluten-free.

Vegan Modification

For a vegan version, use plant-based butter instead of regular butter. Replace the eggs with flax eggs. To make a flax egg, mix 1 tablespoon of flaxseed meal with 2.5 tablespoons of water. Let it sit for a few minutes to thicken. Use dairy-free chocolate chips and vegan marshmallows, too. These swaps create a delicious treat for everyone.

Adding Different Mix-ins or Toppings

Feel free to get creative with mix-ins! You can add nuts like walnuts or pecans for a crunchy texture. Try adding peanut butter chips for a nutty twist, or even white chocolate chips for a different flavor. You can also top the bars with caramel drizzle or chopped candy bars after baking. These changes will make your brownie bars even more fun and tasty!

Storage Info

How to Store Brownie Bars

To keep your gooey s’mores brownie bars fresh, store them in an airtight container. Place parchment paper between layers to avoid sticking. They stay good at room temperature for up to four days. If you want them to last longer, store them in the fridge. They will keep well for about a week when chilled.

Freezing Instructions

You can freeze these brownie bars for later enjoyment. Once cooled, cut them into squares. Wrap each piece tightly in plastic wrap. Then, place the wrapped bars in a freezer-safe bag. They can last in the freezer for up to three months. When ready to eat, thaw them in the fridge overnight.

Reheating Tips

To enjoy your brownie bars warm, reheat them in the oven. Preheat your oven to 350°F (175°C). Place the bars on a baking sheet, cover with foil, and heat for about 10 minutes. This keeps them gooey without drying them out. For a quick fix, you can microwave a single bar for 15-20 seconds. Enjoy them warm with a scoop of ice cream for an extra treat!

FAQs

What makes these brownie bars gooey?

These brownie bars are gooey because of the melted chocolate chips and mini marshmallows. When baked, they melt and create a soft, rich texture. The combination of semi-sweet chocolate and marshmallows adds to that delightful chewiness. The layers trap moisture, making each bite a gooey treat.

Can I use other types of chocolate for this recipe?

Yes, you can use other types of chocolate! Dark chocolate gives a richer taste. Milk chocolate will make the bars sweeter. If you prefer white chocolate, it will add a creamy flavor. Just stick to the same amount as the recipe calls for, one cup. This way, you’ll keep the gooey goodness intact.

How long do the brownie bars last?

These brownie bars last about 3 to 4 days at room temperature. Store them in an airtight container to keep them fresh. You can also refrigerate them to extend their life. Just remember, cold bars may lose some of their gooey texture.

Can I make these brownies ahead of time?

Absolutely! You can make these brownies a day or two in advance. Just bake them and let them cool completely. Store them in an airtight container at room temperature. When it’s time to serve, warm them slightly in the oven for that fresh-baked taste.

In this blog post, we covered all you need for perfect brownie bars. We explored ingredients, substitutes, and variations to suit different diets. I provided step-by-step instructions for baking and cooling, plus tips for achieving gooey perfection. You learned how to store and reheat for later enjoyment too. Whether you prefer gluten-free, vegan, or classic brownies, you have options. Now, you can impress friends and family with your skills. Enjoy your baking journey, and savor every bite of those delicious brownie bar

To make gooey s'mores brownie bars, you'll need: - 1 cup unsalted butter, melted - 1 1/2 cups granulated sugar - 1 cup brown sugar, packed down firmly - 4 large eggs - 1 teaspoon vanilla extract - 1 cup all-purpose flour - 1 cup unsweetened cocoa powder - 1 teaspoon baking powder - 1/2 teaspoon fine sea salt - 1 cup semi-sweet chocolate chips - 1 cup mini marshmallows - 1 cup crushed graham crackers These ingredients blend together to create a rich and gooey treat. You can swap some ingredients if you need to. Here are a few ideas: - Use coconut oil instead of butter for a dairy-free option. - Replace granulated sugar with coconut sugar if you want a lower glycemic index. - Substitute flax eggs for regular eggs for a vegan option. Mix 1 tablespoon ground flaxseed with 2.5 tablespoons water for each egg. - You can use gluten-free flour instead of all-purpose flour to make these bars gluten-free. These substitutions can help fit your needs while keeping the taste great. You can adjust this recipe for different diets. Here are some fun variations: - Gluten-Free: Use gluten-free flour. Check that your chocolate chips and graham crackers are also gluten-free. - Vegan: Use flax eggs, coconut oil, and dairy-free chocolate chips. - Nut-Free: Ensure all ingredients, especially chocolate and graham crackers, are nut-free. These variations keep the spirit of the treat while catering to different diets. Enjoy experimenting with ingredients! {{ingredient_image_2}} First, you need to set your oven. Preheat it to 350°F (175°C). While it heats, grab a 9x13 inch baking dish. Grease it with non-stick spray or line it with parchment paper. This helps with easy removal later. Now, let's mix the wet stuff. In a large bowl, add 1 cup of melted unsalted butter, 1 1/2 cups of granulated sugar, and 1 cup of packed brown sugar. Whisk them together until smooth. Next, add 4 large eggs one by one. Mix well after each egg. Finally, pour in 1 teaspoon of vanilla extract and stir until you have a velvety mixture. In another bowl, sift together 1 cup of all-purpose flour, 1 cup of unsweetened cocoa powder, 1 teaspoon of baking powder, and 1/2 teaspoon of fine sea salt. Slowly add these dry ingredients to the wet mix. Use a spatula to fold them in gently. It’s okay if your batter has a few lumps. Time to layer! Pour half of the brownie batter into your prepared dish. Use your spatula to spread it evenly in the corners. Next, sprinkle half of the crushed graham crackers, then half of the mini marshmallows. Gently dollop the rest of the brownie batter over this layer. Spread it out carefully. Now, top with the remaining graham crackers, chocolate chips, and mini marshmallows for extra gooeyness. Place the dish in your preheated oven. Bake for 25-30 minutes. Check if the edges are set. Insert a toothpick in the center. If it comes out with a few moist crumbs, it's done! Once baked, take the dish out and let it cool for 10-15 minutes. This helps the bars set before you slice them. For an extra treat, toast the marshmallows! You can place the bars under the broiler for 1-2 minutes until they turn golden brown. Keep a close eye on them so they don’t burn. Enjoy your gooey s'mores brownie bars! To get that perfect gooey texture, watch your baking time closely. Bake for 25-30 minutes. You want the edges set but the center soft. A toothpick should have a few moist crumbs when you check it. If you want extra gooeyness, try broiling the bars for one to two minutes. This gives the marshmallows a nice, toasted look. Layering is key for the best s'mores brownie bars. Spread half the brownie batter evenly in the pan first. Then, add half the crushed graham crackers and mini marshmallows. This keeps every bite layered with gooey goodness. After adding the remaining batter, finish with the rest of the toppings. This makes for a great visual appeal and a delicious taste. Cutting these bars neatly can be tricky. Let them cool for about 10-15 minutes in the pan. This helps them set. Use a sharp knife to cut them into squares. For cleaner cuts, wipe the knife with a damp cloth between slices. This prevents sticking and keeps the edges sharp. These brownie bars are best served warm. Pair them with a scoop of vanilla ice cream. A sprinkle of crushed graham crackers or extra mini marshmallows on top makes a great touch. You can also serve them with chocolate sauce for extra sweetness. Enjoy these bars at parties, family gatherings, or just for a cozy night in! Pro Tips Use Room Temperature Eggs: Allow your eggs to sit at room temperature for about 30 minutes before adding them to the batter. This helps create a smoother and more homogenous mixture. Don’t Overmix the Batter: When combining the dry and wet ingredients, mix until just combined. Overmixing can lead to tough brownie bars, so a few lumps are perfectly fine. Experiment with Chocolate: Feel free to mix different types of chocolate chips or even chopped chocolate bars for a unique flavor profile. Dark chocolate or white chocolate can add a delicious twist! Store Properly: Keep any leftovers in an airtight container at room temperature for up to 3 days. For longer storage, refrigerate, and simply warm them up before serving for that gooey texture! {{image_4}} You can make these gooey s'mores brownie bars gluten-free. Just swap the all-purpose flour with a gluten-free flour mix. Look for blends that include a starch for the best results. This simple change keeps the bars soft and rich without losing flavor. Always check that your chocolate chips and graham crackers are also gluten-free. For a vegan version, use plant-based butter instead of regular butter. Replace the eggs with flax eggs. To make a flax egg, mix 1 tablespoon of flaxseed meal with 2.5 tablespoons of water. Let it sit for a few minutes to thicken. Use dairy-free chocolate chips and vegan marshmallows, too. These swaps create a delicious treat for everyone. Feel free to get creative with mix-ins! You can add nuts like walnuts or pecans for a crunchy texture. Try adding peanut butter chips for a nutty twist, or even white chocolate chips for a different flavor. You can also top the bars with caramel drizzle or chopped candy bars after baking. These changes will make your brownie bars even more fun and tasty! To keep your gooey s'mores brownie bars fresh, store them in an airtight container. Place parchment paper between layers to avoid sticking. They stay good at room temperature for up to four days. If you want them to last longer, store them in the fridge. They will keep well for about a week when chilled. You can freeze these brownie bars for later enjoyment. Once cooled, cut them into squares. Wrap each piece tightly in plastic wrap. Then, place the wrapped bars in a freezer-safe bag. They can last in the freezer for up to three months. When ready to eat, thaw them in the fridge overnight. To enjoy your brownie bars warm, reheat them in the oven. Preheat your oven to 350°F (175°C). Place the bars on a baking sheet, cover with foil, and heat for about 10 minutes. This keeps them gooey without drying them out. For a quick fix, you can microwave a single bar for 15-20 seconds. Enjoy them warm with a scoop of ice cream for an extra treat! These brownie bars are gooey because of the melted chocolate chips and mini marshmallows. When baked, they melt and create a soft, rich texture. The combination of semi-sweet chocolate and marshmallows adds to that delightful chewiness. The layers trap moisture, making each bite a gooey treat. Yes, you can use other types of chocolate! Dark chocolate gives a richer taste. Milk chocolate will make the bars sweeter. If you prefer white chocolate, it will add a creamy flavor. Just stick to the same amount as the recipe calls for, one cup. This way, you’ll keep the gooey goodness intact. These brownie bars last about 3 to 4 days at room temperature. Store them in an airtight container to keep them fresh. You can also refrigerate them to extend their life. Just remember, cold bars may lose some of their gooey texture. Absolutely! You can make these brownies a day or two in advance. Just bake them and let them cool completely. Store them in an airtight container at room temperature. When it's time to serve, warm them slightly in the oven for that fresh-baked taste. In this blog post, we covered all you need for perfect brownie bars. We explored ingredients, substitutes, and variations to suit different diets. I provided step-by-step instructions for baking and cooling, plus tips for achieving gooey perfection. You learned how to store and reheat for later enjoyment too. Whether you prefer gluten-free, vegan, or classic brownies, you have options. Now, you can impress friends and family with your skills. Enjoy your baking journey, and savor every bite of those delicious brownie bars!

Gooey S’mores Brownie Bars

Decadent brownie bars layered with chocolate, marshmallows, and graham crackers for a gooey treat.
Prep Time 15 minutes
Cook Time 30 minutes
Total Time 45 minutes
Course Dessert
Cuisine American
Servings 12
Calories 250 kcal

Ingredients
  

  • 1 cup unsalted butter, melted
  • 1.5 cups granulated sugar
  • 1 cup brown sugar, packed down firmly
  • 4 large eggs
  • 1 teaspoon vanilla extract
  • 1 cup all-purpose flour
  • 1 cup unsweetened cocoa powder
  • 1 teaspoon baking powder
  • 0.5 teaspoon fine sea salt
  • 1 cup semi-sweet chocolate chips
  • 1 cup mini marshmallows
  • 1 cup crushed graham crackers

Instructions
 

  • Preheat your oven to 350°F (175°C). Grease a 9x13 inch baking dish with non-stick cooking spray or line it with parchment paper for easier removal later.
  • In a large mixing bowl, combine the melted butter, granulated sugar, and packed brown sugar. Whisk together until the mixture is smooth and well incorporated.
  • Add the eggs, one at a time, mixing thoroughly after each addition to ensure they are fully combined into the batter. Finally, stir in the vanilla extract until the batter is velvety smooth.
  • In a separate bowl, sift together the all-purpose flour, cocoa powder, baking powder, and sea salt. Gradually add this dry mixture to the wet ingredients, folding gently with a spatula until just combined. Be careful not to overmix; a few lumps are perfectly fine.
  • Gently fold in the semi-sweet chocolate chips, ensuring they're evenly distributed throughout the batter for bursts of chocolate in every bite.
  • Pour half of the brownie batter into the prepared baking dish, using a spatula to spread it out evenly into the corners.
  • Sprinkle half of the crushed graham crackers over the brownie layer, followed by half of the mini marshmallows to create a delightful s'mores layer.
  • Carefully dollop and spread the remaining brownie batter over the marshmallow and graham cracker layer, ensuring it's evenly coated.
  • Finish by topping with the rest of the crushed graham crackers, followed by the remaining chocolate chips and mini marshmallows for that extra gooey goodness.
  • Bake in the preheated oven for 25-30 minutes, or until the edges are set and a toothpick inserted into the center comes out with a few moist crumbs. Keep an eye on it to avoid overbaking for the perfect gooey texture!
  • Once baked, remove the dish from the oven and allow the bars to cool in the baking dish for about 10-15 minutes. This helps them set before slicing.
  • For an added twist, if desired, you can place the bars under the broiler for 1-2 minutes until the marshmallows are golden brown and slightly toasted, but watch closely to prevent burning.

Notes

For an added twist, broil the bars for 1-2 minutes to toast the marshmallows.
Keyword brownies, chocolate, dessert, s'mores

WANT TO SAVE THIS RECIPE?

Leave a Comment

Recipe Rating