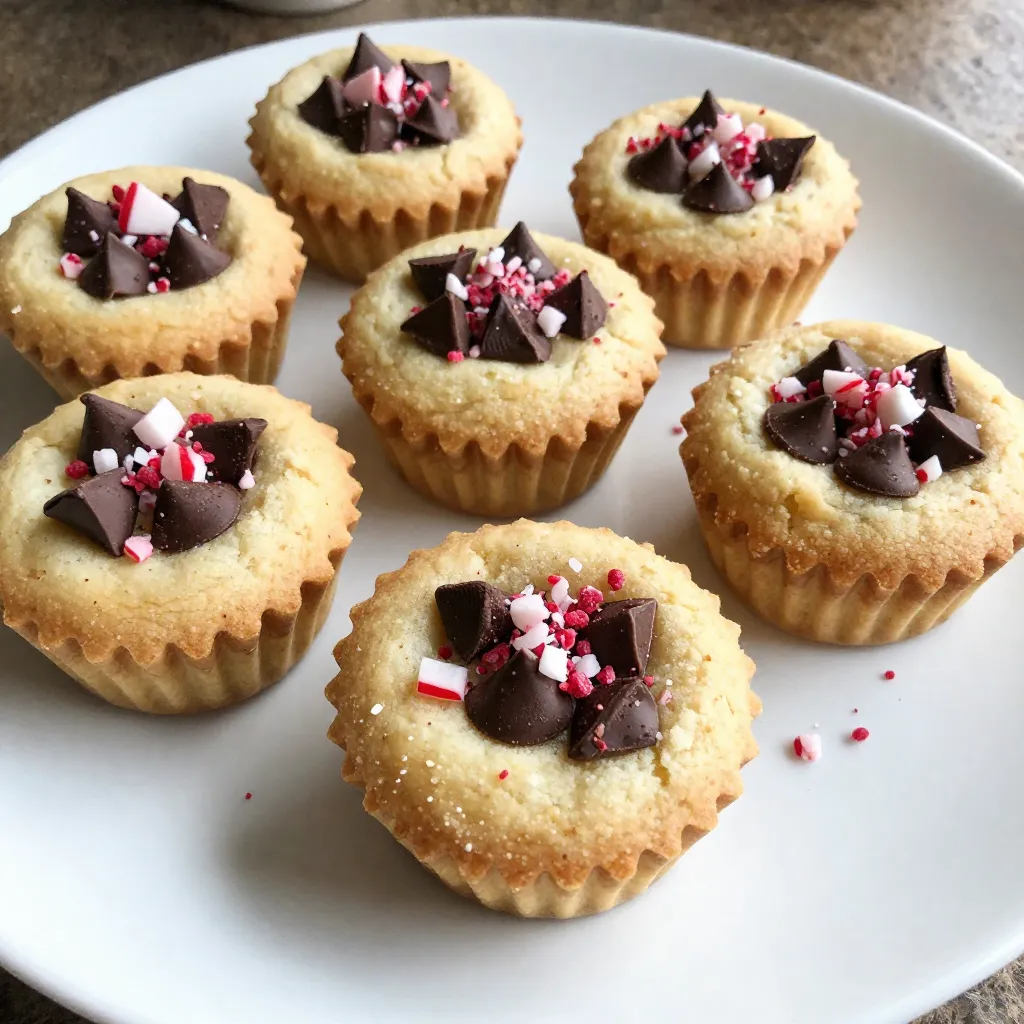
Get ready for a festive treat that will wow your family and friends! Holiday Cookie Cups are fun to make and even better to eat. Imagine warm, gooey chocolate combined with a hint of peppermint, all in a perfect cup shape. In this guide, I’ll share easy steps, helpful tips, and exciting variations to make these cookie cups your new holiday favorite. Let’s dive in and create some magic!
Why I Love This Recipe
- Festive Flavors: The combination of chocolate and peppermint creates a delightful holiday treat that is perfect for celebrations.
- Easy to Make: This recipe is straightforward and quick, making it ideal for bakers of all skill levels, especially during the busy holiday season.
- Perfect Portion: Cookie cups offer the perfect individual serving size, making them great for sharing at parties or gatherings.
- Customizable: Feel free to swap out the chocolate chips or add nuts to personalize these cookie cups to your taste!
Ingredients
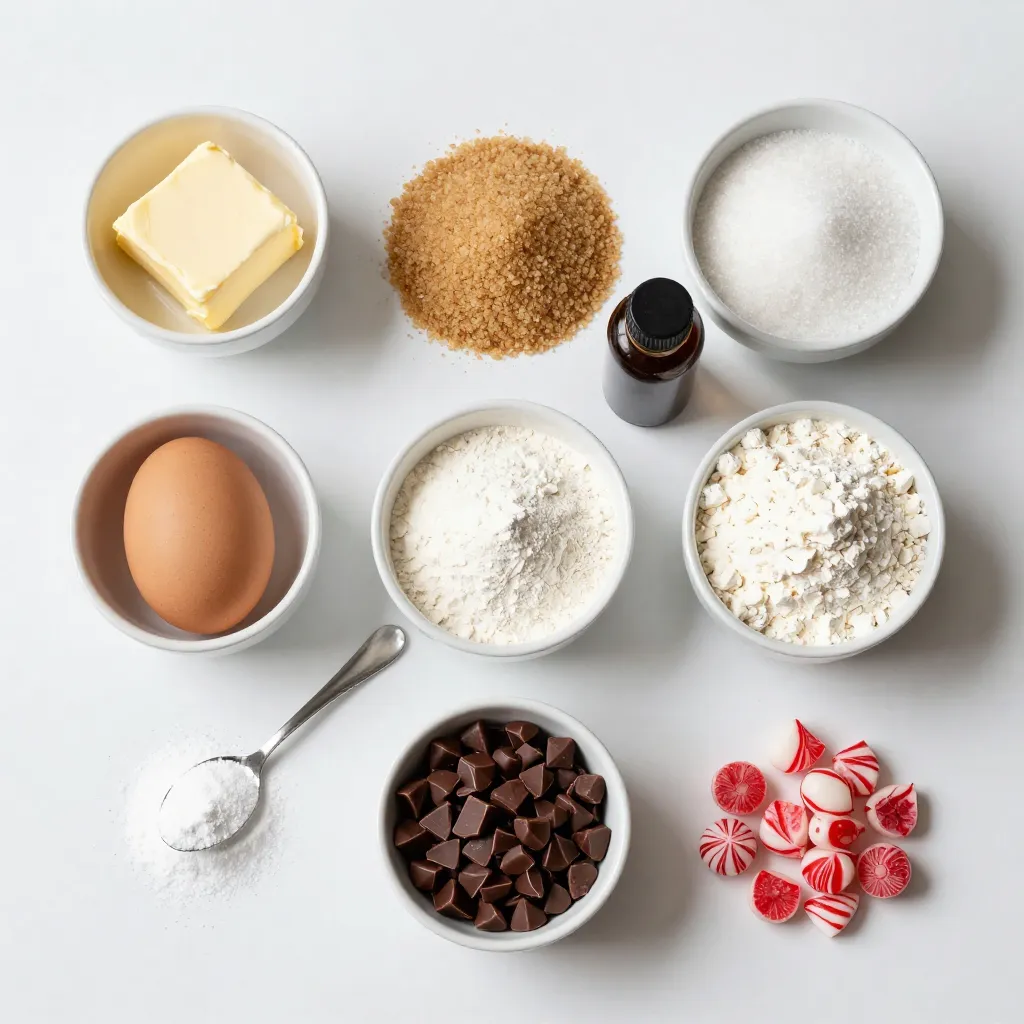
List of Ingredients
– 1 cup unsalted butter, softened to room temperature
– 1 cup brown sugar, packed firmly
– 1/2 cup granulated sugar
– 1 large egg, at room temperature
– 2 teaspoons pure vanilla extract
– 3 cups all-purpose flour, sifted
– 1 teaspoon baking soda
– 1/2 teaspoon fine sea salt
– 1 cup chocolate chips
– 1 cup crushed peppermint candies
To create the perfect Holiday Cookie Cups, gather these simple ingredients. Start with unsalted butter. It needs to be soft. This helps it mix well with sugars. Use both brown and granulated sugar for a sweet flavor.
Next, grab one large egg and pure vanilla extract for richness. The egg should also be at room temperature. This helps it blend smoothly.
For the dry mix, you’ll need all-purpose flour, baking soda, and fine sea salt. Sifting the flour avoids lumps. It makes the cookie cups light and fluffy.
Chocolate chips add a sweet touch. You can choose dark or semi-sweet. Finally, crushed peppermint candies give a festive twist. They add flavor and color.
Having all these ingredients ready makes baking fun! Each one plays a role in making these cookie cups delicious and festive.
Step-by-Step Instructions
Preheat the Oven
To start, preheat your oven to 350°F (175°C). This is the perfect temperature for baking. Next, prepare your muffin tin. You can grease each cup with butter or non-stick spray. If you want to be festive, use colorful paper liners.
Make the Dough
In a large mixing bowl, cream together the softened butter, brown sugar, and granulated sugar. Use an electric mixer for best results. Mix until the mixture is light and fluffy. This usually takes about 3-5 minutes. The right texture is key for lovely cookie cups.
Incorporate Egg and Vanilla
Now, add the large egg and pure vanilla extract into your mixture. Make sure both are at room temperature. This helps them blend better. Mix until the egg is fully combined and the mixture is smooth.
Combine Dry Ingredients
In a separate bowl, whisk together the sifted all-purpose flour, baking soda, and fine sea salt. Slowly add this dry mix to the wet ingredients. Stir gently until just combined. Be careful not to overmix. This will help keep your cookie cups tender.
Fold in Chocolate Chips and Peppermint
Next, gently fold in the chocolate chips and crushed peppermint candies. This ensures they are evenly spread throughout the dough. You want every bite to be delicious.
Fill Muffin Tin and Bake
Using a tablespoon or cookie scoop, fill each muffin cup with dough. Aim for about 3/4 full. This allows room for the cookies to rise as they bake. Place your muffin tin in the oven and bake for about 12-15 minutes. The edges should be lightly golden, and the centers should be soft.
Cooling Instructions
Once baked, take the muffin tin out of the oven. Let the cookie cups cool in the pan for about 5 minutes. This helps them set. Then, gently transfer them to a wire rack. Allow them to cool completely. This step is important for the best texture.
Tips & Tricks
Baking Tips for Success
Baking can be tricky, but I’m here to help you avoid mistakes. Here are some tips:
– Measure Carefully: Use proper measuring cups. Too much flour can make your cookie cups dry.
– Room Temperature Ingredients: Always use room temperature butter and eggs. This helps the dough mix well.
– Don’t Overmix: When you add dry ingredients, mix just until combined. Overmixing makes cookies tough.
– Grease the Pan: Always grease your muffin tin. This helps the cookie cups come out easily.
How to Achieve the Perfect Cookie Cup Texture
To get the right texture, watch for these signs while baking:
– Golden Edges: The edges should turn a light golden color. This shows they are done.
– Soft Centers: The center should look set but still soft. They will firm up as they cool.
– Cooling Time: Let them cool in the pan for 5 minutes before moving them. This helps maintain their shape.
Decoration Ideas
Making your cookie cups festive is fun and easy. Here are some ideas:
– Crushed Peppermint: Sprinkle more crushed peppermint on top for color and crunch.
– Whipped Cream: Fill the cups with whipped cream for a creamy treat.
– Chocolate Drizzle: Drizzle melted chocolate over the top for an extra touch.
– Holiday Sprinkles: Use festive sprinkles to add a pop of color and fun.
These tips will help you create beautiful holiday cookie cups that everyone will love!
Pro Tips
- Chill the Dough: If time allows, chill the cookie dough for 30 minutes before baking. This helps to enhance the flavors and prevents the cookie cups from spreading too much during baking.
- Use Quality Chocolate: Choose high-quality chocolate chips for a richer flavor. Dark chocolate pairs beautifully with the peppermint and adds depth to the cookie cups.
- Watch the Baking Time: Keep an eye on the cookie cups as they bake. Ovens can vary, so start checking around the 12-minute mark to ensure they don’t overbake.
- Experiment with Fillings: Feel free to get creative with fillings! Try adding mini marshmallows, caramel sauce, or even a dollop of peanut butter before baking for a fun twist.
Variations
Gluten-Free Adaptations
To make these cookie cups gluten-free, use a blend of gluten-free flour. I recommend using a mix of almond flour and coconut flour. These flours give a wonderful taste and texture. You can also try a store-bought gluten-free flour mix. Just make sure it has a binding agent, like xanthan gum, to help hold the shapes.
Vegan Versions
For a vegan twist, swap out the butter with coconut oil or vegan butter. Instead of the egg, use a flaxseed meal. Mix one tablespoon of flaxseed with three tablespoons of water. Let it sit for a few minutes until it thickens. This mix works great to bind your cookie cups.
Flavor Variations
Get creative with flavors! You can add different mix-ins like dried fruits, nuts, or even white chocolate chips. Try switching out the peppermint for orange zest or cinnamon for a warm touch. If you love peanut butter, add a scoop of peanut butter chips for a nutty flavor. Each variation brings its own fun twist to the cookie cups.
Storage Info
How to Store Cookie Cups
Store your cookie cups in an airtight container. This keeps them fresh and moist. Be sure to let them cool completely before placing them inside. Keep the container at room temperature, away from heat and sunlight. If you want to save them longer, the fridge is also a good option.
Freezing Instructions
To freeze cookie cups, wait until they cool down. Wrap each cookie cup tightly in plastic wrap. Place the wrapped cups in a freezer-safe bag or container. Label the bag with the date. These cookie cups can last up to three months in the freezer. When you’re ready to eat them, take out only what you need.
Reheating Tips
To reheat frozen cookie cups, first, let them thaw in the fridge overnight. Then, preheat your oven to 350°F (175°C). Place the cookie cups on a baking sheet. Bake for about 5-7 minutes. This helps the cookie cups regain their soft texture. Enjoy them warm for the best taste!
FAQs
Can I make these cookie cups ahead of time?
Yes, you can prep these cookie cups ahead. Make the dough a day in advance. Store it in the fridge. When you’re ready, scoop and bake. This saves you time on busy days.
What can I substitute for crushed peppermint?
If you don’t have peppermint, try crushed nuts or toffee bits. You can also use mini marshmallows for a sweet twist. Dark chocolate chips can add richness, too. Get creative with flavors you enjoy.
How do I prevent cookie cups from sticking to the muffin tin?
To stop sticking, grease your muffin tin well. Use butter or a non-stick spray. You can also line the cups with paper liners. This makes for easy removal and adds a festive look.
Can I use other types of chocolate chips?
Absolutely! You can swap in white chocolate or milk chocolate chips. Try adding butterscotch or peanut butter chips for a fun flavor. Mix and match to find your favorite combo.
This blog post covered all you need for making delightful cookie cups. You learned the exact ingredients, step-by-step instructions, and helpful tips. Variations let you customize your treats for any diet or flavor. Storing your cookie cups properly ensures they stay fresh.
Now, with these guidelines, baking delicious cookie cups can be easy and fun. Enjoy experimenting with flavors and impressing friends and family with your tasty creation