Japanese Chicken Katsu Bowls Flavorful and Satisfying Dish

WANT TO SAVE THIS RECIPE?

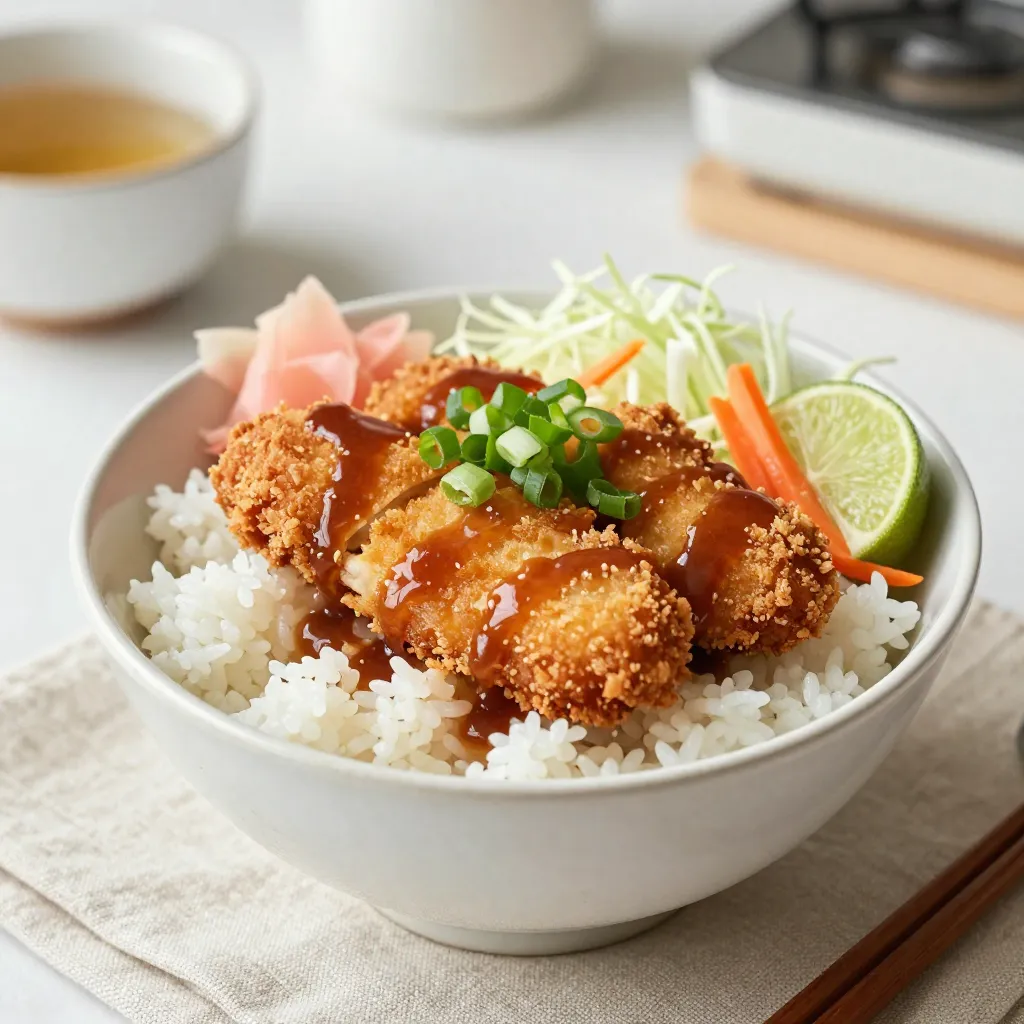
If you’re craving a delicious and satisfying meal, Japanese Chicken Katsu Bowls are a must-try. This dish features tender chicken, crispy breading, and fresh veggies, all topped with a flavorful sauce. In this guide, I’ll share the key ingredients, step-by-step instructions, and tips to perfect this bowl. Whether you’re a kitchen pro or a beginner, you can create a delightful meal that impresses everyone. Ready to dive in?

Why I Love This Recipe

  1. Quick and Easy: This recipe allows you to prepare a delicious meal in just 40 minutes, making it perfect for busy weeknights.
  2. Crispy Texture: The panko breadcrumbs create an irresistibly crispy coating that elevates the chicken katsu experience.
  3. Flavorful Toppings: With the fresh cabbage, carrots, and tonkatsu sauce, this dish is packed with vibrant flavors and textures.
  4. Customizable: You can easily adjust the toppings or substitute ingredients to suit your taste preferences, making this recipe versatile.

Ingredients

Main Ingredients

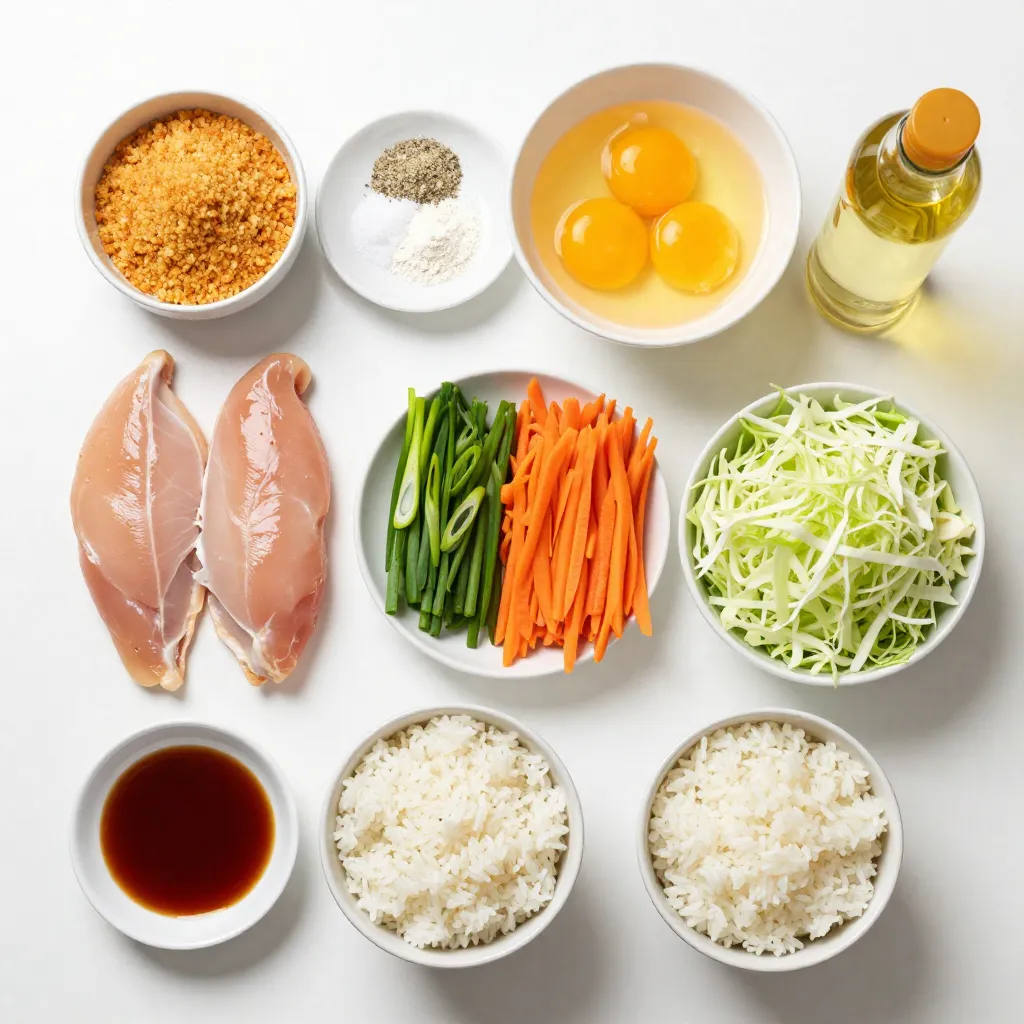
– 2 boneless, skinless chicken breasts

– 1 cup panko breadcrumbs

– 1/2 cup all-purpose flour

– 2 large eggs, beaten

You need fresh chicken breasts for the best taste. Panko breadcrumbs give a nice crunch. All-purpose flour helps the breading stick. The beaten eggs are key for coating.

Seasoning and Accompaniments

– Salt, to taste

– Freshly ground black pepper, to taste

– 1 teaspoon garlic powder

– 1 teaspoon onion powder

– Tonkatsu sauce, for drizzling

– Pickled ginger, for serving

Seasoning makes a big difference. Salt and pepper bring out the chicken’s flavor. Garlic and onion powder add depth. Tonkatsu sauce is sweet and tangy. Pickled ginger offers a zesty bite.

Vegetable and Rice Components

– 2 cups cooked Japanese short-grain rice

– 1 cup finely shredded cabbage

– 1/4 cup shredded carrots

– 1/4 cup sliced scallions

Japanese short-grain rice is sticky and perfect for bowls. Shredded cabbage adds crunch. Carrots bring color and sweetness. Scallions add a fresh, mild onion taste.

Each ingredient enhances the overall dish. When combined, they create a flavorful and satisfying meal.

Step-by-Step Instructions

Preparing the Chicken

1. First, take the chicken breasts and place them between two sheets of plastic wrap.

2. Use a meat mallet or rolling pin to pound the chicken to about 1/2 inch thick. This step helps the chicken cook evenly.

3. Next, season both sides with salt, black pepper, garlic powder, and onion powder. Make sure the seasonings are spread out well.

Breading the Chicken

1. Now, set up your breading station. You need three bowls: one with all-purpose flour, another with beaten eggs, and the last one with panko breadcrumbs.

2. To bread the chicken, first dredge each piece in flour. Shake off extra flour.

3. Dip the chicken into the eggs next, allowing any excess to drip off.

4. Finally, coat the chicken with panko breadcrumbs. Press the breadcrumbs onto the chicken so they stick well.

Cooking the Chicken

1. In a large skillet, heat about 1/2 inch of vegetable oil over medium heat.

2. To check if the oil is ready, drop in a few panko crumbs. If they sizzle, the oil is hot enough.

3. Carefully place the breaded chicken into the skillet. Don’t overcrowd the pan.

4. Fry each piece for about 4-5 minutes on each side. They should be golden brown and cooked through.

5. Once cooked, transfer the chicken to a plate lined with paper towels. This helps drain any excess oil.

Assembling the Bowls

1. While the chicken rests, prepare your serving bowls. Divide the cooked Japanese short-grain rice among them.

2. Top the rice with a good amount of shredded cabbage and a sprinkle of sliced carrots.

3. After the chicken has cooled a bit, slice it into strips.

4. Arrange the chicken over the rice and vegetables in each bowl.

5. Drizzle tonkatsu sauce over the chicken and garnish with sliced scallions. Add pickled ginger on the side for extra flavor.

Tips & Tricks

Cooking Tips

To ensure your chicken katsu is crispy, follow these steps:

– Pound the chicken to an even thickness. This helps it cook evenly.

– Use panko breadcrumbs for the best crunch.

– Fry the chicken in hot oil. The ideal temperature is around 350°F (175°C).

Check the oil’s heat by dropping a few panko crumbs in. If they sizzle, the oil is ready. Avoid overcrowding the pan. This keeps the oil hot and helps the chicken fry evenly.

Presentation Tips

Serving your chicken katsu bowls with chopsticks adds a fun touch. It makes the meal feel more authentic and engaging.

To enhance the dish’s look, add lime slices on the side. The bright color and fresh scent make your bowl more inviting. Plus, a squeeze of lime adds a tasty zing.

Flavor Enhancements

Don’t be afraid to experiment with sauces! Try adding a spicy mayo or a drizzle of sriracha for extra flavor.

You can also customize your vegetable toppings. Add cucumbers, radishes, or avocado for different textures and tastes. These small changes can make a big difference in your bowl.

Pro Tips

  1. Even Thickness: Pound the chicken breasts to an even thickness to ensure they cook uniformly, avoiding dry edges and undercooked centers.
  2. Proper Oil Temperature: Check the oil temperature by dropping panko crumbs in; they should sizzle. This ensures a crispy, golden crust while preventing greasy chicken.
  3. Press the Breadcrumbs: When coating the chicken, press the panko breadcrumbs firmly to ensure they adhere well. This will give you a thicker, crunchier crust.
  4. Rest After Frying: Let the fried chicken rest on paper towels to absorb excess oil. This step helps maintain the crispiness of the coating.

Variations

Alternative Proteins

You can switch up the chicken katsu with different proteins. Using pork katsu is a great option. It has a rich flavor and a juicy texture. Simply follow the same steps as chicken katsu.

If you want a vegetarian option, try using eggplant or tofu. Slice the eggplant into thick rounds, coat it in panko, and fry it until crispy. For tofu, press it to remove moisture, slice it, and then bread and fry it. Both options are tasty and satisfying.

Different Serving Styles

You can serve katsu in many ways. One popular style is katsu curry bowls. Top your rice and vegetables with katsu and pour warm curry sauce over it. This creates a cozy and hearty meal.

Another fun idea is adding a poached egg on top. The runny yolk adds creaminess and richness. Just poach the egg while you fry the katsu. Then, place it on the bowl for a delightful twist.

Flavor Profiles

Want to spice things up? Try making spicy katsu by adding chili powder to the breading mix. This adds a nice kick to each bite.

You can also incorporate sesame or seaweed for more depth. Sprinkle sesame seeds on top before serving. For seaweed, you can use nori sheets, cut into strips. This adds a subtle umami flavor that pairs well with katsu.

Storage Info

Short-term Storage

To store leftover chicken katsu, place it in an airtight container. Keep it in the refrigerator for up to three days. To reheat, use an oven or an air fryer. This helps keep the chicken crispy. Avoid using the microwave, as it can make the katsu soggy.

Long-term Storage

If you want to keep chicken katsu longer, you can freeze it. Wrap each piece tightly in plastic wrap. Then, place them in a freezer bag. This helps prevent freezer burn. You can freeze the katsu for up to three months. When you’re ready to eat, thaw it in the fridge overnight. Reheat in the oven or air fryer until hot.

Shelf Life

Chicken katsu bowls stay fresh in the fridge for about three days. If you freeze them, they can last for up to three months. For the best taste and texture, enjoy them sooner rather than later. Always check for any signs of spoilage before eating.

FAQs

How to make chicken katsu crispy?

To make chicken katsu crispy, follow these tips:

– Use panko breadcrumbs for that light crunch.

– Ensure the oil is hot enough before frying.

– Dredge the chicken in flour, then egg, and finally coat it in panko.

– Press the breadcrumbs firmly onto the chicken to help them stick.

These steps help create a tasty and crispy coating. The hot oil cooks the katsu evenly, making it golden brown.

Can I use other types of breadcrumbs?

Yes, you can use other types of breadcrumbs. Here are some alternatives:

– Regular breadcrumbs: They make a decent substitute.

– Crushed cornflakes: They add a fun crunch.

– Ground nuts: They give a unique flavor and texture.

Each option brings a different taste and texture to the dish. Experiment to find your favorite!

What is tonkatsu sauce?

Tonkatsu sauce is a sweet and tangy sauce that pairs well with katsu. Its key ingredients include:

– Worcestershire sauce

– Ketchup

– Soy sauce

– Sugar

– Vinegar

– Garlic powder

This sauce adds a rich flavor to the crispy chicken. It’s thick and sticky, perfect for drizzling over your katsu.

Is chicken katsu gluten-free?

Chicken katsu can be made gluten-free. Here are some ways to adapt the recipe:

– Use gluten-free breadcrumbs instead of panko.

– Swap all-purpose flour for a gluten-free flour blend.

These changes let you enjoy chicken katsu without gluten. Always check the labels of your ingredients to be safe.

Can I prepare chicken katsu in advance?

Yes, you can prepare chicken katsu in advance. Here are some tips:

– Bread the chicken a few hours ahead and keep it in the fridge.

– Cook the chicken and store it in an airtight container for later.

When you’re ready to serve, just reheat the chicken in the oven for a crispy finish. This makes meal prep easy and quick!

This guide showed you how to make delicious chicken katsu bowls step by step. We covered the main ingredients like chicken, panko, and rice, plus tips to keep your chicken crispy. You can also try different proteins and flavors. Remember, you can store leftovers easily, letting you enjoy this dish later.

Try these ideas, and make your kitchen your favorite place. Happy cookin

- 2 boneless, skinless chicken breasts - 1 cup panko breadcrumbs - 1/2 cup all-purpose flour - 2 large eggs, beaten You need fresh chicken breasts for the best taste. Panko breadcrumbs give a nice crunch. All-purpose flour helps the breading stick. The beaten eggs are key for coating. - Salt, to taste - Freshly ground black pepper, to taste - 1 teaspoon garlic powder - 1 teaspoon onion powder - Tonkatsu sauce, for drizzling - Pickled ginger, for serving Seasoning makes a big difference. Salt and pepper bring out the chicken's flavor. Garlic and onion powder add depth. Tonkatsu sauce is sweet and tangy. Pickled ginger offers a zesty bite. - 2 cups cooked Japanese short-grain rice - 1 cup finely shredded cabbage - 1/4 cup shredded carrots - 1/4 cup sliced scallions Japanese short-grain rice is sticky and perfect for bowls. Shredded cabbage adds crunch. Carrots bring color and sweetness. Scallions add a fresh, mild onion taste. Each ingredient enhances the overall dish. When combined, they create a flavorful and satisfying meal. {{ingredient_image_2}} 1. First, take the chicken breasts and place them between two sheets of plastic wrap. 2. Use a meat mallet or rolling pin to pound the chicken to about 1/2 inch thick. This step helps the chicken cook evenly. 3. Next, season both sides with salt, black pepper, garlic powder, and onion powder. Make sure the seasonings are spread out well. 1. Now, set up your breading station. You need three bowls: one with all-purpose flour, another with beaten eggs, and the last one with panko breadcrumbs. 2. To bread the chicken, first dredge each piece in flour. Shake off extra flour. 3. Dip the chicken into the eggs next, allowing any excess to drip off. 4. Finally, coat the chicken with panko breadcrumbs. Press the breadcrumbs onto the chicken so they stick well. 1. In a large skillet, heat about 1/2 inch of vegetable oil over medium heat. 2. To check if the oil is ready, drop in a few panko crumbs. If they sizzle, the oil is hot enough. 3. Carefully place the breaded chicken into the skillet. Don't overcrowd the pan. 4. Fry each piece for about 4-5 minutes on each side. They should be golden brown and cooked through. 5. Once cooked, transfer the chicken to a plate lined with paper towels. This helps drain any excess oil. 1. While the chicken rests, prepare your serving bowls. Divide the cooked Japanese short-grain rice among them. 2. Top the rice with a good amount of shredded cabbage and a sprinkle of sliced carrots. 3. After the chicken has cooled a bit, slice it into strips. 4. Arrange the chicken over the rice and vegetables in each bowl. 5. Drizzle tonkatsu sauce over the chicken and garnish with sliced scallions. Add pickled ginger on the side for extra flavor. To ensure your chicken katsu is crispy, follow these steps: - Pound the chicken to an even thickness. This helps it cook evenly. - Use panko breadcrumbs for the best crunch. - Fry the chicken in hot oil. The ideal temperature is around 350°F (175°C). Check the oil's heat by dropping a few panko crumbs in. If they sizzle, the oil is ready. Avoid overcrowding the pan. This keeps the oil hot and helps the chicken fry evenly. Serving your chicken katsu bowls with chopsticks adds a fun touch. It makes the meal feel more authentic and engaging. To enhance the dish's look, add lime slices on the side. The bright color and fresh scent make your bowl more inviting. Plus, a squeeze of lime adds a tasty zing. Don’t be afraid to experiment with sauces! Try adding a spicy mayo or a drizzle of sriracha for extra flavor. You can also customize your vegetable toppings. Add cucumbers, radishes, or avocado for different textures and tastes. These small changes can make a big difference in your bowl. Pro Tips Even Thickness: Pound the chicken breasts to an even thickness to ensure they cook uniformly, avoiding dry edges and undercooked centers. Proper Oil Temperature: Check the oil temperature by dropping panko crumbs in; they should sizzle. This ensures a crispy, golden crust while preventing greasy chicken. Press the Breadcrumbs: When coating the chicken, press the panko breadcrumbs firmly to ensure they adhere well. This will give you a thicker, crunchier crust. Rest After Frying: Let the fried chicken rest on paper towels to absorb excess oil. This step helps maintain the crispiness of the coating. {{image_4}} You can switch up the chicken katsu with different proteins. Using pork katsu is a great option. It has a rich flavor and a juicy texture. Simply follow the same steps as chicken katsu. If you want a vegetarian option, try using eggplant or tofu. Slice the eggplant into thick rounds, coat it in panko, and fry it until crispy. For tofu, press it to remove moisture, slice it, and then bread and fry it. Both options are tasty and satisfying. You can serve katsu in many ways. One popular style is katsu curry bowls. Top your rice and vegetables with katsu and pour warm curry sauce over it. This creates a cozy and hearty meal. Another fun idea is adding a poached egg on top. The runny yolk adds creaminess and richness. Just poach the egg while you fry the katsu. Then, place it on the bowl for a delightful twist. Want to spice things up? Try making spicy katsu by adding chili powder to the breading mix. This adds a nice kick to each bite. You can also incorporate sesame or seaweed for more depth. Sprinkle sesame seeds on top before serving. For seaweed, you can use nori sheets, cut into strips. This adds a subtle umami flavor that pairs well with katsu. To store leftover chicken katsu, place it in an airtight container. Keep it in the refrigerator for up to three days. To reheat, use an oven or an air fryer. This helps keep the chicken crispy. Avoid using the microwave, as it can make the katsu soggy. If you want to keep chicken katsu longer, you can freeze it. Wrap each piece tightly in plastic wrap. Then, place them in a freezer bag. This helps prevent freezer burn. You can freeze the katsu for up to three months. When you're ready to eat, thaw it in the fridge overnight. Reheat in the oven or air fryer until hot. Chicken katsu bowls stay fresh in the fridge for about three days. If you freeze them, they can last for up to three months. For the best taste and texture, enjoy them sooner rather than later. Always check for any signs of spoilage before eating. To make chicken katsu crispy, follow these tips: - Use panko breadcrumbs for that light crunch. - Ensure the oil is hot enough before frying. - Dredge the chicken in flour, then egg, and finally coat it in panko. - Press the breadcrumbs firmly onto the chicken to help them stick. These steps help create a tasty and crispy coating. The hot oil cooks the katsu evenly, making it golden brown. Yes, you can use other types of breadcrumbs. Here are some alternatives: - Regular breadcrumbs: They make a decent substitute. - Crushed cornflakes: They add a fun crunch. - Ground nuts: They give a unique flavor and texture. Each option brings a different taste and texture to the dish. Experiment to find your favorite! Tonkatsu sauce is a sweet and tangy sauce that pairs well with katsu. Its key ingredients include: - Worcestershire sauce - Ketchup - Soy sauce - Sugar - Vinegar - Garlic powder This sauce adds a rich flavor to the crispy chicken. It's thick and sticky, perfect for drizzling over your katsu. Chicken katsu can be made gluten-free. Here are some ways to adapt the recipe: - Use gluten-free breadcrumbs instead of panko. - Swap all-purpose flour for a gluten-free flour blend. These changes let you enjoy chicken katsu without gluten. Always check the labels of your ingredients to be safe. Yes, you can prepare chicken katsu in advance. Here are some tips: - Bread the chicken a few hours ahead and keep it in the fridge. - Cook the chicken and store it in an airtight container for later. When you're ready to serve, just reheat the chicken in the oven for a crispy finish. This makes meal prep easy and quick! This guide showed you how to make delicious chicken katsu bowls step by step. We covered the main ingredients like chicken, panko, and rice, plus tips to keep your chicken crispy. You can also try different proteins and flavors. Remember, you can store leftovers easily, letting you enjoy this dish later. Try these ideas, and make your kitchen your favorite place. Happy cooking!

Crispy Chicken Katsu Bowls

Delicious crispy chicken katsu served over rice with fresh vegetables and tonkatsu sauce.
Prep Time 20 minutes
Cook Time 20 minutes
Total Time 40 minutes
Course Main Course
Cuisine Japanese
Servings 2
Calories 600 kcal

Ingredients
  

  • 2 pieces boneless, skinless chicken breasts
  • 1 cup panko breadcrumbs
  • 1 2 cup all-purpose flour
  • 2 large eggs, beaten
  • to taste Salt
  • to taste Freshly ground black pepper
  • 1 teaspoon garlic powder
  • 1 teaspoon onion powder
  • for frying oil Vegetable oil
  • 2 cups cooked Japanese short-grain rice
  • 1 cup finely shredded cabbage
  • 1 4 cup shredded carrots
  • 1 4 cup sliced scallions
  • for drizzling Tonkatsu sauce
  • for serving Pickled ginger

Instructions
 

  • Start with the chicken preparation. Place each chicken breast between two sheets of plastic wrap and gently pound them to an even thickness of about 1/2 inch using a meat mallet or rolling pin.
  • Season both sides of the chicken breasts generously with salt, freshly ground black pepper, garlic powder, and onion powder.
  • Create a breading station by setting out three separate bowls: fill the first bowl with all-purpose flour, the second bowl with the beaten eggs, and the third bowl with panko breadcrumbs.
  • Take each seasoned chicken breast and first dredge it in flour, shaking off any excess. Next, dip it into the beaten eggs, allowing the excess to drip off, and then coat it thoroughly with panko breadcrumbs.
  • In a large skillet, heat about 1/2 inch of vegetable oil over medium heat. To check if the oil is ready, drop a few panko crumbs into the oil; if they sizzle, the oil is hot enough.
  • Carefully add the breaded chicken breasts to the skillet, ensuring not to overcrowd the pan. Fry the chicken for approximately 4-5 minutes on each side or until they are golden brown and cooked through completely.
  • Once cooked, transfer the chicken to a plate lined with paper towels to absorb any excess oil.
  • While the chicken is resting, prepare the serving bowls: divide the cooked Japanese short-grain rice among individual bowls. Top the rice with a generous amount of shredded cabbage and a sprinkle of sliced carrots.
  • After the chicken has cooled slightly, slice it into strips and arrange it artistically over the rice and vegetables in each bowl.
  • Finish the dish by drizzling tonkatsu sauce over the chicken katsu and garnishing with sliced scallions. Add a few pieces of pickled ginger on the side for an extra zing.

Notes

Serve the bowls with a set of chopsticks and a small side of extra tonkatsu sauce for dipping. Adding a slice of lime on the side enhances the visual appeal and provides a refreshing burst of flavor.
Keyword chicken katsu, Japanese cuisine, rice bowls

WANT TO SAVE THIS RECIPE?

Leave a Comment

Recipe Rating