Are you ready to score big at your next game day gathering? These Loaded Mac and Cheese Football Cups are the perfect treat to impress your friends and family. With creamy cheese, crispy bacon, and tasty toppings, they deliver flavor and fun in every bite. In this post, I’ll show you how to make these delicious snacks step by step. Let’s dive into this easy, crowd-pleasing recipe!
Ingredients
Main Ingredients for Loaded Mac and Cheese Football Cups
– 2 cups elbow macaroni
– 2 tablespoons unsalted butter
– 2 cups whole milk
These main ingredients form the base of our loaded mac and cheese. The elbow macaroni gives a nice bite. The butter adds richness, while whole milk makes the sauce creamy.
Flavor Additions
– 2 cups shredded sharp cheddar cheese
– 1 cup cooked chicken, shredded
– 1/2 cup cooked bacon bits (optional)
For flavor, I love using sharp cheddar cheese. It gives a strong, tasty kick. Adding shredded chicken makes it filling, while bacon bits add a smoky crunch. If you don’t like bacon, you can skip it.
Garnishes and Extras
– 1/4 cup green onions, finely chopped
– 1 teaspoon garlic powder
– Optional toppings: diced tomatoes, jalapeños
Garnishes bring extra color and taste. Green onions add freshness, and garlic powder boosts flavor. You can also sprinkle on diced tomatoes or jalapeños for some spice. These extras make each bite exciting.
Step-by-Step Instructions
Preparing Macaroni and Cheese Base
1. Cooking elbow macaroni: Start by boiling water in a large pot. Once it’s boiling, add 2 cups of elbow macaroni. Cook it according to the package directions. You want it to be al dente, so check it a minute early. After cooking, drain the macaroni in a colander and set it aside.
2. Creating the cheese sauce: In the same pot, lower the heat to medium. Add 2 tablespoons of unsalted butter. Let it melt completely. Then, whisk in 2 tablespoons of all-purpose flour. Stir this mix for about a minute. You want to cook it until it bubbles a bit. This helps to remove the raw flour taste. Now, slowly pour in 2 cups of whole milk while whisking. Keep cooking for 2-3 minutes. You want the mix to thicken into a creamy sauce. Stir in 2 cups of shredded sharp cheddar cheese, 1 teaspoon of garlic powder, salt, and pepper. Keep stirring until the cheese melts and the sauce is smooth. Finally, gently fold in the drained macaroni, 1 cup of shredded chicken, and 1/2 cup of cooked bacon bits if you’re using them. Add half of the chopped green onions too.
Assembling the Cups
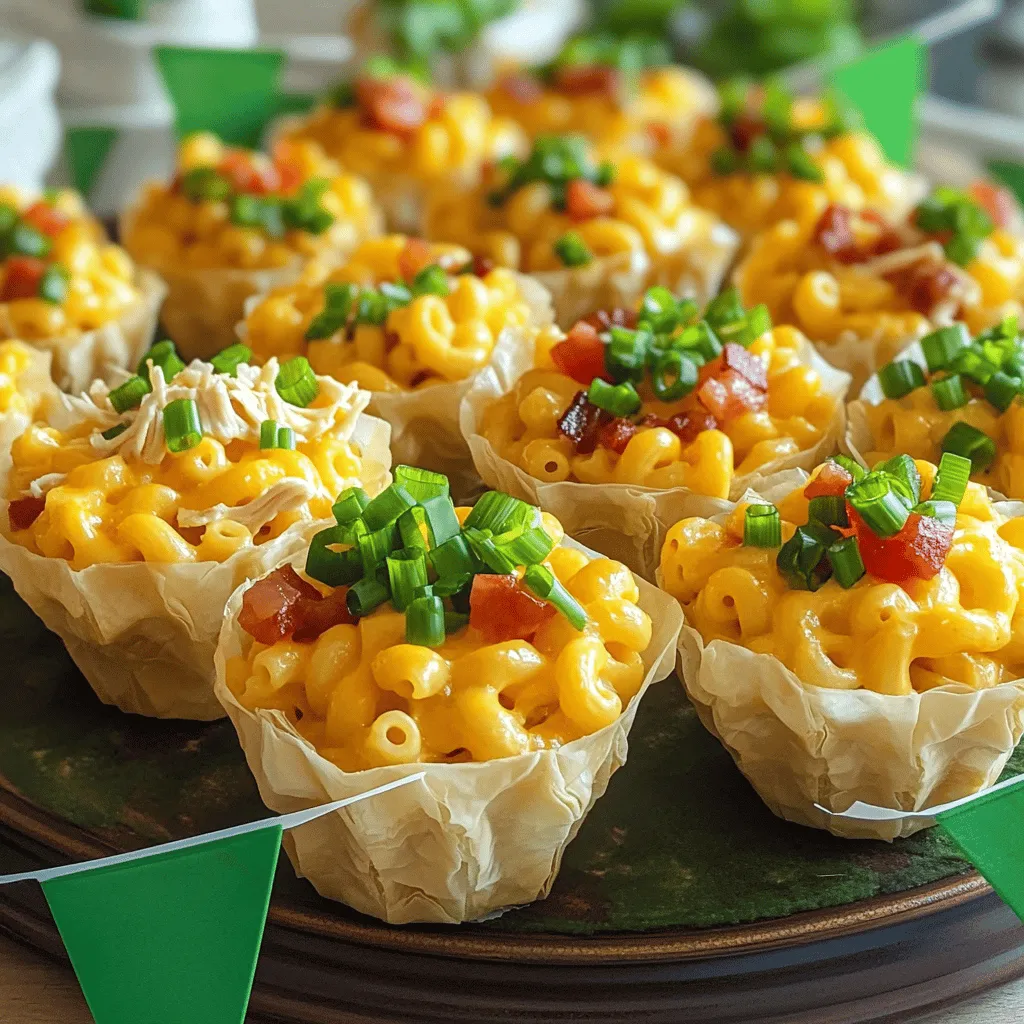
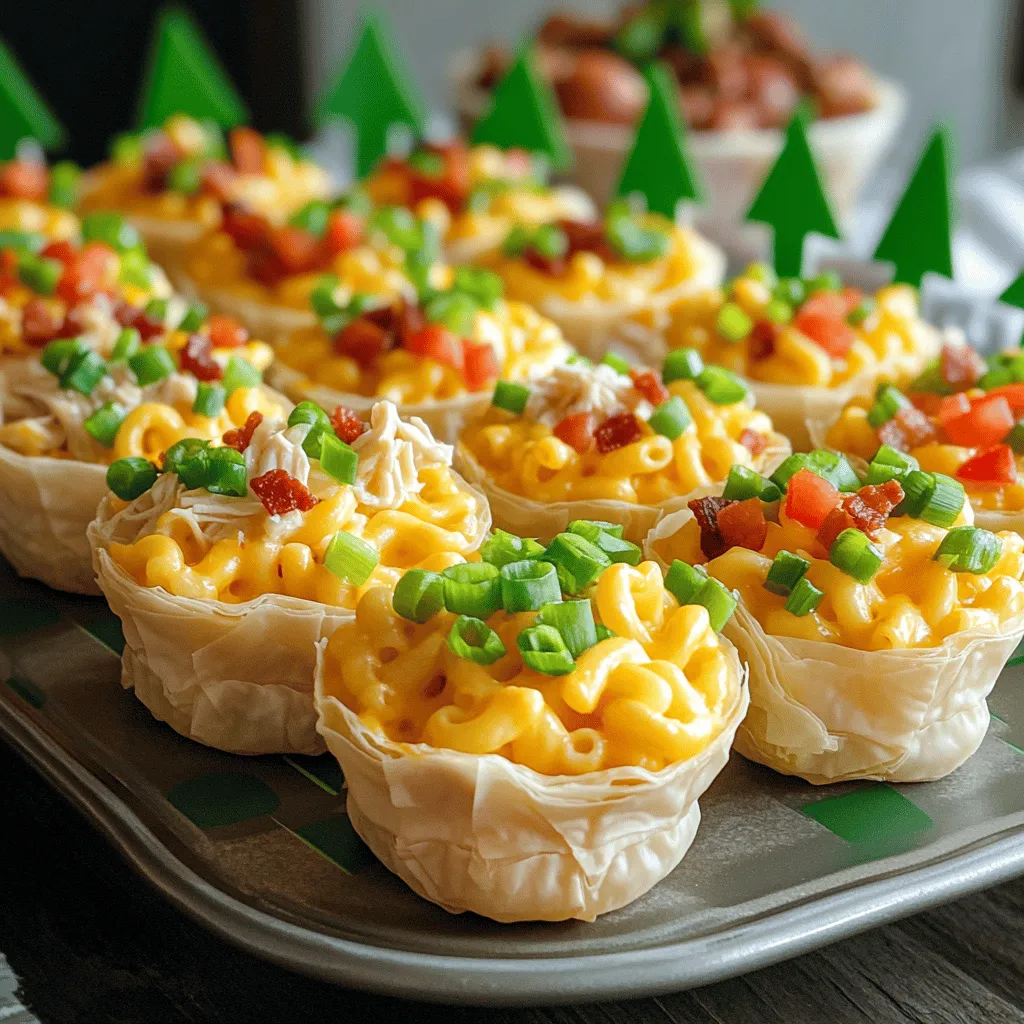
1. Filling mini phyllo pastry cups: Grab your package of mini phyllo pastry cups. Using a spoon, carefully fill each cup with the macaroni and cheese mix. Make sure to pack it a little to fit well.
2. Packing technique for best results: Packing is key! Press down gently so the mixture holds together. This helps each cup stay intact when baked and makes them easier to serve.
Baking Instructions
1. Preheating the oven: Preheat your oven to 350°F (175°C). This step is important for even cooking.
2. Baking times and indicators for doneness: Place the filled cups on a baking sheet. Bake them for 15-20 minutes. You’ll know they are done when the tops are golden brown and bubbling. Once they are ready, carefully remove them from the oven. Let them cool for a few minutes before serving.
Tips & Tricks
Achieving the Perfect Cheese Sauce
To make a smooth and creamy cheese sauce, start with fresh ingredients. Use high-quality cheese, as it melts better. Warm your milk before adding it to the butter and flour mixture. This helps create a silky sauce. Stir constantly as you add cheese to avoid clumps. Never rush this step; patience is key.
Common pitfalls with melting cheese include using low-fat options. They often don’t melt well. Also, avoid overheating the cheese. This can make it grainy. If your sauce gets too thick, add a splash of milk to loosen it up.
Presentation Tips
For maximum appeal, arrange your football cups on a large platter. Create a fun football field look with fresh herbs. You can add little flags to enhance the game day vibe. Stack the cups in groups of three for a great look.
Garnishing adds flair. Consider topping with extra cheese or chopped green onions. Diced tomatoes and jalapeños also bring color and flavor. Choose fun toppings to make each cup unique.
Making Ahead and Serving Suggestions
You can prepare these cups in advance. Make your macaroni and cheese and fill the cups. Store them in the fridge until game day. Just bake them when you’re ready to serve. This saves time and stress.
For ideal pairings, serve with crispy potato chips or soft pretzels. A fresh veggie platter adds a nice crunch. You can also offer dips like ranch or salsa. These snacks complement the creamy mac and cheese perfectly.
Variations
Flavor Customization
You can change the flavor of your Loaded Mac and Cheese Football Cups easily. Here are some great ideas:
– Different cheese options: Try using gouda, mozzarella, or pepper jack cheese. Each cheese adds its unique taste and texture. Mixing cheeses is also a fun way to play with flavors.
– Adding vegetables to the mix: You can sneak in some veggies for added nutrition. Try spinach, bell peppers, or broccoli. They blend well with the cheese and add color to your cups.
Dietary Adjustments
If you have dietary needs, you can still enjoy these tasty cups. Here’s how:
– Making it gluten-free: Use gluten-free pasta and a gluten-free flour mix in your cheese sauce. This way, you can enjoy the same creamy goodness without the gluten.
– Vegetarian alternatives: Skip the chicken and bacon if you want a veggie version. You can add more veggies or even some lentils for protein. This keeps it hearty and satisfying.
Theme Variations
You can adapt these cups for any sports event or holiday. Here are a few fun ideas:
– How to adapt for different sports events: Change the toppings to match your favorite team colors. Use blue cheese for a blue team or add red peppers for a red team.
– Holiday-themed versions: For Halloween, use pumpkin puree in your cheese sauce. In winter, sprinkle some nutmeg on top for a festive twist. This makes your game day fun and seasonal!
Try these variations to make your Loaded Mac and Cheese Football Cups even more exciting.
Storage Info
Proper Storage Techniques
To keep your loaded mac and cheese cups fresh, follow these tips:
– Store leftovers in airtight containers. This keeps them fresh longer.
– Avoid using the original packaging. It may not seal tightly.
– Let the cups cool completely before storing them. This prevents moisture buildup.
Reheating Instructions
Reheating your mac and cheese cups can be easy. Here are some methods:
– Use the oven for the best texture. Preheat it to 350°F (175°C) and bake for about 10-15 minutes.
– You can also use the microwave. Place a cup on a plate, cover it with a damp paper towel, and heat for 1-2 minutes.
– To avoid sogginess, do not overheat. Check them often as they warm.
Freezing for Later
Freezing your loaded cups is a great option for later. Here’s how:
– Place the cooled cups in a single layer on a tray. Freeze them for a couple of hours.
– Once frozen, move them to a freezer bag. This saves space and keeps them fresh.
– For thawing, move the cups to the fridge overnight. Reheat them in the oven for the best results.
You can enjoy these tasty treats anytime!
FAQs
Can you use a different type of pasta?
Yes, you can use other pasta shapes. Try using shells, penne, or fusilli. These shapes hold cheese sauce well. They also add fun textures to your dish. Just remember to cook them until they are al dente. You want them firm enough to fill the cups without breaking.
How long do the football cups last in the fridge?
The football cups stay fresh for about three to four days in the fridge. Store them in an airtight container to keep them from drying out. Before serving, reheat them in the oven. This helps restore their crisp texture and cheesy goodness.
Can I make these mac and cheese cups gluten-free?
Yes, you can make these cups gluten-free. Use gluten-free elbow macaroni instead of regular pasta. For the cheese sauce, substitute all-purpose flour with gluten-free flour. This keeps the sauce thick and creamy. Always check labels for any hidden gluten ingredients.
What’s the best way to serve these on game day?
Serve these cups on a large platter for a fun display. You can arrange them in rows or create a football field design. Use fresh herbs or decorative flags to enhance the look. Place some extra toppings nearby for guests to customize their cups. This makes it easy and fun for everyone.
How can I make the cups spicier?
To add heat, mix in some diced jalapeños or hot sauce into the cheese sauce. You can also sprinkle some cayenne pepper for a kick. Adding pepper jack cheese instead of cheddar gives a nice spicy flavor too. Adjust the spice level based on your taste. Enjoy experimenting with flavors!
Loaded mac and cheese football cups are fun and tasty for any game day. We talked about the main ingredients, how to prepare them, and tips to make them shine. Remember, you can customize the flavors and make them fit your crowd’s needs. Whether you want spicy or gluten-free options, there’s a version for everyone. Get ready to impress your friends and family with this easy recipe. Enjoy the game and your delicious snacks!