No Bake Oreo Cheesecake Simple and Tasty Delight

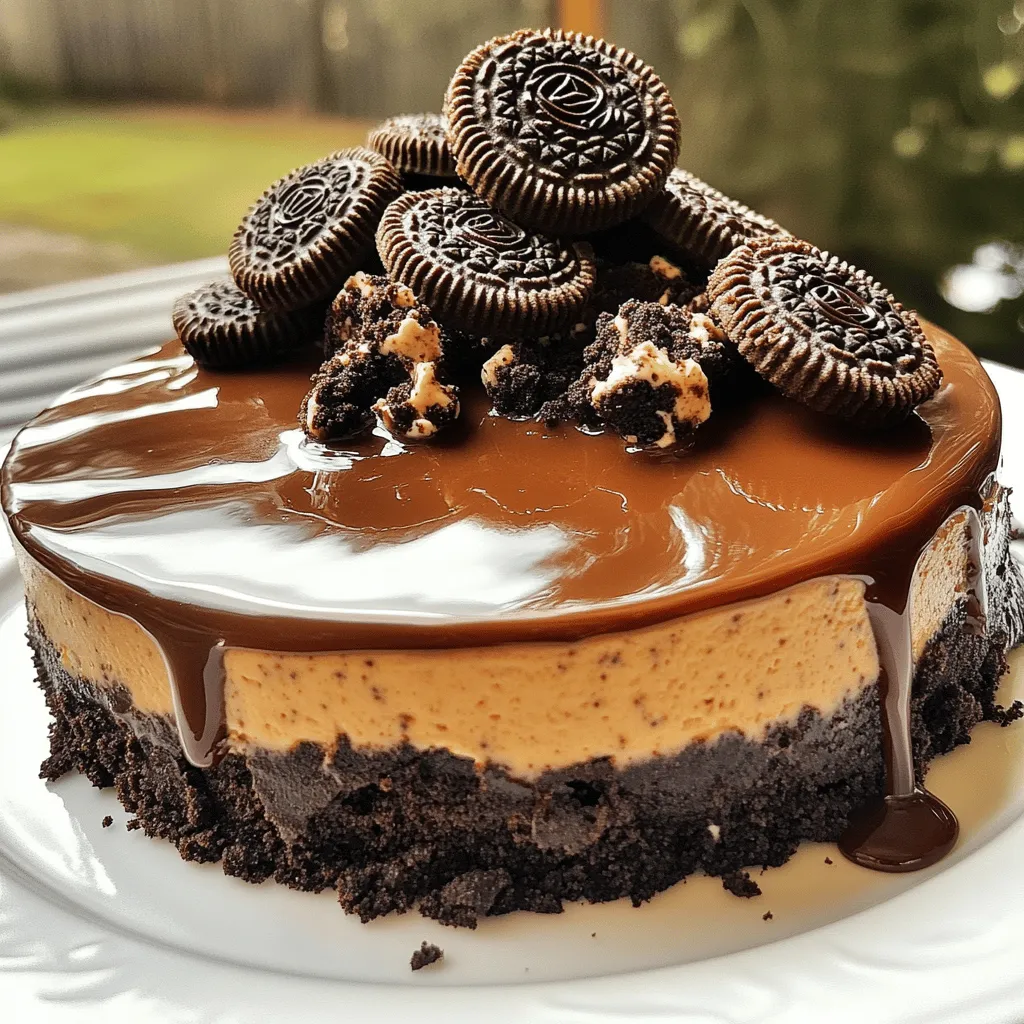
Craving a dessert that’s easy to make and absolutely delicious? Look no further! This No Bake Oreo Cheesecake is a simple and tasty delight that everyone loves. With just a handful of ingredients and no oven required, you can create a creamy, dreamy treat that stands out at any gathering. Get ready to impress your friends and family with a dessert they won’t forget! Let’s dive into the recipe!

Ingredients

Main Ingredients

– 24 Oreo cookies (for crust)

– 5 tablespoons unsalted butter (for crust)

– 16 oz cream cheese (for filling)

– 1 cup powdered sugar (for filling)

– 1 teaspoon vanilla extract (for filling)

– 1 1/2 cups heavy whipping cream (for filling)

– 12 Oreo cookies (chopped for filling)

– Additional Oreos (for topping)

To make the best no-bake Oreo cheesecake, you need simple, tasty ingredients. First, the Oreo cookies create a crunchy crust. You will crush 24 cookies and mix them with melted butter. This mix gives your cheesecake a yummy base.

Next, for the creamy filling, use 16 ounces of cream cheese. Make sure it is soft. This helps it mix well. Add in one cup of powdered sugar for sweetness. A teaspoon of vanilla extract adds great flavor.

The next star is heavy whipping cream. You will need one and a half cups. This is what makes the filling light and fluffy. Don’t forget to chop 12 more Oreo cookies to mix in. These bits provide a nice surprise in each bite.

Lastly, keep some extra Oreos to sprinkle on top when serving. This adds a fun touch and looks great on the plate.

You can find the full recipe for this delicious dessert to guide you through every step.

Step-by-Step Instructions

Preparing the Crust

To start, take 24 Oreo cookies and finely crush them. You can place them in a ziplock bag and use a rolling pin. In a bowl, mix the crushed cookies with 5 tablespoons of melted butter. The mixture should feel like damp sand. Next, press this mixture firmly into the bottom of a 9-inch springform pan. Make sure it’s packed evenly. This creates a strong base for our cheesecake. Place the crust in the freezer while you work on the filling. This will help it firm up.

Making the Filling

In a big bowl, beat 16 oz of softened cream cheese with an electric mixer. Mix until it’s smooth and creamy. Slowly add in 1 cup of powdered sugar, mixing as you go. Then, pour in 1 teaspoon of pure vanilla extract. This adds great flavor to the filling. In another clean bowl, whip 1 1/2 cups of heavy whipping cream. Keep mixing until stiff peaks form. Be careful not to overwhip it, or it can turn grainy.

Assembling the Cheesecake

Now, gently fold the whipped cream into the cream cheese mixture. Use a spatula and be careful to keep the air in. Once the mixtures are combined, fold in 12 roughly chopped Oreo cookies. This adds nice chunks of cookie throughout the cheesecake. Pour this filling over the prepared crust. Use the spatula to smooth the top evenly. Cover the cheesecake with plastic wrap and refrigerate it for at least 4 hours, or better yet, overnight. This lets the flavors blend and set well.

For the full recipe, check the details above.

Tips & Tricks

Success Tips

– Use room temperature cream cheese for a smooth filling.

– Always whip the cream in a clean bowl.

– Be careful not to overwhip the cream; it should be light and fluffy.

Serving Suggestions

– Drizzle chocolate sauce over each slice for extra flavor.

– Use chilled plates to keep your cheesecake cool and tasty.

Common Mistakes to Avoid

– Press the crust firmly; a loose crust will fall apart.

– Do not overmix the filling; keep it creamy, not runny.

Variations

Flavor Ideas

You can easily change the flavor of this cheesecake. Adding mint extract gives a fresh twist to the classic Oreo taste. Just use about half a teaspoon for the right balance. If you want to make it gluten-free, replace regular Oreos with gluten-free Oreos. You still get that great cookie crunch without worry.

Toppings Options

Toppings can make your cheesecake even more fun. Try using different cookies on top, like chocolate chip cookies, for a new flavor combo. You can also add fresh fruit such as strawberries or blueberries. Nuts like chopped pecans or walnuts add a satisfying crunch, making each bite interesting.

Layering Options

Layering makes your cheesecake look amazing and taste even better. Alternate layers of the cheesecake filling with crushed Oreos. This not only adds texture but also enhances the flavor with each slice. It’s a simple way to make your dessert stand out at any gathering.

For the full recipe, check out the Full Recipe section!

Storage Info

Storing the Cheesecake

To keep your cheesecake fresh, store it in the refrigerator. Place it in an airtight container. This helps prevent any weird smells or flavors from other foods. If you don’t have a container, wrap it tightly with plastic wrap.

Shelf Life

Enjoy your cheesecake within 5-7 days for the best taste. If you need to store it longer, you can freeze it. Freezing keeps it safe for about three months. Just make sure it’s wrapped well to avoid freezer burn.

Thawing Instructions

When you’re ready to serve a frozen cheesecake, take it out of the freezer. Place it in the fridge for several hours or overnight to thaw. This slow thawing helps maintain the texture. Avoid microwaving it, as that can make it soggy.

FAQs

Can I use low-fat cream cheese?

Yes, you can use low-fat cream cheese. However, it may change the texture. The cheesecake might be less creamy and a bit denser. If you want a lighter feel, mix it with whipped cream. This can help keep some fluffiness in your dessert.

How long does it take to set?

The cheesecake needs at least 4 hours to set in the fridge. For the best results, let it chill overnight. This extra time helps the flavors blend better. The longer it sits, the more delicious it gets!

Can I make it a day ahead?

Absolutely! Making it a day ahead is a great idea. It allows the flavors to deepen and mix well. Plus, it saves you time on the day you plan to serve it. Just be sure to cover it tightly with plastic wrap.

Is it possible to make mini cheesecakes?

Yes, you can make mini cheesecakes! Just use a muffin tin instead of a springform pan. Line it with cupcake liners for easy removal. Divide the crust and filling into the cups, adjusting the time to chill. Mini versions are fun and perfect for parties.

How to get a clean slice when serving?

To cut clean slices, use a sharp knife. Dip the knife in hot water first, then wipe it dry. This warms the blade and helps cut through the cheesecake smoothly. Repeat this process between each slice for the best results. Enjoy your No Bake Oreo Cheesecake!

You learned how to make a delicious Oreo cheesecake from scratch. Starting with a simple crust, you mixed butter and crushed cookies. Then, you created a creamy filling with cream cheese, powdered sugar, and whipped cream.

Be sure to follow the tips to avoid common mistakes. Customize the cheesecake with flavors and toppings you love. Store leftovers properly to keep them fresh.

You now have the tools to impress friends and family with your cheesecake skills! Enjoy your sweet creations!

- 24 Oreo cookies (for crust) - 5 tablespoons unsalted butter (for crust) - 16 oz cream cheese (for filling) - 1 cup powdered sugar (for filling) - 1 teaspoon vanilla extract (for filling) - 1 1/2 cups heavy whipping cream (for filling) - 12 Oreo cookies (chopped for filling) - Additional Oreos (for topping) To make the best no-bake Oreo cheesecake, you need simple, tasty ingredients. First, the Oreo cookies create a crunchy crust. You will crush 24 cookies and mix them with melted butter. This mix gives your cheesecake a yummy base. Next, for the creamy filling, use 16 ounces of cream cheese. Make sure it is soft. This helps it mix well. Add in one cup of powdered sugar for sweetness. A teaspoon of vanilla extract adds great flavor. The next star is heavy whipping cream. You will need one and a half cups. This is what makes the filling light and fluffy. Don’t forget to chop 12 more Oreo cookies to mix in. These bits provide a nice surprise in each bite. Lastly, keep some extra Oreos to sprinkle on top when serving. This adds a fun touch and looks great on the plate. You can find the full recipe for this delicious dessert to guide you through every step. To start, take 24 Oreo cookies and finely crush them. You can place them in a ziplock bag and use a rolling pin. In a bowl, mix the crushed cookies with 5 tablespoons of melted butter. The mixture should feel like damp sand. Next, press this mixture firmly into the bottom of a 9-inch springform pan. Make sure it’s packed evenly. This creates a strong base for our cheesecake. Place the crust in the freezer while you work on the filling. This will help it firm up. In a big bowl, beat 16 oz of softened cream cheese with an electric mixer. Mix until it’s smooth and creamy. Slowly add in 1 cup of powdered sugar, mixing as you go. Then, pour in 1 teaspoon of pure vanilla extract. This adds great flavor to the filling. In another clean bowl, whip 1 1/2 cups of heavy whipping cream. Keep mixing until stiff peaks form. Be careful not to overwhip it, or it can turn grainy. Now, gently fold the whipped cream into the cream cheese mixture. Use a spatula and be careful to keep the air in. Once the mixtures are combined, fold in 12 roughly chopped Oreo cookies. This adds nice chunks of cookie throughout the cheesecake. Pour this filling over the prepared crust. Use the spatula to smooth the top evenly. Cover the cheesecake with plastic wrap and refrigerate it for at least 4 hours, or better yet, overnight. This lets the flavors blend and set well. For the full recipe, check the details above. - Use room temperature cream cheese for a smooth filling. - Always whip the cream in a clean bowl. - Be careful not to overwhip the cream; it should be light and fluffy. - Drizzle chocolate sauce over each slice for extra flavor. - Use chilled plates to keep your cheesecake cool and tasty. - Press the crust firmly; a loose crust will fall apart. - Do not overmix the filling; keep it creamy, not runny. {{image_4}} You can easily change the flavor of this cheesecake. Adding mint extract gives a fresh twist to the classic Oreo taste. Just use about half a teaspoon for the right balance. If you want to make it gluten-free, replace regular Oreos with gluten-free Oreos. You still get that great cookie crunch without worry. Toppings can make your cheesecake even more fun. Try using different cookies on top, like chocolate chip cookies, for a new flavor combo. You can also add fresh fruit such as strawberries or blueberries. Nuts like chopped pecans or walnuts add a satisfying crunch, making each bite interesting. Layering makes your cheesecake look amazing and taste even better. Alternate layers of the cheesecake filling with crushed Oreos. This not only adds texture but also enhances the flavor with each slice. It’s a simple way to make your dessert stand out at any gathering. For the full recipe, check out the Full Recipe section! To keep your cheesecake fresh, store it in the refrigerator. Place it in an airtight container. This helps prevent any weird smells or flavors from other foods. If you don’t have a container, wrap it tightly with plastic wrap. Enjoy your cheesecake within 5-7 days for the best taste. If you need to store it longer, you can freeze it. Freezing keeps it safe for about three months. Just make sure it’s wrapped well to avoid freezer burn. When you’re ready to serve a frozen cheesecake, take it out of the freezer. Place it in the fridge for several hours or overnight to thaw. This slow thawing helps maintain the texture. Avoid microwaving it, as that can make it soggy. Yes, you can use low-fat cream cheese. However, it may change the texture. The cheesecake might be less creamy and a bit denser. If you want a lighter feel, mix it with whipped cream. This can help keep some fluffiness in your dessert. The cheesecake needs at least 4 hours to set in the fridge. For the best results, let it chill overnight. This extra time helps the flavors blend better. The longer it sits, the more delicious it gets! Absolutely! Making it a day ahead is a great idea. It allows the flavors to deepen and mix well. Plus, it saves you time on the day you plan to serve it. Just be sure to cover it tightly with plastic wrap. Yes, you can make mini cheesecakes! Just use a muffin tin instead of a springform pan. Line it with cupcake liners for easy removal. Divide the crust and filling into the cups, adjusting the time to chill. Mini versions are fun and perfect for parties. To cut clean slices, use a sharp knife. Dip the knife in hot water first, then wipe it dry. This warms the blade and helps cut through the cheesecake smoothly. Repeat this process between each slice for the best results. Enjoy your No Bake Oreo Cheesecake! You learned how to make a delicious Oreo cheesecake from scratch. Starting with a simple crust, you mixed butter and crushed cookies. Then, you created a creamy filling with cream cheese, powdered sugar, and whipped cream. Be sure to follow the tips to avoid common mistakes. Customize the cheesecake with flavors and toppings you love. Store leftovers properly to keep them fresh. You now have the tools to impress friends and family with your cheesecake skills! Enjoy your sweet creations!

No Bake Oreo Cheesecake

Indulge in the ultimate Oreo Bliss No-Bake Cheesecake that’s easy to make and ridiculously delicious! This creamy dessert features a crunchy Oreo crust and a luscious filling packed with cookie goodness. Perfect for any occasion, your friends and family will be begging for seconds. Click through to discover step-by-step instructions and presentation tips that will have everyone impressed. Treat yourself to this delightful cheesecake today!

Ingredients
  

24 Oreo cookies, finely crushed

5 tablespoons unsalted butter, melted

16 oz cream cheese, softened at room temperature

1 cup powdered sugar

1 teaspoon pure vanilla extract

1 1/2 cups heavy whipping cream

12 Oreo cookies, roughly chopped for the filling

Additional Oreo cookies for topping

Instructions
 

Prepare the Crust: In a mixing bowl, combine the finely crushed Oreo cookies with the melted butter. Use a fork or your hands to mix until the texture resembles damp sand.

    Form the Crust: Press this mixture evenly into the bottom of a 9-inch springform pan, ensuring it is firmly packed to create a solid crust. Place the crust in the freezer while you prepare the filling to help it firm up.

      Mix the Filling: In a large mixing bowl, use an electric mixer to beat the softened cream cheese until it is smooth and creamy without lumps. Gradually add the powdered sugar, beating continuously until it is fully combined and the mixture is silky.

        Add Flavor: Pour in the vanilla extract, mixing until everything is well blended.

          Whip the Cream: In a separate clean bowl, whip the heavy whipping cream using an electric mixer until stiff peaks form. This may take several minutes; ensure you do not overwhip.

            Combine Mixtures: Gently fold the whipped cream into the cream cheese mixture using a spatula. Be careful to fold, not stir, to maintain the light and airy texture, until no visible streaks remain.

              Incorporate Oreos: Fold in the roughly chopped Oreo cookies, mixing them evenly throughout the cheesecake batter.

                Assemble the Cheesecake: Carefully pour the cheesecake filling over the prepared crust, using a spatula to smooth the top to ensure an even finish.

                  Chill: Cover the cheesecake with plastic wrap and refrigerate it for at least 4 hours, or preferably overnight, to allow it to fully set and develop flavors.

                    Serve: Once firm, gently remove the sides of the springform pan. Before serving, top with crushed or whole extra Oreo cookies for a delightful garnish.

                      Prep Time: 20 minutes | Total Time: 4 hours 20 minutes | Servings: 8-10

                        - Presentation Tips: For an elegant touch, serve each slice on a chilled plate accompanied by a drizzle of chocolate sauce and a dollop of freshly whipped cream, enhancing the treat's indulgence.

                          Leave a Comment

                          Recipe Rating