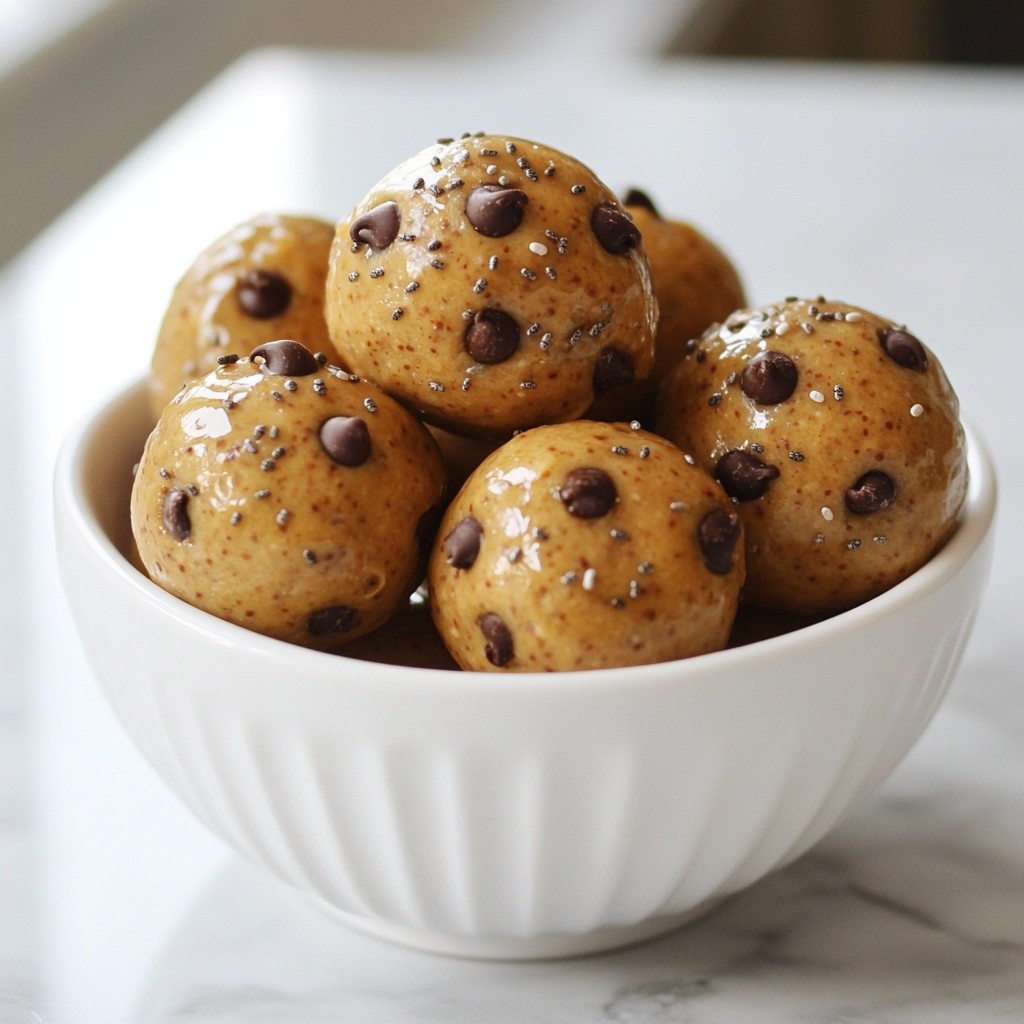
Are you ready to whip up a treat that's easy and oh-so-delicious? These No-Bake Peanut Butter Bars are the perfect snack for anyone! With simple ingredients like natural peanut butter, rolled oats, and dark chocolate, you'll satisfy your cravings without turning on the oven. In just a few easy steps, you'll create a tasty treat that everyone will love. Let's dive into this quick and fun recipe!
Why I Love This Recipe
- Deliciously Nutty: The combination of natural peanut butter and dark chocolate creates a rich, nutty flavor that’s incredibly satisfying.
- Easy to Make: With only a few simple ingredients and minimal prep time, these bars are quick to whip up for any occasion.
- Healthy Ingredients: Packed with wholesome oats and almond flour, these bars offer a nutritious snack option without compromising on taste.
- Perfect for Meal Prep: These bars store well in the fridge, making them an ideal grab-and-go snack for busy days.
Ingredients
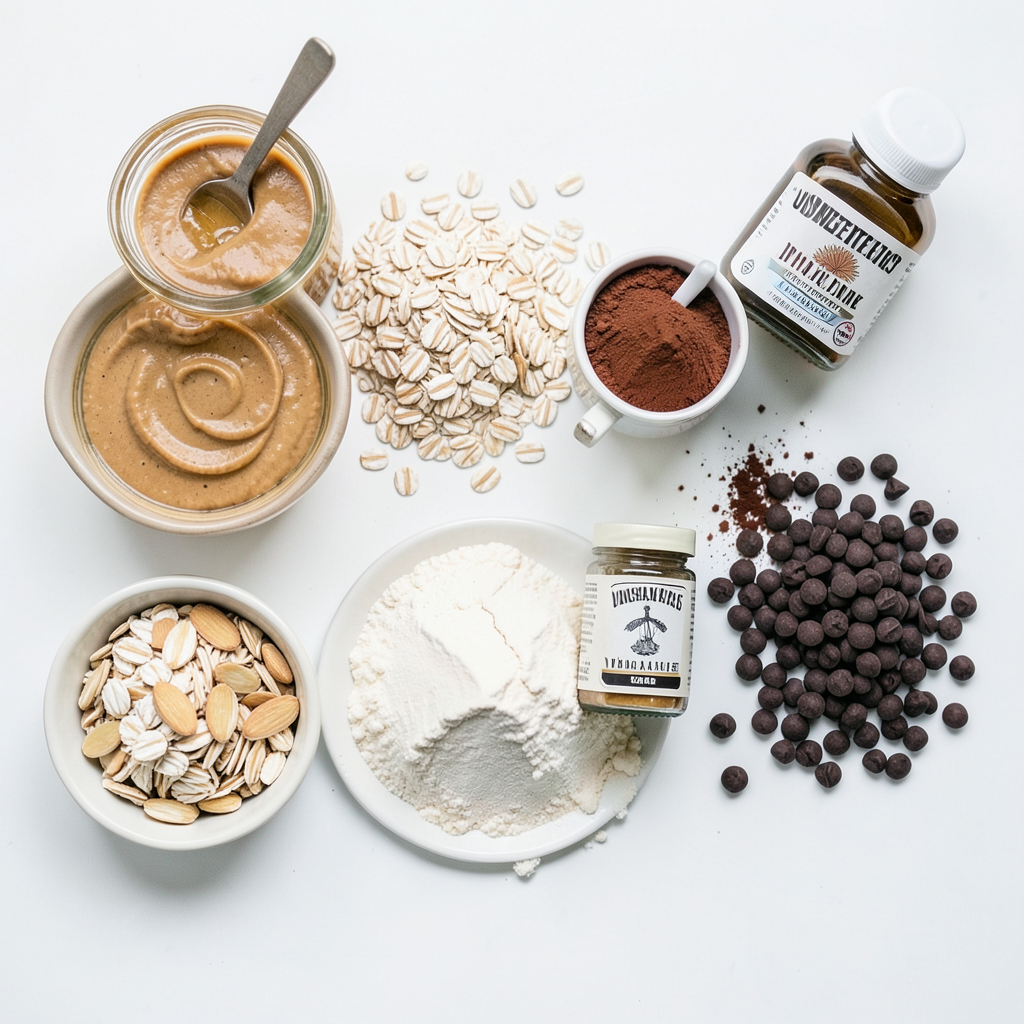
To make delicious no-bake peanut butter bars, you need simple ingredients. Here’s what you will need:
- 1 cup natural peanut butter
- 1 cup rolled oats
- 1/2 cup honey or maple syrup
- 1/2 cup almond flour
- 1/4 cup unsweetened cocoa powder
- 1/2 teaspoon vanilla extract
- 1/4 teaspoon salt
- 1/2 cup dark chocolate chips (use dairy-free if needed)
Each ingredient plays a key role in the flavor and texture of these bars. The natural peanut butter gives a rich taste and creamy texture. Rolled oats add heartiness and a nice chew. Honey or maple syrup provides sweetness and binds everything together. Almond flour adds depth and a nutty flavor, while cocoa powder gives a chocolatey touch. Vanilla extract enhances the overall taste, and salt balances the sweetness. Finally, dark chocolate chips bring melty goodness in every bite.
Feel free to adjust these ingredients to your liking! You can swap honey for maple syrup if you want a different sweet flavor. Enjoy customizing your bars!
Step-by-Step Instructions
Preparation of Peanut Butter Mixture
Start by gathering your ingredients. In a large mixing bowl, add 1 cup of natural peanut butter, 1/2 cup of honey or maple syrup, and 1/2 teaspoon of vanilla extract. Use a spatula to mix everything together. Stir until the mixture is smooth and creamy. This step is key for the best taste. A well-mixed base makes all the difference in flavor and texture.
Mixing Dry Ingredients
Next, take a separate bowl. Combine 1 cup of rolled oats, 1/2 cup of almond flour, 1/4 cup of unsweetened cocoa powder, and 1/4 teaspoon of salt. Stir these dry ingredients until they are evenly mixed. Make sure there are no clumps. This ensures every bite has a balanced taste.
Forming the Batter
Now, it’s time to combine the wet and dry mixtures. Gradually add the dry ingredients into the peanut butter mixture. Use your spatula to fold them together. Keep stirring until a thick batter forms. Once combined, gently fold in 1/2 cup of dark chocolate chips. This adds a nice touch of sweetness and chocolatey goodness to your bars.
Chilling and Serving
Prepare an 8x8 inch square baking dish by lining it with parchment paper. Leave some paper hanging over the sides. This helps with easy removal later. Pour your peanut butter mixture into the dish. Spread it evenly using your spatula. Press down firmly to make a compact layer. Place the dish in the refrigerator. Chill for at least 1-2 hours, until the bars are firm. After chilling, lift the bars out using the parchment paper. Place them on a cutting board and cut into squares or bars. Enjoy your tasty treat!
Tips & Tricks
Best Result Tips
- Ensuring smooth textures: Start by mixing the peanut butter, honey, and vanilla well. This step creates a smooth base. If the peanut butter is thick, warm it slightly. This helps it mix better.
- Pressing the mixture firmly: After combining the wet and dry ingredients, pour the mix into your dish. Use a spatula to spread it out. Press down hard to make it compact. This helps the bars hold their shape.
Presentation Suggestions
- Decorative serving ideas: Serve the bars on a colorful plate for a fun look. You can cut them into fun shapes, too. This makes them more appealing to everyone.
- Optional toppings for visual appeal: Drizzle melted chocolate on top for a rich touch. You can also add chopped nuts or coconut flakes. These toppings add texture and make your bars look great.
Pro Tips
- Chill for Best Texture: Allowing the bars to chill in the refrigerator for a longer period, such as overnight, will help them firm up even more, resulting in a sturdier and more enjoyable texture.
- Nut Butter Variations: Feel free to experiment with different nut butters like almond or cashew for a unique flavor profile, while still retaining the deliciousness of the bars.
- Sweetness Adjustments: Depending on your preference, you can adjust the amount of honey or maple syrup to make the bars sweeter or less sweet, catering to your taste buds.
- Storage Suggestions: These bars can be stored in an airtight container in the refrigerator for up to a week, making them a perfect snack for meal prep or on-the-go energy boosts.
Variations
Flavor Variations
You can change the flavor of the no-bake peanut butter bars easily. Here are some fun ideas:
- Adding nuts: Chopped walnuts or almonds can add a nice crunch. Just fold them in with the chocolate chips.
- Different nut butters: You can swap peanut butter with almond, cashew, or sunflower seed butter. Each nut butter gives a unique taste.
These changes let you create a new twist on the classic recipe. You can match flavors to your mood or what you have at home.
Sweetness Adjustments
If you want to change the sweetness, there are options:
- Alternatives to honey and maple syrup: Use agave nectar or brown rice syrup. These sweeteners work well and have a similar texture.
- Sugar-free options: Try using stevia or erythritol to make the bars sugar-free. These sweeteners provide sweetness without extra calories.
These adjustments will help you customize the bars for your taste. Have fun experimenting with these variations!
Storage Info
Storage Guidelines
To keep your No-Bake Peanut Butter Bars fresh, store them in the refrigerator. Place the bars in an airtight container. This method helps them stay moist and tasty. You can also layer parchment paper between bars to prevent sticking. The bars will stay fresh for about one week in the fridge.
Freezing Tips
To enjoy these bars later, you can freeze them. Cut the bars into squares before freezing. Wrap each square tightly in plastic wrap. Then, place the wrapped bars in a freezer-safe bag or container. This keeps them from getting freezer burn. For the best taste, use them within three months.
When you want to enjoy a bar, take it out of the freezer. Let it thaw in the fridge for a few hours. You can also let it sit at room temperature for about 30 minutes. This way, the texture stays nice, and it will be ready to eat!
FAQs
How long do No-Bake Peanut Butter Bars last?
No-bake peanut butter bars can last up to one week in the refrigerator. Store them in an airtight container. If you want them to last longer, freeze the bars. They can stay fresh for up to three months in the freezer. Just wrap them tightly to prevent freezer burn.
Can I make these bars vegan?
Yes, you can make these bars vegan! Use maple syrup instead of honey. Also, confirm that your dark chocolate chips are dairy-free. You can also substitute almond flour with a vegan flour blend if needed.
What can I use instead of almond flour?
If you need an alternative to almond flour, try using oat flour or coconut flour. Both options are gluten-free. Just remember that coconut flour absorbs more moisture, so you may need to adjust the liquid in your recipe.
How do I know when the bars are set?
The bars are set when they feel firm to the touch. After chilling for 1-2 hours, check for a solid texture. If they still feel soft, give them more time in the fridge. Proper chilling ensures a nice, sturdy bar that holds its shape when cut.
You now have a complete guide to making no-bake peanut butter bars. We covered the key ingredients, step-by-step instructions, and even storage tips. Don’t forget to explore flavor variations and adjust sweetness for your taste.
These bars are easy, fun, and perfect for any occasion. With just a few steps, you can create a delicious treat that lasts. Try them out, share them with friends, and enjoy your homemade snacks!