Pickle Brine Bloody Mary Popsicles Refreshing Summer Treat

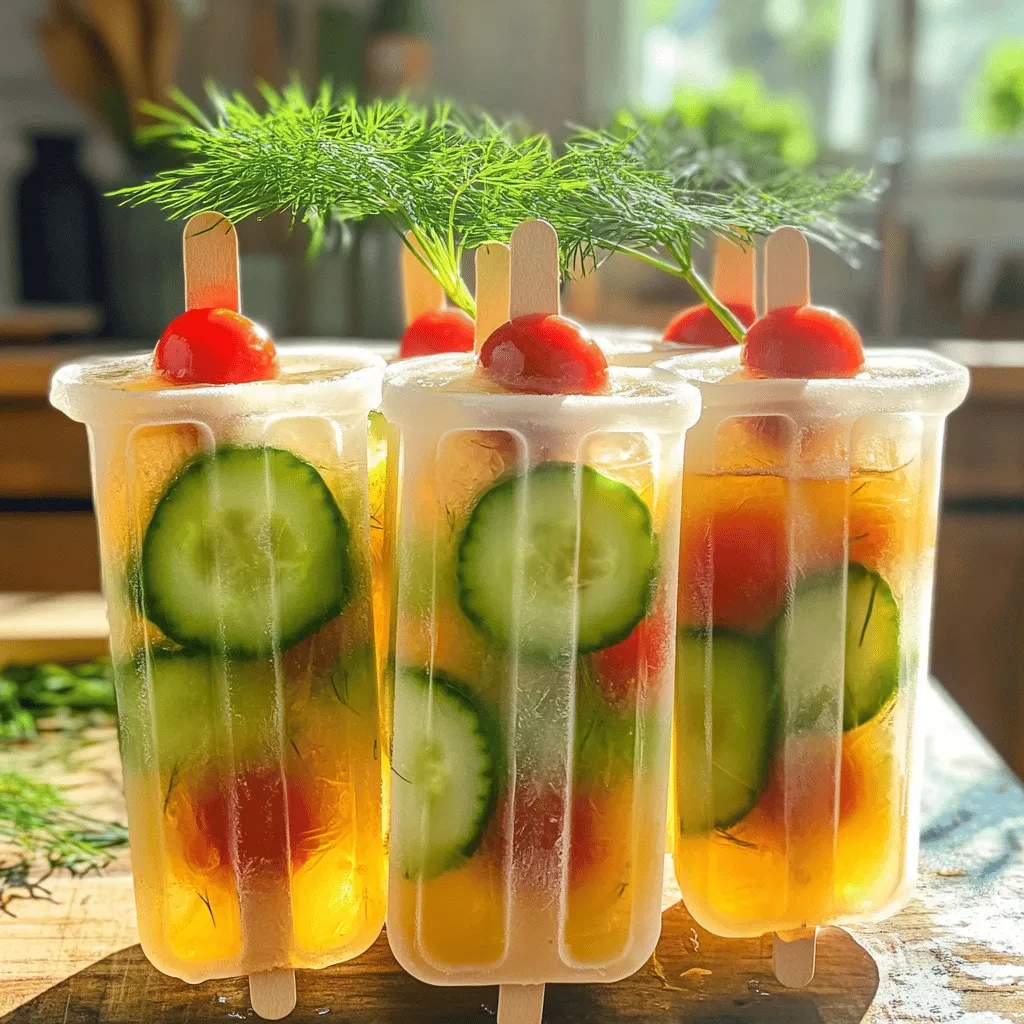
Looking for a unique summer treat? Try Pickle Brine Bloody Mary Popsicles! These refreshing popsicles blend tangy pickle brine and zesty tomato juice, creating a fun twist on a classic drink. Perfect for hot days, they add a flavorful kick to your summer BBQ. In this post, I’ll share the easy recipe and tips to make your popsicles shine. Let’s dive into this cool culinary adventure!

Ingredients

Main Ingredients

– 1 cup pickle brine

– 1 cup tomato juice

– 1 tablespoon Worcestershire sauce

– 1 teaspoon hot sauce

– 1 tablespoon fresh lemon juice

Seasoning and Garnish

– 1/2 teaspoon celery salt

– 1/2 teaspoon freshly ground black pepper

– Fresh dill sprigs

Optional Add-ins

– 1/4 cup ripe cherry tomatoes, halved

– 1/4 cup cucumber, diced into small cubes

Creating Pickle Brine Bloody Mary Popsicles is simple and fun. The main ingredients give these pops their bold flavor. First, the pickle brine adds a tangy zest. Then, tomato juice brings that classic Bloody Mary taste. Worcestershire sauce and hot sauce give it a kick. Fresh lemon juice brightens the mix.

For seasoning, I love using celery salt and black pepper. They enhance the taste and add depth. Fresh dill sprigs not only look nice but also add a fresh herbal note.

If you want to be playful, consider add-ins. Cherry tomatoes and cucumber not only add crunch but also make the pops visually appealing. You can customize these pops to your taste!

For the full recipe, check the detailed instructions. Enjoy this fun summer treat!

Step-by-Step Instructions

Preparing the Mixture

Start by blending the base ingredients in a medium mixing bowl. Combine 1 cup of pickle brine, 1 cup of tomato juice, 1 tablespoon of Worcestershire sauce, 1 teaspoon of hot sauce, 1 tablespoon of fresh lemon juice, 1/2 teaspoon of celery salt, and 1/2 teaspoon of black pepper. Use a whisk or spoon to mix until smooth. Taste the mixture and adjust flavors according to your preference. Want more spice? Add extra hot sauce. Need more zing? A bit more lemon juice does the trick.

Assembling the Popsicles

Now it’s time to assemble your popsicles. Carefully place halved cherry tomatoes and diced cucumber in your molds. Make sure to distribute them evenly for a nice look. Then, gently pour the brine mixture into each mold. Fill them just below the top; this allows the mixture to expand as it freezes.

Freezing and Serving

Next, insert popsicle sticks into the center of each mold. Make sure they are secure to prevent slipping. If your molds have lids, cover them. If not, use plastic wrap to keep freezer odors out. Freeze the molds for at least 6 hours or until they are completely solid. To enjoy your popsicles, hold the molds under warm running water for a few seconds. Gently pull on the sticks until they slide out easily. Enjoy your Pickle Brine Bloody Mary Popsicles as a refreshing summer treat!

Tips & Tricks

Customization Ideas

You can make these popsicles your own.

– Adjust the spice level with hot sauce to suit your taste.

– Add extra veggies like bell peppers or herbs like parsley for new flavors.

Perfect Consistency

To get the best popsicles, follow these tips:

– Make sure to freeze them for at least six hours. This ensures they become solid.

– Use warm water to run over the molds. This helps release the popsicles easily.

Presentation Tips

A great look makes these popsicles even better.

– Garnish with fresh dill before serving. It adds color and flavor.

– Serve with extra garnishes like olives or celery sticks for a fun display.

For a complete guide, check out the Full Recipe to make your Pickle Brine Bloody Mary Popsicles!

Variations

Flavor Twists

You can add fun flavors to your popsicles. Try mixing in beet juice for a sweet twist. Carrot juice also adds a nice color and taste. If you want something unique, experiment with flavored pickle brine. There are many types, like garlic or spicy brine, that can change the flavor profile.

Non-Alcoholic Version

Want a family-friendly treat? Make a virgin version! Simply use only tomato juice and pickle brine. This way, everyone can enjoy them. You can also swap Worcestershire sauce with a vegan option. This makes the popsicle taste just as delicious without animal products.

Seasonal Variants

Make your popsicles even more special by using seasonal fruits or veggies. In summer, ripe tomatoes add freshness. In fall, you might use roasted squash. Adding herbs like basil or cilantro can elevate the taste. These herbs provide a fresh burst of flavor that pairs well with the brine.

For the full recipe, check out the Pickle Brine Bloody Mary Popsicles!

Storage Info

Freezing Guidelines

To keep your Pickle Brine Bloody Mary Popsicles fresh, store them in popsicle molds. This helps them freeze well. Make sure to keep them away from strong-smelling foods in the freezer. Strong odors can change their taste.

Shelf Life

These popsicles taste best within 1-2 weeks after making them. Always check for signs of freezer burn before serving. If they look frosty or dry, it’s best to toss them. Fresh popsicles give the best flavor.

Thawing Tips

When you’re ready to enjoy your popsicles, thaw them in warm water. This will help them slide out easily. Avoid using the microwave, as it can change their texture. You want them to stay nice and firm!

FAQs

Can I use store-bought pickle brine?

Yes, store-bought pickle brine is a convenient option. It saves time and effort. Many brands offer tasty brines that work well in this recipe. Just choose one that you enjoy.

How long do these popsicles take to freeze?

They require a minimum of 6 hours to freeze completely. This allows the flavors to set, giving you a delicious treat. If you can, leave them in the freezer overnight for the best results.

What’s the best way to adjust the recipe for larger batches?

Simply double the ingredients and use larger molds. This way, you can make more popsicles at once. It’s great for parties or gatherings. Enjoy sharing these fun treats with friends!

These savory popsicles blend bold flavors with fun. We used pickle brine, tomato juice, and spices for a unique treat. You learned how to prepare, freeze, and serve them. Don’t forget the options for personal touches and seasonal ingredients.

Experiment with flavors and enjoy your creations. These popsicles can surprise your friends and family with their taste and presentation. Enjoy your culinary journey and share these fun recipes in your kitchen!

- 1 cup pickle brine - 1 cup tomato juice - 1 tablespoon Worcestershire sauce - 1 teaspoon hot sauce - 1 tablespoon fresh lemon juice - 1/2 teaspoon celery salt - 1/2 teaspoon freshly ground black pepper - Fresh dill sprigs - 1/4 cup ripe cherry tomatoes, halved - 1/4 cup cucumber, diced into small cubes Creating Pickle Brine Bloody Mary Popsicles is simple and fun. The main ingredients give these pops their bold flavor. First, the pickle brine adds a tangy zest. Then, tomato juice brings that classic Bloody Mary taste. Worcestershire sauce and hot sauce give it a kick. Fresh lemon juice brightens the mix. For seasoning, I love using celery salt and black pepper. They enhance the taste and add depth. Fresh dill sprigs not only look nice but also add a fresh herbal note. If you want to be playful, consider add-ins. Cherry tomatoes and cucumber not only add crunch but also make the pops visually appealing. You can customize these pops to your taste! For the full recipe, check the detailed instructions. Enjoy this fun summer treat! Start by blending the base ingredients in a medium mixing bowl. Combine 1 cup of pickle brine, 1 cup of tomato juice, 1 tablespoon of Worcestershire sauce, 1 teaspoon of hot sauce, 1 tablespoon of fresh lemon juice, 1/2 teaspoon of celery salt, and 1/2 teaspoon of black pepper. Use a whisk or spoon to mix until smooth. Taste the mixture and adjust flavors according to your preference. Want more spice? Add extra hot sauce. Need more zing? A bit more lemon juice does the trick. Now it’s time to assemble your popsicles. Carefully place halved cherry tomatoes and diced cucumber in your molds. Make sure to distribute them evenly for a nice look. Then, gently pour the brine mixture into each mold. Fill them just below the top; this allows the mixture to expand as it freezes. Next, insert popsicle sticks into the center of each mold. Make sure they are secure to prevent slipping. If your molds have lids, cover them. If not, use plastic wrap to keep freezer odors out. Freeze the molds for at least 6 hours or until they are completely solid. To enjoy your popsicles, hold the molds under warm running water for a few seconds. Gently pull on the sticks until they slide out easily. Enjoy your Pickle Brine Bloody Mary Popsicles as a refreshing summer treat! You can make these popsicles your own. - Adjust the spice level with hot sauce to suit your taste. - Add extra veggies like bell peppers or herbs like parsley for new flavors. To get the best popsicles, follow these tips: - Make sure to freeze them for at least six hours. This ensures they become solid. - Use warm water to run over the molds. This helps release the popsicles easily. A great look makes these popsicles even better. - Garnish with fresh dill before serving. It adds color and flavor. - Serve with extra garnishes like olives or celery sticks for a fun display. For a complete guide, check out the Full Recipe to make your Pickle Brine Bloody Mary Popsicles! {{image_4}} You can add fun flavors to your popsicles. Try mixing in beet juice for a sweet twist. Carrot juice also adds a nice color and taste. If you want something unique, experiment with flavored pickle brine. There are many types, like garlic or spicy brine, that can change the flavor profile. Want a family-friendly treat? Make a virgin version! Simply use only tomato juice and pickle brine. This way, everyone can enjoy them. You can also swap Worcestershire sauce with a vegan option. This makes the popsicle taste just as delicious without animal products. Make your popsicles even more special by using seasonal fruits or veggies. In summer, ripe tomatoes add freshness. In fall, you might use roasted squash. Adding herbs like basil or cilantro can elevate the taste. These herbs provide a fresh burst of flavor that pairs well with the brine. For the full recipe, check out the Pickle Brine Bloody Mary Popsicles! To keep your Pickle Brine Bloody Mary Popsicles fresh, store them in popsicle molds. This helps them freeze well. Make sure to keep them away from strong-smelling foods in the freezer. Strong odors can change their taste. These popsicles taste best within 1-2 weeks after making them. Always check for signs of freezer burn before serving. If they look frosty or dry, it's best to toss them. Fresh popsicles give the best flavor. When you're ready to enjoy your popsicles, thaw them in warm water. This will help them slide out easily. Avoid using the microwave, as it can change their texture. You want them to stay nice and firm! Yes, store-bought pickle brine is a convenient option. It saves time and effort. Many brands offer tasty brines that work well in this recipe. Just choose one that you enjoy. They require a minimum of 6 hours to freeze completely. This allows the flavors to set, giving you a delicious treat. If you can, leave them in the freezer overnight for the best results. Simply double the ingredients and use larger molds. This way, you can make more popsicles at once. It’s great for parties or gatherings. Enjoy sharing these fun treats with friends! These savory popsicles blend bold flavors with fun. We used pickle brine, tomato juice, and spices for a unique treat. You learned how to prepare, freeze, and serve them. Don't forget the options for personal touches and seasonal ingredients. Experiment with flavors and enjoy your creations. These popsicles can surprise your friends and family with their taste and presentation. Enjoy your culinary journey and share these fun recipes in your kitchen!

Pickle Brine Bloody Mary Popsicles

Beat the heat with Pickle Brine Bloody Mary Popsicles that pack a flavorful punch! These unique frozen treats combine tangy pickle brine and savory tomato juice, making them a perfect addition to your summer gatherings. With cherry tomatoes, cucumbers, and a hint of spice, they deliver a refreshing twist. Ready to impress your friends? Click through to explore this fun recipe and learn how to make your own delicious popsicles!

Ingredients
  

1 cup pickle brine

1 cup tomato juice

1 tablespoon Worcestershire sauce

1 teaspoon hot sauce (or more, to suit your spice preference)

1 tablespoon fresh lemon juice

1/2 teaspoon celery salt

1/2 teaspoon freshly ground black pepper

1/4 cup ripe cherry tomatoes, halved

1/4 cup cucumber, diced into small cubes

Fresh dill sprigs for a delightful garnish

Instructions
 

In a medium mixing bowl, blend together the pickle brine, tomato juice, Worcestershire sauce, hot sauce, fresh lemon juice, celery salt, and ground black pepper. Use a whisk or spoon to mix until the ingredients are thoroughly combined.

    Taste the mixture and customize the flavors as desired; add extra hot sauce for a spicier kick or a touch more lemon juice for an added zing.

      Carefully place the halved cherry tomatoes and diced cucumber into your popsicle molds, distributing them evenly for visual appeal.

        Gently pour the flavorful brine mixture into each mold, filling them to just below the top to allow for the mixture to expand as it freezes.

          Insert popsicle sticks into the center of each mold, ensuring they are securely placed to avoid slipping.

            If your popsicle molds have lids, cover them; otherwise, cover the molds with plastic wrap to keep the popsicles free from any freezer odors.

              Freeze the molds for a minimum of 6 hours, or until the popsicles are completely solid and ready to be enjoyed.

                To release the popsicles, hold the molds under warm running water for a few seconds, gently pulling on the sticks until the popsicles slide out easily.

                  For an elegant touch, garnish each popsicle with a fresh sprig of dill right before serving to enhance both flavor and presentation.

                    - Prep Time: 15 minutes

                      - Total Time: 6 hours 15 minutes (includes freezing)

                        - Servings: 6 popsicles

                          Leave a Comment

                          Recipe Rating