Salted Peanut Butter Christmas Trees Festive Treats

WANT TO SAVE THIS RECIPE?

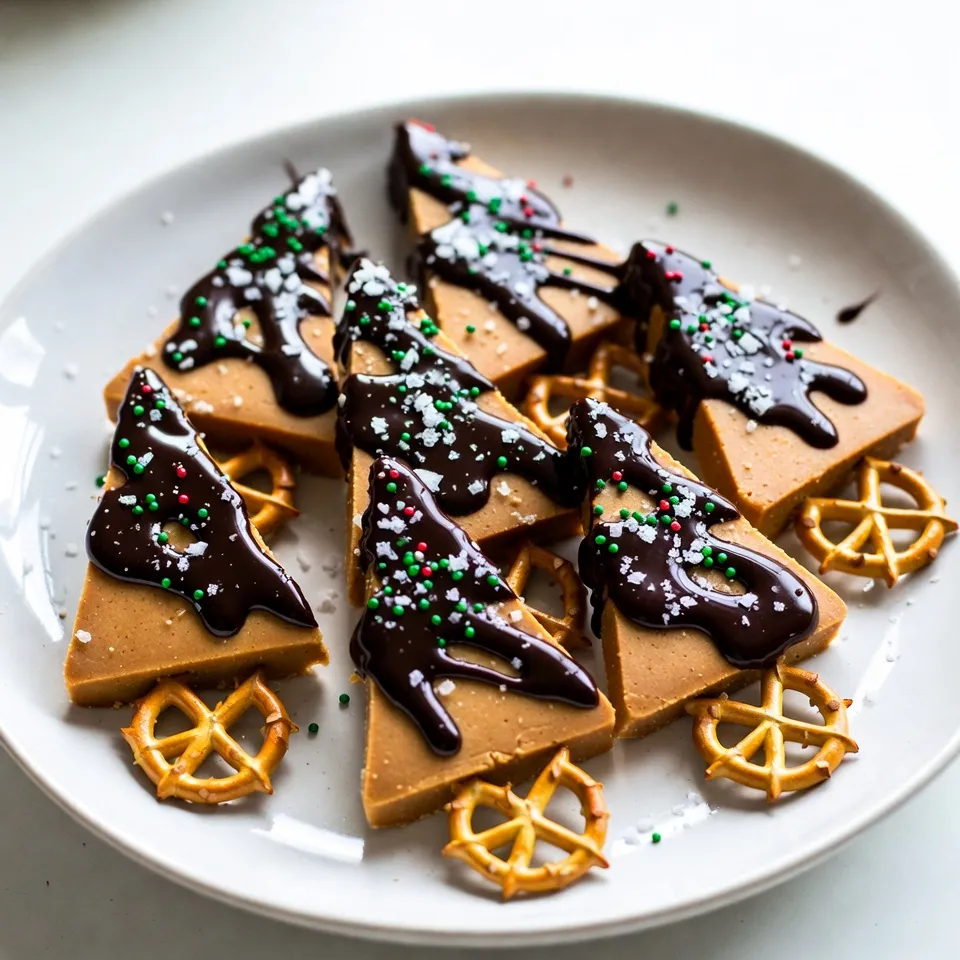
Get ready to add a festive touch to your holiday snack table with Salted Peanut Butter Christmas Trees! These delicious treats are fun to make and perfect for sharing. With creamy peanut butter, chocolate, and colorful sprinkles, they will be a hit at any gathering. I’ll guide you step-by-step to create these tasty trees, ensuring they look as good as they taste. Let’s dive into the recipe that will impress your family and friends!

Why I Love This Recipe

  1. Festive Presentation: These peanut butter trees look adorable and bring a fun holiday spirit to any dessert table.
  2. Easy to Make: This recipe requires simple ingredients and quick steps that make it perfect for holiday baking with kids.
  3. Delicious Flavor: The combination of creamy peanut butter and rich chocolate is a classic that everyone loves.
  4. Customizable: You can easily personalize these trees with different sprinkles or even add your favorite candies for decoration.

Ingredients

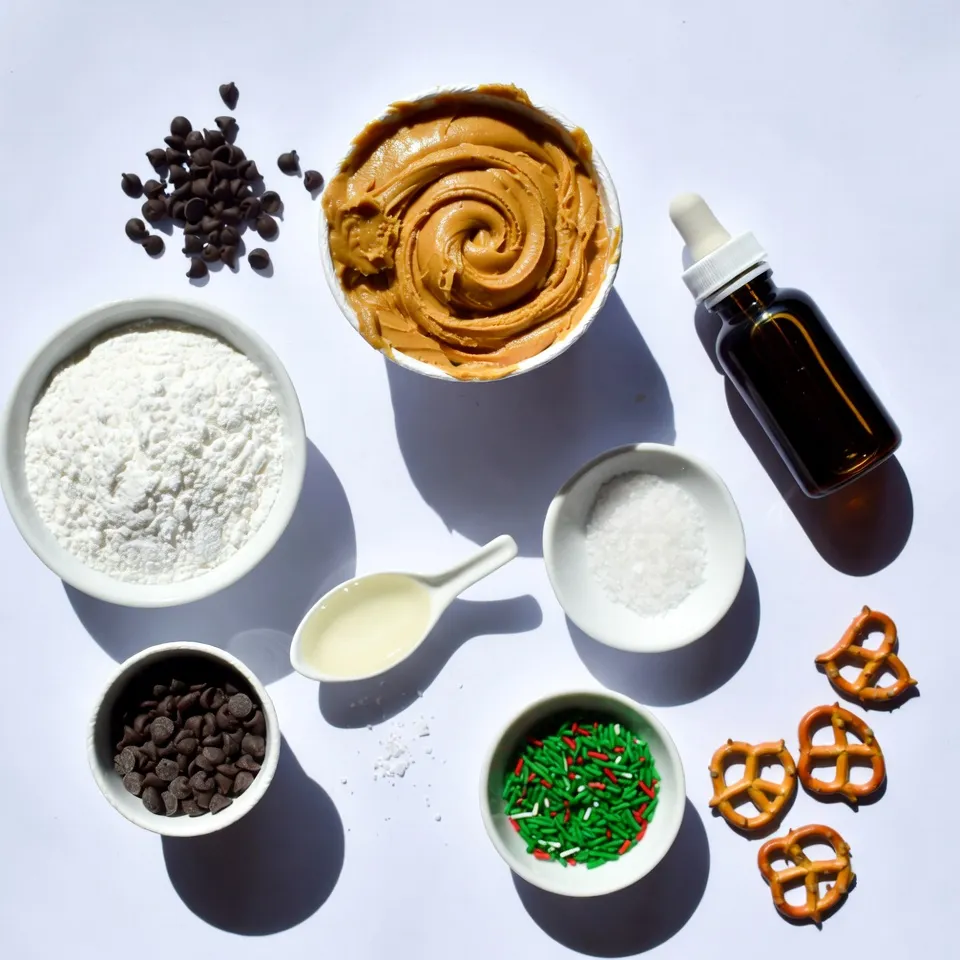
– 1 cup creamy peanut butter

– 1/2 cup powdered sugar

– 1/2 teaspoon vanilla extract

– 1 cup chocolate chips

– 1 teaspoon coconut oil

– Sea salt flakes for sprinkling

– Green and red sprinkles (for decoration)

– Optional: Mini pretzels for tree trunks

When making salted peanut butter Christmas trees, you’ll need a few simple ingredients. Start with creamy peanut butter. This gives the trees their rich flavor. Next, add powdered sugar. It adds sweetness and helps bind the mixture. Vanilla extract enhances the taste.

For the chocolate coating, gather chocolate chips and coconut oil. The oil helps the chocolate melt smoothly. Sea salt flakes give a nice salty kick. Use green and red sprinkles for a festive touch. Lastly, mini pretzels can serve as cute tree trunks.

These ingredients come together to create a fun and tasty holiday treat.

Step-by-Step Instructions

Preparing the Peanut Butter Mixture

Start by mixing the creamy peanut butter, powdered sugar, and vanilla extract. Use a spatula or wooden spoon to blend them well. Keep stirring until the mixture is smooth. You want it lump-free for a nice texture in the trees.

Shaping the Christmas Trees

Next, take about 2 tablespoons of the peanut butter mixture. Mold it into a tree shape. Make it wider at the bottom and pointier at the top. This gives it a nice tree look. Keep shaping until you have several trees.

Chilling the Trees

Now, it’s time to chill the trees. Place them on a parchment-lined baking sheet. Put the baking sheet in the freezer for about 20 minutes. Chilling helps the trees hold their form and makes them easier to coat later.

Melting the Chocolate

While the trees chill, melt the chocolate. In a microwave-safe bowl, mix chocolate chips with coconut oil. Heat in 30-second bursts, stirring in between. Keep heating until the chocolate is smooth and melted. This step is key for a nice, even coating.

Dipping and Decorating the Trees

Once the trees are chilled, take them out of the freezer. Use a fork to dip each tree into the melted chocolate. Make sure each tree gets fully coated. Shake off extra chocolate before placing them back on the baking sheet. While the chocolate is still wet, sprinkle on sea salt and add colorful green and red sprinkles. You can also add mini pretzels to look like tree trunks.

Setting the Chocolate

Finally, to set the chocolate, return the dipped trees to the parchment-lined baking sheet. Refrigerate them for about 30 minutes. This ensures the chocolate hardens properly, making your treats ready to enjoy!

Tips & Tricks

Achieving the Perfect Tree Shape

To mold the perfect tree, start with a scoop of the peanut butter mix. Use about 2 tablespoons for each tree. Shape it into a triangle. Make the bottom wider and the top pointy. This gives it a classic tree look. If the mix is too sticky, wet your hands a bit. This helps shape without making a mess.

Chocolate Dipping Techniques

To dip your trees without a mess, use a fork. First, gently lower the tree into the melted chocolate. Make sure it gets fully coated. After dipping, lift it out and let the excess chocolate drip back into the bowl. You can also tap the fork against the bowl to shake off extra chocolate. This keeps the coating even and smooth.

Decoration Ideas

Get creative with decorations! While the chocolate is still wet, sprinkle sea salt and colorful sprinkles on top. You can use green and red sprinkles for a festive touch. For an extra twist, add a mini pretzel at the base of each tree. This gives the look of a tree trunk. Try different sprinkle shapes or edible glitter for fun!

Pro Tips

  1. Chill Your Mixture: For easier shaping, chill the peanut butter mixture for about 10 minutes before molding it into trees.
  2. Perfect Chocolate Coating: Ensure the chocolate is smooth and free of lumps by stirring well between heating intervals.
  3. Sprinkle Immediately: Add your decorations right after dipping while the chocolate is still wet for better adherence.
  4. Experiment with Flavors: Try adding a pinch of cinnamon or nutmeg to the peanut butter mixture for a festive twist!

Variations

Nut-Free Option

If you want a nut-free treat, try using sunflower seed butter. This spread has a similar creamy texture. You can also use soy nut butter for a perfect swap. Both options keep the taste rich and satisfying. Just mix in the same way as you would with peanut butter.

Different Flavor Combinations

You can add fun flavors to your trees! A drop of almond extract gives a nice twist. You can also mix in cinnamon for a warm spice. For a minty touch, add peppermint extract. Each flavor adds a new layer to your trees. Get creative and see which ones you love most!

Themed Decoration Ideas

Decorating your trees can be a blast! Use candy eyes to make them look playful. You can also use edible glitter for a magical touch. For a winter theme, dust them with powdered sugar to mimic snow. Think about holiday colors too. Red and green sprinkles add a festive flair. Personalize your trees for every celebration!

Storage Info

Storing the Finished Trees

To keep your salted peanut butter Christmas trees fresh, store them in an airtight container. This will prevent air and moisture from ruining their texture. If you want to save space, you can layer wax paper between the trees. This method helps keep them from sticking together. Keep the container in a cool, dry place. For best results, eat them within a week.

Freezing and Thawing

You can freeze the peanut butter trees for later enjoyment. Place the trees on a baking sheet and freeze them for about an hour. Once firm, transfer them to a freezer-safe bag or container. Make sure to remove as much air as possible. When you’re ready to serve, take them out of the freezer and let them thaw at room temperature for about 20-30 minutes. This keeps them fresh and tasty.

Shelf Life

The trees last about a week when stored properly at room temperature. In the fridge, they can last up to two weeks. If frozen, they can stay good for about three months. Always check for any changes in smell or texture before eating. This will help ensure they are still safe to enjoy.

FAQs

Can I use crunchy peanut butter instead of creamy?

Yes, you can use crunchy peanut butter. It will change the texture. The trees will have a nice crunch. This adds a fun twist to the treat. The flavor will still be rich and tasty. However, expect a more rustic look. The trees might not hold shape as well.

How can I make these trees ahead of time?

You can prepare the trees a day in advance. Make the peanut butter mixture and shape the trees. Chill them in the freezer for 20 minutes. Then, store them in an airtight container. Keep them in the fridge until you are ready to dip in chocolate. This saves time on busy days.

What alternatives can I use for chocolate?

If you want a dairy-free option, try dark chocolate. You can also use dairy-free chocolate chips. Another option is carob chips for a unique flavor. Melt them just like regular chocolate. They will coat the trees beautifully.

Are there any allergy considerations for this recipe?

This recipe includes common allergens like peanuts and dairy. If someone has a nut allergy, use sunflower seed butter instead. For chocolate, look for allergy-friendly brands. Always check labels for hidden allergens. This ensures everyone can enjoy the treat safely.

This blog post covered a fun and tasty way to make peanut butter Christmas trees. You learned about the ingredients, step-by-step instructions, and useful tips to shape and decorate your trees. Adding your own twist with different flavors and themes makes it more exciting. Remember, the key is to chill the trees and ensure the chocolate sets properly. Enjoy your sweet creations and share them with friends and family. Let your creativity shine as you decorate and personalize each tre

- 1 cup creamy peanut butter - 1/2 cup powdered sugar - 1/2 teaspoon vanilla extract - 1 cup chocolate chips - 1 teaspoon coconut oil - Sea salt flakes for sprinkling - Green and red sprinkles (for decoration) - Optional: Mini pretzels for tree trunks When making salted peanut butter Christmas trees, you’ll need a few simple ingredients. Start with creamy peanut butter. This gives the trees their rich flavor. Next, add powdered sugar. It adds sweetness and helps bind the mixture. Vanilla extract enhances the taste. For the chocolate coating, gather chocolate chips and coconut oil. The oil helps the chocolate melt smoothly. Sea salt flakes give a nice salty kick. Use green and red sprinkles for a festive touch. Lastly, mini pretzels can serve as cute tree trunks. These ingredients come together to create a fun and tasty holiday treat. {{ingredient_image_2}} Start by mixing the creamy peanut butter, powdered sugar, and vanilla extract. Use a spatula or wooden spoon to blend them well. Keep stirring until the mixture is smooth. You want it lump-free for a nice texture in the trees. Next, take about 2 tablespoons of the peanut butter mixture. Mold it into a tree shape. Make it wider at the bottom and pointier at the top. This gives it a nice tree look. Keep shaping until you have several trees. Now, it's time to chill the trees. Place them on a parchment-lined baking sheet. Put the baking sheet in the freezer for about 20 minutes. Chilling helps the trees hold their form and makes them easier to coat later. While the trees chill, melt the chocolate. In a microwave-safe bowl, mix chocolate chips with coconut oil. Heat in 30-second bursts, stirring in between. Keep heating until the chocolate is smooth and melted. This step is key for a nice, even coating. Once the trees are chilled, take them out of the freezer. Use a fork to dip each tree into the melted chocolate. Make sure each tree gets fully coated. Shake off extra chocolate before placing them back on the baking sheet. While the chocolate is still wet, sprinkle on sea salt and add colorful green and red sprinkles. You can also add mini pretzels to look like tree trunks. Finally, to set the chocolate, return the dipped trees to the parchment-lined baking sheet. Refrigerate them for about 30 minutes. This ensures the chocolate hardens properly, making your treats ready to enjoy! To mold the perfect tree, start with a scoop of the peanut butter mix. Use about 2 tablespoons for each tree. Shape it into a triangle. Make the bottom wider and the top pointy. This gives it a classic tree look. If the mix is too sticky, wet your hands a bit. This helps shape without making a mess. To dip your trees without a mess, use a fork. First, gently lower the tree into the melted chocolate. Make sure it gets fully coated. After dipping, lift it out and let the excess chocolate drip back into the bowl. You can also tap the fork against the bowl to shake off extra chocolate. This keeps the coating even and smooth. Get creative with decorations! While the chocolate is still wet, sprinkle sea salt and colorful sprinkles on top. You can use green and red sprinkles for a festive touch. For an extra twist, add a mini pretzel at the base of each tree. This gives the look of a tree trunk. Try different sprinkle shapes or edible glitter for fun! Pro Tips Chill Your Mixture: For easier shaping, chill the peanut butter mixture for about 10 minutes before molding it into trees. Perfect Chocolate Coating: Ensure the chocolate is smooth and free of lumps by stirring well between heating intervals. Sprinkle Immediately: Add your decorations right after dipping while the chocolate is still wet for better adherence. Experiment with Flavors: Try adding a pinch of cinnamon or nutmeg to the peanut butter mixture for a festive twist! {{image_4}} If you want a nut-free treat, try using sunflower seed butter. This spread has a similar creamy texture. You can also use soy nut butter for a perfect swap. Both options keep the taste rich and satisfying. Just mix in the same way as you would with peanut butter. You can add fun flavors to your trees! A drop of almond extract gives a nice twist. You can also mix in cinnamon for a warm spice. For a minty touch, add peppermint extract. Each flavor adds a new layer to your trees. Get creative and see which ones you love most! Decorating your trees can be a blast! Use candy eyes to make them look playful. You can also use edible glitter for a magical touch. For a winter theme, dust them with powdered sugar to mimic snow. Think about holiday colors too. Red and green sprinkles add a festive flair. Personalize your trees for every celebration! To keep your salted peanut butter Christmas trees fresh, store them in an airtight container. This will prevent air and moisture from ruining their texture. If you want to save space, you can layer wax paper between the trees. This method helps keep them from sticking together. Keep the container in a cool, dry place. For best results, eat them within a week. You can freeze the peanut butter trees for later enjoyment. Place the trees on a baking sheet and freeze them for about an hour. Once firm, transfer them to a freezer-safe bag or container. Make sure to remove as much air as possible. When you’re ready to serve, take them out of the freezer and let them thaw at room temperature for about 20-30 minutes. This keeps them fresh and tasty. The trees last about a week when stored properly at room temperature. In the fridge, they can last up to two weeks. If frozen, they can stay good for about three months. Always check for any changes in smell or texture before eating. This will help ensure they are still safe to enjoy. Yes, you can use crunchy peanut butter. It will change the texture. The trees will have a nice crunch. This adds a fun twist to the treat. The flavor will still be rich and tasty. However, expect a more rustic look. The trees might not hold shape as well. You can prepare the trees a day in advance. Make the peanut butter mixture and shape the trees. Chill them in the freezer for 20 minutes. Then, store them in an airtight container. Keep them in the fridge until you are ready to dip in chocolate. This saves time on busy days. If you want a dairy-free option, try dark chocolate. You can also use dairy-free chocolate chips. Another option is carob chips for a unique flavor. Melt them just like regular chocolate. They will coat the trees beautifully. This recipe includes common allergens like peanuts and dairy. If someone has a nut allergy, use sunflower seed butter instead. For chocolate, look for allergy-friendly brands. Always check labels for hidden allergens. This ensures everyone can enjoy the treat safely. This blog post covered a fun and tasty way to make peanut butter Christmas trees. You learned about the ingredients, step-by-step instructions, and useful tips to shape and decorate your trees. Adding your own twist with different flavors and themes makes it more exciting. Remember, the key is to chill the trees and ensure the chocolate sets properly. Enjoy your sweet creations and share them with friends and family. Let your creativity shine as you decorate and personalize each tree!

Salted Peanut Butter Christmas Trees

Delicious and festive peanut butter treats shaped like Christmas trees, coated in chocolate and decorated with sprinkles.
Prep Time 15 minutes
Cook Time 30 minutes
Total Time 45 minutes
Course Dessert
Cuisine American
Servings 10
Calories 150 kcal

Ingredients
  

  • 1 cup creamy peanut butter
  • 1/2 cup powdered sugar
  • 1/2 teaspoon vanilla extract
  • 1 cup chocolate chips
  • 1 teaspoon coconut oil
  • to taste sea salt flakes for sprinkling
  • to taste green and red sprinkles for decoration
  • optional mini pretzels to use as tree trunks

Instructions
 

  • In a mixing bowl, add the creamy peanut butter, powdered sugar, and vanilla extract. Stir them together using a spatula or wooden spoon until the mixture is fully combined and smooth without lumps.
  • Take approximately 2 tablespoons of the peanut butter mixture and mold it into a triangular shape, wider at the base and tapering toward the top to resemble a tree. Continue shaping until you have formed several trees out of the entire mixture.
  • Arrange the shaped peanut butter trees on a parchment-lined baking sheet. Transfer the baking sheet to the freezer and chill for about 20 minutes, allowing the trees to firm up.
  • In a microwave-safe bowl, combine the chocolate chips and coconut oil. Heat in the microwave in 30-second intervals, stirring well between each interval until the chocolate is completely melted and smooth.
  • Once the peanut butter trees have chilled, take them out of the freezer. Using a fork, carefully dip each tree into the melted chocolate, ensuring they're fully coated. Lightly shake off any excess chocolate back into the bowl.
  • While the chocolate coating is still wet, sprinkle the trees generously with sea salt flakes and add vibrant green and red sprinkles for a festive touch. If you'd like, you can stick a mini pretzel at the base of each tree to give the illusion of a tree trunk.
  • Return the dipped trees to the parchment-lined baking sheet. Refrigerate them for an additional 30 minutes to ensure the chocolate hardens properly.

Notes

For added festivity, place the trees in front of a decorative winter village.
Keyword Christmas, dessert, holiday treats, peanut butter

WANT TO SAVE THIS RECIPE?

Leave a Comment

Recipe Rating