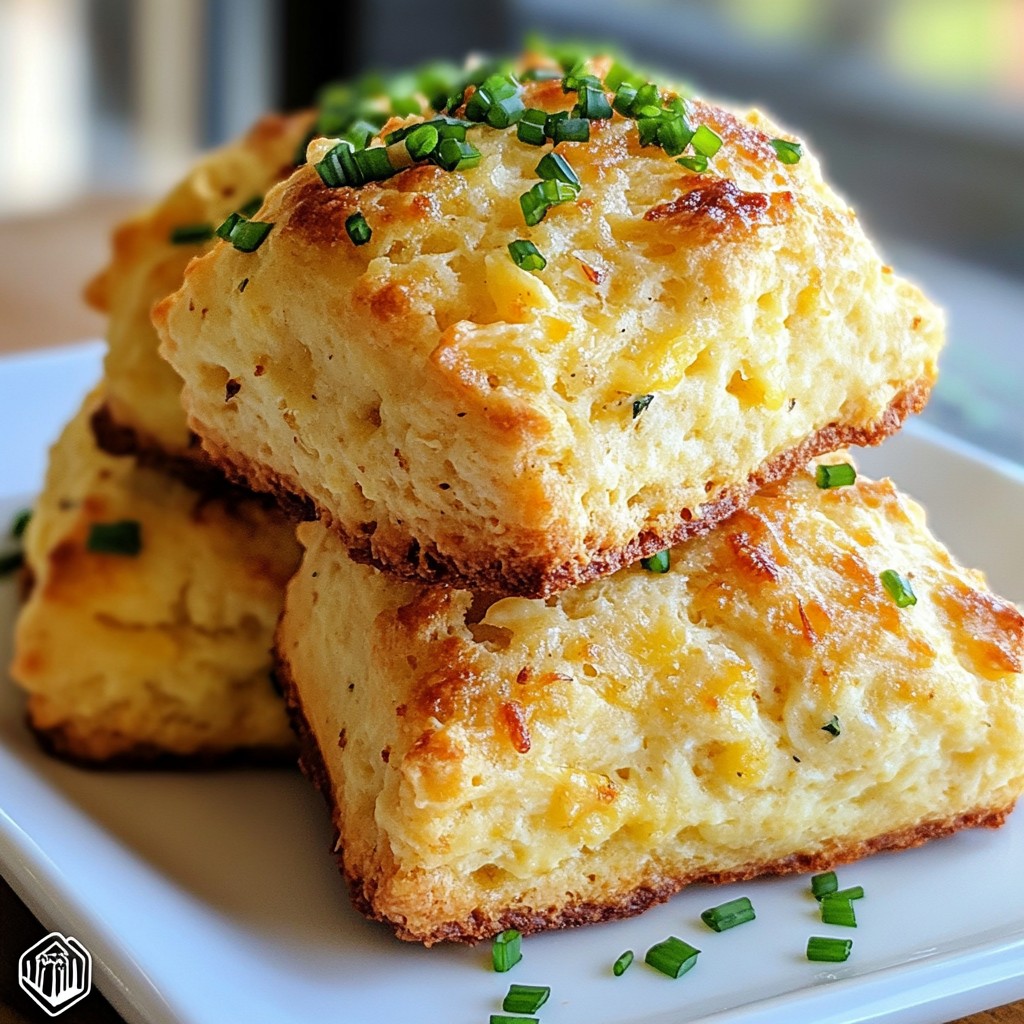
Welcome to my kitchen! Today, we’re diving into the world of savory scones with a popular twist. Imagine warm, golden Garlic Parmesan Scones fresh out of the oven. They’re tasty and easy to make. This recipe brims with flavor and is great for any time of day. Whether you pair them with soup or enjoy them alone, these scones will surely brighten your meal. Ready to bake? Let’s get started!
Why I Love This Recipe
- Delicious Flavor Combination: The rich flavors of garlic and Parmesan create a savory delight that pairs perfectly with any meal.
- Easy to Make: With simple ingredients and straightforward steps, these scones come together quickly, making them perfect for both novice and experienced bakers.
- Versatile Serving Options: These scones are great as a side dish, appetizer, or even a snack, making them a versatile addition to any table.
- Garnish for Presentation: They look stunning when garnished with fresh herbs, adding a pop of color and freshness to your presentation.
Ingredients
List of Ingredients
To make Savory Garlic Parmesan Scones, gather these items:
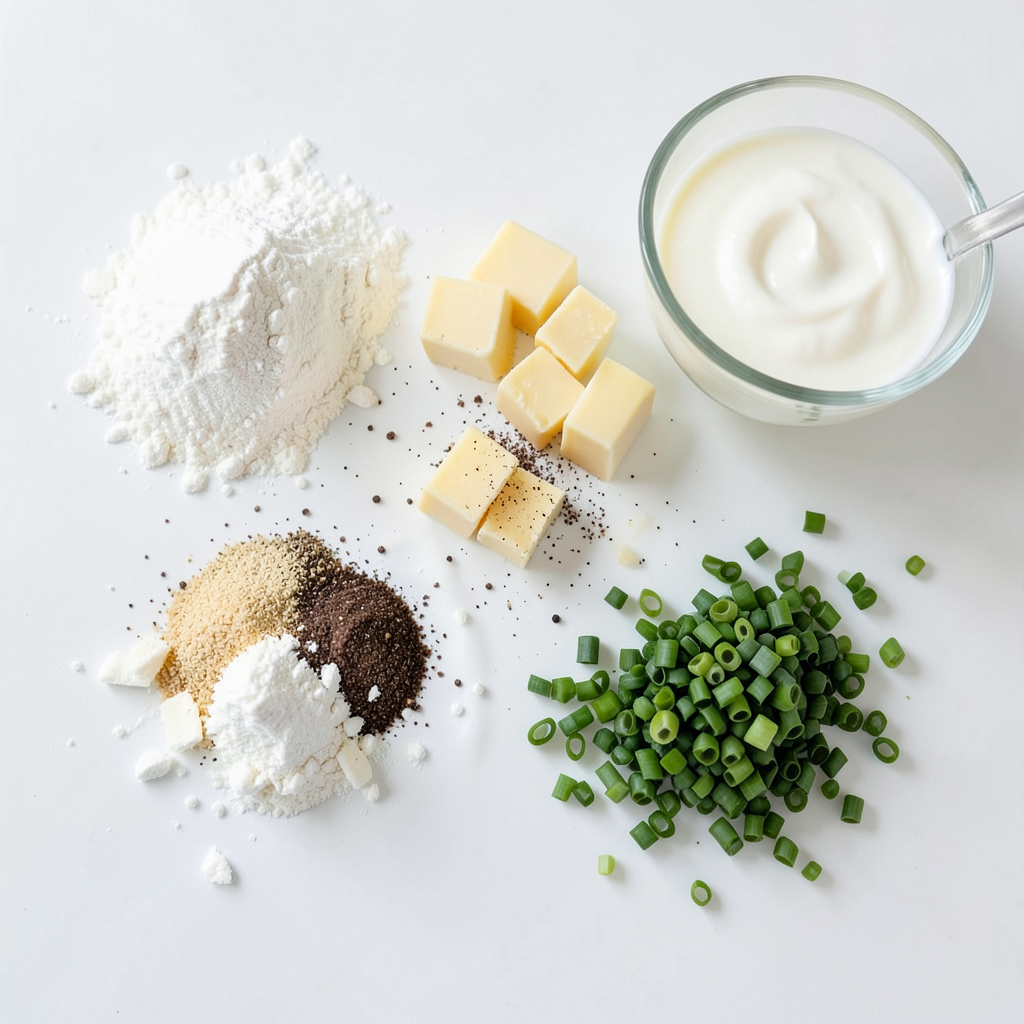
- 2 cups all-purpose flour
- 1 tablespoon baking powder
- 1 teaspoon salt
- 1/2 teaspoon freshly ground black pepper
- 1/2 cup unsalted butter, chilled and cut into small cubes
- 1 cup finely grated Parmesan cheese
- 4 cloves of garlic, minced finely
- 1/2 cup sour cream
- 1/4 cup milk
- Fresh chives or parsley, finely chopped (for garnish)
Ingredient Substitutions
You can swap some ingredients to suit your taste or needs. If you want a lighter option, try using whole wheat flour instead of all-purpose flour. For a dairy-free version, use plant-based butter and a vegan sour cream. You can also use any hard cheese, like aged cheddar, in place of Parmesan. If you don’t have fresh garlic, garlic powder works too. Just use less, about 1/2 teaspoon. Fresh herbs like basil or oregano can replace chives or parsley for a new flavor twist.
Tips on Measuring Ingredients
Measuring ingredients correctly is key for great scones. Use dry measuring cups for flour and baking powder. Scoop flour into the cup, then level it off with a knife. Do not pack it down. For butter, chill it beforehand for easy cutting. When measuring sticky ingredients like sour cream and milk, use liquid measuring cups. Make sure to check eye level for accuracy. This ensures your scones will rise well and taste amazing!
Step-by-Step Instructions
Preparing the Dough
Start by preheating your oven to 400°F (200°C). Line a baking sheet with parchment paper. This step helps the scones not stick. In a large bowl, mix together 2 cups of all-purpose flour, 1 tablespoon of baking powder, 1 teaspoon of salt, and 1/2 teaspoon of black pepper. Use a whisk to blend them well.
Next, add 1/2 cup of chilled butter, cut into small cubes. You can use a pastry cutter, fork, or your fingers to mix the butter. Blend until the texture looks like coarse crumbs. You want some small lumps for a flaky scone.
Now, gently fold in 1 cup of finely grated Parmesan cheese and 4 cloves of minced garlic. Make sure they are spread evenly throughout the mix. In another bowl, whisk together 1/2 cup of sour cream and 1/4 cup of milk until smooth. Slowly add this wet mix to the dry ingredients, stirring just until the dough forms. Don't overmix; this keeps the scones soft.
Shaping and Cutting Scones
Lightly flour a clean surface. Turn the dough out and gently knead it 2-3 times. Be careful not to overwork the dough. Shape it into a circle about 1 inch thick. Use a sharp knife or pizza cutter to cut the dough into 8 equal wedges.
Transfer the wedges to the prepared baking sheet, leaving space between each scone for them to grow. This space helps them bake evenly.
Baking Instructions
Place the baking sheet in your preheated oven. Bake the scones for 20-25 minutes. They should puff up and turn golden brown on top. Keep an eye on them as they bake to make sure they don’t get too dark.
Once they are done, take them out of the oven. Let the scones cool on the baking sheet for a few minutes. Right before serving, sprinkle freshly chopped chives or parsley on top. This adds a nice touch and bright flavor. Enjoy your savory garlic Parmesan scones!
Tips & Tricks
Common Mistakes to Avoid
One big mistake is overmixing the dough. This can make your scones tough. Mix just until the dough comes together. Another mistake is not chilling the butter. Cold butter helps scones rise and stay flaky. Finally, don’t skip the baking soda. It gives your scones a nice lift.
How to Achieve the Perfect Texture
For light and fluffy scones, use a light touch when mixing. You want to see some lumps of butter in the dough. This creates pockets for steam to form. Shape your dough gently into a circle, about one inch thick. This thickness helps the scones rise evenly.
Flavor Enhancements
To take your scones to the next level, try adding herbs. Fresh chives or parsley work well. You can also use garlic powder for extra flavor. If you want a bit of heat, add red pepper flakes. A sprinkle of extra Parmesan on top before baking adds a nice crust.
Pro Tips
- Use Cold Ingredients: Make sure your butter and sour cream are chilled. This helps create a flaky texture in the scones.
- Don't Overmix: When combining the wet and dry ingredients, mix just until the dough comes together to keep the scones tender.
- Experiment with Cheese: While Parmesan is delicious, feel free to mix in other cheeses like cheddar or feta for a unique flavor twist.
- Serve Warm: Enjoy the scones fresh from the oven for the best taste and texture, ideally paired with a creamy dip or butter.
Variations
Additional Cheese Options
You can easily switch up the cheese in these scones. If you want a sharper taste, try aged cheddar. For a creamier flavor, go with cream cheese. You could also use feta for a tangy kick. Each type of cheese adds a unique twist to the scone.
Herb Variations
Herbs can add depth to your scones. For a classic taste, mix in some dried oregano or basil. Want a fresh twist? Add chopped fresh rosemary or thyme. Even a bit of dill can enhance the garlic flavor. Experiment with different herbs to find your favorite mix.
Gluten-Free Adaptations
If you need a gluten-free option, use a gluten-free flour blend. Make sure it has xanthan gum or add it separately to help with texture. Check that your baking powder is gluten-free as well. The scones may be a bit denser, but they will still taste great.
Storage Info
Storing Leftover Scones
You can keep leftover scones fresh for up to three days. Place them in an airtight container at room temperature. This keeps the scones soft and tasty. If you notice any moisture, you can place a paper towel in the container to absorb it. Avoid storing in the fridge, as this can make them dry.
Freezing Options
If you want to save the scones for later, freezing works well. Wrap each scone in plastic wrap tightly. Then place them in a freezer bag or container. They can last up to three months frozen. When you’re ready to enjoy them, just thaw them overnight in the fridge.
Reheating Instructions
To reheat scones, preheat your oven to 350°F (175°C). Place the scones on a baking sheet. Heat for about 10-15 minutes until warmed through. If you like them crispy, you can bake them a little longer. Enjoy them warm for the best flavor!
FAQs
Can I use whole wheat flour?
Yes, you can use whole wheat flour. It gives the scones a nutty flavor. Just remember to adjust the liquid slightly. Whole wheat flour absorbs more moisture, so you may need a bit more milk or sour cream. The scones will be a bit denser but still tasty.
How do I know when the scones are done?
You will know the scones are done when they are puffed and golden brown. The tops should feel firm to the touch. You can also check the bottom. It should be light brown. If you see these signs, you can take them out of the oven.
Can I make the dough ahead of time?
Yes, you can make the dough in advance. Wrap it tightly in plastic wrap and store it in the fridge. You can keep it for up to 24 hours. When you are ready, just roll and cut the scones. They will bake up nice and fresh!
You learned how to make great scones today. I shared key ingredients and smart substitutions. I also provided tips for measuring and baking. Remember the steps to prep, shape, and bake your scones for the best texture. Explore flavor boosts and variations, like cheese and herbs. Store your leftovers well and check FAQs for common questions. The joy of fresh scones awaits you. Enjoy your baking adventures!