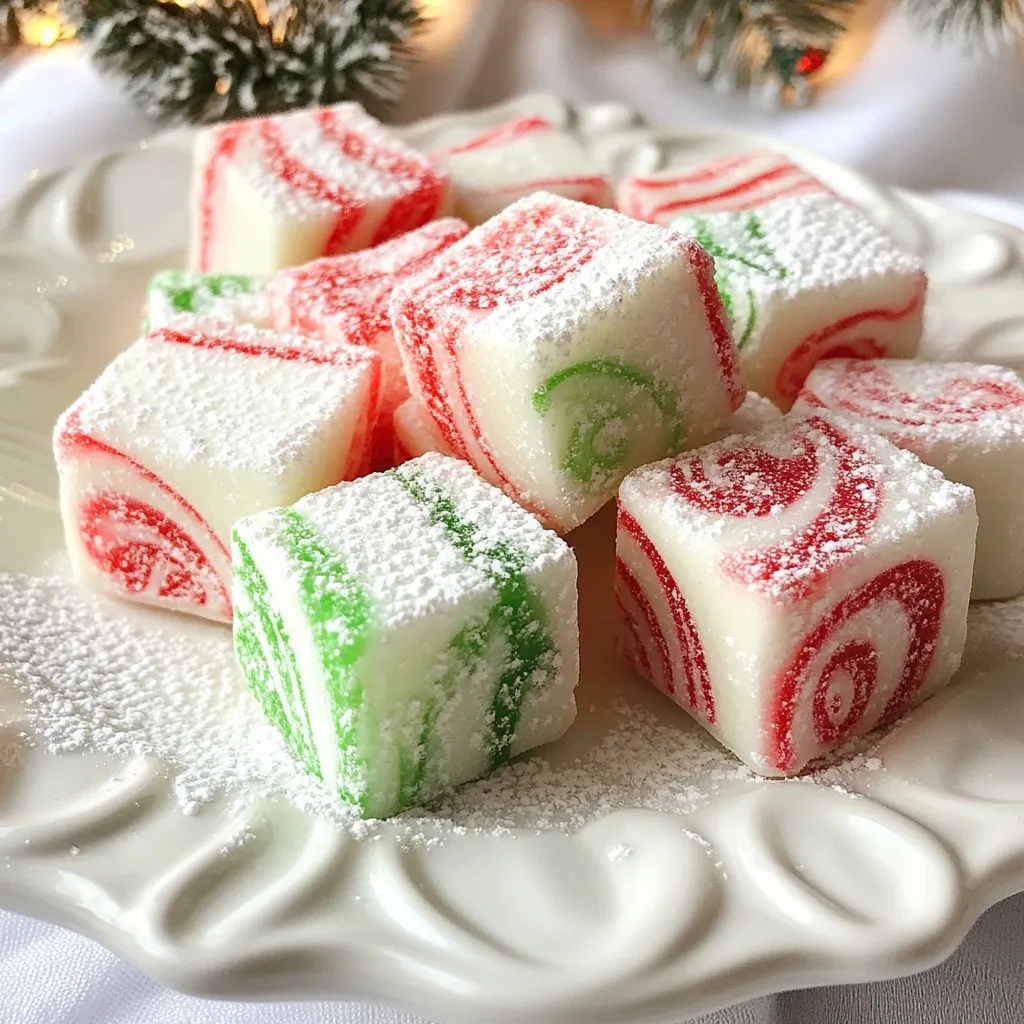
Looking to add a sweet spark to your holiday season? You’re in the right place! In this blog post, I’ll show you how to make soft Christmas peppermints that are both festive and fun. With simple ingredients and easy steps, you’ll impress family and friends with these delightful treats. Let’s dive into this yummy recipe that brings joy and flavor to your holiday table!
Why I Love This Recipe
- Festive Flavors: These soft Christmas peppermints bring a delightful burst of peppermint flavor that perfectly captures the spirit of the holiday season.
- Easy to Make: With simple ingredients and straightforward instructions, this recipe is perfect for bakers of all skill levels.
- Customizable Colors: The option to add red and green food coloring allows you to create a visually stunning treat that’s sure to impress.
- Perfect for Gifting: These homemade peppermint candies make charming gifts, especially when presented in decorative tins or jars.
Ingredients
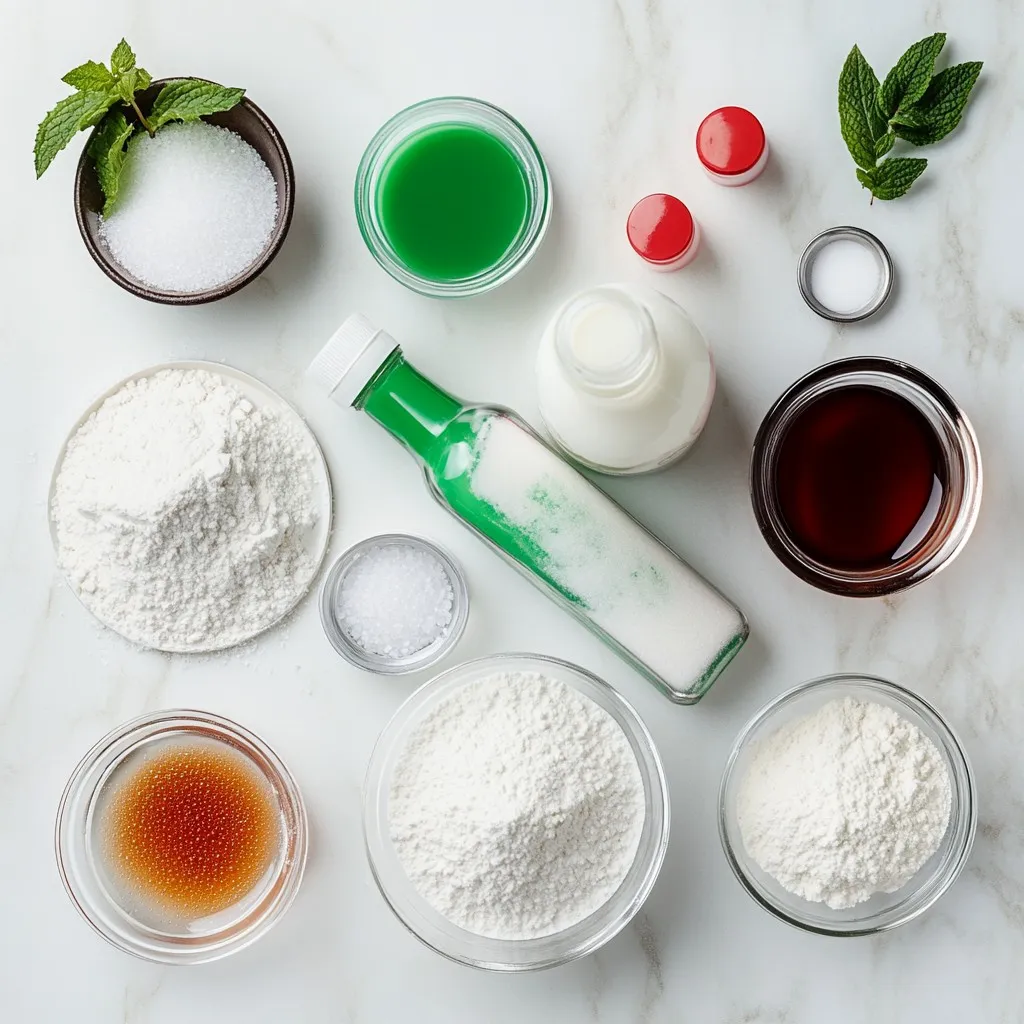
Detailed ingredient list
– 2 cups powdered sugar
– 1 cup milk powder
– 1/2 cup unsweetened peppermint syrup
– 1/4 cup light corn syrup
– 1/2 teaspoon peppermint extract
– 1/4 teaspoon vanilla extract
– 1/4 teaspoon salt
– 1-2 tablespoons milk (as needed for consistency)
– Red and green food coloring (optional for festive swirls)
Ingredient substitutions
You can swap out a few items if needed. Use granulated sugar instead of powdered sugar for a crunchier texture. If you don’t have milk powder, try using coconut powder. You can also replace light corn syrup with honey or agave syrup for a different taste. If you lack peppermint syrup, you can increase the peppermint extract.
Importance of each ingredient
Every ingredient plays a key role in making these soft Christmas peppermints.
– Powdered sugar gives the treats their sweetness and soft texture.
– Milk powder adds creaminess and helps the dough hold well.
– Peppermint syrup is the star flavor; it makes them minty and sweet.
– Corn syrup keeps the candy moist and prevents it from hardening too much.
– Peppermint extract boosts the mint flavor, making it more intense.
– Vanilla extract adds warmth and balances the minty taste.
– Salt enhances the sweetness and flavors overall.
– Milk adjusts the dough’s consistency to make it soft and easy to work with.
– Food coloring is optional but helps create a festive look, adding fun swirls.
These ingredients work together to create a soft, delightful peppermint treat perfect for the holidays.
Step-by-Step Instructions
Preparation of workspace
Start by gathering your tools. You need a large mixing bowl, a whisk, and a spatula. Clear a big area on your countertop. This space helps you mix and shape the peppermints easily.
Mixing dry and wet ingredients
In your mixing bowl, combine the powdered sugar, milk powder, and salt. Use a whisk to mix them well. Next, slowly add in the peppermint syrup, corn syrup, peppermint extract, and vanilla extract. Stir until it clumps. The mixture will be thick at this stage.
Achieving the right dough consistency
Now, we want a soft dough. Add milk one tablespoon at a time. Mix well after each addition. The goal is a dough that is soft but not sticky. It should be easy to handle.
Rolling and shaping the peppermints
Dust your countertop with powdered sugar. Turn the dough out onto this surface. Knead the dough for 2-3 minutes until it feels smooth. If you want colors, split the dough in half. Add red to one half and green to the other. Knead until the colors blend well.
Next, roll each colored dough into long ropes about 1/2 inch wide. Gently twist the red and green ropes together to make a marbled look. Roll this twisted dough into a long log.
Setting the finished product
Use a sharp knife to cut the log into 1-inch pieces. Place the pieces on a parchment-lined baking sheet. Make sure they are spaced out. Let the peppermint pieces set at room temperature for about 12 hours. If you need them sooner, you can refrigerate them.
Once they firm up, dust them with more powdered sugar. This keeps them from sticking together. Store your soft Christmas peppermints in an airtight container to keep them fresh. Enjoy your tasty treats!
Tips & Tricks
Common mistakes to avoid
When making soft Christmas peppermints, some common mistakes can ruin your treats. Avoid these:
– Not measuring ingredients correctly: Use dry and liquid measuring cups. Precision is key.
– Skipping the mixing step: Make sure to mix dry ingredients well. This ensures even flavor.
– Adding too much milk at once: Add milk gradually. This keeps the dough from becoming too sticky.
– Not letting them set long enough: Giving the peppermints time to set is crucial. This helps them firm up properly.
Best practices for kneading dough
Kneading your dough correctly will give you the best texture. Here are some tips:
– Lightly dust your surface: Use powdered sugar to prevent sticking. This makes kneading much easier.
– Knead gently: Use your palm to push the dough down and fold it over. Do this for about 2-3 minutes.
– Check for smoothness: The dough should be soft and cohesive. If it feels sticky, you can dust it with more powdered sugar.
How to create marbled effects
Adding a marbled look to your peppermints makes them festive. Here’s how to do it:
– Divide the dough evenly: Split it into two portions before adding color.
– Use food coloring wisely: Add 1-2 drops of red to one half and green to the other. Knead until evenly colored.
– Roll into ropes: Make long ropes with each color, around 1/2 inch thick.
– Twist them together: Gently twist the red and green ropes. This creates a beautiful marbled effect.
– Roll into a log: Shape the twisted dough into a log. Slice it into bite-sized pieces.
These simple tips will help you make perfect soft Christmas peppermints. Enjoy the process and have fun!
Pro Tips
- Use Fresh Ingredients: Ensure your peppermint syrup and extracts are fresh for the best flavor. Stale ingredients can dull the taste of your candies.
- Adjust Consistency: If the dough feels too dry, add a little extra milk, a teaspoon at a time, until you reach the desired pliability without making it sticky.
- Experiment with Flavors: Feel free to mix in other extracts, like chocolate or almond, to create unique variations of these festive treats.
- Storage Tips: Store the finished peppermint pieces in a cool, dry place, and separate layers with parchment paper to prevent sticking.
Variations
Flavor variations (chocolate, cinnamon, etc.)
You can add fun flavors to your soft Christmas peppermints. Try chocolate by mixing in cocoa powder. Start with 1/4 cup and adjust to taste. You can also use cinnamon for a warm twist. Add 1 teaspoon of ground cinnamon for a cozy flavor. These small changes give your treats a new taste.
Color combinations for festive appeal
Color makes your peppermints fun and festive. Use red and green food coloring for the classic look. You can also try blue and white for a winter theme. Mix colors to create swirls. It is easy and adds a special touch. Don’t forget to have fun with it!
Incorporating spices or additional flavorings
Spices can enhance your peppermint flavor. Consider adding nutmeg or ginger for warmth. Just a pinch goes a long way. You can also use extracts like almond or orange for unique tastes. These little twists make your peppermints stand out and delight everyone.
Storage Info
How to store homemade peppermints
To keep your soft Christmas peppermints fresh, store them in an airtight container. This will prevent them from drying out. You can layer them with wax paper to keep them from sticking together. If you want them to last longer, place them in a cool, dry place away from sunlight.
Shelf life and freshness tips
When stored properly, these peppermints can last for about two weeks. After that, they may start to lose their soft texture. To keep them fresh, check for any signs of moisture or stickiness before serving. If they feel too hard, they may need some extra care.
Freezing options for long-term storage
If you want to save some for later, you can freeze the peppermints. Place them in a single layer on a baking sheet. Once frozen, transfer them to an airtight container. They can stay frozen for up to three months. When you want to enjoy them, let them thaw at room temperature. This way, you can have festive treats anytime!
FAQs
Can I use different types of syrups?
Yes, you can use different syrups. Maple syrup or agave syrup can work well. These options can change the flavor a bit but still taste great. If you prefer a more natural sweetener, honey can also be a good choice. Just remember, the final taste may vary based on what you use.
How long do these peppermints last?
These soft peppermints can last up to two weeks when stored properly. Keep them in an airtight container to maintain their softness. If you want to keep them longer, you can freeze them. They will still taste good for about three months in the freezer.
Can I make these without corn syrup?
Yes, you can make these without corn syrup. A good substitute is using honey or maple syrup. Both will add a nice flavor and help bind the ingredients. Just remember to adjust the amount since they are sweeter than corn syrup.
What if my dough is too sticky?
If your dough feels too sticky, add a little more powdered sugar. Start with a tablespoon and mix well. Keep adding until the dough is soft but not sticky. You want it to be easy to handle and shape. Don’t worry; it’s easy to fix!
In this post, I covered how to make homemade peppermints. I shared the ingredients, the steps to create them, and tips to avoid mistakes. I also explored fun variations for flavors and colors. Remember to store your peppermints well to keep them fresh. Making these treats is fun and rewarding. With a little practice, you’ll master this recipe and impress everyone. Enjoy your candy-making journe