Skip to content
DisclaimerTerms Of UseGDPR PolicyCookie Policy

lazychefmagic

  • Home
  • Drinks
  • Appetizers
  • Dinner
  • Dessert
  • About
  • Contact
  • Privacy Policy
DisclaimerTerms Of UseGDPR PolicyCookie Policy

NO-ING-IMG

- 4 large eggs - 1 medium zucchini, thinly sliced - 1 medium eggplant, thinly sliced - 1 red bell pepper, thinly sliced - 1 cup ricotta cheese - 1 cup fresh spinach, chopped - 1/2 cup grated Parmesan cheese, divided - 1 tablespoon olive oil - 1 teaspoon garlic powder - Salt and pepper, to taste - Fresh basil leaves, for garnish Baked Egg Napoleon is packed with nutrients. Each serving has about: - Calories: 320 - Protein: 18g - Carbs: 18g - Fat: 20g - Fiber: 4g This dish gives you protein from eggs and cheese. The veggies add fiber and vitamins. Choosing fresh ingredients makes your dish better. Here are some tips: - Eggs: Look for firm shells without cracks. Fresh eggs have a bright yolk. - Zucchini and Eggplant: Choose ones that feel firm and heavy. They should have shiny skin. - Red Bell Pepper: Pick peppers that are smooth and bright. Avoid any with soft spots. - Spinach: Look for fresh, vibrant green leaves. Avoid yellow or wilting leaves. - Ricotta Cheese: Choose cheese that looks creamy and fresh. Check the expiration date. These tips will help you pick the best ingredients for your Baked Egg Napoleon. Enjoy crafting this delightful meal! {{ingredient_image_2}} First, gather your ingredients. You need fresh vegetables like zucchini, eggplant, and bell pepper. Next, get your eggs and ricotta cheese. You will also need Parmesan cheese, spinach, and some spices. This recipe takes about 15 minutes to prep. 1. Start by preheating your oven to 375°F (190°C). 2. In a large skillet, add one tablespoon of olive oil. Heat the oil over medium heat. 3. Add the sliced zucchini, eggplant, and red bell pepper to the skillet. 4. Sauté the vegetables for about 5-7 minutes. Stir them often until they soften. 5. Season with salt, pepper, and garlic powder to taste. When cooked, take the skillet off the heat. 6. In a mixing bowl, combine 1 cup of ricotta cheese and 1 cup of chopped spinach. 7. Add half a cup of grated Parmesan cheese to the bowl. Mix well until smooth. 8. Season the ricotta mix with salt and pepper as you like. 1. Grab your baking dish and start layering. First, add the sautéed vegetables. 2. Spoon some of the ricotta mixture over the veggies and spread it out. 3. Keep layering the ingredients until you run out. Finish with the ricotta on top. 4. Use a spoon to make four small wells in the ricotta layer. 5. Crack an egg into each well. Sprinkle the rest of the Parmesan cheese on top. 6. Cover the baking dish with aluminum foil to keep it moist. 7. Bake in the oven for 20 minutes. 8. After 20 minutes, remove the foil. Bake for another 10-15 minutes. Check the eggs for doneness. 9. Once baked, take the dish out and let it cool for a few minutes. 10. Garnish with fresh basil leaves before serving. Enjoy your meal! To get the best eggs, choose large, fresh eggs. Crack them gently into the wells. This helps keep the yolks whole. Bake them until the whites are set but the yolks are still soft. For firmer yolks, bake a little longer. Keep an eye on them as they cook. Use fresh herbs like basil and parsley for a flavor boost. Add spices like paprika or cayenne for heat. Mix fresh garlic into the ricotta for more depth. A splash of lemon juice can brighten the dish. Taste your layers as you go to adjust seasoning. Serve Baked Egg Napoleon on individual plates for a nice touch. Drizzle some olive oil around the edge for elegance. Top each serving with a sprig of fresh basil. You can also sprinkle a bit more Parmesan cheese on top just before serving. This adds flavor and a nice visual flair. Pro Tips Use Fresh Ingredients: The flavor and texture of your Baked Egg Napoleon will greatly benefit from using fresh vegetables and herbs. Seasonal produce not only tastes better but also adds vibrant color to your dish. Experiment with Cheese: While ricotta and Parmesan are delicious, feel free to mix in other cheeses like feta or mozzarella for different flavor profiles. Just remember to adjust the salt content accordingly. Control Egg Doneness: To achieve your desired level of doneness for the eggs, keep an eye on them during the final baking stage. If you prefer runny yolks, remove the dish from the oven earlier. Make Ahead: You can prepare the layers a day in advance and store them in the fridge. Just add the eggs and bake when you're ready to serve, making this a great option for meal prep or gatherings. {{image_4}} You can easily swap ingredients in Baked Egg Napoleon. If you don’t have eggplant, use mushrooms. They add a nice texture. Instead of ricotta, cottage cheese works well too. It gives a similar creaminess. You can also try different cheeses, like feta or goat cheese, for a tangy flavor. If you want a kick, add some red pepper flakes to the ricotta mix. While I love baking this dish, you can also cook it on the stovetop. Simply layer the vegetables and ricotta in a skillet. Crack the eggs on top and cover it. Cook on low heat for about 15 minutes. This gives a nice, fluffy texture. You could even try using a slow cooker. Layer the ingredients as usual and cook on low for 2-3 hours. This recipe shines in every season. In spring, add fresh asparagus or peas for bright flavors. Summer is perfect for fresh tomatoes or corn to enhance sweetness. When fall arrives, incorporate roasted butternut squash or kale for warmth. In winter, use hearty greens like Swiss chard. Each season brings new tastes that keep this dish exciting! After enjoying your Baked Egg Napoleon, let it cool first. Then, place it in an airtight container. Make sure to cover it well to keep it fresh. Store it in the fridge for up to three days. When ready to eat leftovers, preheat your oven to 350°F (175°C). Place the Baked Egg Napoleon in an oven-safe dish. Cover it with foil to prevent drying out. Heat for about 15 to 20 minutes or until warm. You can also use a microwave. Just heat it for 1-2 minutes, checking to avoid overcooking. You can freeze Baked Egg Napoleon for later enjoyment. Cut it into portions before freezing. Wrap each piece in plastic wrap, then place in a freezer-safe bag. It will keep for up to three months. To thaw, move it to the fridge overnight. Reheat as mentioned above. This way, you can enjoy this tasty dish anytime! Yes, you can make Baked Egg Napoleon ahead of time. Prepare it fully, then cover it well. Store it in the fridge for up to 24 hours. When you're ready to bake, just remove it from the fridge. Bake as directed, but add a few extra minutes if it's cold. This makes it great for brunch or busy mornings. Baked Egg Napoleon pairs well with many sides. Here are some ideas: - A fresh green salad. - Toasted crusty bread. - Roasted potatoes for a hearty side. - Sliced avocado for creaminess. - A light yogurt with herbs for a cool dip. These sides balance the rich flavors of the dish and make it even more filling. Baked Egg Napoleon can fit into many diets. It is vegetarian and gluten-free. If you want it dairy-free, use a plant-based ricotta. For a low-carb option, skip the eggplant. Always check ingredient labels for allergens. This dish is flexible, making it great for different diets and tastes. In this post, I shared the essential skills for making Baked Egg Napoleon. We covered ingredient lists, cooking steps, and tips to improve each bite. You can choose your ingredients based on season and preference. Storing and reheating leftovers is simple and keeps the dish fresh. With careful preparation and a little creativity, you can make this recipe your own. Enjoy the fun of cooking and the great taste of your creations!

Baked Egg Napoleon Delightful and Simple Recipe

Are you ready to impress your family with a stunning dish? Baked Egg Napoleon is delightful and easy to make!

- 1 cup unsalted butter, softened to room temperature - 1 cup packed brown sugar - 1/2 cup granulated sugar - 2 large eggs, at room temperature - 1 teaspoon pure vanilla extract - 3 cups all-purpose flour - 1 teaspoon baking powder - 1/2 teaspoon salt - 1 teaspoon ground cinnamon - 1/2 teaspoon ground nutmeg - 1 cup white chocolate chips - 1 cup dried cranberries - 1/2 cup chopped pecans or walnuts When I make these Christmas cookie bars, I focus on quality. The unsalted butter adds creaminess, while both sugars give a sweet depth. Use fresh eggs for the best texture. Vanilla extract enhances the flavor and makes it warm. For the dry mix, all-purpose flour is key. It creates the right structure. Baking powder helps the bars rise. Salt balances the sweetness. Cinnamon and nutmeg bring that festive spice. The best part? The mix-ins! White chocolate chips add a sweet touch. Dried cranberries give a tangy bite. Chopped nuts add crunch and richness. You can mix and match the nuts if you like. Gather these ingredients before starting. This will make your baking process smooth and fun! {{ingredient_image_2}} 1. Preheat your oven to 350°F (175°C). Prepare a 9x13-inch baking pan. You can grease it with butter or use parchment paper for easy removal. 2. In a large bowl, mix 1 cup of softened unsalted butter with 1 cup of packed brown sugar and 1/2 cup of granulated sugar. Use an electric mixer to cream them on medium speed. Do this for 2-3 minutes until the mix is fluffy. 3. Add 2 large eggs, one at a time. Mix well after each egg. Stir in 1 teaspoon of pure vanilla extract until everything blends well. 1. In a different bowl, whisk together 3 cups of all-purpose flour, 1 teaspoon of baking powder, 1/2 teaspoon of salt, 1 teaspoon of ground cinnamon, and 1/2 teaspoon of ground nutmeg. This helps to mix all the dry ingredients evenly. 1. Gradually add the dry mix to the wet mix in your large bowl. Use low speed on your mixer. Mix just until combined; don’t overmix. The dough should feel thick and slightly crumbly. 2. Gently fold in 1 cup of white chocolate chips, 1 cup of dried cranberries, and 1/2 cup of chopped pecans or walnuts. Use a spatula to evenly distribute the mix-ins. 3. Transfer the cookie dough into your prepared baking pan. Press the dough into an even layer with your spatula, smoothing the top for a uniform finish. 1. Place the pan in your preheated oven and bake for 25-30 minutes. The edges should turn golden brown. A toothpick inserted in the center should come out clean. 2. Once baked, take the pan out of the oven. Allow the bars to cool in the pan for about 10 minutes. If you used parchment paper, lift the bars out and place them on a wire rack to cool completely. Then, cut into squares or rectangles. To make the best cookie bars, start with the right dough. The dough should be thick and slightly crumbly. If it feels too wet, add a little more flour. If it feels too dry, you may need more butter. Mixing is key, too. Avoid overmixing after adding the dry ingredients. Stir just until combined. This helps keep the bars soft and chewy. A little decoration goes a long way. For a festive touch, arrange your cookie bars on a bright platter. Dust the tops lightly with powdered sugar for a snowy look. You can also add fun garnishes. Use fresh holly leaves or colorful candy canes. These small touches make your cookie bars stand out at any holiday gathering! Pro Tips Use Room Temperature Ingredients: Make sure your butter and eggs are at room temperature before mixing. This helps create a smoother batter and better texture in the final product. Don’t Overmix the Dough: Mix the wet and dry ingredients just until combined. Overmixing can lead to tough cookie bars, so be gentle when folding in the add-ins. Customize Your Add-Ins: Feel free to swap out the cranberries and nuts for your favorite dried fruits or nuts. This recipe is versatile and can be adjusted to your taste preferences! Check for Doneness: Ovens can vary, so start checking for doneness at the 25-minute mark. The edges should be golden brown, and a toothpick inserted in the center should come out clean. {{image_4}} You can easily change the taste of your Christmas cookie bars. Adding peppermint extract gives a fresh twist. Just use about 1 teaspoon for a nice minty flavor. It pairs well with chocolate. You can switch out the white chocolate chips for dark chocolate chips. Dark chocolate adds richness and depth. If you like nuts, try using different types. Almonds or hazelnuts can make your bars unique. Many people want options that fit their needs. For gluten-free cookie bars, you can swap all-purpose flour for a gluten-free blend. Make sure the blend contains xanthan gum for the best texture. If you need a vegan option, replace eggs with flax eggs. Mix 1 tablespoon of ground flaxseed with 2.5 tablespoons of water. Let it sit for about five minutes to thicken. For butter, use coconut oil or vegan butter. These changes let everyone enjoy your festive treat! After baking, let your cookie bars cool on a wire rack. This helps air circulate around them. It stops the bars from getting soggy on the bottom. Cooling on a rack takes about 30 minutes, which is perfect for letting them set. For the best storage, place your cookie bars in an airtight container. Wrap them in plastic wrap first for extra protection. You can store them at room temperature for up to five days. If you keep them in the fridge, they can last for about a week. Just make sure to let them come to room temp before serving. To freeze your cookie bars, first let them cool completely. Cut them into squares or rectangles. Place the pieces in a single layer on a baking sheet. Freeze them for about two hours. After that, move them to a freezer bag or container. They can stay frozen for up to three months. When you’re ready to eat, just take them out and let them defrost at room temperature for about 30 minutes. Yes, you can make these cookie bars ahead of time. Simply bake them and let them cool. Store them in an airtight container for up to five days. This helps the flavors blend well. To cut the bars evenly, first cool them completely. Use a sharp knife for clean cuts. You can also run the knife under hot water before cutting. This method helps prevent sticking. I recommend using dried cranberries for the best texture and sweetness. Fresh fruit can add moisture, making the bars soggy. If you want to experiment, try using small amounts of dried fruit. To keep the cookie bars moist, don't overbake them. Check for doneness a few minutes early. Also, using room temperature ingredients helps create a softer texture. Yes, you can easily make these bars nut-free. Just omit the nuts or replace them with seeds like sunflower seeds or pumpkin seeds. They add crunch and flavor without the allergens. Now you know how to make delicious cookie bars. We covered the key ingredients, step-by-step mixing, and baking processes. You learned tips for perfecting your bars and fun decoration ideas. We also discussed variations to suit different tastes and dietary needs. Proper cooling and storage will keep your treats fresh. Finally, I answered common questions to help you succeed. Enjoy baking and sharing these tasty cookie bars with friends!

Christmas Cookie Bars Festive and Flavorful Treat

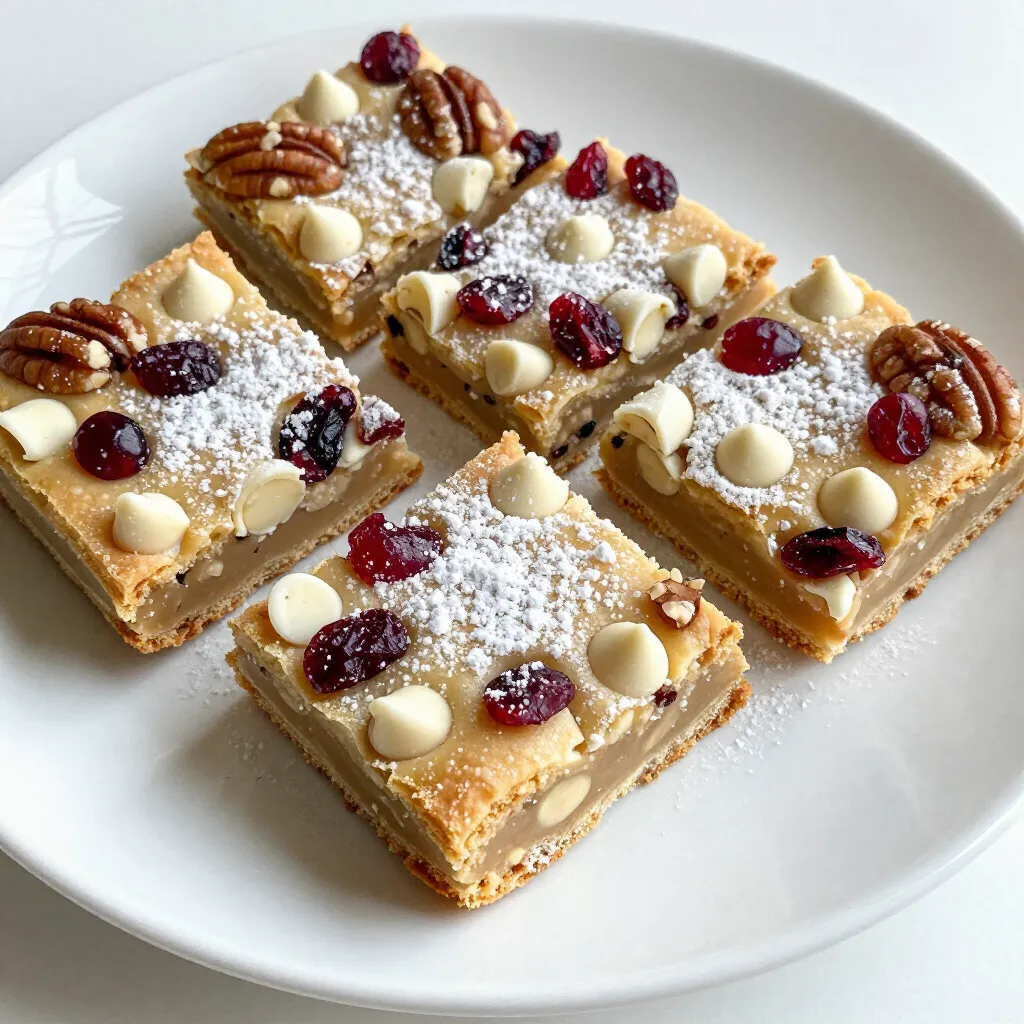
Get ready to indulge in the magic of the season with my easy Christmas Cookie Bars! These festive and flavorful

To make Italian meringue frosting, you need just a few key ingredients: - 1 cup granulated sugar - 1/2 cup water - 3 large egg whites, at room temperature - 1/4 teaspoon cream of tartar - 1 teaspoon vanilla extract (or your favorite flavor) - Pinch of salt These items create the fluffy texture and sweet flavor that make this frosting so special. The sugar and water form a syrup that you pour into whipped egg whites. The cream of tartar helps stabilize the egg whites, while the salt and vanilla add depth to the taste. If you want to change things up, you can substitute some ingredients. Instead of granulated sugar, you can use superfine sugar. This sugar dissolves quickly, which helps the meringue whip up better. For the flavor, try almond or lemon extract instead of vanilla. If you need an egg-free version, you can use aquafaba. Aquafaba is the liquid from canned chickpeas. It works well as a substitute for egg whites in many recipes. Just remember, the texture might be slightly different. To achieve the best results, make sure your mixing bowl is clean and dry. Any fat or grease can prevent the egg whites from whipping properly. Use room temperature egg whites, as they whip better than cold ones. Also, watch the sugar syrup closely. It needs to reach 240°F (115°C) for the right consistency. Make sure to drizzle the hot syrup carefully into the egg whites. This step is crucial. If you pour too quickly, it can cook the egg whites. Finally, whip the meringue until it feels cool to the touch. This ensures the frosting is light and fluffy. Enjoy making this delightful frosting! {{ingredient_image_2}} First, grab a small saucepan. Add 1 cup of granulated sugar and 1/2 cup of water. Place it on medium heat. Stir gently until the sugar dissolves. Keep stirring until the mixture is clear. Then, stop stirring and let it boil. Use a candy thermometer to check the temperature. You want it to reach 240°F (115°C). This is the soft ball stage. Once it hits this point, take it off the heat. While the sugar syrup cooks, take a clean mixing bowl. Add 3 large egg whites and 1/4 teaspoon of cream of tartar. Use an electric mixer on medium speed. Whip the egg whites until they are frothy. You should see them increase in volume slightly. This step is key for a fluffy texture. When the syrup reaches 240°F, it’s time to mix. With the mixer on low, slowly drizzle the hot syrup into the whipped egg whites. Aim for the space between the edge of the bowl and the beaters. This helps avoid splashes. Once all the syrup is in, switch the mixer to high. Whip until the meringue is glossy and cool to the touch. This takes about 7-10 minutes. When done, gently fold in 1 teaspoon of vanilla extract and a pinch of salt. Keep whipping just until these are mixed in. Now, you're ready to use your light and fluffy Italian meringue frosting! To make Italian meringue frosting, you need to whip the egg whites well. Start with room temperature egg whites. They whip up better and faster. Use a clean bowl and beaters. Any fat can ruin your meringue. Begin at medium speed until the whites are frothy. Then, turn the speed to high. This helps create a light and airy texture. Be careful with your sugar syrup. If you stir it while it boils, it can crystallize. Always use a candy thermometer. This ensures the syrup reaches 240°F. If it’s too hot or cold, your meringue won't set right. When adding the syrup, drizzle it slowly. Pour it between the bowl and the beaters. This keeps the mixture smooth and prevents splashes. The final meringue should be glossy and smooth. After mixing, touch it to check if it's cool. This should take about 7-10 minutes of whipping. If it feels warm, keep whipping. Once it cools, fold in the vanilla extract. This adds flavor without losing the texture. You want a fluffy and shiny frosting that looks great on any dessert. Pro Tips Use a Clean Bowl: Ensure that the mixing bowl is completely clean and free of any grease, as even a small amount of fat can prevent the egg whites from whipping properly. Watch the Temperature: Use a candy thermometer to accurately monitor the sugar syrup temperature; reaching exactly 240°F is crucial for achieving the right consistency. Room Temperature Egg Whites: For best results, use egg whites that are at room temperature, as they whip up to a greater volume compared to cold egg whites. Immediate Use: This meringue frosting is best used right after making it for maximum fluffiness and stability; if you need to store it, keep it covered at room temperature for a short period. {{image_4}} You can easily change the flavor of Italian meringue frosting. Just add a teaspoon of your favorite extract. Here are some great options: - Almond extract for a nutty taste. - Lemon extract for a bright, fresh zing. - Mint extract for a cool, refreshing flavor. - Coffee extract for a rich, bold touch. Experiment with different flavors to find what you love most! Adding color to your frosting is fun and easy. You can use gel food colors to create vibrant hues. Here’s how: 1. Divide the frosting into separate bowls. 2. Add a few drops of gel color to each bowl. 3. Mix well until you achieve the desired shade. You can create swirls or layers of color. This makes your desserts pop and look stunning! Italian meringue frosting is super versatile. You can use it on various desserts. Here are some ideas: - Cakes: Spread it on layer cakes for a light finish. - Cupcakes: Pipe it high on cupcakes for a beautiful look. - Pies: Use it as a topping for lemon or chocolate pies. - Tarts: It makes a lovely layer in fruit tarts. This frosting can also be toasted for a delicious crunch. Use a kitchen torch to lightly brown the top, adding an extra layer of flavor. Enjoy getting creative with this delightful frosting! To store leftover Italian meringue frosting, place it in an airtight container. Be sure to press plastic wrap directly onto the frosting's surface to keep air out. This helps prevent drying or crusting. Store it in the fridge for up to five days. Before using it again, let it sit at room temperature for about 30 minutes. Yes, you can freeze Italian meringue frosting! Scoop it into a freezer-safe container. Ensure it is tightly sealed to avoid freezer burn. It can last for up to three months in the freezer. When you're ready to use it, move it to the fridge overnight. Then, let it reach room temperature and re-whip it gently before using. To keep your frosting fresh, avoid exposing it to heat or direct sunshine. Use clean utensils each time you scoop it out. If you notice any separation, gently re-whip it before using. You can also add a little fresh vanilla extract to boost the flavor again. Following these tips ensures your frosting stays light and fluffy! Italian meringue is unique because it uses hot sugar syrup. Other types, like French meringue, use raw egg whites. The heat from the syrup cooks the egg whites, making it safe to eat. This method creates a stable and glossy frosting. It holds its shape well and adds a light texture to desserts. Yes, you can use pasteurized egg whites. They are safe and convenient. These egg whites whip well and help you avoid any food safety issues. Just make sure they are at room temperature for the best results. This helps them achieve the right volume and texture. Italian meringue frosting goes well with many desserts. It is perfect for cakes and cupcakes. You can also use it on pies, like lemon meringue. The sweetness of the frosting balances tart flavors. It's great for layering in trifles or even as a topping for brownies. You can get creative and add it to your favorite treats! Italian meringue frosting is a delightful treat. We covered essential ingredients, tips for perfect texture, and how to store it. Remember to choose your flavor and color options wisely. This frosting works well on many desserts. With practice, you can master this smooth and glossy topping. Enjoy experimenting as you create unique treats. Happy baking!

Italian Meringue Frosting Light and Fluffy Delight

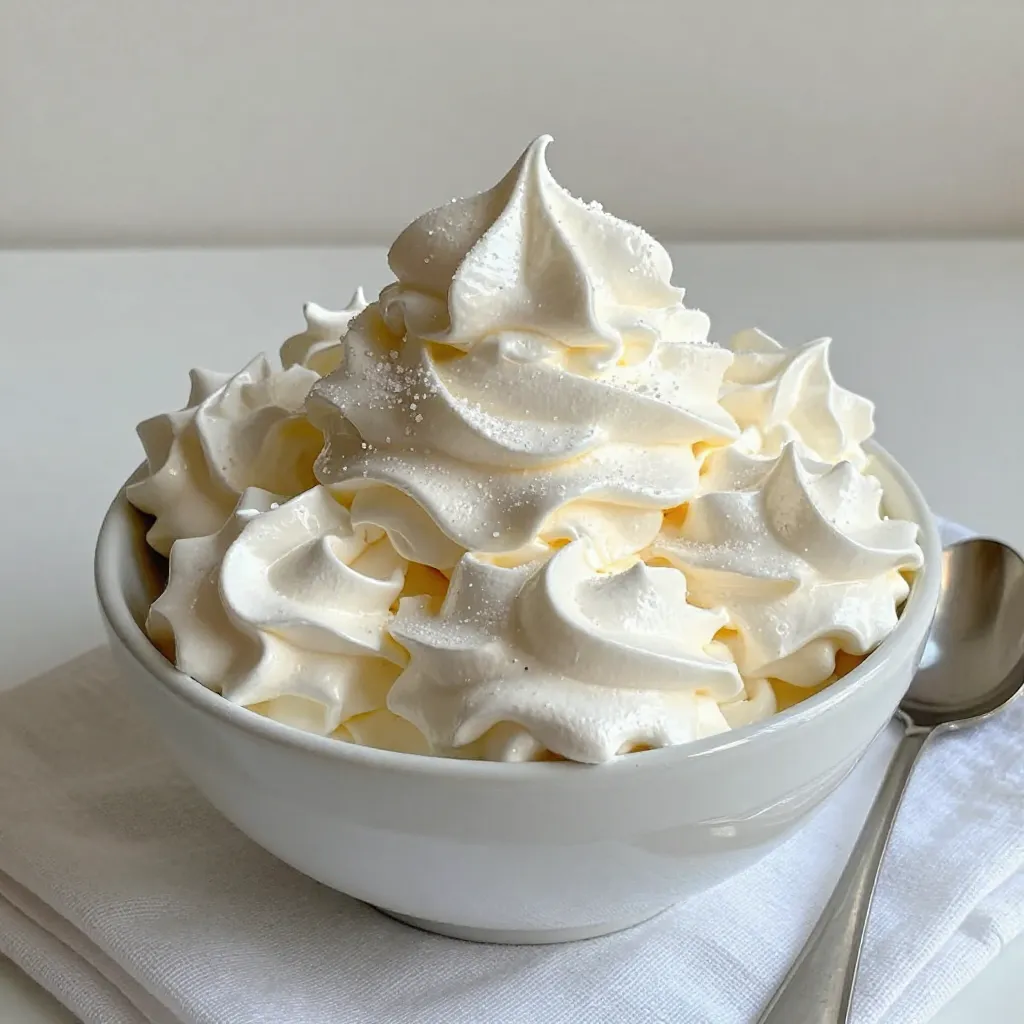
Italian Meringue Frosting is a game changer for your desserts! Light, fluffy, and oh-so-delicious, it’s the perfect topping for cakes,

- 1 cup all-purpose flour - 2 tablespoons granulated sugar - 1 teaspoon baking powder - 1/2 teaspoon baking soda - 1/4 teaspoon fine sea salt - 1 cup buttermilk - 1 large egg, lightly beaten - 2 tablespoons unsalted butter, melted - 1/2 teaspoon pure vanilla extract - 1/2 cup mini chocolate chips - Maple syrup or honey, for a sweet drizzle - Fresh fruit (strawberries, blueberries, or banana slices) To make mini pancake poppers, you need a mix of dry and wet ingredients. First, gather your dry ingredients. You will need all-purpose flour, granulated sugar, baking powder, baking soda, and sea salt. Each plays a key role in making your pancakes light and fluffy. Next, you will prepare the wet ingredients. This includes buttermilk, a beaten egg, melted unsalted butter, and vanilla extract. Buttermilk adds a nice tang and helps the pancakes rise. You can also get creative with optional add-ins and toppings. Mini chocolate chips add sweetness and fun. Drizzle maple syrup or honey on top for extra flavor. Fresh fruit gives a bright and fresh taste. Use strawberries, blueberries, or banana slices to make your poppers even more delightful! {{ingredient_image_2}} - First, grab a large mixing bowl. - In the bowl, whisk together: - 1 cup all-purpose flour - 2 tablespoons granulated sugar - 1 teaspoon baking powder - 1/2 teaspoon baking soda - 1/4 teaspoon fine sea salt - Mix until everything blends well. - In another bowl, combine: - 1 cup buttermilk - 1 large egg, lightly beaten - 2 tablespoons unsalted butter, melted - 1/2 teaspoon pure vanilla extract - Whisk until smooth and creamy. - Now, pour the wet mix into the dry mix. - Stir gently until just combined. - It's okay if some lumps stay. - If you want chocolatey poppers, fold in 1/2 cup mini chocolate chips now. - Preheat your mini donut maker or a non-stick skillet over medium heat. - Lightly grease the surface with cooking spray or butter. - Use a tablespoon to measure and pour the batter into each mold or onto the skillet. - Cook for about 1-2 minutes. - Look for small bubbles on the surface. - When edges set, flip them gently. - Cook for another 1-2 minutes until golden brown. - Drizzle your pancake poppers with maple syrup or honey. - Garnish with fresh fruit like strawberries, blueberries, or banana slices. - For a fun display, stack them on a platter. - Dust with powdered sugar for a sweet touch. - Place a small bowl of syrup next to them for easy dipping. To make your pancake poppers fluffy, do not overmix the batter. Overmixing can lead to tough pancakes. Stir until just combined and leave some lumps. Letting the batter rest for a few minutes helps too. This resting time allows the flour to absorb the liquid. It also gives the baking powder time to activate. You can use a mini donut maker or a skillet. A mini donut maker shapes the pancakes perfectly. A skillet offers more cooking space and is easy to use. If you do not have these, you can try an electric griddle. It cooks pancakes evenly and in larger batches. For a healthier option, use whole wheat flour instead of all-purpose flour. You can also add mashed bananas or applesauce to the batter. For fun flavors, try adding cinnamon or nutmeg. A splash of almond extract can add a nice twist. You can customize the taste to fit your mood! Pro Tips Mixing Matters: Avoid overmixing the batter; a few lumps are perfectly fine and will result in fluffier pancakes. Temperature Check: Ensure your skillet or mini pancake maker is preheated properly for even cooking and to achieve that golden-brown color. Flavor Boost: Experiment with different add-ins like nuts, spices, or flavored extracts to customize the taste to your liking. Garnish Wisely: Fresh fruit not only adds flavor but also enhances the visual appeal; consider arranging them artistically for a stunning presentation. {{image_4}} You can easily change up the taste of mini pancake poppers. Here are two fun ideas: - Chocolate chip mini pancake poppers: Add 1/2 cup of mini chocolate chips to your batter. The chocolate will melt and create a tasty treat. Kids love them! - Berry-infused mini pancake poppers: Fold in 1/2 cup of fresh or frozen berries. Blueberries, strawberries, or raspberries work great. They add color and a burst of flavor. Making these poppers fit your needs is simple. Here are a couple of options: - Gluten-free options: Use gluten-free flour instead of regular flour. Your pancake poppers will still taste great! - Vegan adaptations: Swap the egg for a flax egg and use plant-based milk. You can also replace butter with coconut oil. This keeps the poppers fluffy and delicious. You can match your mini pancake poppers to the seasons. Here are two ideas: - Pumpkin spice mini pancake poppers for fall: Add 1/2 cup of pumpkin puree and 1 teaspoon of pumpkin spice to the batter. They’ll smell and taste like autumn! - Lemon blueberry mini pancake poppers for summer: Mix in the zest of one lemon and 1/2 cup of blueberries. The fresh flavor is perfect for warm days. To keep your mini pancake poppers fresh, store them in the fridge. Place them in an airtight container. They will stay tasty for up to three days. If you want to keep them longer, freezing is a great option. Just layer them with parchment paper in a freezer-safe bag. They will last up to two months this way. When you're ready to enjoy your leftovers, reheating is easy. You can use a microwave for a quick option. Heat them for about 20 seconds to start. Check if they are warm enough, and add more time if needed. To keep them crispy, use an oven. Place them on a baking sheet and heat at 350°F for about 5-7 minutes. This helps avoid sogginess and keeps them fluffy. Mini pancake poppers have a good shelf life if stored correctly. In the fridge, you can enjoy them for three days. In the freezer, they can last up to two months. Watch for signs of spoilage. If they smell off or look dry, it's best to toss them. Always trust your senses when it comes to food safety. To make mini pancake poppers, first gather your ingredients. You need: - 1 cup all-purpose flour - 2 tablespoons granulated sugar - 1 teaspoon baking powder - 1/2 teaspoon baking soda - 1/4 teaspoon fine sea salt - 1 cup buttermilk - 1 large egg, lightly beaten - 2 tablespoons unsalted butter, melted - 1/2 teaspoon pure vanilla extract - 1/2 cup mini chocolate chips (optional) 1. Mix the dry ingredients well in a large bowl. 2. In another bowl, combine the wet ingredients. 3. Gradually mix the wet into the dry ingredients. Stir gently. 4. If you want, fold in mini chocolate chips. 5. Preheat a mini donut maker or skillet. 6. Pour the batter into the molds or skillet. 7. Cook for 1-2 minutes, flip, then cook for another 1-2 minutes. 8. Serve with syrup and fresh fruit! Yes, you can use milk instead of buttermilk. Just add 1 tablespoon of vinegar or lemon juice to 1 cup of milk. Let it sit for about 5 minutes. This will make a quick substitute for buttermilk. The flavor will be slightly different, but it will still work well in the recipe. Toppings can make your mini pancake poppers even better. Here are some ideas: - Maple syrup or honey for sweetness - Fresh fruit like strawberries or blueberries - Whipped cream for a fun treat - Nut butter for a protein boost - Chocolate sauce for more indulgence To store leftover pancake poppers, place them in an airtight container. You can keep them in the fridge for up to 3 days. For freezing, lay them flat in a single layer on a baking sheet. Once frozen, transfer them to a freezer bag. They can last up to 2 months. To reheat, you can use a microwave or toaster oven. For the microwave, heat for about 20-30 seconds. If using a toaster oven, set it to low heat for a few minutes. This keeps them warm and fluffy. Yes, you can make these pancake poppers in advance. Prepare the batter and store it in the fridge overnight. This can save you time in the morning. You can also cook the poppers ahead of time and reheat them later. Enjoy a quick breakfast without fuss! You can make delightful mini pancake poppers easily at home. We covered the key ingredients, from dry to wet, plus optional add-ins. You learned the step-by-step process to prepare and cook them perfectly. Remember the tips for fluffy pancakes and the fun variations to try. Lastly, storing and reheating tips ensure they taste great later. Enjoy your cooking adventure, and let your creativity shine with toppings!

Mini Pancake Poppers Easy and Fun Breakfast Treat

Looking for a fun and easy breakfast that will make your mornings brighter? Try Mini Pancake Poppers! These bite-sized treats

- 1 cup unsalted butter, softened to room temperature - 1 cup brown sugar, packed firmly - 1/2 cup granulated sugar - 1 large egg, at room temperature - 2 teaspoons pure vanilla extract - 3 cups all-purpose flour, sifted - 1 teaspoon baking soda - 1/2 teaspoon fine sea salt - 1 cup chocolate chips - 1 cup crushed peppermint candies To create the perfect Holiday Cookie Cups, gather these simple ingredients. Start with unsalted butter. It needs to be soft. This helps it mix well with sugars. Use both brown and granulated sugar for a sweet flavor. Next, grab one large egg and pure vanilla extract for richness. The egg should also be at room temperature. This helps it blend smoothly. For the dry mix, you’ll need all-purpose flour, baking soda, and fine sea salt. Sifting the flour avoids lumps. It makes the cookie cups light and fluffy. Chocolate chips add a sweet touch. You can choose dark or semi-sweet. Finally, crushed peppermint candies give a festive twist. They add flavor and color. Having all these ingredients ready makes baking fun! Each one plays a role in making these cookie cups delicious and festive. {{ingredient_image_2}} To start, preheat your oven to 350°F (175°C). This is the perfect temperature for baking. Next, prepare your muffin tin. You can grease each cup with butter or non-stick spray. If you want to be festive, use colorful paper liners. In a large mixing bowl, cream together the softened butter, brown sugar, and granulated sugar. Use an electric mixer for best results. Mix until the mixture is light and fluffy. This usually takes about 3-5 minutes. The right texture is key for lovely cookie cups. Now, add the large egg and pure vanilla extract into your mixture. Make sure both are at room temperature. This helps them blend better. Mix until the egg is fully combined and the mixture is smooth. In a separate bowl, whisk together the sifted all-purpose flour, baking soda, and fine sea salt. Slowly add this dry mix to the wet ingredients. Stir gently until just combined. Be careful not to overmix. This will help keep your cookie cups tender. Next, gently fold in the chocolate chips and crushed peppermint candies. This ensures they are evenly spread throughout the dough. You want every bite to be delicious. Using a tablespoon or cookie scoop, fill each muffin cup with dough. Aim for about 3/4 full. This allows room for the cookies to rise as they bake. Place your muffin tin in the oven and bake for about 12-15 minutes. The edges should be lightly golden, and the centers should be soft. Once baked, take the muffin tin out of the oven. Let the cookie cups cool in the pan for about 5 minutes. This helps them set. Then, gently transfer them to a wire rack. Allow them to cool completely. This step is important for the best texture. Baking can be tricky, but I'm here to help you avoid mistakes. Here are some tips: - Measure Carefully: Use proper measuring cups. Too much flour can make your cookie cups dry. - Room Temperature Ingredients: Always use room temperature butter and eggs. This helps the dough mix well. - Don’t Overmix: When you add dry ingredients, mix just until combined. Overmixing makes cookies tough. - Grease the Pan: Always grease your muffin tin. This helps the cookie cups come out easily. To get the right texture, watch for these signs while baking: - Golden Edges: The edges should turn a light golden color. This shows they are done. - Soft Centers: The center should look set but still soft. They will firm up as they cool. - Cooling Time: Let them cool in the pan for 5 minutes before moving them. This helps maintain their shape. Making your cookie cups festive is fun and easy. Here are some ideas: - Crushed Peppermint: Sprinkle more crushed peppermint on top for color and crunch. - Whipped Cream: Fill the cups with whipped cream for a creamy treat. - Chocolate Drizzle: Drizzle melted chocolate over the top for an extra touch. - Holiday Sprinkles: Use festive sprinkles to add a pop of color and fun. These tips will help you create beautiful holiday cookie cups that everyone will love! Pro Tips Chill the Dough: If time allows, chill the cookie dough for 30 minutes before baking. This helps to enhance the flavors and prevents the cookie cups from spreading too much during baking. Use Quality Chocolate: Choose high-quality chocolate chips for a richer flavor. Dark chocolate pairs beautifully with the peppermint and adds depth to the cookie cups. Watch the Baking Time: Keep an eye on the cookie cups as they bake. Ovens can vary, so start checking around the 12-minute mark to ensure they don’t overbake. Experiment with Fillings: Feel free to get creative with fillings! Try adding mini marshmallows, caramel sauce, or even a dollop of peanut butter before baking for a fun twist. {{image_4}} To make these cookie cups gluten-free, use a blend of gluten-free flour. I recommend using a mix of almond flour and coconut flour. These flours give a wonderful taste and texture. You can also try a store-bought gluten-free flour mix. Just make sure it has a binding agent, like xanthan gum, to help hold the shapes. For a vegan twist, swap out the butter with coconut oil or vegan butter. Instead of the egg, use a flaxseed meal. Mix one tablespoon of flaxseed with three tablespoons of water. Let it sit for a few minutes until it thickens. This mix works great to bind your cookie cups. Get creative with flavors! You can add different mix-ins like dried fruits, nuts, or even white chocolate chips. Try switching out the peppermint for orange zest or cinnamon for a warm touch. If you love peanut butter, add a scoop of peanut butter chips for a nutty flavor. Each variation brings its own fun twist to the cookie cups. Store your cookie cups in an airtight container. This keeps them fresh and moist. Be sure to let them cool completely before placing them inside. Keep the container at room temperature, away from heat and sunlight. If you want to save them longer, the fridge is also a good option. To freeze cookie cups, wait until they cool down. Wrap each cookie cup tightly in plastic wrap. Place the wrapped cups in a freezer-safe bag or container. Label the bag with the date. These cookie cups can last up to three months in the freezer. When you’re ready to eat them, take out only what you need. To reheat frozen cookie cups, first, let them thaw in the fridge overnight. Then, preheat your oven to 350°F (175°C). Place the cookie cups on a baking sheet. Bake for about 5-7 minutes. This helps the cookie cups regain their soft texture. Enjoy them warm for the best taste! Yes, you can prep these cookie cups ahead. Make the dough a day in advance. Store it in the fridge. When you're ready, scoop and bake. This saves you time on busy days. If you don’t have peppermint, try crushed nuts or toffee bits. You can also use mini marshmallows for a sweet twist. Dark chocolate chips can add richness, too. Get creative with flavors you enjoy. To stop sticking, grease your muffin tin well. Use butter or a non-stick spray. You can also line the cups with paper liners. This makes for easy removal and adds a festive look. Absolutely! You can swap in white chocolate or milk chocolate chips. Try adding butterscotch or peanut butter chips for a fun flavor. Mix and match to find your favorite combo. This blog post covered all you need for making delightful cookie cups. You learned the exact ingredients, step-by-step instructions, and helpful tips. Variations let you customize your treats for any diet or flavor. Storing your cookie cups properly ensures they stay fresh. Now, with these guidelines, baking delicious cookie cups can be easy and fun. Enjoy experimenting with flavors and impressing friends and family with your tasty creations!

Holiday Cookie Cups Festive and Fun Treats

Get ready for a festive treat that will wow your family and friends! Holiday Cookie Cups are fun to make

- 1 cup mascarpone cheese - 1 cup heavy cream - 1 cup crushed ladyfinger cookies - 2 tablespoons espresso powder - 3 tablespoons powdered sugar - 1 teaspoon vanilla extract - 1 tablespoon cocoa powder (for rolling) - Dark chocolate shavings (for garnish) Mascarpone cheese adds a rich and creamy base. If you cannot find it, you can use cream cheese. Mix it with a bit of sour cream for a similar taste. Heavy cream gives the truffles a light texture. If you want a lighter option, use half-and-half, but the truffles may be less fluffy. Ladyfinger cookies provide a lovely crunch. If you want to avoid gluten, use gluten-free cookies. Espresso powder gives that classic coffee flavor. You could use instant coffee if that’s what you have. Just make sure to mix it well so it dissolves. When buying mascarpone, look for brands with simple ingredients. A good heavy cream should have at least 36% fat. Check that the ladyfingers are fresh and crisp. For espresso powder, choose a brand that has a rich flavor. Always go for pure vanilla extract, as it adds depth to the truffles. Visit local farmers' markets for fresh ingredients, especially for cream. This can enhance the overall taste of your truffles. If you can, buy organic. This ensures you are getting quality products that are better for you and the planet. {{ingredient_image_2}} To make tiramisu truffles, you start with heavy cream. In a mixing bowl, whip the cream until soft peaks form. This takes about 3 to 5 minutes. Set the whipped cream aside. In another bowl, mix the mascarpone cheese with crushed ladyfinger cookies, espresso powder, powdered sugar, and vanilla extract. Use a spatula to blend these until smooth. Next, fold the whipped cream into the mascarpone mixture. Be gentle to keep it airy. Mix until you see no white streaks. After that, cover the bowl with plastic wrap and chill it in the fridge for at least 1 hour. This step helps the mixture firm up. Once chilled, scoop out portions of the mixture with a tablespoon. Roll each portion into small balls, about 1 inch wide. Then, spread cocoa powder on a plate. Roll each truffle in the cocoa powder to coat them fully. Finally, place the truffles in a serving container. For a nice touch, sprinkle dark chocolate shavings on top. Chill the truffles for another 30 minutes before serving. The key to great truffles is in the folding technique. Gently fold the whipped cream into the mascarpone mixture. This keeps the truffles light and fluffy. If you mix too hard, you'll lose that airy texture. Another tip is to chill the mixture well. This makes it easier to scoop and shape the truffles. Using high-quality ingredients also makes a big difference. Good mascarpone cheese and fresh espresso powder will enhance the flavors. Chilling time is crucial in this recipe. It helps the mixture set and makes it easier to shape. If you skip this step, your truffles might be too soft. After rolling them in cocoa powder, chilling again helps the flavors blend. It also firms them up for a better texture. So, don’t rush this part! To get the best texture, whip the cream until soft peaks form. This takes about 3-5 minutes. Soft peaks give the truffles a light and airy feel. When mixing in the whipped cream, fold gently. This keeps the truffles from becoming heavy. Make sure the mascarpone mixture is smooth before folding in the cream. If your truffles are too soft, they may need more chilling time. Place them in the fridge for about 30 minutes to firm up. If they crumble, your mixture may be too dry. Add a bit more mascarpone or cream to fix this. If the cocoa powder does not stick, roll the truffles again in the cocoa after chilling. Store any leftover truffles in an airtight container in the fridge. They stay fresh for up to 5 days. For longer storage, you can freeze them. Just make sure to wrap them well. Thaw truffles in the fridge before enjoying them again. This keeps their texture and taste intact. Pro Tips Chill Your Tools: Place your mixing bowl and beaters in the refrigerator for 10-15 minutes before whipping the cream. This helps the cream whip faster and achieve better volume. Ladyfinger Quality Matters: Use fresh ladyfinger cookies for the best texture and flavor. Stale cookies can lead to a drier truffle mixture. Experiment with Flavors: Add a splash of coffee liqueur or flavored extracts like almond or hazelnut to the mascarpone mixture for a unique twist on classic tiramisu flavors. Storage Tips: Keep the truffles in an airtight container in the refrigerator for up to a week. For longer storage, freeze them, but roll in cocoa powder only before serving. {{image_4}} You can add fun flavors to your tiramisu truffles. For a zesty twist, try adding orange zest. This brightens the taste and gives a fresh kick. Mix in about one teaspoon of finely grated zest. Another idea is to add a splash of amaretto. Just a tablespoon can enhance the nutty flavor. Be careful not to add too much. You want the coffee taste to shine through. Make your truffles look even more appealing with creative toppings. You can roll them in crushed nuts or sprinkles for a fun look. Dark chocolate shavings add a touch of elegance. Place the truffles in a decorative box for gifting. You can also serve them on a rustic wooden platter lined with parchment paper. Drizzle some melted chocolate over the top for a beautiful finish. If you're looking for vegan options, you can swap out the mascarpone cheese. Use a vegan cream cheese or cashew cream instead. For the heavy cream, opt for coconut cream. This keeps the richness while making it dairy-free. Use vegan ladyfinger cookies for the base. These changes let everyone enjoy delicious tiramisu truffles. After making your tiramisu truffles, you should store them in the fridge. Place them in an airtight container to keep them fresh. This container prevents moisture and odors from affecting the taste. Make sure to layer parchment paper between the truffles if they touch. This helps avoid sticking and keeps them looking nice. You can also freeze tiramisu truffles. First, let them chill in the fridge for 30 minutes. Once firm, place them on a baking sheet in a single layer. Freeze until solid, then transfer them to a freezer-safe bag. Write the date on the bag for easy tracking. They can last up to three months in the freezer. When ready to eat, thaw them in the fridge overnight. Tiramisu truffles will stay fresh in the fridge for about five days. Keep an eye on their appearance. If they start to look dry or lose their flavor, it’s time to discard them. To enjoy the best taste, eat them within the first few days. Always check for any off smell or changes in texture before eating, as this ensures you enjoy them at their best. Yes, you can make Tiramisu Truffles ahead of time. They taste even better after a day in the fridge. Just follow the full recipe and chill them properly. You can store them in an airtight container. This keeps them fresh for up to a week. The flavors blend and deepen, making them extra tasty. If you don't have mascarpone cheese, you can use cream cheese. Mix it with a bit of heavy cream for a similar texture. Ricotta cheese is another option. Just blend it well to make it smooth. This way, you still get a creamy filling. Each option gives a unique flavor twist to the truffles. Yes, Tiramisu Truffles are suitable for kids, but with a note. They contain espresso powder, which has caffeine. If you prefer, you can omit the espresso or use decaf. The truffles will still taste good without the coffee flavor. Kids will enjoy the sweet, creamy taste and chocolate coating. You now have all the tools to make perfect Tiramisu truffles. We covered the key ingredients, helpful tips, and step-by-step instructions. Remember, chilling is important for the best texture. Explore variations to match your taste, and don’t forget these truffles freeze well. Lastly, I hope you feel ready to impress friends and family with your delicious creations. Enjoy making Tiramisu truffles today!

Tiramisu Truffles Delightful and Easy Dessert Recipe

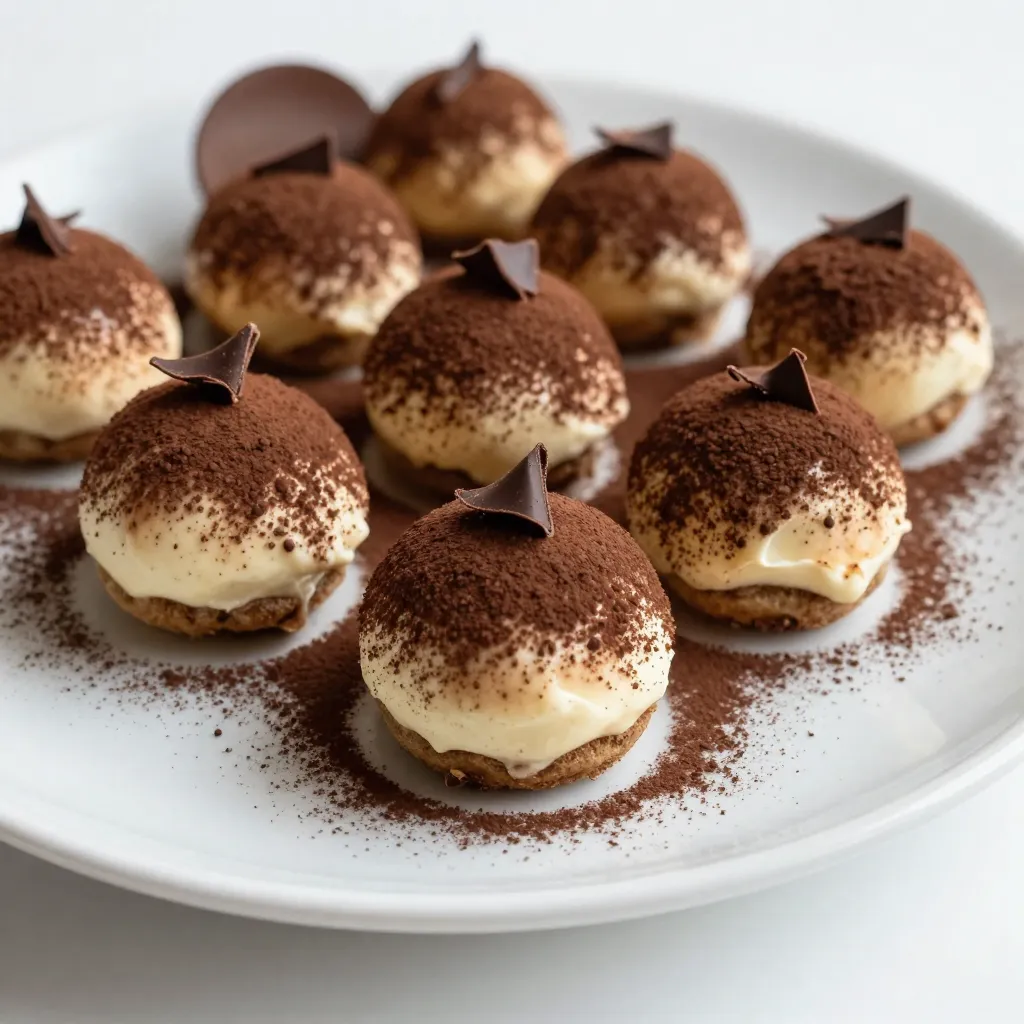
If you love the rich flavors of tiramisu, wait until you try these Tiramisu Truffles! This easy dessert recipe brings

To make salted caramel fudge truffles, gather these key items: - 1 cup heavy cream - 2 cups semi-sweet chocolate chips - 1 cup granulated sugar - 1/4 cup unsalted butter, cut into small pieces - 1 teaspoon vanilla extract - 1/2 teaspoon sea salt (plus additional for garnish) - 1/2 cup cocoa powder (for dusting) You can add your own twist to the truffles with these extras: - 1/2 cup finely chopped nuts (for rolling) - Flavored extracts like almond or peppermint - A pinch of espresso powder for a coffee kick If you’re out of something, don’t worry! Here are some swaps: - Use coconut cream instead of heavy cream for a dairy-free option. - Swap semi-sweet chocolate chips for dark chocolate chips if you like a richer taste. - Use brown sugar instead of granulated sugar for a deeper flavor in your caramel. {{ingredient_image_2}} To start, gather your ingredients. You need granulated sugar and water. In a medium saucepan, mix the sugar and 1/4 cup of water. Place it on medium heat. Stir gently until the sugar dissolves. Once it dissolves, stop stirring and let it boil. Watch closely as it changes color. After about 8-10 minutes, it should turn golden amber. When it reaches that color, carefully pour in the heavy cream. Be careful; it will bubble up. Stir gently until the mixture is smooth and well combined. Remove the pan from heat. Add unsalted butter, vanilla extract, and sea salt. Mix until the butter melts and everything is combined. Next, move to the chocolate. Place the semi-sweet chocolate chips in a heatproof bowl. Pour the warm caramel sauce over the chips. Let it sit for 2-3 minutes without stirring. This lets the chocolate melt nicely. After waiting, stir the mixture until it is smooth and glossy. Make sure there are no lumps. A good melt is key for a rich truffle. Once your mixture is ready, cover the bowl with plastic wrap. Place it in the fridge for about 2 hours. This helps the mixture firm up. After chilling, use a melon baller or small cookie scoop. Portion out small amounts of the truffle mixture. With clean hands, roll each portion into a ball. If you like nuts, roll some truffles in finely chopped nuts. For a classic touch, roll the truffles in cocoa powder. If you want a salty kick, sprinkle a bit of sea salt on top. Arrange the truffles on a baking sheet lined with parchment paper. Chill them for another 30 minutes to set firmly. When making these truffles, avoid stirring the sugar while it boils. This can cause the sugar to crystallize, ruining your caramel. Remember to watch the color closely. If the caramel turns too dark, it may taste bitter. Lastly, be careful when adding cream to the hot caramel. The mixture can bubble up quickly, so pour slowly. To get that smooth and silky texture, use high-quality chocolate chips. The better the chocolate, the creamier the truffles will be. Let the warm caramel sit on the chocolate for a few minutes before stirring. This helps the chocolate melt evenly. Also, ensure you mix gently until everything is combined. This keeps air bubbles from forming in your truffles. You can jazz up your truffles with extra flavors. Try adding a teaspoon of espresso powder for a coffee kick. A dash of orange zest can give a fresh twist. For a spicy note, consider a pinch of cayenne pepper. You could also roll some truffles in chopped nuts or toasted coconut for added texture and taste. Pro Tips Use a Candy Thermometer: For precision, consider using a candy thermometer to monitor the caramel’s temperature, ensuring it reaches the perfect golden stage without burning. Cool Gradually: Allow the caramel to cool gradually before adding it to the chocolate. This helps prevent seizing and ensures a smooth mixture. Chill for Texture: Chilling the truffle mixture for a longer period can yield a firmer texture, making it easier to roll into perfect spheres. Experiment with Coatings: Don’t hesitate to experiment with different coatings like crushed pretzels or toasted coconut for a unique flavor twist! {{image_4}} You can easily customize these salted caramel fudge truffles. Adding nuts gives a lovely crunch. Try using finely chopped almonds, pecans, or hazelnuts. You can also add spices. A pinch of cinnamon or a dash of espresso powder boosts flavor. These small changes can make your truffles unique and personal. Rolling options can change the look and taste of your truffles. Cocoa powder is classic and rich. For a fun twist, try colorful sprinkles or shredded coconut. You can even use crushed graham crackers for a s'mores vibe. Experiment with different coatings to find your favorite. Adapting this recipe for dietary needs is simple. For a vegan version, use coconut cream instead of heavy cream and dairy-free chocolate chips. Ensure your sugar is vegan as well. For gluten-free options, check that your chocolate chips and any add-ins are certified gluten-free. These swaps keep the truffles tasty and suitable for everyone. To keep your salted caramel fudge truffles fresh, place them in an airtight container. Layer parchment paper between truffles to prevent sticking. Store them in the refrigerator to maintain their texture. Avoid leaving them at room temperature for too long, as they can soften. When stored correctly, truffles can last about two weeks in the fridge. If you want to keep them longer, you can freeze them. Place the truffles in a single layer on a baking sheet and freeze for about an hour. Once firm, transfer them to a freezer-safe bag. They can last up to three months in the freezer. If your truffles become too soft, refrigerate them for a bit to firm up. If they are frozen, let them sit at room temperature for about 10-15 minutes before enjoying. This helps restore their creamy texture without melting. Avoid reheating truffles in the microwave, as this can alter their taste and texture. Yes, you can make these truffles ahead of time. They keep well in the fridge. You can store them for up to a week. Just keep them in an airtight container. This makes it easy to have a sweet treat ready when you need one! If you don't have heavy cream, you can use coconut cream. It gives a nice flavor and texture. Another option is to use half-and-half, but the truffles may be less rich. You can also try using a dairy-free cream. Each option adds its own twist to the truffles! Watch the sugar as it cooks. When it turns a golden amber color, it is ready. This usually takes about 8-10 minutes. Be careful not to burn it. If it smells very sweet and looks golden, you have made great caramel! You learned how to make delicious salted caramel fudge truffles. We covered ingredients, steps, and tips to avoid mistakes. These truffles can fit any taste with simple swaps and variations. Remember to store them right for the best flavor. Whether you make them ahead or adapt for diets, you’re all set to impress. Enjoy the fun of creating your own tasty treats!

Salted Caramel Fudge Truffles Simple Delight Recipe

Indulge your taste buds with my simple recipe for Salted Caramel Fudge Truffles! These rich, velvety delights combine the sweet

- 1 cup cream cheese, softened to room temperature - 1 cup powdered sugar - 1/4 cup unsweetened cocoa powder - 1 teaspoon pure vanilla extract - 1/2 cup whipped topping (like Cool Whip) - 1/4 cup mini marshmallows - 1/4 cup semi-sweet chocolate chips - Graham crackers or a variety of dippable cookies (like chocolate chip, sugar cookies) To make a delicious Hot Cocoa Dip, I always start with cream cheese. It gives the dip a rich and smooth base. Make sure it is soft, so it mixes well. Next, I add powdered sugar for sweetness. This makes the dip taste like dessert. Cocoa powder is a must. It gives the dip that classic hot cocoa flavor. Don’t forget the pure vanilla extract. It adds depth and warmth to the mix. Whipped topping is next. It makes the dip light and fluffy. Mini marshmallows are essential too. They add fun and texture. I love folding in semi-sweet chocolate chips for extra chocolatey goodness. Finally, you need something to dip. Graham crackers or cookies work great. They make this treat even more fun to enjoy. {{ingredient_image_2}} - Soften the cream cheese Start by taking your cream cheese out of the fridge. Let it sit at room temperature for about 30 minutes. This makes it easy to beat smooth. - Combine the dry ingredients In a medium bowl, add 1 cup of powdered sugar and 1/4 cup of unsweetened cocoa powder. Sift these together. This helps avoid lumps and ensures a smooth dip. - Incorporate vanilla extract Pour 1 teaspoon of pure vanilla extract into the dry mix. This adds a lovely flavor. Stir it in with a spatula until it is well mixed. - Fold in whipped topping Next, add 1/2 cup of whipped topping to the bowl. Use a spatula to gently fold it in. This makes your dip light and fluffy. - Add marshmallows and chocolate chips Now, fold in 1/4 cup of mini marshmallows and 1/4 cup of semi-sweet chocolate chips. Make sure they are mixed well throughout the dip for sweet bites. - Final presentation Spoon your dip into a serving bowl. Smooth the top with the back of a spoon. For a fun touch, sprinkle a few extra mini marshmallows and chocolate chips on top to make it look great. To make the best Hot Cocoa Dip, you need the right consistency. Aim for a smooth and creamy texture. Start with softened cream cheese. This makes it easy to blend with the other ingredients. Mix it until there are no lumps. Gradual mixing of the powdered sugar and cocoa powder helps. This keeps the dip rich and thick. For flavor, you can enhance your dip in many ways. Adding a pinch of salt brightens the taste. You can also use flavored whipped topping. Try vanilla or chocolate for extra fun. If you love mint, drop in some peppermint extract. This gives a fresh twist to the classic flavor. Make-ahead tips can save you time. You can prepare this dip a day in advance. Just store it in the fridge. Cover it well, so it stays fresh. Before serving, give it a quick stir. This keeps it creamy. You can also prepare your dippers ahead of time. Arrange graham crackers and cookies on a platter for easy access. Pro Tips Use Room Temperature Cream Cheese: Ensuring your cream cheese is at room temperature will help achieve a smoother dip without lumps. Customize Your Dippers: Offer a variety of dippable items like pretzels, fruit slices, or cookies to cater to different tastes and create a fun experience. Chill Before Serving: For the best flavor and texture, consider chilling the dip for about 30 minutes before serving to allow the flavors to meld. Garnish Creatively: Use whipped topping and chocolate shavings as additional garnishes to add visual appeal and extra flavor to your dip. {{image_4}} You can easily tweak the hot cocoa dip to match your taste. Here are some fun ideas: - Add peppermint extract for minty flavor: Just a tiny bit gives a refreshing twist. Use about 1/4 teaspoon for a nice balance without overpowering the chocolate. - Incorporate nut butters: A spoonful of peanut butter or almond butter adds creaminess and richness. It also makes the dip more filling. - Use white chocolate chips: If you love white chocolate, swap in white chocolate chips. They will add a sweet, creamy note that pairs well with the cocoa. These changes can make your dip unique and fun for any occasion. Don't be afraid to mix and match! Each variation will bring a new taste adventure. To keep your Hot Cocoa Dip fresh, store it in the fridge. Use an airtight container to hold in the flavor. This way, the dip stays creamy and tasty for a few days. If you have extra dip, freeze it for later. Scoop the dip into a freezer-safe container. Leave some space at the top, as it will expand when frozen. When you're ready to enjoy it, thaw it overnight in the fridge. Reheating is easy. If the dip looks a bit stiff, mix in a splash of milk. This helps bring back its smooth texture. Microwave it for a few seconds to warm it up. Just be careful not to overheat it. Remember, proper storage keeps your Hot Cocoa Dip delightful and ready for fun! Can I make Hot Cocoa Dip dairy-free? Yes, you can. Use dairy-free cream cheese and a non-dairy whipped topping. Coconut cream works well if you want a rich texture. This way, you keep all the creaminess without dairy. What dippers work best with Hot Cocoa Dip? Graham crackers are a classic choice. You can also use sugar cookies or chocolate chip cookies. Fresh fruit, like strawberries or banana slices, adds a fun twist. Pretzels give a nice crunch, too. How long does Hot Cocoa Dip last in the fridge? Hot Cocoa Dip stays fresh for about three days in the fridge. Store it in an airtight container. Just give it a good stir before serving again. Can I use other types of chocolate? Absolutely! You can swap semi-sweet chocolate chips for dark or milk chocolate. For a twist, try using white chocolate chips for a sweeter dip. Each type brings its own flavor to the mix. Hot Cocoa Dip brings joy with its creamy texture and rich flavor. We covered all the essential ingredients, from cream cheese to mini marshmallows. The easy step-by-step instructions guide you through making this fun treat. You now have tips to perfect the dip and explore tasty variations. Don’t forget how to store it to keep it fresh. Enjoy crafting a delicious dip that will make any gathering special!

Irresistible Hot Cocoa Dip Creamy and Fun Treat

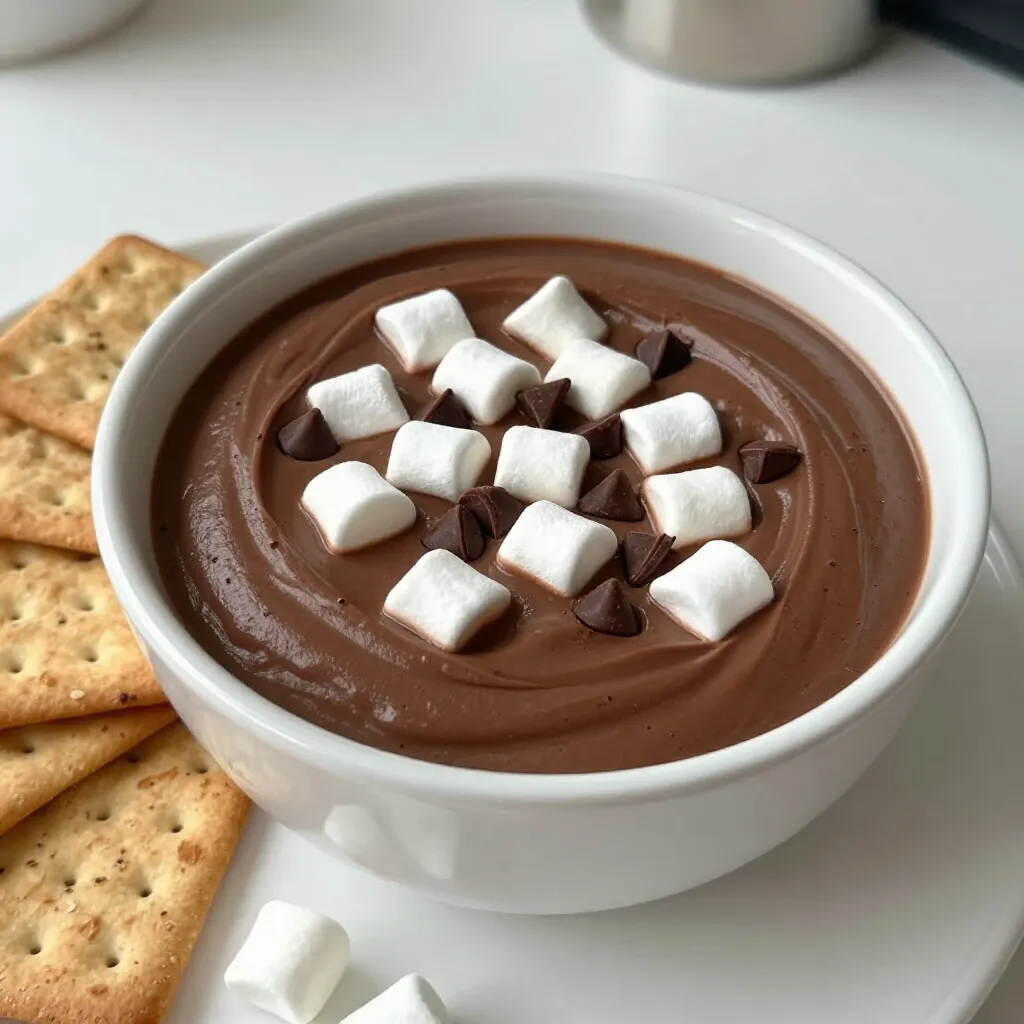
Craving a fun and tasty treat? Look no further than my Irresistible Hot Cocoa Dip! This creamy concoction combines sweet

- 24 gingerbread cookies - 1 cup cream cheese (softened) - ½ cup powdered sugar - 1 teaspoon vanilla extract - 1 cup whipped topping (like Cool Whip) - 1 cup peppermint candies (coarsely crushed) - 2 cups vanilla pudding mix (prepared as per package instructions) - 1 cup milk (for pudding) - ½ cup chocolate chips (for drizzling) - Optional: festive sprinkles for garnish Each ingredient plays a key role in making this dessert special. The gingerbread cookies give a warm, spicy flavor. Cream cheese adds a soft, creamy layer. Powdered sugar sweetens it just right. Vanilla extract brings in a lovely aroma. Whipped topping makes the dessert light and fluffy. Peppermint candies add a fun crunch and festive color. The vanilla pudding ties everything together, making it smooth and rich. Milk helps prepare the pudding to the perfect consistency. Chocolate chips create a sweet drizzle that everyone loves. Finally, sprinkles add a burst of holiday cheer on top. Each layer combines to create a treat that captures the spirit of the season. {{ingredient_image_2}} To start, lay down gingerbread cookies in a rectangular baking dish. It’s best to fit them snugly together. This helps form a solid base for your lasagna. Make sure there are no gaps between the cookies. An even coverage gives you a nice look and taste. Next, grab a mixing bowl. Combine the softened cream cheese, powdered sugar, and vanilla extract. Mix until it becomes smooth. This might take a minute or two. Then, gently fold in the whipped topping. Be careful not to deflate the mix. You want it to stay light and fluffy. Now, take half of your cream cheese mixture. Spread it evenly over the layer of gingerbread cookies. This is essential for a good balance of flavors. After that, sprinkle half of the crushed peppermint candies on top. Press them down slightly so they stick well. Pour half of the prepared vanilla pudding over the peppermint layer. Spread it carefully to cover the candies. This step is key for keeping layers defined. Now, repeat this layering process. Start with another layer of gingerbread cookies, then add the remaining cream cheese mixture, crushed peppermint, and finish with the rest of the pudding. For the top layer, arrange a final layer of gingerbread cookies neatly. This makes the lasagna look nice and complete. Next, melt the chocolate chips in a microwave-safe bowl. Do this in 30-second intervals. Stir after each interval until it is smooth and melted. Once melted, drizzle the chocolate generously over the top layer of cookies. This adds an enticing finish. Finally, cover the dish with plastic wrap. Chill it in the refrigerator for at least four hours. Overnight chilling works best for firmness and flavor. Before serving, sprinkle festive sprinkles on top for a fun holiday touch. To get the best cream cheese layer, start with room temperature ingredients. Cold cream cheese will not mix well. It will stay lumpy, which is not what you want. Leave the cream cheese out for about an hour before mixing. This small step makes a big difference. Next, mix your cream cheese with powdered sugar and vanilla. Use a sturdy spatula or a hand mixer. Mix until smooth and creamy. Be careful not to over-mix. Over-mixing can make the mixture too airy. You want it smooth but thick enough to hold layers. Layering is key for a great Christmas cookie lasagna. Start with a single layer of gingerbread cookies. Make sure they fit snugly without gaps. This creates a strong base. Spread the cream cheese mixture evenly over the cookies. Use a spatula for a smooth layer. After that, add the peppermint candies. Press them down gently so they stick. Then pour the vanilla pudding on top. Spread it evenly as well. Repeat the process for the next layers. The more even the layers, the better it will look. When it’s time to serve, use a sharp knife for cutting. Clean the knife between cuts for neat slices. This helps maintain the layers and makes for pretty pieces. For a festive touch, sprinkle some festive sprinkles on top. You can also add some extra crushed peppermint for more color and flavor. These small details make your dessert shine and impress your guests. Pro Tips Chill for Best Results: Allow the lasagna to chill overnight for the best flavor and texture. The longer it sets, the better the layers will meld together. Use Fresh Ingredients: Make sure your cream cheese is at room temperature for easier mixing, and use fresh peppermint candies to enhance the flavor. Drizzle with Care: When melting the chocolate for drizzling, do it in short intervals and stir frequently to avoid burning. Layering Technique: Ensure each layer is evenly spread and pressed down slightly to avoid gaps, which will help the lasagna hold together when serving. {{image_4}} You can switch up the base cookie for more fun. Try using sugar cookies or chocolate cookies. Sugar cookies add a soft, sweet touch. Chocolate cookies bring a rich flavor that pairs well with the cream cheese layers. The key is to choose cookies that hold their shape. You want layers that are sturdy and tasty. Feel free to get creative with your layers! You can add different candies like crushed Oreos or M&Ms. These candies add color and crunch. You can also swap the vanilla pudding for chocolate or butterscotch. Each of these flavors brings a new twist to your Christmas Cookie Lasagna. If you need a gluten-free version, use gluten-free cookies. Many brands offer great options that taste just as good. For dairy-free needs, choose dairy-free cream cheese and whipped topping. You can also use almond or soy milk for the pudding. These swaps allow everyone to enjoy this festive treat! Chilling is key for great flavor. I recommend chilling your Christmas cookie lasagna for at least four hours. For best results, try to chill it overnight. This helps the layers set and blend nicely. The flavors deepen, making each bite more delightful. To store leftovers, cover the dish tightly with plastic wrap or a lid. Keep it in the refrigerator. This way, it stays fresh for up to three days. If you want to keep it longer, freezing is a good option. To freeze, cut the lasagna into portions. Wrap each piece in plastic wrap and then in foil. This prevents freezer burn. You can freeze it for up to three months. When ready to eat, thaw it in the fridge overnight before enjoying. If you need a cream cheese alternative, try these options: - Mascarpone cheese offers a rich, smooth texture. - Greek yogurt gives a tangy flavor and creamy feel. - Silken tofu is a great dairy-free choice. - Ricotta cheese can work, too, for a lighter option. Each substitute brings a unique taste, so choose what fits your recipe best. Yes! You can prepare this dessert ahead of time. - Make it up to two days before serving. - Store it in the fridge, covered with plastic wrap. - This helps the layers set and flavors blend well. Just remember to top it with sprinkles right before serving. No peppermint? No problem! Here are some tasty alternatives: - Use crushed candy canes for a similar minty flavor. - Try chocolate chips for a sweet twist. - Sprinkles add color and fun without changing the flavor. - You can also use crushed Oreos for a chocolatey touch. Get creative! This blog post covered how to make a delicious Christmas Cookie Lasagna. You learned about the key ingredients, step-by-step instructions, and helpful tips. Variations allow for personal touches to suit your taste. Proper chilling and storage keep your dessert fresh. In the end, don’t hesitate to experiment with flavors and textures. Enjoy creating your holiday treat!

Christmas Cookie Lasagna Delightful Holiday Dessert

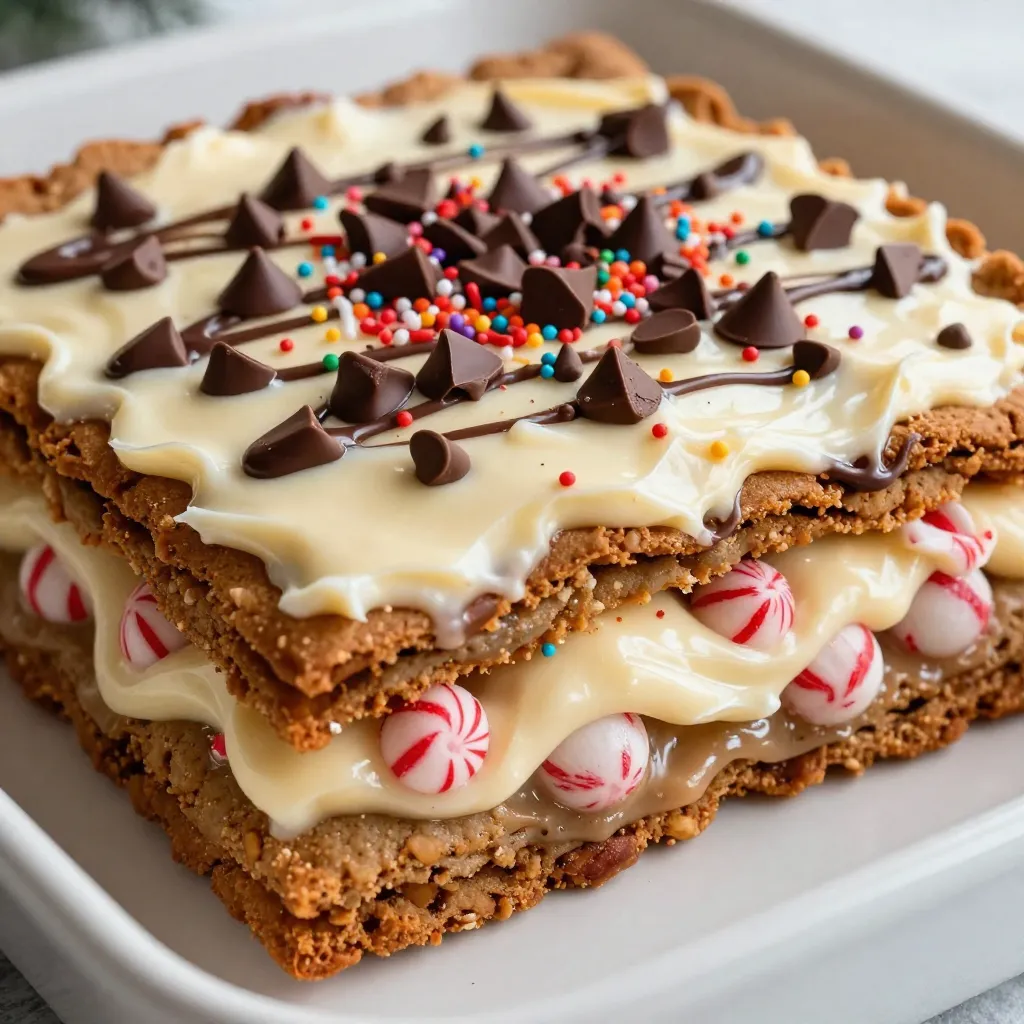
If you’re looking for a fun and festive dessert this holiday season, look no further! Christmas Cookie Lasagna is an

- 1 ½ cups graham cracker crumbs - ½ cup unsalted butter, melted - 2 tablespoons sugar - 2 (8 oz) packages cream cheese, softened to room temperature - 1 cup granulated sugar - 1 teaspoon vanilla extract - 3 large eggs, at room temperature - 1 cup plain Greek yogurt - 1 cup crushed pistachios, plus extra for garnish - ½ teaspoon ground cinnamon - ½ cup honey - ½ cup water - 1 tablespoon freshly squeezed lemon juice You can swap graham cracker crumbs with crushed cookies like Oreos for a fun twist. If you need a dairy-free option, try using vegan cream cheese. You can use maple syrup instead of honey, if desired. For a nut-free version, replace pistachios with sunflower seeds or omit them entirely. Using fresh ingredients makes a big difference in flavor and texture. Fresh cream cheese gives the cheesecake its creamy base. Fresh pistachios add crunch and a bright taste. When you use high-quality honey, it enhances the sweetness and richness of the dish. Always check expiration dates for dairy and eggs to ensure the best results. {{ingredient_image_2}} To start, preheat your oven to 325°F (160°C). In a bowl, mix 1 ½ cups of graham cracker crumbs, ½ cup of melted unsalted butter, and 2 tablespoons of sugar. Stir well until it looks like wet sand. Press this mixture into the bottom of a 9-inch springform pan. Make sure it’s even and compact. Bake the crust for 10 minutes, then let it cool while you make the filling. In a large bowl, beat 2 packages of softened cream cheese with an electric mixer. Mix until creamy and smooth. Slowly add 1 cup of granulated sugar and 1 teaspoon of vanilla extract, mixing well. Add 3 large eggs, one at a time, blending well after each one. Now gently fold in 1 cup of plain Greek yogurt, 1 cup of crushed pistachios, and ½ teaspoon of ground cinnamon. Be careful not to overmix! Pour the cheesecake mixture over the cooled crust. Use a spatula to smooth the top. Tap the pan gently on the countertop to release air bubbles. Place the cheesecake in the oven and bake for about 50-60 minutes. The center should be slightly jiggly. Turn off the oven and crack the door open. Let the cheesecake cool in the oven for 1 hour. This helps prevent cracks. While the cheesecake cools, make the honey syrup. In a small saucepan, mix ½ cup of honey, ½ cup of water, and 1 tablespoon of lemon juice. Heat over medium until it simmers. Cook for about 5-7 minutes, stirring often. The syrup should thicken slightly. Once done, remove it from heat and let it cool to room temperature. When the cheesecake cools to room temperature, cover it with plastic wrap. Refrigerate for at least 4 hours or overnight for the best taste. To serve, carefully remove the cheesecake from the springform pan. Drizzle the honey syrup over it and sprinkle with extra crushed pistachios. Slice it up and enjoy this delightful treat! To get that smooth, creamy texture in your Baklava Pistachio Cheesecake, start with room temperature cream cheese. Cold cream cheese will not blend well and can cause lumps. Use an electric mixer to beat the cream cheese until it's light and fluffy. This step is key for a silky filling. Add the sugar and vanilla next, mixing them well before adding the eggs. Make sure to add the eggs one at a time, mixing well after each one. This helps keep the texture even. Cracks can ruin the look of your cheesecake, but there are easy ways to prevent this. First, bake the cheesecake at a low temperature. This helps it cook evenly. After baking, turn off the oven, crack the door open, and let the cheesecake cool slowly inside. This gradual cooling will stop sudden temperature changes that can cause cracks. Also, avoid overmixing your batter, as this can introduce air that leads to cracks when baking. For a stunning presentation, slice your cheesecake with a warm knife for clean cuts. Serve each slice on a nice plate. Drizzle the cooled honey syrup generously over the top. Add a sprinkle of crushed pistachios for texture and flavor. For a pop of color, top each slice with a sprig of mint. This not only looks great but adds freshness to every bite. Enjoy your beautiful creation! Pro Tips Cool Gradually: After baking, let the cheesecake cool in the oven with the door ajar. This helps to prevent cracks by allowing it to set slowly. Room Temperature Ingredients: Ensure that your cream cheese and eggs are at room temperature before mixing. This results in a smoother batter and better texture. Perfectly Chilled: For the best flavor and texture, allow the cheesecake to chill in the refrigerator overnight before serving. Garnishing: When serving, drizzle extra honey syrup and sprinkle additional crushed pistachios on top for a beautiful presentation and added flavor. {{image_4}} You can mix up the nuts in your Baklava Pistachio Cheesecake. While pistachios are a classic choice, you can also use walnuts or almonds. Each nut brings its own flavor. Walnuts add a rich, earthy taste, while almonds provide a delightful crunch. Feel free to blend different nuts for a unique twist. Just make sure to crush them finely for the best texture. Adding flavors can elevate your cheesecake. You might consider mixing in orange or rose water for a fragrant touch. A pinch of cardamom can add warmth and depth. For a chocolate lover's delight, fold in cocoa powder or melted chocolate. These flavors can transform the cheesecake into something truly special. Experiment with your favorite tastes to find the perfect blend. If you want a different sweetness level, try using maple syrup or agave nectar instead of honey. These options can offer a unique flavor and sweetness. Stevia or monk fruit are great low-calorie alternatives. Adjust the amount based on how sweet you like your dessert. This way, you can enjoy a delicious cheesecake that fits your diet. To keep your baklava pistachio cheesecake fresh, wrap it well. Use plastic wrap or aluminum foil. You can also place it in an airtight container. This prevents the cheesecake from drying out or absorbing odors from the fridge. You can freeze the cheesecake if you want to save some for later. First, let it cool completely. Then, wrap it tightly in plastic wrap. Place it in a freezer-safe container. It can stay in the freezer for up to three months. When ready to eat, thaw it in the fridge overnight before serving. Baklava pistachio cheesecake lasts about five days in the fridge. Store it covered to keep it fresh. If you notice any changes in texture or smell, it’s best to discard it. For the best taste, enjoy it within the first few days after making it. Baklava Pistachio Cheesecake is a sweet dessert that blends two favorites. It combines rich cheesecake with the flavors of baklava. You get a creamy filling made with cream cheese, Greek yogurt, and crushed pistachios. The crust is made from graham cracker crumbs, giving it a delightful crunch. Honey syrup adds a sweet touch, just like in traditional baklava. Yes, you can make this cheesecake a day or two ahead. This dessert tastes even better after chilling overnight. The flavors blend nicely, making it extra tasty. Just remember to store it in the fridge until you're ready to serve. To check if your cheesecake is done, look for a slight jiggle in the center. The edges should be set, while the middle remains a bit wobbly. This means it will firm up as it cools. After baking, let it cool slowly in the oven to prevent cracks. You can serve the cheesecake with a drizzle of honey syrup. Adding extra crushed pistachios on top makes it look pretty. A sprig of mint also adds a nice pop of color. For a refreshing contrast, serve with fresh fruit like berries. You now know how to create a delicious Baklava Pistachio Cheesecake. We covered the best ingredients, how to prepare them, and tips for a smooth finish. Using fresh ingredients makes a big difference in taste. Remember to try different nuts or flavors to make it your own. Proper storage keeps it fresh longer. Enjoy this unique dessert at your next gathering. Your guests will love it!

Baklava Pistachio Cheesecake Irresistible Delight

Get ready to satisfy your sweet tooth with my Baklava Pistachio Cheesecake! This dessert combines the rich, nutty flavors of

Older posts
Page1 Page2 … Page86 Next →

dsad

© 2026 lazychefmagic • Built with GeneratePress

Our Policies

  • Copyright Policy
  • Cookie Policy
  • GDPR Policy
  • Privacy Policy
  • Disclaimer
  • Terms Of Use

More Information

  • Home
  • About
  • Contact
  • Appetizers
  • Dessert
  • Dinner
  • Drinks
©2026, lazychefmagic About Back To Top