Skip to content
DisclaimerTerms Of UseGDPR PolicyCookie Policy

lazychefmagic

  • Home
  • Drinks
  • Appetizers
  • Dinner
  • Dessert
  • About
  • Contact
  • Privacy Policy
DisclaimerTerms Of UseGDPR PolicyCookie Policy

NO-ING-IMG

- 2 boneless, skinless chicken breasts - 2 tablespoons Cajun seasoning - 1 tablespoon olive oil - 3 cloves garlic, minced - 1 medium onion, diced - 1 bell pepper, diced - 1 cup heavy cream - 1 cup chicken broth - 1 cup shredded mozzarella cheese - 8 oz fettuccine or penne pasta - Salt and pepper to taste - Fresh parsley, chopped I love using simple yet bold ingredients in my Creamy Cajun Chicken Pasta. Each one adds a unique flavor. First, I use two boneless, skinless chicken breasts. They cook quickly and soak up the spices well. Cajun seasoning gives the chicken a spicy kick. I recommend two tablespoons for a balanced heat. Next, I add olive oil to the skillet. It keeps the chicken from sticking and adds richness. Minced garlic and diced onion create a fragrant base. A bell pepper adds sweetness and color. You can use red or green—both work great. The sauce uses heavy cream and chicken broth. The cream makes it rich and smooth. The broth adds depth to the flavor. I always include mozzarella cheese for a melty finish. Finally, I choose fettuccine or penne pasta. Both types hold the creamy sauce well. Don’t forget to season with salt and pepper for the final touch. Fresh parsley adds a pop of color and freshness to the dish. - Bring salted water to a boil. - Cook pasta until al dente. Start by filling a large pot with water. Add a good amount of salt, as it helps flavor the pasta. Once the water is boiling, add your pasta. I love using fettuccine or penne for this dish. Cook it according to the package directions. Aim for al dente, which means it should be firm but not hard. This usually takes about 8-10 minutes. When done, drain the pasta but save a little water in case you need it for the sauce later. - Season chicken with Cajun seasoning. - Sear chicken in olive oil until cooked. While the pasta cooks, grab your chicken breasts. Sprinkle Cajun seasoning all over them. Make sure to coat both sides well. This spice mix is what gives your dish that bold flavor. Heat olive oil in a large skillet over medium-high heat. Once hot, add the chicken. Sear it for 5-7 minutes on each side until it turns golden brown and is cooked through. The internal temperature should reach 165°F (75°C). Afterward, remove the chicken and let it rest before slicing it into thin strips. - Add garlic, onion, and bell pepper to the skillet. - Cook until onion is translucent. In the same skillet, add minced garlic, diced onion, and diced bell pepper. This is where the magic happens! Sauté these for about 3-4 minutes. You want the onion to become translucent and the bell pepper to soften. The aroma will be fantastic! - Pour in chicken broth and heavy cream. - Simmer until sauce thickens. Next, pour in the chicken broth and heavy cream. Stir well, scraping up any bits stuck to the bottom of the skillet. Bring this mixture to a gentle simmer. Let it simmer for about 3-5 minutes. Stir occasionally until the sauce thickens slightly. This creamy sauce will be the star of your pasta dish! - Toss cooked pasta with sauce. - Incorporate sliced chicken and cheese. Now, it’s time to bring everything together. Add your cooked pasta to the skillet. Toss it well so the pasta is coated in the creamy sauce. Then, add the sliced chicken and shredded mozzarella cheese. Stir until the cheese melts and everything is combined. Taste it and add salt and pepper to your liking. - Garnish with parsley before plating. Remove the skillet from heat. To make your dish look pretty, garnish it with freshly chopped parsley before plating. The green color adds a nice touch! Serve it warm and enjoy your meal. - How to properly season chicken: To make your chicken full of flavor, sprinkle Cajun seasoning on both sides. Use enough to cover it well. This makes each bite tasty and bold. - Recommended pasta types for best results: Fettuccine or penne works best. These shapes hold the creamy sauce well. You can also try linguine or rigatoni for a fun twist. - Adjusting thickness with pasta water: If your sauce is too thick, save some pasta water. Add a little to the sauce to loosen it up. This helps the sauce cling to the pasta better. - Substituting ingredients for dietary needs: You can use low-fat cream or a plant-based cream for a lighter option. If you need gluten-free, choose gluten-free pasta. These swaps keep the dish tasty for everyone. - Best serving dishes and garnishes: Serve the pasta in deep bowls. Top each dish with fresh parsley and a sprinkle of Cajun seasoning. This adds color and makes it look gourmet. - Pairing recommendations: Garlic bread is a great side for this dish. A fresh salad adds crunch and balance. Together, they make a perfect meal. {{image_4}} You can switch up the protein in this dish. Try shrimp or sausage instead of chicken. Both options bring a new taste to the meal. If you want a vegetarian dish, use firm tofu or add more veggies. Zucchini, mushrooms, or broccoli work great. This way, everyone can enjoy this creamy pasta. To boost flavors, think about adding sundried tomatoes or fresh spinach. Both add a wonderful touch to the dish. You can also try different seasoning blends. A bit of smoked paprika or Italian herbs can create a unique flavor. Experimenting with these additions makes the recipe your own. Need gluten-free options? You can use gluten-free pasta brands. They cook well and taste great in this dish. If you avoid dairy, there are dairy-free creams available. Look for coconut cream or almond milk as a base. Both give a creamy texture without dairy, making this dish enjoyable for everyone. To keep your Creamy Cajun Chicken Pasta fresh, store it in the fridge. Use airtight containers to avoid drying out. Make sure to let the pasta cool down before sealing it. This helps to keep the cream sauce nice and creamy. When reheating, you want to avoid dry pasta. The best way is to add a splash of chicken broth or cream. If using a microwave, heat in short bursts. Stir between each burst to ensure even heating. For the stovetop, place the pasta in a skillet. Add a little broth or cream and stir. Heat over medium-low until warm. This method keeps your pasta creamy and flavorful. If you want to save some for later, freeze the pasta and sauce separately. Store them in freezer-safe bags or containers. This helps maintain the texture. When you're ready to eat, thaw the pasta in the fridge overnight. Reheat the sauce on the stovetop with some added cream or broth for the best results. This way, your dish tastes fresh even after freezing! You can use several ingredients instead of heavy cream. Here are some options: - Milk and butter: Combine 3/4 cup of milk with 1/4 cup of melted butter. - Greek yogurt: Use plain Greek yogurt for a thick and creamy texture. - Coconut milk: This adds a hint of sweetness and a unique flavor. - Silken tofu: Blend it until smooth for a dairy-free choice. These alternatives work well and still give a creamy feel. Creamy Cajun Chicken Pasta lasts about 3 to 4 days in the fridge. Store it in an airtight container. Make sure it cools down before sealing. This helps keep it fresh and tasty. Yes, you can make this dish ahead of time. Cook the pasta and sauce, then store them separately. This keeps the pasta from getting soggy. When ready to eat, just reheat the sauce and mix in the pasta. The spiciness depends on the Cajun seasoning you use. If you like it mild, use less seasoning. You can also add sour cream or yogurt to cool it down. For extra heat, add more seasoning or a dash of hot sauce. In this blog post, I covered how to make Creamy Cajun Chicken Pasta. You learned about the key ingredients, step-by-step cooking instructions, and storage tips. I also shared variations to make this dish your own. Final thought: This recipe offers both comfort and flavor. You can impress anyone at your table with ease. Enjoy cooking and experimenting with it!

Creamy Cajun Chicken Pasta Flavorful and Easy Recipe

Are you ready to bring some bold flavors to your dinner table? My Creamy Cajun Chicken Pasta combines tender chicken

- 1 lb. Italian sausage (remove casing if necessary) - 4 medium potatoes, diced into 1-inch cubes - 1 large onion, finely diced - 3 cloves garlic, minced I love starting with Italian sausage. It gives the soup a rich, savory flavor. You can remove the casing if you prefer. Next, I use four medium potatoes, diced into cubes. They add heartiness and texture. A large onion, finely diced, brings sweetness. Finally, three cloves of minced garlic create an amazing aroma. - 4 cups vegetable broth (low-sodium preferred) - 2 cups kale, stems removed and chopped For the broth, I choose four cups of low-sodium vegetable broth. It keeps the soup light and flavorful. Then, I add two cups of kale. I remove the stems and chop the leaves. Kale adds nutrition and a lovely green color. - 1 cup heavy cream (or substitute with coconut milk for a lighter option) - 1 tablespoon olive oil - 1 teaspoon dried thyme - 1 teaspoon smoked paprika - Salt and pepper to taste - Grated Parmesan cheese for serving (optional) I use one cup of heavy cream for a rich finish. If you want a lighter soup, coconut milk works well. I also add one tablespoon of olive oil for sautéing. For flavor, I use one teaspoon each of dried thyme and smoked paprika. Lastly, salt and pepper bring everything together. If you like, sprinkle some grated Parmesan cheese on top before serving. To start, heat a large pot over medium heat. Add 1 tablespoon of olive oil. When the oil shimmers, toss in 1 finely diced onion. Sauté it for about 5 minutes. You want the onion to become soft and clear. Next, add 3 minced garlic cloves. Stir often for 1 minute until the garlic smells great. Now it’s time for the star of the dish: the sausage. Add 1 pound of Italian sausage to your pot. Use a spatula to break it into smaller pieces. Cook the sausage for about 7 to 10 minutes. Make sure it turns brown and there is no pink left in it. This step adds a lot of flavor to our soup. With the sausage cooked, it’s time to mix in the veggies. Add 4 medium potatoes, diced into 1-inch cubes. Sprinkle in 1 teaspoon of dried thyme and 1 teaspoon of smoked paprika. Season with salt and pepper to your taste. Stir everything well to combine. Next, pour in 4 cups of vegetable broth. Increase the heat and bring it to a gentle boil. Once it boils, reduce the heat, cover the pot, and let it simmer for 15 to 20 minutes. You want the potatoes to be fork-tender. This is where the magic happens, and the flavors blend beautifully. After the potatoes are soft, add in 2 cups of chopped kale. Stir it in and cover the pot again. Let it cook for 5 more minutes. This will wilt the kale and make it tender. Finally, remove the pot from heat and stir in 1 cup of heavy cream or coconut milk. This gives the soup a rich and creamy feel. Adjust the seasoning if needed. Now you’re ready to serve! To get the best flavor in your sausage potato kale soup, start with fresh ingredients. Use high-quality Italian sausage for a rich taste. Cooking the sausage until it is nicely browned adds depth to the soup. Sauté the onion and garlic until they are soft. This step brings out their natural sweetness. Seasoning is very important. I like to add salt and pepper during cooking. This helps build flavor. Try adding a pinch of dried thyme and smoked paprika. They give your soup a warm, earthy taste. For serving, pair this soup with crusty bread. A fresh side salad also works well. It adds a nice crunch. You can top the soup with grated Parmesan cheese for extra flavor. Chopped fresh herbs, like parsley or basil, can brighten the dish. If you want to make the soup dairy-free, replace heavy cream with coconut milk. This keeps the soup creamy without the dairy. For a gluten-free option, ensure your broth is gluten-free. All the other ingredients are naturally gluten-free, so you're in good shape! {{image_4}} You can switch up the sausage in this soup. Try chorizo for a spicy kick or turkey sausage for a leaner option. Each type brings a new flavor to the pot. For veggies, feel free to get creative! Swap kale for spinach or collard greens. You can even add carrots or bell peppers for extra color and taste. Want to boost the flavor? Add some red pepper flakes for heat. A dash of cumin can bring warmth too. If you love a smoky taste, try adding more smoked paprika. Herbs also add great flavor. Fresh parsley or basil can brighten the soup. Toss in some bay leaves while it simmers for depth. Remove them before serving! You can make this soup in a slow cooker. Just brown the sausage and sauté the onion and garlic first. Then, add all ingredients to the slow cooker. Cook on low for 6-8 hours. If you have an Instant Pot, it’s even faster! After browning the sausage and veggies, add broth and potatoes. Seal the lid and cook on high pressure for 10 minutes. Quick release and stir in the kale and cream. These variations let you enjoy this soup in new ways! To store leftovers, let the soup cool to room temperature. Then, transfer it to an airtight container. It keeps well in the fridge for up to three days. Make sure to label the container with the date. This ensures you know when it was made and helps avoid waste. For freezing, allow the soup to cool completely. Then, pour it into freezer-safe bags or containers. Leave some space at the top for expansion. You can freeze it for up to three months. When you want to enjoy it again, just thaw it in the fridge overnight before reheating. To reheat the soup, pour it into a pot over medium heat. Stir it often to prevent sticking. Heat until it's hot throughout, about 5 to 10 minutes. If the soup looks too thick, add a splash of broth or water. This helps to bring back its creamy texture. You can also reheat the soup in the microwave. Just use a microwave-safe bowl and cover it loosely. Heat in 1-minute bursts, stirring in between, until it's hot. Sausage Potato Kale Soup lasts about 3 to 4 days in the fridge. Store it in an airtight container. This keeps it fresh and tasty. Make sure to cool the soup before putting it in the fridge. If you want it to last longer, consider freezing it. Yes, you can use frozen kale! Just add it to the pot when you would add fresh kale. Frozen kale will soften quickly and blend well into the soup. It is a great time-saver. Plus, it still packs a nutritious punch! Sausage Potato Kale Soup pairs well with crusty bread or a fresh salad. You can serve it with garlic bread for a tasty twist. Feeling fancy? Top it with grated Parmesan cheese for extra flavor. Enjoy your meal! This article shows you how to make Sausage Potato Kale Soup. We started with key ingredients like sausage, potatoes, and kale. Then, we discussed cooking steps like sautéing and simmering. I shared tips for great flavor and ways to modify the dish. You learned about ingredient swaps and cooking methods for variety. In the end, this soup is versatile and easy. I hope you try it soon! Enjoy making your own tasty version.

Satisfying Sausage Potato Kale Soup Easy and Hearty

If you’re seeking a warm, comforting dish that packs a punch, look no further than this Satisfying Sausage Potato Kale

- 1 package (about 20) frozen potstickers (chicken or vegetable) - 4 cups chicken or vegetable broth - 1 medium onion, finely chopped - 2 cloves garlic, minced - 1 tablespoon ginger, grated - 1 red bell pepper, sliced - 1 cup baby spinach - 1 tablespoon soy sauce (or tamari for gluten-free) - 1 tablespoon fish sauce - 1 tablespoon lime juice - 1 teaspoon chili paste (adjust to spice preference) - Fresh cilantro for garnish - 2 green onions, sliced for garnish - Salt and pepper to taste Let’s dive into the key elements of this soup. First, you can use frozen potstickers for speed and ease. Choose chicken or vegetable potstickers based on your taste. The broth forms the heart of the soup. Use chicken or vegetable broth for a rich flavor. Next, we have the aromatics: onion, garlic, and ginger. Chop the onion finely for a sweet taste. Mince the garlic for a strong kick. Grate the ginger to add warmth and depth. The soup gets color and crunch from red bell pepper and baby spinach. Slice the bell pepper thinly, so it cooks evenly. Add the baby spinach at the end for a fresh touch. For seasoning, soy sauce and fish sauce add umami. Lime juice brightens the flavor, while chili paste gives it a kick. Finally, don’t forget the garnishes. Fresh cilantro and green onions bring a burst of freshness. These ingredients create a soup that is vibrant and comforting. 1. Cooking the aromatics: onion, garlic, and ginger Heat a splash of oil in a large pot over medium heat. Once hot, add the finely chopped onion. Sauté for about 3 minutes until the onion is soft and clear. Then, add the minced garlic and grated ginger. Stir for 1 minute, letting the garlic and ginger fill your kitchen with their lovely smell. 2. Simmering the broth and adding vegetables Next, pour in 4 cups of chicken or vegetable broth. Bring this mixture to a gentle simmer. This broth forms the tasty base of your soup. Add the sliced red bell pepper next. Let it simmer for 5 minutes. This gives the pepper time to soften and add flavor to the broth. 3. Cooking the potstickers in the broth Carefully add the frozen potstickers to the pot. Make sure they are fully covered by the broth. Cook for about 5 to 7 minutes. They should be warm and tender when done. 4. Final seasoning and serving instructions Stir in the baby spinach, soy sauce, fish sauce, lime juice, and chili paste. Let the soup cook for another 2 to 3 minutes. This wilts the spinach and blends all the flavors. Taste the soup and add salt and pepper to your liking. Serve it hot in bowls. Garnish with fresh cilantro and sliced green onions for an extra burst of color and taste. - Choosing the right potstickers: You can use frozen or homemade potstickers. Frozen ones save time. They also cook well in the broth. Homemade potstickers add a personal touch. Use your favorite filling, like chicken or veggies. - Adjusting spice levels with chili paste: The soup can be mild or spicy. Start with one teaspoon of chili paste. Taste the soup, then add more if you want it hotter. Remember, you can always add more spice, but you can’t take it out! - Ensuring vegetables are perfectly cooked: Cut your veggies small for even cooking. Sauté the onion, garlic, and ginger first. Then, add the red bell pepper. It softens in the broth, adding great flavor. The baby spinach cooks quickly, so add it last. - Best garnishes for visual appeal: Fresh cilantro and sliced green onions make great toppings. They add color and flavor. Sprinkle them just before serving for the best look. - Serving suggestions for a complete meal: Serve the soup in deep bowls. Pair it with rice or a fresh salad. This makes it a full meal that everyone will love. {{image_4}} You can easily switch up the proteins in this soup. If you want a plant-based option, use tofu. It absorbs flavors well and adds a nice texture. Shrimp works great too. It cooks quickly and adds a sweet, briny taste. As for vegetables, feel free to mix it up. Try adding mushrooms for earthiness or bok choy for a crunch. Carrots can also add a nice sweetness. Experiment with what you have at home. If you need a gluten-free version, opt for tamari instead of soy sauce. Also, choose a gluten-free broth. This way, everyone can enjoy the soup without worry. You can take your soup to the next level with herbs and spices. Fresh basil or mint can add a bright note. You might even consider adding a touch of lemongrass for that classic Thai flavor. For some heat, include fresh chilies or a dash of hot sauce. Adjust the spice level to your liking. This will make each bowl feel warm and inviting. These tweaks help you create a soup that feels unique and personal. Let your taste buds guide you! To store your Thai potsticker soup, let it cool first. Once cool, pour it into an airtight container. This helps keep the soup fresh. You can refrigerate it for up to three days. If you want to keep it longer, freeze it. Just make sure to use freezer-safe containers. When reheating, do it on low heat. Stir gently to avoid breaking the potstickers. Add a little broth or water if it seems thick. In the fridge, your soup will stay fresh for about three days. If you freeze it, it can last for up to three months. Just remember, the longer it sits, the more the flavors may change. For the best taste, try to eat it sooner rather than later. Can I use homemade potstickers? Yes, you can use homemade potstickers. They add a fresh touch and unique flavor to your soup. Just make sure they are cooked before adding them to the broth. This helps keep the soup warm and tasty. What if I don't have soy sauce? If you don't have soy sauce, you can use tamari for a gluten-free option. Other alternatives include coconut aminos or even a bit of salt. Just adjust to your taste. These options give your soup a nice depth without missing soy sauce. Is this soup suitable for meal prep? Absolutely! This soup is great for meal prep. You can make a big batch and store it in the fridge for up to four days. Just keep the potstickers separate until you're ready to eat to keep them from getting soggy. Can I make it vegetarian or vegan? Yes, you can easily make this soup vegetarian or vegan. Use vegetable broth and replace potstickers with vegetable ones. Check the fish sauce, as it is not vegan. You can use a vegan fish sauce or skip it entirely for a lighter flavor. This blog post explored how to make a tasty Thai potsticker soup. We covered the key ingredients like frozen potstickers, broth, and fresh veggies. You learned step-by-step instructions for cooking and tips for perfecting your soup. Consider ingredient substitutions to customize flavors. In conclusion, this soup is easy to make and fun to share. Enjoy cooking and let your creativity shine!

Thai Potsticker Soup Flavorful and Simple Recipe

Are you craving a warm, flavorful dish that is easy to make? Look no further than my Thai Potsticker Soup!

- 1 lb ground turkey or chicken, lean and seasoned - 4 large bell peppers, diced into bite-sized pieces - 1 cup quinoa, thoroughly rinsed in a fine-mesh strainer - 1 can (15 oz) black beans, rinsed under cold water and drained - 1 can (15 oz) diced tomatoes with green chilies, including all juices - 4 cups vegetable broth, low-sodium preferred - 1 medium onion, finely chopped - 2 cloves garlic, minced - 2 teaspoons ground cumin - 1 teaspoon smoked paprika - Salt and freshly ground black pepper to taste - Fresh cilantro or parsley, chopped for garnish 1. Start by heating a tablespoon of olive oil in a large pot over medium heat. 2. Add the finely chopped onion and minced garlic. Sauté for about 3-4 minutes. Stir until the onion is soft and fragrant. 3. Increase the heat slightly. Add the ground turkey or chicken to the pot. Cook for 5-7 minutes. Break up the meat as it cooks until browned and no longer pink. 4. Next, incorporate the diced bell peppers into the pot. Cook for 3 more minutes. Stir occasionally until the peppers soften and release their sweetness. 5. Add the rinsed quinoa, black beans, diced tomatoes with their juices, and vegetable broth. Mix in the ground cumin and smoked paprika. Season with salt and pepper to taste. Stir well to combine all the ingredients. 6. Bring the mixture to a rolling boil. Once boiling, reduce the heat to low. Cover the pot with a lid. Let it simmer for about 20-25 minutes. Cook until the quinoa is fluffy and the bell peppers are tender. 7. Before serving, taste the soup and adjust the seasoning with more salt and pepper, if needed. 8. Ladle the soup into bowls. Garnish with freshly chopped cilantro or parsley to enhance flavor and presentation. - Ensuring quinoa is fully cooked: Quinoa should be soft and fluffy. It usually cooks in about 15 minutes. Keep an eye on it while simmering. If it looks too watery, let it cook a bit longer. You can also taste it. It should not be crunchy. - Adjusting seasoning for flavor: Taste your soup before serving. If it needs more flavor, add salt and pepper. You can also add more cumin or smoked paprika if you want a stronger taste. Be careful not to add too much at once. A little goes a long way. - Garnishing with herbs: Fresh herbs make your soup look great and taste fresh. Chopped cilantro or parsley on top adds color and flavor. Sprinkle it right before serving for the best look. - Adding lime, cheese, or yogurt: A wedge of lime on the side adds a nice twist. Squeeze it into your bowl for a tangy boost. You can also top your soup with shredded cheese or a dollop of Greek yogurt. This adds creaminess and pairs well with the spices. You can store your High Protein Stuffed Pepper Soup in the fridge for up to 4 days. Keep it in an airtight container to maintain freshness. When you reheat, warm it on the stove over medium heat. Stir often to avoid sticking. You can also use a microwave. Heat in short bursts, stirring between each, until hot. To freeze the soup, let it cool completely first. Pour it into freezer-safe containers or bags. Leave some space at the top for expansion. It will stay good for about 3 months in the freezer. When you're ready to eat, thaw it overnight in the fridge. For reheating, use the stove or microwave until hot. Always stir well to make sure it heats evenly. {{image_4}} The protein in this soup comes from three main sources: - Ground turkey or chicken - Black beans - Quinoa Ground turkey or chicken is lean and rich in protein. One pound provides about 70 grams of protein. Black beans add about 15 grams. Quinoa, a whole grain, has about 24 grams. Together, they create a hearty meal packed with nearly 109 grams of protein. Protein helps build muscles and keeps you feeling full. It also aids in recovery after exercise. This makes the soup great for anyone looking to boost their protein intake without excess fat. Eating a high-protein diet offers many advantages. It can help with weight loss by keeping you full longer. This soup also includes a variety of vegetables like bell peppers and onions. Bell peppers are not just colorful; they are full of vitamins A and C. These vitamins support your immune system. Onions add flavor and also contain antioxidants. Together, these veggies provide fiber, which aids digestion. Including fiber in your meals helps keep your gut healthy. This soup is a delicious way to enjoy a balanced diet. It combines the benefits of protein and the nutrients from fresh vegetables. Can I use other types of meat? Yes, you can use different meats. Ground beef or pork work well too. Just adjust the cooking time. Ensure the meat is lean to keep it healthy. What can I substitute for quinoa? If you don't have quinoa, try brown rice or farro. These grains add texture and flavor. They also keep the soup hearty and filling. How to make it spicier? To spice it up, add chopped jalapeños or a dash of hot sauce. You can also increase the amount of smoked paprika. This brings warmth and depth to the soup. Can I add more vegetables? Absolutely! Feel free to add zucchini, corn, or spinach. These veggies boost nutrition and flavor. Just chop them small and add them when you add the bell peppers. This blog post covered how to make a healthy soup. We discussed main ingredients like ground turkey, bell peppers, and quinoa. I explained the step-by-step cooking process, including tips to enhance flavor and adjust for different diets. Remember, you can store or freeze leftovers for later. This soup is not only tasty but also packed with nutrients. Enjoy your cooking and feel free to experiment with flavors and ingredients. You’ll create a dish that suits your taste and health goals.

High Protein Stuffed Pepper Soup Hearty and Delicious

Looking for a warm, filling meal that’s packed with protein? My High Protein Stuffed Pepper Soup is just what you

To make Greek Honey Pie, you will need these ingredients: - 1 cup all-purpose flour - 1/2 cup unsalted butter, melted - 1/4 cup powdered sugar - 1 large egg yolk - 1/4 teaspoon salt - 1/2 teaspoon vanilla extract - 1 cup walnuts, finely chopped - 1 teaspoon cinnamon - 1/2 cup honey - 1/2 cup almond milk - Zest of 1 lemon - 1 teaspoon baking powder - 1 tablespoon sesame seeds If you have allergies, you can make some easy swaps. Here are some ideas: - Use gluten-free flour instead of all-purpose flour. - Swap unsalted butter for coconut oil for a dairy-free option. - Replace almond milk with oat milk or soy milk if you prefer. - If you can’t have walnuts, try pecans or sunflower seeds. Using fresh ingredients makes a big difference. Fresh walnuts add crunch and flavor. Fresh lemon zest brightens the pie. Good quality honey enhances the sweetness. When you use fresh items, your pie will taste better. So always choose fresh ingredients for this recipe. To start, grab a large mixing bowl. In it, combine 1 cup of all-purpose flour, 1/2 cup of melted unsalted butter, and 1/4 cup of powdered sugar. Add 1 large egg yolk, 1/4 teaspoon of salt, and 1/2 teaspoon of vanilla extract. Mix these ingredients until you have a smooth dough. It should feel soft and easy to handle. Next, lightly dust your work surface with flour. Roll the dough into a circle that fits a 9-inch pie pan. Gently press the dough into the pan’s bottom and up the sides. Trim any extra dough hanging over the edges. Use a fork to prick the bottom of the crust. This helps prevent bubbles while baking. While the crust cools, prepare the filling. In another mixing bowl, combine 1 cup of finely chopped walnuts, 1 teaspoon of cinnamon, and the zest of 1 lemon. Add 1/2 cup of honey, 1/2 cup of almond milk, and 1 teaspoon of baking powder. Mix well until everything blends into a smooth mixture. This filling is the heart of your pie, rich in flavor and texture. Preheat your oven to 350°F (175°C). Bake the prepared crust for about 15 minutes, or until it turns lightly golden. Once done, take it out and let it cool slightly. Now, pour the walnut filling into your pre-baked crust. Spread it evenly with a spatula. Sprinkle 1 tablespoon of sesame seeds on top for added crunch and flavor. Return the pie to the oven and bake for 25-30 minutes. You’ll know it’s ready when the filling is set and the top is lightly golden. After baking, let the pie cool completely in the pan. This cooling step is key for the perfect slice. Enjoy your Greek Honey Pie at room temperature or chilled! To get a great crust for your Greek honey pie, use cold butter. Cold butter helps keep the crust flaky. Mix the flour and butter until it looks like crumbs. Then add the powdered sugar and egg yolk. This will help the crust hold together. Don't overwork the dough. If it feels tough, it won’t be as nice. Pricking the crust with a fork helps it bake evenly. This step stops bubbles from forming. You can make this pie even more special by adding herbs or spices. Cinnamon is a classic choice. It pairs well with the sweetness of honey. Lemon zest adds a fresh touch. If you like, try a hint of nutmeg or cardamom for a twist. Be careful not to add too much. You want the honey flavor to shine through. When serving your Greek honey pie, think about how to make it look great. A sprinkle of walnuts on top adds texture. Fresh mint leaves can add a pop of color. Serve the pie on a nice plate. For extra sweetness, drizzle honey over each slice. This makes it even more tempting. You can also serve it with a scoop of vanilla ice cream. This adds creaminess and complements the flavors well. {{image_4}} When making Greek honey pie, you can use different nuts. Walnuts are traditional and add a rich flavor. They offer a nice crunch and a deep, earthy taste. Almonds, on the other hand, provide a sweet, mild flavor. They can make the pie taste lighter and fresher. If you choose almonds, use chopped or slivered ones. This will keep the texture nice. You can even mix both nuts for a fun twist. Experimenting with nuts can change the pie’s taste and texture. Try it out to find your favorite! Honey is the star of Greek honey pie. The type of honey you use changes the taste. For a floral note, try orange blossom honey. It adds a bright flavor. Clover honey is milder and sweet, making it a great choice for balance. If you like a strong taste, buckwheat honey is perfect. It has a rich, bold flavor that stands out. Consider using local honey for a personal touch. Each type brings its unique twist to the pie. You can easily make Greek honey pie vegan. Replace the egg yolk with a flaxseed egg. Just mix one tablespoon of flaxseed meal with three tablespoons of water and let it sit for a few minutes. Use coconut oil instead of butter for a plant-based fat. You can also swap honey for agave syrup or maple syrup. These substitutes keep the sweetness but fit a vegan diet. Always check for nut allergies if serving to others. This pie can be a delightful treat for everyone, no matter their diet. To keep your Greek honey pie fresh, store it in an airtight container. This helps prevent it from drying out. You can place it at room temperature for up to two days. If you need to store it longer, refrigerate the pie. Just make sure it is covered well. This keeps the flavors intact and maintains its texture. When you want to enjoy leftovers, reheating is simple. Preheat your oven to 300°F (150°C). Place a slice of pie on a baking sheet. Heat it for about 10-15 minutes. This warms the pie without making it soggy. You can also use a microwave for quick reheating. Just heat for 20-30 seconds. Be careful not to overheat it, as this can change the texture. If you want to freeze your Greek honey pie, it’s easy. First, let the pie cool completely. Then, wrap it tightly in plastic wrap. After that, place it in a freezer-safe bag. This way, it can last for up to three months in the freezer. When you are ready to eat it, thaw it in the fridge overnight. Reheat it gently before serving for the best taste. Greek Honey Pie is made of simple ingredients. You need all-purpose flour, unsalted butter, powdered sugar, and an egg yolk for the crust. The filling contains walnuts, honey, almond milk, cinnamon, and lemon zest. This mix gives the pie its sweet and nutty taste. Yes, you can replace almond milk. Use regular milk, oat milk, or soy milk. Each will change the taste a bit, but they will still work. Greek Honey Pie can last about 3 to 4 days in the fridge. Store it in an airtight container to keep it fresh. The flavors will develop more over time, making it even better. Yes, you can make this pie ahead of time. Bake it a day before you plan to serve it. Just cool it fully, then store it in the fridge. This saves time and lets the flavors blend. Serve Greek Honey Pie at room temperature or chilled. For extra sweetness, drizzle more honey on top. Garnish with walnuts or mint leaves for a nice touch. You’ve learned how to make a delicious Greek Honey Pie from scratch. We covered key ingredients, step-by-step instructions, and tips to make it perfect. Using fresh ingredients is vital to flavor and texture. You can explore variations and make it suit your taste or diet. Remember to store it properly for the best taste. With practice, you'll be serving this pie to friends and family in no time. Enjoy your baking journey!

Greek Honey Pie Deliciously Sweet and Simple Recipe

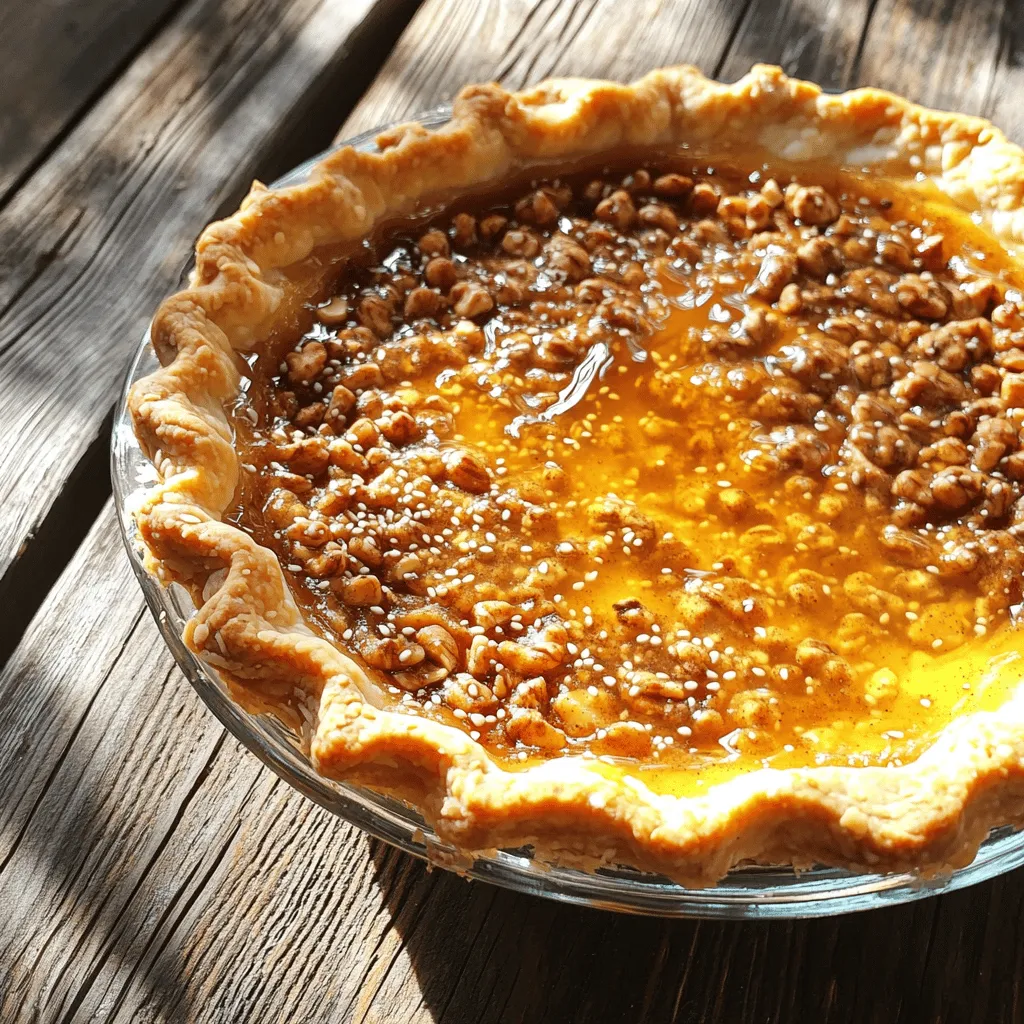
Are you ready to indulge in a delightful dessert? Greek Honey Pie is sweet, simple, and packed with flavor. This

In this vegetarian crockpot chili, you will need several key ingredients. First, gather: - 2 cans of black beans, rinsed and drained - 1 can of kidney beans, rinsed and drained - 1 can of diced tomatoes with juice - 1 bell pepper, diced - 1 medium onion, chopped - 2 cloves of garlic, minced - 1 medium zucchini, diced - 1 medium carrot, diced - 1 cup of corn kernels - 2 tablespoons of chili powder - 1 teaspoon of ground cumin - 1 teaspoon of smoked paprika - Salt and pepper to taste - 2 cups of vegetable broth - 1 tablespoon of olive oil These ingredients combine to create a rich and hearty chili. Each type of bean offers protein and fiber. The tomatoes add acidity and sweetness. The vegetables provide texture and flavor. To make this dish even more delicious, consider adding some toppings: - Sliced avocado - Fresh cilantro - A dollop of sour cream These toppings bring creaminess, freshness, and a burst of flavor. They can also enhance the dish's visual appeal. If you have dietary needs, here are some substitutions: - Use quinoa or lentils instead of beans for a different protein source. - Replace vegetable broth with water or a homemade broth to control salt. - For a spicy kick, add diced jalapeños or hot sauce. - To make it vegan, skip the sour cream and choose a dairy-free alternative. These substitutions help you tailor the chili to your taste and dietary needs. This way, everyone can enjoy a warm bowl of chili! {{ingredient_image_2}} Start by gathering your vegetables. You need a bell pepper, onion, garlic, zucchini, and carrot. Dice the bell pepper and zucchini into small pieces. Finely chop the onion and mince the garlic. Heat one tablespoon of olive oil in a skillet over medium heat. Add the onion and garlic first. Sauté them for about two minutes. Next, add the bell pepper, carrot, and zucchini. Cook for three more minutes until they are tender and fragrant. This step builds a great base for your chili. Once your vegetables are ready, transfer them to the crockpot. Spread them evenly across the bottom. Now, it’s time to add the beans. You will need two cans of black beans and one can of kidney beans. Be sure to rinse and drain them well. Next, add one can of diced tomatoes along with their juice. Pour in one cup of corn kernels. Then, sprinkle in two tablespoons of chili powder, one teaspoon of ground cumin, and one teaspoon of smoked paprika. Add salt and pepper to taste. Finally, pour in two cups of vegetable broth. Stir everything gently until combined. Now that your ingredients are in the crockpot, it’s time to cook. Secure the lid tightly. You can choose to cook on low or high. If you cook on low, set the timer for six to eight hours. For high, set it for three to four hours. The longer you cook, the better the flavors meld together. Before serving, taste the chili. Adjust the seasoning with more salt and pepper if needed. Your hearty vegetarian chili is now ready to enjoy! To make your chili pop, use fresh herbs. Adding fresh cilantro or parsley at the end brightens the dish. You can also try a squeeze of lime juice. This adds zest and cuts through the richness. For deeper flavor, consider adding a dash of hot sauce or a pinch of sugar. These small tweaks can make a big impact. For the best texture, don’t skip sautéing the veggies first. This step builds a great flavor base. If you like a thicker chili, mash some beans after cooking. This helps create a creamy texture. If it's too thick, add a little vegetable broth to adjust. Remember to cook it long enough. The longer it simmers, the better it tastes. Serve your chili in deep bowls for a comforting meal. Top it with creamy avocado slices, fresh cilantro, or a dollop of sour cream. These toppings add color and flavor. Pair it with crusty bread or crispy tortilla chips for crunch. A side of rice also works well. Feel free to get creative and make it your own! Pro Tips Layering Flavors: Sautéing the vegetables before adding them to the crockpot enhances their flavor and aroma, giving your chili a richer taste. Bean Variations: Feel free to mix different types of beans, such as pinto or garbanzo beans, to add variety and texture to your chili. Make it Spicy: If you like heat, add diced jalapeños or a pinch of cayenne pepper to the pot for an extra kick. Chili Consistency: For a thicker chili, you can mash some of the beans with a fork before cooking, or add a tablespoon of tomato paste. {{image_4}} You can change the beans for different flavors and textures. For a creamier chili, use navy beans or cannellini beans. If you want more color, try pinto beans or add chickpeas. Mixing different beans adds depth to the chili and makes it more fun. To control the heat, adjust the spices. For mild chili, use less chili powder. If you like spice, add diced jalapeños or red pepper flakes. You can also include a splash of hot sauce for an extra kick. Taste as you go to get it just right. If you want more protein, add lentils or quinoa. Both options cook well in the crockpot and soak up flavor. You might also consider adding tofu or tempeh for a meat-like texture. These additions make the chili heartier and more filling. To store leftover chili, let it cool first. Then, place it in an airtight container. You can keep it in the fridge for up to five days. If you want to save it longer, freezing is a great option. You can freeze this chili easily. Use freezer-safe bags or containers. Make sure to leave some space for the chili to expand. It can last up to three months in the freezer. When you’re ready to eat it, thaw it in the fridge overnight. To reheat, you can use the stove or microwave. If using the stove, heat it in a pot over medium heat. Stir often until it’s hot. For the microwave, place it in a bowl and cover it. Heat in short intervals, stirring between each. Enjoy your chili warm and flavorful! If you want to skip the beans, try lentils. Lentils cook quickly in the crockpot. They add protein and a nice texture. You can also use diced vegetables like mushrooms or eggplant for a hearty bite. Just remember to adjust the cooking time. Cook lentils for 4-5 hours on low. Absolutely! To add heat, include chopped jalapeños or a dash of hot sauce. You can also add cayenne pepper or crushed red pepper flakes. Adjust the amount based on your heat level. Start small, then taste and add more. This way, you control the spice. The chili lasts about 4-5 days in the fridge. Store it in an airtight container for best results. Reheat it on the stove or in the microwave before serving. If you want it to last longer, consider freezing it instead. It can freeze well for up to 3 months. This blog covered the key ingredients, cooking steps, and helpful tips for making chili. You can customize your dish with toppings and substitutions. Remember, adjust spice levels and protein sources to suit your taste. Store leftovers properly and enjoy your chili later. This recipe is versatile and fun to explore. Get creative and make it your own. Dive in and enjoy a warm bowl of deliciousness!

Vegetarian Crockpot Chili Flavorful and Simple Recipe

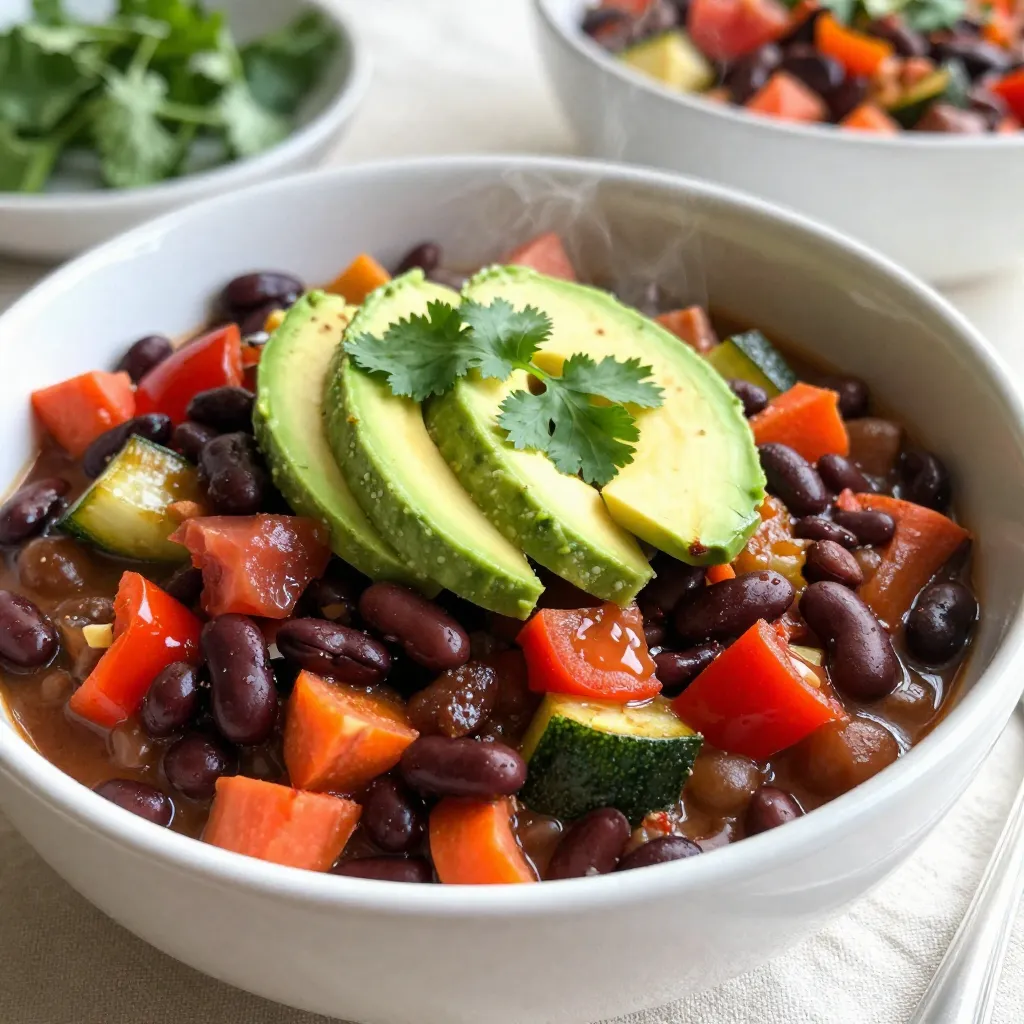
Looking for a warm and comforting meal that’s easy to make? My Vegetarian Crockpot Chili is just what you need!

- 1 lb ground beef - 1 small onion, finely chopped - 2 cloves garlic, minced - 1 can (15 oz) black beans, drained and rinsed - 1 can (10 oz) enchilada sauce For these One-Pan Cheesy Beef Enchiladas, the main ingredients make all the difference. Ground beef gives a rich flavor and hearty texture. The onions and garlic add a sweet and savory base. Black beans boost protein and fiber, making the dish more filling. You need enchilada sauce for a tasty kick and moisture. - 6 small flour tortillas - 1 cup shredded cheddar cheese - 1 cup shredded Monterey Jack cheese You can use flour tortillas, which stay soft and roll easily. They hold the filling well, making each bite delicious. For cheese, I like using a mix of cheddar and Monterey Jack. Cheddar adds sharpness, while Monterey Jack brings creaminess. Together, they melt beautifully and create a cheesy topping. - 1 teaspoon chili powder - 1 teaspoon ground cumin - ½ teaspoon salt - ½ teaspoon black pepper Seasonings are key to great flavor. Chili powder adds warmth and a bit of heat. Ground cumin gives a smoky taste that pairs well with beef. Salt and pepper enhance the overall flavor, making each bite satisfying. Adjust these spices to suit your taste; cooking should always feel personal! - Preheat your oven to 375°F (190°C). This step warms up your oven. - In a large skillet, heat over medium heat. Add 1 small chopped onion. Sauté for about 3 minutes until it turns soft. Then, add 2 cloves of minced garlic. Cook for another minute until it smells great. - Next, add 1 pound of ground beef to the skillet. Use a spatula to break it apart. Cook until it is brown and fully cooked. This should take about 5 to 7 minutes. If there is extra fat, drain it out. - Stir in 1 can of drained black beans. Add 1 teaspoon of chili powder, 1 teaspoon of ground cumin, ½ teaspoon of salt, and ½ teaspoon of black pepper. Then, pour in half of the enchilada sauce. Mix well until everything blends together. - In a 9x13 inch baking dish, spread a thin layer of the remaining enchilada sauce on the bottom. This helps the enchiladas not stick. - Take a small flour tortilla and place a generous spoonful of the beef mix down the center. Roll it tightly and keep the seam on the bottom. Repeat this for all tortillas, placing them seam-side down in the dish. - Pour any leftover enchilada sauce on top of the rolled tortillas. Then, sprinkle 1 cup of shredded cheddar cheese and 1 cup of Monterey Jack cheese over the top. - Cover the baking dish with aluminum foil. This keeps the moisture in while baking. Place it in the preheated oven. Bake for 20 minutes. - After 20 minutes, carefully remove the foil. Return the dish to the oven for another 10 minutes. This helps the cheese become bubbly and golden brown. - Once baked, let the enchiladas rest for a few minutes. Garnish with fresh chopped cilantro. Serve with sour cream on the side if you like. To avoid soggy tortillas, warm them slightly in the microwave. This makes them soft and easy to roll. Don't soak them in sauce for too long. A light layer of sauce on the bottom helps too. Getting the cheese just right is key. Use a mix of cheddar and Monterey Jack for great flavor. Sprinkle cheese on top generously. This gives a nice, gooey finish when baked. Using pre-cooked beef can save you time. You can find it in many stores. Just heat it up and mix it with the other ingredients. Chopping onions and garlic can take time. Try using a food processor for quick chopping. Alternatively, buy pre-chopped onions and minced garlic. This saves you even more time! Elevate your dish with fresh garnishes. Chopped cilantro adds a nice pop of color and flavor. You can also add sour cream for a creamy touch. Pair your enchiladas with simple side dishes. A fresh salad or rice works well. You can even serve them with tortilla chips and salsa for a fun twist! {{image_4}} You can easily make these enchiladas meat-free. Swap the ground beef for black beans. This adds protein and fiber. You can also mix in other beans like pinto or kidney beans. Add more vegetables for extra flavor and nutrition. Bell peppers, zucchini, or corn work great. Just chop them small and sauté with the onions and garlic. This way, you keep a tasty filling without meat. Want to turn up the heat? You can add diced jalapeños or a dash of hot sauce. Mix them into the beef mixture or sprinkle on top before baking. For a milder version, use less chili powder. Kids may not like spicy food, so keep it simple for them. You can also serve sour cream on the side. This helps cool it down for little ones. Cheese can change the whole dish. While cheddar and Monterey Jack are classic, you can try different blends. Pepper Jack adds a nice kick. For a lighter option, consider part-skim mozzarella. If you need a non-dairy choice, use vegan cheese. These options melt well and taste great. Just choose what fits your taste and diet. To store leftover enchiladas, place them in a sealed container. They will stay fresh in the fridge for up to four days. If you want to keep them longer, freezing is a great option. Wrap the enchiladas tightly in plastic wrap, then place them in a freezer-safe bag. They can last up to three months in the freezer. Just label the bag with the date to keep track. When you're ready to eat your leftovers, the best way to reheat them is in the oven. Preheat your oven to 350°F (175°C). Place the enchiladas in a baking dish and cover with foil. This keeps them moist. Heat for about 20 minutes, or until warm. You can also use a microwave, but be careful. Microwaving can make the tortillas soggy. If using a microwave, place a damp paper towel over the enchiladas to help keep them moist. In the fridge, your enchiladas will stay good for about four days. After that, you should toss them out. Look for signs of spoilage. If they smell off or look moldy, it’s best to throw them away. Always trust your senses when it comes to food safety. Yes, you can make these enchiladas ahead. Prepare the dish, but do not bake it. Cover it tightly and store it in the fridge for up to 24 hours. When ready, just bake it straight from the fridge. You may need to add a few extra minutes to the baking time. This way, you save time on busy nights. Ground turkey or chicken works great if you want a lighter option. For a vegetarian choice, you can use black beans or lentils. Both will add protein and flavor. Another option is to use crumbled tofu, which soaks up flavors well. Each choice gives a unique taste and texture to your dish. Yes, corn tortillas can be used, but they will change the texture. Corn tortillas are firmer and have a distinct flavor. They may break more easily when rolling. To help, warm them up in a pan first. This makes them more flexible and easier to work with. Enjoy experimenting with different types for your enchiladas! In this post, we explored making delicious enchiladas step by step. You learned about key ingredients, such as beef, beans, and spices. I provided tips for perfecting texture and flavor. We also discussed variations for different diets and taste preferences. Remember, storing and reheating enchiladas correctly keeps them tasty. With this guide, you can impress anyone with your cooking skills. Enjoy creating your own enchiladas and feel free to experiment! You’ll make a dish that everyone loves.

One-Pan Cheesy Beef Enchiladas Easy Family Meal

Looking for an easy family meal that packs a cheesy punch? This One-Pan Cheesy Beef Enchiladas recipe is your answer!

To make the Minute Sausage Cabbage Stir-Fry, you will need the following ingredients: - 2 tablespoons vegetable oil - 1 pound turkey or chicken sausage, sliced into rounds - 1 small head of green cabbage, chopped into bite-sized pieces - 1 bell pepper (red or yellow), sliced into strips - 1 medium onion, thinly sliced - 2 cloves garlic, minced - 1 inch piece of fresh ginger, grated - 1 tablespoon soy sauce - 1 tablespoon rice vinegar - 1 teaspoon sesame oil - Salt and pepper to taste - 2 green onions, finely chopped for garnish - Sesame seeds, for garnish You will need a few tools to prepare this dish easily: - A large wok or deep skillet - A sharp knife for chopping - A cutting board for safety - A spatula or wooden spoon for stirring - Measuring spoons for accurate amounts To make your stir-fry more appealing, consider these garnishes: - Finely chopped green onions for a fresh touch - Sesame seeds for added crunch and flavor - A light drizzle of sesame oil for richness Start by gathering all your ingredients. Chop the cabbage into bite-sized pieces. Slice the sausage into rounds. Thinly slice the onion and bell pepper. Mince the garlic and grate the ginger. This prep will make cooking easy and fast. Heat 2 tablespoons of vegetable oil in a large wok or skillet. Aim for medium-high heat. When the oil is hot, add the sliced sausage. Cook it for about 5 to 7 minutes. Turn the sausage often. Look for a nice brown color. Once cooked, take the sausage out of the pan and set it aside. In the same pan, add the sliced onion and bell pepper. Stir-fry these for 2 to 3 minutes. You want them to soften and smell good. Next, add the chopped cabbage, minced garlic, and grated ginger. Stir-fry everything for 5 to 7 more minutes. The cabbage should wilt but stay bright green. Put the cooked sausage back in the pan with the vegetables. Pour in 1 tablespoon of soy sauce, 1 tablespoon of rice vinegar, and 1 teaspoon of sesame oil. Toss all the ingredients together. Stir-fry for another 2 minutes. This helps the flavors mix well. Taste your dish and add salt and pepper if needed. When ready, serve it hot. Garnish with chopped green onions and sesame seeds for a nice touch. To save time, prep your ingredients first. Chop the cabbage, slice the sausage, and mince the garlic. You can do this the night before. Store them in the fridge. Use pre-sliced sausage if you want to skip a step. Add a splash of lime juice for a fresh twist. A pinch of red pepper flakes adds heat. You can also mix in chopped herbs like cilantro. These will brighten the dish and deepen the flavors. Always heat your pan before adding oil. This helps to sear the sausage better. Stir-fry quickly over high heat for a crisp texture. Tossing the ingredients often ensures even cooking. Don't overcrowd the pan; work in batches if needed. {{image_4}} You can use various meats in this stir-fry. Instead of turkey or chicken sausage, try pork or beef sausage for richer flavor. If you prefer a leaner option, opt for chicken breast cut into strips. This keeps cooking time similar. Just remember to adjust seasonings to match the meat you choose. Feel free to get creative with your veggies. Add carrots for sweetness or snap peas for crunch. You can also use broccoli or cauliflower for more texture. The key is to chop them small for even cooking. This way, all the flavors blend well. Plus, you'll boost the nutrition of your meal! For a plant-based version, swap the sausage for tofu or tempeh. You can marinate them in soy sauce or sesame oil for extra taste. Use your favorite veggies, like bell peppers and zucchini, to bring color and flavor. This way, you still get a hearty meal without meat. Enjoy every bite while sticking to your diet! To keep your Minute Sausage Cabbage Stir-Fry fresh, place it in an airtight container. Make sure it cools down to room temperature before sealing. Store it in the fridge for up to three days. This method helps maintain the flavors and texture of your stir-fry. When you're ready to enjoy leftovers, reheat the stir-fry in a skillet over medium heat. Stir it often to ensure even heating. You can also use the microwave. Heat it in 30-second intervals, stirring in between. This keeps your meal hot without overcooking it. You can freeze the stir-fry for longer storage. Allow it to cool, then transfer it to a freezer-safe container. It can last up to three months in the freezer. When ready to eat, thaw it in the fridge overnight. Reheat it in a skillet or microwave as mentioned above for best results. Minute Sausage Cabbage Stir-Fry lasts about 3 to 4 days in the fridge. Make sure to store it in an airtight container. This keeps the flavors fresh and the food safe. Yes, you can make this stir-fry ahead of time. It reheats well and saves time on busy nights. Just cook it, cool it, and store it in the fridge. You can serve this stir-fry with rice or noodles. It also pairs well with crusty bread. A simple side salad can add a nice crunch and freshness, too. Absolutely! This recipe is great for meal prep. You can divide it into portions for easy lunches or dinners. Just follow the storage tips to keep it tasty throughout the week. This blog post covered all you need to make a great Minute Sausage Cabbage Stir-Fry. We discussed your complete ingredient list, essential tools, and optional garnishes to elevate your dish. You learned step-by-step cooking instructions and tips to save time and boost flavor. I also shared variations for different diets and storage tips to maximize freshness. Now, it’s your turn to try this recipe. Enjoy cooking and tasting your creation!

Minute Sausage Cabbage Stir-Fry Quick and Tasty Meal

If you’re short on time but crave a delicious meal, look no further! My Minute Sausage Cabbage Stir-Fry is quick,

- 12 lasagna noodles - 1 pound ground beef - 1 pound Italian sausage - 1 medium onion, diced - 3 cloves garlic, minced - 2 cups ricotta cheese - 2 cups shredded mozzarella cheese (divided) - 1 cup grated Parmesan cheese - 2 large eggs - 3 cups marinara sauce - 2 teaspoons dried oregano - 2 teaspoons dried basil - Salt and black pepper to taste These ingredients are the heart of a great lasagna. The lasagna noodles act as layers, holding all the flavors together. Ground beef and Italian sausage add rich taste. Onions and garlic give a sweet and savory base. Ricotta and mozzarella create a creamy texture, while Parmesan adds a lovely sharpness. - Fresh basil leaves for garnish Garnishing with fresh basil gives a nice touch. It adds color and a fresh flavor that pops. You can also sprinkle some extra Parmesan on top just before serving for added flavor. - Large pot for boiling noodles - Large skillet for cooking meat - Mixing bowl for ricotta - 9x13 inch baking dish - Aluminum foil Having the right tools makes cooking easier. A large pot helps cook the noodles well. A skillet is perfect for the meat sauce. A mixing bowl is needed to combine the ricotta mixture. Finally, a baking dish holds everything together while baking. {{ingredient_image_2}} Start by preheating your oven to 375°F (190°C). A hot oven helps the cheese melt and the sauce bubble. In a large pot, boil salted water. Add the 12 lasagna noodles and cook them until they are al dente. Follow the package instructions for timing. After cooking, carefully drain the noodles. Lay them flat so they don’t stick together. Heat a tablespoon of olive oil in a large skillet over medium heat. Add one medium diced onion and three minced garlic cloves. Sauté until the onion turns translucent. This takes about 3-4 minutes. Now, add one pound of ground beef and one pound of Italian sausage. Cook until both are browned and crumbly. Drain any excess fat. Stir in three cups of marinara sauce, two teaspoons of dried oregano, and two teaspoons of dried basil. Season with salt and black pepper. Let this sauce simmer for about 10 minutes. This helps the flavors blend. In a mixing bowl, combine two cups of ricotta cheese, one cup of shredded mozzarella cheese, one cup of grated Parmesan cheese, and two large eggs. Add a pinch of salt and black pepper. Use a fork to mix until smooth. This mixture adds creaminess to your lasagna. Grab a 9x13 inch baking dish. Start with a thin layer of meat sauce at the bottom. Place four lasagna noodles horizontally over this sauce. Next, spread half of the ricotta mixture evenly over the noodles. Then, add a third of the meat sauce on top. Repeat this: add another four noodles, the remaining ricotta mixture, and another third of the meat sauce. Finish by adding the last four noodles, covering them with the remaining meat sauce. Sprinkle the last cup of shredded mozzarella cheese over the top layer of meat sauce. To keep it from browning too much, cover the baking dish tightly with aluminum foil. Place the lasagna in the preheated oven. Bake for 25 minutes. After this time, remove the foil. Bake for another 15 minutes until the cheese is golden and bubbly. To prevent lasagna noodles from sticking, add salt to boiling water. This helps keep the noodles separate. Stir gently as you add them to the pot. After cooking, drain the noodles and run cold water over them. This cools them down and stops the cooking. Lay them flat on parchment paper or a clean kitchen towel. This step helps keep them from sticking. The ricotta filling is key to a great lasagna. Use good quality ricotta for the best taste. Mix it with one cup of shredded mozzarella and Parmesan cheese. This blend adds rich flavor. Don’t forget to add two large eggs; they help bind the filling. A pinch of salt and pepper enhances the taste. Mix everything until smooth for a creamy texture. For a perfect cheese melt, use a mix of cheeses. Combining mozzarella and Parmesan creates a nice balance. Sprinkle the top layer with mozzarella just before baking. Cover it with foil for the first part of baking. This helps the cheese melt without burning. Remove the foil later to allow the cheese to brown and bubble. This creates a beautiful, golden top that looks and tastes amazing. Pro Tips Use Fresh Herbs: Incorporating fresh basil or oregano can elevate the flavor of your lasagna, giving it a vibrant taste and aroma. Let it Rest: Allowing the lasagna to cool for at least 15 minutes before slicing helps the layers set, making it easier to serve and preventing it from falling apart. Experiment with Cheeses: Feel free to mix different cheeses such as provolone or fontina for a unique flavor profile that enhances the classic lasagna experience. Freezing Tips: If you want to prepare it ahead of time, lasagna freezes well. Just ensure it’s tightly covered to prevent freezer burn. {{image_4}} You can easily make a vegetarian lasagna. Start with fresh veggies like spinach, zucchini, or mushrooms. Layer these with the cheese and sauce. Use the same ricotta mix but skip the meat. This way, you get a rich and tasty dish without meat. You can mix meats for a unique flavor. Try using ground turkey or chicken instead of beef. You can also add pancetta for a salty kick. Blend the meats to create a richer sauce. Each meat adds its own taste to the lasagna. Cheese is key in lasagna. If you want a twist, try using goat cheese instead of ricotta. It gives a tangy flavor that pairs well with marinara. You can also mix in provolone or gouda for a different melt. Each cheese brings a new taste to your dish. You can store leftover lasagna in an airtight container. Make sure it cools first. Place it in the fridge for up to four days. If you want to keep it longer, freezing is a great option. To freeze lasagna, let it cool completely. Wrap it tightly in plastic wrap and then foil. Label it with the date. You can freeze it for up to three months. When ready to eat, just thaw in the fridge overnight before reheating. Reheat your lasagna in the oven for the best taste. Set your oven to 350°F (175°C). Cover it with foil to keep it moist. Bake for about 20 minutes or until hot. You can also use a microwave, but the oven gives better texture. Enjoy your meal! Yes, you can make lasagna ahead of time. Prepare it in advance, then cover it tightly. Keep it in the fridge for up to 24 hours. You can bake it straight from the fridge. Just add a few extra minutes to the baking time. If you need a ricotta substitute, try cottage cheese. Blend it for a smoother texture. You can also use cream cheese or Greek yogurt for a richer taste. Each option will give a unique twist to the lasagna. Lasagna can turn watery if the noodles are not cooked right. Undercooked noodles can soak up sauce. Too much sauce can also cause this issue. Make sure to drain excess liquid from your meat sauce before layering. Let the lasagna cool for about 15 minutes. This cooling time helps it set. It makes slicing much easier and keeps the layers intact. Enjoy each slice with fresh basil on top for added flavor. Classic Italian lasagna is a delight. We covered the main ingredients, from rich meat sauce to creamy ricotta. I shared step-by-step instructions for baking this dish perfectly. With handy tips and variations, you can customize it to your taste. Storing your leftovers is easy, and I provided all the best methods. I hope you feel more prepared to make a lasagna that wows everyone. Happy cooking!

Classic Italian Lasagna Rich and Flavorful Recipe

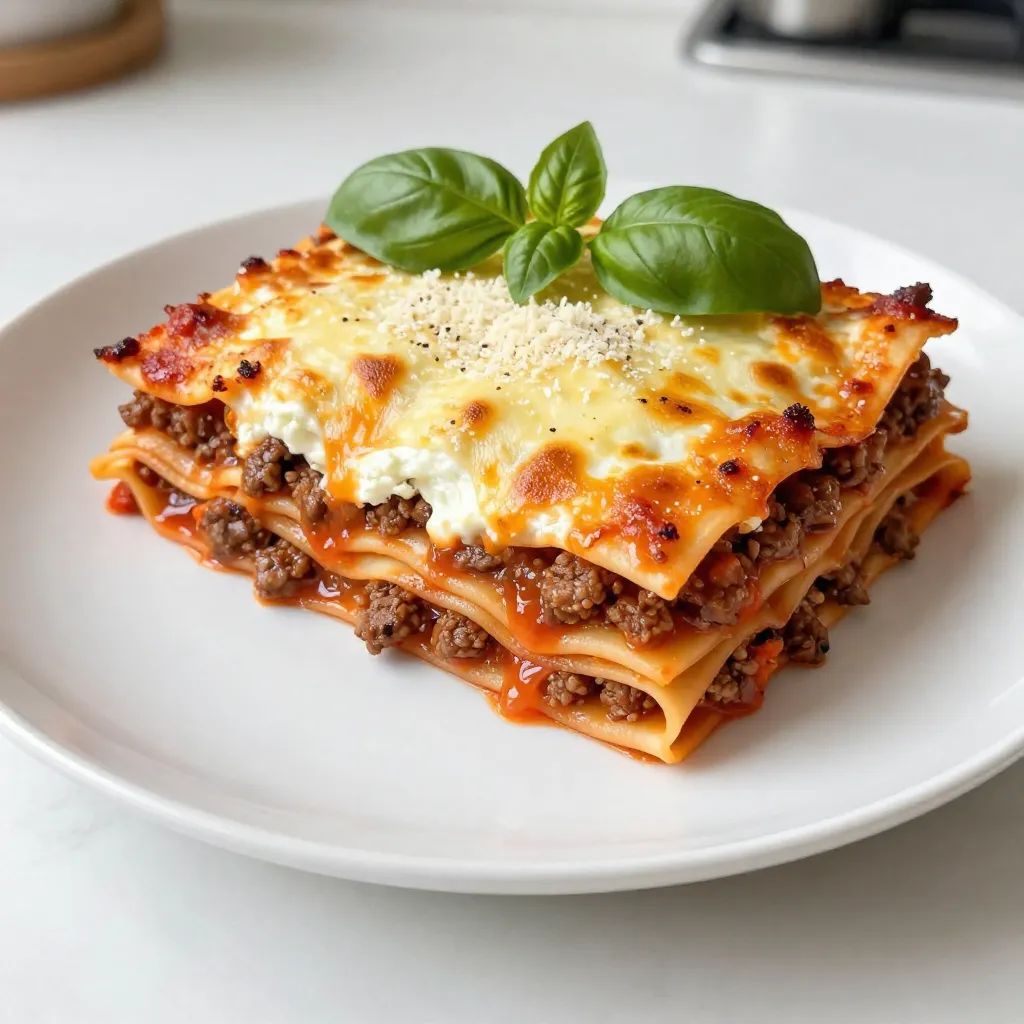
If you crave a dish that warms the soul, Classic Italian Lasagna is the answer. This rich and flavorful recipe

To make Cheesy Weeknight Baked Pasta, you need these main items: - 12 oz. penne pasta - 2 cups marinara sauce - 1 cup ricotta cheese - 1 cup shredded mozzarella cheese - 1/2 cup grated Parmesan cheese - 1 teaspoon Italian seasoning - 1/2 teaspoon garlic powder - 1/4 teaspoon red pepper flakes (optional) - Salt and pepper to taste - Fresh basil leaves for garnish These ingredients work together to create a rich and creamy dish. The blend of cheeses adds layers of flavor, while the pasta gives it a hearty touch. You can customize your dish with these optional items: - 1/4 teaspoon red pepper flakes for some heat - Other herbs like oregano or thyme for added flavor These extra seasonings can help you tailor the dish to your taste. You can add more or less of these spices based on your family’s preferences. For a twist on the classic, try these cheese choices: - Fontina for a creamy texture - Gouda for a smoky flavor - Cheddar for a sharp kick These cheeses can change the taste of your baked pasta. Mixing different cheeses can lead to exciting new flavors, so feel free to experiment! {{ingredient_image_2}} Start by preheating your oven to 375°F (190°C). A hot oven helps the dish cook evenly. In a large pot, bring salted water to a rolling boil. Add 12 oz. of penne pasta. Cook it for about 8 to 10 minutes. You want it al dente, so don’t overcook! Once done, drain the pasta in a colander and set it aside. In a big mixing bowl, combine 2 cups of marinara sauce and 1 cup of ricotta cheese. Add half of the shredded mozzarella, 1 teaspoon of Italian seasoning, and 1/2 teaspoon of garlic powder. For some heat, toss in 1/4 teaspoon of red pepper flakes, if you like. Season with a pinch of salt and pepper. Mix everything until well combined. This sauce is creamy and packed with flavor. Now, gently fold the drained pasta into the sauce mixture. Make sure every piece of penne gets coated with that delicious sauce. Lightly grease a 9x13 inch baking dish with cooking spray or olive oil. Pour the pasta mixture into the dish, spreading it out evenly. To top it off, sprinkle the remaining mozzarella and 1/2 cup of grated Parmesan cheese over the pasta. This topping will create a cheesy crust. Cover the baking dish tightly with aluminum foil. This helps keep moisture in. Place it in the preheated oven and bake for about 20 minutes. After 20 minutes, carefully remove the foil. Bake for another 10 minutes to get a bubbly, golden top. Once it’s out of the oven, let the dish cool for about 5 minutes. This cooling time lets the flavors mix well. Just before serving, add fresh basil leaves for a nice touch. To avoid overcooking the penne pasta, start with a large pot of salted water. Bring it to a rolling boil before adding the pasta. Cook the pasta for about 8-10 minutes, checking it a minute or two before the time is up. You want it al dente, meaning firm to the bite. Drain the pasta and set it aside right away. This keeps it from cooking further in the hot water. Herbs and spices can make your baked pasta even better. I love using Italian seasoning, garlic powder, and red pepper flakes in this dish. These add warmth and depth to the flavor. You can also mix in fresh herbs like basil or parsley for a bright touch. A pinch of salt and pepper balances the flavors too. Experiment with your favorite spices to find your perfect blend! If you want a simpler way to make this dish, try a one-pot method. You can cook the pasta in the same pot with the sauce. Start by adding the uncooked pasta, marinara sauce, and water. Then, stir in the ricotta and seasonings. Cover it and cook on low heat until the pasta is tender. Finish with cheese on top and place it under the broiler to melt. This saves time and cleanup! Pro Tips Perfect Pasta: Always cook your pasta al dente, as it will continue to cook in the oven and prevent it from becoming mushy. Cheese Choices: Feel free to mix different types of cheese such as fontina or gouda for added flavor complexity. Herb Infusion: Add fresh herbs like oregano or thyme to the sauce for an extra layer of freshness. Storage Savvy: This dish can be made ahead and stored in the refrigerator for up to 2 days before baking. Just cover it tightly with foil! {{image_4}} You can add meat for more flavor and protein. Try cooked sausage or chicken. Brown the sausage in a pan. For chicken, grill or bake it first. Chop it into bite-sized pieces before mixing in. This will make your dish heartier. For a veggie twist, add spinach or mushrooms. Fresh spinach wilts well in the pasta. Just stir it in before baking. Mushrooms add a nice earthy taste. Sauté them first for better flavor. Both options make your meal colorful and healthy. If you need a gluten-free dish, use gluten-free pasta. There are many types available now. Ensure your sauce is also gluten-free. This way, everyone can enjoy the meal without worry. Adjust cooking times based on the pasta package instructions. Store your baked pasta in an airtight container. Make sure it cools down first. Leftovers can last in the fridge for about three to four days. If you want to keep it fresh longer, consider freezing. To reheat, preheat your oven to 350°F (175°C). Place the pasta in a baking dish. Cover it with foil to avoid drying out. Heat for about 20 minutes. You can also use the microwave. Just warm it in short bursts, stirring in between. To freeze, let the pasta cool completely. Portion it into freezer-safe containers. It can last up to three months in the freezer. When ready to eat, thaw it in the fridge overnight. Then, reheat as mentioned above. Yes, you can use other pasta. Try rotini, ziti, or shells. Each type will change the texture. A good rule is to pick pasta that holds sauce well. Cook it to al dente to avoid mushy pasta after baking. To make it spicier, add more red pepper flakes. You can also mix in diced jalapeños or a splash of hot sauce. These options add heat without changing the dish's core flavors. Start with a little spice and taste as you go. Baked pasta goes well with fresh salads. A simple green salad works nicely. Garlic bread is also a great choice. You could even serve steamed vegetables for extra color and nutrition. Keep it light to balance the cheesy pasta. Baked pasta is easy to make and fun to eat. We covered the main ingredients, optional extras, and the best cheese choices. I shared step-by-step instructions for prep and baking. You now have tips to enhance flavor and avoid overcooking. We discussed tasty variations for meat lovers and vegetarians. Lastly, I provided storage tips to enjoy leftovers later. With this guide, you can create a delicious baked pasta that fits any taste. Enjoy your cooking adventure!

Cheesy Weeknight Baked Pasta Easy Family Favorite

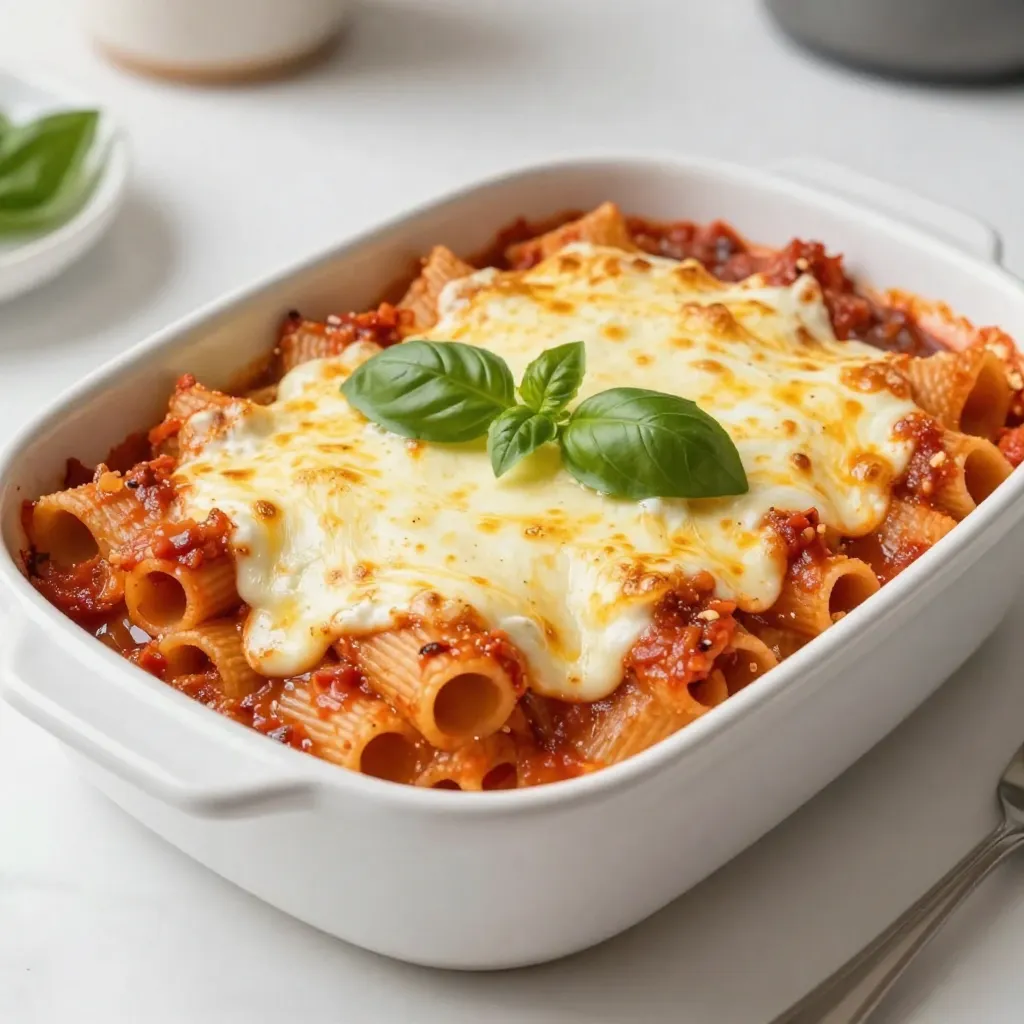
Looking for a fast and cheesy dinner that the whole family will love? This Cheesy Weeknight Baked Pasta is your

Older posts
Newer posts
← Previous Page1 … Page9 Page10 Page11 … Page86 Next →

dsad

© 2026 lazychefmagic • Built with GeneratePress

Our Policies

  • Copyright Policy
  • Cookie Policy
  • GDPR Policy
  • Privacy Policy
  • Disclaimer
  • Terms Of Use

More Information

  • Home
  • About
  • Contact
  • Appetizers
  • Dessert
  • Dinner
  • Drinks
©2026, lazychefmagic About Back To Top