Skip to content
DisclaimerTerms Of UseGDPR PolicyCookie Policy

lazychefmagic

  • Home
  • Drinks
  • Appetizers
  • Dinner
  • Dessert
  • About
  • Contact
  • Privacy Policy
DisclaimerTerms Of UseGDPR PolicyCookie Policy

NO-ING-IMG

- 1 pound ground beef - 1 tablespoon Worcestershire sauce - 1 teaspoon garlic powder - 1 teaspoon onion powder The main ingredients for Garlic Butter Cheeseburger Rollups create a tasty filling. Ground beef is the star of this dish. I use one pound for good flavor and texture. Worcestershire sauce adds depth to the beef. Garlic powder and onion powder boost the taste. A pinch of salt and pepper is key. These flavors work together to make a savory mix. - 1 cup shredded sharp cheddar cheese - 1 package (8 oz) refrigerated crescent roll dough - 4 tablespoons unsalted butter, melted - 3 cloves garlic, minced Next, we have the additional ingredients that enhance the rollups. Shredded sharp cheddar cheese melts beautifully inside. It adds creaminess and a rich taste. Refrigerated crescent roll dough makes life easy. It saves time and gives a flaky texture. I melt unsalted butter and mix it with minced garlic for topping. This garlic butter adds flavor and moisture to the rollups. - Fresh parsley, finely chopped (for garnish) Finally, fresh parsley is perfect for garnish. It adds a pop of color and freshness. Just sprinkle it on top before serving. It makes the rollups look even more inviting. These ingredients come together to create a fun and tasty treat for any meal or snack. Preheating the oven First, you need to preheat your oven to 375°F (190°C). This step helps the rollups cook evenly and get that nice golden color. Cooking the ground beef In a large skillet, heat over medium heat. Add 1 pound of ground beef. Use a spatula to break it apart as it cooks. Stir until the beef turns brown. This will take about 5 to 7 minutes. Once browned, drain any excess fat. Next, add 1 tablespoon of Worcestershire sauce, 1 teaspoon of garlic powder, 1 teaspoon of onion powder, and a pinch of salt and pepper. Mix everything well and remove it from the heat. Let it cool for a few minutes. Rolling out the crescent dough On a lightly floured surface, roll out the crescent dough. Pinch the seams together. This creates one solid sheet without gaps. This step is key for keeping the filling inside. Filling and rolling each piece Using a sharp knife or pizza cutter, cut the dough into rectangles. Each piece should be about 4 inches by 6 inches. On the wider end of each rectangle, place a generous spoonful of the cooled beef mixture. Top with a sprinkle of shredded cheddar cheese. Now, roll the dough tightly from the wider end, tucking in the filling as you go. Place each roll seam-side down on the baking sheet. Coating with garlic butter In a small bowl, mix the melted butter with 3 cloves of minced garlic. Use a pastry brush to coat the top of each rollup with this garlic butter. This adds flavor and keeps the rollups moist. Baking time and temperature Bake the rollups in your preheated oven for 12 to 15 minutes. Look for a beautiful golden brown color and melted cheese. Once done, take them out and let them cool for a few minutes. You can then sprinkle fresh parsley on top for extra flavor and color. To get perfect browning of beef, use medium heat. Stir the beef often. This helps it cook evenly. Drain any extra fat before you add spices. This keeps the filling from being too greasy. To prevent cheese overflow, use a small amount of cheese. Place it right on the beef before rolling. This way, it melts inside and stays put. For the best sauces, try ketchup or ranch dressing. They complement the rollups well. You can also serve them with a spicy dipping sauce for a kick. When presenting these rollups, arrange them on a nice platter. Garnish with fresh parsley for a pop of color. This adds a nice touch for gatherings. For preparation, you will need a large skillet and a spatula. A sharp knife or pizza cutter is great for cutting the dough. I recommend using a baking sheet lined with parchment paper. This makes cleanup easy and helps the rollups bake evenly. A pastry brush helps spread the garlic butter on top easily. {{image_4}} You can easily change the cheese in this recipe. Try mozzarella for a milder taste. Swiss cheese also works great if you like a nutty flavor. If you want to go lighter, swap ground beef for ground turkey or chicken. They still taste amazing and cut down on fat. Want some heat? Add diced jalapeños or a splash of hot sauce to the beef mix. This gives the rollups a nice kick! You can also add chopped veggies like bell peppers or mushrooms. This makes the filling more colorful and adds great texture. If you're gluten-free, look for gluten-free crescent roll dough. Many brands offer it now. You can also make a vegetarian version using plant-based ground meat. Just swap the beef for your favorite meat substitute, and you’ll still enjoy this tasty treat! To keep your Garlic Butter Cheeseburger Rollups fresh, let them cool. Place the rollups in an airtight container. Store them in the fridge. They will last about 3 to 4 days for best quality. If you want to keep them longer, consider freezing them. When reheating, I suggest using the oven. Preheat it to 350°F (175°C). Place the rollups on a baking sheet. Heat for about 10-12 minutes. This method helps keep the rollups crispy. You can also microwave them. Just be careful, as microwaving can make them soggy. For long-term storage, freeze them before baking. Wrap each rollup tightly in plastic wrap and then in foil. They can last for up to 2 months in the freezer. After storing, serve leftovers as a snack. Pair them with your favorite sauces like ketchup or ranch. You can also cut them into smaller pieces for party platters. If you want to transform them, chop the rollups and mix them into a salad. This adds a fun twist to your meal. To freeze these rollups, let them cool completely. Wrap each roll tightly in plastic wrap. Place the wrapped rollups in a freezer bag. Squeeze out all the air and seal. Label the bag with the date. They can stay in the freezer for up to three months. When you are ready to eat, thaw them in the fridge overnight. Then, reheat them in the oven at 350°F (175°C) until warm. Yes, you can make these rollups ahead of time. Prepare the filling and roll them up. Place them on a baking sheet, cover with plastic wrap, and refrigerate. They can sit in the fridge for up to 24 hours before baking. This saves time on busy days. Just remember to brush with garlic butter before baking. To add some heat, try these ideas. Mix in some diced jalapeños with the beef. You can also add a few dashes of hot sauce to the meat mixture. If you love spice, use pepper jack cheese instead of cheddar. These changes will give your rollups a nice kick. These rollups taste great with many dipping sauces. Classic ketchup is a favorite. Ranch dressing also works well for a creamy touch. For a tangy flavor, try barbecue sauce. You can even make a spicy mayo by mixing mayonnaise with sriracha. Each sauce adds a unique twist to the rollups. You can tell the rollups are done when they look golden brown. The cheese should be melted and bubbly. A food thermometer can help, too. Insert it into the center; it should read at least 165°F (74°C). Let them cool for a few minutes before serving. This way, the cheese won't burn your mouth! In this post, we explored how to make Garlic Butter Cheeseburger Rollups. First, we discussed key ingredients like ground beef and cheese. Next, I shared step-by-step instructions for preparation, assembly, and baking. Tips covered ways to enhance flavor and presentation. We also looked at variations, storage, and common questions. Finally, experiment with flavors and ingredients. Get creative, and enjoy this dish with family and friends. Your kitchen will be filled with tasty smells!

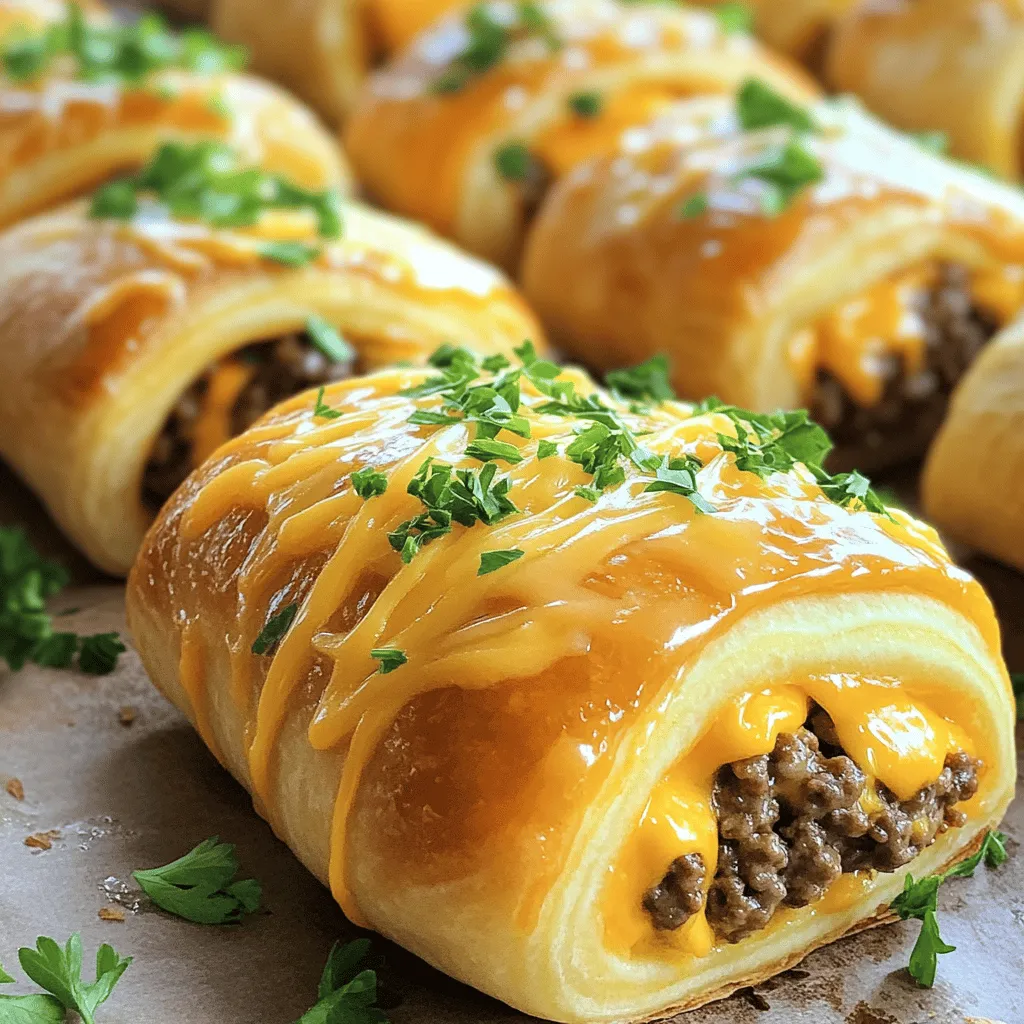
Garlic Butter Cheeseburger Rollups Easy and Tasty Treat

Do you love the rich flavors of burgers but crave something new? Dive into these Garlic Butter Cheeseburger Rollups! They

- 2 lbs boneless, skinless chicken thighs - 1/2 cup honey - 1/2 cup low-sodium soy sauce - 4 cloves garlic, finely minced - 1 tablespoon fresh ginger, freshly grated - 1 tablespoon sesame oil - 2 tablespoons rice vinegar - 1 teaspoon freshly ground black pepper - 1 tablespoon cornstarch (optional, for thickening the sauce) - 2 green onions, finely chopped (for garnishing) - Sesame seeds (for garnishing) - Alternatives for chicken: You can use chicken breast or tofu for a vegetarian option. - Healthier options for ingredients: Try using maple syrup instead of honey. Choose low-sodium soy sauce to cut back on salt. - Gluten-free alternatives: Use tamari instead of soy sauce for a gluten-free dish. How to whisk the sauce ingredients Start by taking a medium bowl. Add the honey, soy sauce, minced garlic, grated ginger, sesame oil, rice vinegar, and black pepper. Use a whisk to mix these ingredients. Make sure there are no lumps. You want a smooth sauce that blends well. Properly arranging chicken in the crockpot Next, grab your chicken thighs. Place them gently into the crockpot. Fit them snugly so they cook evenly. Once the chicken is in, pour the sauce over it. Make sure every piece is coated well. This will help the chicken soak up all the flavors. Low vs. high cooking settings Now it’s time to choose your cooking setting. You can set your crockpot to low for 6-8 hours or to high for 3-4 hours. Cooking on low gives a more tender chicken. On high, it cooks faster but may not be as soft. Pick the method that fits your schedule best. How to know when the chicken is done To check if the chicken is done, look for a few signs. The chicken should be fully cooked and should pull apart easily with a fork. If it looks dry or tough, it may need more time. Use a meat thermometer if you have one; the internal temperature should reach 165°F. How to make a thick sauce If you want a thicker sauce, this is simple. Mix cornstarch with cold water to create a slurry. Add this to the crockpot in the last 30 minutes. Stir it in well. This will help the sauce get nice and thick. Instructions for shredding chicken Once the chicken is done, carefully take it out. Use tongs to lift it out of the crockpot. Then, take two forks and shred the chicken into bite-sized pieces. Return the shredded chicken to the crockpot. Stir it well so every piece absorbs the yummy sauce. To boost the taste of your Crockpot honey garlic chicken, consider adding a pinch of red pepper flakes. This will give it a nice kick. You can also sprinkle in some dried herbs like thyme or oregano for depth. Marinating the chicken in the sauce for at least 30 minutes can make a big difference. It allows the flavors to soak in, making every bite burst with taste. Cooking time can change based on the size of your chicken thighs. For smaller pieces, 3 hours on high will work. Larger thighs may need up to 8 hours on low. Using a meat thermometer is smart. It ensures your chicken reaches 165°F, which is safe and perfect for shredding. Serve your honey garlic chicken over fluffy rice or noodles for a hearty meal. Steamed broccoli or a fresh green salad pairs well too. If you have leftovers, try making a wrap with the chicken and some veggies. You can also toss it into a stir-fry for a quick lunch. {{image_4}} You can easily add heat to your honey garlic chicken. Try adding red pepper flakes or sriracha for a spicy kick. If you want a different taste, swap the soy sauce for teriyaki or barbecue sauce. Each sauce brings its own twist. Feel free to use other proteins. Chicken breasts or turkey work well too. You can also try tofu or tempeh for a vegetarian option. Just ensure you adjust cooking times for different proteins. If you want to add more veggies, bell peppers, or broccoli make great additions. Toss them in the crockpot for extra flavor and nutrition. Serve your honey garlic chicken over rice or noodles for a filling meal. You can also use it in wraps or sandwiches for a fun twist. If you're prepping meals, portion the chicken into containers with veggies. This makes lunch easy and tasty for the week. Don't forget to garnish with green onions and sesame seeds for a lovely look! To store leftover honey garlic chicken, place it in an airtight container. It keeps best in the fridge. Make sure to cool it down first before sealing. This dish stays fresh for about 3 to 4 days. To enjoy it later, just reheat the chicken until it's hot throughout. You can freeze honey garlic chicken for up to 3 months. Use a freezer-safe container or a zip-top bag. Remove as much air as possible before sealing. For reheating, let it thaw overnight in the fridge. Then, heat it on the stove or in the microwave. Add a splash of water if it seems dry. This way, it stays tasty and juicy. Batch cooking is a great way to save time. Make a big batch of honey garlic chicken and store it properly. You can mix it with rice or noodles for easy meals. This dish works well in wraps or salads too. Plan to eat it within a week for the best flavor. How long does it take to cook on low vs. high? Cooking on low takes about 6-8 hours. Cooking on high takes around 3-4 hours. The longer cooking time helps the chicken stay tender and juicy. Can I cook this without a crockpot? Yes, you can use a stovetop or oven. Use a heavy pot with a lid, and cook on low heat. Make sure to stir often and check for doneness. What to do if the chicken is overcooked? If the chicken is overcooked, it may be dry. You can add more sauce to help moisten it. Shred the chicken and mix it back into the sauce for better flavor. How to fix a watery sauce? To fix a watery sauce, mix cornstarch with cold water. Add it to the sauce and cook for 30 minutes. This will thicken the sauce nicely. Best rice or noodle pairs Serve this dish over fluffy white rice or whole grain rice. Egg noodles also pair well, adding a nice texture to the meal. Can I prepare this recipe ahead of time? Yes, you can prep the sauce and chicken the day before. Store them in the fridge. Just cook it the next day when you’re ready for a tasty meal. This blog post covered a delicious honey garlic chicken recipe. We explored the key ingredients and shared useful tips for flavor and cooking times. You learned about different variations and storage methods. The recipe is easy to follow, and you can adapt it to suit your taste. I hope you find joy in creating this dish. With simple steps and tips, you can enjoy a tasty meal any night of the week. Happy cooking!

Crockpot Honey Garlic Chicken Simple and Tasty Dish

Looking for a simple and tasty dish? My Crockpot Honey Garlic Chicken is the answer! With just a few easy

To make double chocolate banana bread, you need a few key ingredients. Here’s the list: - Ripe bananas - Coconut oil - Brown sugar and granulated sugar - Eggs and vanilla extract - Baking soda and salt - All-purpose flour and cocoa powder - Chocolate chips and optional nuts Each ingredient plays an important role in flavor and texture. Ripe bananas bring natural sweetness and moisture. Coconut oil adds richness and a light taste. The mix of brown and granulated sugar gives depth to the sweetness. Using eggs helps bind the bread and makes it fluffy. The vanilla extract adds a lovely aroma that enhances the overall flavor. Baking soda acts as a leavening agent, helping the bread rise. A pinch of salt balances the sweetness and boosts flavors. All-purpose flour creates the structure, while cocoa powder delivers that deep chocolate flavor. Chocolate chips provide delightful bursts of chocolate in each bite. If you want some crunch, add chopped nuts like walnuts or pecans. Gather these ingredients to create your own irresistible double chocolate banana bread! First, preheat your oven to 350°F (175°C). This step is key for even baking. While the oven heats, prepare a 9x5 inch loaf pan. You can grease it with coconut oil or line it with parchment paper. Lining makes it easier to remove the bread later. Next, grab a large mixing bowl. In this bowl, mash the three ripe bananas until smooth. Then, add 1/3 cup of melted coconut oil. Mix them well until the oil blends in with the bananas. Now, it’s time to add sweetness. Pour in 1/2 cup of packed brown sugar and 1/4 cup of granulated sugar. Stir this mixture until the sugars dissolve completely. Then, add two large eggs, one by one. Whisk them well after each egg. Finally, add 1 teaspoon of pure vanilla extract for flavor. In a separate bowl, whisk together the dry ingredients. Combine 1 teaspoon of baking soda, a generous pinch of salt, 1 cup of all-purpose flour, and 1/2 cup of sifted cocoa powder. Make sure there are no lumps. Now, gently fold this mixture into the wet ingredients. Stir until just combined. Be careful not to overmix, or the bread may turn out dense. Pour the batter into your prepared loaf pan. Use a spatula to smooth the top for even baking. Place the loaf pan in the preheated oven. Bake for 50 to 60 minutes. Check doneness by inserting a toothpick into the center. It should come out clean or with a few moist crumbs. Once done, let the banana bread cool in the pan for about 10 minutes. Then, transfer it to a wire rack to cool completely. - Choosing the right type of chocolate: Use dark chocolate chips for a rich taste, or milk chocolate for a sweeter bite. Both types melt well and add great texture. - Importance of ripe bananas: Always choose bananas with brown spots. They are sweeter and add moisture to the bread. Overripe bananas make the best flavor. - Avoiding overmixing: Mix the batter gently. Overmixing can make the bread tough. Stop mixing as soon as the dry ingredients blend into the wet ones. - Serving suggestions: Slice the bread while it's warm. Serve it with a light dusting of powdered sugar for a pretty touch. Pair it with vanilla ice cream for an extra treat. - Enhancing with toppings: Drizzle melted chocolate on top for a decadent look. You can also add chopped nuts or sprinkles for added crunch and color. {{image_4}} You can add nuts for extra crunch. I suggest using either walnuts or pecans. Walnuts give a rich flavor, while pecans add a slight sweetness. To add nuts, chop them into small pieces. Fold the chopped nuts into the batter just before you pour it into the loaf pan. This way, they spread evenly throughout your bread. You can switch up the chocolate chips for more fun. Dark chocolate chips offer a rich taste, while milk chocolate chips add sweetness. If you want to get fancy, try swapping in white chocolate chips. They will give a creamy contrast to the deep cocoa flavor in the bread. Just remember to keep the balance of flavors in mind. Want to make your banana bread healthier? You can use healthier sugars like coconut sugar or honey. These options offer a unique flavor and can be better for your body. You might also try alternative flours. Almond flour or oat flour can add a nice twist. Just remember to adjust the amount, as these flours behave differently than all-purpose flour. To keep your double chocolate banana bread fresh, follow these simple tips: - Cool Completely: Let the bread cool down fully before storing it. - Wrap It Up: Use plastic wrap or aluminum foil to wrap the bread tightly. This helps keep moisture in and prevents it from drying out. - Use an Airtight Container: You can also place the wrapped bread into an airtight container. This adds an extra layer of protection against air. - Room Temperature: Store the bread at room temperature for up to four days. It stays soft and tasty this way. - Refrigerate for Longer Storage: If you want to keep it longer, place it in the fridge. It can last up to a week when chilled. When you're ready to enjoy your banana bread again, reheating it right is key: - Slice First: Cut the bread into slices. This helps it heat evenly. - Oven Method: Preheat your oven to 350°F (175°C). Place the slices on a baking sheet. Heat for about 10 minutes. This keeps the bread soft and warm. - Microwave Method: If you're in a hurry, use the microwave. Heat one slice for about 15-20 seconds. Check to see if it's warm enough. - Avoid Overheating: Don't heat it too long, or it may dry out. You want it warm, not hot. Following these tips keeps your double chocolate banana bread delicious, no matter when you enjoy it! Yes, you can use frozen bananas. To prepare them, take the bananas out of the freezer. Let them thaw in the fridge overnight or on the counter for a few hours. Once they are soft, peel them and mash until smooth. This helps maintain the moisture in your banana bread. You can use several alternatives for coconut oil. Some good options include: - Vegetable oil - Canola oil - Unsalted butter (melted) These substitutes work well and give a nice flavor. Choose what fits your taste best. To make this banana bread gluten-free, you can swap all-purpose flour with gluten-free flour blends. Here are some good choices: - Almond flour - Oat flour - Gluten-free all-purpose flour Make sure your flour has a binding agent, like xanthan gum, to help with texture. A dense banana bread often comes from overmixing the batter. Mix just until combined. Also, using too many bananas or not enough leavening agents can cause density. Make sure your baking soda is fresh for the best rise. This blog post covers how to make delicious banana bread. We explored the needed ingredients, like ripe bananas and chocolate chips, and walked through easy steps for mixing and baking. I shared tips for perfecting your bread and even offered variations to suit your taste. Plus, I provided storage and reheating advice. In closing, you can create a tasty treat with simple ingredients and methods. Enjoy your delicious banana bread, and remember that practice makes perfect!

Double Chocolate Banana Bread Irresistible Treat

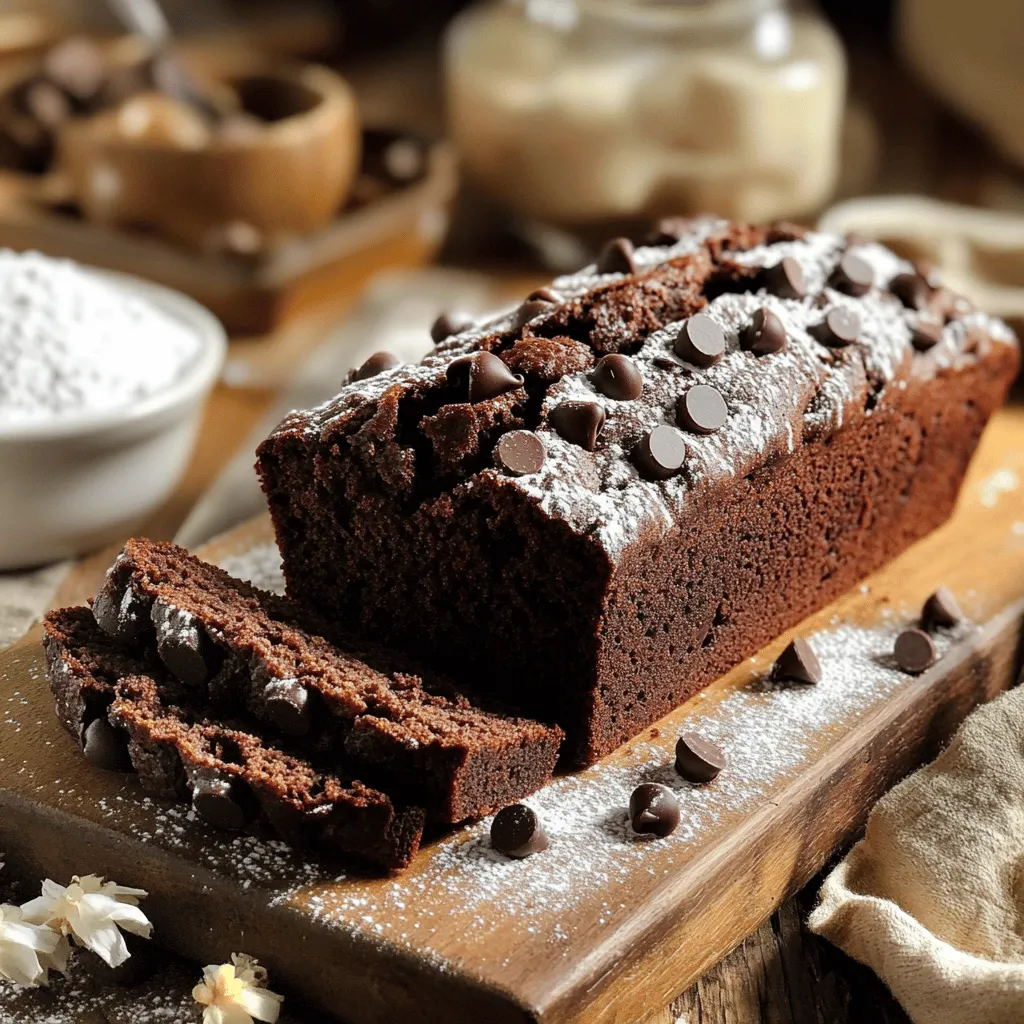
Are you ready to indulge in a decadent treat that combines rich chocolate with the sweetness of ripe bananas? My

To make air fryer churro bites, you need the following ingredients: - 1 cup all-purpose flour - 1/2 cup water - 2 tablespoons granulated sugar - 1/2 teaspoon salt - 1 tablespoon vegetable oil - 1/2 teaspoon ground cinnamon - 2 teaspoons baking powder - 1/4 cup melted butter (for coating) - Additional sugar and cinnamon for dusting You can swap some ingredients if needed: - Use whole wheat flour instead of all-purpose flour for a healthier option. - Replace the vegetable oil with coconut oil for added flavor. - If you want a sugar-free version, try using a sugar substitute in place of granulated sugar. You will need a few tools to make these tasty bites: - Medium saucepan - Wooden spoon - Piping bag with a star tip - Air fryer - Parchment paper - Bowl for mixing sugar and cinnamon These ingredients and tools will help you create delicious churro bites with ease. You’ll love how simple and fun this recipe is! To start, grab a medium saucepan. In it, mix 1/2 cup water, 2 tablespoons sugar, 1/2 teaspoon salt, and 1 tablespoon vegetable oil. Heat this over medium heat until it boils. When it reaches a rolling boil, take it off the heat. Now, stir in 1 cup all-purpose flour and 2 teaspoons baking powder. Use a wooden spoon to mix until a dough forms. Let it cool for about 5 minutes. Once the dough is cool enough to touch, it’s time to pipe. Get a piping bag and fit it with a star-shaped tip. Scoop the dough into the bag. Preheat your air fryer to 350°F (175°C). Line the air fryer basket with parchment paper. This helps the churros not stick. Now, pipe bite-sized pieces of dough into the basket. Make sure to space them out. Cook the churro bites in the air fryer for about 8-10 minutes. Look for them to puff up and turn golden brown. Keep a close eye on them. You don’t want to overbake. While they cook, mix equal parts of sugar and cinnamon in a bowl for the dusting. When they’re done, take them out and toss them in melted butter. Then, roll each bite in the cinnamon sugar mix. Enjoy your tasty treats! To get churro bites that are fluffy inside and crispy outside, follow these tips: - Use the right amount of water. Too much can make the dough runny. - Make sure your air fryer is properly preheated. This helps the dough puff up nicely. - Keep the dough cool before piping. Warm dough can spread too much. - Pipe small, even bites. This ensures they cook evenly. Common mistakes can lead to churros that are not quite right. Here’s how to avoid them: - Don’t skip the parchment paper. It helps prevent sticking and makes cleanup easy. - Watch the cooking time. Overbaking can make churros dry. Stay close and check often. - Don’t overcrowd the basket. Give each churro bite room to puff and brown. Serving churro bites can be fun and creative. Here are some ideas: - Serve warm on a decorative plate. Dust them with extra cinnamon sugar for flair. - Pair with a small bowl of chocolate ganache. This adds a rich, sweet dip. - Try dulce de leche for a creamy contrast. It complements the cinnamon flavor well. - You can even add a scoop of vanilla ice cream for a delightful dessert twist. {{image_4}} You can change the flavor of your churro bites with different coatings. Instead of the classic cinnamon sugar, try adding cocoa powder for a chocolate twist. Or mix in some nutmeg for a warm, spicy kick. For a fun twist, use crushed nuts like almonds or pecans. They add a nice crunch. You can even coat the churro bites in toasted coconut for a tropical vibe. Flavored churro bites are a great way to mix things up. Add vanilla extract or almond extract to the dough for a deeper flavor. You can also fold in chocolate chips or even caramel bits for a sweet surprise. If you love citrus, try adding some lemon or orange zest. This adds a fresh taste that brightens the churro bites. Serving your churro bites can be just as fun as making them. Try serving them on a colorful plate for an eye-catching look. A small bowl of chocolate ganache or dulce de leche makes a great dip. You can also serve them with whipped cream or a scoop of ice cream. For a healthier option, consider fresh fruit like strawberries or apple slices. A drizzle of honey or maple syrup adds a sweet touch too. I recommend placing leftover churro bites in an airtight container. This keeps them fresh. You can store them at room temperature for up to two days. If you want them to last longer, put them in the fridge. They will stay good for about a week when chilled. To reheat churro bites, preheat your air fryer to 350°F (175°C). Place the bites in the basket for about 3-5 minutes. This will help them regain their crispiness. You can also use a microwave, but they may not be as crunchy. Microwave them for about 10-15 seconds at a time until warmed. If you have many churro bites, freezing is a great option. First, let them cool completely. Next, place them in a single layer on a baking sheet. Freeze them for about an hour. After they are frozen, transfer them to a freezer-safe bag. They can be kept in the freezer for up to three months. When ready to eat, reheat directly from frozen in your air fryer. Yes, you can make churro bites without an air fryer. You can use a deep fryer or bake them in the oven. If you choose to deep fry, heat oil in a pot to 350°F (175°C). Carefully drop in the dough pieces and fry until golden brown. If baking, preheat your oven to 375°F (190°C) and place the dough on a lined baking sheet. Bake for about 12-15 minutes or until they are golden brown. Churro bites are done when they puff up and turn golden brown. In an air fryer, this usually takes about 8-10 minutes. Keep an eye on them as they cook. If they are still pale after 10 minutes, give them a few more minutes. You can also check by inserting a toothpick. If it comes out clean, they are done. You can store leftover churro dough in the fridge for a day or two. Wrap it tightly in plastic wrap and place it in an airtight container. If you want to keep it longer, freeze it. Just shape it into small balls, then freeze. When you are ready to use it, thaw in the fridge overnight, then pipe and fry or bake as usual. You learned how to make churro bites from scratch. We covered everything from ingredients to cooking tips. Remember, using the right tools makes a big difference. Don't forget to experiment with flavors and coatings for fun twists. Store any leftovers properly to enjoy later. Churro bites are versatile, so get creative with dips and serving ideas. You can even make them without an air fryer! Enjoy your delicious churro bites and share them with friends!

Air Fryer Churro Bites Simple and Delicious Treat

Craving a sweet treat that’s quick and easy? You’ll love these Air Fryer Churro Bites! With just a few simple

- Cauliflower florets - Fresh mushrooms - Garlic cloves - Olive oil and butter - Spices and seasoning - Garnish options The garlic cauliflower mushroom skillet is simple yet packed with flavor. Here’s a detailed look at what you need. First, start with cauliflower florets. Use one medium head, cut into bite-sized pieces. Cauliflower brings a mild taste and great texture to the dish. Next, you'll need fresh mushrooms—about 8 ounces, sliced. Cremini or button mushrooms work well here, adding depth to the taste. Don't forget the garlic cloves! You’ll need four cloves, minced. Garlic gives the skillet its amazing aroma and flavor. For cooking, use olive oil and butter. Two tablespoons of olive oil and one tablespoon of unsalted butter create a rich base. Now, let’s spice things up. You'll need dried thyme and smoked paprika. One teaspoon of each adds warmth and earthiness. Finally, season with salt and freshly cracked black pepper to taste. For garnish, I recommend using fresh parsley, finely chopped, and the zest of one fresh lemon. This brightens the dish and adds a pop of color. Gather these ingredients, and you'll be ready to make a delicious garlic cauliflower mushroom skillet that’s sure to impress! 1. Heat a large skillet over medium heat. 2. Add 2 tablespoons of olive oil and 1 tablespoon of butter. 3. Allow the oil and butter to melt together until shimmering. 4. Add 4 minced garlic cloves to the skillet. 5. Sauté the garlic for about 1 minute until it is fragrant. 6. Avoid browning the garlic to keep its fresh taste. 7. Introduce 8 ounces of sliced mushrooms to the skillet. 8. Cook the mushrooms for 5-7 minutes, stirring occasionally. 9. Wait until they brown and release their moisture. 1. Add the cauliflower florets to the skillet. 2. Season with 1 teaspoon of dried thyme and 1 teaspoon of smoked paprika. 3. Add salt and freshly cracked black pepper to taste. 4. Stir everything together to coat the vegetables with the spices. 5. Cover the skillet with a lid to trap steam. 6. Let it cook for 8-10 minutes, stirring occasionally. 7. The goal is to have tender cauliflower with a slight crunch. 1. After 10 minutes, remove the lid from the skillet. 2. Cook for an additional 2-3 minutes to let excess liquid evaporate. 3. This helps caramelize the cauliflower slightly. 4. Once cooked to your liking, take the skillet off the heat. 5. Stir in the zest of 1 fresh lemon for a bright flavor. 6. Serve hot, garnished with finely chopped fresh parsley. 7. Enjoy this dish with a pop of color and taste! To get the best texture for your garlic cauliflower mushroom skillet, focus on timing. Start by sautéing the garlic for just one minute. This step gives your dish a rich, aromatic base without burning the garlic. If garlic turns brown, it will taste bitter. Next, when adding mushrooms, cook them until they are browned and tender. This step releases their moisture, creating a flavorful base. Finally, add the cauliflower florets and cook them until tender, but keep a slight crunch. This texture adds interest to each bite. Seasoning your dish well enhances the flavors. Use smoked paprika and dried thyme to give depth. Salt and pepper are key, so season as you go. A squeeze of fresh lemon juice at the end brightens the whole dish. Prep your ingredients in advance to save time. Cut the cauliflower into florets and slice the mushrooms ahead of time. This way, when you start cooking, you can focus on the steps without rushing. Using a one-pan method makes this meal quick and simple. You only need one skillet, which means less cleanup. This method also lets the flavors meld together beautifully, making your dish even tastier. One common mistake is overcooking garlic. Watch it closely while sautéing. If it turns brown, start over. Another pitfall is not seasoning properly. Taste your dish as it cooks. Adjust the salt and pepper to your liking. Remember, seasoning layers can make all the difference in flavor. {{image_4}} You can switch up the mushrooms in this dish. Try shiitake, portobello, or oyster mushrooms. Each type brings a different flavor and texture. If you want a bolder taste, go with shiitake. For a milder option, button mushrooms work well. You can also change the spices. Instead of smoked paprika, use regular paprika or even chili powder for heat. Add a pinch of cumin for a warm flavor. These swaps keep the dish fresh and exciting. If you follow a vegan diet, you can easily make this dish vegan. Just replace the unsalted butter with more olive oil. The dish still tastes great without the butter, and it stays creamy. For gluten-free options, this recipe is already gluten-free! Just check your spices to make sure they are gluten-free. This makes it a safe choice for everyone. This skillet pairs well with proteins. Serve it with grilled chicken or baked fish for a balanced meal. For a vegetarian option, add some cooked quinoa or chickpeas for extra protein. You can also choose sides that complement the dish. A simple green salad or steamed rice works great. These sides add freshness and balance to the meal. Enjoy! To store leftovers, let the dish cool to room temperature. Place it in an airtight container. Keep it in the fridge for up to three days. Ensure you seal it well to avoid moisture loss. This keeps the flavors fresh and tasty. You can freeze the dish for longer storage. Use a freezer-safe container and cover it tightly. It will stay good for about one month. When you want to eat it, thaw it overnight in the fridge. Reheat it on the stove over low heat. Stir occasionally to heat evenly. This helps maintain the texture. Making this dish ahead of time is easy. Cook a larger batch and portion it out. Store in small containers for quick meals. You can grab one for lunch or dinner. This dish is great for busy days when you need a healthy meal fast. How long does it take to cook cauliflower? Cooking cauliflower takes about 18-20 minutes. You want it tender but still crisp. Start by sautéing it after the mushrooms. Cover the skillet for even cooking. Stir occasionally for the best texture. Can I use frozen vegetables? Yes, you can use frozen vegetables. Just remember to thaw them first. Frozen vegetables may cook faster, so check them often. Adjust the cooking time to avoid mushiness. Calories per serving Each serving of Garlic Cauliflower Mushroom Skillet has around 150 calories. This is a healthy side dish or main meal. Health benefits of the ingredients - Cauliflower: High in fiber, low in carbs. Great for digestion. - Mushrooms: Packed with vitamins and antioxidants. Good for your immune system. - Garlic: Known for heart health and anti-inflammatory benefits. - Olive oil: Contains healthy fats, good for your heart. What to use if I don’t have fresh garlic? If you lack fresh garlic, use garlic powder. About 1 teaspoon equals 1 clove of fresh garlic. Add it along with the other spices. Can I omit the butter for a vegan dish? Yes, you can skip the butter. Use more olive oil instead. This keeps the dish vegan while still adding richness. In this blog post, we explored a tasty dish made from simple ingredients. You learned how to prepare cauliflower, mushrooms, and garlic, while boosting flavor with spices. We shared cooking tips, variations, and storage advice to simplify your meal prep. Remember, avoiding common mistakes will help you shine as a cook. Whether you serve it solo or with sides, this dish is easy and healthy. Enjoy trying out these ideas in your kitchen and making this recipe your own. Happy cooking!

Garlic Cauliflower Mushroom Skillet Flavorful Delight

Are you ready to whip up a quick and tasty dish? My Garlic Cauliflower Mushroom Skillet is a simple way

- 1 lb boneless, skinless chicken thighs - 1 medium onion, diced - 2 cloves garlic, minced - 2 medium carrots, sliced - 2 celery stalks, chopped - 1 bell pepper, diced - 1 zucchini, chopped - 1 can (14 oz) diced tomatoes - 4 cups chicken broth - 1 tablespoon olive oil - 1 teaspoon dried oregano - 1 teaspoon dried basil - Salt and black pepper to taste - 1 cup cooked orzo pasta (optional) - Fresh basil leaves for garnish - Additional spices like red pepper flakes - A splash of white wine for depth - Other vegetables like green beans or peas The ingredients for Sicilian Chicken Soup are simple yet flavorful. The main star is the chicken. I recommend using boneless, skinless chicken thighs. They add great flavor and tenderness. Diced onion and minced garlic bring a fragrant base to the soup. Then, we add sliced carrots, chopped celery, and diced bell pepper for sweetness and crunch. Zucchini adds a lovely texture. The canned diced tomatoes bring acidity and color. The chicken broth is essential for a rich, comforting base. Olive oil helps sauté the veggies. Dried oregano and basil add classic Italian flavor. Finally, salt and black pepper bring everything together. You can make the soup heartier by adding cooked orzo pasta. For extra flavor, consider adding a splash of white wine or red pepper flakes. You can also throw in other veggies like green beans or peas. These optional add-ins allow you to make the soup your own. Each choice enhances the overall taste and makes it truly special. How to properly chop vegetables Chopping vegetables is key for even cooking. Start with a sharp knife. Cut the ends off the carrots and peel them. Then slice them into thin rounds. For celery, cut off the tops and bottoms, then chop them into small pieces. The onion should be diced finely. To do this, cut it in half, peel it, and slice it into small squares. For bell peppers, remove the seeds and cut them into bite-sized pieces. Finally, chop the zucchini into small cubes. Best practices for cooking chicken For the chicken, I prefer using boneless, skinless thighs. They stay juicy and tender. Cut the chicken into small, even pieces. This helps them cook faster. Make sure to pat the chicken dry with a paper towel. This step helps achieve a nice sear when you cook them. Heat olive oil in a large pot Start by heating one tablespoon of olive oil in a large pot over medium heat. Wait until the oil shimmers, which means it’s ready. Sauté onions and garlic until fragrant Add the diced onion to the pot. Cook for about 3-4 minutes until the onion is soft and clear. Then, add the minced garlic. Stir it for one more minute until it smells great. Add vegetables and chicken, followed by tomatoes and broth Next, toss in the sliced carrots, chopped celery, and diced bell pepper. Cook these for about 5-6 minutes. The veggies should start to soften. Now, add the chicken pieces and cook for 5-7 minutes. Stir often so they brown nicely. Once the chicken is browned, pour in the can of diced tomatoes with juice, the chicken broth, and chopped zucchini. Add the dried oregano and basil. Stir everything well and bring it to a boil. Tips on simmering for optimal flavor After it boils, lower the heat to a gentle simmer. Cover the pot and let it cook for 20-25 minutes. This allows the flavors to mix and the chicken to become tender. When to add pasta (orzo) If you want to add orzo, do it during the last 10 minutes of cooking. Stir it in carefully to prevent sticking. If you don’t want orzo, just skip this step. Seasoning the soup to taste Before serving, taste the soup. Add salt and black pepper according to your preference. This step is crucial for bringing out the flavors. Serve the soup with fresh basil leaves on top for a bright finish. Seasoning is key to great soup. Start with salt and pepper when cooking the veggies. This brings out their natural flavors. When you add the chicken, season it again. This helps every bite taste good. Finally, taste the soup before serving. Adjust the salt and pepper as needed. For the right consistency, make sure to simmer your soup. This allows flavors to blend. If it's too thick, add more broth. If it’s too thin, let it cook a bit longer. You want a nice, hearty texture. Herbs and spices make your soup shine. Use dried oregano and basil for classic Sicilian taste. You can also add red pepper flakes for some heat. Fresh herbs, like parsley or thyme, can boost the flavor too. For garnishing, fresh basil leaves add color and a nice aroma. Consider serving with a wedge of lemon on the side. It brightens the soup and adds a fresh twist. One common mistake is overcooking the chicken. Chicken should be tender, not dry. Cook it just until it is no longer pink. Another mistake is skipping the sautéing steps. Sautéing the onions and garlic builds a flavor base. Don't rush this part. It makes the soup rich and warm. Following these tips will help you create a perfect bowl of Sicilian Chicken Soup. {{image_4}} You can change Sicilian chicken soup to fit your taste. Adding capers or olives gives it a salty kick. These ingredients add depth and make the soup more exciting. Some people use different broth bases, like vegetable broth. This change makes the soup lighter and still tasty. If you need gluten-free options, you can swap orzo for rice or quinoa. This keeps the soup hearty without the gluten. For a vegetarian version, use chickpeas and vegetable stock. This option is rich in protein and still filling. Using fresh, seasonal vegetables can enhance the flavor. In summer, add zucchini and tomatoes for brightness. In winter, root vegetables like parsnips and turnips work well. Adapt the recipe based on what's fresh in your area. This keeps the soup tasty all year long. To store your leftover Sicilian chicken soup, let it cool first. Transfer it to an airtight container. This keeps it fresh and tasty. The recommended duration for best freshness is about 3 to 4 days in the fridge. Always check for any off smells before reheating. Freezing is a great option if you want to save some soup for later. First, let the soup cool completely. Then, pour it into freezer-safe containers. Leave some space at the top for expansion. This soup can last in the freezer for about 2 to 3 months. When you’re ready to eat, thaw it overnight in the fridge. Reheat it on the stove over medium heat, stirring often. You can also use a microwave but stir it occasionally to ensure even heating. Pair your Sicilian chicken soup with crusty bread or a fresh salad. The bread is perfect for soaking up the broth. A simple side of roasted vegetables also works well. For drinks, consider a light white wine or sparkling water with lemon. These drinks complement the soup's flavors nicely. Can I make Sicilian Chicken Soup in a slow cooker? Yes, you can! Just brown the chicken and sauté the veggies first. Then, transfer everything to the slow cooker with the broth and tomatoes. Cook on low for 6-8 hours or on high for 4 hours. This method lets the flavors develop slowly. What is the best type of chicken to use for flavor? Boneless, skinless chicken thighs work best. They stay juicy and tender during cooking. You could use chicken breasts, but they may dry out. Thighs add depth to the soup and soak up the rich broth. What can I use instead of orzo pasta? If you want to skip orzo, try small rice or quinoa. Both will add heartiness. You can also use other small pasta shapes like ditalini or acini di pepe for a fun twist. How to substitute fresh herbs for dried herbs in the recipe? Use three times more fresh herbs than dried ones. For example, if the recipe calls for 1 teaspoon of dried oregano, use 3 teaspoons of fresh oregano. Fresh herbs brighten the soup and add a lovely aroma. How many calories are in Sicilian Chicken Soup? A serving of this soup has about 250 calories. This may vary based on added ingredients. If you include orzo, the calorie count will increase slightly. It’s still a healthy, filling meal. Is this soup suitable for meal prep? Yes, it is perfect for meal prep! The soup keeps well in the fridge for up to 3 days. You can also freeze it for up to 3 months. Just leave out the orzo if you plan to freeze it, then add it fresh when you reheat. What is the origin of Sicilian Chicken Soup? This soup comes from Sicily, an Italian island known for its rich food culture. It blends flavors from the sea and land. The use of fresh herbs and local veggies makes it special. How does Sicilian Chicken Soup differ from other chicken soups? Sicilian Chicken Soup has a unique twist with its use of local ingredients. The addition of tomatoes, zucchini, and olives gives it a Mediterranean flair. Other chicken soups might be simpler and less colorful. This blog covered everything you need for a great Sicilian Chicken Soup. We listed ingredients, gave step-by-step instructions, and shared helpful tips. Now you can create your own delicious version. Remember to play with flavors and add your twist. Whether it's seasonal veggies or a splash of wine, make it your own. Enjoy your cooking journey and share your soup with others! You’ll impress everyone with this warm and hearty meal.

Sicilian Chicken Soup Nourishing Comfort in a Bowl

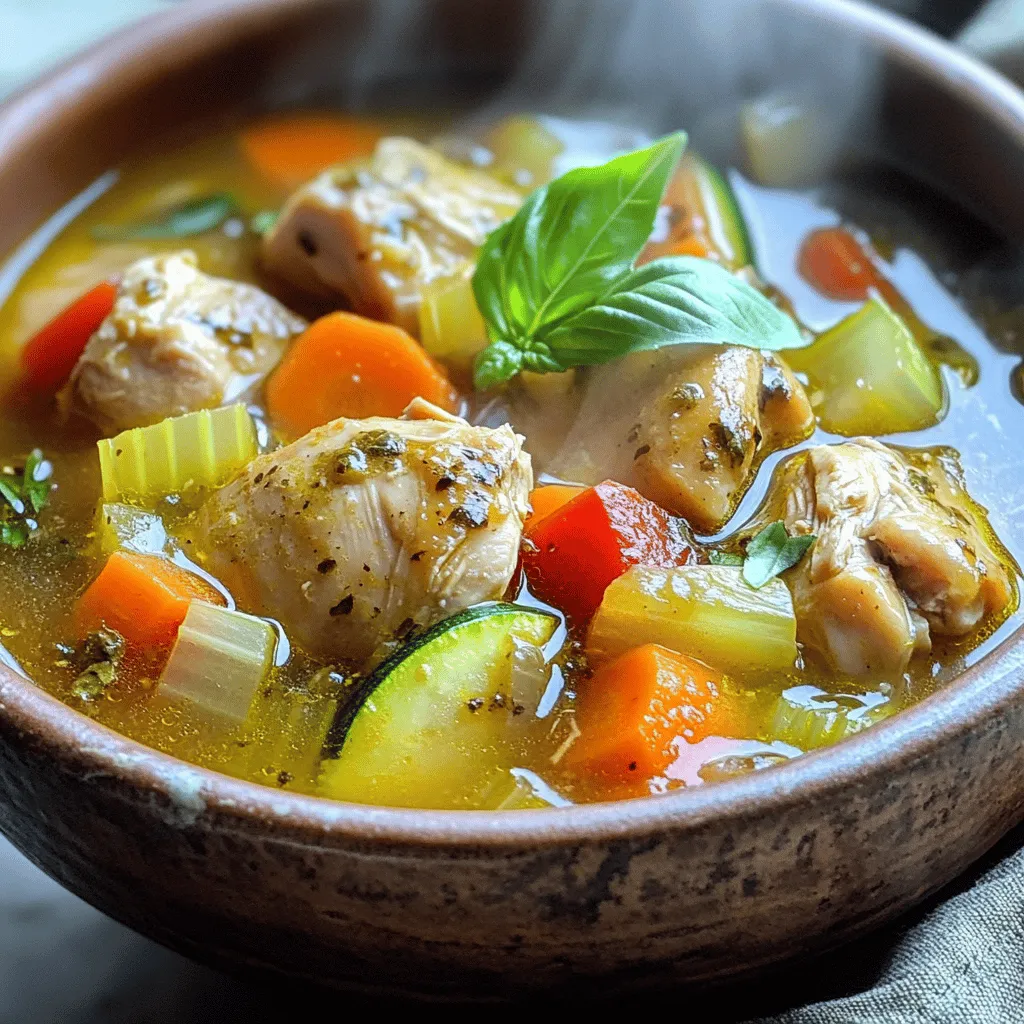
If you’re craving warmth and flavor, my Sicilian Chicken Soup is just what you need. This dish blends tender chicken,

- 1 cup all-purpose flour - 2 tablespoons granulated sugar - 2 teaspoons baking powder - 1/2 teaspoon salt - 1 large egg - 1 cup milk (whole or 2%) - 2 tablespoons unsalted butter, melted - Zest of 1 lemon (about 1 teaspoon) - 1 tablespoon fresh lemon juice - 1 cup fresh blueberries - Maple syrup, for drizzling - Additional lemon zest for garnish Gathering the right ingredients is key to making Blueberry Lemon Pancake Bites. Start with your dry ingredients. Use one cup of all-purpose flour. Add two tablespoons of granulated sugar, two teaspoons of baking powder, and half a teaspoon of salt. This mix gives the bites their base. Next, we need the wet ingredients. Crack one large egg into a bowl. Add one cup of milk, either whole or 2%. Then, mix in two tablespoons of melted unsalted butter. For bright flavor, add the zest of one lemon and one tablespoon of fresh lemon juice. Finally, it’s time for the add-ins. Use one cup of fresh blueberries. If you need to, frozen blueberries work, but thaw and drain them first. You can drizzle some maple syrup on top when serving. For a touch of color, add extra lemon zest as a garnish. These ingredients blend together to create a tasty, fluffy treat that everyone will love! {{ingredient_image_2}} - Preheat the oven to 375°F (190°C). - Grease a mini muffin tin. - In a large bowl, combine the dry ingredients. - Use all-purpose flour, sugar, baking powder, and salt. - In a separate bowl, mix the wet ingredients. - Beat the egg until frothy, then add milk, butter, lemon zest, and lemon juice. - Stir until everything is well combined. - Pour the wet mix into the dry mix. - Gently combine with a spatula. Don't overmix; some lumps are fine. - Carefully fold in the fresh blueberries. - Use a spatula to keep them intact. - Fill each cup of the mini muffin tin about 2/3 full with batter. - Place the muffin tin in the oven. - Bake for 12-15 minutes. - Check for a golden brown color and a clean toothpick. - Cool in the pan for 5 minutes, then transfer to a wire rack. Do not overmix the batter. When you combine wet and dry ingredients, stir gently. Lumps are okay; they help keep your pancake bites fluffy. Overmixing makes them tough and chewy. To check for doneness, look for golden brown edges. Insert a toothpick into a bite. If it comes out clean, they are ready. If the toothpick has batter, bake for a few more minutes. Serve the pancake bites warm on a bright platter. This makes them look fun and inviting. Drizzle warm maple syrup on top for added flavor. A sprinkle of extra lemon zest adds a nice touch and makes it pop. You can swap blueberries for other fruits. Try raspberries, strawberries, or even chopped apples. Each fruit brings a new taste. For dairy-free options, use almond milk or oat milk instead of regular milk. You can also use a dairy-free butter substitute. For gluten-free bites, swap the all-purpose flour for a gluten-free blend. Pro Tips Fresh Blueberries: Using fresh blueberries will enhance the flavor and texture of your pancake bites. If using frozen, ensure they are fully thawed and drained to avoid excess moisture in the batter. Lemon Zest Boost: For a stronger lemon flavor, feel free to add a bit more lemon zest. It brightens the taste of the pancakes and complements the blueberries beautifully. Don’t Overmix: Mix the wet and dry ingredients until just combined. A few lumps are okay! Overmixing can lead to dense pancake bites instead of light and fluffy ones. Serving Suggestions: These pancake bites are fantastic on their own, but you can also serve them with whipped cream, yogurt, or a sprinkle of powdered sugar for an extra treat! {{image_4}} You can change the flavor of these pancake bites easily. Adding spices like cinnamon or nutmeg gives warmth and depth. Just a pinch can make a big impact. You can also try other citrus fruits. Oranges or limes can add a fresh twist. Experiment and find your favorite mix! If you need a vegan option, you can swap the egg and milk. Use a flax egg made from ground flaxseed and water. Almond or oat milk works well too. For a low-sugar version, cut back on the sugar or use a sugar substitute. This makes the bites tasty and friendly for many diets. These pancake bites are great for any time of day. Serve them for breakfast, a quick snack, or even dessert. You can add fun toppings too! Try yogurt, fresh fruit, or even whipped cream. Drizzle chocolate sauce for a sweet treat. The options are endless, so get creative! To keep your Blueberry Lemon Pancake Bites fresh, store them in a cool place. If you plan to eat them within two days, you can leave them at room temperature. Just place them in an airtight container to avoid drying out. For longer freshness, put them in the refrigerator. In the fridge, they can last up to five days. Make sure to wrap them well or use a sealed container. This keeps them moist and tasty. If you want to save pancake bites for later, freezing is the best option. After they cool completely, place them in a single layer on a baking sheet. Freeze for about an hour until firm, then transfer them to a freezer bag. Remove as much air as possible to prevent freezer burn. They can last up to three months in the freezer. When you're ready to eat them, reheat them in the oven or microwave. For the oven, preheat to 350°F (175°C) and bake for about 10 minutes. If using the microwave, heat for 20-30 seconds at a time until warm. The shelf life of stored pancake bites varies by storage method. At room temperature, they are best eaten within two days. In the fridge, they stay fresh for about five days. If frozen, they can last up to three months. Always check for any signs of spoilage before consuming, just to be safe! You can use frozen blueberries if fresh ones are not available. Just make sure to thaw and drain them first. You can also try other berries, like raspberries or chopped strawberries, for a fun twist. Mix and match to find your favorite flavor! To make blueberry lemon pancake bites gluten-free, swap the all-purpose flour for a gluten-free blend. Many brands offer all-purpose gluten-free flour that works well in baking. Just ensure it has xanthan gum for better texture. Yes, you can! Make the pancake bites and store them in an airtight container. They stay fresh in the fridge for up to three days. This makes breakfast quick and easy on busy mornings. Reheat pancake bites in the microwave for about 10-15 seconds. You can also warm them in the oven at 350°F (175°C) for about 5 minutes. This will keep them soft and tasty, just like when they were fresh out of the oven. Yes, flavored yogurt can replace milk. It will add a unique taste to your pancake bites. Just make sure to choose a yogurt you enjoy, as the flavor will come through in the final dish. These pancake bites are simple and fun to make. We mixed dry and wet ingredients, added berries, and baked them to perfection. You can customize these with various fruits or flavors. Remember to store them right for the best taste. Whether for breakfast or a snack, they’re sure to please. Enjoy experimenting with different toppings and variations. You'll find your favorite way to enjoy these delightful treats. Happy baking!

Blueberry Lemon Pancake Bites Simple and Tasty Treat

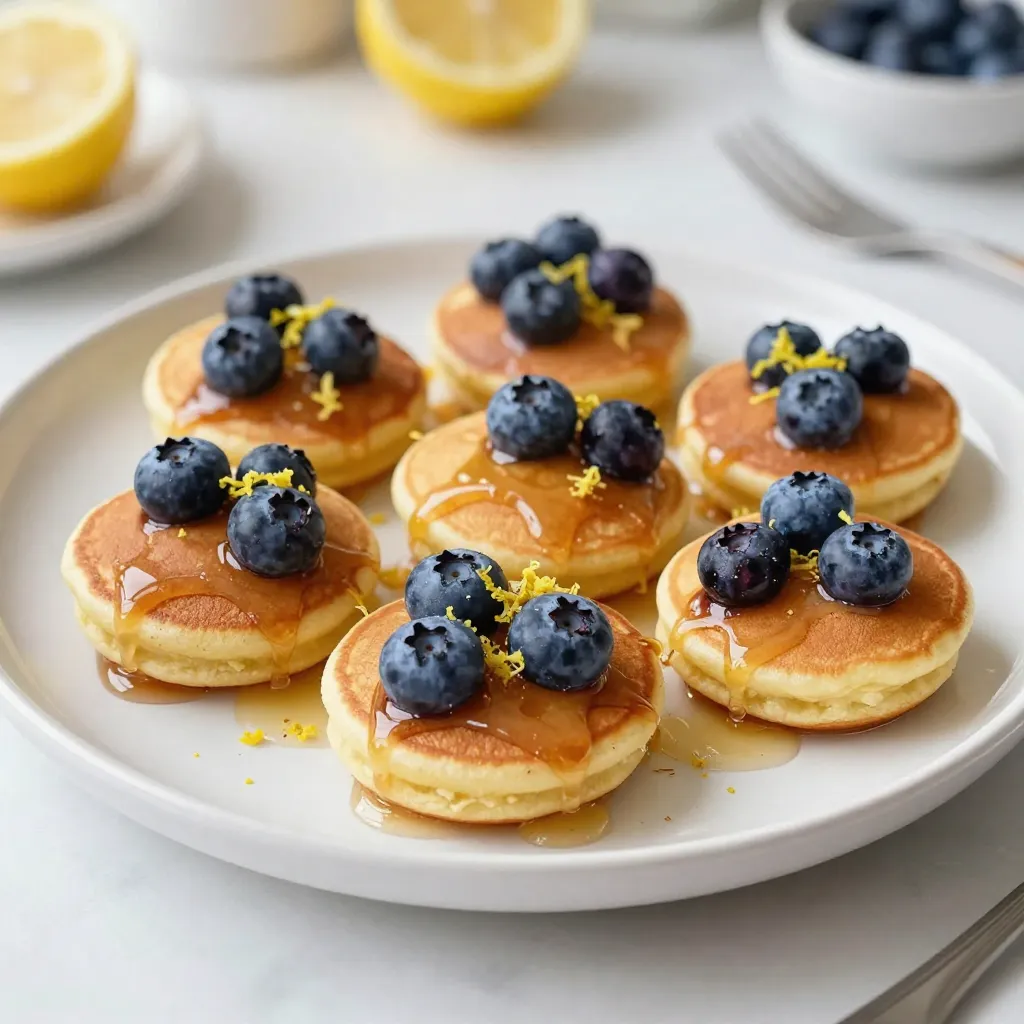
Who doesn’t love a tasty treat that’s quick and easy to make? Blueberry Lemon Pancake Bites are the perfect mix

- 2 large apples (preferably Granny Smith or Honeycrisp), peeled, cored, and diced - 1 cup all-purpose flour - 1/4 cup granulated sugar - 1 teaspoon baking powder - 1/2 teaspoon ground cinnamon - 1/4 teaspoon ground nutmeg - 1/4 teaspoon salt - 1/2 cup milk - 1 large egg - 1 teaspoon pure vanilla extract - 1 tablespoon fresh lemon juice - Cooking spray You need two large apples. I like using Granny Smith or Honeycrisp. They add a nice tartness. The all-purpose flour gives the fritters their structure. Granulated sugar adds sweetness. Baking powder helps them rise and stay fluffy. Ground cinnamon and nutmeg bring warm, cozy flavors. Salt balances the sweetness, making each bite perfect. Milk adds moisture to the batter. The egg binds everything together. Pure vanilla extract gives a lovely aroma. Fresh lemon juice brightens the apples, enhancing their flavor. Finally, cooking spray prevents sticking in the air fryer. For extra sweetness, you can dust the fritters with powdered sugar. If you want a twist, try adding chopped nuts or raisins into the batter. A scoop of ice cream on top makes a fun treat too! You could even mix in some chocolate chips for a sweeter version. These options let you customize your fritters to match your taste. Start with 2 large apples. I prefer Granny Smith or Honeycrisp. Peel, core, and dice them. Then, place the diced apples in a medium bowl. Add 1 tablespoon of fresh lemon juice. Toss the apples to coat them well. This step helps keep the apples fresh and adds flavor. In a large mixing bowl, sift together 1 cup of all-purpose flour, 1/4 cup of granulated sugar, 1 teaspoon of baking powder, 1/2 teaspoon of ground cinnamon, 1/4 teaspoon of ground nutmeg, and 1/4 teaspoon of salt. Whisk until blended. In another bowl, whisk together 1/2 cup of milk, 1 large egg, and 1 teaspoon of pure vanilla extract. Pour the wet mixture into the dry ingredients. Gently fold with a spatula until just combined. It's okay if a few lumps remain. Carefully add the diced apples and fold them in evenly. Preheat your air fryer to 350°F (175°C) for about 5 minutes. Lightly spray the air fryer basket with cooking spray. Using a spoon or ice cream scoop, drop small mounds of batter, about 2 tablespoons each, into the basket. Leave space between each mound. Cook for 8-10 minutes. Flip the fritters halfway through to ensure even browning. When they turn golden brown, transfer them to a wire rack to cool. If you want, dust with powdered sugar before serving. Enjoy your tasty apple fritters! To make your apple fritters perfect, follow these tips: - Preheat your air fryer for even cooking. This helps the fritters cook nicely. - Use parchment paper to line the basket. This makes cleanup easier and helps the fritters cook evenly. - Don’t overcrowd the basket. Leave space between fritters for the hot air to circulate. This makes them crispier. - Flip the fritters halfway through cooking. This ensures both sides get that nice golden color. Here are some mistakes that can ruin your fritters: - Overmixing the batter can lead to tough fritters. Mix just until combined. - Skipping the lemon juice can dull the apple flavor. It brightens the taste. - Not checking the cooking time may result in undercooked or burnt fritters. Keep an eye on them. Serving your fritters nicely makes them even more inviting: - Use a decorative plate to showcase your fritters. A fun or colorful plate adds charm. - Dust with powdered sugar right before serving. This gives a sweet touch and looks great. - Add fresh apple slices around the fritters. This adds color and hints at the flavors inside. By following these tips, you will make tasty and beautiful apple fritters every time! {{image_4}} You can swap apples for other fruits in this recipe. Pears work great, too. They add a sweet touch and a soft bite. You can also try ripe bananas for a unique twist. Just mash them up and mix them into the batter. Berries like blueberries or raspberries can add a burst of flavor. Adjust sugar based on the sweetness of the fruit you choose. If you need a gluten-free option, use gluten-free flour. It works well in this recipe. You can find blends that mimic all-purpose flour. Just make sure to check the package for the right measurements. Some brands may need a little extra liquid, so keep an eye on the batter. Your fritters will still taste amazing! You can jazz up your fritters with extra spices. Try adding a pinch of ginger for warmth. A bit of cardamom can also add a nice touch. Want a richer flavor? Use brown sugar instead of white sugar. For a fun twist, mix in some chocolate chips or nuts. These add both taste and texture, making your fritters even better! To keep your apple fritters fresh, place them in an airtight container. Make sure they cool completely before sealing. This helps keep them crispy and tasty. Store them at room temperature for up to two days. If you need to keep them longer, consider freezing. When you want to eat your fritters again, use an air fryer or oven. Preheat your air fryer to 350°F (175°C). Heat the fritters for 3-5 minutes. They will warm up and regain some crispiness. You can also use a microwave, but this may make them soft. If you have leftovers, freezing is a great idea. First, let the fritters cool completely. Then, wrap each fritter in plastic wrap. Place them in a freezer bag and remove as much air as possible. They can stay in the freezer for up to three months. To enjoy them later, just thaw in the fridge overnight, then reheat. Air fryer apple fritters last about 2-3 days when stored in an airtight container. Keep them in the fridge to maintain freshness. You might notice they become less crispy after a day. To revive the crunch, pop them back in the air fryer for a few minutes. Yes, you can make fritters without an air fryer. You can deep fry them in hot oil. Heat about 2-3 inches of oil in a pot. Drop the batter mounds carefully into the hot oil. Fry until golden brown; this usually takes about 3-4 minutes per side. Granny Smith and Honeycrisp apples are the best for fritters. These apples give a nice balance of tartness and sweetness. They hold their shape well when cooked, too. You can also try Fuji or Gala apples for a sweeter flavor. In this article, we explored the essentials for making air fryer apple fritters. We discussed key ingredients, provided clear instructions, and shared helpful tips. The variations help you customize your fritters, while storage info ensures they stay fresh. With simple steps and tasty options, you can enjoy delicious apple fritters anytime. Now, go ahead and try making them your way!

Air Fryer Apple Fritters Tasty and Simple Recipe

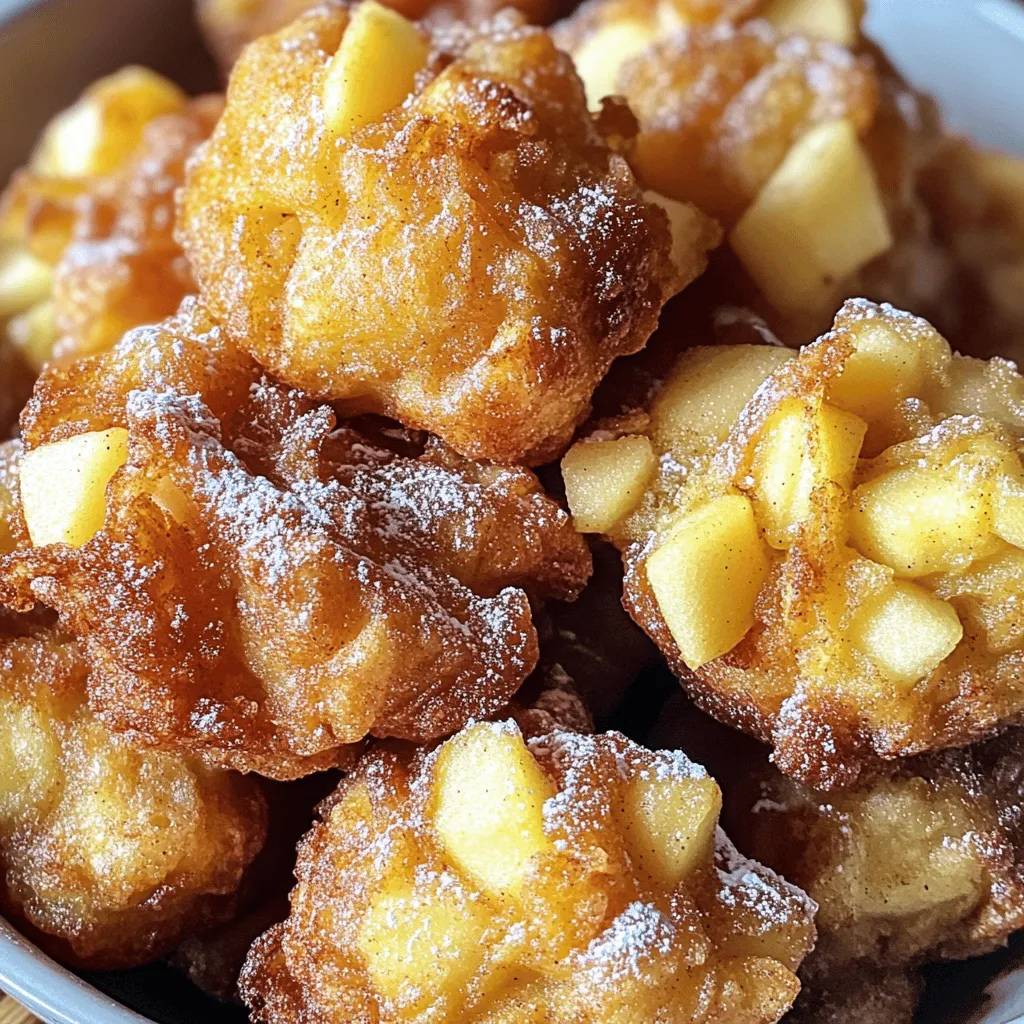
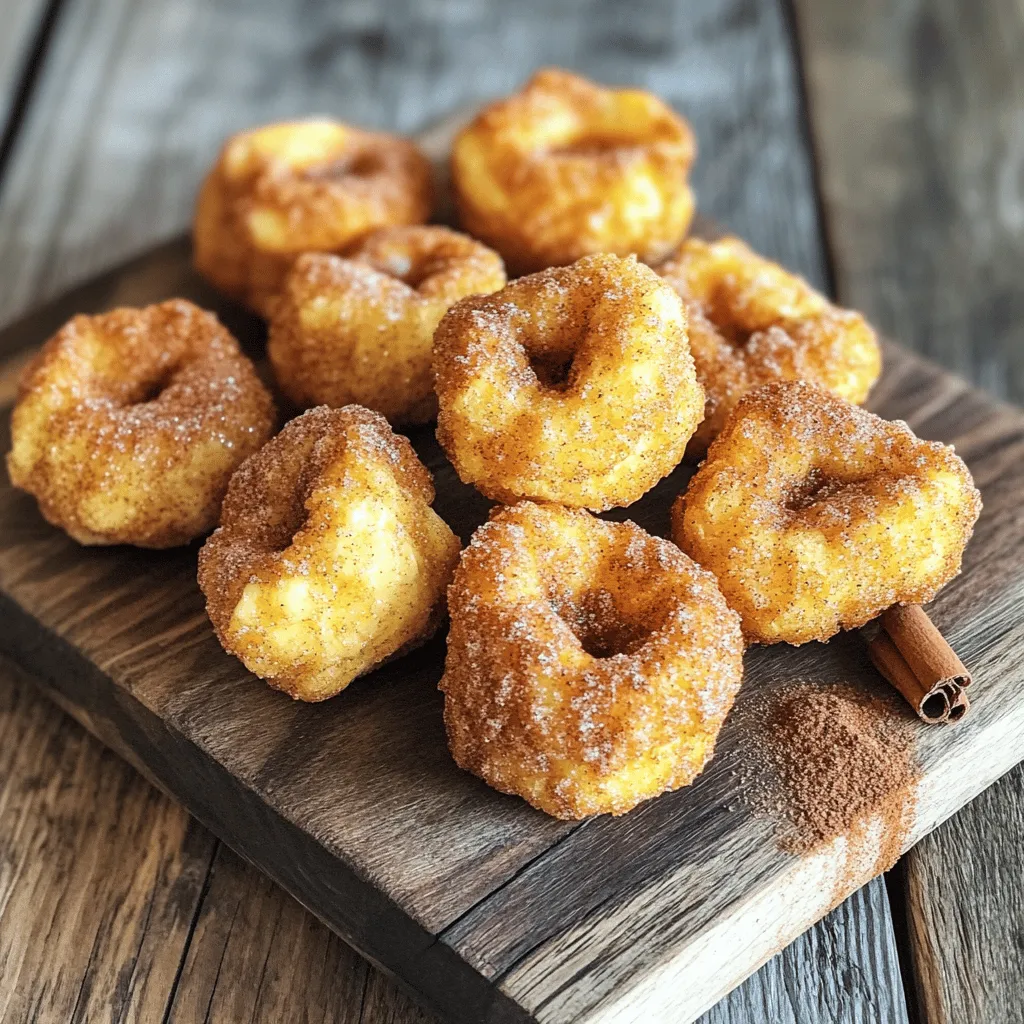
Get ready to delight your taste buds with my simple Air Fryer Apple Fritters recipe! These tasty treats are easy

- Shrimp: 1 pound large, peeled and deveined - Olive Oil: 2 tablespoons - Garlic: 3 cloves, finely minced - Cherry Tomatoes: 1 cup, halved - Sun-Dried Tomatoes: 1/2 cup, chopped - Heavy Cream: 1 cup - Chicken Broth: 1/2 cup, low-sodium - Spinach: 1 cup, chopped - Red Pepper Flakes: 1/2 teaspoon (optional) - Salt and Black Pepper: to taste - Parmesan Cheese: 1/2 cup, freshly grated - Fresh Basil: for garnish To make creamy Tuscan shrimp, you need fresh ingredients. Start with large shrimp. They should be peeled and deveined. This saves time and makes eating easier. Olive oil adds flavor and helps cook the shrimp. Garlic brings a rich aroma. Use fresh garlic, finely minced for the best taste. Cherry tomatoes add sweetness and color. Sun-dried tomatoes give a unique flavor. Heavy cream creates a rich sauce. Chicken broth adds depth to the dish. Fresh spinach adds color and nutrients. Red pepper flakes can give a little heat. Salt and black pepper enhance all the flavors. Finally, use freshly grated Parmesan cheese. It melts beautifully and adds creaminess. Garnish with fresh basil to brighten the dish. These ingredients come together to create a flavorful meal. You can adjust the amounts based on your taste. Enjoy cooking! - Step 1: Heat 2 tablespoons of olive oil in a skillet over medium heat. - Step 2: Add 1 pound of shrimp, seasoned with salt and black pepper. Cook shrimp for 2-3 minutes on each side. The shrimp should turn pink and opaque. Once done, remove the shrimp and place them on a plate. - Step 3: In the same skillet, sauté 3 cloves of finely minced garlic for about 30 seconds. You want it fragrant but not brown. - Step 4: Add 1 cup of halved cherry tomatoes and 1/2 cup of chopped sun-dried tomatoes. Cook for 3-4 minutes to soften them. - Step 5: Pour in 1/2 cup of low-sodium chicken broth. Raise the heat slightly and let it simmer for 2 minutes. - Step 6: Lower the heat and stir in 1 cup of heavy cream and 1/2 cup of freshly grated Parmesan cheese. Mix until the sauce is creamy and smooth. - Step 7: Toss in 1 cup of roughly chopped spinach and 1/2 teaspoon of red pepper flakes, if you like a bit of heat. Cook for another 2-3 minutes until the spinach wilts. - Step 8: Add the cooked shrimp back to the skillet. Toss gently to coat with the creamy sauce. Heat everything for 1-2 minutes until warmed through. - Step 9: Taste the dish and adjust the seasoning with more salt and pepper if needed. To avoid overcooking shrimp, cook them just until they turn pink. This takes about 2-3 minutes per side. If you see them start to curl, they are done. Overcooked shrimp become tough and rubbery, which no one wants. Seasoning at each step is key. Start with salt and pepper when cooking shrimp. This adds flavor right from the start. When you add garlic and tomatoes, season again. The more layers of flavor, the better your dish will taste! For extra flavor, consider adding spices like oregano or thyme. These herbs pair well with the creamy sauce. You can also try a pinch of smoked paprika for a smoky touch. If you want to mix up the cheese, try using goat cheese or feta. These cheeses add a different taste and texture. They can make your creamy Tuscan shrimp even more exciting! For side dishes, serve creamy Tuscan shrimp over al dente pasta or fluffy rice. The creamy sauce clings to these well, making every bite delicious. You can also serve it with crusty bread to soak up the sauce. When it comes to wine, a crisp white wine like Sauvignon Blanc works best. Its bright acidity balances the richness of the dish. A light Pinot Grigio also pairs nicely and enhances the meal experience. {{image_4}} If you want gluten-free options, serve the creamy Tuscan shrimp over zucchini noodles or rice. Both choices keep the dish light and tasty. For a dairy-free creamy sauce, use coconut milk instead of heavy cream. It adds a different twist and still tastes delicious. You can swap shrimp for scallops or even white fish. Both options give the dish a new flavor. For a fresh touch, add seasonal veggies like asparagus or bell peppers. These not only add color but also boost the nutrition. To enhance the taste, add lemon zest before serving. It brightens up the dish and adds a lovely zing. You can also try fresh herbs like oregano or thyme. These add depth and make your creamy Tuscan shrimp even more delightful. To keep your creamy Tuscan shrimp fresh, refrigerate leftovers right away. Use airtight containers to prevent air from spoiling your dish. Glass containers work best, but any sealable plastic container is fine. Make sure the shrimp cool down a bit before sealing the container. This helps keep the shrimp juicy and prevents condensation inside. If you want to save your creamy Tuscan shrimp for later, freezing is a great option. First, let the dish cool completely. Then, place it in a freezer-safe container. Be sure to leave some space at the top for expansion. To reheat, let it thaw in the fridge overnight. When ready, warm it gently on low heat. Stir often to keep the sauce creamy. Avoid using high heat, as it can make the dish grainy. In the fridge, your creamy Tuscan shrimp lasts about 3-4 days. For the freezer, it can stay good for up to 2 months. Check for signs of spoilage before eating. If you see any off-smells, discoloration, or changes in texture, it’s best to toss it. Remember, when in doubt, throw it out! Can I make creamy Tuscan shrimp ahead of time? Yes, you can make creamy Tuscan shrimp ahead. Cook the shrimp and sauce, then store them in the fridge. When ready to serve, reheat gently on the stove. This helps keep the shrimp tender and the sauce creamy. What can I substitute for heavy cream? If you need a substitute for heavy cream, use half-and-half or coconut milk. You can also blend silken tofu with a bit of milk. These options still create a rich sauce. How do I achieve the best texture for shrimp? To get the best texture for shrimp, avoid overcooking. Cook shrimp just until they turn pink and opaque, about 2-3 minutes per side. This keeps them juicy and tender. What thickness should the creamy sauce be? Aim for a sauce that is thick enough to coat the back of a spoon. If it is too thin, let it simmer longer to reduce. If it is too thick, add a splash of chicken broth or milk to reach the desired consistency. What can I serve with creamy Tuscan shrimp? Creamy Tuscan shrimp pairs well with pasta, rice, or crusty bread. You can also serve it over zucchini noodles for a lighter option. Add a fresh green salad on the side for balance. Can I make this dish spicy? Absolutely! To make it spicy, add red pepper flakes. You can also use fresh diced jalapeños or a dash of hot sauce. Adjust the spice level to your taste. This creamy Tuscan shrimp recipe combines fresh ingredients and simple steps. You learned how to cook shrimp perfectly and prepare a flavorful sauce. Tips and variations help you make this dish your own. Store leftovers properly to enjoy another day. I hope you try this recipe soon and delight in every bite. Simple, tasty meals like this make cooking fun and easy. Enjoy your culinary adventure!

Creamy Tuscan Shrimp Irresistible Dinner Delight

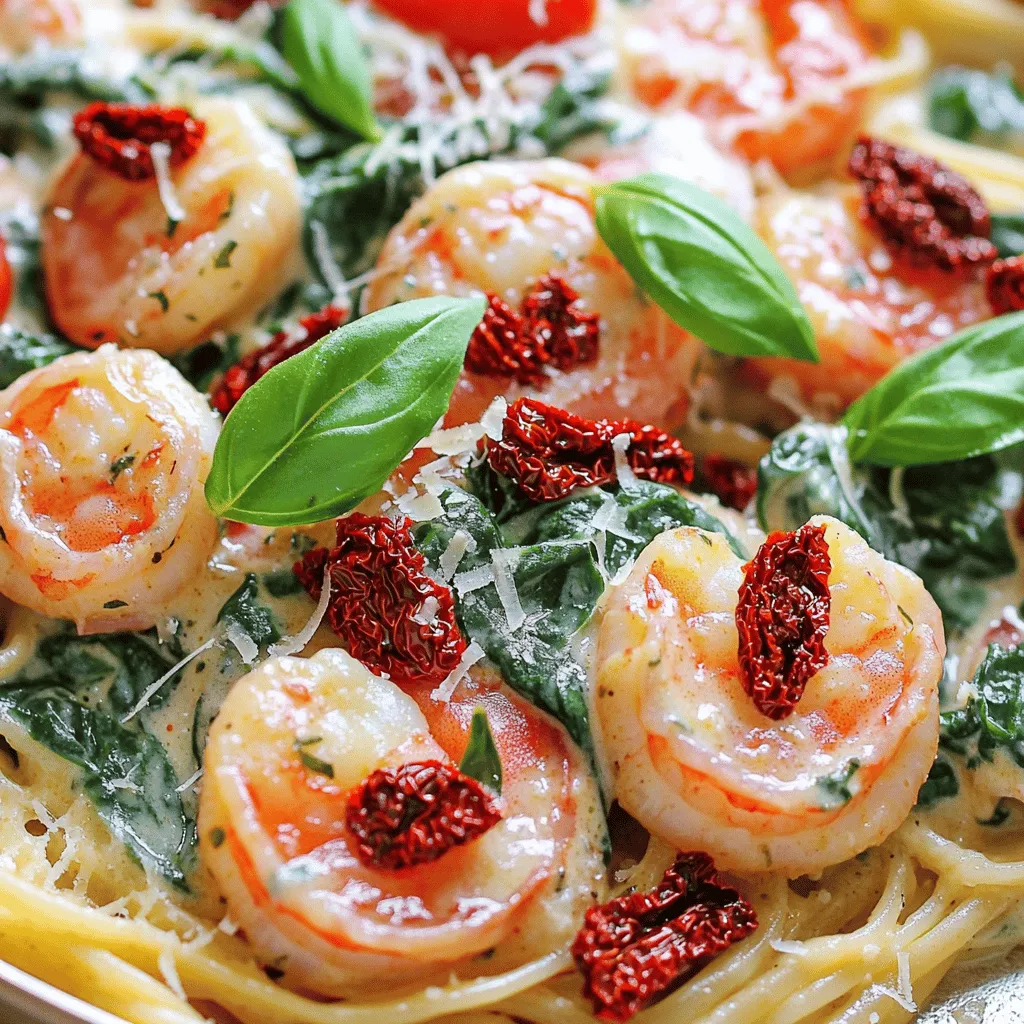
Are you ready to impress at dinner tonight? This Creamy Tuscan Shrimp recipe is not just a meal; it’s a

- 1 box yellow cake mix - 1 cup chopped pecans - 1 cup caramel sauce - 1/2 cup unsalted butter, melted - 1 cup shredded coconut (optional) - 1 cup sweetened condensed milk - 1/2 teaspoon vanilla extract - 1/2 teaspoon salt - Whipped cream for serving (optional) The main ingredients for this dessert are simple but create magic together. The yellow cake mix forms the base. It is easy to use and gives a nice flavor. The chopped pecans add a lovely crunch. The caramel sauce brings sweetness and gooey goodness. Melted butter helps bind everything. If you want to add texture, consider adding shredded coconut. Sweetened condensed milk makes it creamy. A touch of vanilla extract adds depth. The salt balances the sweetness perfectly. - Different nuts (walnuts, almonds) - Chocolate chips - Fruit toppings (bananas, berries) You can make this dessert your own with optional add-ins. Try different nuts like walnuts or almonds. They add unique flavors and textures. You can also mix in chocolate chips for a sweet twist. For a fruity touch, add bananas or berries on top. These options let you customize the cake to your taste. - Calories, fat, carbs, protein per serving - Suggested substitutes for dietary restrictions This cake is rich and delightful. Each serving has a good amount of calories, fat, and carbs. If you want to make it lighter, you can substitute the butter with applesauce. For a dairy-free version, try using coconut milk instead of sweetened condensed milk. Always check for dietary needs when serving. - Preheat oven to 350°F (175°C). - Grease the 9x13 inch baking dish. First, you need to warm up your oven. Set it to 350°F. This is the perfect temperature for baking. Next, take your baking dish and grease it well. Use cooking spray or butter. This helps the cake come out easily later. - Combine cake mix, pecans, butter, and other ingredients. - Press half of the mixture into the baking dish. Now, grab a big bowl. In it, mix the yellow cake mix, chopped pecans, and melted butter. If you want, add shredded coconut for extra flavor. Stir in the vanilla extract and salt. Mix until everything is combined but keep it crumbly. Take half of this mixture and press it into the bottom of your greased dish. Make sure it’s even and packed down well. - Drizzle caramel and pour sweetened condensed milk. - Sprinkle remaining cake mixture on top. - Bake for 30-35 minutes. Next, drizzle the caramel sauce over your pressed cake layer. Make sure to cover as much as you can. Then pour the sweetened condensed milk over the caramel. It should cover the whole area. Finally, sprinkle the rest of the cake mixture on top. Leave some gaps to let the caramel show through. Now, place your dish in the oven. Bake for 30 to 35 minutes. You will know it’s done when the top turns golden brown and the edges bubble. Once it’s ready, let it cool for about 10-15 minutes before serving. This helps the layers firm up. - How to know when the cake is done: Look for a golden brown top and bubbly edges. You can also insert a toothpick into the center. If it comes out clean, the cake is ready. - Importance of cooling time: Let the cake cool for 10-15 minutes after baking. This time helps the layers set. You want it to hold together when you slice it. - Presentation ideas: Serve the cake warm for the best taste. Top it with whipped cream and drizzle extra caramel sauce on top. For added crunch, sprinkle some chopped pecans before serving. - Pairing suggestions with beverages: This dessert pairs well with coffee or hot chocolate. A scoop of vanilla ice cream also makes a great match. - Overmixing the batter: Mix just until the ingredients combine. Overmixing can make the cake tough. - Not evenly spreading layers: Be sure to spread the cake mixture evenly. This helps the caramel soak in and ensures a great texture. {{image_4}} You can mix up the flavors in your caramel pecan dump cake. Here are two tasty options: - Chocolate caramel pecan dump cake: Add a cup of chocolate chips to the cake mix. This will give a rich chocolate flavor that pairs well with caramel. - Coconut caramel dump cake: If you love coconut, include a cup of shredded coconut. It adds a nice texture and a tropical twist. You can make this dessert fit your diet: - Gluten-free options: Use a gluten-free cake mix instead of the yellow cake mix. This allows everyone to enjoy the cake. - Vegan alternatives: Replace the butter with coconut oil or a plant-based butter. Use almond milk instead of sweetened condensed milk for a vegan twist. You can adapt this cake for different seasons: - Adding spices for fall flavors: Mix in half a teaspoon of pumpkin spice or cinnamon. This gives the cake a warm, cozy flavor perfect for autumn. - Special editions for holidays: For Christmas or Thanksgiving, add chopped cranberries or a hint of nutmeg. This makes it festive and fun for holiday gatherings. To keep your leftover caramel pecan dump cake fresh, let it cool first. You can store it at room temperature for up to two days. Just cover it with foil or plastic wrap. If you prefer, you can also store it in the fridge. This will help it last a bit longer, up to one week. Just remember to cover it well to avoid drying out. If you want to save your cake for later, freezing is a great option. To freeze, cut the cake into slices. Wrap each slice in plastic wrap and then place them in a freezer bag. This way, you can take out just what you need. The cake will stay good in the freezer for about three months. When you're ready to enjoy it again, just thaw in the fridge overnight. To reheat, pop a slice in the microwave for about 20-30 seconds. The shelf life of your caramel pecan dump cake varies by storage method. At room temperature, it lasts about two days. In the fridge, it can last up to one week. If frozen, you can enjoy it for about three months. Always check for any signs of spoilage before eating. A Caramel Pecan Dump Cake is a rich and sweet dessert. It combines a cake mix with pecans and caramel. This dish is easy to make and perfect for gatherings. The origins trace back to simple home baking traditions, where "dump" refers to mixing ingredients quickly. To make homemade caramel sauce, you will need: - 1 cup sugar - 6 tablespoons butter - 1/2 cup heavy cream 1. Start by melting the sugar in a saucepan over medium heat. Stir it often until it turns a golden color. 2. Once melted, add butter and stir until it melts completely. 3. Slowly pour in the cream while stirring. Be careful, as it will bubble up. 4. Remove from heat and let it cool before using it in your dump cake. Yes, you can prepare this dessert ahead of time. Mix the dry ingredients and store them in a bowl. Prepare the caramel sauce and store it in the fridge. On the day you want to serve, just layer the ingredients and bake. This way, you save time and still enjoy a fresh dessert. To make a gluten-free version, use a gluten-free yellow cake mix. Many brands offer this option in stores. Ensure all other ingredients are gluten-free as well. This way, everyone can enjoy the dessert without worries. You can serve this cake warm with whipped cream on top. A drizzle of extra caramel sauce adds more flavor. You can also sprinkle some chopped pecans for crunch. For a special touch, serve it with vanilla ice cream. This combination makes the dessert even more delightful. This blog post covered how to make a delicious Caramel Pecan Dump Cake. We explored the key ingredients, step-by-step instructions, and tips for perfecting your bake. You learned about different variations and storage options to keep your cake fresh. Use these insights to create a tasty treat with your own twist. Enjoy sharing this dessert with friends and family. Happy baking!

Caramel Pecan Dump Cake Irresistible Dessert Recipe

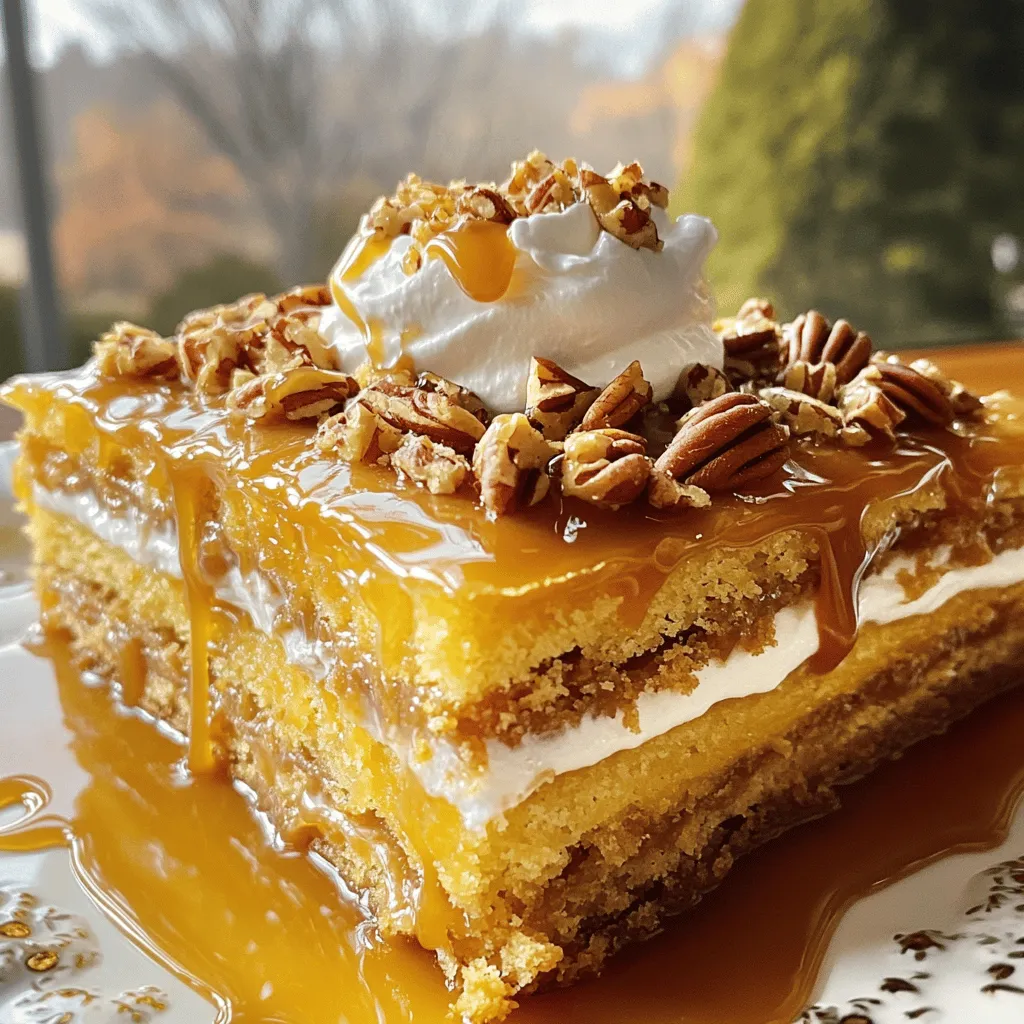
Are you ready to indulge in a dessert that’s as easy as it is delicious? This Caramel Pecan Dump Cake

Older posts
Newer posts
← Previous Page1 … Page10 Page11 Page12 … Page86 Next →

dsad

© 2026 lazychefmagic • Built with GeneratePress

Our Policies

  • Copyright Policy
  • Cookie Policy
  • GDPR Policy
  • Privacy Policy
  • Disclaimer
  • Terms Of Use

More Information

  • Home
  • About
  • Contact
  • Appetizers
  • Dessert
  • Dinner
  • Drinks
©2026, lazychefmagic About Back To Top