Skip to content
DisclaimerTerms Of UseGDPR PolicyCookie Policy

lazychefmagic

  • Home
  • Drinks
  • Appetizers
  • Dinner
  • Dessert
  • About
  • Contact
  • Privacy Policy
DisclaimerTerms Of UseGDPR PolicyCookie Policy

NO-ING-IMG

- 1 cup pure pumpkin puree - 1/2 cup unsweetened applesauce - 1/2 cup packed brown sugar - 1/4 cup granulated sugar - 2 large eggs - 1 teaspoon pure vanilla extract - 1 1/2 cups all-purpose flour - 1 teaspoon baking powder - 1/2 teaspoon baking soda - 1 teaspoon ground cinnamon - 1/2 teaspoon ground nutmeg - 1/4 teaspoon ground ginger - 1/4 teaspoon salt - 1 cup semi-sweet chocolate chips - Optional: 1/2 cup chopped walnuts To make gooey chocolate chip pumpkin bread, gather these ingredients first. The pumpkin puree gives this bread its rich flavor and moisture. Applesauce adds sweetness and helps keep it soft. Brown sugar and granulated sugar balance the sweetness nicely. For the dry mix, I use all-purpose flour for the best texture. Baking powder and baking soda help the bread rise. Cinnamon, nutmeg, and ginger add warm spices that make this treat feel cozy. A pinch of salt enhances all the flavors. Finally, the chocolate chips are a must. They melt into gooey pockets of goodness. If you like, toss in some walnuts for crunch. This combination of ingredients makes a delicious pumpkin bread that everyone will love. - Preheat the oven to 350°F (175°C). - Prepare a 9x5 inch loaf pan. Grease it well or line it with parchment paper. This step helps with easy removal later. - In a large bowl, combine 1 cup of pumpkin puree, 1/2 cup of unsweetened applesauce, 1/2 cup of packed brown sugar, 1/4 cup of granulated sugar, 2 large eggs, and 1 teaspoon of pure vanilla extract. - Whisk until smooth. This mixture adds moisture and flavor to your bread. - In another bowl, sift together 1 1/2 cups of all-purpose flour, 1 teaspoon of baking powder, 1/2 teaspoon of baking soda, 1 teaspoon of ground cinnamon, 1/2 teaspoon of ground nutmeg, 1/4 teaspoon of ground ginger, and 1/4 teaspoon of salt. - Sifting ensures there are no clumps and helps the bread rise nicely. - Gradually mix the dry ingredients into the wet mixture. Stir gently until they just combine. Do not overmix; it's okay to have a few lumps. - Fold in 1 cup of semi-sweet chocolate chips and, if you like, 1/2 cup of chopped walnuts for extra texture. - Pour the batter into the prepared loaf pan. Smooth the top with a spatula for even baking. - Place the loaf pan in your preheated oven and bake for 55-60 minutes. To check if it's done, insert a toothpick in the center. It should come out clean, but a few melted chocolate bits are fine. - Let the bread cool in the pan for about 10 minutes before transferring it to a wire rack. This cooling helps maintain its shape. - Avoid overmixing the batter: This keeps your bread soft and light. Stir just until you see no dry flour. A few lumps are fine; they add character. - Use room temperature eggs: Room temp eggs mix better and help the batter blend more smoothly. If your eggs are cold, place them in warm water for a few minutes. - Position the loaf pan in the center of the oven: This helps the bread bake evenly. If the pan is too close to the heat, the edges may cook too fast. - Check doneness with a toothpick: Insert a toothpick into the center of the loaf. If it comes out clean, your bread is ready! A few melted chocolate chips are okay. - Drizzle with melted chocolate: This adds a fun touch and makes your bread look fancy. Melt some chocolate and pour it over the top for a treat. - Serve with whipped cream: A dollop of whipped cream adds creaminess and balances the sweetness. It’s a perfect match for your gooey bread. {{image_4}} If you need a gluten-free choice, swap the all-purpose flour with gluten-free all-purpose flour. This simple change keeps the bread moist and delicious. Just make sure your flour blend has xanthan gum for the best texture. Want to mix things up? You can add dried cranberries or pecans for a fun twist. Both add texture and flavor. If you prefer dark chocolate, use dark chocolate chips instead of semi-sweet. They give a rich, deep taste that pairs well with pumpkin. For an extra burst of flavor, try adding a teaspoon of vanilla or almond extract. This small change will elevate your bread. If you like citrus, include some orange zest. It adds a fresh twist that brightens the taste. To keep your gooey chocolate chip pumpkin bread fresh, store it at room temperature. Wrap it tightly in plastic wrap or aluminum foil. This helps to keep moisture in and prevents it from drying out. You can also place it in an airtight container. If you prefer, you can store it in the fridge. However, this may dry it out a bit. If you choose to refrigerate, wrap it well to maintain freshness. To freeze pumpkin bread, let it cool completely first. Wrap each loaf tightly in plastic wrap. You can also use aluminum foil for extra protection. Place the wrapped bread in a freezer bag or an airtight container. This keeps out air and moisture. When you want to enjoy it, remove the bread from the freezer. Let it thaw in the fridge overnight or at room temperature for a few hours. For best taste, eat within three months of freezing. Gooey chocolate chip pumpkin bread tastes best within the first few days. If stored at room temperature, it stays fresh for about four to five days. In the fridge, it may last up to a week. If frozen, it keeps its taste for about three months. For the best flavor, try to eat it sooner rather than later. Yes, you can use fresh pumpkin! First, choose a small sugar pumpkin. Cut it in half and remove the seeds. Roast each half in the oven at 350°F (175°C) for about 45 minutes. Let it cool, then scoop out the flesh. Blend it until smooth. You need 1 cup of this puree for your bread. To check if your pumpkin bread is done, insert a toothpick into the center. If it comes out clean or with a few melted chocolate chips, the bread is ready. Look for a golden-brown color on top. The sides should slightly pull away from the pan. If you want to replace eggs, try these options: - 1/4 cup unsweetened applesauce for each egg - 1/4 cup mashed banana - 1 tablespoon ground flaxseed mixed with 2.5 tablespoons water (let it sit for 5 minutes) These will help keep your bread moist and tasty! You learned how to make delicious gooey chocolate chip pumpkin bread. With simple steps, you'll mix wet and dry ingredients and bake them to perfection. Always remember to check for doneness and avoid overmixing. You can also try different flavors and add-ins for variety. Enjoy your warm, sweet bread fresh or store it for later. This recipe is easy and fun for everyone. Get baking and share it with friends and family!

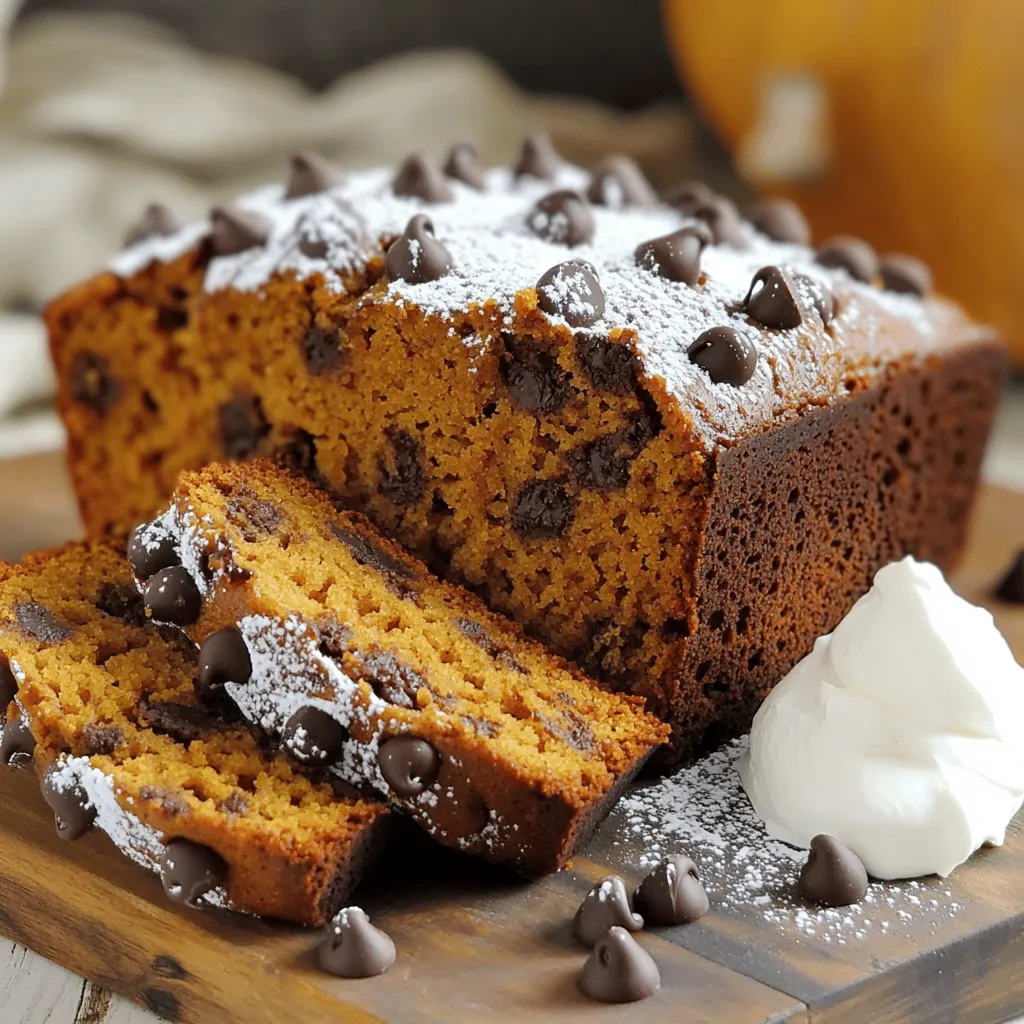
Gooey Chocolate Chip Pumpkin Bread Simple Treat Recipe

Get ready to indulge in a warm slice of gooey chocolate chip pumpkin bread! This easy recipe blends rich pumpkin

- 1 jar dill pickles (approximately 16 oz), drained and sliced - 1 cup all-purpose flour - 2 large eggs - 1 cup breadcrumbs (panko is preferred for an extra crunchy texture) - 1 tablespoon garlic powder - 1 tablespoon onion powder - 1 teaspoon smoked paprika - 1/2 teaspoon cayenne pepper (adjust according to your spice preference) - 1/2 teaspoon salt - Cooking spray Each ingredient plays a role in creating that perfect crunch. The flour gives a base layer, while the eggs help the crumbs stick. The panko adds that extra crunch we love. For spices, garlic and onion powder add flavor, while smoked paprika adds depth. The cayenne brings heat, and salt balances everything. If you're out of dill pickles, you can use bread and butter pickles for a sweeter taste. Instead of panko, regular breadcrumbs work, but they won't be as crunchy. If you need a gluten-free option, use almond flour or a gluten-free breadcrumb. For eggs, a flaxseed mixture can work as a vegan alternative. Just remember, substitutions can change the flavor and texture slightly. To start, grab your jar of dill pickles. Drain the jar well and slice the pickles into rounds. This helps them cook evenly. Then, place the slices on a paper towel. Pat them dry gently to remove extra moisture. This step is key for crispiness later. Next, let’s make the coating. In a shallow bowl, mix 1 cup of all-purpose flour with garlic powder, onion powder, smoked paprika, cayenne pepper, and salt. This seasoned flour adds flavor. In another bowl, crack two large eggs and whisk them well. This will be your egg wash. Then, pour panko breadcrumbs into a third bowl. Now, take a pickle slice and dip it in the seasoned flour first. Shake off any excess flour. This helps the egg stick. Next, dip the floured pickle into the egg wash, covering it fully. Let any extra egg drip off. Finally, roll the pickle slice in the breadcrumbs. Press down gently to make sure the crumbs stick well. Preheat your air fryer to 400°F (200°C) for about 5 minutes. This ensures a nice cooking environment. While it heats up, spray the air fryer basket lightly with cooking spray. This helps the pickles not stick. Place the breaded pickles in a single layer. Don’t overcrowd them; this makes them cook unevenly. You may need to fry in batches. Lightly spray the tops of the pickles again with cooking spray. Cook the pickles for 8-10 minutes. Flip them halfway through. This ensures they turn golden brown and crispy all over. When done, carefully take them out and let them cool slightly before serving. To get your fried pickles crispy, follow these steps. First, make sure to pat the pickles dry. This removes extra moisture. Next, use panko breadcrumbs. They add extra crunch. When coating, shake off excess flour and egg. This ensures the layers stick well. Lastly, spray the breaded pickles lightly with cooking spray before air frying. This will help them crisp up beautifully. Avoid these common mistakes for perfect pickles. Don’t skip drying the pickles; moisture ruins crispiness. Also, don’t overcrowd the air fryer basket. If you pile them in, they steam instead of fry. Flip the pickles halfway through cooking for even browning. Lastly, don’t skip the cooking spray. It’s key for that golden crust! For the best results, preheat your air fryer to 400°F (200°C) for 5 minutes. Cook the pickles for 8-10 minutes. Flip them halfway for even crispness. Keep an eye on them toward the end. Once they are golden brown, they are ready to eat! If you're cooking in batches, keep the first ones warm in the oven. This way, all your fried pickles are hot and ready to enjoy at once. {{image_4}} You can change the breading for your crispy fried pickles. Instead of plain breadcrumbs, try using crushed cornflakes. This gives them a fun crunch. You can also use seasoned breadcrumbs for extra flavor. If you want a lighter option, try using almond flour or chickpea flour. Each option gives a unique taste and texture. Seasoning is key for great flavor. You can add more spices to the flour mix. Try adding Italian seasoning for a herb twist. For a zesty kick, mix in lemon zest. You can also use curry powder for a bold flavor. Feel free to experiment and find your favorite blend. Dipping sauces can change the whole experience. Ranch dressing is a classic choice. For a spicy option, mix sriracha with mayo. You can also try a sweet and sour sauce for balance. If you love heat, a spicy mustard is great. Test different sauces to find what you love best! To store leftover fried pickles, let them cool completely. Place them in an airtight container. Keep them in the fridge for up to three days. To keep them crispy, avoid stacking them too high. For the best results when reheating, use your air fryer. Preheat it to 375°F (190°C). Lay the pickles in a single layer. Heat for about 4-5 minutes. This method keeps them crispy and tasty. You can also use the oven. Set it to 400°F (200°C) and bake for 5-7 minutes. To freeze fried pickles, let them cool fully. Place them in a single layer on a baking sheet. Freeze for about an hour until solid. Then, transfer them to a freezer bag or container. They can last up to three months in the freezer. When ready to eat, thaw them in the fridge overnight and reheat in the air fryer. You can add more cayenne pepper to the flour mix. Start with one teaspoon. If you want a real kick, try adding some hot sauce to the egg wash. This gives your fried pickles extra heat and flavor. You can also sprinkle some chili powder on top after cooking for an extra punch. Yes, you can use sweet pickles if you prefer a sweeter taste. Sweet pickles will change the flavor profile. They will not be as tangy, but they can still be delicious. Enjoy them with a creamy dip to balance the sweetness. I love serving fried pickles with ranch dressing or spicy dipping sauce. You can also add a sprinkle of fresh dill on top for flavor and garnish. Pair them with a cold drink for a perfect snack or appetizer. Fried pickles last about 3 to 4 days in the fridge. Place them in an airtight container to keep them fresh. However, they are best enjoyed right after cooking for maximum crispiness. You can find the full recipe in the earlier section of this article. It includes all the steps and ingredients to make crispy air fryer fried pickles at home. Enjoy cooking this tasty snack! This guide covered everything you need for tasty air fryer fried pickles. We discussed ingredients, how to prepare them, and tips for perfect results. Remember to try different breading and seasonings to make them your own. Store any leftovers properly to keep them fresh. Fried pickles are versatile and fun to make. With these steps, you can enjoy crispy, flavorful snacks anytime. Enjoy the process and taste the results!

Crispy Air Fryer Fried Pickles Perfect for Snacking

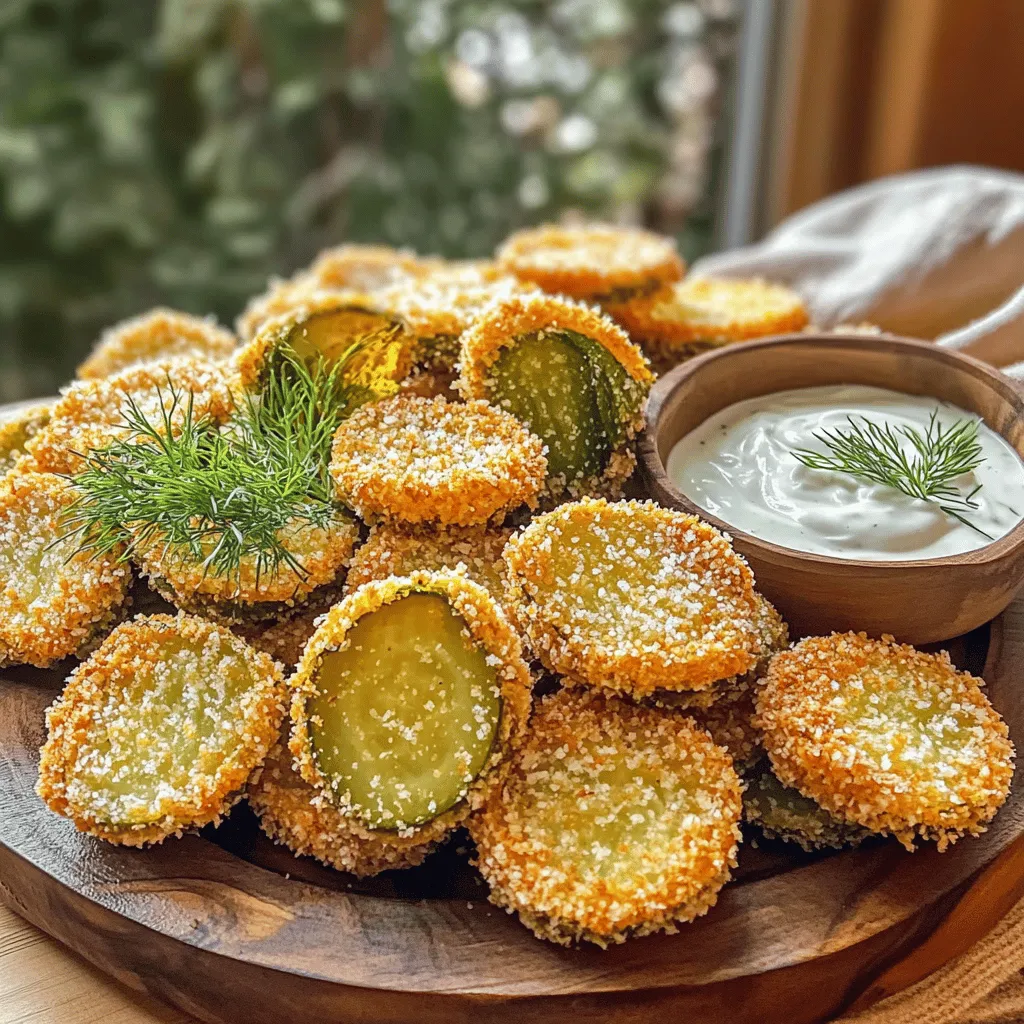
Do you crave a tasty snack that’s easy to make? Look no further! Crispy Air Fryer Fried Pickles offer the

- 1 cup diced cooked ham - 1 cup shredded mozzarella cheese - 1/2 cup cream cheese, softened to room temperature - 2 tablespoons fresh chives, finely chopped - 1 tablespoon fresh parsley, finely chopped - 1 teaspoon garlic powder - 1/2 teaspoon freshly ground black pepper - 1 sheet of puff pastry, fully thawed - 1 egg, beaten (for egg wash) - Sesame seeds for sprinkling (optional) When I make ham and cheese sticks, I love starting with fresh, quality ingredients. The diced cooked ham gives a savory kick. Shredded mozzarella cheese melts beautifully, making each bite creamy. Cream cheese adds richness, making the filling smooth and decadent. Herbs like chives and parsley give a fresh touch. They balance the savory flavors and make the dish pop. Garlic powder adds a warm, savory note, while black pepper brings a gentle heat. Don't forget the puff pastry! It creates a flaky, golden crust. The egg wash helps it shine when baked. If you like some crunch, sprinkle sesame seeds on top. They add a nice texture and flavor. Gather these ingredients, and you’re ready to make a tasty snack everyone will love! - Preheat your oven to 400°F (200°C). - Line a baking sheet with parchment paper to avoid sticking. - In a medium bowl, mix together: - 1 cup diced cooked ham - 1 cup shredded mozzarella cheese - 1/2 cup softened cream cheese - 2 tablespoons chopped fresh chives - 1 tablespoon chopped fresh parsley - 1 teaspoon garlic powder - 1/2 teaspoon black pepper - Stir well until all the ingredients blend into a creamy mix. - Dust your work area with flour. - Roll out the puff pastry to about 1/8 inch thick. - Cut the pastry into strips, each 2 inches wide and 6 inches long. - At one end of each strip, add a generous tablespoon of the ham mixture. - Fold the pastry over the filling or roll it up tightly. - Use a fork to press down the edges and seal them firmly. - Brush the tops of the sticks with beaten egg wash. - If you like, sprinkle sesame seeds on top for extra crunch. - Place the sticks on the lined baking sheet, spaced apart. - Bake them for 15-20 minutes until golden brown and puffed. - After baking, let them cool on the sheet for a few minutes before serving. To make ham and cheese sticks that wow, I suggest baking them at 400°F (200°C). This temperature gives you golden, flaky pastry. Bake for about 15-20 minutes. Keep an eye on them during the last few minutes. The sticks should puff up and turn a nice golden brown. For the filling, aim for a creamy texture. If you use too much cream cheese, it can get runny. Mix diced ham, mozzarella, and cream cheese well. This blend creates a rich taste. The fresh herbs add a nice touch, too. When serving these sticks, warm is best. Place them on a nice platter for a fun look. Pair them with zesty spicy mustard or a tangy ranch dip. These sauces add flavor and make the snack more exciting. You can add a sprinkle of fresh herbs on top for color. This small touch makes your dish pop. One common mistake is overfilling the pastry. If you add too much filling, it can spill out while baking. Stick to a generous tablespoon of the mix at the end of each strip. Handling the puff pastry can be tricky. Be sure to flour your surface lightly. This helps prevent sticking. When sealing the edges, use a fork to press down firmly. This keeps the filling inside, ensuring a perfect bite every time. {{image_4}} You can switch up the cheese in your ham and cheese sticks. Try using cheddar or gouda. These cheeses bring rich and bold flavors. Mixing different cheeses can create a tasty depth. For example, blend mozzarella with sharp cheddar. This combo will give your sticks a delightful twist. Adding spices can make your snack even better. A sprinkle of paprika or cayenne can add a nice kick. You can also toss in some veggies. Spinach or bell peppers add color and crunch. Simply chop them finely and mix with the cheese and ham. This way, your snack gets a healthy upgrade. If you're gluten-free, don't worry! You can use gluten-free pastry for the sticks. There are many great brands available. For those who prefer vegan options, swap the dairy. Use plant-based cream cheese and cheese. You can still enjoy delicious, cheesy flavors without the animal products. After you make your ham and cheese sticks, store any leftovers in the fridge. Place them in an airtight container. This keeps them fresh for a few days. When you're ready to eat them, you can re-crisp them. To do this, use an oven or air fryer. Preheat the oven to 350°F (175°C). Bake for about 10 minutes. In an air fryer, set it to 350°F and cook for 5-7 minutes. Both methods give you a nice crunch. If you want to keep your ham and cheese sticks longer, freezing is a great option. First, let them cool completely. Then, place them in a single layer on a baking sheet. Freeze them for about an hour. After they are firm, transfer them to a freezer bag. Remove as much air as possible. To thaw, move them to the fridge overnight before baking. This way, they are ready to cook without losing flavor. In the fridge, your ham and cheese sticks will last about 3 to 4 days. Check for signs of spoilage before eating. If they smell sour or look discolored, it’s best to throw them away. Always trust your senses. Keeping food safe is important for good health. Enjoy your tasty snack without worry! To make ham and cheese sticks, follow these simple steps: 1. Preheat your oven to 400°F (200°C). Line a baking sheet with parchment paper. 2. In a bowl, mix diced cooked ham, shredded mozzarella, and softened cream cheese. Add chopped chives, parsley, garlic powder, and black pepper. Stir until smooth. 3. Lightly flour your counter. Roll out the puff pastry to 1/8 inch thick. Cut it into strips, about 2 inches wide and 6 inches long. 4. Place a tablespoon of the ham mix at one end of each pastry strip. Fold or roll it tightly. Use a fork to seal the edges. 5. Brush the tops with beaten egg. Sprinkle sesame seeds if you want. 6. Place the sticks on the baking sheet, spaced apart. Bake for 15-20 minutes until golden brown. 7. Let them cool for a few minutes before serving. These tasty sticks make a great snack or light meal. Yes, you can use pre-made puff pastry. It's a great time-saver for busy cooks. Just make sure it is fully thawed before you roll it out. This option still gives you crispy, flaky results. Feel free to check the package for any specific instructions. Using store-bought pastry can help you focus on the filling. It still tastes delicious and looks impressive. Here are some great dips that go well with ham and cheese sticks: - Spicy mustard: Adds a nice kick. - Ranch dressing: Creamy and cool. - Honey mustard: Sweet and tangy flavor. - Marinara sauce: A classic for a tomato twist. These dips can enhance the taste and make your snack even more fun! This blog post covered all you need for tasty ham and cheese sticks. We detailed the key ingredients, from ham to cheese and seasonings. You learned step-by-step how to prepare, bake, and serve them. I also shared tips to improve your dish and avoid mistakes. You can experiment with variations to suit your taste. Remember to store leftovers properly for the best flavor. Enjoy making these delicious snacks for yourself and your friends!

Ham And Cheese Sticks Tasty Snack for Any Occasion

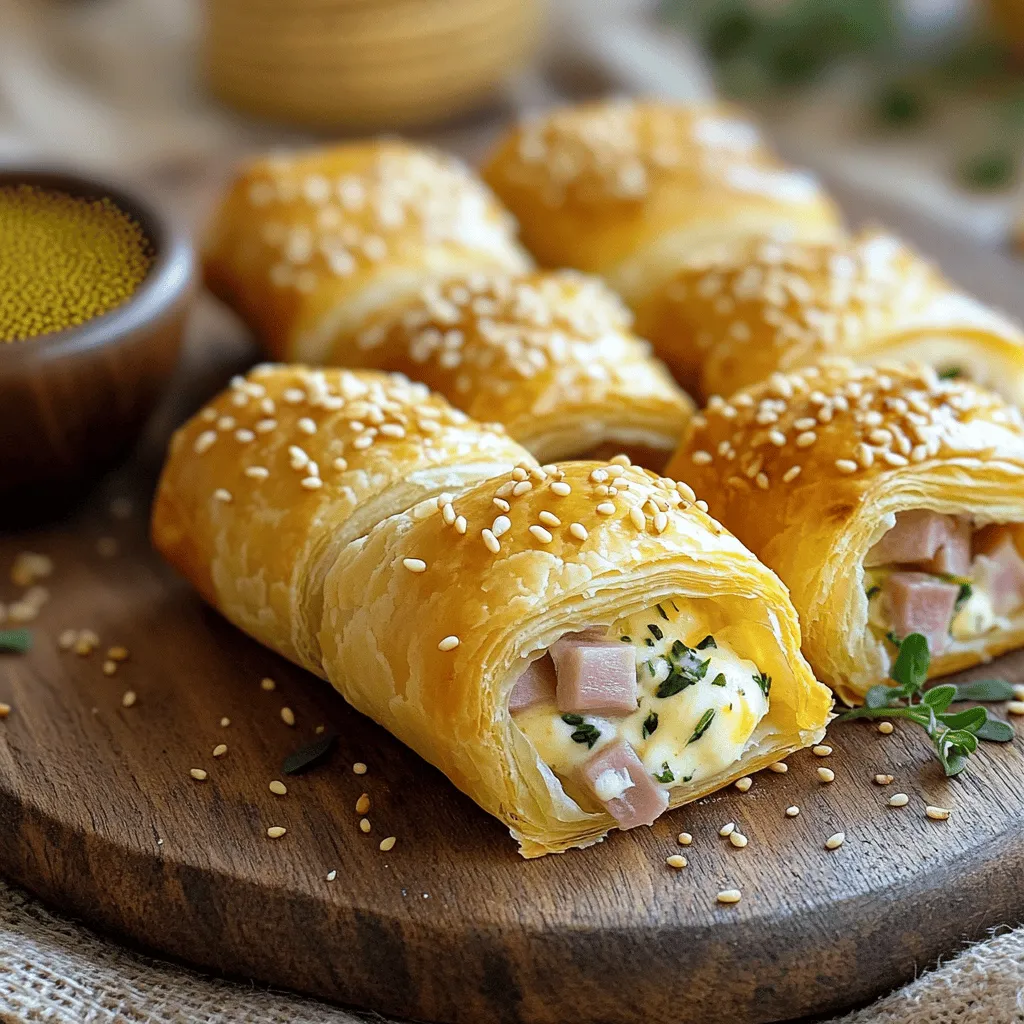
Looking for a snack that’s a hit at any gathering? Ham and cheese sticks are your answer! These delightful treats

- 2 boneless, skinless chicken breasts - 1 cup panko breadcrumbs - 1/2 cup all-purpose flour - 2 large eggs, beaten You need fresh chicken breasts for the best taste. Panko breadcrumbs give a nice crunch. All-purpose flour helps the breading stick. The beaten eggs are key for coating. - Salt, to taste - Freshly ground black pepper, to taste - 1 teaspoon garlic powder - 1 teaspoon onion powder - Tonkatsu sauce, for drizzling - Pickled ginger, for serving Seasoning makes a big difference. Salt and pepper bring out the chicken's flavor. Garlic and onion powder add depth. Tonkatsu sauce is sweet and tangy. Pickled ginger offers a zesty bite. - 2 cups cooked Japanese short-grain rice - 1 cup finely shredded cabbage - 1/4 cup shredded carrots - 1/4 cup sliced scallions Japanese short-grain rice is sticky and perfect for bowls. Shredded cabbage adds crunch. Carrots bring color and sweetness. Scallions add a fresh, mild onion taste. Each ingredient enhances the overall dish. When combined, they create a flavorful and satisfying meal. {{ingredient_image_2}} 1. First, take the chicken breasts and place them between two sheets of plastic wrap. 2. Use a meat mallet or rolling pin to pound the chicken to about 1/2 inch thick. This step helps the chicken cook evenly. 3. Next, season both sides with salt, black pepper, garlic powder, and onion powder. Make sure the seasonings are spread out well. 1. Now, set up your breading station. You need three bowls: one with all-purpose flour, another with beaten eggs, and the last one with panko breadcrumbs. 2. To bread the chicken, first dredge each piece in flour. Shake off extra flour. 3. Dip the chicken into the eggs next, allowing any excess to drip off. 4. Finally, coat the chicken with panko breadcrumbs. Press the breadcrumbs onto the chicken so they stick well. 1. In a large skillet, heat about 1/2 inch of vegetable oil over medium heat. 2. To check if the oil is ready, drop in a few panko crumbs. If they sizzle, the oil is hot enough. 3. Carefully place the breaded chicken into the skillet. Don't overcrowd the pan. 4. Fry each piece for about 4-5 minutes on each side. They should be golden brown and cooked through. 5. Once cooked, transfer the chicken to a plate lined with paper towels. This helps drain any excess oil. 1. While the chicken rests, prepare your serving bowls. Divide the cooked Japanese short-grain rice among them. 2. Top the rice with a good amount of shredded cabbage and a sprinkle of sliced carrots. 3. After the chicken has cooled a bit, slice it into strips. 4. Arrange the chicken over the rice and vegetables in each bowl. 5. Drizzle tonkatsu sauce over the chicken and garnish with sliced scallions. Add pickled ginger on the side for extra flavor. To ensure your chicken katsu is crispy, follow these steps: - Pound the chicken to an even thickness. This helps it cook evenly. - Use panko breadcrumbs for the best crunch. - Fry the chicken in hot oil. The ideal temperature is around 350°F (175°C). Check the oil's heat by dropping a few panko crumbs in. If they sizzle, the oil is ready. Avoid overcrowding the pan. This keeps the oil hot and helps the chicken fry evenly. Serving your chicken katsu bowls with chopsticks adds a fun touch. It makes the meal feel more authentic and engaging. To enhance the dish's look, add lime slices on the side. The bright color and fresh scent make your bowl more inviting. Plus, a squeeze of lime adds a tasty zing. Don’t be afraid to experiment with sauces! Try adding a spicy mayo or a drizzle of sriracha for extra flavor. You can also customize your vegetable toppings. Add cucumbers, radishes, or avocado for different textures and tastes. These small changes can make a big difference in your bowl. Pro Tips Even Thickness: Pound the chicken breasts to an even thickness to ensure they cook uniformly, avoiding dry edges and undercooked centers. Proper Oil Temperature: Check the oil temperature by dropping panko crumbs in; they should sizzle. This ensures a crispy, golden crust while preventing greasy chicken. Press the Breadcrumbs: When coating the chicken, press the panko breadcrumbs firmly to ensure they adhere well. This will give you a thicker, crunchier crust. Rest After Frying: Let the fried chicken rest on paper towels to absorb excess oil. This step helps maintain the crispiness of the coating. {{image_4}} You can switch up the chicken katsu with different proteins. Using pork katsu is a great option. It has a rich flavor and a juicy texture. Simply follow the same steps as chicken katsu. If you want a vegetarian option, try using eggplant or tofu. Slice the eggplant into thick rounds, coat it in panko, and fry it until crispy. For tofu, press it to remove moisture, slice it, and then bread and fry it. Both options are tasty and satisfying. You can serve katsu in many ways. One popular style is katsu curry bowls. Top your rice and vegetables with katsu and pour warm curry sauce over it. This creates a cozy and hearty meal. Another fun idea is adding a poached egg on top. The runny yolk adds creaminess and richness. Just poach the egg while you fry the katsu. Then, place it on the bowl for a delightful twist. Want to spice things up? Try making spicy katsu by adding chili powder to the breading mix. This adds a nice kick to each bite. You can also incorporate sesame or seaweed for more depth. Sprinkle sesame seeds on top before serving. For seaweed, you can use nori sheets, cut into strips. This adds a subtle umami flavor that pairs well with katsu. To store leftover chicken katsu, place it in an airtight container. Keep it in the refrigerator for up to three days. To reheat, use an oven or an air fryer. This helps keep the chicken crispy. Avoid using the microwave, as it can make the katsu soggy. If you want to keep chicken katsu longer, you can freeze it. Wrap each piece tightly in plastic wrap. Then, place them in a freezer bag. This helps prevent freezer burn. You can freeze the katsu for up to three months. When you're ready to eat, thaw it in the fridge overnight. Reheat in the oven or air fryer until hot. Chicken katsu bowls stay fresh in the fridge for about three days. If you freeze them, they can last for up to three months. For the best taste and texture, enjoy them sooner rather than later. Always check for any signs of spoilage before eating. To make chicken katsu crispy, follow these tips: - Use panko breadcrumbs for that light crunch. - Ensure the oil is hot enough before frying. - Dredge the chicken in flour, then egg, and finally coat it in panko. - Press the breadcrumbs firmly onto the chicken to help them stick. These steps help create a tasty and crispy coating. The hot oil cooks the katsu evenly, making it golden brown. Yes, you can use other types of breadcrumbs. Here are some alternatives: - Regular breadcrumbs: They make a decent substitute. - Crushed cornflakes: They add a fun crunch. - Ground nuts: They give a unique flavor and texture. Each option brings a different taste and texture to the dish. Experiment to find your favorite! Tonkatsu sauce is a sweet and tangy sauce that pairs well with katsu. Its key ingredients include: - Worcestershire sauce - Ketchup - Soy sauce - Sugar - Vinegar - Garlic powder This sauce adds a rich flavor to the crispy chicken. It's thick and sticky, perfect for drizzling over your katsu. Chicken katsu can be made gluten-free. Here are some ways to adapt the recipe: - Use gluten-free breadcrumbs instead of panko. - Swap all-purpose flour for a gluten-free flour blend. These changes let you enjoy chicken katsu without gluten. Always check the labels of your ingredients to be safe. Yes, you can prepare chicken katsu in advance. Here are some tips: - Bread the chicken a few hours ahead and keep it in the fridge. - Cook the chicken and store it in an airtight container for later. When you're ready to serve, just reheat the chicken in the oven for a crispy finish. This makes meal prep easy and quick! This guide showed you how to make delicious chicken katsu bowls step by step. We covered the main ingredients like chicken, panko, and rice, plus tips to keep your chicken crispy. You can also try different proteins and flavors. Remember, you can store leftovers easily, letting you enjoy this dish later. Try these ideas, and make your kitchen your favorite place. Happy cooking!

Japanese Chicken Katsu Bowls Flavorful and Satisfying Dish

If you’re craving a delicious and satisfying meal, Japanese Chicken Katsu Bowls are a must-try. This dish features tender chicken,

To make these tasty street style chicken tacos, gather the following main ingredients: - 2 large chicken breasts, diced into bite-sized pieces - 1 tablespoon high-quality olive oil - 1 teaspoon chili powder - 1 teaspoon ground cumin - 1 teaspoon garlic powder - 1 teaspoon onion powder - Salt and freshly ground black pepper to taste - 8 small, soft corn tortillas These ingredients create a flavorful base for your tacos. The spices add warmth and depth to the chicken, making each bite special. Now, let’s talk about the toppings. These add freshness and crunch: - 1 cup finely shredded cabbage (green or purple for color) - 1 ripe avocado, sliced into thin wedges - 1/2 cup fresh cilantro, roughly chopped - 1 lime, cut into wedges for serving - 1/2 cup salsa (choose your favorite store-bought brand or homemade) These toppings bring a burst of color and flavor. The creamy avocado and zesty lime juice brighten every taco. If you want to boost the flavor even more, consider these optional ingredients: - Diced jalapeños for a spicy kick - Crumbled queso fresco for a creamy touch - Pickled red onions for tanginess Feel free to mix and match these ingredients. Customize your tacos to suit your taste! Start by cutting the chicken breasts into bite-sized pieces. In a medium bowl, mix the chicken with olive oil, chili powder, ground cumin, garlic powder, onion powder, salt, and black pepper. Make sure every piece gets a good coat of the spices. This marinade adds great flavor and makes the chicken juicy. Heat a skillet on medium-high heat. Once hot, add the marinated chicken. Cook it for about 8 to 10 minutes. Stir the chicken occasionally to cook it evenly. You want it to be fully done and no longer pink inside. Once cooked, take it off the heat and set it aside. Now it's time to put together your tacos. First, warm the corn tortillas. You can use a skillet or a microwave. If using a skillet, heat them for about 30 seconds on each side. If using a microwave, heat them for 15 to 20 seconds. Once warm, take a tortilla and add a scoop of the cooked chicken in the center. Top it with shredded cabbage, a few avocado slices, and chopped cilantro. Add some salsa on top and a squeeze of lime juice for extra flavor. Repeat this with the rest of your ingredients until all tacos are ready. Enjoy the burst of flavors in every bite! To get real street food flavors, use fresh ingredients. Choose high-quality chicken and spices. The chili powder and cumin bring warmth and depth. Don't skip the lime; it adds brightness. A sprinkle of fresh cilantro gives a burst of flavor. Use soft corn tortillas for that classic taste. For more authenticity, grill the chicken instead of pan-frying it. Warming tortillas is key for soft, tasty tacos. You can use a skillet or microwave. For the skillet, heat it over medium. Place each tortilla for about 30 seconds on each side. This makes them warm and pliable. If you use the microwave, wrap a few in a damp paper towel. Heat them for 15-20 seconds. This keeps them soft and moist. Presentation makes a dish more inviting. Arrange tacos on a colorful platter. Add lime wedges around the edge for zest. Serve a bowl of salsa on the side for dipping. You can also sprinkle extra chopped cilantro on top. This adds color and freshness. These small touches make your tacos look and taste amazing. Enjoy! {{image_4}} You can change up the protein in your tacos. Try using beef, pork, or shrimp. Each meat offers a unique flavor and texture. For a lighter option, use grilled chicken thighs. You can also switch to shredded rotisserie chicken for a quick meal. Don’t forget about the spices; adjust them to match your chosen protein. Salsa is key for great tacos. You can make classic tomato salsa, but don't stop there! Try mango salsa for sweetness. Pineapple salsa adds a tropical twist. If you like heat, try a spicy tomatillo salsa. You can even blend avocados and garlic for a creamy sauce. Each salsa brings new tastes and fun to your tacos. You can make tasty tacos without meat! Try using black beans or lentils for protein. Grilled veggies like bell peppers and zucchini add flavor and crunch. For a heartier option, use jackfruit cooked in spices for a pulled "pork" feel. You can top these with all the same fresh toppings, too. These options show that tacos can be fun for everyone! Store your leftover chicken tacos in an airtight container. This keeps them fresh. Place the tacos in the fridge if you plan to eat them within three days. If you have chicken and toppings separate, they will last longer. To reheat, use a skillet over low heat. This warms the tacos evenly without drying them out. You can also microwave them. Heat in short bursts of 15 seconds. Check often to avoid overcooking. For longer storage, freeze your cooked chicken separately from the tortillas. Place the chicken in a freezer-safe bag. Remove as much air as possible before sealing. You can freeze the tortillas too, but wrap them tightly. Defrost in the fridge overnight before using. Street-style chicken tacos come from Mexico. Vendors sell them on busy streets. They use simple, fresh ingredients. This style of taco is known for its bold flavors. The cooking method is quick and easy, making it popular. People love the mix of spices and toppings. You get a taste of Mexican culture with every bite. Yes, you can use other meats. Beef, pork, or shrimp work great too. Just change the cooking time if needed. For beef, cook until it is brown. Pork should reach a safe internal temperature. Shrimp cooks faster, so watch them closely. Feel free to mix and match for fun flavors! Making homemade salsa is easy and fun. Here’s a quick recipe you can try: - 2 ripe tomatoes, diced - 1 small onion, chopped - 1 jalapeño, minced (remove seeds for less heat) - 1/4 cup fresh cilantro, chopped - Juice of 1 lime - Salt to taste Mix all ingredients in a bowl. Let it sit for about 10 minutes. This helps the flavors blend. You can adjust the heat level by adding more jalapeño or even some garlic. Enjoy your fresh salsa on those tasty tacos! You now have all the key steps to make delicious street-style chicken tacos. We covered the main ingredients, cooking techniques, and tasty toppings. Remember to explore variations for more flavor and fun. Don’t forget to store leftovers properly for later meals. Enjoy the unique tastes of street food in your kitchen. With practice, your tacos will impress friends and family. Dive in and enjoy the process of making these tasty treats!

Savory Street Style Chicken Tacos Quick and Easy Recipe

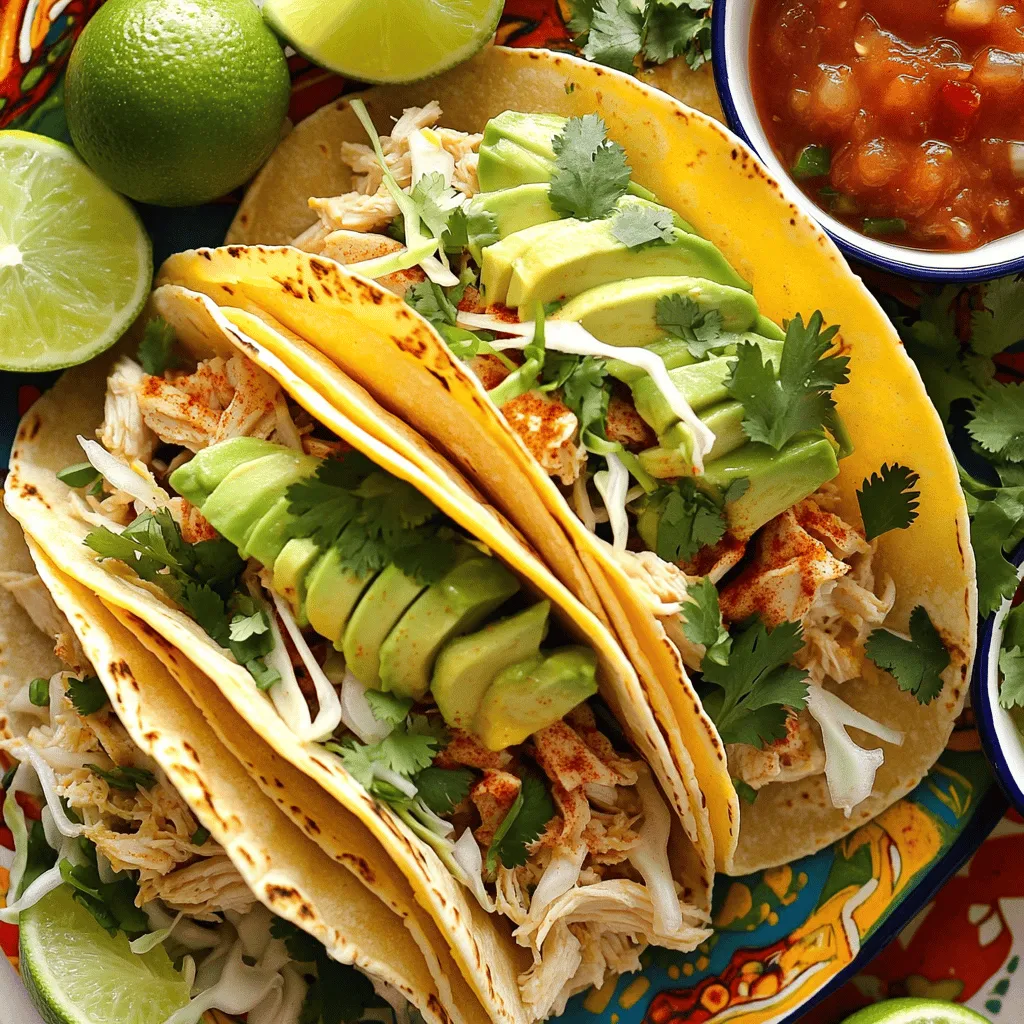
Are you ready to spice up your weeknight dinners? This quick and easy street-style chicken taco recipe is packed with

- 1 cup pumpkin puree - 1/2 cup cream cheese, softened - 1/2 cup granulated sugar - 1/2 cup packed brown sugar - 1/2 cup vegetable oil - 3 large eggs, at room temperature - 2 cups all-purpose flour The main ingredients are key for rich flavor. The pumpkin puree gives moisture and a warm taste. Cream cheese adds creaminess. The two sugars create a sweet balance. Eggs help the bread rise and stay soft. All-purpose flour forms the base for the bread. - 1/2 cup chopped walnuts or pecans - 1 teaspoon vanilla extract Optional ingredients boost texture and flavor. Nuts add a nice crunch. Vanilla enhances the sweetness and aroma, making each bite special. - 1 teaspoon baking soda - 1/2 teaspoon baking powder - 1 teaspoon ground cinnamon - 1/2 teaspoon ground nutmeg - 1/4 teaspoon ground ginger - 1/4 teaspoon salt Seasonings are vital for that cozy, fall taste. Baking soda and baking powder help the bread rise. Cinnamon, nutmeg, and ginger bring warmth and depth. A pinch of salt balances the sweet notes. Together, they create a comforting flavor profile that you'll love. - Preheat your oven to 350°F (175°C). - Grease a 9x5 inch loaf pan or line it with parchment paper. - Gather all ingredients for easy access. - In a large bowl, beat the cream cheese until smooth. - Add granulated sugar, brown sugar, and oil. Mix until creamy. - Add eggs one at a time, mixing well after each. - Stir in pumpkin puree and vanilla extract until smooth. - In a separate bowl, sift flour, baking soda, baking powder, cinnamon, nutmeg, ginger, and salt. - Slowly fold the dry mix into the wet mix. Don’t over-mix. - If you like, fold in chopped nuts for extra crunch. - Pour the batter into your greased pan. Smooth the top with a spatula. - Bake for 60-70 minutes. Check doneness with a toothpick. - If the toothpick comes out clean or with a few crumbs, it's done. - Let the bread cool in the pan for 10 minutes. - Move the bread to a wire rack to cool completely before slicing. To get a soft and moist bread, avoid over-mixing. When you combine the wet and dry ingredients, mix just until you see no dry flour. This keeps the bread tender. Also, make sure your ingredients are at room temperature. This helps them blend well and rise nicely. Adding spices can give your bread a deeper taste. Try adding a pinch of allspice or a bit more cinnamon. You can also add mix-ins like chocolate chips or dried cranberries. These add fun bursts of flavor and texture. Dust the top of your bread with powdered sugar for a pretty look. It adds a sweet touch without being too much. For serving, slice the bread and place it on a nice platter. You can pair each slice with cream cheese. This makes for a rich and tasty treat that guests will love. {{image_4}} You can make this bread even more fun. Adding chocolate chips gives it a sweet twist. Just fold in about 1 cup of semi-sweet chocolate chips when mixing. They melt and create gooey pockets in every slice. You can also switch up the nuts. If you prefer, use pecans or hazelnuts instead of walnuts. Each nut adds a unique flavor and texture. You can even skip the nuts if you want a smoother bread. If you need a gluten-free version, swap all-purpose flour for a gluten-free blend. Ensure the blend has a good binding agent. This will keep the bread from crumbling. For a vegan option, replace eggs with flax eggs. Mix 1 tablespoon of ground flaxseed with 3 tablespoons of water. Let it sit until it thickens. For cream cheese, use a plant-based alternative. These swaps keep the bread delicious for everyone. Try using other squash instead of pumpkin. Butternut or acorn squash works well. They bring a different taste but still keep it cozy. You can also switch spices based on the season. In the fall, add cloves for warmth. For a holiday twist, include allspice or cardamom. Adjusting spices keeps the bread fresh and exciting all year round. To keep your pumpkin cream cheese bread fresh, store it correctly. - Storing at room temperature: Wrap the bread in plastic wrap or foil. This keeps moisture in and prevents it from drying out. Store it in a cool, dark place like a pantry. It can last for up to three days this way. - Refrigeration tips for longevity: If you want to keep it longer, place it in the fridge. Wrap it tightly in plastic wrap or foil. It can stay fresh for about a week when refrigerated. Just remember, cold storage may change the texture a little. Freezing is a great option if you want to save some bread for later. - How to properly freeze pumpkin cream cheese bread: Allow the bread to cool completely before freezing. Wrap it tightly in plastic wrap, then place it in a freezer bag. Be sure to remove as much air as possible. This helps prevent freezer burn. It can last for up to three months in the freezer. - Thawing tips for optimal taste: When you are ready to eat it, take the bread out of the freezer. Unwrap it and place it in the fridge for several hours or overnight to thaw. For a quicker method, leave it at room temperature for a few hours. Enjoy your bread warm by reheating slices in the oven or microwave. This will bring back its original taste and softness. Pumpkin cream cheese bread stays fresh for about 3 to 5 days at room temperature. Store it in an airtight container. If you refrigerate it, it can last up to a week. To keep it even longer, freeze the bread for up to three months. Yes, you can use canned pumpkin puree. It saves time and offers a consistent flavor. Just make sure to choose pure pumpkin, not pumpkin pie filling, which has added spices and sugar. This bread pairs well with a variety of toppings. Try spreading cream cheese, butter, or even apple butter on a slice. A hot cup of coffee or chai tea makes it even better. Absolutely! You can prepare the batter a day in advance. Just store it in the fridge. Bake it the next day for a warm, fresh treat. You can also bake the bread ahead and store it. To slice the bread, wait until it cools completely. Use a sharp serrated knife for clean cuts. This helps keep the slices intact and perfect for serving. You learned how to make delicious pumpkin cream cheese bread. We covered the main and optional ingredients, along with seasonings. The step-by-step instructions made baking easy. Tips helped perfect the texture and flavor. You can also explore variations to suit your taste. Finally, storage tips ensure your bread stays fresh. Try this recipe and enjoy your baking journey! Each bite brings warmth and joy, perfect for any season.

Pumpkin Cream Cheese Bread Irresistible Fall Treat

Fall is here, and what better way to celebrate than with warm, fluffy Pumpkin Cream Cheese Bread? This treat is

You need 4 ears of fresh corn. Look for corn that feels firm and heavy. The husks should be bright green and tightly wrapped. Fresh corn gives the best taste and crunch. You can add crumbled feta cheese for a tangy flavor. It brings a nice salty touch. You might also want to include extra toppings, like diced jalapeños or black beans, for more variety. For the dressing, you need: - 3 tablespoons freshly squeezed lime juice - 2 tablespoons extra virgin olive oil - 1 teaspoon chili powder (adjust for spice preference) - Salt and black pepper to taste The lime juice adds a fresh zing. Olive oil keeps the salad light. Chili powder gives it a bit of heat. Seasoning makes every bite flavorful! Start with fresh corn. Bring a big pot of water to a rolling boil. Then, add the husked corn. Cook it for 5-7 minutes until the kernels feel tender. When done, take the corn out of the water and let it cool. Once cool, use a sharp knife to cut the kernels off the cob. Drop them into a large bowl as you go. Next, it’s time for the veggies. Dice one vibrant red bell pepper. Chop a small red onion very finely. Halve a cup of cherry tomatoes. Dice a ripe avocado carefully. Lastly, roughly chop ¼ cup of fresh cilantro. Add all these colorful ingredients to the bowl with the corn. This mix makes your salad fresh and bright. Now, let’s make the dressing. In a small bowl, squeeze fresh lime juice. Add two tablespoons of extra virgin olive oil. Mix in one teaspoon of chili powder, plus some salt and black pepper. Whisk these ingredients together until they blend well. This dressing will give your salad a nice tangy kick. Finally, combine everything. Drizzle the dressing over the corn and veggies. Gently toss the mixture. Make sure the dressing coats every bite. If you like, sprinkle ½ cup of crumbled feta cheese on top. Give it one last light stir, but be careful not to mash the avocado. Your Summer Street Corn Salad is now ready to serve! Choose fresh corn for the best taste. Look for ears with bright green husks. The kernels should be plump and juicy. Red bell peppers should be firm and shiny. The color should be deep and vibrant. For cherry tomatoes, pick ones that feel heavy for their size. Ripe avocados should yield slightly when pressed. Fresh cilantro adds a lovely aroma. If you use feta cheese, pick a good quality for rich flavor. The dressing makes this salad shine. Use freshly squeezed lime juice for a zesty kick. Mix lime juice with olive oil in a small bowl. Add chili powder for a touch of heat. Adjust the chili powder to fit your spice level. Season with salt and black pepper to taste. Whisk until the dressing is smooth and well combined. This simple dressing enhances all the fresh flavors in the salad. Serve the salad in a large, colorful bowl. This showcases the vibrant ingredients. Garnish with extra cilantro for added freshness. A lime wedge on the side adds a fun touch. This salad pairs well with grilled meats or fish. It makes a great side for picnics or barbecues. Enjoy it as a light lunch or a refreshing snack. The flavors get better as it sits, so let it rest a bit before serving! {{image_4}} You can add many tasty things to this salad. Try adding cooked black beans for protein. They add creaminess and make the salad filling. You can also mix in diced jalapeños for a spicy kick. If you want a smoky flavor, add some smoked paprika. Crushed tortilla chips on top add great crunch. You can even swap feta for queso fresco for a creamier taste. This salad is very flexible for diets. If you want it vegan, skip the feta cheese. You can replace it with a vegan cheese or leave it out. For gluten-free options, this salad is already safe. Just check your dressing ingredients to be sure. If you need it low-carb, cut the corn and add more veggies like zucchini or cucumber. Have extra veggies? Toss them in! Leftover grilled corn works great here. Use any diced bell peppers, carrots, or even leftover beans. If you have extra lime juice, drizzle it over the top. You can also use leftover dressing from other salads to save time. This dish is perfect for using what you have and reducing waste. To keep your Summer Street Corn Salad fresh, store it in the fridge. Place it in an airtight container. It stays good for about 3 days. The flavors mix well, but the avocado may brown. To slow this down, squeeze extra lime juice on the avocado before mixing it in. This trick helps keep the salad bright and fresh. Freezing this salad isn’t the best idea. The texture of the corn and veggies changes when frozen. If you want to freeze it, leave out the avocado and feta. You can freeze the corn and veggies in separate bags. When you’re ready to eat, thaw them and mix with fresh avocado and feta. When prepping this salad, cut your veggies ahead of time. You can store them in separate containers. This makes it easy to toss everything together when you’re ready to eat. You can also mix the dressing in advance. Just keep it in the fridge until serving. This way, you save time and enjoy fresh, easy meals all week. Yes, you can make this salad ahead of time. Prepare it up to a day in advance. Just store it in the fridge. The flavors will blend nicely. But add the avocado and dressing just before serving. This keeps everything fresh and bright. You can customize your salad with different toppings. Try adding black beans for protein. Corn can be swapped for grilled zucchini. You can also use diced jalapeños for more heat. Chopped green onions or crumbled queso fresco work great too. Get creative with what you love! To change the spice level, play with the chili powder. Start with less if you prefer mild. You can also add hot sauce for a kick. If you want more heat, try diced jalapeños or crushed red pepper flakes. Taste as you go to find your perfect balance. Absolutely, this salad is perfect for potlucks! It is colorful and tasty, making it a crowd-pleaser. Just ensure you keep it chilled until serving. You can make it ahead and let the flavors shine. It’s easy to share, and people will love it! This blog post covered everything you need for a great Summer Street Corn Salad. We looked at the fresh corn and optional ingredients that make this dish pop. You learned how to cook corn, prepare veggies, and whip up a tasty dressing. Additionally, I shared tips for selecting the best ingredients and serving ideas. Remember, you can get creative with variations or even store leftovers. Enjoy your salad! It’s easy, fun, and perfect for sharing.

Summer Street Corn Salad Vibrant and Fresh Dish

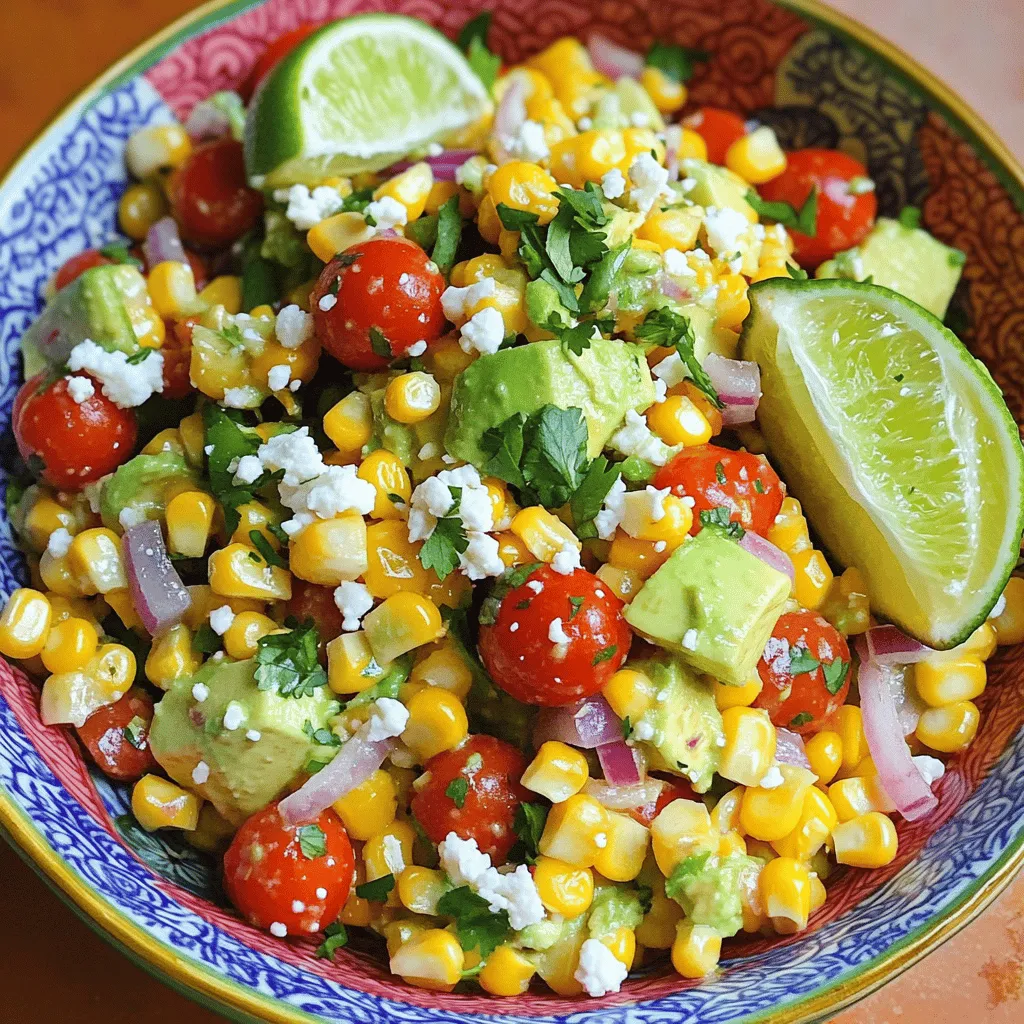
Summer Street Corn Salad is a colorful dish that bursts with flavor. If you love fresh, simple meals, this salad

To make this delightful Autumn Pumpkin Cake, gather the following ingredients: - 2 cups all-purpose flour - 1 teaspoon baking powder - 1 teaspoon baking soda - 1 teaspoon ground cinnamon - 1/2 teaspoon ground nutmeg - 1/2 teaspoon ground ginger - 1/4 teaspoon salt - 1 cup granulated sugar - 1 cup packed brown sugar - 1 cup vegetable oil - 4 large eggs - 2 cups canned pumpkin puree - 1 teaspoon vanilla extract You will need a few key items for baking this cake: - Two 9-inch round cake pans - Electric mixer - Mixing bowls (medium and large) - Spatula or wooden spoon - Wire rack for cooling These tools help ensure your cake bakes evenly and comes out perfectly. For the creamy frosting, gather these items: - 8 oz cream cheese, softened - 1/2 cup unsalted butter, softened - 1 cup powdered sugar - 1/4 cup caramel sauce (store-bought or homemade) - 1/2 teaspoon vanilla extract - Pinch of salt These ingredients create a rich and sweet topping that pairs perfectly with the pumpkin cake. 1. Start by preheating your oven to 350°F (175°C). 2. Grease two 9-inch round cake pans with butter. Dust them with flour to stop sticking. 3. In a medium bowl, combine 2 cups of flour, 1 teaspoon of baking powder, and 1 teaspoon of baking soda. 4. Add 1 teaspoon of cinnamon, 1/2 teaspoon of nutmeg, 1/2 teaspoon of ginger, and 1/4 teaspoon of salt. Whisk this mix well and set it aside. 5. In a large bowl, blend 1 cup of granulated sugar with 1 cup of brown sugar and 1 cup of vegetable oil. Beat with an electric mixer until smooth. 6. Add 4 eggs one at a time, mixing well after each addition. Then mix in 2 cups of pumpkin puree and 1 teaspoon of vanilla extract. 1. Slowly add the dry mix to the wet mix using a spatula. Stir until just combined; do not overmix. 2. Divide the batter evenly between the two prepared cake pans. Smooth the tops. 3. Bake for 25-30 minutes. Check doneness by inserting a toothpick; it should come out clean. 4. Let the cakes cool in the pans for 10 minutes. Carefully remove them and place on a wire rack to cool completely. 1. While the cakes cool, prepare the frosting. In a bowl, beat 8 oz of softened cream cheese with 1/2 cup of softened butter. Mix until creamy. 2. Gradually add 1 cup of powdered sugar, 1/4 cup of caramel sauce, 1/2 teaspoon of vanilla extract, and a pinch of salt. 3. Start on low speed to avoid a sugar cloud, then mix on medium until fluffy and well combined. 4. Once the cakes are cool, place one layer on a serving platter. Spread a layer of frosting on top. 5. Add the second layer and frost the whole cake, covering the top and sides. 6. For a pretty finish, drizzle more caramel sauce on top before serving. To get a light and fluffy cake, mix your wet and dry ingredients carefully. Too much mixing can make your cake dense. Use a spatula to combine them gently. Also, make sure your ingredients are at room temperature. This helps them blend well. The pumpkin puree adds moisture and flavor. So, don’t skip it! 1. Overmixing the Batter: This makes the cake tough. Mix just until combined. 2. Wrong Oven Temperature: Always preheat your oven. A hot oven helps the cake rise. 3. Not Greasing the Pans: Grease and flour the pans well. This stops the cake from sticking. 4. Skipping the Cooling Time: Let the cakes cool completely. Frosting a warm cake can melt the frosting. Presentation makes your cake shine! Use a spatula to spread the frosting smoothly. Drizzle extra caramel sauce on top for a sweet touch. You can also sprinkle crushed pecans or pumpkin seeds around the edges. This adds texture and looks lovely. Serve your slices on decorative plates for a cozy autumn feel. {{image_4}} You can make a gluten-free pumpkin cake by using gluten-free flour. Look for a blend that works well for baking. Replace the all-purpose flour in the recipe with an equal amount of gluten-free flour. This simple swap keeps the cake moist and delicious. If you want to try a different frosting, consider using whipped cream. You can mix heavy cream with sugar until it forms soft peaks. Another option is a chocolate ganache. Just melt chocolate with cream and let it cool slightly. This rich flavor pairs well with pumpkin. Add spices for more flavor! Consider mixing in a teaspoon of ground cloves or allspice. You can also add nuts like walnuts or pecans to the batter for crunch. For something unique, fold in chocolate chips or dried cranberries. These additions make the cake even more special. Once your autumn pumpkin cake cools, store it in an airtight container. This keeps the cake fresh for up to four days. If you have leftover slices, make sure to wrap them in plastic wrap first. This will help maintain moisture and flavor. For best results, store the cake at room temperature, away from direct sunlight. You can freeze the cake for later enjoyment. First, let the cake layers cool completely. Wrap each layer tightly in plastic wrap, then in aluminum foil. This double wrap prevents freezer burn. The cake can last for up to three months in the freezer. When you’re ready to enjoy it, thaw in the fridge overnight before serving. To reheat the cake, preheat your oven to 350°F (175°C). Place the cake on a baking sheet and cover it lightly with foil. Heat for about 10-15 minutes, or until warm. If you want to serve it cold, simply slice and enjoy as is. The caramel cream cheese frosting adds a rich flavor, whether warm or chilled. Yes, you can use fresh pumpkin. Start with a small pumpkin, around 2 to 3 pounds. Cut it in half, remove the seeds, and roast it until soft. This usually takes about 45 minutes at 350°F. Let it cool, then scoop out the flesh and blend it until smooth. Use this puree in place of the canned pumpkin. Fresh pumpkin offers a brighter flavor, but canned is more convenient. To achieve a thicker frosting, add more powdered sugar. Start with 1/4 cup at a time. Mix it in slowly until you reach your desired thickness. If the frosting becomes too sweet, you can balance it with a pinch of salt. Another option is to chill the frosting in the fridge for about 30 minutes. This helps it firm up before spreading. To cut a layered cake neatly, use a serrated knife. Start by marking where you want to cut without pressing down. Make smooth, gentle sawing motions. Clean the knife with a damp cloth between cuts to keep edges tidy. For even slices, wipe the knife after each cut. Enjoy beautifully presented pieces with minimal mess! This post covered all you need for a great cake. We discussed key ingredients, step-by-step baking, and tips for success. Remember, texture matters and avoiding mistakes can boost your cake. Consider gluten-free options or new flavors for fun. Store and freeze properly for best results. Don't hesitate to experiment with frosting thickness or fresh pumpkin. Enjoy making your cake and impressing your friends! Happy baking!

Autumn Pumpkin Cake with Caramel Cream Cheese Frosting

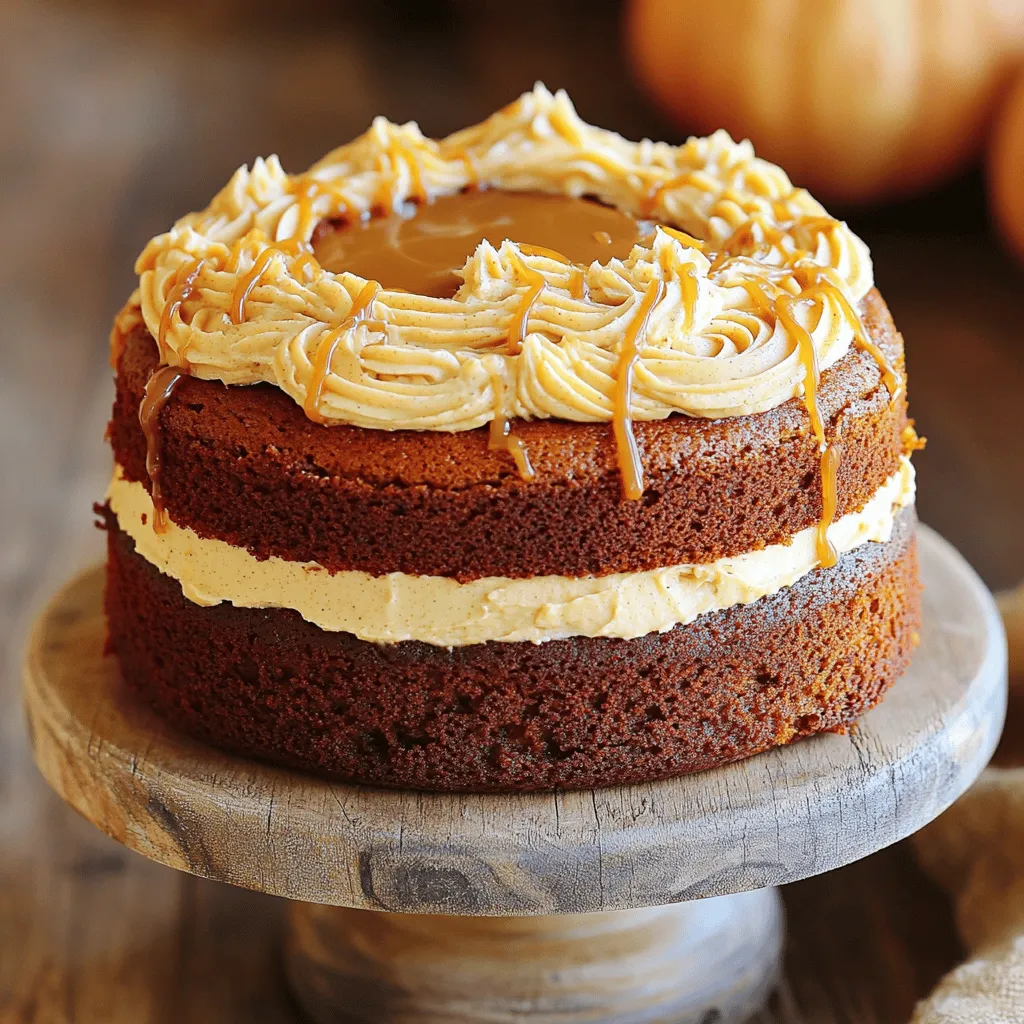
As fall approaches, nothing captures the season quite like a warm slice of Autumn Pumpkin Cake with Caramel Cream Cheese

- 2 large apples (Granny Smith or Honeycrisp recommended) - 1 cup all-purpose flour - 1 teaspoon baking powder - 1/2 teaspoon ground cinnamon - 1/4 teaspoon ground nutmeg - 1/4 teaspoon fine salt - 1 cup cold sparkling water - 1 cup panko breadcrumbs - Vegetable oil for frying - Powdered sugar for dusting (optional) To make crispy fried apple rings, you need fresh ingredients. I recommend using Granny Smith or Honeycrisp apples. Their tartness adds a nice balance to the sweet batter. You will also need all-purpose flour, baking powder, ground cinnamon, ground nutmeg, and salt. These dry ingredients create a flavorful batter. The cold sparkling water is key. It makes the batter light and airy, which helps the rings fry up crispy. Panko breadcrumbs give the rings a nice crunch. Make sure to use them instead of regular breadcrumbs. Lastly, have vegetable oil on hand for frying. This oil should be hot but not smoking. If you want a sweet finish, powdered sugar is optional for dusting. Gather these ingredients before you start cooking. This way, you will have everything ready to make your delicious treat! - First, wash and dry the apples well. - Use a corer or a sharp knife to remove the cores. - Slice each apple into rings, about 1/4 inch thick. Set these aside for later. - In a bowl, combine the flour, baking powder, cinnamon, nutmeg, and salt. - Whisk the dry ingredients together until they mix well. - Gradually add cold sparkling water to the bowl. - Whisk until the batter is smooth and thick. It should coat the apple rings well. - Heat about 2 inches of vegetable oil in a deep pan. - Use a thermometer to check the oil temperature. Aim for 350°F (175°C). - Dip each apple ring into the batter, covering it fully. - Transfer the battered ring to a dish with panko breadcrumbs. Press to coat both sides. - Once the oil is ready, carefully add a few apple rings. - Fry them for about 2-3 minutes on each side. Look for a golden brown color. - Use a slotted spoon to lift the rings from the oil. - Place them on a plate lined with paper towels to drain excess oil. - If you like, sprinkle the warm rings with powdered sugar before serving. To make crispy fried apple rings, cold sparkling water is key. The bubbles in sparkling water help the batter get light and airy. This makes your apple rings extra crispy when fried. Frying temperature matters too. Heat the oil to 350°F (175°C) for the best results. If the oil is too cool, the batter will be soggy. If it is too hot, the outside burns before the inside cooks. Use a deep-fry thermometer for accuracy. Avoid overcrowding the pan. Fry just a few apple rings at a time. If you add too many, the oil temperature drops. This can lead to uneven cooking and less crispy rings. For a delightful touch, sprinkle powdered sugar on your fried apple rings. This adds sweetness and makes them look great. You can also drizzle caramel sauce over them for extra flavor. Pair your apple rings with ice cream. Vanilla or cinnamon ice cream works well. The cold ice cream and warm apple rings create a tasty contrast. Enjoy every bite of this sweet treat! {{image_4}} You can easily change the taste of your crispy fried apple rings. One fun way is to add vanilla extract to the batter. Just a teaspoon will make a big difference. It adds a sweet scent and a deeper flavor that you will love. You can also try different spices. Ground ginger or cloves can give your rings a warm twist. These spices can make the dish feel cozy, perfect for chilly days. Just remember, a little goes a long way, so start small and taste as you go. If you want a different crunch, try using crushed nuts instead of panko. Almonds or walnuts add a unique flavor. They also give a nice crunch and are packed with nutrients. Just remember to chop them finely for even coating. For those who need gluten-free options, almond flour works well. You can also use gluten-free breadcrumbs. Both options will give you a crispy texture without the gluten. They are great choices for everyone to enjoy. After you enjoy your crispy fried apple rings, store any leftovers properly. Place them in an airtight container. This keeps the rings fresh. Store them in the fridge for up to three days. If you want to keep them longer, you can freeze them. Wrap each ring in plastic wrap. Then, put them in a freezer-safe bag. They can last for up to three months in the freezer. When you’re ready to eat the leftovers, you can reheat them easily. The oven or air fryer works best. Preheat your oven to 350°F (175°C). Spread the apple rings on a baking sheet. Bake for about 10 minutes. If using an air fryer, heat it to 350°F (175°C). Cook the rings for about 5 minutes. To keep the rings crispy, do not cover them while reheating. This helps them stay crunchy. Enjoy your warm apple rings just like you made them! Yes, you can use different apples. The best apples for frying are Granny Smith and Honeycrisp. Granny Smith apples offer a nice tart taste, while Honeycrisp apples are sweet and crisp. Both hold up well in hot oil. You can also try Fuji or Braeburn apples for a sweeter touch. To make healthier apple rings, you can bake them instead of frying. Just coat the apple rings in the batter and place them on a baking sheet lined with parchment. Bake at 400°F (200°C) for about 15-20 minutes. You can also use whole wheat flour for the batter. Fried apple rings taste great with many dips. Caramel sauce is a classic choice. You might also enjoy chocolate sauce, honey, or yogurt. For a fun twist, try serving them with a cinnamon cream cheese dip. Yes, you can make the batter ahead of time. Store it in the fridge for up to 24 hours. Just remember to whisk it again before use. The batter may thicken, so you might need to add a bit more sparkling water. The best apples for frying are Granny Smith, Honeycrisp, and Fuji. Granny Smith gives a tart flavor, while Honeycrisp and Fuji add sweetness. All these varieties keep their shape well during frying, making them perfect for crispy apple rings. You’ve learned how to make delicious fried apple rings. We discussed the key ingredients, simple steps, and helpful tips to achieve a perfect crisp. Remember, using cold sparkling water and the right frying temperature matters for the best outcome. Feel free to explore variations, from spices to coatings. Storing and reheating are easy too! Enjoy experimenting with dips, and remember to choose the right apples for the best taste. Now, go ahead and create your tasty treat!

Crispy Fried Apple Rings Delightful Sweet Treat

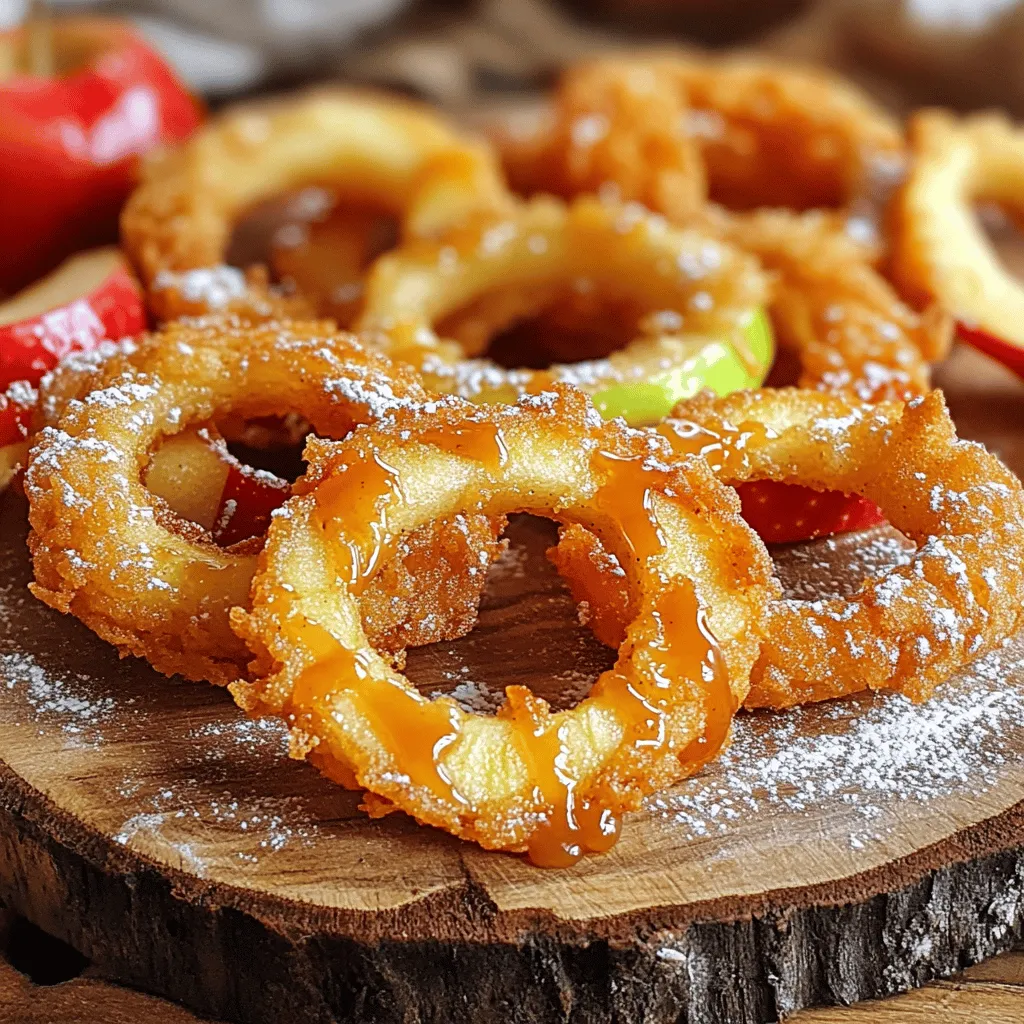
Are you ready to bite into a crunchy, sweet delight? Crispy fried apple rings are the treat you’ve been waiting

- 1 cup unsalted butter, softened - 1 cup granulated sugar - 1/2 cup brown sugar - 2 large eggs - 1 teaspoon pure vanilla extract - 2 1/2 cups all-purpose flour - 1 teaspoon baking powder - 1/2 teaspoon salt - 1 tablespoon heavy cream - 1 cup granulated sugar (for caramelizing) - 1 tablespoon cornstarch To create these Crème Brûlée Cookies, you need fresh, simple ingredients. Start with unsalted butter, which should be soft and at room temperature. This helps to make your cookies fluffy and light. You will also need both granulated and brown sugar. The brown sugar adds a rich, caramel flavor. You’ll need two large eggs, which should also be at room temperature. Eggs help bind the dough and add moisture. Pure vanilla extract gives a lovely aroma and taste. For the dry mix, grab all-purpose flour, baking powder, and salt. The baking powder makes your cookies rise. You will also need cornstarch, which keeps the cookies tender. Finally, heavy cream and more granulated sugar are essential for the caramelized topping. The cream adds richness, while the sugar creates that delightful crunchy layer. Gather these ingredients before you start baking for a smooth and fun process! 1. Preheat your oven to 350°F (175°C). Line two baking sheets with parchment paper. This makes cleanup easy. 2. In a large bowl, cream together 1 cup of softened unsalted butter, 1 cup of granulated sugar, and 1/2 cup of brown sugar. Use an electric mixer on medium speed for about 2 to 3 minutes. You want it light and fluffy. 3. Add 2 large eggs, one at a time. Mix well after each addition. Then, stir in 1 teaspoon of pure vanilla extract. This adds a nice flavor. 1. In a separate bowl, whisk together 2 1/2 cups of all-purpose flour, 1 teaspoon of baking powder, 1/2 teaspoon of salt, and 1 tablespoon of cornstarch. Mix until uniform. 2. Gradually add the dry mix to the wet ingredients. Stir gently until it all comes together. Avoid overmixing to keep your cookies tender. 3. Use a cookie scoop or tablespoon to portion rounded balls of dough. Place them on the baking sheets with space in between. They will spread while baking. 4. Bake for 10 to 12 minutes. Look for golden edges and slightly underbaked centers. Let them cool on the sheets for 5 minutes, then transfer to a wire rack to cool completely. 1. While the cookies cool, make the crème brûlée topping. In a small bowl, mix 1 tablespoon of heavy cream with 1 cup of granulated sugar until it forms a thick paste. 2. Once the cookies are cool enough, spread a thin layer of the crème brûlée mixture on top of each cookie. Make sure it covers evenly. 3. To caramelize, use a kitchen torch. Carefully heat the sugar until it turns golden brown. If you don’t have a torch, place the cookies under a broiler for 1 to 2 minutes. Watch closely to prevent burning. 4. Let the cookies cool again for about 10 minutes. This helps the topping harden. Enjoy your delicious Crème Brûlée Cookies! - Avoid overmixing to keep your cookies tender. Mix just until combined. - Monitor baking time carefully. Bake for 10-12 minutes for the best texture. - To achieve the best caramelization, use a kitchen torch. Move the flame slowly for even browning. - If you don’t have a torch, use your oven broiler. Keep a close eye on the cookies to prevent burning. - Serve the cookies on a decorative plate for a nice touch. - Dust them lightly with sugar and add fresh berries or mint leaves for color. These small details make a big difference! {{image_4}} You can make these cookies even more fun by adding flavors. Try adding citrus zest to give a bright twist. Lemon or orange zest works well. It adds a fresh taste that balances the sweetness. Another great idea is to mix in chocolate chips or nuts. Dark chocolate chips create a rich flavor. Chopped nuts add crunch and texture. Both options make these cookies even more delightful. If you need gluten-free cookies, use a gluten-free flour blend. Look for a mix that includes xanthan gum. This helps keep cookies soft and chewy. For dairy-free cookies, replace the butter with coconut oil. You can also use a dairy-free cream for the topping. Almond or soy cream works well in this recipe. Pair your Crème Brûlée Cookies with a hot drink. Coffee or tea complements their rich flavor. You can also serve them with milk for a classic touch. For a fun twist, make cookie sandwiches. Spread a layer of frosting or whipped cream between two cookies. This adds extra sweetness and makes for a tasty treat! To keep your Crème Brûlée Cookies fresh, store them at room temperature. Place them in an airtight container. This helps prevent them from drying out. If you want to keep them longer, you can store them in the fridge or freezer. - Room Temperature Storage Tips: Use a container that seals well. Avoid stacking the cookies too high to keep them safe from breaking. - Refrigerator vs. Freezer Storage: Cookies can last up to a week in the fridge. In the freezer, they can last up to three months. Just remember to wrap them tightly before freezing. When ready to enjoy your cookies again, you may want to refresh them. The best way to do this is in the oven. Preheat it to 350°F (175°C). Place the cookies on a baking sheet and warm them for about 5 to 10 minutes. - Best Ways to Refresh Cookies: Use the oven for even heat. Avoid using the microwave as it can make them soggy. - Avoiding Sogginess: To keep your cookies crispy, don’t cover them when reheating. Airflow helps maintain their texture. Knowing how long your cookies last is key to enjoying them at their best. At room temperature, they stay fresh for about a week. - How Long Cookies Last: In the fridge, they can last up to two weeks. In the freezer, they can last up to three months. - Signs of Spoilage: If the cookies become hard, dry, or develop an off smell, it’s time to toss them. Always trust your senses! To keep your cookies soft, store them in an airtight container. This helps trap moisture. You can also place a slice of bread in the container. The bread keeps the cookies moist. Avoid direct sunlight and heat. Yes, you can make the dough ahead of time. To refrigerate, wrap it tightly in plastic wrap. It will stay fresh for up to three days. If you want to freeze the dough, place it in a freezer bag. It can last for up to three months. Just thaw it in the fridge before baking. You can find pre-made cookies at specialty bakeries or gourmet stores. Some popular brands sell them online, like Trader Joe's and Whole Foods. Prices can vary but usually range from $5 to $10 per box. To reheat, place cookies in a toaster oven at 350°F for about 5 minutes. This method keeps them soft and warm. You can also microwave them for 10-15 seconds, but be careful not to overheat. Crème Brûlée Cookies are not naturally gluten-free. To make them gluten-free, use a gluten-free flour blend. Check labels to ensure all other ingredients are gluten-free. To ensure even baking, rotate the baking sheets halfway through. This helps cookies bake uniformly. Also, space the cookies well on the sheet to allow hot air to circulate. In this blog post, you learned how to make Crème Brûlée Cookies. We covered the key ingredients, step-by-step instructions, and helpful tips. You can create these cookies with a smooth caramel topping and various flavor options. Remember, monitoring your baking time is vital for the right texture. Enjoy serving them fresh or trying different variations. With the right tips, your cookies will impress everyone. Happy baking!

Crème Brûlée Cookies Irresistible Sweet Treat Recipe

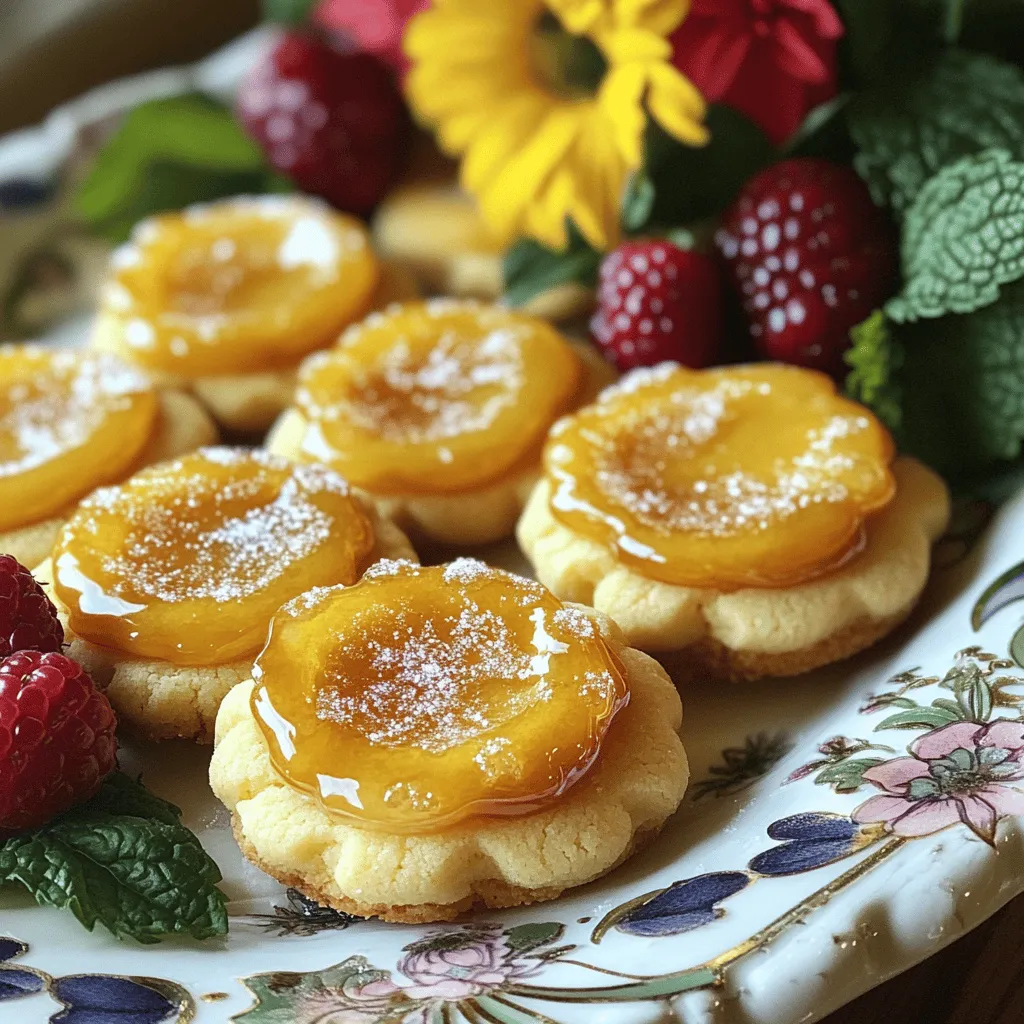
If you love desserts that combine creamy and crispy textures, you will adore Crème Brûlée Cookies! These delightful treats merge

Older posts
Newer posts
← Previous Page1 … Page11 Page12 Page13 … Page86 Next →

dsad

© 2026 lazychefmagic • Built with GeneratePress

Our Policies

  • Copyright Policy
  • Cookie Policy
  • GDPR Policy
  • Privacy Policy
  • Disclaimer
  • Terms Of Use

More Information

  • Home
  • About
  • Contact
  • Appetizers
  • Dessert
  • Dinner
  • Drinks
©2026, lazychefmagic About Back To Top