Skip to content
DisclaimerTerms Of UseGDPR PolicyCookie Policy

lazychefmagic

  • Home
  • Drinks
  • Appetizers
  • Dinner
  • Dessert
  • About
  • Contact
  • Privacy Policy
DisclaimerTerms Of UseGDPR PolicyCookie Policy

NO-ING-IMG

- 1 pound boneless chicken thighs, cut into bite-sized pieces - 1/2 cup cornstarch - 2 tablespoons vegetable oil - 1 red bell pepper, diced - 1 yellow bell pepper, diced - 1 cup pineapple chunks (fresh or canned) - 1/2 cup granulated sugar - 1/2 cup apple cider vinegar - 1/4 cup ketchup - 1 tablespoon soy sauce - 1 tablespoon freshly grated ginger - 2 cloves garlic, minced - 1 teaspoon sesame oil - Salt and freshly ground black pepper to taste - Cooked jasmine rice, for serving These ingredients come together to create a sweet and tangy dish. The chicken thighs add richness, while the pineapple gives a juicy burst of flavor. The bell peppers add color and crunch. - Chopped green onions - Toasted sesame seeds These garnishes enhance the look and taste of your meal. Green onions add freshness, while sesame seeds bring a nutty flavor. If you can't find chicken thighs, try chicken breast instead. For a gluten-free option, use tamari in place of soy sauce. You can swap apple cider vinegar with rice vinegar for a milder taste. If you want more veggies, add broccoli or snap peas for extra crunch. You can also use any type of fruit, like mango, for a different twist. Remember, cooking is about being creative. Feel free to mix and match ingredients to suit your taste! Start by seasoning your chicken thighs with salt and freshly ground black pepper. This step adds flavor. Next, cut your chicken into bite-sized pieces for easy cooking. Now, coat each piece with cornstarch. This helps to create a crispy texture. Make sure to shake off any extra cornstarch. Set the chicken aside for cooking. Heat vegetable oil in a large skillet over medium-high heat. Wait until the oil shimmers before adding the chicken. Place the chicken pieces in a single layer. Cook them for about 5 to 7 minutes. Turn them occasionally to brown evenly. Once golden, transfer the chicken to a plate and set it aside. In the same skillet, add the diced red and yellow bell peppers. Sauté them for 3 to 4 minutes. Stir frequently until they soften and become colorful. Next, add the pineapple chunks, grated ginger, and minced garlic. Cook for another 2 to 3 minutes. This helps to release the flavors. Now, make the sauce. In a bowl, whisk together sugar, apple cider vinegar, ketchup, soy sauce, and sesame oil. Mix until smooth and well combined. Pour the sauce mixture into the skillet with the vegetables. Bring it to a gentle simmer. Let it cook for about 2 minutes until the sauce thickens slightly. Now, return the cooked chicken to the skillet. Gently toss everything together. Make sure the chicken is well coated with the sauce. Heat through for an additional 2 to 3 minutes. Serve the sweet and sour chicken over fluffy jasmine rice. Garnish with chopped green onions and toasted sesame seeds. Enjoy your colorful and tasty meal! To get the best taste from your sweet and sour chicken, focus on balance. You want sweet, tangy, and savory flavors. Use fresh pineapple for a bright, juicy taste. The apple cider vinegar gives a nice tang. The sugar adds sweetness, while soy sauce brings depth. Taste your sauce as you mix. Adjust the sugar or vinegar if needed. This way, you create a flavor that shines. For crispy chicken, start with cornstarch. This helps create a crunchy crust. Coat each piece well, but shake off the extra. Make sure your oil is hot before adding chicken. If the oil is too cool, the chicken steams instead of fries. Cook in batches if needed. Don’t crowd the pan. This keeps the heat up and the chicken crispy. Presentation makes your dish more appealing. Serve the chicken in a colorful bowl. A white bowl can help the colors pop. Add a mound of fluffy jasmine rice as a base. Sprinkle chopped green onions and toasted sesame seeds on top. For an eye-catching touch, add a wedge of fresh pineapple or lime. This not only adds color but also enhances the flavor. {{image_4}} You can easily make a vegetarian version of sweet and sour chicken. Instead of chicken, use tofu or tempeh. These options soak up flavor well and provide a nice texture. 1. Tofu: Press firm tofu to remove extra water. Cut it into cubes and coat it with cornstarch. Cook it in oil until golden brown. 2. Tempeh: Cut tempeh into bite-sized pieces. Sauté it in oil until crispy. The sauce remains the same. You get a delicious dish that even non-vegetarians will love! Sweet and sour chicken has many regional twists. Each area adds its own flair. Here are a few to try: - Hawaiian style: Use fresh pineapple and add bell peppers. This version is bright and tropical. - Thai style: Incorporate fish sauce and fresh basil for a herbal touch. It gives a unique, savory flavor. - Chinese style: Stick to traditional ingredients like bell peppers and onion. This version focuses on balance and harmony. Each variation keeps the sweet and sour flavor but adds a unique twist. You can also switch up the sauce for new tastes. Here are some ideas: - Mango sauce: Replace pineapple with mango for a sweeter, fruitier flavor. - Orange sauce: Use fresh orange juice and zest instead of vinegar. It adds a nice citrus kick. - Spicy sauce: Add chili paste or sriracha to the original sauce for a spicy kick. These alternatives keep the dish exciting and help you explore new flavors in your kitchen. To keep your sweet and sour chicken fresh, follow these steps. First, let the chicken cool to room temperature. Then, transfer it to an airtight container. Make sure to seal it tightly. Store the container in the fridge. This way, the chicken stays juicy and flavorful for up to three days. When you are ready to enjoy your leftovers, reheat them properly. You can use the microwave or a skillet. If using the microwave, place the chicken in a microwave-safe bowl. Cover it loosely with a lid or a damp paper towel. Heat in short bursts, about one minute at a time, until warm. If using a skillet, add a splash of water for moisture. Heat over medium heat, stirring occasionally, until hot. Freezing sweet and sour chicken is simple. First, let it cool completely. Then, portion it into freezer-safe bags or containers. Be sure to remove as much air as possible to avoid freezer burn. Label each bag with the date. You can freeze it for up to three months. To reheat, thaw overnight in the fridge and then follow the reheating instructions. Enjoy your meal any time you crave it! You can serve Sweet and Sour Chicken with jasmine rice for a classic pairing. Rice soaks up the sauce well, making each bite tasty. You can also serve it with steamed broccoli or snap peas for a healthy side. A fresh salad with a light dressing adds a crunchy contrast. If you want something different, try it with fried rice or noodles. Sweet and Sour Chicken can last in the fridge for about three to four days. Make sure to store it in an airtight container to keep it fresh. If you want to enjoy it later, always check for any signs of spoilage before eating. Yes, you can make Sweet and Sour Chicken ahead of time. Just prepare the dish, let it cool, and store it in the fridge. When you're ready to eat, reheat it on the stove or in the microwave. The flavors may even taste better after a day in the fridge! In this post, we explored sweet and sour chicken, from key ingredients to cooking steps. I provided tips for perfecting flavor and ensuring crispy chicken. We also discussed variations, including vegetarian options and regional twists. You learned how to store and reheat leftovers effectively. Sweet and sour chicken is versatile and fun to make. Experiment with flavors for your perfect dish. Enjoy cooking this classic, share it with others, and make it your own!

Savory Sweet and Sour Chicken Easy Weeknight Meal

Looking for an easy weeknight meal that packs a punch? Sweet and sour chicken is the perfect dish. It combines

- 1 lb flank steak, thinly sliced against the grain - 2 cups fresh broccoli florets - 3 tablespoons soy sauce, divided - 2 tablespoons oyster sauce - 1 tablespoon cornstarch - 3 cloves garlic, minced - 1 tablespoon fresh ginger, grated - 1 tablespoon sesame oil - 2 tablespoons vegetable oil, divided - Salt and freshly cracked pepper to taste - Sesame seeds for garnish (optional) - Cooked rice or quinoa for serving When making Easy Beef and Broccoli, I always focus on fresh and quality ingredients. The flank steak is key. Slicing it against the grain makes it tender. Broccoli adds a nice crunch and bright color. For the sauces, I use soy sauce and oyster sauce. They bring rich flavors that enhance the dish. Cornstarch helps to thicken the sauce and coat the beef perfectly. Don't forget the garlic and ginger. They add a wonderful aroma and depth to the dish. Sesame oil gives a nice nutty flavor too. These ingredients create a tasty and balanced meal. You can serve it over rice or quinoa for a full meal. Enjoying this dish is easy when you have everything ready! - Combine sliced flank steak with 2 tablespoons of soy sauce and 1 tablespoon of cornstarch. - Allow to marinate for 15 minutes. To marinate the beef, use a medium bowl. This step helps the meat soak up flavors. The soy sauce adds saltiness, while the cornstarch helps create a nice texture. - Blanch fresh broccoli in boiling water for 2 minutes. - Drain and set aside. Blanching the broccoli makes it bright green and tender. Boil water in a pot and add the florets. After 2 minutes, quickly drain the broccoli. This method keeps it crisp and vibrant. - Sauté marinated beef in a skillet over medium-high heat. - Cook until evenly browned and fully cooked. Heat 1 tablespoon of vegetable oil in a large skillet. Once hot, add the beef in batches. This prevents overcrowding and ensures even cooking. Sauté for 2-3 minutes until the beef is browned. - Add garlic and ginger to the skillet. - Sauté until fragrant. In the same skillet, add the remaining oil. Then, toss in minced garlic and grated ginger. Stir them for about 30 seconds. Their aroma will fill your kitchen and add depth to the dish. - Incorporate blanched broccoli and stir-fry for 2 minutes. Add the broccoli back into the skillet. Stir-fry it with the garlic and ginger for about 2 minutes. This allows the broccoli to absorb those great flavors. - Mix cooked beef with broccoli and sauces. - Allow sauce to thicken slightly. Return the cooked beef to the skillet. Pour in the oyster sauce, the remaining soy sauce, and sesame oil. Gently mix everything together. This step helps the sauce coat the beef and broccoli. - Adjust seasoning with salt and pepper. - Serve over rice or quinoa, garnished with sesame seeds. Taste the dish and add salt and pepper as needed. Serve the beef and broccoli over a bed of rice or quinoa. If you like, sprinkle sesame seeds on top for a nice touch. To get the best beef texture, slice the flank steak thinly. Always cut against the grain. This step makes the meat tender. Aim for slices about 1/4 inch thick. Marinate the beef for about 15 minutes. This helps it soak up the flavors and makes it juicy. Blanching broccoli is key to keeping its color and flavor. First, boil some water in a pot. Add the fresh broccoli florets for about 2 minutes. You want them bright green and slightly tender. After that, drain and cool them right away. This stops the cooking process and keeps them crisp. When stir-frying, avoid overcrowding the pan. If you add too much food, it steams instead of sears. Cook in batches if needed. Use high heat for the best results. High heat cooks the beef quickly, giving it a nice brown color. This also keeps the broccoli vibrant and crunchy. {{image_4}} You can change the flavor with different sauces. Teriyaki sauce adds a sweet touch. Hoisin sauce brings a rich, savory taste. Both sauces work well with beef and broccoli. Simply swap them for the oyster sauce. Adjust the amount based on your taste. If you want to mix things up, use chicken or tofu instead of beef. Chicken thighs or breasts cook just as well. Cut them into thin slices like you do with beef. For tofu, choose firm or extra-firm. Press the tofu to remove extra water. This helps it absorb flavors better. Feel free to add more veggies to your dish. Bell peppers bring a nice crunch. Snap peas add a sweet pop. You can also try carrots or mushrooms. Just prepare them the same way as broccoli. This makes your meal colorful and healthy. To keep your Easy Beef and Broccoli fresh, follow these steps: - Refrigeration: Allow the dish to cool down. Place it in an airtight container. Store it in the fridge. Enjoy within 3-4 days for the best taste. - Freezing: If you want to save it longer, freeze it. Use a freezer-safe container or bag. Make sure to remove as much air as possible. It can last up to 2-3 months in the freezer. Reheating beef and broccoli is quick and easy. Here are the best methods: - Microwave: Place the leftovers in a microwave-safe dish. Cover with a lid or microwave-safe wrap. Heat on high for 1-2 minutes. Stir halfway through to ensure even heating. - Stovetop: Heat a skillet over medium heat. Add a splash of water or broth. Add the beef and broccoli. Stir often until heated through, about 5 minutes. - Oven: Preheat the oven to 350°F (175°C). Place the dish in an oven-safe container. Cover with foil to keep moisture. Heat for about 15-20 minutes. Knowing how long your dish lasts is essential. Here's the scoop: - In the fridge: Your Easy Beef and Broccoli will stay good for about 3-4 days. - In the freezer: Properly stored, it will last 2-3 months. After that, the quality may decline, but it’s still safe to eat. Yes, you can make Easy Beef and Broccoli ahead. Cook it fully, then cool it down. Store it in an airtight container in the fridge. It stays fresh for about three days. When ready to eat, reheat it on the stove or in the microwave. This dish tastes great even after a day or two! If you need a soy sauce substitute, try tamari. It has a similar taste and is gluten-free. Another option is coconut aminos, which is sweeter and less salty. If you want a low-sodium choice, use low-sodium soy sauce. Each alternative gives a unique flavor, so choose what you like best! The original recipe is not gluten-free due to soy sauce and oyster sauce. To make it gluten-free, use gluten-free soy sauce and check your oyster sauce. Many brands offer gluten-free versions. Always read labels to be sure. This way, you can enjoy the dish without worry! Yes, you can use frozen broccoli! It saves time and is easy to find. Just steam or microwave it before adding it to the skillet. Frozen broccoli is often blanched before freezing, so it cooks faster. This option is great when you want a quick meal. To spice up your beef and broccoli, add chili paste or red pepper flakes. Start with a small amount and taste as you go. You can also use fresh sliced chilies or sriracha for extra heat. Adjust the spice to your liking for a flavor boost! This recipe for beef and broccoli is simple and satisfying. You learned about the right ingredients, step-by-step cooking, and clever tips to enhance flavor and texture. Whether you choose to swap proteins or add fresh veggies, this dish is versatile. Store leftovers properly to enjoy them later. With these tricks, your cooking can be both easy and delicious. Enjoy making this mouthwatering meal anytime!

Easy Beef and Broccoli Quick and Tasty Recipe Guide

Are you ready to whip up a delicious meal that’s quick and easy? This Easy Beef and Broccoli recipe is

- 300g chicken breast, thinly sliced into strips - 200g egg noodles - 1 red or yellow bell pepper, sliced into thin strips - 1 cup broccoli florets - 2 cloves garlic, finely minced - 2 tablespoons fresh ginger, grated - 3 tablespoons soy sauce - 2 tablespoons honey - 1 tablespoon sesame oil - 1 tablespoon vegetable oil - 1 teaspoon cornstarch mixed with 2 tablespoons water (to form a slurry) - Salt and freshly cracked black pepper, to taste - Sliced mushrooms for earthiness - Snap peas for a fresh crunch - Carrots for sweetness and color These ingredients add depth to your dish. They can make the stir fry even more vibrant and tasty. - 2 green onions, chopped - 1 tablespoon sesame seeds Chopped green onions add a fresh bite. They also offer a nice pop of color. Sesame seeds give a nutty flavor and a lovely crunch. You can also add a lime wedge. It will brighten the dish and enhance the flavors. {{ingredient_image_2}} First, cook the egg noodles. Boil water in a pot and add the noodles. Cook them until they are al dente, about 3-4 minutes. Drain the noodles and set them aside. Timing is key; while the noodles cook, you can prepare the chicken and veggies. In a large skillet, heat vegetable oil over medium-high heat. Once the oil is hot, add the thinly sliced chicken. Season it with salt and pepper. Cook the chicken for 5-7 minutes. Look for a nice golden color. When fully cooked, move the chicken to a plate and keep it warm. In the same skillet, add minced garlic and grated ginger. Let them sauté for about 30 seconds. Stir continuously to avoid burning. You want to release their wonderful aromas. This step adds depth to your dish. Next, add the sliced bell pepper and broccoli florets to the skillet. Stir-fry them for 3-4 minutes. You want them tender but still crisp. Their bright colors will make the dish pop and add nutrition. Now, return the cooked chicken to the skillet. In a bowl, mix soy sauce, honey, and sesame oil. Pour this sauce over the chicken and veggies. Stir everything together to coat well. This will enhance the flavors and meld the ingredients. To thicken the sauce, introduce the cornstarch slurry. Stir it into the skillet and cook for another 2-3 minutes. The sauce will become thick and glossy. This step ensures the sauce clings to every bite. Finally, add the cooked egg noodles to the skillet. Toss everything together until the noodles are fully coated in sauce. Taste and adjust seasoning if needed. Remove from heat and serve hot. Garnish with chopped green onions and sesame seeds for a beautiful finish. Enjoy your meal! To create a great stir fry, focus on high heat. Use a wok or large skillet for even cooking. Cut your chicken and veggies into small, uniform pieces. This helps them cook evenly. Always prep your ingredients before cooking. Stir-frying is fast, so you need to be ready. Caramelization happens when you cook sugars. In this dish, honey helps with that. Start with hot oil in your skillet. Add the chicken and let it sit for a moment before stirring. This way, it gets a nice sear. Once you add your sauce, cook it until it thickens. This will give your chicken a shiny, sweet glaze. Don’t overcrowd the pan. If your skillet is too full, the heat drops. This leads to steaming instead of frying. Also, don’t rush the cooking of garlic and ginger. They need just a bit of time to bring out their flavors. Lastly, taste the dish as you cook. Adjust salt and pepper to your liking. A sturdy wok is best for stir frying. It holds heat well and allows for quick cooking. A good spatula or wooden spoon helps you toss the ingredients easily. A cutting board and sharp knife are necessary for chopping. Lastly, have a bowl handy for your sauce mixture. This keeps everything organized as you cook. Pro Tips Marinate for Flavor: For an even deeper flavor profile, consider marinating the chicken in the soy sauce, honey, and ginger for at least 30 minutes before cooking. Veggie Variations: Feel free to swap in your favorite vegetables or whatever you have on hand, such as snap peas, carrots, or bok choy, to customize the dish. Cooking Noodles: Make sure not to overcook the egg noodles; they should be slightly undercooked as they will continue to cook when added to the stir fry. Serving Suggestions: Serve the stir fry with a side of lime wedges for an extra burst of freshness and a drizzle of chili oil for heat, if desired. {{image_4}} You can easily make this dish vegetarian or vegan. Swap the chicken for tofu or tempeh. Both options soak up flavors well. Use the same marinade for a tasty treat. You can also try seitan for a meaty texture. Replace egg noodles with rice noodles for a vegan twist. This recipe is flexible with proteins. You can use shrimp, beef, or pork. Each choice gives a unique taste. For fish lovers, salmon fillets work great too. Just cook them until flaky. This way, you can enjoy various flavors and textures. Feel free to add more veggies for color and crunch. Snap peas, carrots, and zucchini are excellent options. Mushrooms add a savory depth. Try adding baby corn or bok choy for extra flair. The more veggies, the better the nutrition and flavor! You can spice up the dish easily. Add red pepper flakes for heat. A splash of lime juice brightens the flavors. For a sweet twist, use pineapple chunks. For a unique taste, try adding hoisin sauce or oyster sauce. Each twist makes this meal exciting! To keep your caramelized chicken stir fry noodles fresh, store them in an airtight container. Make sure the noodles cool completely before sealing. This helps prevent moisture buildup, which can lead to soggy noodles. Use the leftovers within three days for the best taste. When you are ready to enjoy the leftovers, reheat them gently. Use a skillet over medium heat. Add a splash of water or broth to keep the noodles moist. Stir occasionally until everything is heated through. This method helps maintain the noodles' texture and flavor. If you want to freeze your stir fry, do so right after cooking. Allow it to cool completely, then portion it into freezer-safe bags. Squeeze out the air before sealing. For best quality, use within one month. When ready to eat, thaw it in the fridge overnight. Reheat in a skillet for a quick meal. You can use coconut aminos instead of soy sauce. This will give a sweet and salty taste. Another option is to use broth with spices like garlic and ginger for flavor. You can add a splash of vinegar for acidity, too. Egg noodles are great for this dish. They soak up sauce well and cook quickly. You can also try rice noodles if you want a gluten-free option. Whole wheat noodles add a nice texture and flavor. Yes! This dish is perfect for meal prep. Cook everything and let it cool. Store it in airtight containers. You can keep it in the fridge for up to four days. Just reheat when ready to eat. To make this dish gluten-free, use gluten-free soy sauce or coconut aminos. Swap egg noodles for rice noodles. Check all other ingredients for gluten, like broth or sauces. This way, you can enjoy the flavors without worry. Serve it with a side of steamed vegetables for added nutrients. A fresh salad with sesame dressing also pairs well. If you want more carbs, try serving it with jasmine rice. This adds a nice balance to the meal. This blog post explored making caramelized chicken stir fry noodles. We discussed the best ingredients, the steps to perfect cooking, and tips for great flavor. You learned how to customize with different proteins and vegetables. We also covered storage and reheating for leftovers. In your kitchen, you can now create this tasty dish with ease. Enjoy experimenting and developing your own variations. Trust these methods to help you achieve a delicious meal every time.

Caramelized Chicken Stir Fry Noodles Flavorful Delight

Are you ready for a dish that will tickle your taste buds? Caramelized Chicken Stir Fry Noodles are the perfect

- 1 cup freshly brewed espresso or strong coffee - 1 cup milk (your choice of dairy or non-dairy) - 2 tablespoons pure maple syrup - 1/2 teaspoon ground cinnamon To create a rich and cozy Maple Cinnamon Latte, you need a few key ingredients. Start with a cup of freshly brewed espresso or strong coffee. This will form the base of your drink and provide that bold flavor. Next, choose your milk. You can use any type, whether it's whole milk, almond milk, or oat milk. The choice is yours! Pure maple syrup adds a sweet and natural touch. It gives the latte its signature flavor. Ground cinnamon adds warmth and spice. This simple blend of ingredients makes for a delightful drink. - 1/4 teaspoon vanilla extract - Whipped cream (optional, for a luxurious topping) - Additional ground cinnamon and maple syrup for garnish For a little extra flavor, consider adding vanilla extract. It enhances the overall taste and adds depth. Whipped cream is also a nice touch if you want a creamy topping. You can drizzle more maple syrup and sprinkle extra cinnamon on top for garnish. These optional ingredients can elevate your latte experience! To start, brew a strong cup of espresso or coffee. You can use an espresso machine, French press, or pour-over method. Each method gives a rich flavor. If you want a bold taste, aim for a dark roast. This will really enhance your latte. The strength of your coffee is key, so don’t skip this step. Next, heat your milk in a small saucepan. Pour in one cup of your choice. Use medium-low heat. Stir it often to warm it evenly. Avoid boiling the milk, as this can change its taste. You want it warm but not hot. When it is warm, froth the milk using a whisk or a milk frother. Whisk until you see bubbles forming. This creates a creamy texture that feels rich. Now, it’s time to mix your ingredients. In a bowl, combine the brewed espresso with two tablespoons of maple syrup, half a teaspoon of cinnamon, and a splash of vanilla extract. Stir this well until everything blends together. Next, slowly pour the frothed milk into the espresso mix. Use a spoon to hold back the foam at first. This helps the milk mix in smoothly. After pouring, add the frothy milk on top. Finish by drizzling a bit more maple syrup and a sprinkle of cinnamon on top. This gives it a nice touch and looks great! To make your Maple Cinnamon Latte even better, consider adding flavor boosters. Nutmeg offers a warm spice that pairs well with cinnamon. Chocolate can add a rich twist; just stir in a bit of cocoa powder. You can also experiment with different types of milk. Almond milk gives a nutty taste, while oat milk adds creaminess. Each milk type will change the latte's texture and flavor. The right serving vessel makes a big difference. Clear glass mugs are perfect since they show off the latte's beautiful layers. This adds to the visual appeal. For garnishing, consider topping it with whipped cream. This creates a luxurious finish. A sprinkle of ground cinnamon or a drizzle of maple syrup adds a lovely touch. You can pair your latte with a shortbread cookie for a nice treat. One common mistake is overheating the milk. Always warm it gently to avoid boiling. Overheated milk can spoil the taste and texture. Another mistake is not measuring ingredients accurately. Use measuring spoons for the maple syrup and cinnamon. This ensures you get the best flavor without any surprises. {{image_4}} You can easily make a vegan version of the Maple Cinnamon Latte. Instead of dairy milk, use plant-based options like: - Almond milk - Oat milk - Coconut milk - Soy milk These substitutes give a creamy texture. Some may be sweeter, so adjust the maple syrup. If you pick almond milk, you might want a bit more syrup. If you go with oat milk, it tends to foam well. For those on a keto diet, I suggest using sugar-free maple syrup. Here are some good brands: - Lakanto - ChocZero - Maple Grove Farms Choose low-carb milk, such as: - Unsweetened almond milk - Coconut milk - Heavy cream These options keep the carbs low while still tasting great. To switch it up with the seasons, try adding flavors. In fall, a sprinkle of pumpkin spice works wonders. It adds warmth and a festive touch. In summer, make an iced version of this latte. Brew your espresso, cool it, and pour it over ice. Add your milk and syrup, then enjoy a refreshing treat! If you have leftover Maple Cinnamon Latte, store it in the fridge. Use a sealed container to keep it fresh. Drink it within 2 days for the best taste. Do not freeze the latte, as it may change the texture. For the frothed milk, it’s best to froth only what you need. Unused frothed milk can lose its texture and flavor when stored. If you must store it, place it in the fridge. Re-froth before use to bring back that creamy goodness. Maple syrup can last a long time if stored properly. Keep it in a cool, dark place. Once opened, store it in the fridge to extend its life. Check for mold or an off smell before using. If you see either, it’s best to toss it out. Ground spices, like cinnamon, should be kept in a sealed jar. Store them in a cool, dark place, too. They can lose flavor over time, so use them within a year for the best taste. For milk products, check for spoilage signs. Look for changes in smell, texture, or color. If the milk smells sour or has lumps, do not use it. Always choose fresh milk for your latte for the best flavor. Yes, you can use strong brewed coffee instead of espresso. This option works well. Just make sure the coffee is rich. A French press or pour-over can create a strong cup. You can froth milk using a whisk. Heat the milk in a pan until warm. Then, whisk it quickly until it gets bubbles. You can also use a jar. Shake the warm milk in the jar until it froths. Cinnamon can help control blood sugar levels. It may also have anti-inflammatory properties. Maple syrup provides antioxidants and is a natural sweetener. Both add flavor with less processed sugar. Yes, you can use flavored syrups. Vanilla or hazelnut syrups can add unique flavors. Just remember that these might change the taste of your latte. Absolutely! You can use almond, oat, or coconut milk. These options work well and still create a creamy texture. Just choose one that you like best. In this post, we covered how to make a Maple Cinnamon Latte at home. You learned about the main and optional ingredients, brewing methods, and tips for enhancing flavor. We also shared ways to present your drink beautifully and avoid common mistakes. You can even try variations for vegan or keto diets. Remember, making this latte is easy and fun. Enjoy crafting your perfect cup, and don’t hesitate to experiment with flavors and styles!

Maple Cinnamon Latte Rich and Cozy Coffee Treat

Get ready to warm up with a Maple Cinnamon Latte! This cozy coffee treat brings rich flavors and delightful aromas

- 8 oz rice noodles - 2 tablespoons gochujang (Korean red chili paste) - 1 tablespoon honey or maple syrup - 2 tablespoons soy sauce - 1 tablespoon sesame oil - 1 teaspoon rice vinegar - 2 cloves garlic, finely minced - 1-inch piece ginger, freshly grated - 1 cup assorted bell peppers (sliced red, yellow, and green) - 1 medium carrot, julienned for a crisp texture - 1 cup snap peas or snow peas, ends trimmed - 2 green onions, thinly sliced Rice noodles work great in this dish. They soak up all the flavors from the sauce. Gochujang gives these noodles their unique kick. It’s spicy and sweet, perfect for a quick meal. Honey or maple syrup adds sweetness. You can balance the heat by adding more or less gochujang. Soy sauce brings in a salty flavor, while sesame oil gives a rich, nutty finish. - Sesame seeds - Fresh cilantro leaves Garnishes make your dish look pretty and add flavor. Sesame seeds add a nice crunch. Fresh cilantro gives a burst of freshness. You can add these before serving for a lovely touch. By using these ingredients, you can make a quick and tasty meal. The mix of flavors and textures will impress your family or friends. - First, fill a large pot with water. - Bring the water to a rolling boil. - Once boiling, add 8 oz of rice noodles. - Cook the noodles for about 4-6 minutes, or until al dente. - Drain the noodles in a colander. - Rinse them under cold water to stop the cooking. - Set the drained noodles aside for later use. - In a medium bowl, combine the gochujang, honey (or maple syrup), soy sauce, and sesame oil. - Add 1 teaspoon of rice vinegar and mix well. - Whisk until smooth and well blended. - Taste the sauce. Adjust the flavor to your liking. - Add more honey for sweetness or more gochujang for heat if you like it spicy. - Choose colorful vegetables like bell peppers, carrots, and snap peas. - Heat a tablespoon of oil in a large skillet or wok over medium-high heat. - Once the oil is hot, add the sliced bell peppers, julienned carrot, and snap peas. - Stir-fry the vegetables for about 3-4 minutes. - Stir frequently until they are tender but still crunchy. - Gently add the cooked rice noodles to the skillet. - Carefully pour the gochujang sauce over the noodles. - Toss everything together with tongs or a spatula. - Make sure the noodles are evenly coated in the sauce. - Warm through for an additional 2-3 minutes. - Remove the skillet from heat and fold in the sliced green onions. - Transfer the colorful noodle mixture to a serving dish. - For a beautiful touch, sprinkle sesame seeds and fresh cilantro on top. - Serve these noodles warm and enjoy! - Avoiding overcooking: Start by boiling water in a large pot. Once it’s bubbling, add the rice noodles. Cook them for about 4-6 minutes. Check for al dente texture. If you overcook them, they will become mushy. - How to prevent sticking: After cooking, drain the noodles in a colander. Rinse them under cold water. This stops the cooking and keeps them separate. Toss a little sesame oil on them if you want to be extra safe from sticking. - Options for different flavor profiles: You can make this sauce your own! Try adding lime juice for a zesty twist. If you like it sweeter, use more honey or maple syrup. For a bolder taste, add a splash of soy sauce. - Suggested spice and sweetness adjustments: If you love heat, add more gochujang. If you want less spice, reduce it. Taste the sauce as you mix it. Adjust it until it’s just right for you. - Alternative vegetables for personalization: You can swap bell peppers for zucchini or mushrooms. Try adding broccoli or bok choy for extra crunch. Be creative with colors and textures! - Tips on frozen vs. fresh vegetables: Fresh veggies keep their crunch better, but frozen can be quicker. If using frozen, make sure to thaw them first. Either way, cook until they are bright and tender. {{image_4}} To make Sweet & Spicy Gochujang Noodles plant-based, swap the soy sauce with tamari. Tamari is gluten-free and still offers a rich flavor. You can also replace honey with maple syrup for a fully vegan dish. This keeps the sweetness but removes all animal products. Add more veggies, like mushrooms or zucchini, to boost flavor and texture. They blend well with the gochujang sauce and make the dish hearty. For those who enjoy meat, chicken or shrimp pairs well with these noodles. Simply slice the chicken thinly or use peeled shrimp. Cook them in the skillet before adding the vegetables. If you prefer tofu, use firm or extra-firm tofu. Cube it and sauté until golden brown. Tofu absorbs the sauce well and adds a nice protein boost. Adding protein makes this dish more filling and satisfying. If you need gluten-free options, use coconut aminos instead of soy sauce. This gives a similar flavor without the gluten. For noodles, try using rice noodles as the recipe suggests. They are naturally gluten-free. You may also use gluten-free pasta or zucchini noodles for a lighter version. These swaps keep the dish tasty and suitable for various diets. To keep your Sweet & Spicy Gochujang Noodles fresh, place them in an airtight container. This helps to lock in moisture and flavor. Make sure the noodles cool down before sealing. Store them in the fridge. They will stay fresh for about three days. When it's time to enjoy leftovers, you want to keep the noodles tasty. Here are some easy methods: - Stovetop: Heat a pan over medium heat. Add a splash of water or oil to prevent sticking. Stir the noodles until heated through. - Microwave: Place the noodles in a bowl. Add a few drops of water and cover with a plate. Heat in 30-second bursts, stirring in between, until warm. Both methods keep the texture nice and chewy. If you want to save your Gochujang noodles for later, freezing is an option. In the fridge, they last three days. In the freezer, they can last up to three months. Be sure to use a freezer-safe container. This keeps them from getting freezer burn. When you’re ready to eat, thaw them in the fridge overnight before reheating. Gochujang is a thick, red paste made from Korean chili peppers, glutinous rice, fermented soybeans, and salt. It has a deep, rich flavor that is both spicy and slightly sweet. You can find it in many Korean dishes, like bibimbap and tteokbokki. It adds great depth to sauces, marinades, and soups. With gochujang, you can easily spice up your Sweet & Spicy Gochujang Noodles. This paste brings warmth without being overwhelming, making it perfect for anyone who enjoys a bit of heat. Yes, you can make Sweet & Spicy Gochujang Noodles ahead of time. To prep, cook the noodles and stir-fry the veggies. Store them separately in airtight containers. This way, the noodles stay fresh, and the veggies keep their crunch. If you store them in the fridge, they will last for about three days. When you are ready to eat, just reheat everything in a pan. Add a splash of water or oil to keep them moist as you warm them up. You can serve these noodles with several side dishes. Steamed dumplings pair well for a full meal. Crispy spring rolls also make a great match. For a fresh touch, serve a side salad with a light dressing. If you want to add protein, grilled chicken or tofu can be tasty options. The colorful veggies in the noodles already make for a vibrant plate, so keep it simple and enjoy! In this post, we discussed how to make delicious Sweet & Spicy Gochujang Noodles. I shared key ingredients, including rice noodles and gochujang. You learned how to cook noodles, prepare the sauce, and stir-fry vibrant veggies. We also covered tips for storage and reheating. Now, you can enjoy and customize this dish with ease. Experiment with flavors and garnishes to make it your own. Your kitchen adventures await!

Sweet & Spicy Gochujang Noodles Quick and Flavorful Dish

If you crave bold flavors with a hint of sweetness, you’re in for a treat! Sweet & Spicy Gochujang Noodles

To make a Caramelized Onion Gruyère Tart, gather these key ingredients: - 1 sheet of puff pastry, thawed - 3 large onions, thinly sliced - 2 tablespoons olive oil - 1 teaspoon balsamic vinegar - 1 teaspoon sugar - 1 teaspoon thyme leaves (fresh or dried) - 1 cup Gruyère cheese, shredded - 1/2 cup ricotta cheese - Salt and pepper, to taste - 1 egg, beaten (for egg wash) These ingredients create a lovely balance of flavors. The puff pastry gives a flaky base. The onions provide sweetness after caramelizing. Gruyère cheese adds a rich, nutty taste, while ricotta brings creaminess. Balsamic vinegar and sugar enhance the onion's natural sweetness. Thyme adds a hint of earthiness, and the egg wash helps achieve a golden crust. Don’t worry if you don’t have all these ingredients at hand. You can explore substitutions. For example, use another cheese like cheddar or mozzarella. You can also add herbs like rosemary for a different flavor twist. Each choice creates a new take on the classic tart. When you prepare this tart, remember to take your time caramelizing the onions. This step brings out their deep flavor and beautiful color. Enjoy the process and get ready to impress your family and friends with this delicious dish! Preheating your oven to 400°F (200°C) is very important. A hot oven helps the tart bake evenly. This temperature ensures that the puff pastry becomes flaky and golden. To caramelize the onions, start with a large skillet. Pour in two tablespoons of olive oil and heat it over medium. Add three thinly sliced onions. Stir them often to keep them from sticking. After about 15 minutes, the onions will soften and turn translucent. Next, mix in one teaspoon of sugar, one teaspoon of balsamic vinegar, and one teaspoon of thyme leaves. Add salt and pepper to taste. Keep cooking for 20-25 more minutes. Stir often until the onions turn a rich, golden brown. This step brings out their sweet, deep flavor. While the onions cook, prepare the puff pastry. Lightly flour your counter and roll out one sheet to fit your tart pan. Gently press it into the pan's edges. Use a fork to prick the bottom. This keeps the pastry from puffing up while baking. In a bowl, mix one cup of shredded Gruyère cheese and half a cup of ricotta cheese. Spread this creamy mixture evenly across the puff pastry. Then, layer the caramelized onions on top of the cheese. Brush the edges of the tart with a beaten egg for a shiny crust. Place the tart in the preheated oven. Bake for 25-30 minutes. Look for a puffed, golden brown pastry to know it’s done. After baking, let the tart cool for a few minutes before slicing. This helps the flavors settle and makes serving easier. To get great caramelized onions, start with medium heat. Use a large skillet with enough room. This helps the onions cook evenly. Stir them often to prevent sticking. After 15 minutes, they should be soft and clear. Add sugar, balsamic vinegar, thyme, salt, and pepper. Keep cooking for 20-25 minutes. Watch for a rich, golden color. The longer you cook them, the deeper the flavor. Real Gruyère cheese comes from Switzerland. It has a firm texture and a nutty flavor. When choosing Gruyère, look for a golden-yellow hue. It should smell fresh, with a hint of sweetness. The taste should be creamy and rich. Avoid cheese that feels dry or crumbly. Quality cheese makes your tart shine. For a lovely finish, serve your tart warm. Top it with fresh thyme leaves for color. Drizzle balsamic reduction over the tart for extra flavor. Pair it with a light salad for balance. A glass of white wine complements the dish nicely. Enjoy the beauty and taste of your creation! {{image_4}} You can make this tart even better by adding vegetables. Mushrooms bring a rich, earthy taste. Simply slice fresh mushrooms and sauté them with the onions. Their flavor blends well with the caramelized onions. Spinach also works great. Add it toward the end of cooking the onions. This way, it wilts but keeps its color. You can also try bell peppers or zucchini for a fresh twist. While Gruyère is delicious, you can explore other cheeses too. Fontina cheese melts well and has a nutty flavor. It pairs nicely with the onions. Aged cheddar adds a sharp taste, giving a different flavor kick. If you prefer a creamy texture, use goat cheese. It adds a tangy flavor that complements the sweetness of the onions. Mixing different cheeses can create a unique taste that fits your style. To make this tart a full meal, serve it with a side salad. A light, leafy salad with vinaigrette adds a fresh crunch. You can also pair it with a warm soup. Tomato bisque or a simple vegetable soup works well. This combination creates a hearty meal that satisfies. The tart shines as a main dish while still being a delightful treat. To keep your leftover tart fresh, store it in an airtight container. Place it in the fridge for up to three days. When you’re ready to enjoy it again, preheat your oven to 350°F (175°C). Bake for about 10-15 minutes. This reheating method helps the pastry regain its crispiness. You can freeze the tart before or after baking. To freeze before baking, wrap the assembled tart tightly in plastic wrap. Place it in a freezer bag. It can stay frozen for up to three months. When you’re ready to bake, don’t thaw it. Just add 10-15 minutes to the baking time. If freezing after baking, let it cool completely first. Wrap it well and follow the same steps. To maintain taste and texture, store the tart tightly wrapped. Avoid exposure to air. This keeps it from drying out. For the best flavor, eat it within a few days. If you follow these steps, you’ll enjoy the savory delight of caramelized onion Gruyère tart even after the first day. Yes, you can use different types of pastry for your tart. Shortcrust pastry works well. It has a nice, crumbly texture. If you prefer, you can even make your own pastry from scratch. Homemade pastry can add a personal touch. Just be sure to roll it out thin enough to fit your tart pan. You’ll know your onions are caramelized when they turn a deep golden brown. They should be soft and sweet, with a rich flavor. Look for a nice glossy sheen on the onions. This color shows they have released their natural sugars. The cooking time can vary, but it usually takes about 35–40 minutes on medium heat. This tart pairs beautifully with several dishes. You can serve it with a side salad for freshness. A simple green salad with vinaigrette works well. For drinks, try a crisp white wine or a light beer. They balance the rich flavors of the tart. You could also serve it with a dollop of sour cream or yogurt for extra creaminess. This blog covers making a delicious cheese and onion tart. We talked about key ingredients like puff pastry and Gruyère. You learned how to preheat the oven and caramelize onions for rich flavor. Assembling and baking the tart is straightforward. You can try different cheeses or add vegetables to change it up. Store leftovers properly to keep them tasty. Enjoy this versatile dish for any meal!

Caramelized Onion Gruyere Tart Savory Flavor Delight

Looking to impress your guests? A Caramelized Onion Gruyere Tart is your answer! This savory delight combines the sweetness of

- 2 lbs boneless, skinless chicken breasts - 1 medium onion, finely chopped - 3 cloves garlic, minced - 2 cans (15 oz each) great northern beans, drained and rinsed - 1 can (4 oz) diced green chilies - 1 cup corn, frozen or canned, drained - 4 cups chicken broth - 1 teaspoon ground cumin - 1 teaspoon chili powder - 1 teaspoon dried oregano - ½ teaspoon salt - ½ teaspoon black pepper In this recipe, the chicken breasts serve as the main protein. They bring a lovely flavor and texture. The beans and corn add heartiness and nutrition. The onion and garlic provide a savory base. The broth ties everything together, making it rich and comforting. - 1 cup heavy cream or coconut milk (for a dairy-free choice) - Fresh cilantro, chopped (for garnish) - Sliced jalapeños (optional, for garnish) - Tortilla chips (for serving) You can make your chili creamier by adding heavy cream. For a dairy-free option, use coconut milk. Fresh cilantro gives a bright touch and a pop of color. If you like spice, add jalapeños on top. Tortilla chips are great on the side for dipping. - This recipe makes 6-8 servings. - For fewer servings, you can cut the recipe in half. - If you want to freeze leftovers, use airtight containers for best results. The portion sizes work well for family dinners or meal prep. Adjust as needed for your crowd or to save for later. To start, gather all your ingredients. This makes cooking easier. 1. Place 2 lbs of boneless, skinless chicken breasts at the bottom of your slow cooker. 2. Next, add 1 medium chopped onion and 3 minced garlic cloves on top of the chicken. 3. Then, add 2 cans of drained great northern beans, 1 can of diced green chilies, and 1 cup of corn. 4. Pour in 4 cups of chicken broth. Sprinkle 1 teaspoon each of cumin, chili powder, and oregano, along with ½ teaspoon of salt and black pepper. 5. Now, stir everything gently to mix well. For cooking times, if you set your slow cooker to low, cook for 6-8 hours. If you use high, cook for 4-5 hours. Check the chicken. It should be tender and easy to shred. Once the cooking time is up, take the chicken out. Use two forks to shred it. Then, put the shredded chicken back into the pot. Next, stir in 1 cup of heavy cream or coconut milk for a dairy-free option. Mix well. Let it simmer on low for 20-30 minutes. This helps blend all the flavors together. Taste it. Adjust the seasoning with more salt or spices if you want. For serving, use warm bowls. Ladle the chili into each bowl. Garnish with fresh cilantro and optional sliced jalapeños for a bit of spice. Serve with crispy tortilla chips on the side. They add a great crunch! To ensure your chicken is tender, I recommend using boneless, skinless chicken breasts. This cut cooks evenly and stays moist. Place the chicken at the bottom of the slow cooker. The chicken will absorb all the broth flavors as it cooks. For flavor enhancement, use fresh garlic and onion. Their aromas boost your chili’s taste. Add spices like cumin and chili powder early. This allows the spices to bloom. Don't forget to taste and adjust seasonings before serving. You can substitute ingredients easily. If you want a different bean, black beans work well. For a lighter option, try turkey instead of chicken. Adjust the spice level to your liking. If you want more heat, add diced jalapeños or extra chili powder. For a milder flavor, skip the spicy ingredients. You can always serve hot sauce on the side for those who like it hot. For storing leftovers, let the chili cool first. Place it in an airtight container. It will stay fresh in the fridge for about three days. When reheating, use a pot on medium heat. Stir often to prevent sticking. If it seems thick, add a splash of chicken broth. You can also microwave individual portions. Just cover the bowl to avoid splatters. {{image_4}} You can change the beans or proteins in this chili. Try black beans, pinto beans, or chickpeas. Each bean brings a unique taste and texture. For proteins, use turkey or tofu instead of chicken. They will work well and add their own flair. If you want a vegetarian or vegan dish, swap the chicken for cauliflower or tempeh. Use vegetable broth instead of chicken broth. You can also add more beans to make it hearty. Coconut milk is a great dairy-free option, making it creamy and rich. To make your chili unique, add spices or herbs. Consider adding smoked paprika for a deep flavor or cayenne for heat. Fresh herbs like cilantro or parsley can brighten the dish. Incorporating extra vegetables is another fun way to change it up. Bell peppers, zucchini, or carrots can enhance the texture and taste. Just chop them small and add them with the other ingredients. This makes your chili more colorful and packed with nutrients. You can serve your chili with many tasty sides. Try sour cream or Greek yogurt for creaminess. Grated cheese is also a great topping. For a complete meal, make it a one-pot dish. Add rice, quinoa, or pasta to the slow cooker. They will soak up flavors and make the dish filling. You can also serve it with warm tortillas or crusty bread for dipping. Enjoy exploring these variations to find your favorite combination! To keep your slow cooker white chicken chili fresh, follow these steps: - Refrigeration tips: Let the chili cool to room temperature. Transfer it to an airtight container. Store it in the fridge for up to four days. This keeps it safe and tasty. - Freezing techniques for longer shelf life: If you want to keep it longer, freeze the chili. Use freezer-safe bags or containers. Remove as much air as you can. Label them with the date. It can last up to three months in the freezer. The shelf life of your chili depends on how you store it: - How long it stays fresh in the fridge: In the fridge, your chili remains fresh for about four days. After that, it may lose flavor and safety. - Properly frozen duration: When frozen, it stays good for about three months. Make sure to thaw it in the fridge before reheating. It's important to check for signs of spoilage: - Identifying when it’s no longer good to eat: If you see any mold or if it smells sour, do not eat it. Also, if the texture seems slimy or off, throw it away. Always trust your senses to keep meals safe. What can I use instead of chicken? You can use turkey or tofu as a great substitute. Both options work well. Turkey gives a similar taste and texture. Tofu absorbs flavors and makes it vegetarian. Can I make this chili spicy? Absolutely! To add heat, include more diced green chilies or sliced jalapeños. You can also sprinkle in cayenne pepper or hot sauce to taste. How do I thicken my chili? To thicken your chili, try mashing some beans in the pot. You can also add cornstarch mixed with water. Another option is to simmer it longer with the lid off. Can I prepare this recipe in advance? Yes, you can prep the ingredients a day ahead. Just store them in the fridge. You can also cook and store the chili in the fridge for up to three days. Is this recipe healthy? Yes, this recipe can be healthy. It includes lean chicken, beans, and veggies. These ingredients provide protein, fiber, and essential nutrients. Can I reduce calories or fat content? You can reduce calories by using less heavy cream or switching to coconut milk. You can also use low-fat chicken or skip the cream entirely for a lighter dish. This blog post explored how to make a delicious chili using simple ingredients. You learned about main and optional ingredients, step-by-step cooking instructions, and tips for customizing your dish. The post also highlighted storage methods and variations for different diets. Chili is versatile and easy to make. You can adapt it to your taste and enjoy it countless ways. Get cooking and make this chili your own!

Slow Cooker White Chicken Chili Flavorful Dinner Delight

Craving a warm, hearty meal that’s easy to make? Slow cooker white chicken chili is your answer! This dish combines

For this soup, you need a few key ingredients that blend well. Here’s what you will need: - 2 cans (15 oz each) cannellini beans, drained and rinsed - 4 cups vegetable broth - 1 cup heavy cream (or coconut cream for a vegan alternative) - 1 tablespoon extra-virgin olive oil - 1 medium onion, finely diced - 3 cloves garlic, minced - 2 cups kale, roughly chopped (stems discarded) - 1 teaspoon dried oregano - 1 teaspoon dried thyme - 1/2 teaspoon red pepper flakes (adjust to your spice preference) - Salt and freshly ground black pepper to taste - Fresh basil leaves, for garnish Using good quality olive oil makes a big difference. It adds flavor and richness. Fresh garlic and onion create a strong base that enhances the soup. The cannellini beans are creamy and filling, making them perfect for this dish. If you have dietary needs, you can easily adjust this recipe. Here are some options: - Use coconut cream for a vegan choice. - Substitute vegetable broth with chicken broth for added flavor. - Swap kale with spinach if you prefer a milder green. - Add chickpeas instead of beans for more protein. These swaps let you enjoy the soup without losing taste. They also cater to different diets. Herbs and spices bring the soup to life. I suggest using: - Fresh basil leaves for garnish, which add a nice touch. - Dried oregano and thyme are key flavors in this soup. - Adjust red pepper flakes based on how spicy you like it. You can also experiment with fresh herbs, like parsley or dill. Fresh herbs brighten the dish and add vibrant flavors. Using the right herbs enhances the overall experience of the soup. Start by heating olive oil in a large pot over medium heat. Once the oil is hot, add the diced onion. Sauté the onion for 5 to 7 minutes. It should turn soft and see-through. After that, add minced garlic and red pepper flakes. Stir this mixture for 1 to 2 minutes. It will smell great, but watch so the garlic doesn’t burn. Next, it’s time to add the main ingredients. Pour in the drained cannellini beans and vegetable broth. Then, add dried oregano, dried thyme, and a good pinch of salt and pepper. Stir everything well. Bring this mix to a gentle simmer. Once it starts simmering, lower the heat. Let it cook uncovered for 15 minutes. This step lets all the flavors blend together. Now, let’s make it creamy! Use an immersion blender to blend the soup. Blend it until it’s smooth but keep some bean chunks for texture. If you don’t have an immersion blender, you can use a regular blender. Just transfer some soup in batches and blend until smooth. After blending, return the soup to the pot. Stir in the heavy cream or coconut cream for a vegan option. Add the chopped kale next. Cook everything over low heat for 5 minutes. This step makes the kale tender and warms the soup through. Before serving, taste your soup. Adjust the salt and pepper as you like. To change the taste of your soup, you can add more herbs or spices. If you love garlic, add extra minced garlic for a bolder flavor. You can also use fresh herbs like basil or parsley. They add freshness and bright notes. For a tangy twist, mix in a splash of lemon juice before serving. Taste as you go to find your perfect balance! For a rich and creamy soup, blending is key. Use an immersion blender to create a smooth base. Leave some whole beans for texture. If you want a thicker soup, let it simmer longer. This lets the flavors deepen and the soup thicken. Always add the heavy cream or coconut cream at the end. This keeps it rich without boiling away its creaminess. Presentation can make your soup even more inviting! Ladle the hot soup into rustic bowls. Add fresh basil leaves on top for a pop of color. A light drizzle of extra-virgin olive oil adds shine. For extra crunch, sprinkle some homemade croutons or grated cheese on top. These small touches make your dish look and taste gourmet! {{image_4}} You can easily make this soup vegan. Just swap heavy cream for coconut cream. The coconut cream adds a rich, creamy texture. It also gives a hint of sweetness that pairs well with the savory flavors. You won’t miss the dairy at all! To make this soup heartier, consider adding protein. Chickpeas are a great option. They blend well and add a nice texture. If you prefer meat, try adding sausage. Slice it up and sauté it with the onions. This adds a savory depth to the soup. Either option boosts the nutritional value and makes the dish more filling. Short on time? Use an Instant Pot for a fast meal. Start by sautéing the onions and garlic using the sauté function. Then, add the beans, broth, and spices. Seal the lid and cook on high pressure for 10 minutes. After it’s done, quick-release the steam. Finally, blend the soup and add the cream and kale. This method saves time without sacrificing flavor. To store leftover creamy Tuscan white bean soup, let it cool first. Then, transfer it to an airtight container. This helps keep the soup fresh. You can store it in the fridge for up to four days. If you want to keep it longer, freezing is a great option. When ready to eat your soup, reheat it on the stove. Pour the soup into a pot and heat over low to medium heat. Stir often. This helps the flavors blend again. If the soup gets too thick, add a splash of vegetable broth or water. You want it creamy, not clumpy! Freezing creamy Tuscan white bean soup is easy. Use freezer-safe containers or bags. Be sure to leave some space for expansion. The soup can last in the freezer for up to three months. When you’re ready to enjoy it, thaw it in the fridge overnight. Then, reheat as mentioned above. This way, you can have a warm, delicious meal ready anytime! Yes, you can use dried beans. First, soak them overnight. Then, cook them until tender before adding to the soup. This will take more time, but it can deepen the flavor. Use about 1 cup of dried beans for this recipe. To add heat, use more red pepper flakes. You can also add diced jalapeños or hot sauce. Start with a small amount and taste as you go. This way, you can find the perfect spice level for you. This soup pairs well with crusty bread or a fresh salad. You can also serve it with homemade croutons for extra crunch. A sprinkle of cheese on top adds flavor too. Enjoy it with a glass of white wine for a nice touch! This blog covers everything about making creamy Tuscan white bean soup. We discussed key ingredients, cooking steps, and tasty variations. Remember to use fresh herbs for the best flavor. Adjust seasonings to fit your taste and enjoy it hot or cold. Store leftovers well to keep its creaminess. With these tips, you can create a soup that impresses every time. Enjoy your cooking adventure!

Creamy Tuscan White Bean Soup Flavorful and Simple Dish

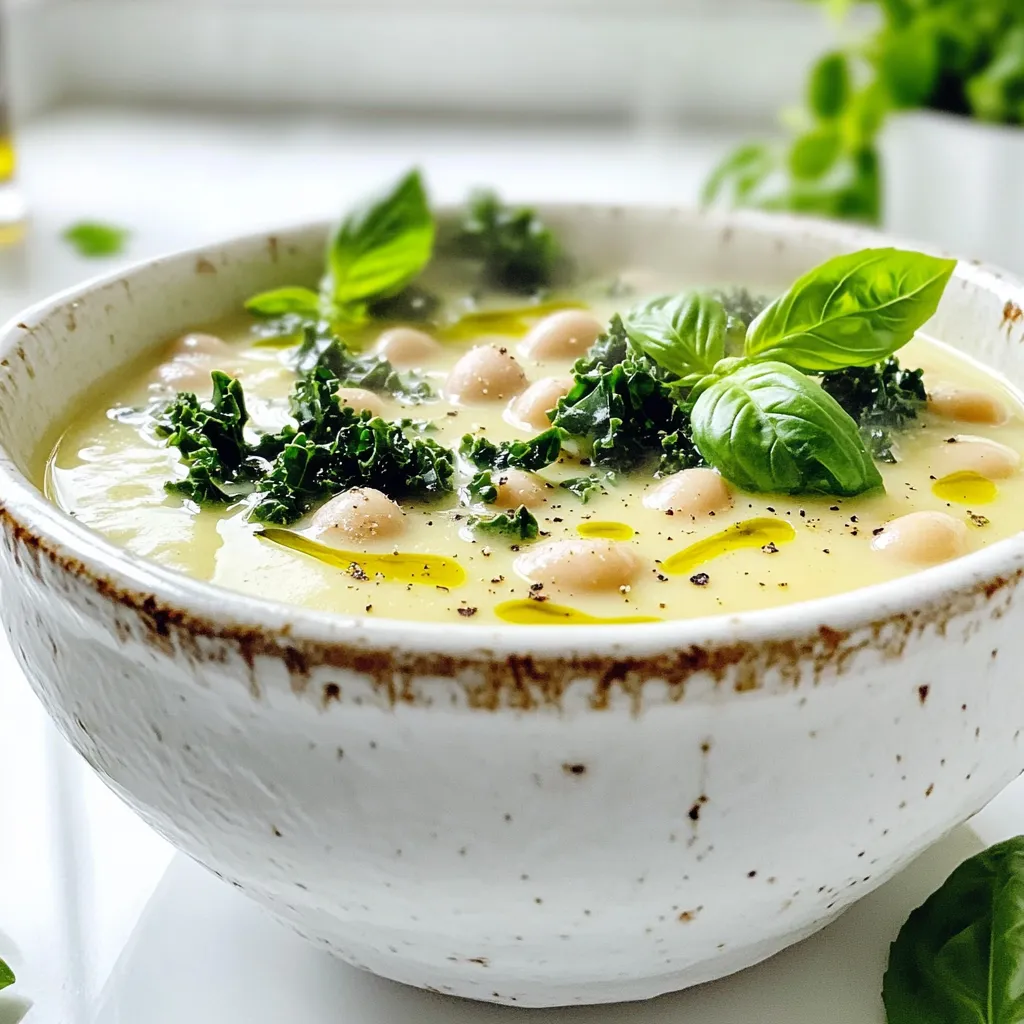
Looking for a warm bowl of comfort? This Creamy Tuscan White Bean Soup is easy to make and packed with

- 2 cups all-purpose flour - 1 teaspoon baking powder - 1/2 teaspoon baking soda - 1/4 teaspoon salt - 1/2 cup unsalted butter, softened - 1 cup granulated sugar - 3 large eggs - 1 teaspoon vanilla extract - 1/2 cup apple cider - 1 teaspoon ground cinnamon - 1/4 teaspoon ground nutmeg - 1 cup powdered sugar (for the glaze) - 2 tablespoons apple cider (for the glaze) You will need common items for this cake. Start with flour, baking powder, and baking soda. These form the base. Next, you need salt to enhance flavor. Butter adds richness and moisture. Use unsalted butter for better control over salt. Granulated sugar sweetens the cake. Eggs provide structure and help it rise. Vanilla extract adds a lovely flavor. Apple cider is key to the cake's taste. It gives moisture and a hint of fall. For spice, ground cinnamon and nutmeg are perfect. They warm up the flavor. Finally, powdered sugar and apple cider make a tasty glaze. This glaze adds sweetness and a beautiful finish. Enjoy gathering these simple ingredients! First, you need to preheat your oven to 350°F (175°C). This step is key for even baking. While your oven heats, grab a 9x5 inch loaf pan. Generously grease and flour the pan. This helps the cake come out easily once baked. In a medium bowl, mix the dry ingredients. Combine 2 cups of all-purpose flour, 1 teaspoon of baking powder, 1/2 teaspoon of baking soda, 1/4 teaspoon of salt, 1 teaspoon of ground cinnamon, and 1/4 teaspoon of ground nutmeg. Whisk them well and set the bowl aside. Now, take a large bowl and add 1/2 cup of softened unsalted butter and 1 cup of granulated sugar. Use an electric mixer on medium speed. Beat this mixture for about 3-4 minutes. It should look light and fluffy. This step adds air and makes your cake soft. Next, add 3 large eggs to your butter-sugar mix. Do this one at a time. Mix well after each egg to ensure a smooth batter. Lastly, stir in 1 teaspoon of vanilla extract. This adds a lovely flavor to your cake. Now, it’s time to mix the dry and wet ingredients. Gradually add the dry mixture to the wet mix, alternating with 1/2 cup of apple cider. Start with a bit of dry, then add some cider. Repeat this until everything is mixed. Be careful not to overmix; this keeps your cake tender and light. Pour the batter into your prepared loaf pan. Use a spatula to smooth the top. This helps it bake evenly. Place the pan in the center of the oven. Bake for 50-60 minutes. Check if it's done by inserting a toothpick. It should come out clean when the cake is ready. After baking, remove the cake from the oven. Let it cool in the pan for about 10 minutes. This helps it firm up. Then, transfer it to a wire rack to cool completely. While it cools, make the glaze. Mix 1 cup of powdered sugar with 2 tablespoons of apple cider until smooth. Drizzle this glaze over the cooled cake for a sweet finish. To make the best pound cake, avoid overmixing your batter. Overmixing can lead to a dense cake. When you combine the wet and dry ingredients, mix just until you see no flour. This keeps your cake light and fluffy. For the glaze, aim for a smooth and thick consistency. Mix the powdered sugar with apple cider until it is just right. If your glaze is too thick, add a drop of cider. If it's too thin, sprinkle in more powdered sugar. Taste as you go to find your perfect balance. For a stunning display, serve your cake on a rustic wooden board. Add thinly sliced apples on the side for color. A sprinkle of cinnamon on top adds warmth and charm. This simple touch makes your dessert look inviting and festive. {{image_4}} You can make this pound cake even better by adding nuts or raisins. Chopped walnuts or pecans add a nice crunch. They also bring a rich flavor that pairs well with apple cider. You can also add a cup of raisins for a sweet surprise in each bite. Just fold them into the batter before you pour it into the pan. This small step takes the cake to a new level! While the apple cider glaze is tasty, you can try other options too. A caramel glaze gives a sweet and buttery twist. Melt some caramel candies with a bit of cream for a smooth glaze. You could also use a simple vanilla glaze. Just mix powdered sugar with milk and vanilla extract. Each glaze offers a unique flavor, so feel free to experiment! For a gluten-free version, you can easily swap the all-purpose flour. Use a 1-to-1 gluten-free flour blend instead. These blends work well in most recipes. They provide the same texture and taste without the gluten. You might also try almond flour for a nutty flavor. Just remember to adjust the moisture in the recipe as needed. To keep your apple cider glazed pound cake fresh, wrap it well. Use plastic wrap to cover the cake tightly. You can also place it in an airtight container. Store it at room temperature for best results. This keeps the cake moist and tasty. Avoid putting it in the fridge, as this can dry it out. Freezing your cake is easy. First, let it cool completely. Then, wrap it tightly in plastic wrap. After that, place it in a freezer-safe bag or container. This prevents freezer burn. When you want to enjoy it, thaw it overnight in the fridge. For a quick thaw, leave it at room temperature for a few hours. When stored properly, your cake lasts about 4 to 5 days at room temperature. If you freeze it, it can last for up to 3 months. However, for the best taste, enjoy it within the first month. The flavors are freshest then, making each bite a delight. Yes, you can use store-bought apple cider. Look for cider that is pure and has no added sugars. Fresh cider gives a great taste, but store-bought works well too. You can find it in most grocery stores, especially in the fall. You can use several options to replace eggs in baking. Some good choices are: - 1/4 cup unsweetened applesauce - 1/4 cup yogurt - 1/4 cup silken tofu, blended - 1 tablespoon ground flaxseed mixed with 2.5 tablespoons water These substitutes help bind the cake while keeping it moist. To test for doneness, insert a toothpick into the center of the cake. If it comes out clean or with a few crumbs, the cake is ready. If it has wet batter on it, bake for a few more minutes. Keep an eye on it to avoid overbaking. Yes, you can make this cake ahead of time. Bake it one to two days before serving. Store it in an airtight container at room temperature. You can also freeze it for up to three months. Just remember to glaze it after thawing for the best taste. This blog post covers how to make a delicious apple cider cake, from gathering ingredients to baking techniques. We explored key ingredients, step-by-step instructions, and expert tips to perfect your cake. Remember, great texture requires care, and glazing enhances flavor. Variations add fun, while proper storage keeps your cake fresh. Baking is rewarding, so enjoy the process and share your tasty results! With these insights, you are ready to impress friends and family with your baking skills. Happy baking!

Apple Cider Glazed Pound Cake Delightful Dessert Recipe

Get ready to treat your taste buds! This Apple Cider Glazed Pound Cake is a sweet dream come true. With

For this smothered chicken rice skillet, you'll need some key items. - Chicken thighs: Use 4 boneless, skinless chicken thighs. They stay juicy and cook well. - Rice: One cup of long-grain white rice works best. It cooks evenly and pairs nicely. - Broth: Two cups of chicken broth adds flavor. You can use low-sodium options if desired. - Vegetables: You’ll need one medium onion, diced, and one bell pepper, diced. Add one cup of frozen mixed vegetables for extra color and taste. Now, let's talk about the seasonings and oil. - Olive oil: Two tablespoons of olive oil help sauté the veggies and chicken. It adds a nice richness. - Spices: For seasoning, use one teaspoon of smoked paprika, one teaspoon of dried oregano, and half a teaspoon of ground black pepper. Adjust salt to taste. - Optional garnishes: Fresh parsley adds a lovely touch on top. It brightens the dish and makes it look great. {{ingredient_image_2}} - Seasoning the chicken: Start by taking the four chicken thighs. Generously season both sides with salt, black pepper, smoked paprika, and dried oregano. The spices will add great flavor to the chicken. - Cooking the chicken in the skillet: Heat two tablespoons of olive oil in a large skillet over medium heat. Once the oil is hot, add the seasoned chicken thighs. Cook them for about 5-7 minutes on each side. You want them golden brown and fully cooked. After cooking, take the chicken out and let it rest on a plate. - Adding onion and bell pepper: In the same skillet, toss in the diced onion and bell pepper. Sauté these veggies for about 3-4 minutes. You want the onion to become soft and see-through. - Incorporating garlic: Next, add minced garlic to the skillet. Cook for one more minute. The garlic will fill your kitchen with a lovely aroma. - Toasting the rice: Now, add one cup of long-grain white rice to the skillet. Stir well to coat the rice with the oil and veggies. Toast the rice for about 2 minutes. This helps the rice soak up all the flavors. - Adding broth and returning chicken: Pour in two cups of chicken broth, stirring gently. Make sure to scrape up any tasty bits stuck to the bottom. Then, return the cooked chicken thighs to the skillet, nestling them into the rice. - Covering and cooking duration: Sprinkle one cup of frozen mixed vegetables over the top. Cover the skillet with a lid. Let the mixture come to a gentle simmer. - Fluffing the rice before serving: Once it simmers, turn the heat to low. Cook for 20-25 minutes. After this time, remove the skillet from heat and let it sit for 5 minutes. This lets the rice firm up. Finally, use a fork to fluff the rice and mix it with the chicken. Enjoy your meal! - To keep the chicken juicy, do not overcook it. Cook each side for 5-7 minutes. Use a meat thermometer to check for an internal temperature of 165°F. This ensures it stays moist and tender. - For rice texture, long-grain white rice works best. It stays fluffy and separates well. Avoid short-grain rice, as it tends to clump together and become sticky. - Pair your dish with a fresh side salad or crusty bread. Both add great texture and flavor. A green salad with a light vinaigrette complements the richness of the chicken and rice. - For garnishing, fresh parsley adds a nice pop of color. You can also sprinkle some red pepper flakes for a touch of heat. This not only enhances flavor but also makes your dish look appealing. Pro Tips Even Cooking: For evenly cooked chicken, choose thighs of similar size. This ensures they cook at the same rate and avoid any undercooked pieces. Flavor Boost: Enhance the dish by marinating the chicken thighs in olive oil, smoked paprika, and oregano for a few hours before cooking for deeper flavor. Rice Texture: Rinsing the rice before cooking can remove excess starch, resulting in fluffier rice that doesn’t clump together. Resting Time: Allowing the dish to rest after cooking helps the flavors meld together and ensures the rice firms up for better serving. {{image_4}} You can easily boost the flavor of your smothered chicken rice skillet. Start by adding spices. Try a pinch of cayenne for heat. You can also use chili powder for a smokier taste. Hot sauce can add a nice kick as well. Consider using different vegetables too. You can swap the frozen mixed veggies for fresh ones. Spinach, zucchini, or mushrooms work great. Just chop them up and add them in when you sauté the onion and bell pepper. These simple changes can make your dish even more exciting! If you need gluten-free options, use gluten-free rice. Many types of rice are naturally gluten-free. Just check the label to be sure. You can also use chicken broth labeled gluten-free. Want to change the protein? You can swap chicken thighs for tofu, turkey, or pork. Just adjust the cooking time based on the protein you choose. This way, you can make the dish fit your diet while keeping it tasty! To keep your smothered chicken rice skillet fresh, follow these tips: - Refrigeration: Let the dish cool to room temperature. Then, place it in an airtight container. Store it in the fridge for up to 3 days. This keeps the flavors intact and makes it easy to grab for a quick meal. - Freezing: For longer storage, freeze the dish. Use a freezer-safe container. It stays good for up to 2 months. When ready to eat, thaw it in the fridge overnight before reheating. This method helps maintain the taste and texture. When it’s time to enjoy your leftovers, try these methods: - Microwave: Place a portion in a bowl and cover it loosely. Heat at medium power for 2-3 minutes. Stir halfway through to ensure even heating. This method is quick and convenient. - Stovetop: Heat a skillet over medium heat. Add a splash of chicken broth or water to keep it moist. Stir the dish and heat for about 5-7 minutes. This method helps keep the rice fluffy and the chicken juicy. To keep the rice fluffy, avoid overcooking it during reheating. Stir gently to mix the chicken and rice without breaking the grains. Enjoy your delicious meal again! Yes, you can use brown rice! However, brown rice takes longer to cook. You should adjust the cooking time to about 40-45 minutes. Make sure to add extra broth or water since brown rice absorbs more liquid. If you don't have chicken thighs, you can use chicken breasts. They will work well but may dry out faster. You can also try turkey thighs or even tofu for a vegetarian option. Just adjust the cooking time to ensure they cook through. Absolutely! This recipe is great for meal prep. You can make a big batch and store it in individual containers. Just keep it in the fridge for up to four days. You can also freeze portions for up to three months. Simply thaw in the fridge before reheating. Yes! Adding more veggies can boost the dish's nutrition. Consider adding spinach, zucchini, or mushrooms. You can mix in fresh or frozen vegetables. Just add them at the same time as the frozen mixed vegetables for even cooking. This dish combines simple ingredients to create a hearty meal. We covered the best chicken and rice, perfect seasonings, and cooking steps. Tips about storage and variations help you make it yours. You can tweak flavors or adapt for diets easily. In short, cooking at home can bring joy. With practice, you’ll make a dish your family loves. Enjoy your cooking adventures and share your results!

Smothered Chicken Rice Skillet Quick and Tasty Meal

Looking for a quick and tasty weeknight meal? You’ve found it! This Smothered Chicken Rice Skillet combines juicy chicken thighs

Older posts
Newer posts
← Previous Page1 Page2 Page3 Page4 … Page86 Next →

dsad

© 2026 lazychefmagic • Built with GeneratePress

Our Policies

  • Copyright Policy
  • Cookie Policy
  • GDPR Policy
  • Privacy Policy
  • Disclaimer
  • Terms Of Use

More Information

  • Home
  • About
  • Contact
  • Appetizers
  • Dessert
  • Dinner
  • Drinks
©2026, lazychefmagic About Back To Top