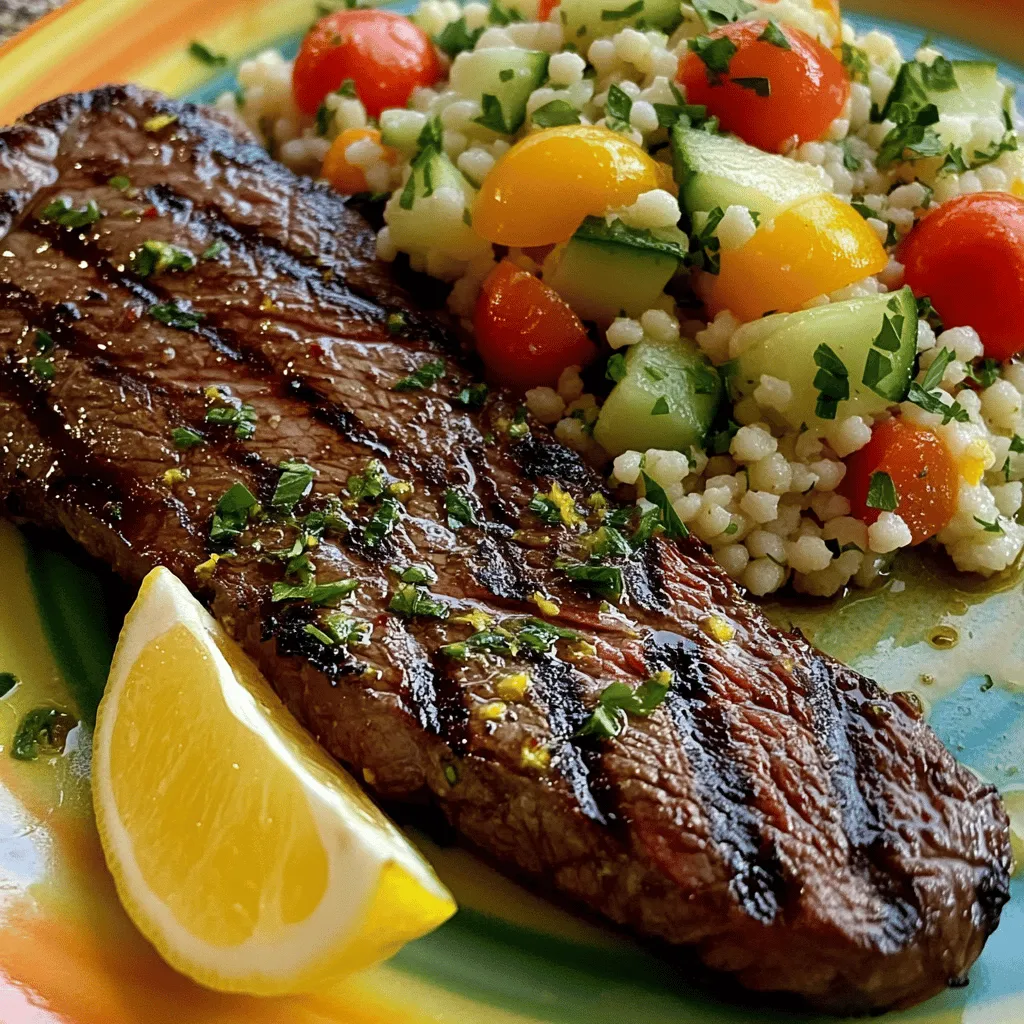
Grilled Skirt Steak with Lemon Herb Couscous Delight
Ready to impress your taste buds? My Grilled Skirt Steak with Lemon Herb Couscous Delight is the dish you need!
Ready to impress your taste buds? My Grilled Skirt Steak with Lemon Herb Couscous Delight is the dish you need!
![To create a Kiwi Mint Mojito Mocktail, you need fresh and simple ingredients. Here’s the complete list: - Fresh kiwi - Mint leaves - Sweetener options - Lime juice - Sparkling water - Garnishes Using ripe and juicy kiwis makes a big difference. I love the bright green color of fresh kiwi. It adds a fun look to your drink. Mint leaves bring a cool taste that pairs well with kiwi. You can choose your sweetener. Honey works well, but you can use sugar or agave too. Fresh lime juice adds a zesty kick that brightens the flavor. Sparkling water gives the drink its fizz. Finally, use kiwi slices and mint sprigs as garnishes for a lovely finish. You can find the full recipe [here]. Enjoy crafting this refreshing summer drink! To start, gather your ingredients. You will need ripe kiwis, fresh mint leaves, honey, and lime juice. In a sturdy glass or cocktail shaker, place the chopped kiwi pieces along with the mint leaves. Now, let’s talk about muddling. Use a muddler or the back of a spoon. Press down gently on the kiwis and mint. You want to mash them just enough to release their juices and oils. Aim for a pulpy mixture but don’t over-muddle. This step makes the flavors pop! Next, add honey and lime juice to the mixture. Muddle gently once more to blend everything well. The sweetness of the honey and the tartness of the lime will bring your mocktail to life. Now it’s time to prepare your glass. Fill it with ice cubes to the top. This will keep your drink cold and refreshing. After preparing the base, it’s time to add the sparkling water. Pour it over the ice slowly. This helps maintain the bubbles. When you stir, do it gently. Use a straw or spoon and mix just enough to blend the kiwi-mint base with the sparkling water. Be careful not to stir too hard, or you’ll lose the carbonation. For a stunning presentation, garnish your mocktail. Add extra mint sprigs and kiwi slices on the rim of the glass. This not only looks great but also adds a hint of flavor. Follow these steps, and you will have a delightful Kiwi Mint Mojito Mocktail. You can find the Full Recipe for more details! - Choosing ripe kiwis: Look for kiwis that are soft to the touch. They should have a nice, sweet smell. Ripe kiwis blend better and enhance the drink's taste. - Adjusting sweetness levels: Start with one tablespoon of honey. If you like it sweeter, add more. Taste as you go to find the right balance. - Balancing mint and lime flavors: Use fresh mint for a bright taste. Lime adds zing. Start with one tablespoon of lime juice and adjust to your liking. - Ideal occasions for the mocktail: This drink is perfect for hot summer days, picnics, or family gatherings. It’s a fun drink for kids and adults. - Pairing with snacks or appetizers: Serve this mocktail with light snacks, like chips and guac or fresh veggies. It also goes well with fruity desserts. {{image_4}} You can add a twist to your Kiwi Mint Mojito Mocktail with other fruits. Try adding berries like strawberries or raspberries for a fruity punch. Pineapple also adds a tropical vibe that blends well with kiwi. You can even mix in some cucumber slices for a refreshing crunch. If you want to explore herbal infusions, you can use basil or thyme. These herbs give a unique flavor that complements the mint. Just remember to muddle them lightly to release their oils. To turn your mocktail into a cocktail, simply add some alcohol. Light rum is a classic choice for mojitos, enhancing the tropical feel. You can also use vodka for a smoother taste. If you enjoy gin, its herbal notes will pair well with the mint. Try to keep the balance right. Start with one or two ounces of alcohol. Then adjust to your taste. This way, you’ll have a refreshing drink without overpowering the kiwi and mint flavors. For the full recipe, check out the Kiwi Mint Mojito Mocktail 🥝. To keep kiwis fresh, store them in the fridge. They last longer when cool. Place them in a plastic bag with holes. This keeps air flow while avoiding moisture. Mint leaves need care too. Wrap them in a damp paper towel. Then put them in a plastic bag. This helps them stay fresh longer. If you plan to prepare the mocktail in advance, chop the kiwis and keep them in an airtight container. This cuts down on prep time later. Enjoy your Kiwi Mint Mojito Mocktail within a few hours for the best taste. After that, it may lose its fizz. If you have leftovers, store them in the fridge. Consume within 24 hours. To bring back some life, add fresh mint or a splash of sparkling water. This can help refresh stale mocktails. Always taste before serving. A quick stir can also help mix flavors. For the full recipe, check out the linked section to create your perfect drink! What are the health benefits of kiwis and mint? Kiwis are full of vitamin C, which helps your immune system. They also have fiber, good for digestion. Mint can aid in digestion too. It freshens your breath and adds flavor without extra calories. Together, they make a tasty and healthy drink. Can I make this mocktail ahead of time? You can prepare the kiwi-mint base in advance. Just muddle kiwis and mint, then store it in the fridge. When you’re ready to serve, add ice and sparkling water. This keeps the drink fresh and fizzy. What’s the best way to adjust sweetness? Honey is a great choice for sweetness. Start with one tablespoon and taste it. If it’s not sweet enough, add more honey. You could also use agave syrup or any sweetener you prefer. Adjust to your taste for the perfect balance. Enjoy making your Kiwi Mint Mojito Mocktail! For the detailed process, check the Full Recipe. This blog post shared how to make a refreshing Kiwi Mint Mojito mocktail. You learned about key ingredients, from fresh kiwis to sparkling water. The step-by-step guide helped you muddle and mix for the best flavor. I shared tips for enhancing taste and ideas for serving. Plus, you found fun variations to try. Remember, the fresh taste of kiwi and mint can brighten any occasion. Enjoy crafting your mocktails and impressing friends with tasty drinks!](https://lazychefmagic.com/wp-content/uploads/2025/06/5838832d-8a5e-498b-8a91-481f79fab9c6.webp)
Are you ready to sip on a refreshing Kiwi Mint Mojito Mocktail this summer? With just a few simple ingredients
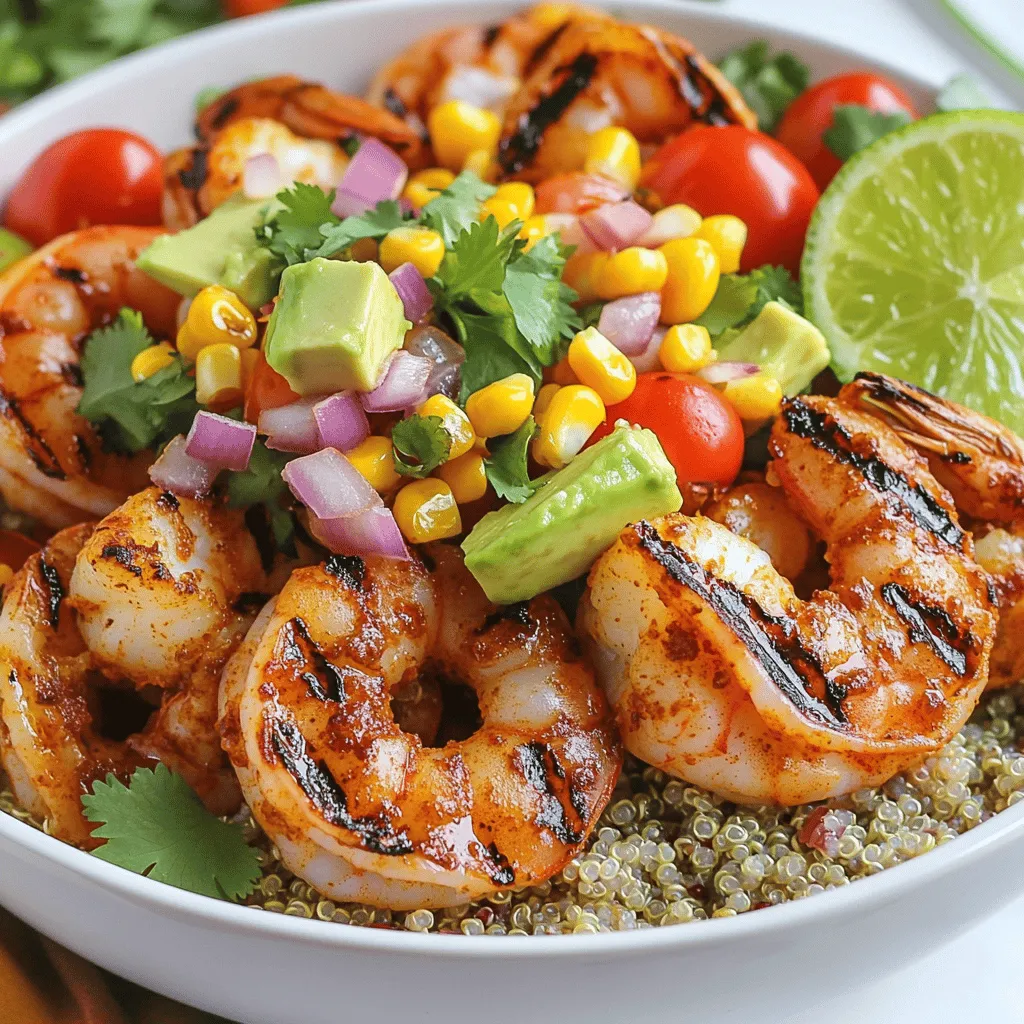
Looking for a fresh, tasty dish that’s easy to make? Try my Grilled Shrimp Bowl with Avocado and Corn Salsa

Are you ready to spice up your pizza night? Lemon pizza offers a refreshing twist on your favorite classic. With
![- 2 boneless, skinless chicken breasts - 2 cups fresh tortellini (cheese or spinach-filled) - 1 cup cherry tomatoes, halved - 1 cup fresh spinach, roughly chopped - 1 cup zucchini, sliced into half-moons - 1/2 cup store-bought basil pesto - 2 tablespoons olive oil - 1 teaspoon garlic powder - Salt and freshly ground black pepper to taste - Optional: Grated Parmesan cheese and fresh basil leaves for garnish Gather these ingredients to make One-Pan Pesto Chicken with Tortellini and Veggies. Each one plays a key role in creating a delicious meal. The chicken brings protein, while the tortellini adds a fun, chewy texture. Cherry tomatoes and zucchini give freshness and color. Spinach adds a healthy touch. The basil pesto unites all flavors with its rich taste. Olive oil helps cook the chicken and veggies. Garlic powder gives extra flavor, while Parmesan cheese enhances the dish when served. You can find the full recipe at [Full Recipe]. Enjoy cooking! - Heat the Oil: In a large skillet, heat olive oil over medium heat. Wait until the oil shimmers. - Season the Chicken: Season both sides of the chicken breasts with garlic powder, salt, and pepper. This adds great flavor. - Cook the Chicken: Place chicken in the skillet. Cook for 6-7 minutes on each side. The chicken should be golden brown and cooked through. - Sauté the Vegetables: Add zucchini and cherry tomatoes to the skillet. Cook for 3-4 minutes until they start to soften. - Add Spinach: Stir in the spinach. Cook until the spinach wilts, which should take about 1-2 minutes. - Cook the Tortellini: Boil water in a pot. Add fresh tortellini and cook according to the package instructions. This usually takes 3-5 minutes. - Combine Everything: Once the tortellini is cooked, drain it. Add the tortellini to the skillet with the cooked vegetables. - Finish the Dish: Slice the cooked chicken and return it to the skillet. Pour in the basil pesto and gently toss everything together. Heat for about 2 minutes. - Adjust Seasoning and Serve: Taste the dish and adjust the seasoning. Add more salt and pepper if needed. Enjoy this vibrant meal warm. For the full recipe, be sure to check out the complete guide. - Use a meat thermometer for perfect chicken doneness. Cook chicken to 165°F (75°C). - Adjust cooking times based on heat and pan size. High heat cooks faster than low heat. - Substitute chicken with shrimp or tofu for a different protein. This change adds variety. - Experiment with other vegetables like bell peppers or broccoli. Both add color and nutrition. - Serve in shallow bowls with a sprinkle of Parmesan. This adds flavor and looks nice. - Use fresh basil as a garnish for visual appeal. A bright green touch makes the dish pop. For the full recipe, check out the complete instructions above. Enjoy your cooking! {{image_4}} You can easily boost the taste of this dish. - Add lemon zest for a citrusy twist. It brightens the flavors and adds freshness. - Incorporate red pepper flakes for added spice. This gives your dish a nice kick that many enjoy. You can make this meal suit different diets. - Use gluten-free tortellini for a gluten-free option. Many brands offer tasty choices that fit this need. - Opt for dairy-free pesto to make it vegan-friendly. Look for brands that use nuts or seeds in their pesto. Planning ahead can save time later. - Prepare ingredients ahead and store separately until ready to cook. This makes cooking quick and easy on busy days. - Make a large batch to freeze for quick meals later. You can thaw it out for a fast dinner option. These variations help you customize One-Pan Pesto Chicken with Tortellini and Veggies to your taste and needs. Enjoy experimenting with flavors and ingredients! For the complete recipe, check the [Full Recipe]. - Refrigeration: Store in an airtight container for up to 3 days. This keeps your dish fresh and tasty. - Freezing: Freeze portions in freezer-safe bags for up to 2 months. This is great for quick meals later. - For best results, reheat in a skillet over low heat until warmed through. This helps maintain the texture. - Alternatively, microwave in short intervals, stirring occasionally. Check often to avoid overheating. Prep time is just 10 minutes. The total cook time is 30 minutes. This recipe serves four people. Yes, you can prepare the ingredients ahead of time. Store them in the refrigerator until you are ready to cook. You can try sun-dried tomato pesto or make your own homemade pesto if you like. Yes, you can make it gluten-free by using gluten-free tortellini. This recipe for One-Pan Pesto Chicken with Tortellini combines simple ingredients with easy steps. You learned how to cook tender chicken, fresh veggies, and flavorful tortellini in just one pan. I shared tips for meal prep and variations to fit your needs. Cooking can be quick and fun! Don't hesitate to make this dish your own with your favorite flavors. Enjoy your meal and feel confident in the kitchen!](https://lazychefmagic.com/wp-content/uploads/2025/06/46a9a28b-9313-4af7-b6f4-469fa6dcf004.webp)
Are you craving a quick and tasty meal? This One-Pan Pesto Chicken with Tortellini and Veggies is perfect for you!
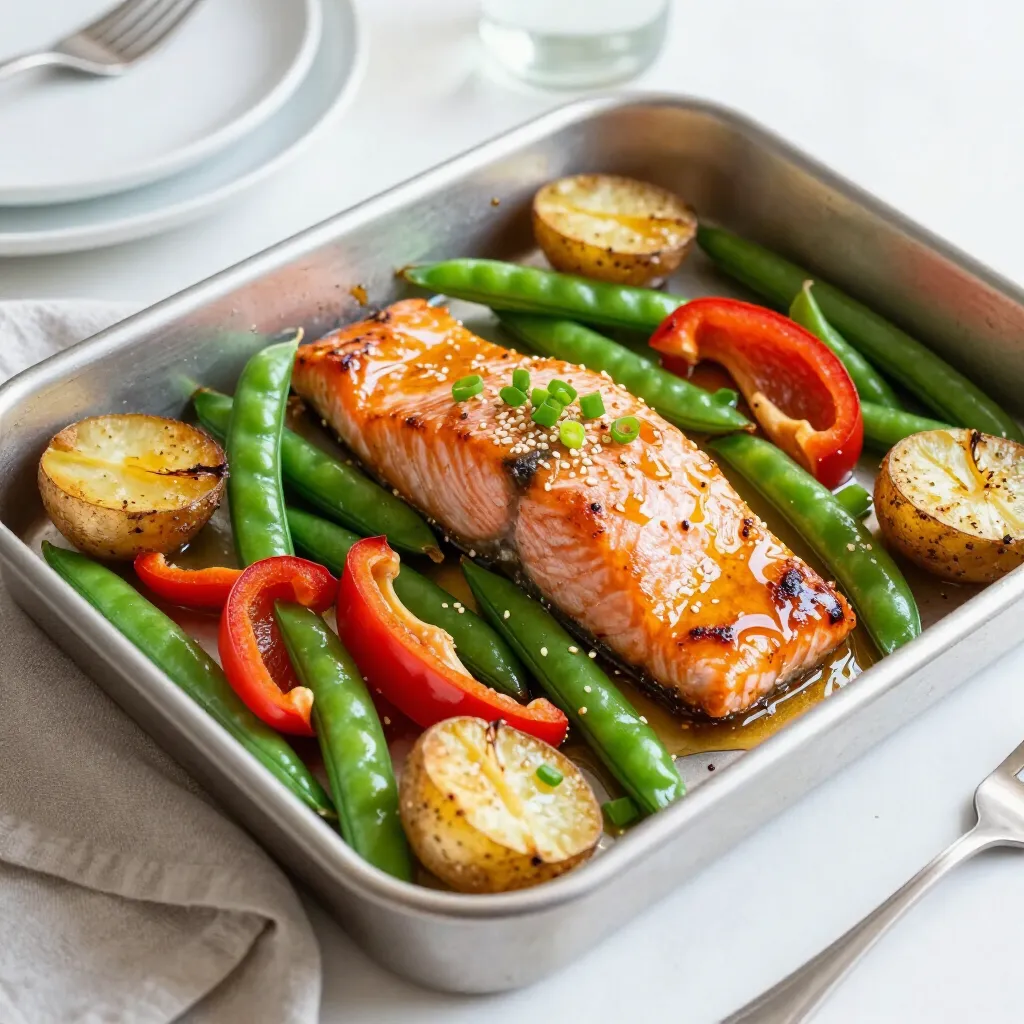
Looking for a simple yet flavorful dinner? This Sheet Pan Honey Garlic Salmon is your answer! With just a few
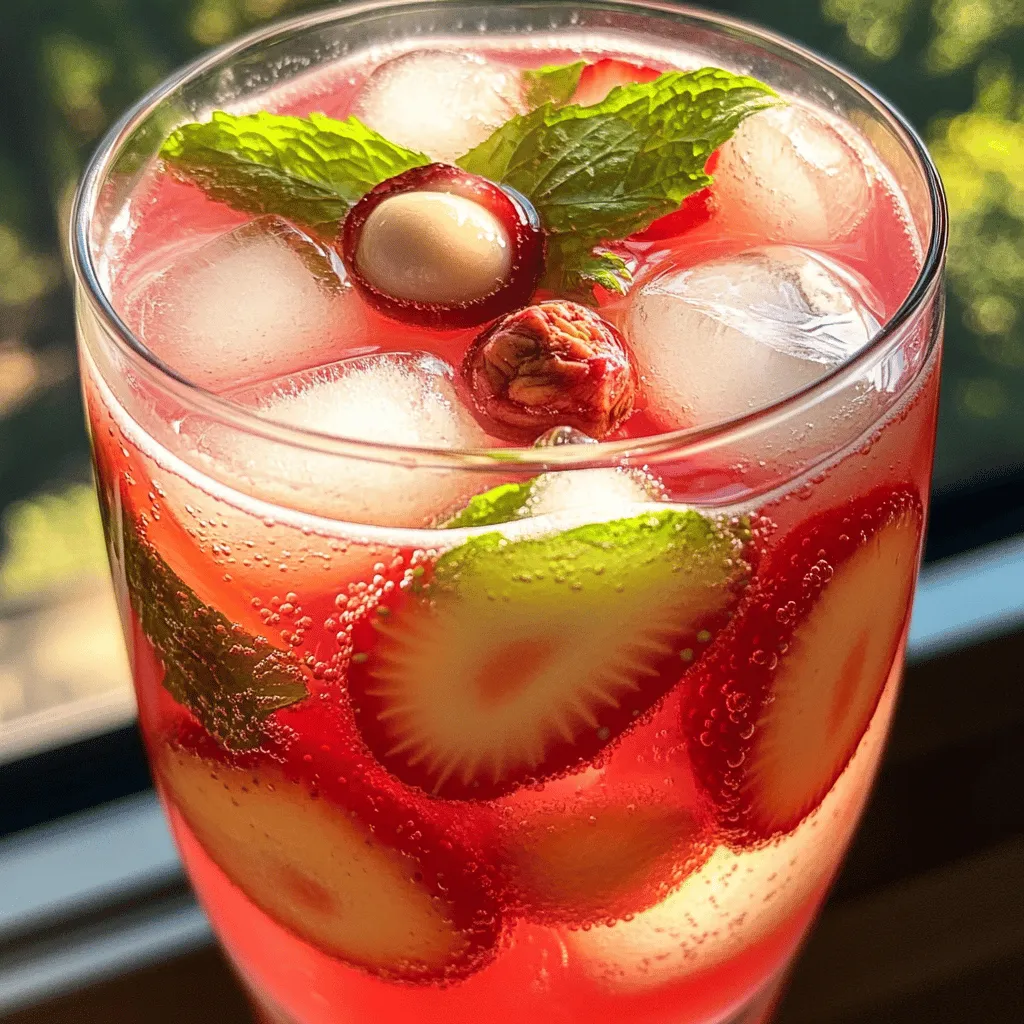
Looking for a drink that screams summer? Strawberry Lychee Lemonade is your answer! This bright and fruity drink combines the
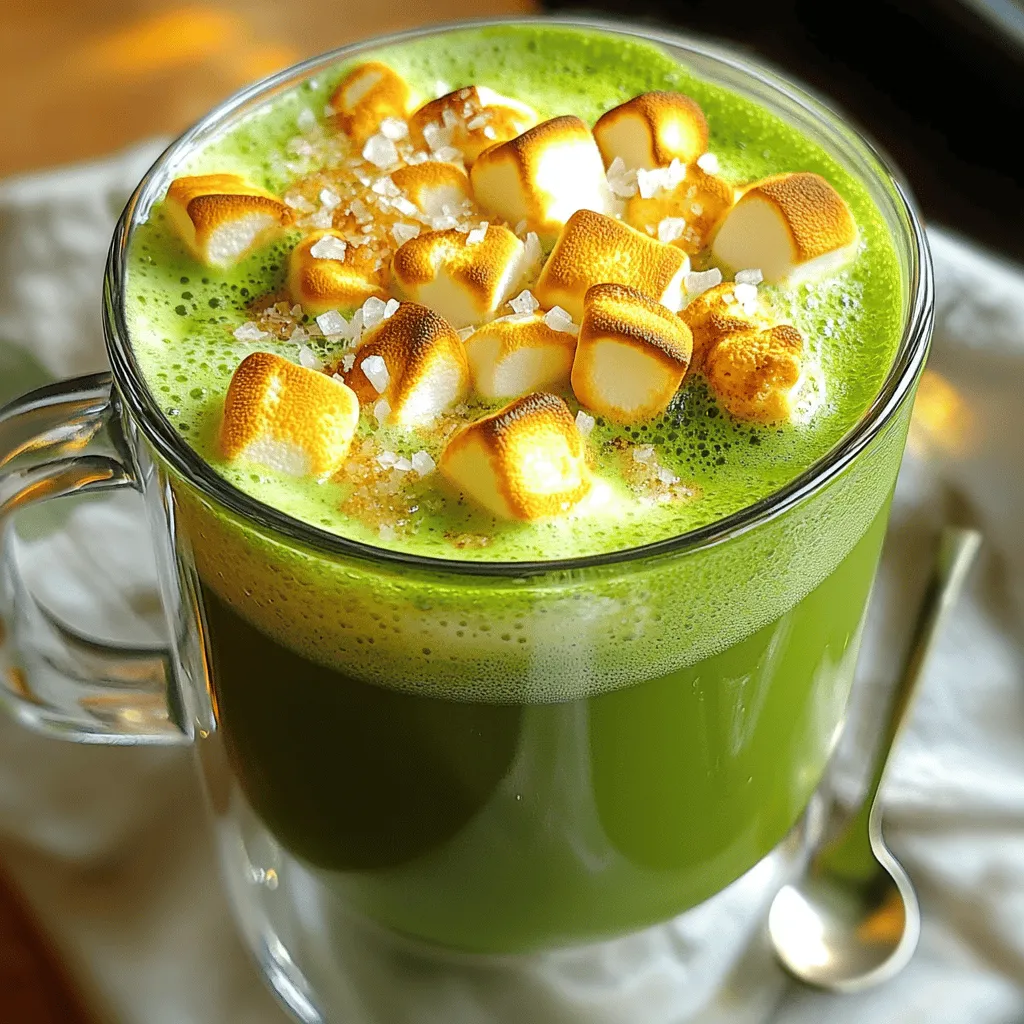
If you’re ready to experience a drink that combines the warmth of toasted marshmallows with the smoothness of matcha, you’re
![To make your Honey Ginger Pear Tea Latte, you will need: - 2 ripe pears, peeled, cored, and diced - 1 tablespoon fresh ginger, finely grated - 2 cups water - 2 tablespoons honey (or to taste) - 2 cups milk (your choice of dairy or plant-based) - 2 black tea bags (or 2 tablespoons loose leaf black tea) - 1 teaspoon vanilla extract - Cinnamon stick (for garnish) - Ground cinnamon (for dusting) Gather these tools for an easy cooking experience: - Medium saucepan - Fine-mesh sieve - Large bowl - Ladle - Mugs or cups for serving Choosing the right ingredients can make a big difference. Here are my tips: - Pears: Look for ripe, firm pears. They should be slightly soft to the touch but not mushy. Fresh pears add natural sweetness. - Ginger: Fresh ginger is key. It should be firm and smooth. Avoid any that looks wrinkled or dry. - Honey: Choose raw or local honey for the best flavor. It enhances the tea latte nicely. - Milk: Select your favorite milk type. Almond, oat, or cow's milk all work well. - Tea: Use high-quality black tea. It adds depth to your latte. Check for freshness in the packaging. Using these tips, you can elevate your Honey Ginger Pear Tea Latte. For the full recipe, check the [Full Recipe]. Start by peeling and coring the pears. Dice them into small pieces. Grate the fresh ginger finely. In a medium saucepan, combine the diced pears, grated ginger, and 2 cups of water. Heat the mixture over medium heat until it starts to boil. Once boiling, reduce the heat slightly. Let it simmer for about 10 minutes. You want the pears to soften and release their sweet flavor into the water. After simmering, take the saucepan off the heat. Carefully strain the pear and ginger mixture through a fine-mesh sieve into a large bowl. Press the pear pieces gently to get all the juice. Discard the solids left in the sieve. Pour the strained juice back into the saucepan. Bring it to a gentle simmer again. Now, stir in 2 tablespoons of honey until it dissolves completely. Next, add 2 cups of milk to the saucepan. Heat it gently, making sure it does not boil. Boiling can ruin the creaminess. Introduce the black tea bags or loose leaf tea into the mixture. Let the tea steep for 5 minutes. If using loose tea, strain it out before serving. Stir in 1 teaspoon of vanilla extract to blend all flavors. Finally, ladle the honey ginger pear tea latte into mugs. Garnish each cup with a cinnamon stick and a dusting of ground cinnamon. This adds a lovely aroma and looks great. Enjoy your cozy drink! To boost the flavor of your Honey Ginger Pear Tea Latte, choose ripe pears. Ripe pears have more natural sweetness and flavor. Fresh ginger gives a zingy kick. Use a fine grater for the ginger to release its oils. Adding a pinch of nutmeg or a splash of lemon juice can also enhance the taste. One common mistake is boiling the milk. If you boil it, the texture can change. Always heat it gently. Another mistake is not straining the pear-ginger mix well. You want a smooth drink, so press firmly on the solids to get all the juice. Don’t rush the tea steeping. Letting it steep for five minutes brings out the best flavor. Adjust sweetness by adding more or less honey. Taste the mixture before serving to find your perfect level. For creaminess, you can use whole milk or a creamier plant-based milk. Almond milk is lighter, while oat milk is creamier. Experiment with different types to find what you love best. For the Full Recipe, refer to the earlier section. {{image_4}} You can change the flavor by using different sweeteners. If you want a low-calorie option, try stevia or monk fruit. Maple syrup brings a rich taste. Agave nectar adds a mild sweetness. Each one will add a unique twist to your latte. The type of milk you use can change the taste and texture. Whole milk makes it creamy. Almond milk gives it a nutty flavor. Oat milk adds a touch of sweetness. Coconut milk offers a tropical vibe. Soy milk is a great vegan option. Choose what you like best! You can enhance your latte by adding seasonal flavors. In fall, try a pinch of nutmeg or allspice. In winter, a bit of cloves can warm you up. Adding a splash of orange juice brightens the drink in spring. Experiment with different spices or fruits to make it your own. Check the full recipe for inspiration! To store your honey ginger pear tea latte, let it cool first. Pour it into an airtight container. You can keep it in the fridge for up to three days. If you want to save it longer, you can freeze it. Just remember to leave some space in the container, as liquids expand when frozen. When you're ready to enjoy your latte again, take it out of the fridge. Pour it into a saucepan and heat it over low heat. Stir gently to mix the flavors back together. If frozen, let it thaw in the fridge overnight first. Avoid boiling the latte to keep it creamy. The shelf life of this latte in the fridge is about three days. If you freeze it, try to use it within one month for the best taste. To thaw, place the container in the fridge overnight. You can also thaw it in a bowl of warm water if you're in a hurry. Just make sure to stir well before serving again. Ginger helps with digestion and can ease nausea. It has anti-inflammatory properties that may reduce pain. Pears are rich in fiber, which is great for gut health. They also provide vitamins C and K. This drink combines their benefits, making it a delightful and healthy choice. Yes, you can! Just skip the black tea. Use herbal tea instead. A nice choice is chamomile or rooibos. These options add warmth without caffeine. You’ll still enjoy the sweet and spicy flavors of ginger and pear. To make more servings, simply double or triple the ingredients. Use 4 or 6 pears, and adjust the ginger and honey as needed. Keep the water and milk ratios the same. You can also brew the tea in a larger pot. Enjoy this cozy drink with friends or family! For the full recipe, check out [Full Recipe]. In this post, I covered how to make a delightful pear and ginger beverage. We explored the ingredients, tools, and tips for selecting quality items. I shared step-by-step instructions for preparation and brewing. Additionally, we discussed ways to enhance flavor, avoid mistakes, and make variations. Finally, we looked at storage tips and answered common questions. Enjoy experimenting with your own twists on this recipe. With these tools and tips, your beverage will surely impress!](https://lazychefmagic.com/wp-content/uploads/2025/06/20c5d3d4-12a0-4068-86fe-7fdb6a65b375.webp)
Looking for a comforting drink that warms your soul? Try my Honey Ginger Pear Tea Latte! This easy recipe combines
![- 1 cup blackberries, fresh or frozen - 1 ripe banana, sliced - 1 cup coconut milk - 1 teaspoon chai tea powder or 1 brewed chai tea bag - 1 tablespoon honey or maple syrup - 1 tablespoon chia seeds - ½ teaspoon pure vanilla extract - Ice cubes (optional) This Blackberry Coconut Chai Smoothie is a treat for your taste buds. The bright blackberries bring a sweet-tart flavor. The ripe banana adds creaminess and natural sweetness. Both fruits blend together well, creating a rich base. For the liquid, coconut milk is creamy and delicious. You can use canned coconut milk for a thicker texture. A carton of coconut milk is lighter but still tasty. The chai tea gives this smoothie a warm spice. You can use chai tea powder or a brewed bag, whatever you have on hand. When it comes to sweeteners, honey or maple syrup works well. Use one tablespoon for a touch of sweetness. Chia seeds add great texture and nutrition. They help thicken the smoothie and are a source of fiber. A dash of pure vanilla extract rounds out the flavors. If you want a chill, refreshing drink, add ice cubes. They make the smoothie extra cool and smooth. All these ingredients come together for a delightful blend. You can find the full recipe for more detailed steps. To start, brew the chai tea. If you have a chai tea bag, steep it in 1 cup of hot water for about 5 minutes. This will bring out its rich spices and flavors. Once brewed, take out the tea bag and let the tea cool to room temperature. This step is key to avoid warming the smoothie later. Now, it's time to blend! In your blender, add the following ingredients: - 1 cup blackberries - 1 ripe banana, sliced - 1 cup coconut milk - 1 teaspoon chai tea powder or the cooled chai tea - 1 tablespoon honey or maple syrup - 1 tablespoon chia seeds - ½ teaspoon pure vanilla extract Blend everything on high speed until smooth and creamy. You want it to feel like a silky drink, with no chunks left. After blending, taste it. If you want it sweeter, add more honey or syrup. Blend again to mix it well. If you like your smoothie cold, toss in a handful of ice cubes. This will make it extra refreshing! Blend again until the ice is crushed and mixed. After blending, pour the smoothie into glasses. Let it sit for a few minutes. This allows the chia seeds to thicken the mix. You can top each glass with whole blackberries or a sprinkle of chia seeds for a nice look. Enjoy your Blackberry Coconut Chai Smoothie! When making your Blackberry Coconut Chai Smoothie, choose fresh or frozen blackberries. Fresh blackberries offer bright flavor. Frozen blackberries add chill and creaminess. Both options work well, so pick what you have. For coconut milk, you can use canned or cartoned. Canned coconut milk brings a rich, creamy texture. Cartoned coconut milk is lighter and less thick. Choose based on your taste and health needs. To get your smoothie just right, adjust the thickness as needed. If it's too thick, add more coconut milk. If it's too thin, toss in some ice. More ice makes it colder and thicker. Blend until you reach your desired texture. Garnish your smoothie for a fun look. Whole blackberries on top add a pop of color. A sprinkle of chia seeds also looks great. You can serve it in mason jars for a rustic feel. Enjoy your smoothie with a straw or a spoon! For the complete recipe, check out the [Full Recipe]. {{image_4}} You can easily change fruits in the smoothie. Instead of blackberries, use strawberries or mango. Strawberries add a sweet and tart touch. Mango offers a rich and creamy flavor. Both fruits blend well with coconut milk. For sweeteners, consider vegan options. Maple syrup works great instead of honey. It gives a nice taste and keeps it plant-based. Adjust the amount based on how sweet you like it. Want to kick up the flavor? Add spices like cinnamon or nutmeg. Just a pinch can make a huge difference. These spices add warmth and depth to your drink. If you want, try mixing in leafy greens too. Spinach or kale can boost nutrition without changing the taste much. They blend right in, making your smoothie even better. If you like a thicker drink, make it into a smoothie bowl. To do this, use less liquid. Start with half the coconut milk and blend until creamy. You can always add more if needed. For toppings, get creative! Try sliced bananas, granola, or extra berries. These add texture and flavor. Plus, they make your bowl look pretty! You can find the full recipe for this delicious drink in the main article. Enjoy! To keep your Blackberry Coconut Chai Smoothie fresh, place it in an airtight container. This helps maintain its flavor and texture. Store it in the fridge for up to two days. After that, it may lose its taste and smoothness. If you see any separation, just give it a quick stir before drinking. You can freeze this smoothie for later enjoyment. Pour it into freezer-safe containers, leaving some space for expansion. It’s best to freeze it within 24 hours after making it. When you want to drink it, remove it from the freezer and let it thaw in the fridge overnight. For faster defrosting, place the container in a bowl of cold water for 30 minutes. Blend again to get a smooth texture after thawing. If you want to take your smoothie with you, use a travel-friendly container. Look for insulated cups with secure lids. This keeps your drink cold and prevents spills. You can make your smoothie ahead of time. Just prepare it the night before and store it in the fridge. In the morning, grab it and go! Enjoy your delicious and refreshing treat wherever you are. To make this smoothie dairy-free, you can use coconut milk. This milk is creamy and rich, perfect for our drink. You can also try almond milk or oat milk if you prefer. Both options are light and tasty. Just choose unsweetened types to keep the flavors balanced. Yes, you can use many sweeteners. Maple syrup works well for a natural touch. Agave nectar is also a good choice and is easy to mix in. If you want a low-calorie option, try stevia or monk fruit sweetener. Just taste as you add to find your perfect level of sweetness. This smoothie is packed with nutrients. Blackberries have vitamins and antioxidants. They help fight cell damage and boost your immune system. Bananas give you potassium, which is good for your heart. Coconut milk adds healthy fats, which can keep you full. Chia seeds are rich in fiber, helping digestion. Drinking this smoothie means you enjoy a tasty treat while getting a healthy boost. The Full Recipe can guide you in making this delicious drink! This smoothie recipe blends fresh blackberries and banana with creamy coconut milk. You start by brewing chai tea, then blend all ingredients until smooth. Remember to adjust the thickness to your liking. Explore variations with different fruits and spices for extra flavor. Store leftovers properly for future enjoyment. This tasty drink is easy to make and packed with nutrition. It’s a great addition to your routine for a healthy boost. Give it a try and enjoy each sip!](https://lazychefmagic.com/wp-content/uploads/2025/06/910be64e-7677-4211-84e2-073cf5e80335.webp)
Looking for a delicious and healthy drink? Try my Blackberry Coconut Chai Smoothie! This refreshing blend combines juicy blackberries, creamy
