Skip to content
DisclaimerTerms Of UseGDPR PolicyCookie Policy

lazychefmagic

  • Home
  • Drinks
  • Appetizers
  • Dinner
  • Dessert
  • About
  • Contact
  • Privacy Policy
DisclaimerTerms Of UseGDPR PolicyCookie Policy

NO-ING-IMG

To make a Mocha Coconut Cold Drip Tonic, you need these key items: - 1 cup coarsely ground coffee (a medium roast is ideal) - 4 cups cold water - 1 can (13.5 oz) coconut milk - 2 tablespoons unsweetened cocoa powder - 2 tablespoons pure maple syrup (adjust to taste) - 1/2 teaspoon vanilla extract - Ice cubes These ingredients work together to create a rich and creamy drink. The cold brew coffee gives a smooth base, while coconut milk adds creaminess. Cocoa powder brings a deep chocolate flavor, and maple syrup sweetens it just right. Garnishes can make your drink look and taste even better. Here are some fun options: - Toasted coconut flakes for a crunchy topping - Dark chocolate shavings for a touch of elegance Adding these garnishes not only enhances flavor but also adds a beautiful look to your drink. You can get creative with your choices! You might not have every ingredient at home. Here are some easy swaps: - Use almond milk or oat milk instead of coconut milk for a different taste. - Swap maple syrup for honey or agave syrup to change the sweetness. - If you don't have cocoa powder, use chocolate syrup for a quick fix. These substitutions help you adapt the recipe to what you have in your kitchen. You can still enjoy a tasty Mocha Coconut Cold Drip Tonic! For the complete recipe, refer to the Full Recipe. To start, grab a large jar or cold brew coffee maker. You need to mix one cup of coarsely ground coffee with four cups of cold water. Stir gently to make sure all the coffee grounds soak well. Seal the jar or cover the coffee maker and place it in the fridge. Let it steep for at least 12 hours. If you want a bolder flavor, leave it for up to 24 hours. While the coffee brews, let’s prepare the coconut cream. In a mixing bowl, combine one can of coconut milk, two tablespoons of unsweetened cocoa powder, two tablespoons of pure maple syrup, and half a teaspoon of vanilla extract. Whisk until it's smooth and creamy. Take a taste! If you want it sweeter, add more maple syrup. Now, it’s time to bring it all together. In a serving glass, mix equal parts of your cold brew concentrate and the coconut cream. Stir gently to blend the flavors well. - Serving Suggestions: Fill another glass with ice cubes. Pour your mocha coconut blend over the ice. If you want it creamier, add a splash of coconut milk on top. For a fun touch, sprinkle toasted coconut flakes on the drink. You can also add dark chocolate shavings for an extra treat. Now, grab a straw, mix everything well, and enjoy the flavorful and refreshing Mocha Coconut Cold Drip Tonic! For the full recipe, check the earlier section. To make great cold brew coffee, start with coarsely ground coffee. A medium roast works best. Use a large jar or cold brew maker. Combine one cup of coffee with four cups of cold water. Stir gently to mix. Seal the jar and place it in the fridge. Let it steep for at least 12 hours. The longer you steep, the richer the flavor. Strain the coffee using a fine mesh strainer. This step keeps your drink smooth. When it comes to sweetness, start with two tablespoons of pure maple syrup. Taste your mocha coconut blend after mixing. If you want it sweeter, add more syrup. Remember, you can control the sweetness based on your taste. This drink should be smooth and tasty, not overly sweet. You can add fun flavors to your tonic. A splash of vanilla extract gives it depth. For a chocolate kick, try adding dark chocolate shavings. Toasted coconut flakes add nice texture and flavor. Feel free to get creative! Use flavored syrups or spices like cinnamon. Each addition can change the drink's character. Explore different combinations to find your favorite! For the full recipe, refer to the section above. {{image_4}} You can turn your Mocha Coconut Cold Drip Tonic into a delightful iced latte. Start with the full recipe, but instead of mixing the cold brew with the coconut cream, layer them for a stunning look. Pour your cold brew over ice, then gently add the coconut cream on top. This creates a beautiful drink that’s perfect for hot days. If you want a dairy-free version, use your favorite plant-based milk instead of coconut milk. Almond milk, oat milk, or cashew milk work well. Just remember to adjust the cocoa powder and syrup to fit your chosen milk. This keeps the drink just as rich and tasty while meeting dietary needs. You can add seasonal flavors to your Mocha Coconut Cold Drip Tonic. In fall, try adding a dash of pumpkin spice for warmth. During the summer, mix in fresh berries or mint for a refreshing twist. You can also experiment with flavored syrups, like hazelnut or vanilla, to change the taste and keep things exciting. To store your cold brew coffee, pour it into a clean jar or bottle. Make sure it's tightly sealed. Place it in the fridge to keep it fresh. Cold brew can last up to two weeks in the fridge. This way, you can enjoy the rich flavor whenever you want. For the coconut cream mixture, store it in an airtight container. Keep it in the fridge as well. The mixture stays good for about five days. If you see any separation, just stir it well before using. Once you mix your Mocha Coconut Cold Drip Tonic, it’s best to drink it fresh. If you have leftovers, store them in the fridge for one day. The flavors may change after that. Enjoy your drink while it’s still creamy and tasty. You can find the full recipe in the article for detailed steps and tips! Making this drink takes about 15 minutes of prep time. However, you need to steep the coffee for at least 12 hours. If you want a richer flavor, go for 24 hours. So, plan ahead! You’ll get a smooth cold brew that makes this tonic so good. I don’t recommend using hot coffee. Cold brew has a smooth taste that hot coffee can’t match. Hot coffee can also taste bitter in this drink. Cold brew blends perfectly with the coconut and cocoa flavors. Stick with the cold brew for the best results. You can use pure maple syrup to sweeten your tonic. Start with 2 tablespoons and taste it. If you want it sweeter, add more syrup until you reach the flavor you love. You can also try honey or agave syrup as alternatives. Just remember, adjust based on your taste! The Mocha Coconut Cold Drip Tonic is a refreshing drink. We covered its key ingredients, from cold brew coffee to coconut cream. Following the step-by-step guide will help you make it right. Don't forget our tips to adjust sweetness and enhance flavor. You can also explore fun variations or store your drink properly. Remember, this tonic is all about enjoying your coffee in new ways. Get creative and make it your own!

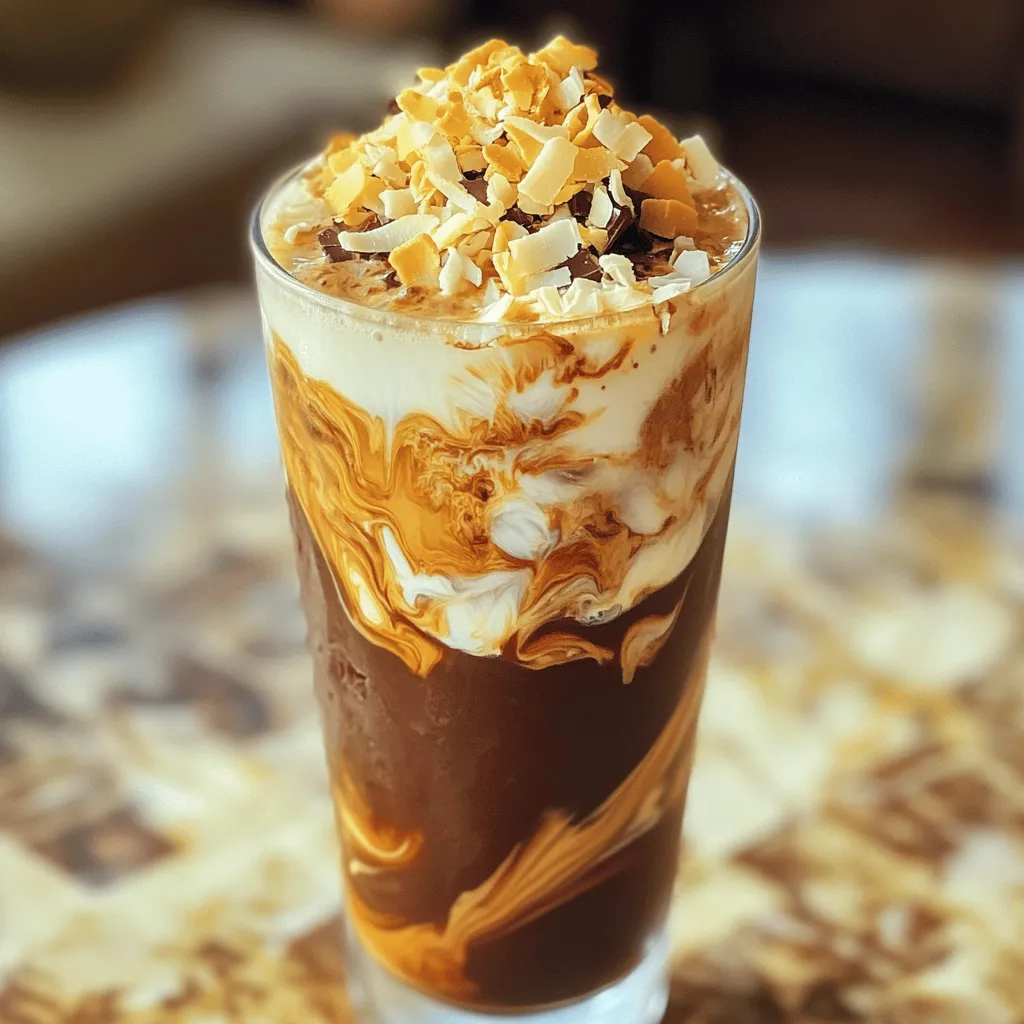
Mocha Coconut Cold Drip Tonic Flavorful and Refreshing

Ready to indulge in a drink that’s both flavorful and refreshing? The Mocha Coconut Cold Drip Tonic is not just

To make the Tangerine Mint Cooler, gather these simple ingredients: - 2 cups freshly squeezed tangerine juice - 1 cup sparkling water or club soda - 1/4 cup fresh mint leaves - 2 tablespoons honey or agave syrup - 1 tablespoon freshly squeezed lime juice - Ice cubes - Tangerine slices for garnish These ingredients come together to create a bright, refreshing drink. Fresh tangerine juice gives a sweet and tangy flavor. The mint adds a cool touch that makes it perfect for summer. You can use sparkling water for fizz or club soda for a smoother texture. Honey or agave syrup adds sweetness, so adjust it to your taste. Lime juice balances the drink with a bit of tartness. Don’t forget the ice cubes! They keep your cooler chill and refreshing. Finally, tangerine slices as a garnish not only look pretty but also enhance the citrus flavor. With this list in hand, you are ready to enjoy a cool, thirst-quenching treat. For the full recipe, check out the detailed instructions. - Juicing the tangerines: Start by cutting each tangerine in half. Use a juicer to extract the juice. Aim for about 2 cups of fresh juice. - Optional: Straining the juice: If you want a smoother drink, strain the juice through a fine mesh sieve. This will remove pulp and seeds for a clean finish. - Combining juice with sweetener and lime juice: In a medium bowl, mix the fresh tangerine juice with 2 tablespoons of honey or agave syrup. Add 1 tablespoon of lime juice for a zesty kick. - Mixing thoroughly until dissolved: Stir the mixture well until the sweetener fully dissolves. This step ensures every sip is just the right amount of sweet. - Techniques for muddling mint leaves: Take about 1/4 cup of fresh mint leaves. Use a muddler or the back of a spoon to gently press the leaves. This helps release their lovely oils. - Importance of releasing oils: Muddling mint releases its flavor, making your drink aromatic and fresh. Be careful not to tear the leaves too much. - Pouring the tangerine mixture over muddled mint: Once you’ve muddled the mint, slowly pour the tangerine mixture into the pitcher over the mint. - Adding sparkling water and gently stirring: Next, add 1 cup of sparkling water or club soda. Stir gently to combine, keeping the bubbles intact for a refreshing fizz. - Filling glasses with ice cubes: Grab some glasses and fill each one with ice cubes. This keeps your drink cold and refreshing. - Pouring and garnishing the drink: Finally, pour the tangerine mint mixture over the ice. Add a few mint leaves and a slice of tangerine for garnish. This adds color and makes your drink look amazing. You can use honey or agave syrup for sweetness. Both add a nice touch. Honey gives a richer taste, while agave is milder. Start with two tablespoons, then taste. If you want it sweeter, add more. Always aim for a balanced flavor. Add a squeeze of lime juice for a zesty kick. Lime brightens the tangerine taste. You can also use tangerine zest for a stronger flavor. For a fresh twist, try other herbs. Basil or lemongrass can change the drink's vibe. Just remember to use fresh herbs for the best taste. Garnish your drink for extra flair. A sprig of mint or a tangerine slice looks great. You can also use decorative straws for fun. Serve in tall glasses for a summer party. This drink is perfect for gatherings, so consider a large pitcher for easy serving. For the full recipe of this refreshing drink, check out the [Full Recipe]. {{image_4}} You can make this drink even more fun. Try adding pineapple or mango. This gives a sweet and fruity taste. Just blend in about a cup of fresh pineapple or mango juice. Mix it with the tangerine juice. The result? A tropical delight that sings summer! Want to switch things up? You can add herbs like basil or cilantro. These herbs add a unique twist. Basil brings a sweet note, while cilantro adds a fresh zing. Just muddle a handful of the herbs with the mint. This will give your cooler a fresh and exciting flavor. Want to make it a bit more grown-up? You can turn the cooler into a cocktail! Add your favorite spirit, like vodka or rum. Start with one ounce per serving. This adds a fun kick. Just remember to mix it well to keep the flavors balanced. To store leftover Tangerine Mint Cooler, place it in a sealed container. This keeps it fresh in the fridge. Try to drink it within two days for the best taste. To maintain carbonation, avoid shaking the container. Instead, gently stir the drink before serving. The Tangerine Mint Cooler stays fresh for about two to three days in the fridge. After that, the flavors may fade. The fizz will also reduce over time. If you notice any changes in smell or taste, it’s best to toss it out. You can make ice cubes from the leftover mixture. Simply pour the drink into an ice cube tray and freeze. These cubes add a fun twist when mixed into drinks later. You can also prepare this cooler ahead of time for summer parties. Just freeze it and let it thaw in the fridge before serving. This way, you save time and impress your guests! If you don't have tangerines, use other citrus juices. Good options include orange juice, grapefruit juice, or a mix of lemon and lime juice. These juices bring a bright, zesty flavor. Adjust the sweetness based on your choice. Orange juice works well since it is sweeter. Yes, you can prepare the tangerine mint mixture ahead of time. Mix the juice, mint, and sweetener, but leave out the sparkling water. Store it in the fridge for up to two days. When ready to serve, add the sparkling water to keep it fizzy. This way, you will have a refreshing drink ready for guests. You can use mint extract, but use it sparingly. Start with a few drops, then taste. Extract can be much stronger than fresh mint leaves. If you want an intense mint flavor, this can be a good choice. Just remember, fresh leaves have a nice texture and aroma that extract lacks. Try a watermelon cooler for a sweet, juicy treat. You can also whip up a classic mojito with lime and mint. For a fruity twist, make a berry spritzer with mixed berries and soda water. Each option is light and perfect for hot days. Check out my other recipes for more ideas! In this blog post, we explored how to make a refreshing Tangerine Mint Cooler. We covered the key ingredients, step-by-step instructions, and useful tips. You learned about variations to customize your drink. Plus, we shared storage info to keep it fresh. Enjoy crafting this delightful drink for warm days. Remember, it’s all about fresh flavors and personal touches. Try different herbs or fruits to make it your own. With a little creativity, you’ll impress friends and family at any gathering.

Tangerine Mint Cooler Refreshing Summer Delight

Looking for a refreshing sip to beat the summer heat? Meet the Tangerine Mint Cooler! This drink offers bright tangerine

To make a tasty Salted Pistachio Caramel Frappe, gather these key ingredients: - 1 cup brewed coffee, cooled to room temperature - 1 cup milk of choice (dairy, almond, or oat work well) - 1/2 cup pistachios, shelled and coarsely chopped - 1/4 cup caramel sauce (store-bought for convenience or homemade for a personal touch) - 2 tablespoons sugar (feel free to adjust based on your desired sweetness level) - 1/4 teaspoon fine sea salt (plus extra for garnish) - 1 cup ice cubes - Whipped cream (for generous topping) These ingredients blend together to create a rich and creamy drink that is hard to resist. You can add a personal touch by using these optional ingredients: - A splash of vanilla extract for added flavor - Chocolate syrup for a sweet twist - A sprinkle of cinnamon for warmth - Additional nuts like almonds or hazelnuts for texture These options let you customize the frappe to fit your taste. If you have specific dietary needs, here are some substitutions: - Use a plant-based milk like almond or coconut for dairy-free options. - Replace sugar with a natural sweetener like honey or agave syrup. - Swap pistachios with sunflower seeds for a nut-free option. These substitutions keep the frappe delicious while meeting dietary needs. For the full recipe, be sure to check out the complete instructions. To make a Salted Pistachio Caramel Frappe, start by gathering your ingredients. You will need coffee, milk, pistachios, caramel sauce, sugar, sea salt, ice, and whipped cream. 1. First, pour the cooled brewed coffee into your blender. 2. Next, add your choice of milk. The type of milk can change the flavor, so pick what you like. 3. Then, add the caramel sauce, sugar, and fine sea salt. 4. Blend these ingredients on medium speed until everything mixes well and is smooth. After blending the base mixture, it’s time to add the fun stuff! 1. Add the coarsely chopped pistachios to the blender. 2. Toss in the ice cubes. 3. Now, switch the blender to high speed. This step is key to achieving a creamy and frothy texture. Blend until it looks thick and fluffy. If you want a sweeter taste, taste the mixture, then add more sugar. Blend for a few seconds to mix it well. Pour the frappe into tall glasses until they are three-quarters full. Leave space for whipped cream! 1. Top each glass with a generous swirl of whipped cream. 2. Drizzle extra caramel sauce on the whipped cream for a sweet touch. 3. Sprinkle a pinch of sea salt on top to balance the flavors. For a fancy finish, garnish each glass with a few whole pistachios. This adds great color and texture. Enjoy your drink! If you want the full recipe, check out the Full Recipe for more details. To make your salted pistachio caramel frappe even better, try these tips: - Add more pistachios: Toss in extra nuts for a crunch. - Use flavored coffee: Vanilla or hazelnut coffee adds a nice twist. - Experiment with spices: A pinch of cinnamon or nutmeg can bring warmth. These simple changes can create a unique taste for your frappe. Here are some common mistakes when making your frappe: - Using hot coffee: Always cool your coffee first. Hot coffee can melt the ice too fast. - Skipping salt: Salt enhances sweetness. Don’t skip it for the best flavor. - Not blending long enough: Blend until frothy. A smooth texture is key. Avoiding these errors will lead to a better frappe. Homemade caramel sauce is easy and so tasty. Here’s how to make it: 1. Gather ingredients: You need sugar, water, butter, and heavy cream. 2. Heat sugar and water: In a pan, mix equal parts sugar and water. Heat on medium. 3. Watch for color: Once it turns golden, remove it from heat. 4. Add butter and cream: Stir in butter and cream until smooth. Homemade caramel can enhance the flavor of your frappe. For more details, check the Full Recipe. {{image_4}} You can switch up the nuts in the Salted Pistachio Caramel Frappe. Almonds bring a mild taste, while hazelnuts add a rich flavor. If you love cashews, they give a creamy texture. Each nut offers a unique twist, so feel free to experiment. To make the frappe dairy-free or vegan, simply use plant-based milk. Almond, oat, or coconut milk work great. For whipped cream, you can find vegan options in stores or make your own using coconut cream. Just chill a can of coconut milk and whip it! This way, you keep the creamy feel without any dairy. You can add seasonal flavors to your frappe for special occasions. In fall, try pumpkin spice syrup for a cozy vibe. For summer, blend in fresh berries for a fruity twist. You can even add a sprinkle of cinnamon or nutmeg for a warm touch during the holidays. These small changes make your frappe fun and festive. For the full recipe, check out the Salted Pistachio Caramel Frappe. To keep your Salted Pistachio Caramel Frappe fresh, store it in an airtight container. This helps prevent the frappe from absorbing any strange smells or flavors. Make sure the container is clean and dry before use. If you have extra whipped cream, store it separately in the fridge. If you want to enjoy your frappe warm, you can gently heat it. Pour it into a pot and warm it on low heat. Stir often to avoid burning. You can also use leftover frappe as a base for a milkshake or as a topping for desserts like ice cream or pancakes. Just blend it again if you want a smoother texture. Each ingredient in your frappe has a different shelf life: - Brewed coffee: 3-4 days in the fridge. - Milk: Check the expiration date on the container. - Pistachios: Store in a cool, dry place for up to 6 months. - Caramel sauce: Homemade lasts 2 weeks in the fridge; store-bought can last longer. - Sugar and salt: Indefinite shelf life if stored properly. Keeping track of these will help you enjoy your frappe longer. For the full recipe, check the earlier section. Use brewed coffee that you enjoy. I recommend medium roast for a balanced taste. Cold brew works well too. It gives a smooth flavor and less acidity. Avoid strong or bitter coffee. You want your frappe to be sweet and creamy. Yes, you can prepare it in advance. Blend all the ingredients except ice and whipped cream. Store it in the fridge. When you're ready, add ice and blend again. This way, you keep the frothy texture. Just remember, freshly made is always best! To get that great frothy texture, blend on high speed after adding ice. Make sure your ice is fresh and not too large. If it’s too thick, add a little more milk. If it’s too thin, add more ice and blend again. Absolutely! You can chop pistachios and measure out your caramel sauce ahead of time. Store them in airtight containers. Brew your coffee and let it cool in the fridge. This saves time and makes it easy to whip up your frappe. For the full recipe, check out the Salted Pistachio Caramel Frappe! This blog post covered everything about making a Salted Pistachio Caramel Frappe. We explored the key ingredients and customization options. I shared step-by-step instructions and tips for great texture and taste. You learned how to avoid common mistakes and make delicious caramel sauce. We also discussed fun variations and storage tips. Now, you can craft this tasty drink with confidence. Enjoy making and sharing your perfect frappe!

Salted Pistachio Caramel Frappe Rich and Creamy Delight

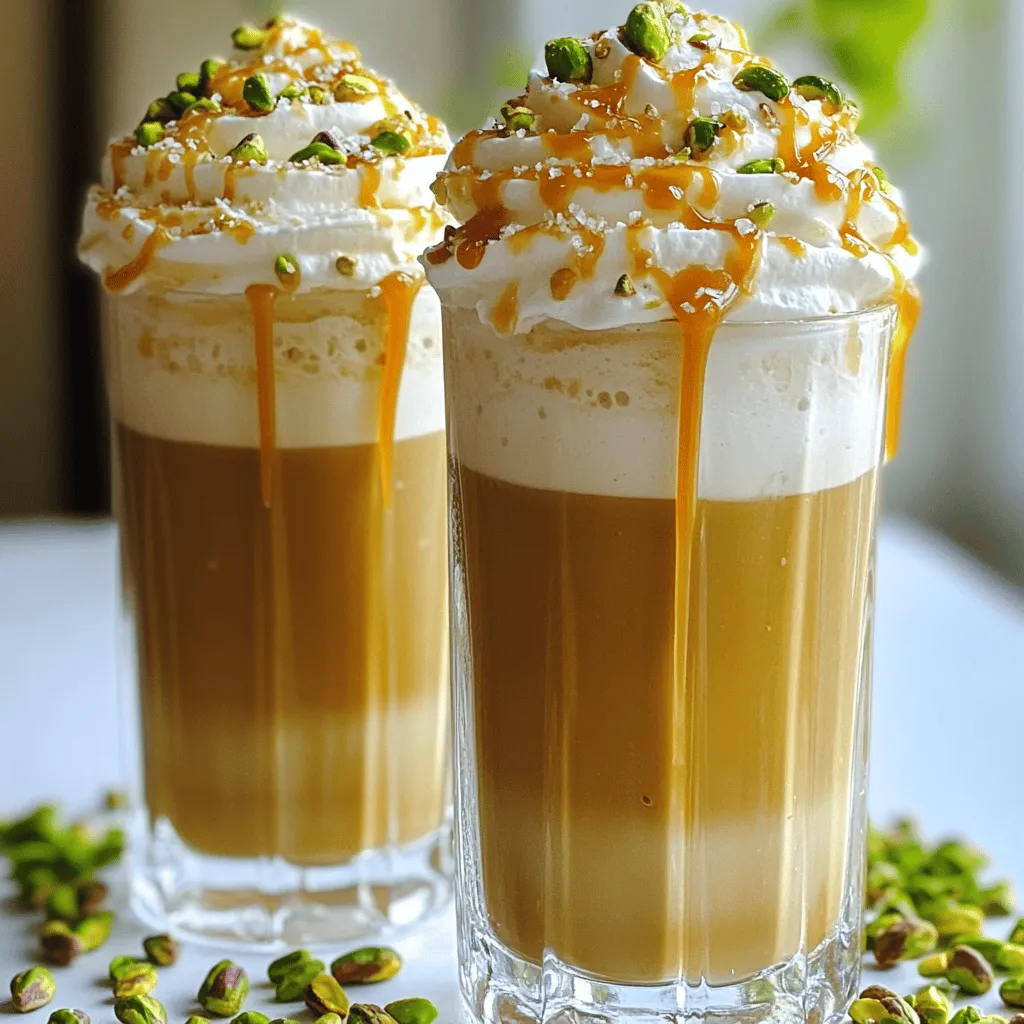
Are you ready to treat your taste buds? With my Salted Pistachio Caramel Frappe, you’ll dive into a rich and

To make the Dark Chocolate Raspberry Refresher, gather these simple items: - 1 cup fresh raspberries, cleaned - 1 cup unsweetened almond milk (or your preferred milk) - 2 tablespoons dark cocoa powder - 2 tablespoons honey or maple syrup (adjust according to sweetness preference) - 1/2 teaspoon pure vanilla extract - 1/4 cup Greek yogurt (optional, for added creaminess) - Ice cubes, as needed - Fresh mint leaves, for garnish You can swap certain ingredients for others. If you don’t have fresh raspberries, use frozen ones. They work well too! For milk, any type like oat or coconut will do. If you want a vegan option, pick maple syrup instead of honey. If you lack Greek yogurt, try a dairy-free yogurt or skip it altogether. When selecting raspberries, look for ones that are plump and bright. Avoid mushy or dull berries. For cocoa powder, pick a brand labeled as "dark" for richer flavor. Always choose pure vanilla extract over imitation for a better taste. When it comes to milk, organic options often taste fresher and creamier. To start, gather your ingredients. You will need: - 1 cup fresh raspberries, cleaned - 1 cup unsweetened almond milk (or your preferred milk) - 2 tablespoons dark cocoa powder - 2 tablespoons honey or maple syrup - 1/2 teaspoon pure vanilla extract - 1/4 cup Greek yogurt (optional) - Ice cubes, as needed - Fresh mint leaves, for garnish First, rinse the fresh raspberries under cold water. Make sure to clean them well. After washing, gently pat them dry with a paper towel. This helps remove excess water. Next, place all the ingredients into a high-speed blender. Add the rinsed raspberries, almond milk, dark cocoa powder, honey or maple syrup, vanilla extract, and Greek yogurt if you want creaminess. Now, toss in a handful of ice cubes. This step makes your drink cold and refreshing. Blend everything on high speed until the mixture is smooth. After blending, taste your drink. If you want it sweeter, add more honey or maple syrup. Blend again for a few more seconds until fully mixed. Pour the mixture into pre-chilled glasses. Fill each glass halfway to leave room for garnish. For a nice touch, add a few whole raspberries on top of each drink. Finish by adding a sprig of fresh mint to each glass. This makes your Dark Chocolate Raspberry Refresher look beautiful and fresh. Serve right away for the best taste! To get a smooth drink, blend well. Start with fresh raspberries and use a high-speed blender. If you add Greek yogurt, it makes the drink creamier. Blend until there are no lumps. If it feels too thick, add more almond milk. This keeps your refresher light and frosty. Sweetness is key for balance. Start with two tablespoons of honey or maple syrup. After blending, taste your drink. If you want it sweeter, add more syrup, but do it in small amounts. Blend again to mix well. This way, you control how sweet your drink is. Serve your Dark Chocolate Raspberry Refresher in chilled glasses. This keeps it cool longer. Top each glass with whole raspberries and a mint sprig. This adds color and makes it look fancy. You can also use colorful straws for fun. Sharing this drink? Make sure to garnish each glass for a wow factor. {{image_4}} You can make this drink even better by adding other fruits. Try strawberries, blueberries, or bananas. These fruits mix well with raspberries. They can add more flavor and sweetness. Just remember to keep the same amount of liquid. You can blend them in with the raspberries for a new twist. If you want a dairy-free drink, almond milk is a great choice. You can also use oat milk or coconut milk. These options give a creamy taste without dairy. Each type of milk adds a unique twist. Choose the one you love most for the best flavor. Want to spice up your Dark Chocolate Raspberry Refresher? You can add a pinch of cinnamon or nutmeg. These spices bring warmth and depth. You might also try almond or peppermint extract. Just a few drops can change the whole drink. Experiment to find your favorite flavor combination! If you have any of the Dark Chocolate Raspberry Refresher left, store it in the fridge. Use an airtight container to keep it fresh. This drink tastes best when enjoyed right away, but you can keep it for up to two days. Before serving, give it a quick stir or blend again for the best texture. You don't need to heat this drink. It’s meant to be cold and refreshing. If you try to warm it, the texture may change. Instead, enjoy it chilled right from the fridge. Most of the ingredients have a good shelf life: - Fresh raspberries: Use within 1-3 days of purchase for the best flavor. - Almond milk: Check the expiration date on the carton. It usually lasts about a week after opening. - Dark cocoa powder: Store in a cool, dry place. It can last for up to two years. - Honey or maple syrup: Both can last indefinitely if stored properly. - Greek yogurt: Usually good for about 1-2 weeks after opening. Using fresh ingredients ensures a tasty drink. For the full recipe, check the main section. Enjoy your refresher! Yes, you can make this drink ahead of time. I recommend blending it and storing it in the fridge. Just be sure to use a sealed container. This drink tastes best when cold and fresh. If you plan to enjoy it later, give it a quick stir before serving. Definitely! Frozen raspberries work perfectly in this drink. They add a nice chill and a great flavor. Just toss them in the blender without thawing. You might need to add a bit more sweetener if they taste less sweet. If you want a different flavor, you can use carob powder instead of cocoa. It gives a unique taste that pairs well with raspberries. Another option is to use chocolate syrup for a sweeter drink. Just remember to adjust the sweetness as needed. For the complete recipe, check out the Full Recipe section above! This article explored how to make a delicious drink. We started with choosing the right ingredients and their substitutions. I shared steps for preparation and blending. You learned tips for texture and presentation. We also looked at fun variations and how to store leftovers. In summary, making this drink is easy and fun. Try new flavors and enjoy it your way!

Dark Chocolate Raspberry Refresher Simple and Tasty Drink

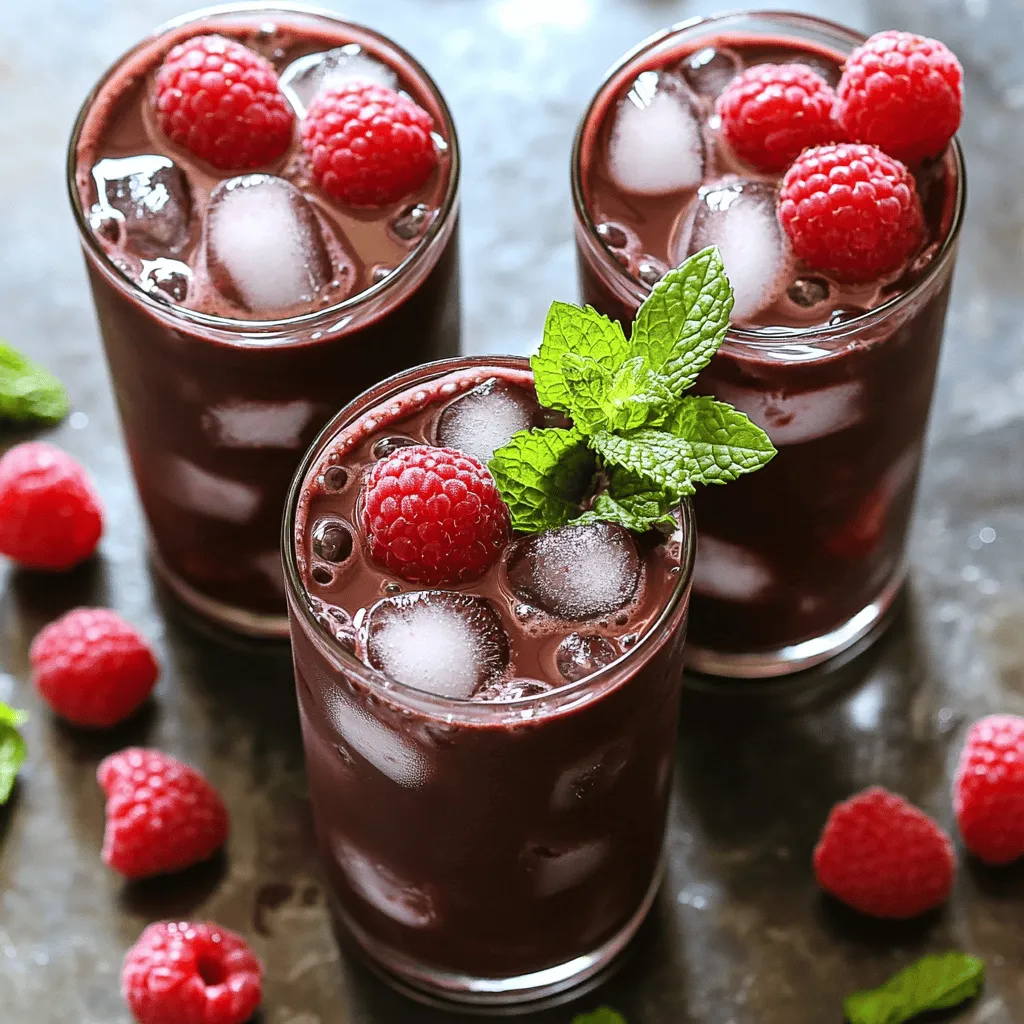
Looking for a fun and tasty drink? Try my Dark Chocolate Raspberry Refresher! This simple drink blends rich dark chocolate

To make the best Kiwi Passionfruit Agua Fresca, you need a few simple ingredients. Here’s what you should gather: - Ripe kiwis - Passionfruits - Cold water - Agave syrup - Fresh lime juice - Fresh mint leaves - Ice cubes Each ingredient plays a key role in creating a drink that is both tasty and refreshing. Ripe kiwis give a sweet and tangy flavor. They add a vibrant green color to your drink. Passionfruits provide a unique tartness that balances well with the kiwi. Their pulp adds texture and makes the drink exciting. Cold water helps dilute the mix and keeps it light. Agave syrup adds sweetness. You can adjust it to make the drink just how you like it. Fresh lime juice brings in a zesty kick. It brightens the flavors and adds freshness. Fresh mint leaves are for garnish. They give a nice aroma and a pop of green. You can also add them to the drink for extra flavor. Ice cubes are essential for serving. They keep the drink cold and refreshing. With these ingredients, you are ready to make a delicious summer drink. For the full recipe, check the details in the section above. 1. Start with 4 ripe kiwis. Peel and chop them into small pieces. Place them in a blender. 2. Next, take 3 passionfruits. Cut them in half and scoop out the pulp. Add this to the blender with the kiwis. 3. Pour in 2 cups of cold water. Blend on high until the mixture is smooth and creamy. 4. Grab a large pitcher. Use a fine-mesh sieve to strain the blended mixture. Press with a spatula to get all the juice out. You want to leave the seeds and pulp behind. 5. Now, pour in the remaining 2 cups of cold water. Add 1/4 cup of agave syrup and the juice of 1 fresh lime. Stir well until everything mixes nicely. 1. For the best taste, refrigerate the mixture for at least 30 minutes. This helps the flavors blend perfectly. 2. When ready to serve, take tall glasses and fill them with ice cubes. Pour the chilled agua fresca over the ice. 3. For a lovely touch, garnish each glass with fresh mint leaves. You can also add a lime wheel or a slice of kiwi on the rim for color. This Kiwi Passionfruit Agua Fresca is a perfect drink for hot summer days. Enjoy it fresh! To get the right sweetness, adjust the agave syrup in your drink. Start with 1/4 cup, then taste it. If it’s not sweet enough, add more syrup, a little at a time. Each fruit has its own sweetness, so the right amount may change. If you don't have agave syrup, try honey or maple syrup. Both work well, but they might change the drink’s flavor a bit. You can also use simple syrup, made by mixing equal parts sugar and water. For a beautiful presentation, serve your agua fresca in tall, clear glasses. Add a lime wheel or a slice of kiwi on the rim for color. You can also drop fresh mint leaves into the glass. This not only looks great but adds a nice aroma too. When it comes to ice, use large cubes. They melt slower and keep your drink cool without watering it down too fast. You can also freeze some kiwi or passionfruit pulp in ice trays. This adds a fun twist to your drink as they melt. For the full recipe, check the detailed steps above. {{image_4}} You can make your Kiwi Passionfruit Agua Fresca even tastier by adding other fruits. Strawberries or mango work great here. Just chop them up and blend them in with the main ingredients. This adds a new layer of flavor while keeping it fresh. Herbs can also give your drink a lovely twist. Try adding basil or rosemary. They infuse the agua fresca with a unique taste. Just add a few leaves when blending. You will be surprised at how much flavor these herbs can add. Want to turn your refreshing drink into a cocktail? You can easily make a Kiwi Passionfruit Agua Fresca cocktail. Adding spirits gives it a fun kick. Vodka or rum are great choices for mixing. Pour in a shot after blending your fruits. Stir well and enjoy your new creation. Experiment with different spirits to find what you love. Each option brings out new flavors in your agua fresca. This is a great way to impress friends at your next summer gathering. For the full recipe, check out the complete guide to making this delightful drink. To keep your Kiwi Passionfruit Agua Fresca fresh, store it in the fridge. Use a glass pitcher or a tightly sealed bottle. This drink tastes best cold. You can enjoy it for up to three days. After that, it may lose some flavor and freshness. If you have leftover agua fresca, try using it in fun ways. Pour it over pancakes or waffles for a fruity twist. You can mix it with yogurt for a refreshing snack. It also makes a tasty base for smoothies. Just blend it with some ice and your favorite fruits. Enjoy your delicious creations! Can I make this drink ahead of time? Yes, you can make this drink ahead of time. I suggest storing it in the fridge for up to two days. The flavors will blend well, and it will stay refreshing. Just remember to stir it again before serving. What is the nutritional information for this recipe? The nutritional information varies based on the sweetness you choose. On average, one serving has about 80 calories. It includes vitamins from kiwi and passionfruit, plus hydration from water. You get a nice boost of vitamin C! Can I use frozen fruits instead of fresh ones? Yes, frozen fruits work great! They add a nice chill to the drink. Just blend them as you would with fresh fruits. The flavor might be slightly different, but it will still be delicious. What can I substitute for agave syrup? You can use honey or maple syrup instead of agave syrup. Both will sweeten your drink nicely. Just taste as you go to ensure the sweetness is right for you. How do I ensure the drink stays refreshing and cool? To keep your drink cool, use lots of ice cubes. You can also chill the glasses before serving. This way, your Kiwi Passionfruit Agua Fresca stays cold and refreshing for longer. You learned how to make a refreshing Kiwi Passionfruit Agua Fresca. We covered ingredients, preparation, and storage tips. You can adjust sweetness and add fun flavors. Experiment with fruits or even create a cocktail. This drink is perfect for warm days and gatherings. Remember, enjoy your creation fresh and share with friends. Making this drink can spark joy and impress anyone. Dive into your kitchen and make this tasty beverage soon!

Kiwi Passionfruit Agua Fresca Refreshing Summer Drink

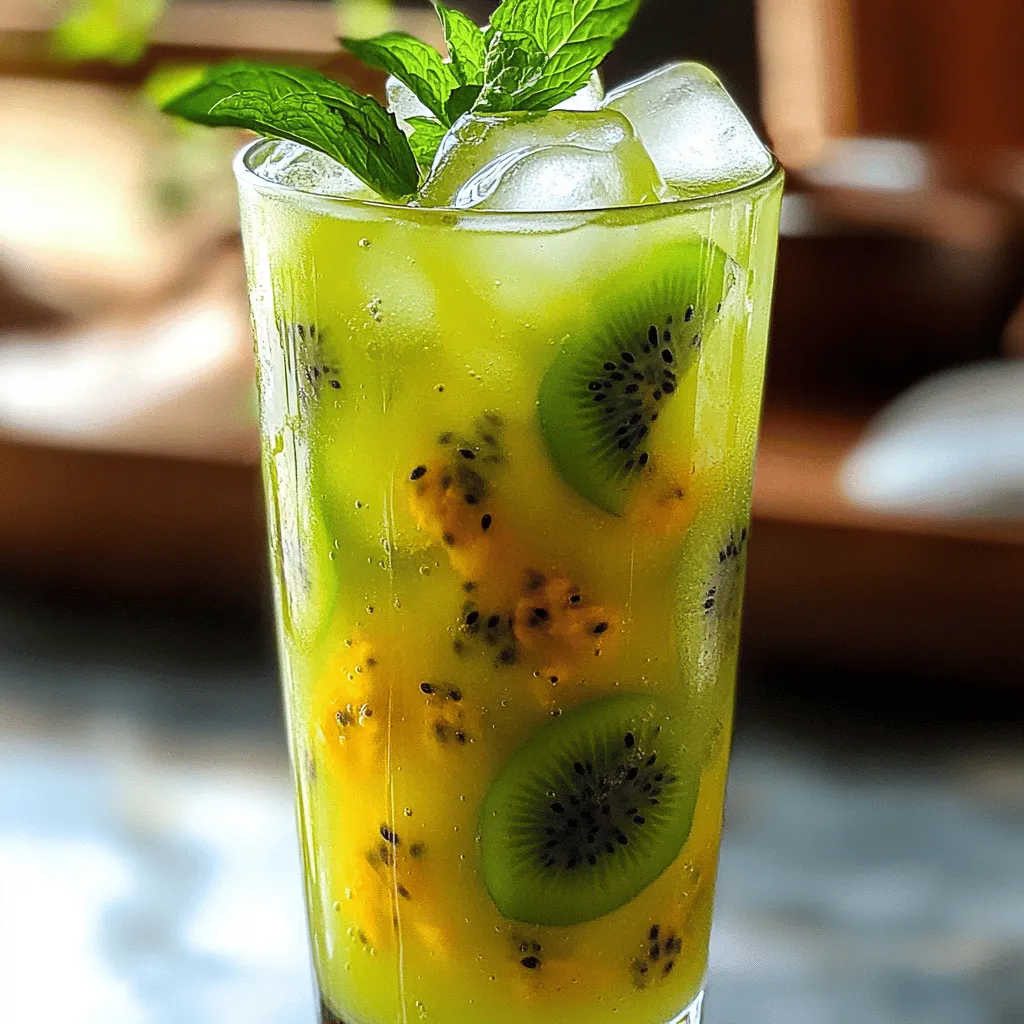
Looking for the perfect summer drink? You need to try Kiwi Passionfruit Agua Fresca! This sweet and tangy drink is

- 4 cups ripe watermelon, cubed and seeds removed - 2 cups cantaloupe, cubed - 1 cup fresh mint leaves, loosely packed - 3 tablespoons freshly squeezed lime juice - 4 cups cold water - 2-4 tablespoons agave syrup or honey - A pinch of salt To make the best Minted Melon Agua Fresca, you need fresh, ripe fruits. Look for melons that feel heavy for their size. Their scent should be sweet and fragrant. Fresh mint leaves should be green and vibrant. Avoid any brown or wilted leaves for the best flavor. Lime juice adds a nice zing. Freshly squeezed lime juice is best. It enhances the drink's taste and freshness. For sweetness, you can use agave syrup or honey. Start with a small amount, then taste as you go. Adjust it to fit your taste. This drink is not just refreshing; it’s also healthy. The fruits provide hydration and vitamins. It’s perfect for hot days or gatherings with friends. You can find the [Full Recipe] above for specific measurements and steps. Enjoy making this delightful drink! - Step 1: Blend the fruits and mint Start by adding the cubed watermelon, cantaloupe, fresh mint leaves, lime juice, and a pinch of salt into your blender. Blend on high for about 1-2 minutes until smooth. This step creates a vibrant mix of flavors. - Step 2: Strain for a smooth texture (optional) If you want a silky drink, strain the blended mixture through a fine mesh sieve or cheesecloth. This will remove any pulp. If you like some texture, feel free to skip this step. - Step 3: Mix in cold water Pour 4 cups of cold water into your pitcher. Stir the mixture well to ensure everything combines nicely. This will help balance the sweetness and make it more refreshing. - Step 4: Adjust sweetness with agave syrup or honey Taste the agua fresca. If you want it sweeter, add agave syrup or honey, one tablespoon at a time. Stir well after each addition. Keep tasting until you hit your perfect sweetness level. - Step 5: Chill before serving For the best experience, chill the agua fresca in the fridge for at least one hour. This allows the flavors to meld. If you're in a hurry, serve it immediately over ice for instant refreshment. This recipe is perfect for warm days. Enjoy it as a thirst-quencher or a fun party drink. For the full recipe, check out the details above. - Choosing the right melon: Pick ripe melons for the best flavor. Look for a sweet smell and a firm feel. The skin should have a slight sheen and be free of bruises. Watermelon should be heavy for its size. Cantaloupe should have a golden spot where it sat on the ground. - Importance of freshness in mint and lime juice: Use fresh mint leaves. They should be bright green and fragrant. Fresh lime juice brings a zesty taste. Avoid bottled lime juice, as it lacks the freshness you need. - Adjusting sweetness to personal taste: Start with two tablespoons of agave syrup or honey. Mix well, then taste. Add more if you like it sweeter. You control how sweet your drink is, so make it just right for you! - Ideas for garnishing your drink: Add fresh mint leaves on top. A slice of lime can brighten your drink. These garnishes make your drink look fancy and inviting. - Glassware recommendations: Serve in tall glasses or mason jars. These options keep your drink cool and show off its pretty colors. Clear glass lets you see the vibrant hues of your agua fresca. - Pairing foods with Minted Melon Agua Fresca: This drink goes well with light snacks. Try it with fresh fruit, tacos, or salad. The coolness of the drink balances spicier foods. Enjoy it at picnics or summer parties for a refreshing treat! For the full recipe, check out the detailed steps to create this delightful drink! {{image_4}} You can make your Minted Melon Agua Fresca even better. Try adding other fruits like honeydew or strawberries. These fruits bring unique flavors and colors to your drink. You can mix and match, so get creative! Infusing herbs like basil or cilantro adds a fresh twist. Just blend them with the fruits for a new take. Each bite will surprise your taste buds! If you want a fun twist, turn your agua fresca into a cocktail. It’s easy to make! Just add a splash of vodka or rum to your glass. These spirits mix well and keep the drink light. You can adjust the amount to fit your taste. Enjoy it at a summer party or a cozy night in. Your Minted Melon Agua Fresca will be a hit! For the full recipe, check out the steps above. To keep leftover agua fresca fresh, store it in a clean glass pitcher. Always cover it with a lid or plastic wrap. This prevents it from absorbing other flavors in your fridge. If you have added ice, remove it first. Ice can dilute the drink and make it watery. You can keep agua fresca in the fridge for about 3 days. After that, it may lose its flavor and freshness. Always give it a quick stir before serving again. This helps mix any settled ingredients. Yes, you can freeze agua fresca! Pour it into ice cube trays or freezer-safe containers. Leave some space at the top, as liquids expand when frozen. This method is great for a hot day when you want a quick chill. To thaw, place the frozen agua fresca in the fridge overnight. If you need it fast, run the container under warm water. Once thawed, stir it well to mix everything back together. Use it in smoothies or as a refreshing slush. What is Agua Fresca? Agua fresca means "fresh water" in Spanish. It is a light drink made from fruits, water, and sugar. This drink is popular in Mexico and Latin America. It is refreshing, especially on hot days. Is Minted Melon Agua Fresca healthy? Yes, minted melon agua fresca is healthy! It is full of vitamins from fruits. Watermelon and cantaloupe keep you hydrated. Mint adds flavor without extra calories. You can adjust the sweetness too. Use less sugar or none at all. Can I make this recipe ahead of time? Absolutely! You can make it a day ahead. Just store it in the fridge. The flavors will mix well overnight. Just remember to stir before serving. How to adjust the recipe for larger servings? To make more servings, double or triple the ingredients. Use 8 cups of watermelon and 4 cups of cantaloupe. Adjust the lime juice and mint too. Keep the cold water in the same ratio. What other flavors pair well with mint and melon? You can mix mint and melon with other fruits. Try adding berries, like strawberries or blueberries. Pineapple and lime also work well. Each fruit brings a new twist to the drink. You can be creative! Check out the Full Recipe for ideas. Minted Melon Agua Fresca is a refreshing drink you can easily make. We covered its ingredients, simple steps, and variations to fit any taste. Fresh fruits and herbs create a delightful flavor that’s hard to resist. You can serve it chill or enhance it with your favorite spirits. Remember to store leftovers properly and enjoy them later. This drink not only quenches your thirst but also brings joy to any gathering. Try it today and savor the cool, fruity goodness!

Minted Melon Agua Fresca Refreshing Summer Drink

Looking for a refreshing drink to cool you down this summer? Try Minted Melon Agua Fresca! This vibrant blend of

- 1 ripe mango, peeled and diced - 1 ripe banana, sliced - 1 teaspoon ground turmeric - 1/2 teaspoon ginger powder (or 1-inch piece of fresh ginger, grated) - A pinch of black pepper - 1 cup coconut milk (or almond milk) - 1 tablespoon honey or maple syrup (optional for sweetness) - 1 tablespoon chia seeds - 1/2 cup ice cubes Turmeric Mango Sunrise Smoothie is bright and full of flavor. Each ingredient plays a key role. The mango brings sweetness, while the banana adds creaminess. Turmeric gives the smoothie a unique taste and health benefits. Ground turmeric is key here. It has curcumin, which can help reduce inflammation. Ginger adds warmth and a slight spice. The pinch of black pepper boosts turmeric absorption, making it even better for you. Coconut milk or almond milk gives a creamy base. It helps blend everything smoothly. If you like sweet, add honey or maple syrup. Chia seeds are a fantastic source of fiber. They also thicken your smoothie and make it more filling. The ice cubes keep your drink nice and cold. This combination makes a perfect breakfast or snack. It’s refreshing and packed with nutrients. You can find the full recipe above to try it yourself! - Prepare all ingredients: peel, slice, and dice. - Grate fresh ginger if using instead of powder. Start by peeling the ripe mango and cutting it into small pieces. This makes it easier to blend. Slice the banana into coins. If you want a stronger ginger flavor, grate fresh ginger. If not, just use ginger powder. - Combine mango, banana, turmeric, and ginger in a blender. - Add coconut milk and sweetener if desired. In a blender, add the diced mango, sliced banana, ground turmeric, and ginger (fresh or powdered). Pour in the coconut milk for a creamy base. If you like it sweeter, add honey or maple syrup now. - Add chia seeds and black pepper. - Blend until smooth and creamy, adjusting sweetness as needed. Next, sprinkle in the chia seeds and a pinch of black pepper. The black pepper helps your body absorb the benefits of turmeric. Blend everything until it’s smooth and creamy. Taste it and adjust the sweetness if you want. - Pour into glasses and garnish with chia seeds or turmeric. Once blended, pour the smoothie into your favorite glasses. For a nice touch, sprinkle some chia seeds or a dash of turmeric on top. This adds flavor and looks great. Enjoy your Turmeric Mango Sunrise Smoothie! For the full recipe, check the main section. To make your Turmeric Mango Sunrise Smoothie even better, use fresh ginger. It adds a bolder taste. If you like things sweeter, adjust the honey or maple syrup to your liking. Think about adding spinach or kale. These greens add extra vitamins and minerals. You can also include protein powder to make your smoothie more filling and nutritious. A high-speed blender is best for this smoothie. It helps achieve a smooth consistency. Remember to stop the blender occasionally to scrape down the sides. This way, you get an even blend throughout. For the Full Recipe, refer to the earlier sections. {{image_4}} You can switch up the flavors in your Turmeric Mango Sunrise Smoothie. If you want to change the fruit, try using pineapple or peach instead of mango. These fruits bring their own sweet and tangy notes. You can also play with the type of milk you use. Almond milk adds a nutty flavor, while oat milk gives a creamy texture. Each choice creates a new taste experience. Boost the nutrition of your smoothie by adding extra ingredients. Flaxseeds or oats are great choices for added fiber. They help keep you full longer. If you want a creamier texture, add a scoop of nut butter, like almond or peanut butter. This adds healthy fats and makes the smoothie even more satisfying. You can make seasonal changes to keep things fresh. In summer, use frozen mango to create a chillier, refreshing smoothie. It feels great on a hot day. For a fun twist, add a splash of orange juice. This brings a bright citrus flavor that pairs well with the mango. Each variation makes your smoothie unique and exciting. For the full recipe, check out the section above. You can store leftover smoothie in the refrigerator for up to 24 hours. This keeps it fresh for your next meal. Use an airtight container to maintain freshness. This simple step helps lock in flavor and nutrients. For long-term storage, freeze your smoothie in ice cube trays. This makes it easy to grab what you need. Later, blend the frozen cubes into new smoothies for a quick and chilled treat. It’s a great way to enjoy the taste of your favorite smoothie anytime. If your smoothie thickens after storage, don’t worry. Just re-blend it with a splash of water or milk. This helps adjust the consistency to your liking. You can make it as smooth as you want. Turmeric contains curcumin. Curcumin is known for its anti-inflammatory properties. It can help reduce swelling and pain. Many people enjoy it for its health benefits. Adding turmeric to your diet is easy and tasty. Yes, you can make this smoothie vegan. Just swap honey for maple syrup. You can also use coconut or almond milk. Both options work great and keep the smoothie creamy. Yes, you can prepare this smoothie ahead of time. However, drink it within 24 hours. This way, you keep the best freshness and nutrients. The flavors will be more vibrant when fresh. Yes, you can substitute the mango. Other tropical fruits work well, too. Pineapple and banana are great choices. They add a sweet taste and smooth texture to your drink. This blog post shows you how to make a tasty and healthy smoothie. It covers fresh and dry ingredients and how to blend them. You learned tips to enhance flavor and boost nutrition. You can also try different fruits and types of milk for fun variations. Remember to store leftovers wisely to keep them fresh. Get creative with your smoothie, and enjoy the benefits! Making healthy choices can be easy and fun.

Turmeric Mango Sunrise Smoothie Refreshing and Healthy

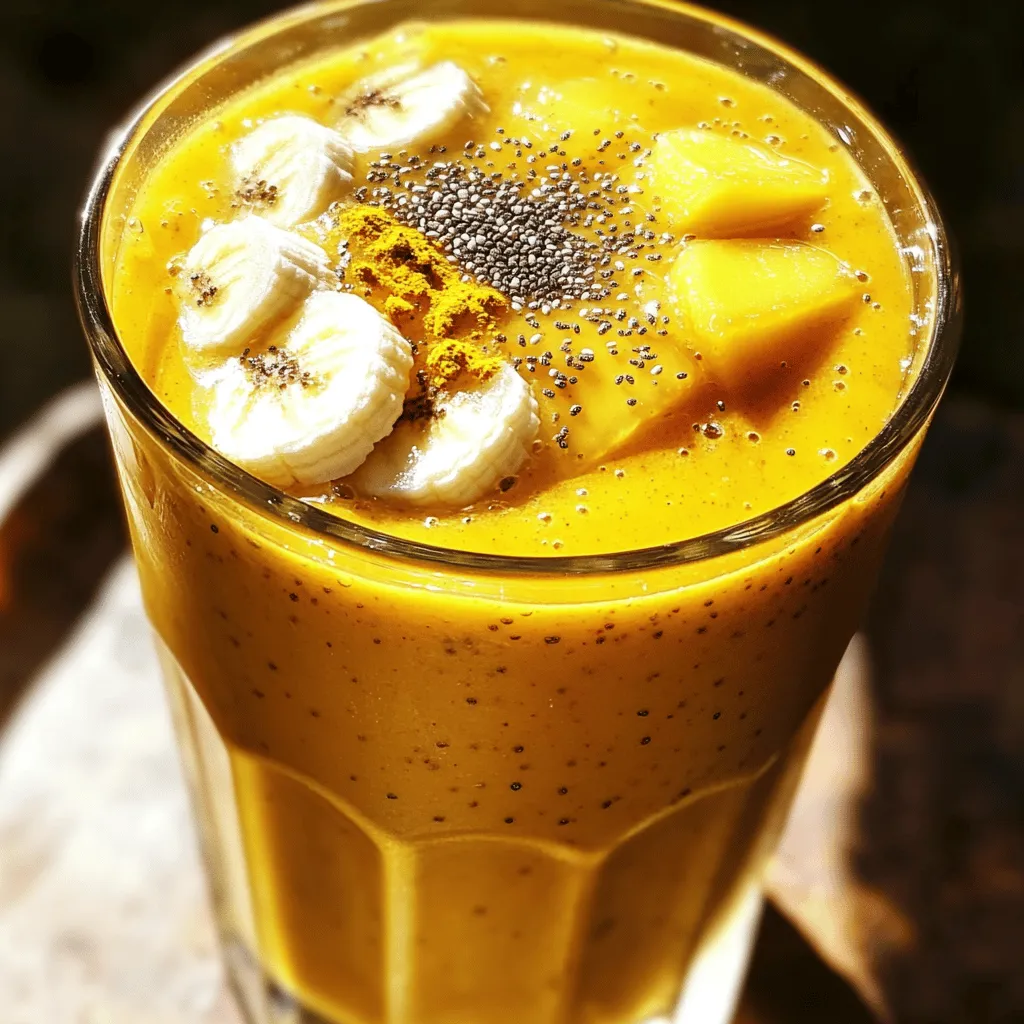
Start your day with a burst of flavor and health! The Turmeric Mango Sunrise Smoothie combines the sweetness of ripe

- 2 cups strong brewed chai tea, cooled - 1 cup coconut milk or alternative milk - 1/4 cup honey or maple syrup - 2 teaspoons pure vanilla bean paste - 1/2 teaspoon ground cinnamon - 1/4 teaspoon ground ginger - Pinch of freshly grated nutmeg - 1/2 cup whipped cream (optional) High-quality ingredients make a big difference in flavor. For the chai tea, choose a brand that you love. It should be bold and flavorful. You can brew it strong to ensure your freeze tastes great. When it comes to milk, coconut milk adds a rich, creamy taste. If you want something lighter, try almond or oat milk. Each milk gives a unique twist to the freeze. I often use honey for its warm taste. Maple syrup works well too and adds a nice earthy note. When adjusting sweetness, start with less. You can always add more if needed. For natural sweeteners, consider using agave nectar or stevia. They can help you control the sweetness without adding sugar. Remember, the right balance makes all the difference in your Vanilla Bean Chai Freeze. Feel free to explore the [Full Recipe] for detailed steps! Start by making your chai blend. First, take 2 cups of strong brewed chai tea. Make sure it has cooled to room temperature. Next, pour in 1 cup of coconut milk. This adds a nice creaminess. Now, whisk in 1/4 cup of honey or maple syrup. This sweetens your mix and brings all the flavors together. Add 2 teaspoons of pure vanilla bean paste. If you have a whole vanilla bean, scrape the seeds from it instead. Next, sprinkle in 1/2 teaspoon of ground cinnamon and 1/4 teaspoon of ground ginger. These spices give the chai its warm flavor. Finally, add a pinch of freshly grated nutmeg. Mix everything well until you have a smooth blend. Once your mixture is ready, pour it into a freezer-safe container. You want to make sure the surface is nice and even, so smooth the top with a spatula. Seal the container with a lid or plastic wrap. Put it in the freezer and let it freeze for about 4 hours. Keep an eye on it. You want it to be firm but not too hard. This is key for a good texture later on. To make your freeze light and fluffy, you need to scrape it. Every hour, take the container out of the freezer. Use a fork to scrape the mixture. This breaks up any icy spots. Repeat this each hour for the best texture. Once it is fully frozen, it should be airy and delightful. Scoop the Velvet Vanilla Bean Chai Freeze into bowls or elegant glasses. If you want, add a dollop of whipped cream on top. A light dusting of cinnamon or nutmeg makes it look even better. Serve your Vanilla Bean Chai Freeze in glass bowls. This shows off its creamy texture. A clear bowl adds to the visual appeal. Garnish each serving with whipped cream. A sprinkle of cinnamon or nutmeg can make it look even nicer. You might also add a cinnamon stick for a fun twist. You can boost the flavor in your freeze. Adding a bit of chocolate can create a rich taste. Vanilla extract is another great addition. It pairs well with the chai spices. Don't hesitate to try different spices, too! Cardamom or cloves can give it a unique flair. Each spice brings a new layer of warmth. Pair your Vanilla Bean Chai Freeze with snacks or desserts. It goes well with cookies or brownies. You can even serve it at parties or special events. It’s a refreshing treat on hot days. Share it at family gatherings for a delightful surprise. Enjoy it any time you want a sweet, cool treat! {{image_4}} You can easily make this treat dairy-free. Use almond, oat, or soy milk in place of coconut milk. These options add their unique flavors and textures. If you want a nut-free version, stick with oat milk or soy milk. Both will still give you a creamy texture without dairy. Want to spice it up? Consider adding cardamom or cloves. These spices can add warmth and depth to the flavor. You can also incorporate fruit purees like mango or raspberry. This fruity twist will give your freeze a refreshing zing. If you're watching your sugar intake, adjust the sweetness. You can reduce the honey or maple syrup to suit your taste. For a sugar-free option, try using stevia or erythritol. These sweeteners can help you enjoy a tasty treat without the extra sugar. To keep your Vanilla Bean Chai Freeze fresh, store it in a freezer-safe container. Make sure the lid is tight. This keeps out air and helps prevent ice crystals. You can store it for up to three months in the freezer. For best results, consume it within a month to enjoy the best flavor and texture. When you’re ready to serve, take the freeze out of the freezer. The best way to thaw it is to let it sit in the fridge for about 30 minutes. This helps it soften evenly. If you're in a hurry, you can leave it at room temperature for about 10-15 minutes. To keep the texture nice, avoid using a microwave, as it can melt it unevenly. To know if your freeze is still good, check for ice crystals or a change in color. If it smells off, it’s time to toss it. To keep it fresh longer, always seal it tightly after serving. Try to scoop out only what you need and put the rest back in the freezer quickly. This prevents warm air from getting in and keeps your treat tasting great. Yes, you can use regular milk. Each milk type has its pros and cons. - Cow's Milk: It adds creaminess but has dairy allergens. - Almond Milk: Great for a nutty taste, but less creamy. - Soy Milk: Thick and creamy, a good dairy alternative. - Oat Milk: Creamy and sweet, a popular choice today. Coconut milk brings a tropical flavor that pairs well with chai. If you try other milks, adjust the sweetness as needed. To make it vegan, swap out honey for maple syrup. You can also use any non-dairy milk. - For Sweetness: Use maple syrup or agave nectar. - For Creaminess: Try almond, soy, or oat milk. These changes keep the dish plant-based while still tasting great. You can enjoy many sweets with Vanilla Bean Chai Freeze. Here are my favorites: - Cookies: Try ginger snaps or shortbread for a delightful crunch. - Brownies: A fudgy brownie complements the freeze's creaminess. - Fruit: Fresh berries or sliced bananas add a fresh touch. These pairings enhance the flavors and make your dessert experience even better. For the full recipe, check out the details above! In this blog post, I shared a complete guide for making Vanilla Bean Chai Freeze. We covered key ingredients, step-by-step instructions, and useful tips. I also explored variations for different diets and flavors. Remember, using high-quality ingredients makes a big difference in taste. You can adjust sweetness based on your preference. With easy storage and serving ideas, you can enjoy this treat any time. Dive in and experiment to find your favorite version of this refreshing dessert!

Vanilla Bean Chai Freeze Refreshing Frozen Treat

Looking for a delightful way to cool down? The Vanilla Bean Chai Freeze is your perfect treat! This refreshing dessert

- 1 cup pomegranate juice (preferably freshly squeezed) - 1 tablespoon fresh rosemary leaves, plus additional sprigs for garnish Pomegranate juice brings a sweet and tart flavor to the drink. I love using fresh juice, as it tastes better and is more vibrant. Fresh rosemary leaves add an aromatic touch, enhancing the drink's overall flavor. - 2 tablespoons honey or agave syrup (adjust according to sweetness preference) - Juice of 1 fresh lime Honey or agave syrup sweetens the cooler. You can adjust the amount based on how sweet you want it. Fresh lime juice adds a zesty kick. This citrus helps balance the sweetness of the drink, making it refreshing. - 2 cups sparkling water or club soda - Ice cubes - Pomegranate seeds, for garnish Sparkling water or club soda gives the cooler its bubbly texture. Ice cubes keep your drink chilled. I love to add pomegranate seeds as a garnish. They add a pop of color and a burst of flavor to each sip. This Pomegranate Rosemary Cooler is easy to make and perfect for summer. You can find the full recipe at the beginning of the article. To start, grab a small saucepan. Place it over low heat. Pour in 1 cup of pomegranate juice. Add 2 tablespoons of honey or agave syrup. Toss in 1 tablespoon of fresh rosemary leaves. Stir the mix gently as it warms. Make sure the honey dissolves fully. Keep the heat low. You want to warm it, not boil it. After about 10-15 minutes, turn off the heat. Let the mixture steep. This step helps the syrup soak up the rosemary flavor. The longer you steep, the more flavor you get. Next, it's time to strain the syrup. Use a fine sieve to separate the liquid from the rosemary leaves. Discard the leaves. Now, you have a rich, fragrant syrup. Add the juice of 1 fresh lime to this syrup. Stir gently to mix everything well. The lime adds a nice zing. This balance of sweet and tart is key. Now, let’s build your cooler. Fill each glass with ice cubes. Aim for a generous amount to keep your drink cold. Pour in the pomegranate-lime mixture until the glass is half full. Carefully top off each glass with 2 cups of sparkling water or club soda. Watch the bubbles rise! Stir gently with a long spoon. This helps mix the flavors without losing fizz. Finish your cooler with a sprig of fresh rosemary and a sprinkle of pomegranate seeds for garnish. These touches make your drink look vibrant and inviting. For the complete recipe, check out the Full Recipe. To make your Pomegranate Rosemary Cooler shine, you should think about the sweetness. Honey or agave syrup can be adjusted to fit your taste. If you like it sweeter, add a bit more honey. If you prefer less sweetness, cut back. Taste as you go, and find what you love. Next, consider acidity. Lime juice adds a nice tang to the drink. You can squeeze in more lime if you enjoy a zesty flavor. If you want a smoother drink, reduce the lime juice. Balance is key for a refreshing experience. Choosing the best pomegranate juice is crucial. Freshly squeezed juice offers the best flavor. If fresh juice isn't available, look for pure juice without added sugars. This ensures you get that rich, tart taste. For rosemary, always select fresh sprigs. Look for bright green leaves with no browning. Fresh rosemary will give your cooler a vibrant aroma. Dried rosemary lacks the same flavor, so stick with fresh for the best result. Presentation matters when serving your cooler. Start by choosing clear glasses to show off the vibrant colors. The deep red of the pomegranate juice looks stunning against the green rosemary. Enhance the visual appeal with garnishes. A sprig of fresh rosemary and some pomegranate seeds on top add texture. You can also add lime wedges on the glass rim for a pop of color. This makes your drink not only tasty but also pretty for gatherings. {{image_4}} You can easily change the taste of your Pomegranate Rosemary Cooler. Adding citrus fruits can bring a fresh twist. Try squeezing in some orange or grapefruit juice. This will brighten the drink and enhance its flavor. You can also use herbs like mint or basil. They add a cooling effect and a new layer of taste. Just muddle a few leaves before mixing them in. You can mix and match to find your favorite blend! Do you want a non-alcoholic version? It's simple! Just skip any alcohol and enjoy the pomegranate and rosemary flavors. You can make a delightful mocktail by adding more sparkling water. Other summer fruit juices are great options too. Consider using watermelon, peach, or even cucumber juice. Each will give a unique taste, perfect for hot days. Want to make the cooler festive? You can adapt it for the holidays! Add spices like cinnamon or nutmeg for a warm flavor. This twist makes it perfect for fall gatherings. In winter, try using cranberry juice instead of pomegranate. It adds a seasonal touch while keeping the drink refreshing. These small changes can keep your cooler exciting all year long. To keep your pomegranate rosemary cooler fresh, store any leftover syrup in an airtight jar. Make sure to place it in the fridge. The cooler itself should also go in the fridge if you have leftovers. Keep it covered to avoid any strange odors from other foods. You can expect your pomegranate syrup to stay fresh for about one week in the fridge. If you see any mold or off-smells, it’s time to toss it out. For the cooler, it’s best enjoyed fresh, but it can last for up to three days in the fridge. If the bubbles fade or it smells off, don’t drink it. Always trust your senses when checking for spoilage. A Pomegranate Rosemary Cooler is a refreshing drink that combines sweet pomegranate juice, fresh rosemary, lime, and bubbly water. It has a bright flavor, making it perfect for warm days. The rosemary adds a unique twist, giving it an herbal note that pairs well with the fruitiness of the pomegranate. You can enjoy it as a fun drink at gatherings or a simple refreshment at home. Yes, you can use frozen pomegranate juice. Just make sure to thaw it before using. Frozen juice can taste different from fresh juice, as it may lose some freshness. If you want the best flavor, opt for freshly squeezed pomegranate juice. It gives the drink a vibrant taste that shines through in every sip. You can prepare the pomegranate rosemary syrup ahead of time. Simply follow the steps in the Full Recipe. After straining, store the syrup in the fridge for up to a week. When you are ready to serve, mix it with sparkling water and ice. This way, you can enjoy your cooler without much fuss when guests arrive. Yes, both pomegranate and rosemary have health perks. Pomegranate juice is rich in vitamins and antioxidants. It may help reduce inflammation and promote heart health. Rosemary also has benefits; it may boost your memory and digestion. Using these ingredients in your drink not only tastes good but can also support your well-being. This blog post explored how to make a refreshing Pomegranate Rosemary Cooler. You learned about essential ingredients, like pomegranate juice and fresh herbs. We covered each step, from preparing the infusion to combining flavors. Tips helped you balance sweetness and choose the best ingredients. You can also try variations for seasonal fun. Remember, making this cooler is easy and rewarding. Whether for a gathering or a quiet night, it brings joy and refreshment. Enjoy your cooler and share it with others for a delightful experience!

Pomegranate Rosemary Cooler Refreshing Summer Drink

Looking for a refreshing summer drink that packs a flavor punch? The Pomegranate Rosemary Cooler is your answer! This vibrant

- 2 teaspoons ceremonial matcha powder - 1 cup chilled canned coconut milk - 1 tablespoon honey or maple syrup - 1 cup ice cubes - 1/2 teaspoon pure vanilla extract - Whipped coconut cream (for topping) - Toasted coconut flakes - Optional flavorings or sweeteners Matcha Coconut Cloud Frappe is a simple and fun drink to make. The main ingredients are key to its taste. You will need ceremonial matcha powder. This type of matcha has a bright green color and rich flavor. The coconut milk adds creaminess. It also brings a tropical twist to the drink. Honey or maple syrup gives it sweetness. You can adjust the amount based on your taste. Next, we have additional ingredients. Ice cubes keep your frappe cold and refreshing. The pure vanilla extract adds a hint of warmth. Finally, whipped coconut cream creates that lovely cloud-like topping. It makes the drink look even more tempting. For garnishing options, toasted coconut flakes add a nice crunch. You can also try other flavorings or sweeteners. Get creative and make it your own! This drink is not just tasty, but it can also be a showstopper. So, let your imagination run wild with the toppings! If you want to see how to make it, check the Full Recipe. 1. Measure and add matcha powder to a blender. Use 2 teaspoons of ceremonial matcha powder. This type has a vibrant color and great taste. 2. Pour in coconut milk and sweetener. Add 1 cup of chilled canned coconut milk. Then, mix in 1 tablespoon of honey or maple syrup. Adjust the sweet taste to your liking. 1. Secure the blender lid and blend on high speed. Blend for about 30 to 45 seconds. You want a smooth and frothy drink. 2. Adjust sweetness after blending as needed. Taste your frappe. If it needs more sweetness, add a bit more honey or syrup. Blend again briefly to mix it well. 1. Pour into a tall glass. Fill the glass about three-quarters full. This leaves room for toppings. 2. Add whipped coconut cream and garnish with coconut flakes. Top your drink with whipped coconut cream. It creates a cloud-like look. Finish with some toasted coconut flakes for added crunch and flavor. Now you can enjoy a refreshing Matcha Coconut Cloud Frappe! For the full recipe, check the section on ingredients and instructions. To get a frothy blend, use a high-speed blender. I recommend blending for about 30 to 45 seconds. This works well to mix all ingredients, making the frappe creamy and light. If the ingredients are too cold, it may create a thicker texture. However, if it’s too warm, the frappe might turn runny. Aim for chilled coconut milk and ice to keep it just right. You can try different sweeteners for your frappe. Honey or maple syrup works great, but you can also use agave or stevia. Each sweetener has its own taste. If you want it sweeter, just add a bit more. Start small, then taste and adjust as needed. This way, you can make it perfect for your liking. Serving matters! Use tall, clear glasses to show off the lovely layers of your frappe. For a fun touch, add whipped coconut cream on top. Then sprinkle toasted coconut flakes over the cream. This adds both flavor and a nice look. You can even add a colorful straw or a fun spoon to make it more inviting. {{image_4}} You can get creative with flavors in your Matcha Coconut Cloud Frappe. Adding extracts like almond or extra coconut enhances the taste. You can also try blending in fruits like bananas or avocados. These fruits add creaminess and a natural sweetness. For a tropical twist, try fresh pineapple or mango. If you're watching your calories, consider using low-fat coconut milk. This change keeps the flavor but cuts down on fat. You might also want to switch sweeteners. A sugar-free option, like stevia or monk fruit, works well. This way, you can enjoy your drink without the sugar rush. To keep your frappe fully plant-based, check all your ingredients. Ensure that your sweeteners and flavorings are vegan. If you want whipped cream on top, use whipped coconut cream. Many brands offer dairy-free options that froth nicely. This keeps your frappe creamy and delicious while staying vegan. To keep your Matcha Coconut Cloud Frappe fresh, store it in an airtight container. Glass jars work well. They help seal in flavor and prevent spills. You can also use plastic containers if that's what you have. Just make sure they close tightly. For best results, refrigerate your leftovers. Consume them within two days. After that, the texture and taste may change. Can you reheat a frappe? It’s best to enjoy your frappe cold, but you can use leftovers in new ways! Use the leftover frappe as a base for smoothies. Just blend it with fresh fruit or yogurt. You can also pour it over pancakes or waffles for a unique twist. If you need to re-blend it, add a bit of ice and blend again. This will help restore its fluffy texture. Want to prepare in advance? You can freeze your frappe! Pour it into ice cube trays. Once frozen, transfer the cubes to a plastic bag. This way, you can use them later in smoothies or other drinks. For the best taste, thaw your frappe cubes in the fridge overnight. You can also blend them while still frozen if you want a thicker drink. Just remember, the flavor will be best if used within three weeks. What is ceremonial matcha and why is it preferred? Ceremonial matcha is a high-quality green tea powder. It comes from the youngest tea leaves. This matcha has a bright green color and a smooth taste. It is ground finely, which makes it perfect for drinks like our Matcha Coconut Cloud Frappe. I recommend using ceremonial grade for the best flavor and health benefits. Can I use culinary grade matcha? Yes, you can use culinary grade matcha. However, it has a more bitter taste. This type is often used in baking or cooking. If you want a sweeter drink, stick with ceremonial matcha for your frappe. What food pairs well with Matcha Coconut Cloud Frappe? This frappe goes well with light snacks. You can enjoy it with fruit, like strawberries or mango slices. It also pairs nicely with baked goods, such as scones or muffins. The flavors of matcha and coconut work well with these foods. Best occasions to serve this beverage You can serve this frappe at any time. It is great for brunch or as an afternoon treat. It also makes a fun drink for parties or summer gatherings. Your guests will love the unique flavor and creamy texture. What are the health benefits of matcha? Matcha is packed with antioxidants. It may help boost your energy and focus. It can also support your metabolism and help with weight loss. Drinking matcha regularly can improve your overall health. How does coconut milk contribute to nutritional value? Coconut milk adds healthy fats to your frappe. These fats can help keep you full longer. It also contains vitamins and minerals, like potassium and magnesium. This makes your drink not only tasty but also nutritious. This blog post shared a simple and tasty recipe for a Matcha Coconut Cloud Frappe. We covered key ingredients like ceremonial matcha, coconut milk, and sweeteners. You learned how to blend and serve your frappe with whipped coconut cream and garnishes. I provided tips for perfect texture and sweetness, along with healthy variations. In summary, this recipe is easy, fun, and allows room for creativity. Enjoy making this delightful drink while exploring your unique flavors!

Matcha Coconut Cloud Frappe Refreshing and Creamy Drink

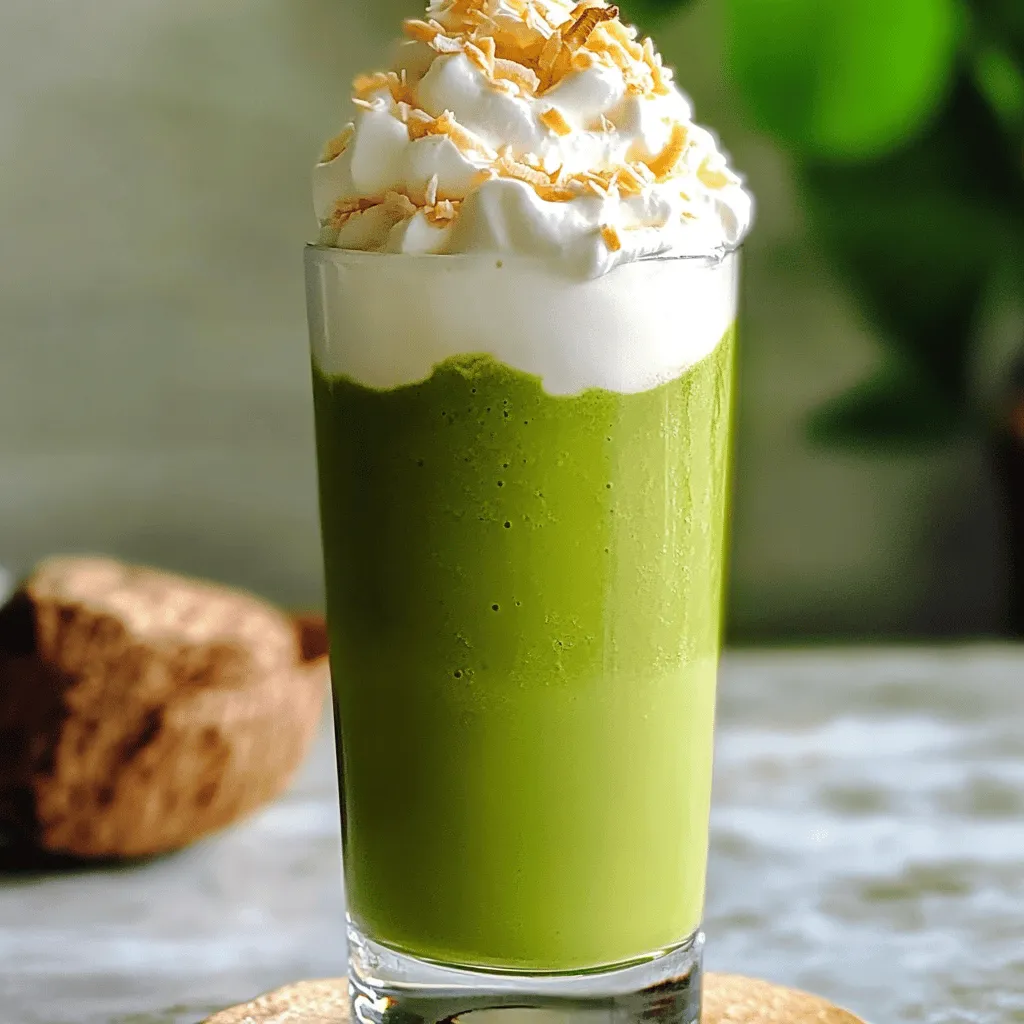
Craving a cool and creamy treat that gives you a burst of energy? The Matcha Coconut Cloud Frappe might just

Older posts
Newer posts
← Previous Page1 … Page35 Page36 Page37 … Page86 Next →

dsad

© 2026 lazychefmagic • Built with GeneratePress

Our Policies

  • Copyright Policy
  • Cookie Policy
  • GDPR Policy
  • Privacy Policy
  • Disclaimer
  • Terms Of Use

More Information

  • Home
  • About
  • Contact
  • Appetizers
  • Dessert
  • Dinner
  • Drinks
©2026, lazychefmagic About Back To Top