Skip to content
DisclaimerTerms Of UseGDPR PolicyCookie Policy

lazychefmagic

  • Home
  • Drinks
  • Appetizers
  • Dinner
  • Dessert
  • About
  • Contact
  • Privacy Policy
DisclaimerTerms Of UseGDPR PolicyCookie Policy

NO-ING-IMG

To make the Blueberry Lemon Cheesecake Smoothie, you need these simple ingredients: - 1 cup fresh or frozen blueberries - 1 ripe banana, peeled and frozen - 1 cup creamy Greek yogurt - 1/2 cup cream cheese, softened to room temperature - 1 cup almond milk (or any milk variety you prefer) - 2 tablespoons honey or maple syrup (optional, adjust based on desired sweetness level) - Zest of 1 medium lemon - Juice from 1/2 medium lemon - 1/4 teaspoon pure vanilla extract - A pinch of salt Each ingredient adds its own flavor and texture. Fresh or frozen blueberries bring vibrant color and taste. The ripe banana offers natural sweetness and creaminess. Greek yogurt adds protein and tang. Cream cheese gives that cheesecake richness. Almond milk keeps the smoothie light and smooth. Honey or maple syrup sweetens it up if you like. Lemon zest and juice give a zesty kick. Pure vanilla extract adds warmth. A pinch of salt balances the flavors. These ingredients work together to create a refreshing drink that feels like dessert. You can find the full recipe above to guide you through the process! - Add the blueberries, frozen banana, Greek yogurt, and cream cheese. - Pour in the almond milk and sweetener, if using. Start by gathering your ingredients. I love using fresh or frozen blueberries for their rich taste. The frozen banana gives the smoothie a creamy texture. Greek yogurt adds protein, while cream cheese brings that cheesecake flavor. Once you have everything ready, toss them all into your high-powered blender. Next, pour in the almond milk. This will help blend everything smoothly. If you like it sweeter, add in honey or maple syrup now. - Include lemon zest, lemon juice, vanilla extract, and salt. - Blend until smooth, scraping sides as needed. Now it’s time to add some zest! Sprinkle in the lemon zest and squeeze in the lemon juice. This gives your smoothie a bright, refreshing kick. Don’t forget the vanilla extract and a pinch of salt. The salt helps balance the flavors. Blend everything on high speed. Stop to scrape down the sides if needed. This ensures a smooth mix without lumps. - Adjust sweetness or lemon flavor as needed. - Serve the smoothie in chilled glasses. After blending, taste your smoothie. If it needs more sweetness, add a bit more honey or lemon juice and blend again. Once you’re happy with the flavor, pour the smoothie into chilled glasses. For a fun touch, you can garnish each glass with a few fresh blueberries or a sprinkle of lemon zest. Enjoy your Blueberry Lemon Cheesecake Smoothie as a refreshing treat! Check out the Full Recipe for more details. When making your Blueberry Lemon Cheesecake Smoothie, start with the best ingredients. For blueberries, you can choose between fresh and frozen. Fresh blueberries are juicy and sweet. Look for ones that are firm and plump. If you cannot find fresh ones, frozen blueberries work well too. They are often picked at peak ripeness, which locks in flavor. Next, let’s talk about bananas. A ripe banana is key for sweetness and creaminess. Choose bananas with a few brown spots, as this means they are sweet. If you can, peel and freeze your banana before blending. This will make your smoothie colder and thicker. Using a high-powered blender is a must for this smoothie. A strong blender crushes the fruit and cream cheese into a smooth mix. If you use a regular blender, you may end up with chunks instead of a creamy drink. To achieve the ideal smoothness, blend all your ingredients on high speed. Stop to scrape the sides of the blender every so often. This helps mix everything well. Blend until the mixture is silky and creamy. If it feels too thick, add a splash of almond milk to help it blend. Presentation makes your smoothie look just as good as it tastes. For a beautiful finish, garnish your smoothie with fresh blueberries on top. You can also sprinkle lemon zest for a pop of color. Serve your smoothie in chilled glasses to keep it refreshing. This drink works great as a breakfast option or a sweet snack after lunch. You can even add a straw for fun! Enjoying your smoothie this way makes every sip a delight. {{image_4}} You can easily make this smoothie a bit healthier. For a dairy-free option, swap the Greek yogurt and almond milk for coconut yogurt and oat milk. Both options add great creaminess. If you want to lower the sugar, try using less honey or maple syrup. You can even skip it altogether if the fruit is sweet enough. Want to boost the nutrients? Add a handful of spinach or kale to your smoothie. These greens blend well and add vitamins without changing the taste much. You can also experiment with different fruits. Strawberries, raspberries, or mangoes can give your smoothie a unique twist. Using seasonal fruits can keep this smoothie fresh. In the summer, add strawberries or peaches for a sweet touch. In winter, try using citrus fruits like oranges or grapefruits. They add a nice zing and pair well with blueberries. Each season brings a new flavor to explore! To keep your Blueberry Lemon Cheesecake Smoothie fresh, store any leftovers in the fridge. Use an airtight container to minimize air exposure. This keeps it cool and tasty. Drink the smoothie within one day for the best flavor. If you want to save it longer, freezing is a great option. Pour the smoothie into ice cube trays or freezer-safe bags. This way, you can enjoy it later. When stored properly, your smoothie can last about 24 hours in the fridge. For frozen smoothies, they can stay fresh for up to three months. Check for signs of spoilage before drinking. If you see separation, odd smells, or changes in color, it’s time to toss it out. Freshness matters for taste and health! To make your smoothie thicker, you can try these tips: - Use less almond milk. Start with half a cup. - Add more frozen fruits like bananas or blueberries. - Include a scoop of Greek yogurt for extra creaminess. - Blend in some ice cubes for a frosty texture. These tips help you create a rich and creamy smoothie each time. Yes, you can use different sweeteners. Here are some options: - Agave nectar is a good choice for a mild sweetness. - Coconut sugar offers a unique flavor with less impact on blood sugar. - Stevia is great for a zero-calorie option. Feel free to adjust the amount based on your taste. The ingredients in this smoothie have many health benefits: - Blueberries are high in antioxidants and vitamins C and K. - Greek yogurt provides protein and probiotics for gut health. - Lemon is rich in vitamin C, boosting your immune system. Together, these ingredients make a nutritious and tasty drink. Enjoy the Full Recipe for a delightful treat! This blog post shared a simple guide to making a tasty smoothie. You learned about the key ingredients, step-by-step blending instructions, and helpful tips. The variations offer fun ways to change the flavor or make it healthier. Storing your smoothies properly keeps them fresh longer. Remember, you can customize your drink to fit your taste. Enjoy exploring different flavors and ingredients. Your smoothie adventure starts now!

Blueberry Lemon Cheesecake Smoothie Refreshing Delight

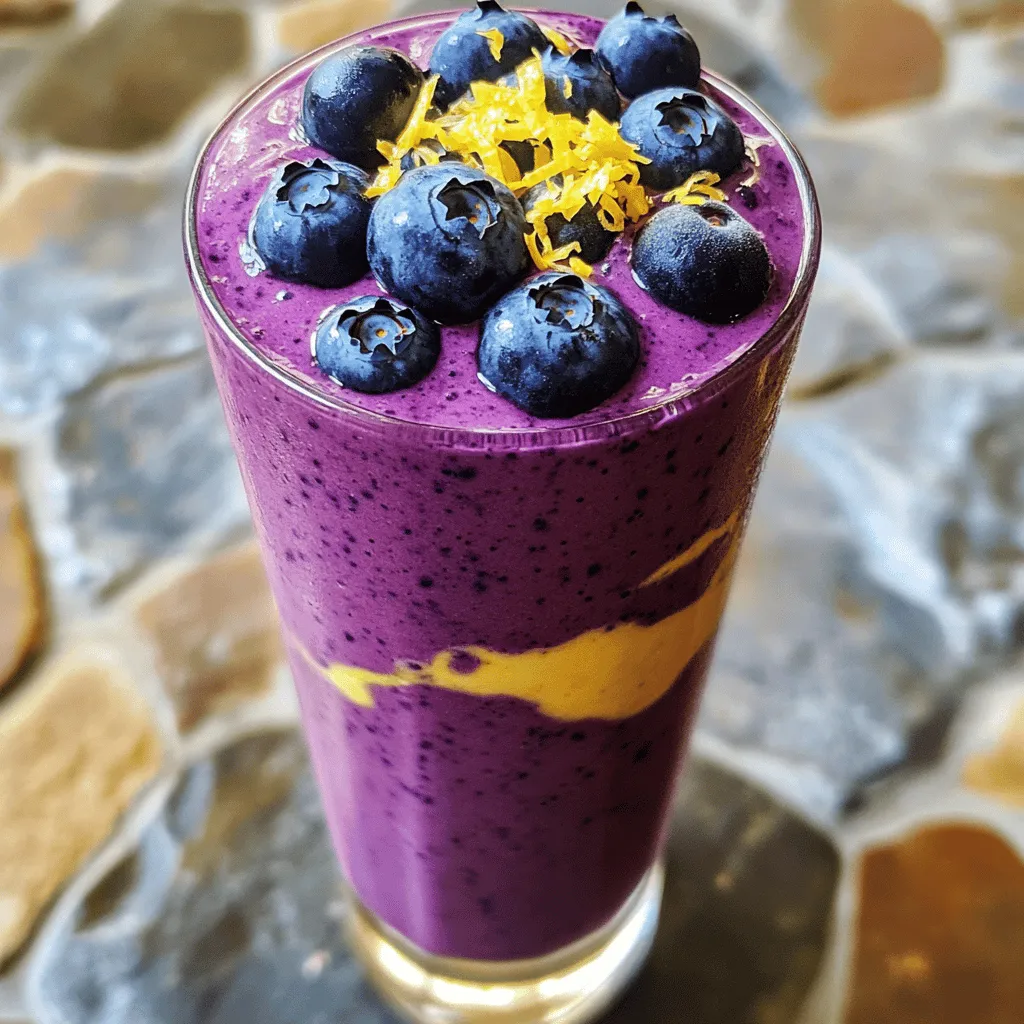
Are you ready to sip on something refreshing and tasty? This Blueberry Lemon Cheesecake Smoothie combines fruity blueberries, zesty lemon,

- 4 cups water - 4 black tea bags - 1 cup passion fruit pulp (freshly scooped or bottled) - 1/2 cup fresh mint leaves, plus extra for garnish - 1/4 cup honey or agave syrup (adjust according to your preferred sweetness) - Ice cubes - Fresh lemon slices for garnish Fresh vs. Bottled Passion Fruit Pulp Using fresh passion fruit pulp gives a bright flavor. You scoop it from ripe fruits. If fresh is hard to find, bottled pulp works too. Just check the label for added sugars. Fresh pulp tends to have more aroma and taste. Choosing the Right Type of Tea I like using black tea for this recipe. It blends well with the fruit and mint. You can also try green tea for a lighter flavor. Herbal teas can add a fun twist too. Just pick a tea you enjoy. Alternative Sweeteners and their Benefits Honey adds a rich sweetness and pairs well with the flavors. Agave syrup is a good choice if you want a vegan option. You can also use stevia or coconut sugar for a healthier twist. Each sweetener brings its own flavor, so feel free to experiment. Start with boiling 4 cups of water. The steeping time is key to great tea. For a strong flavor, steep the black tea bags for 5 to 7 minutes. If you steep too long, the tea may taste bitter. Once the tea is ready, remove the tea bags carefully. A spoon can help you fish them out without making a mess. While the tea steeps, prepare your pitcher. Add 1 cup of passion fruit pulp, 1/2 cup of fresh mint leaves, and 1/4 cup of honey or agave syrup. To get the best flavor from the mint, muddle the leaves. Use a muddler or the back of a spoon to press down on the mint gently. This action releases the mint oils and enhances the drink. Mix all the ingredients well to ensure the flavors blend. After brewing, pour the hot tea over the passion fruit and mint mix in the pitcher. Stir it all together to combine the flavors. Let the mixture cool at room temperature for about 15 minutes. Next, move the pitcher to the refrigerator. Chill the tea for at least 1 hour. This step helps the flavors infuse well. When you are ready to serve, fill your glasses with ice cubes. Pour the chilled passion fruit mint iced tea over the ice. For a lovely presentation, add a sprig of fresh mint and a lemon slice to each glass. This drink looks as good as it tastes! For the full recipe, check out the instructions above. Enjoy your refreshing summer drink! - Over-Steeping Tea: Steeping black tea too long can make it bitter. Aim for 5 to 7 minutes for a smooth flavor. If you like it stronger, try a different tea type instead. - Skipping the Cooling Step: Cooling the tea is key for the best taste. If you pour hot tea over ice, it will dilute quickly. Always chill your tea in the fridge for at least an hour. - Alternative Herbs to Combine with Mint: You can add other herbs to boost flavor. Basil or lemongrass pairs well with mint. Each herb brings a unique twist to your drink. - Using Fresh Fruits for Additional Taste: Add slices of fresh fruit like strawberries or oranges. These fruits add color and extra flavor. They also make your drink more fun and fresh. - Ideal Glassware for Serving: Use clear glasses for your iced tea. This lets the vibrant colors shine. It also makes your drink look more appealing. - Garnishing Ideas for Visual Appeal: Garnish each glass with a mint sprig or a lemon slice. You can also add edible flowers for a fancy touch. This not only looks great but also enhances the flavor. Try these tips to create the best Passion Fruit Mint Iced Tea. For the complete recipe, refer to the Full Recipe section. {{image_4}} You can easily change up the taste of your passion fruit mint iced tea. Here are two fun ideas to try. - Passion Fruit and Basil Iced Tea: Swap mint for basil. Basil adds a warm, sweet taste. It pairs well with passion fruit. Just muddle fresh basil leaves like you do with mint. - Tropical Fruit Medley Twist: Add other fruits for a tropical vibe. You can mix pineapple, mango, or coconut with the passion fruit. This will create a fruity explosion in your drink! If you want to switch up how you sweeten your iced tea, consider these options. - Using Stevia or Coconut Sugar: Stevia is a plant-based sweetener. It has zero calories. Coconut sugar adds a rich flavor. Both are great for a healthier choice. - Sugar-Free Options for Health-Conscious Drinkers: You can use sugar-free syrups or honey alternatives. These keep your drink sweet without extra calories. Just be sure to taste as you go! Feeling the chill? You can adapt this drink for any season. - Adapting the Recipe for Hot Tea Lovers: Brew the tea as you normally would. Serve it hot instead of iced. You can still add passion fruit and mint for a cozy drink. - Serving Suggestions for Different Seasons: In summer, serve with ice and fresh fruit. For winter, try it warm with a cinnamon stick. This makes it comforting and festive. For the full recipe, check the earlier section! To keep your passion fruit mint iced tea fresh, use glass or plastic pitchers. These containers seal well and prevent spills. Choose a pitcher with a lid for best results. You can also use airtight jars if you want to save smaller portions. When storing, place the pitcher in the fridge right away. Iced tea tastes best cold. Make sure to chill it for at least an hour. If you have leftover tea, pour it into your container and seal it. This keeps the flavors fresh longer. Iced tea can last in the fridge for about 3 to 5 days. After that, it might lose its fresh taste. Check for any strange smell or color. If it smells off or looks cloudy, it’s time to toss it. If you want to revive old iced tea, try adding fresh mint leaves or a splash of lemon juice. This can bring back some flavor. You can also mix in a bit of honey or agave syrup to sweeten it up. Fresh ingredients help improve the taste and make it enjoyable again. For the full recipe, check above! Passion Fruit Mint Iced Tea is a refreshing drink made with black tea, passion fruit, and mint. The tea has a fruity, vibrant flavor. The mint adds a cool note that makes it perfect for hot days. It is easy to make and looks beautiful in a glass. Yes, you can. You can use herbal tea or green tea instead. Both options give a different flavor. Herbal tea offers a caffeine-free choice. Green tea gives a lighter taste, but it pairs well with passion fruit and mint. You can change the sweetness by adding more or less honey or agave syrup. Start with the suggested 1/4 cup. Taste the tea after mixing. If you want it sweeter, add more sweetener little by little. You can also use stevia or other sweeteners. Passion fruit is high in vitamins A and C. It can boost your immune system and improve skin health. Mint helps with digestion and freshens your breath. Both ingredients can add a healthy twist to your drink. Yes, you can serve this tea warm. Just skip the cooling step in the recipe. Serve it right after mixing the hot tea with the passion fruit and mint. It will still taste good, but the cool version is more refreshing for summer. You can find the [Full Recipe] for this tasty drink above. Passion Fruit Mint Iced Tea is refreshing and easy to make. We covered key ingredients, brewing tips, and storage advice. I shared how to enhance flavors and avoid common mistakes. You can personalize this drink with variations and sweeteners that suit your taste. Now you have all the tools to craft a delightful beverage. Enjoy your iced tea menu, and don't hesitate to experiment with flavors! Each sip can lead to new discoveries and joy.

Passion Fruit Mint Iced Tea Refreshing Summer Drink

When the heat hits, nothing cools you down like a refreshing Passion Fruit Mint Iced Tea. This delightful drink blends

To make the perfect Double Chocolate Espresso Shake, you need a few key ingredients: - 2 cups rich chocolate ice cream - 1 cup milk (dairy or your favorite plant-based alternative) - 2 shots of robust espresso (or ½ cup of strong brewed coffee, cooled) - ¼ cup luscious chocolate syrup (plus extra for drizzling) - 2 tablespoons unsweetened cocoa powder - A pinch of sea salt These ingredients bring together that deep chocolate flavor and strong coffee kick. The chocolate ice cream makes it creamy, and the espresso adds a nice boost. The cocoa powder deepens the flavor even more, while the sea salt enhances all the tastes. To make your shake even more delightful, consider adding these toppings: - Whipped cream (for a delightful topping) - Chocolate shavings or chips (for a decadent garnish) Whipped cream adds a fluffy texture, while chocolate shavings add a nice crunch. You can also drizzle extra chocolate syrup over the top for a sweet finish. If you want to change things up, here are some great substitutions: - Use vanilla ice cream instead of chocolate for a lighter shake. - Swap the espresso for instant coffee for a quick fix. - Use almond milk or oat milk for a dairy-free version. These substitutions can help you create a shake that fits your taste or dietary needs. Whether you want a classic or a twist, the Double Chocolate Espresso Shake is flexible and fun. For the full recipe, see above. Step 1: Blending the Ingredients Start by gathering your ingredients. You need chocolate ice cream, milk, espresso, chocolate syrup, cocoa powder, and a pinch of sea salt. Add all these items into a high-powered blender. Blend on high speed. You want a smooth and creamy texture. This should take about 30 seconds to a minute. The mixture should look thick and luscious. Step 2: Adjusting Consistency If your shake is too thick, don’t worry. Just add a little more milk. Add one tablespoon at a time. Blend after each addition until you get your perfect consistency. Sample the shake. If it needs more sweetness, add extra chocolate syrup. Blend again to mix it well. How to Serve the Shake Pour the shake into tall, chilled glasses. This makes the drink look fancy and fun. Top each shake with a generous amount of whipped cream. Drizzle extra chocolate syrup on the whipped cream. Finally, sprinkle chocolate shavings or chips on top. This adds a nice touch and makes it look delicious. Glassware Recommendations Choose tall glasses for serving. Clear glasses let you see the beautiful layers of chocolate and cream. Fun straws can make the drink more exciting. You can also add a small plate of chocolate shavings for guests. This way, they can add more if they want. Enjoy your delightful Double Chocolate Espresso Shake! To get a thick and creamy shake, use rich chocolate ice cream. The ice cream makes the shake smooth and delicious. Blend the ingredients well for a few minutes. If it seems too thick, add more milk. Start with a tablespoon and blend again. Keep blending until you find your favorite texture. Taste your shake after blending. If it needs more sweetness, add chocolate syrup. Do this slowly. Start with one tablespoon, blend, and taste again. You can always add more, but it's hard to take sweetness away. This way, you can make the shake just right for you. To elevate the flavor, add a pinch of sea salt. Salt brings out the rich chocolate taste. You can also try adding a splash of vanilla extract for extra depth. If you want a coffee kick, add a bit more espresso. Experiment to find the mix you love most. For the full recipe, follow the steps and enjoy your creation! {{image_4}} Low-Calorie Options You can make a lighter version of the Double Chocolate Espresso Shake. Use low-fat chocolate ice cream or frozen yogurt instead of regular ice cream. Swap full-fat milk for almond milk or skim milk. These changes cut calories but keep the flavor rich and delicious. You still get that chocolate and espresso kick! Dairy-Free Adaptations If you want a dairy-free shake, use plant-based ice cream, like coconut or almond. Choose non-dairy milk, such as soy or oat milk. These swaps make the shake creamy without dairy. Plus, they add their unique flavors, enhancing your drink. Add-Ins You can elevate your shake with fun add-ins. Try a splash of mint extract for a fresh twist, or add a teaspoon of vanilla extract for warmth. Chocolate lovers can toss in chocolate chips for extra texture. These little tweaks can change the whole vibe of your shake. Seasonal Twists Change up your shake with seasonal flavors. In fall, mix in pumpkin puree and pumpkin spice for warmth. In summer, blend in fresh berries for a fruity twist. These seasonal variations keep the shake exciting all year long. Enjoy exploring different flavors and finding your favorites! To keep your Double Chocolate Espresso Shake fresh, store it in an airtight container. Glass jars work well for this. Make sure to seal it tight. If you have some shake left, avoid leaving it out. It can melt and lose its creamy texture. When it comes to shakes like this, reheating isn’t the best option. Instead, if your shake has thickened, give it a good stir. You can also add a splash of milk to bring back its creamy feel. Blend again if needed to mix well. Your delicious shake stays good in the fridge for about 1 to 2 days. After that, it may lose its rich taste. If you freeze it, it lasts for about a month. Just remember to let it thaw in the fridge before enjoying it again. For the best taste, enjoy it fresh! For the full recipe, check back to the ingredients list. Yes, you can use instant coffee. Mix 1-2 tablespoons of instant coffee with hot water. This gives you a strong coffee flavor similar to espresso. It’s quick and easy. Just let it cool before adding it to your shake. If you don’t have chocolate syrup, try using melted dark chocolate. You can also use cocoa powder mixed with a little honey or maple syrup. This gives a rich taste and can be healthier too. Absolutely! To make a vegan shake, swap the chocolate ice cream for a dairy-free version. Use almond milk or oat milk instead of regular milk. Make sure your chocolate syrup is plant-based too. It’s still creamy and delicious! To reduce the sweetness, cut back on chocolate syrup. You can also add more milk or ice cream. Unsweetened cocoa powder is another great choice to balance sweetness. Taste as you go to find your perfect mix. In this post, we explored how to make a double chocolate espresso shake. We covered the key ingredients, step-by-step preparation, and serving tips. I shared ways to adjust texture and sweetness for your taste. You can even try fun variations and healthier options. Whether you prefer a classic shake or a unique twist, you now have the tools to create it. Enjoy your shake, and keep experimenting!

Double Chocolate Espresso Shake Delightful and Creamy

Are you craving something rich, creamy, and oh-so-chocolatey? Look no further! This Double Chocolate Espresso Shake combines the bold kick

The ingredients for the Lychee Lavender Lemon Spritz are simple yet flavorful. Here’s what you need: - 1 cup lychee fruit, peeled and pitted - 2 tablespoons dried lavender flowers - 1/4 cup freshly squeezed lemon juice - 2 tablespoons honey or agave syrup - 3 cups sparkling water or club soda - Ice cubes - Garnish: lemon slices and fresh mint Lychee fruit adds a sweet and floral note. Dried lavender brings a lovely aroma. Fresh lemon juice adds brightness and zing. Choose honey or agave syrup based on your sweetness preference. Sparkling water or club soda gives it that refreshing fizz. The ice cubes keep your drink nice and cold. Finally, the lemon slices and mint make your drink look beautiful. Using fresh and quality ingredients makes all the difference. You can even find lychee fruit in cans if fresh ones are hard to find. I encourage you to explore local markets for fresh lavender. It can really enhance the flavor of your drink. This drink is perfect for warm days or outdoor parties. You can find the Full Recipe to guide you through the process. Enjoy crafting this delightful spritz! - Combine 1 cup of peeled and pitted lychee fruit with 2 tablespoons of dried lavender flowers and 1 cup of water in a small saucepan. - Heat the mixture over medium heat until it gently boils. Once boiling, reduce the heat and let it simmer for about 10 minutes. This helps the flavors blend nicely. - After simmering, remove the pan from the heat. Let the mixture steep for another 10 minutes. This step is key for infusing the syrup with great taste. - Strain the syrup through a fine-mesh sieve into a bowl, discarding the solids. You will have a fragrant liquid that smells amazing. - Add 1/4 cup of freshly squeezed lemon juice and 2 tablespoons of honey or agave syrup to the strained liquid. Mix it well until everything combines smoothly. - Allow the mixture to cool completely at room temperature before moving on. This will keep the drink refreshing. - Grab four glasses and fill each with ice cubes to keep your drink chilled. - Pour about 1/4 of the lychee-lavender-lemon mixture into each glass, filling them up. - Top off each glass with 3 cups of sparkling water or club soda, stirring gently to mix and keep the fizz. - For a lovely finish, garnish each spritz with a slice of lemon and a few fresh mint leaves. This adds visual appeal and a burst of flavor. For the full recipe, check out the complete guide to bring this delightful drink to life! - Adjusting sweetness to taste: Everyone has a different sweet tooth. Start with two tablespoons of honey or agave syrup. Taste it. Add more if you like it sweeter. Remember, you can always add, but you can't take away. - Fresh versus dried lavender: Fresh lavender provides a bright flavor. Dried lavender has a more subtle taste. If you use dried, use a little less. About one tablespoon should be just right. Experiment to find what you like best. - Importance of fresh lemon juice: Always use fresh lemon juice. It gives the drink a bright, zesty flavor. Bottled lemon juice lacks freshness and taste. Squeeze those lemons for the best results! - Best glassware for a spritz: Use tall, clear glasses to show off the beautiful layers of your drink. A highball glass or a spritz glass works great. These glasses let you enjoy the fizz and the color. - Pairing with snacks or appetizers: This drink goes well with light snacks. Try it with fresh fruit, cheese, or a light salad. The flavors complement each other perfectly. - Creative garnishing ideas: Add lemon slices and mint leaves for a fresh look. You can also try a sprig of fresh lavender as a garnish. It adds a touch of elegance to your glass. - Using edible flowers for decoration: Edible flowers make your drink pop! Use flowers like pansies or violets. They not only look pretty but add a hint of flavor too. Just make sure they are safe to eat! Feel free to explore the [Full Recipe] for more detailed instructions and a delightful treat! {{image_4}} You can switch out lychee for other tropical fruits. Mango adds a sweet twist. Pineapple brings a bright, tangy flavor. Passion fruit gives a unique taste and aroma. Each fruit creates a different vibe in your drink. To make a mocktail, skip the alcohol but keep the fun. Use the same steps as the original recipe. You can add more fruit juice, like orange or coconut, for extra flavor. You might also try adding a splash of herbal tea for depth. Flavored sparkling waters can change the drink's taste. Try cucumber or berry-infused waters for something new. You can also infuse your spritz with herbs like basil or rosemary. Just add small sprigs to the drink for a fresh aroma. This adds a unique touch to your refreshing drink. To store leftover syrup, pour it into a clean glass jar. Seal it tightly with a lid. Keep it in the fridge. The syrup lasts about one week. You can use it in drinks, desserts, or even drizzled on pancakes. It adds a lovely flavor boost. For assembled drinks, the key is to drink them right away. If you need to store them, cover them tightly. Keep them in the fridge for up to two hours. This helps keep the spritz fizzy. If you let it sit too long, it can go flat. Always add the sparkling water just before serving for the best taste. You can prepare the syrup a day ahead. This saves time for parties. Just mix the syrup and lemon juice, then chill. When ready to serve, add ice and sparkling water. For gatherings, make a big batch of syrup. This way, you can create more drinks without hassle. Just follow the Full Recipe for the perfect spritz! Lychee is a small, round fruit with a bumpy, red skin. Inside, it has white, juicy flesh. It is sweet and floral, with a hint of tartness. The taste reminds me of a mix between grapes and rose petals. You'll find lychee in many Asian dishes and drinks. Its unique flavor makes it a star in this refreshing spritz. Yes, you can! If you prefer, try using maple syrup, agave nectar, or stevia. Each sweetener will change the taste slightly. Maple syrup gives a rich, earthy note. Agave is light and mild, while stevia is much sweeter. You can adjust the amount to suit your taste. Just remember to mix well to ensure even sweetness. Absolutely! To make it a bit more fun, add a splash of gin, vodka, or rum. Gin pairs well with the floral notes. Vodka keeps the focus on the lychee and lemon. For rum, choose a light variety to maintain freshness. Start with one ounce of alcohol per glass, then adjust to your liking. Enjoy your spritz with a twist! [Full Recipe] This blog post guided you through making a delicious Lychee Lavender Spritz. We covered key ingredients like lychee, lavender, and fresh lemon juice. You learned the step-by-step process from syrup to spritz. I shared tips for perfecting flavors and creative serving suggestions. In the end, you can customize this drink to suit your taste. Enjoy experimenting with different fruits or sweeteners. Whether it's a fun party drink or a refreshing mocktail, this spritz is sure to impress. Happy mixing!

Lychee Lavender Lemon Spritz Refreshing Summer Drink

Looking for a refreshing drink to beat the summer heat? My Lychee Lavender Lemon Spritz combines the sweet taste of

To make the best Watermelon Mint Mojito Mocktail, start with fresh watermelon. Use about 2 cups of ripe, juicy watermelon, cut into cubes. The sweeter, the better! You will blend it to create a smooth juice. Fresh watermelon gives your drink a vibrant color and refreshing taste. Next, gather about 10 fragrant mint leaves. Look for bright green leaves with no brown spots. Mint adds a cool flavor that pairs well with watermelon. You will muddle the leaves to release their oils. This step is key to getting that wonderful minty aroma. You will need 2 tablespoons of freshly squeezed lime juice. It brings a tangy kick that balances the sweetness of the watermelon. For sweetness, use 1 tablespoon of honey or agave syrup. Feel free to adjust the sweetener to your taste. This mix of flavors makes the mocktail pop! Sparkling water is essential for that fizzy finish. You can top off your drink with it after pouring in the watermelon juice. Make sure to have plenty of ice cubes ready. They keep your mocktail cold and refreshing on a hot day. Garnishes add the final touch. Use lime wedges and mint sprigs to make your drink look pretty. Place a lime wedge on the rim of the glass and a mint sprig inside. These small details make your mocktail feel special and inviting. For the full recipe, check out the details I provided! To start, take 2 cups of fresh watermelon and cut it into cubes. Place the cubes in your blender. Blend on high until smooth. If you prefer a clear juice, pour the mix through a fine mesh sieve. Use a spatula to help push the juice through and leave the pulp behind. Next, grab a tall glass. Add 10 fresh mint leaves and 2 tablespoons of lime juice. Using a muddler or the back of a spoon, press the mint leaves gently. This helps release the mint’s oils without tearing them too much. This step adds a fresh flavor to your drink. Now, drizzle in 1 tablespoon of honey or agave syrup. Stir the mixture well. This combines the sweetener with the mint and lime juice. Make sure the flavors blend nicely. Adjust the sweetness based on your taste. Fill the glass halfway with ice cubes. Pour the freshly strained watermelon juice over the ice. Fill the glass until it is three-quarters full. This keeps your drink cool and refreshing. Finally, top off your drink with sparkling water. Fill it to your desired level. Give it a gentle stir to mix everything together. To make it look pretty, add a lime wedge on the rim and a sprig of mint into the drink. Enjoy your vibrant Watermelon Mint Mojito Mocktail! For the full recipe, check out the details above. Pick a watermelon that feels heavy for its size. Look for a uniform shape and a creamy spot. This spot shows where the fruit rested on the ground and ripened. A dull skin is also a sign of ripeness. Avoid watermelons with soft spots or bruises. To make smooth juice, cut the watermelon into cubes. Blend it on high until it is liquid. For a clearer drink, strain the juice through a fine mesh sieve. Press the pulp gently with a spatula to get every drop of juice. This step makes a big difference in texture. Taste your watermelon juice before adding sweetener. Some watermelons are sweeter than others. If it needs more sweetness, use honey or agave syrup. Add small amounts, stir, and taste again. This way, you can find the perfect balance. Serve your mocktail in chilled glasses for a cool touch. Add a slice of watermelon on the rim for a fun look. A few mint leaves floating on top add a lovely aroma. This drink looks great and tastes even better. For a party, make a large batch and let guests serve themselves! Check the Full Recipe for more details on preparation. {{image_4}} You can make your Watermelon Mint Mojito Mocktail even better by adding other fruits. Try using strawberries, raspberries, or blueberries. These fruits mix well with watermelon's sweet flavor. Just chop them up and add them to your blender with the watermelon. You can also mash them with the mint and lime juice if you want a more intense fruit taste. Each fruit adds a new twist and makes your drink colorful! While mint is a star in this drink, other herbs can shine too. Basil works great for a fresh, herbal touch. You can also try using rosemary for a more robust flavor. Just like with mint, muddle the herbs to release their oils. Experiment with different herbs to find what you like best. Mixing herbs can lead to exciting new flavors in your mocktail. A fun way to enjoy your mocktail is by hosting a mocktail bar. Set up a table with all the ingredients for the Watermelon Mint Mojito Mocktail. Include different fruits and herbs for guests to mix their drinks. Provide cups, ice, and garnishes. This lets everyone get creative and make their perfect drink. They can even try your Full Recipe or create their own special mix. It's a fantastic way to connect with friends and family while having fun! If you have leftover Watermelon Mint Mojito Mocktail, store it in the fridge. Use a sealed container to keep it fresh. It’s best to drink it within 24 hours. The longer it sits, the less fizzy it becomes. If you see any separation, just stir it before serving. Use fresh watermelon and mint for the best flavor. Store watermelon in the fridge, wrapped tightly. This keeps it juicy and firm. For mint, place it in a glass of water, like a flower. Cover it with a plastic bag and store it in the fridge. This helps keep the leaves vibrant and fresh. You can make parts of this mocktail ahead of time. Blend the watermelon juice and store it in the fridge. Muddle the mint and lime juice, then mix them just before serving. This way, you keep the drink fresh and bubbly. For a party, set up a mocktail station to let guests mix their drinks. Check out the Full Recipe for all the steps to enjoy this refreshing drink! Yes, you can prepare the watermelon juice in advance. Blend the watermelon and strain it. Store the juice in the fridge for one to two days. When ready to serve, mix with mint, lime juice, and sparkling water. If you don't have lime juice, you can use lemon juice. It gives a similar tangy flavor. Another option is to use orange juice for a sweeter taste. Yes, you can use mint extract instead of fresh mint leaves. Use only a few drops, as it is strong. Mix it with lime juice and watermelon juice to keep the flavor balanced. To add spice, include a few slices of fresh jalapeño or a pinch of cayenne pepper. Muddle the jalapeño with mint and lime. This will add a nice kick to your drink. - Watermelon: High in water and vitamins A and C. Great for hydration. - Mint: Aids digestion and adds a fresh flavor. - Lime juice: Packed with vitamin C and supports the immune system. - Honey or agave syrup: Natural sweeteners with fewer calories than sugar. - Sparkling water: Hydrating and calorie-free. Each ingredient brings health benefits while keeping your drink refreshing and tasty. Check out the Full Recipe for a delightful summer treat! This blog covered how to make a refreshing watermelon mint mocktail. We explored ingredients like fresh watermelon, mint leaves, lime juice, and sparkling water. You learned how to prepare the juice, muddle mint, mix everything, and garnish the drink. Tips on picking the best ingredients helped ensure great flavor. I hope you feel inspired to try this drink. Enjoy the fun of making your own mocktail and play with flavors. Cheers to your next refreshing creation!

Watermelon Mint Mojito Mocktail Refreshing Drink Recipe

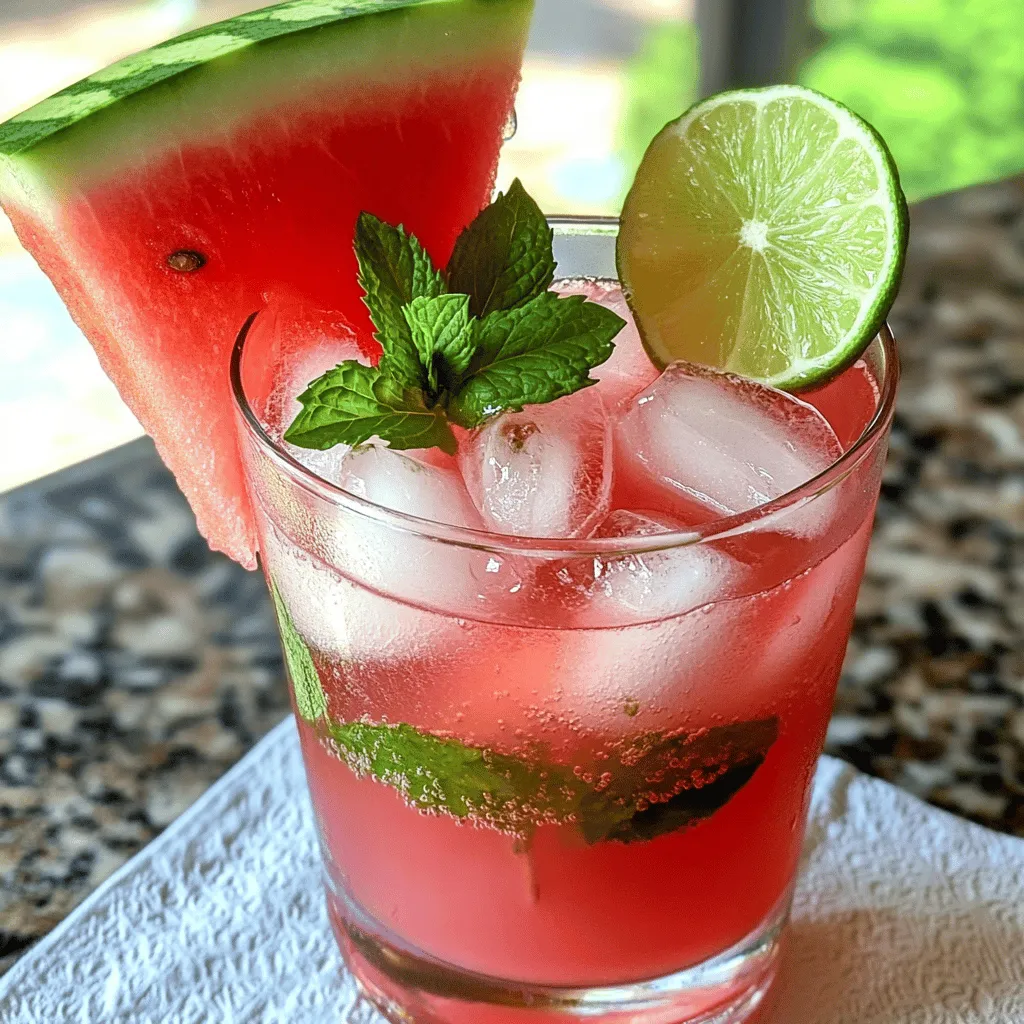
Are you ready to sip on something cool and refreshing? The Watermelon Mint Mojito Mocktail is your perfect summer drink!

To make a flavorful Shrimp and Avocado Bowl, you need these key items: - 1 lb shrimp, peeled and deveined - 2 ripe avocados, diced - 1 cup cooked quinoa (or rice for a heartier option) - 1 ripe mango, diced - 1 small red onion, finely chopped - 1 red bell pepper, diced - 1 jalapeño, minced (optional for a spicy kick) - 2 tablespoons fresh lime juice - 1 tablespoon olive oil - Salt and pepper, to taste - Fresh cilantro, chopped (for garnish) You can add more zest to your bowls with these optional ingredients: - Garlic, minced, for extra depth - Corn, for sweetness and crunch - Black beans, for protein and texture - Avocado oil, for a different richness - Additional lime wedges, for extra tang If you have dietary needs, try these substitutes: - Use shrimp alternatives like tofu or tempeh for a vegan option. - Swap quinoa for cauliflower rice for a low-carb choice. - Replace lime juice with lemon juice if you prefer. - Use brown rice instead of white for more fiber. - Opt for a different fruit, like pineapple, in the salsa for a twist. For the full recipe, check out the complete details and instructions. Enjoy crafting your delicious bowls! Start by taking 1 pound of peeled and deveined shrimp. Place them in a large bowl. Add 2 tablespoons of olive oil, 2 tablespoons of fresh lime juice, salt, and pepper. Mix everything well. Let the shrimp sit for about 15 minutes. This helps them soak up all the flavors. Next, you need to cook 1 cup of quinoa or rice. Follow the package instructions. Make sure it cooks until fluffy. Once done, set it aside. Let it cool a bit while you work on the other parts of the bowl. Now, grab a separate bowl for the mango salsa. Dice 1 ripe mango, chop 1 small red onion, and dice 1 red bell pepper. If you like it spicy, mince 1 jalapeño. Combine all these in the bowl. Add a splash of lime juice and season with salt and pepper. Mix it well. This salsa adds a bright flavor. Heat a non-stick skillet over medium-high heat. Once hot, add the marinated shrimp. Cook them in a single layer. This step is key! Cook for 2-3 minutes on each side. You want them pink and opaque. Avoid overcooking, as it will make them tough. To assemble, take serving bowls. Add a scoop of cooked quinoa or rice to each bowl. Top it with diced avocado. Next, add the cooked shrimp. Finally, spoon on the mango salsa. This layering makes the dish look and taste amazing. For the final touch, sprinkle freshly chopped cilantro on top. This adds color and a fresh taste. You can also add lime wedges on the side. They give an extra zing when you squeeze them over the dish. Enjoy your tropical shrimp and avocado bowls with mango salsa! For the full recipe, check out the details above. To cook shrimp just right, start with fresh shrimp. After marinating, heat a non-stick skillet over medium-high heat. Add shrimp in a single layer. Cook for 2-3 minutes on each side. The shrimp should turn pink and opaque. Avoid overcooking; it makes shrimp tough. If you're using a thermometer, the internal temp should reach 120°F. This gives you that juicy bite you want. Mango salsa adds a bright taste to your bowl. To boost its flavor, use ripe mangoes. They should feel slightly soft when you press them. Add fresh lime juice to enhance sweetness. You can also try adding diced cucumbers or fresh mint. For a spicy note, include minced jalapeño. Just remember to adjust the amount to your spice level! A beautiful bowl makes a meal special. Start with a base of quinoa or rice. Layer diced avocado on top. Then, place the cooked shrimp in the center. Finish with a scoop of mango salsa on top. For color, sprinkle fresh cilantro over the top. You can also add lime wedges on the side. This not only looks great but adds a zesty touch. Enjoy your tropical delight! {{image_4}} You can easily make this dish gluten-free. Just use quinoa or rice as your base. Both are naturally gluten-free and pair well with shrimp and avocado. Always check that your ingredients, like sauces or spices, are labeled gluten-free. For a vegetarian twist, swap shrimp for black beans or chickpeas. These beans add protein and texture. Diced cucumbers or grilled zucchini can replace shrimp and add a fresh taste. This makes the dish hearty and satisfying without meat. If you love heat, add minced jalapeño to your bowls. It gives a nice kick to the meal. You can mix it into the mango salsa or sprinkle it on top. Adjust the amount based on your spice level. For an extra spicy touch, add red pepper flakes or hot sauce. For the full recipe, check out the Tropical Shrimp & Avocado Bowls with Mango Salsa. To keep your shrimp and avocado bowls fresh, store leftovers in an airtight container. Layer the shrimp and avocado separately from the quinoa and mango salsa. This prevents sogginess and keeps flavors bright. Place the container in the fridge. Enjoy leftovers within two days for the best taste. When you’re ready to eat, reheat the quinoa or rice in the microwave. Do this for about one minute, stirring halfway. For shrimp, warm them in a skillet over low heat. This keeps them tender. Avoid overheating, as shrimp can become rubbery. If you want to save your shrimp and avocado bowls for later, freeze the shrimp and quinoa together. Place them in a freezer-safe bag. Squeeze out excess air before sealing it tightly. Avoid freezing the avocado, as it doesn’t thaw well. You can add fresh avocado when you’re ready to serve. Use frozen shrimp and quinoa within three months for the best quality. Yes, you can use frozen shrimp. Just ensure you thaw them first. Place the shrimp in cold water for about 15-20 minutes. This helps to keep the shrimp tender and juicy when cooked. Frozen shrimp are often just as good as fresh ones. You can serve your bowls with a side of tortilla chips or a fresh green salad. A light dressing pairs well with the shrimp and avocado. You can also add a dollop of sour cream or Greek yogurt for creaminess. The total time to prepare this dish is about 40 minutes. You will spend around 15 minutes prepping and 25 minutes cooking. This makes it a great option for a quick yet delicious meal. Yes, this recipe is excellent for meal prep. You can make the shrimp, quinoa, and salsa ahead of time. Store each component in separate containers in the fridge. This way, you can easily assemble your bowls throughout the week. Just add avocado fresh before serving to keep it green and tasty. For the complete recipe, check out the Full Recipe. This article covered the key steps to create delicious Shrimp and Avocado Bowls. We explored the main ingredients, optional flavors, and dietary substitutes. I shared easy instructions for cooking shrimp and preparing mango salsa, along with tips for perfect results. You can adjust this dish to fit various preferences or needs. In the end, this meal is not just tasty; it’s flexible and easy to store. Enjoy trying different variations to keep it fresh each time!

Shrimp and Avocado Bowls with Mango Salsa Delight

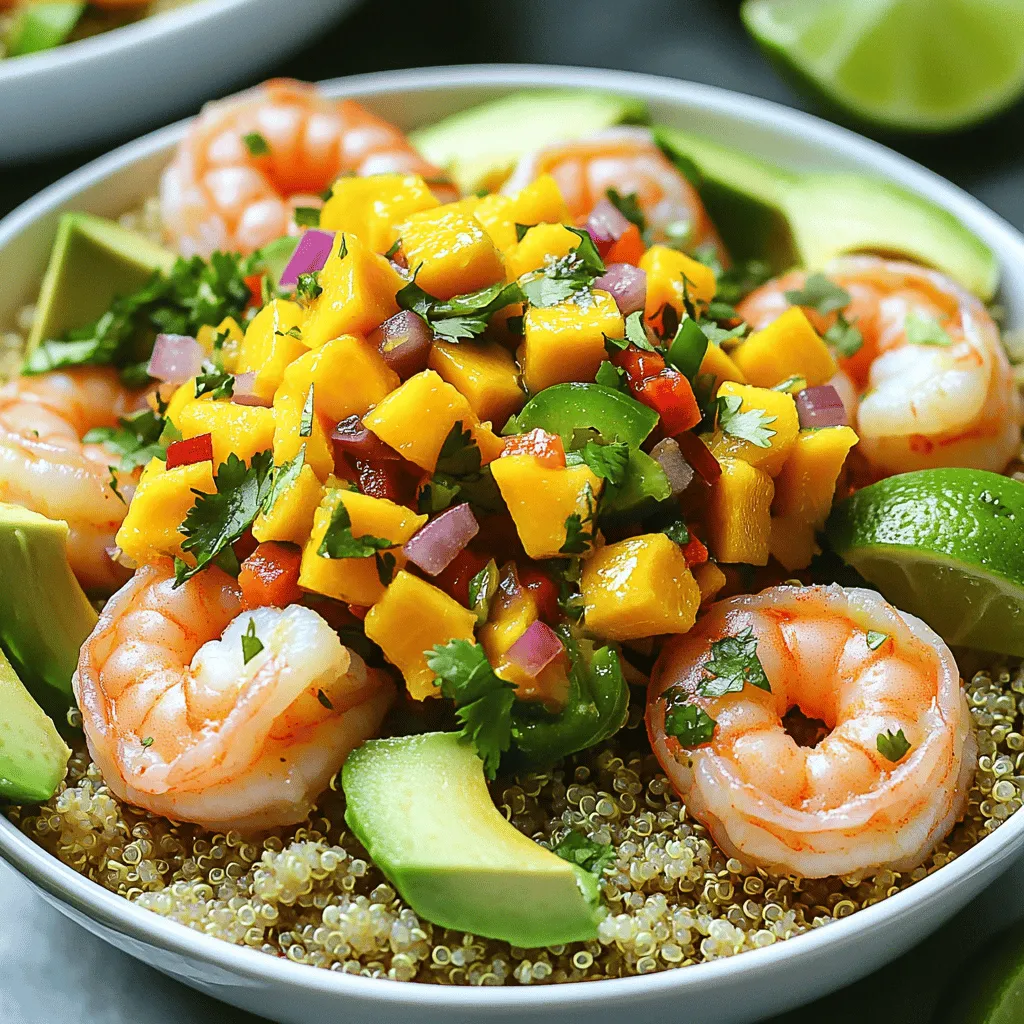
Welcome to the vibrant world of Shrimp and Avocado Bowls with Mango Salsa! If you crave bold flavors and healthy

- 4 cups mixed greens - 2 cups fresh strawberries - 1 cup cucumber - 1/2 cup red onion - 1/2 cup pecans - 1/2 cup feta cheese - 1/4 cup extra virgin olive oil - 2 tablespoons apple cider vinegar - 1 tablespoon honey - Salt and freshly cracked pepper When choosing fresh produce, always look for vibrant colors. The mixed greens should feel crisp and fresh. Strawberries need to be ripe and juicy. A cucumber should be firm and free of blemishes. The red onion can add a nice sweet touch. For the crunchy elements, pecans offer a great nutty flavor. Make sure to toast them slightly for more depth. Feta cheese adds a creamy texture and a salty kick that balances the salad well. For the dressing, the olive oil provides a rich base. Apple cider vinegar adds a delightful tang. Honey sweetens the mix, and salt and pepper enhance all the flavors. You can find the full recipe to make this salad shine. First, grab a small bowl. Add the olive oil, apple cider vinegar, honey, salt, and pepper. Use a whisk to blend everything well. You want a smooth dressing. Let it sit for a few minutes. This allows the flavors to meld together nicely. Next, take a large mixing bowl. Combine the mixed greens, sliced strawberries, cucumber, and red onion. Toss them gently. Be careful not to bruise the strawberries. You want them to stay fresh and pretty. Now it's time to dress the salad. Drizzle your prepared dressing over the salad mix. With a gentle touch, toss everything together. Make sure all the ingredients are coated evenly. This step is key for flavor. Once the salad is dressed, sprinkle the toasted pecans and crumbled feta cheese on top. These toppings add a wonderful crunch and creaminess. They make the salad even more delicious. For the last step, lightly toss the salad one more time. This helps mix in the toppings without breaking the cheese. You can serve it right away for the best taste. If you prefer, refrigerate it for 30 minutes. This allows the flavors to deepen. Follow the [Full Recipe] for detailed steps and tips. For a lovely look, serve your salad in a wooden bowl. This adds a nice rustic feel. If you want something fancy, use glass bowls. You can see the colors pop! Top each bowl with a whole strawberry and a sprinkle of feta. This makes each serving look special. This salad pairs great with grilled proteins like chicken or shrimp. It also works well as a light lunch. You can serve it as a side dish at dinner. The fresh flavors make it a hit at any meal. To elevate the taste, try adding fresh herbs like basil or mint. These can give your salad a fresh twist. You can also mix in spices like black pepper or even a pinch of cayenne for heat. If you want to change the dressing, consider using balsamic vinegar or a yogurt-based dressing. These options can give new life to your salad. For the full recipe, check out the details above! {{image_4}} You can switch out strawberries for other fresh berries like blueberries or raspberries. These fruits add new flavors and colors. Try adding peaches in summer or apples in fall. You can also mix in seasonal greens. Arugula in spring and kale in winter work well, too. This keeps your salad fresh and exciting. If you need a gluten-free salad, rest easy. All the ingredients in this salad are gluten-free. Just check the croutons if you add them. For those who want a vegan option, swap feta cheese with a vegan cheese alternative. You can also use tahini or avocado for creaminess. This way, everyone can enjoy your salad. To change the crunch factor, try different nuts or seeds. Almonds, walnuts, or sunflower seeds add great taste and texture. You can also use croutons for a delightful crunch. They add a different texture that makes the salad even more enjoyable. Experiment with these options to find your favorite mix! To keep your Strawberry Crunch Salad fresh, store it in an airtight container. This helps prevent moisture loss and keeps the flavors intact. I recommend refrigerating the salad for up to three days. After that, the salad may lose its crispness. Can you freeze salad? Generally, I advise against it. Freezing can make the greens soggy and unappealing. If you want to freeze components, do it separately. You can freeze the pecans and feta cheese. Just let them cool completely before sealing in a freezer bag. If your salad becomes soggy, don't worry! You can refresh it easily. Rinse the greens under cold water and pat them dry. This will help restore their crunch. Another fun idea is to repurpose leftovers. Blend them into a smoothie or toss them into a wrap for a tasty meal. You can get creative! You can keep this salad in the fridge for about 2 days. After that, it may not taste fresh. Watch for signs of spoilage. If the greens turn brown or mushy, it's time to toss it. The strawberries may also get soggy. Always check for any off smells or slimy textures. Yes, you can prep some parts ahead. Chop the veggies and slice the strawberries a few hours before serving. Store them separately in the fridge. Mix the dressing in advance too. Just wait to combine everything until you are ready to eat. This keeps the salad crisp and tasty. This salad is packed with fresh produce. Mixed greens offer vitamins A and C. Strawberries are full of antioxidants and fiber. Cucumbers add hydration and crunch. Pecans bring healthy fats, while feta gives protein. Overall, this salad is a great choice for a light, balanced meal. Absolutely! You can use maple syrup as a sweetener. Agave nectar is another good option. If you want a sugar-free choice, try using a mashed banana. It will give a different flavor but still taste great in the dressing. If you need a nut-free option, try sunflower seeds. They add a nice crunch without nuts. You could also use walnuts or almonds for a similar texture. Each will give a unique flavor twist to your salad. This blog post shared a fresh and tasty Strawberry Crunch Salad recipe. We covered ingredients, step-by-step instructions, and useful tips for serving. You can customize this salad for each season, ensuring variety. Proper storage and ways to refresh leftovers were also discussed. In conclusion, this salad is easy to make and packed with flavor. It's perfect for lunch or a side dish. Enjoy this healthy option today, and get creative with your ingredients!

Strawberry Crunch Salad with Champagne Vinaigrette Delight

Looking for a fresh and vibrant salad? This Strawberry Crunch Salad with Champagne Vinaigrette is your answer! Packed with greens,

To make Chimichurri Chicken Thighs, gather these ingredients: - 4 chicken thighs (skin-on for crispiness or skinless for lightness) - 1 cup fresh parsley, finely chopped - 1/2 cup fresh cilantro, finely chopped - 4 cloves garlic, minced - 1/4 cup high-quality olive oil - 2 tablespoons red wine vinegar or apple cider vinegar - 1 teaspoon red pepper flakes - 1 teaspoon smoked paprika - Salt and freshly cracked black pepper, to taste - Juice of 1 fresh lime When picking chicken thighs, freshness matters. Look for thighs that appear pink and moist. Avoid any that seem dull or off-color. The skin should be tight, not loose. If you prefer skin-on, check for crispy skin. For skinless thighs, choose ones that feel firm. Sourcing local or free-range chicken can enhance flavor and nutrition. You can easily adjust this recipe for dietary needs. If you want a lower-fat option, use skinless thighs. For a vegetarian version, substitute chicken with firm tofu or portobello mushrooms. If you're sensitive to gluten, ensure your vinegar is gluten-free. Adjust the red pepper flakes to make the dish milder or skip them for a no-heat option. You can also swap out the herbs. Use basil or oregano instead of parsley and cilantro if desired. For the full recipe, check out the detailed instructions and cooking tips. To start, gather your ingredients for the chimichurri sauce. In a bowl, mix: - 1 cup fresh parsley, finely chopped - 1/2 cup fresh cilantro, finely chopped - 4 cloves garlic, minced - 1/4 cup high-quality olive oil - 2 tablespoons red wine vinegar (or apple cider vinegar) - 1 teaspoon red pepper flakes - 1 teaspoon smoked paprika - Salt and freshly cracked black pepper, to taste - Juice of 1 fresh lime Whisk everything together until it looks good. Set aside a quarter of the sauce to drizzle on the chicken later. First, dry the chicken thighs with paper towels. This helps them get crispy. Season both sides with salt and pepper. Heat a small drizzle of olive oil in a large skillet over medium heat. Add the chicken thighs, skin-side down if you chose skin-on. Sear them for about 6-7 minutes until they turn golden brown. Carefully flip the thighs and pour half of the chimichurri sauce over them. Cover the skillet with a lid. Let them cook for another 10-12 minutes until the internal temperature hits 165°F (75°C). This ensures the chicken is cooked well and juicy. Once the chicken is done, take the skillet off the heat. Let the chicken rest for about 5 minutes. This resting time makes the meat juicy. Just before serving, drizzle the reserved chimichurri sauce on top. This adds a fresh burst of flavor to your dish. You can serve the chicken on a colorful plate with lime wedges and extra herbs for a beautiful look. To get a great sear on chicken thighs, start with dry meat. Pat them with paper towels. This helps the skin get crispy. Heat your skillet on medium heat. Add a little olive oil. When the oil shimmers, it’s time to add the thighs. If you use skin-on thighs, place them skin-side down. Let them cook undisturbed for 6-7 minutes. This gives them a nice golden crust. Flip them carefully to avoid splatter. Chimichurri can be simple or bold. Start with the basics: parsley and cilantro. If you want more flavor, add more garlic. Enjoy a spicy kick? Toss in extra red pepper flakes. Prefer a milder sauce? Skip the heat altogether. The vinegar adds tang, but you can swap it out. Try lime juice for a different twist. Each change will create a unique taste for your chicken thighs. Chimichurri chicken thighs shine on their own but pair well with sides. Try them with rice or grilled veggies for a colorful plate. A simple salad adds freshness. You can also serve them with crusty bread. This helps soak up the chimichurri sauce. For a fun twist, add chips and salsa on the side. Everyone loves a good dipping option! For more cooking ideas, check out the Full Recipe. {{image_4}} Grilling chicken thighs gives them a smoky flavor. Start by marinating the thighs in the chimichurri sauce for at least 30 minutes. This adds flavor and tenderizes the meat. Preheat your grill to medium-high heat. Place the chicken on the grill and cook for about 6-8 minutes per side. Make sure the internal temperature hits 165°F (75°C). Serve with extra chimichurri sauce on the side for dipping. You can change the flavor by using different herbs or spices. Try adding basil or oregano for a new twist. Fresh thyme or dill can also make a unique mix. If you want more heat, use cayenne pepper instead of red pepper flakes. Don’t be afraid to experiment! The goal is to find a mix that makes your taste buds dance. You can cook the chicken thighs in an oven or skillet. If you choose the oven, preheat it to 400°F (200°C). Place the seasoned thighs on a baking sheet and bake for 25-30 minutes. The chicken will be juicy and flavorful. Cooking in a skillet gives a nice sear. Both methods work well, so pick what you prefer. Each method brings out the chimichurri's bright flavors in its own way. For the full recipe, check out the detailed instructions above. To keep your leftover chimichurri chicken thighs fresh, store them in an airtight container. Make sure the chicken cools down fully before sealing. Place the container in the fridge. It will last for about three to four days. If you want to keep it longer, consider freezing. Reheating chicken thighs can be tricky. To avoid dryness, use a skillet or oven. If using a skillet, add a splash of water or broth. Heat over low heat, covering with a lid. This keeps moisture in. For oven reheating, wrap the chicken in foil. Bake at 350°F (175°C) for about 15-20 minutes. Check the internal temperature to ensure it reaches 165°F (75°C) again. Freezing chimichurri sauce is easy and smart. Pour the sauce into ice cube trays. Once frozen, pop them out and store in a freezer bag. This method helps you use just what you need later. The sauce keeps well for up to three months in the freezer. When ready to use, thaw in the fridge overnight or in warm water. Chimichurri is a vibrant sauce from Argentina. It blends fresh herbs, garlic, and oil. Many people use it with grilled meats. The mix of parsley and cilantro gives it a bright green look. This sauce brings a zesty kick to any dish. You can find it in many South American kitchens. It is perfect for adding flavor to plain chicken thighs. Yes, you can make chimichurri sauce ahead of time. It tastes even better after sitting for a few hours. Just store it in the fridge in a sealed container. Let it sit for at least 30 minutes to let the flavors blend. This way, you save time on busy days. Chimichurri chicken thighs pair well with many sides. Here are some great options: - Grilled Vegetables: Bell peppers and zucchini add color and crunch. - Rice: Fluffy white or brown rice soaks up the sauce well. - Potatoes: Roasted or mashed potatoes make a filling side. - Salad: A simple green salad with light dressing balances the meal. - Bread: Fresh crusty bread is great for dipping into the chimichurri sauce. These sides complement the juicy chicken perfectly. You can find the full recipe for chimichurri chicken thighs [here](#). Chimichurri chicken thighs are tasty and easy to make. We explored the ingredients, cooking methods, and tips. Choosing good chicken thighs helps with flavor. The chimichurri sauce adds a zesty kick. You can substitute ingredients to fit your diet. Remember to let your chicken rest for the best taste. Try grilling or using different herbs for fun variations. You can store leftovers and reheat them well. With these steps, you're ready to enjoy a delicious meal anytime. Happy cooking!

Chimichurri Chicken Thighs Flavorful and Juicy Dish

If you’re looking for a juicy, flavorful dish that impresses every time, you’re in the right place. Chimichurri chicken thighs

- Fresh strawberries - Coconut water - Sweetener options (honey, agave syrup) - Fresh lime juice - Ice cubes To make a delicious Healthy Strawberry Slushie, you need just a few fresh ingredients. The star of the show is the fresh strawberries. Choose ripe, sweet strawberries for the best flavor. You will need two cups, hulled and sliced. Next, grab one cup of coconut water. This adds a light, sweet taste and keeps the drink refreshing. For sweetness, you can use honey or agave syrup. One tablespoon should be enough, but feel free to adjust it to your taste. Fresh lime juice gives your slushie a zesty kick, so don't skip this step. You’ll need one tablespoon of lime juice. Lastly, ice cubes are a must. You need one cup to achieve that slush-like texture. This blend of ingredients makes a perfect summer drink that is both tasty and healthy. For the full recipe, check out the instructions and tips later in the article. To make a healthy strawberry slushie, start with fresh strawberries. First, wash them well. Then, remove the green tops and slice the strawberries. This makes blending easier. Next, it’s time to blend. In your blender, add the cut strawberries. Pour in the coconut water and lime juice. If you want it sweeter, add honey. Blend everything on high until smooth. You should see a bright, red mix without chunks. Now, for the slushie texture, add ice cubes. Pulse the blender a few times. This will crush the ice. Keep blending until the mix is thick and slushy. After blending, taste your slushie. If it needs more sweetness, add a bit more honey. Blend briefly again to mix it well. Finally, pour the slushie into chilled glasses. Serve right away to keep that icy feel. Enjoy your refreshing drink! For the complete process, check the Full Recipe. If you want a vegan slushie, skip the honey. Use agave syrup instead. Agave gives sweetness without animal products. You can also try maple syrup for a different flavor. For more plant-based fun, add a splash of almond milk. This will make your slushie creamy and rich. You can make this slushie sugar-free easily. Try using stevia or erythritol as sweeteners. These won't add sugar but will still make your drink sweet. You can also mix in other fruits like blueberries or raspberries for natural sweetness. Each fruit brings a new flavor twist. Want to spice things up? Add mint or basil to your slushie. Just a few leaves can bring a fresh taste. You can also mix strawberries with other fruits like mango or peach. Experimenting makes it fun and tasty. Try different combos to find your favorite mix. {{image_4}} To keep your slushie fresh, store any leftovers in a sealed container in the fridge. It will stay good for up to two days. If you want to save it longer, try freezing it. Pour the slushie into an ice cube tray or a freezer-safe container. This way, you can enjoy it later on hot days. If you freeze your slushie, you might notice a change in texture. To restore it, take the container out of the freezer. Let it thaw for about 15 minutes at room temperature. Then, blend it again until it’s smooth. This should bring back that perfect slushie texture. For thawing, avoid the microwave. Instead, let it sit out to warm up a bit. This method keeps the taste and texture just right. Enjoy your refreshing strawberry slushie anytime! You can use several liquids instead of coconut water. Some good choices are plain water, almond milk, or yogurt. Each option will change the taste a bit. For example, water keeps it light, while almond milk adds creaminess. Yogurt gives a tangy flavor and thick texture. Choose what fits your taste best. Yes, you can prepare this slushie in advance. Blend all the ingredients and store the mixture in the freezer. Just keep it in an airtight container. When you're ready to enjoy, take it out and blend again. This will make sure it stays smooth. Strawberries are packed with nutrients. They contain vitamin C, which helps your immune system. They also have fiber, which is good for digestion. Eating strawberries may lower your heart disease risk. Plus, they have antioxidants that protect your body. Enjoying strawberries can help keep you healthy and energized. This slushie recipe uses fresh strawberries and coconut water for a tasty treat. We covered how to prepare your ingredients, blend them for a smooth texture, and customize your drink’s sweetness. You learned fun ways to present your slushie, try vegan options, and mix in new flavors. Enjoy your refreshing drink, and don’t be afraid to get creative. With some basic tips and tricks, you can make it your own. Try different fruits or garnishes and find your perfect blend. Refreshing your slushie game is just a blend away!

Healthy Strawberry Slushie Refreshing Summer Drink

Summer heat calls for a refreshing drink, and I have just the thing: a Healthy Strawberry Slushie! This delightful blend

- All-purpose flour - Baking powder, salt, garlic powder, dried oregano - Milk and olive oil - Egg and cheese - Toppings like pepperoni and marinara sauce - Optional: Fresh basil leaves Gathering the right ingredients is key to making pizza cupcakes. You need all-purpose flour, which gives the cupcakes their base. The baking powder helps them rise. Salt adds flavor. Garlic powder and dried oregano bring that classic pizza taste. Next, you’ll need milk and olive oil for moisture. The egg binds everything together, while cheese adds creaminess. For toppings, pick your favorites! I like diced pepperoni, but any meat or veggie works well. Don't forget marinara sauce! It goes right in the center for a tasty surprise. If you want an extra touch, add fresh basil leaves as a garnish. They look great and taste fresh! Now, you're set to make some fun and yummy pizza cupcakes. For the full recipe, check out the recipe section. - Preheat Oven: Start by preheating your oven to 375°F (190°C). - Grease Muffin Tin: Use cooking spray or butter to grease the muffin tin well. This step helps the cupcakes pop out easily after baking. - Combine Dry Ingredients: In a large bowl, mix the flour, baking powder, salt, garlic powder, and oregano. Make sure they are well blended. This mix gives your cupcakes a tasty base. - Mix Wet Ingredients: In another bowl, whisk the milk, olive oil, and egg until smooth. This adds moisture to your cupcakes. - Combine Wet and Dry: Slowly pour the wet mix into the dry bowl. Stir gently with a spatula until just mixed. It’s okay if there are a few lumps; don’t over-mix. - Add Cheese and Toppings: Fold in the shredded mozzarella cheese and diced pepperoni. This adds loads of flavor. - Fill Muffin Cups: Spoon about one tablespoon of batter into each muffin cup, filling them one-third full. - Layer with Marinara Sauce: Add a teaspoon of marinara sauce on top of the batter in each cup. Then, spoon another layer of batter until the cups are two-thirds full. - Bake to Perfection: Put the muffin tin in the oven and bake for 15-18 minutes. They are done when golden brown and a toothpick comes out clean. These easy steps will help you create delicious Pizza Cupcakes. For the complete recipe, check out the Full Recipe section. Enjoy your cooking! To bake pizza cupcakes that rise and cook evenly, follow these tips: - Preheat the oven to ensure heat is consistent. This helps the cupcakes rise well. - Use a light touch when mixing. Combine wet and dry ingredients gently. Over-mixing can make the cupcakes tough. Presentation is key to making your pizza cupcakes shine. Here are some ideas: - Serve on a wooden board. Place the cupcakes neatly and add a few fresh basil leaves around them. This adds color and flair. - Offer marinara sauce on the side. This makes a tasty dip for your guests. You can even add some herbs to the sauce for extra flavor. Enjoy this delightful recipe and make it your own! For the full recipe, check out the details provided earlier. {{image_4}} You can easily change up the flavors in your pizza cupcakes. If you want to go vegetarian, swap the pepperoni for veggies. Try bell peppers, mushrooms, or olives. These will keep the taste fresh and fun. For those who love heat, add jalapeños or spicy sausage. This twist adds a kick to every bite. You can also mix in some crushed red pepper flakes for extra spice. Feel free to experiment and find your favorite combo! If you need gluten-free options, use a gluten-free flour blend. Many brands offer great substitutes that work well in baking. Just make sure to check the blend for the best results. For dairy-free cupcakes, substitute the cheese with a dairy-free alternative. There are many tasty vegan cheeses available today. You can also use almond or oat milk instead of regular milk. These swaps make your pizza cupcakes inclusive for everyone! To keep your pizza cupcakes fresh, store them in the fridge. Place them in an airtight container. This helps to keep them moist and tasty. They will last about three days in the fridge. If you want to keep them longer, freezing is a great option. For freezing, let the cupcakes cool completely first. Wrap each cupcake tightly in plastic wrap. Then, place them in a freezer bag or container. They can stay frozen for up to three months. When you're ready to enjoy, simply thaw them in the fridge overnight. To reheat pizza cupcakes, the oven is the best method. Preheat your oven to 350°F (175°C). Place the cupcakes on a baking sheet and cover them lightly with foil. Heat for about 10-15 minutes. This keeps the texture soft and the cheese melty. You can also use a microwave. Place one cupcake on a microwave-safe plate. Heat for 20-30 seconds. This method is quick, but it may make the cupcakes a bit soggy. If you prefer crispness, stick with the oven! Can I make pizza cupcakes ahead of time? Yes, you can make pizza cupcakes ahead of time. Just bake them and let them cool. Store them in an airtight container for up to three days. You can reheat them in the oven or microwave before serving. What are the best toppings for pizza cupcakes? The best toppings depend on your taste. Some favorites include: - Pepperoni - Sausage - Mushrooms - Bell peppers - Olives - Spinach Feel free to mix and match your favorites! Can I use different cheeses? Absolutely! You can use any cheese you like. Some great options are: - Cheddar - Provolone - Gouda - Feta Each cheese adds a unique flavor. How can I make the center saucier? To make the center saucier, add more marinara sauce. Place a teaspoon of sauce in each cup before adding the batter. You can also mix some sauce into the batter for extra flavor. Are pizza cupcakes suitable for meal prep? Yes! Pizza cupcakes are great for meal prep. They are easy to store and reheat. Just pack them in containers for quick lunches or snacks. Full Recipe: Pizza Cupcakes Delight 🧁 For the complete recipe, check out the section above. You learned how to make tasty pizza cupcakes. We covered ingredients, steps, tips, and variations. Remember to mix wet and dry items well but don't overdo it. Feel free to try different toppings and adjustments. Store extras in the fridge or freeze them for later use. These cupcakes are fun to make and share. Whether for a snack or a meal, enjoy your cooking adventure!

Pizza Cupcakes Delight Tasty and Easy Recipe

If you love pizza but want a fun twist, you’ll adore pizza cupcakes! This recipe blends warm, cheesy goodness with

Older posts
Newer posts
← Previous Page1 … Page36 Page37 Page38 … Page86 Next →

dsad

© 2026 lazychefmagic • Built with GeneratePress

Our Policies

  • Copyright Policy
  • Cookie Policy
  • GDPR Policy
  • Privacy Policy
  • Disclaimer
  • Terms Of Use

More Information

  • Home
  • About
  • Contact
  • Appetizers
  • Dessert
  • Dinner
  • Drinks
©2026, lazychefmagic About Back To Top