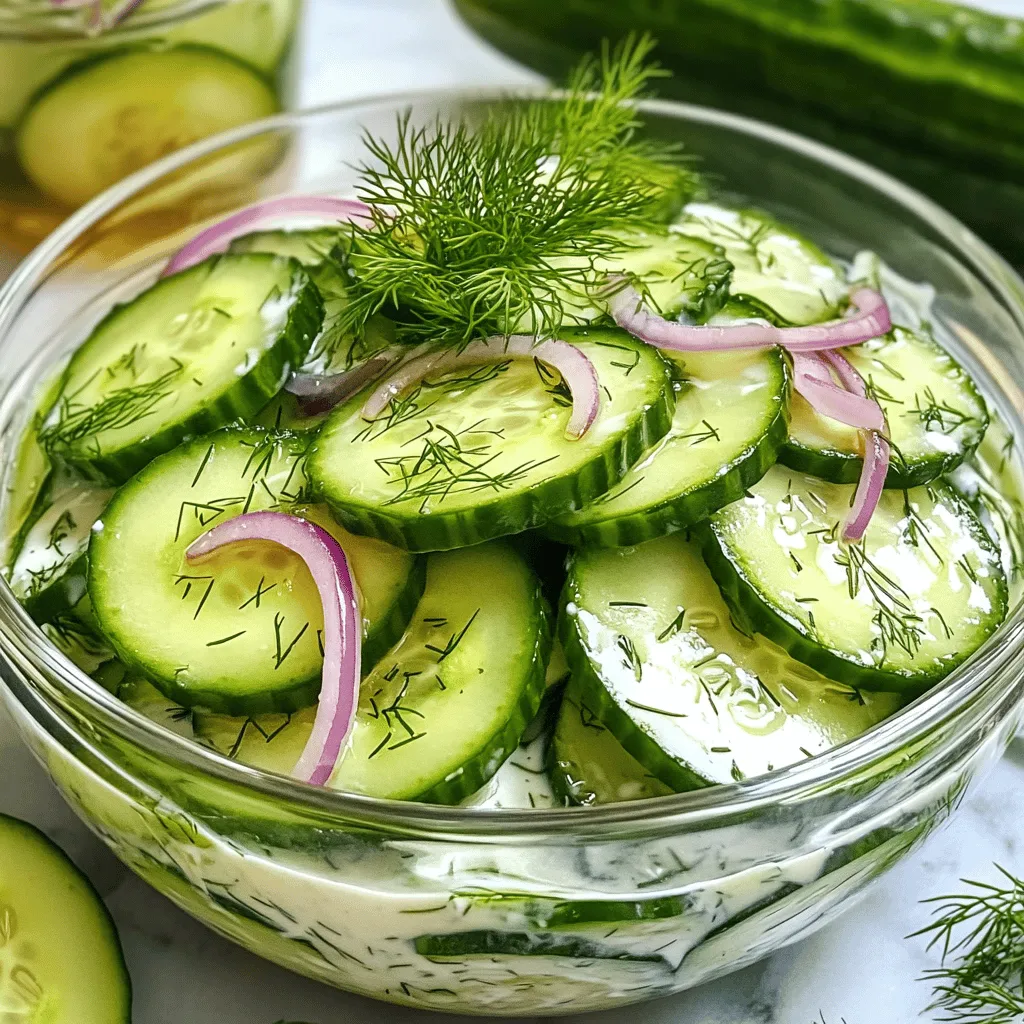
Skip to content
DisclaimerTerms Of UseGDPR PolicyCookie Policy

lazychefmagic

  • Home
  • Drinks
  • Appetizers
  • Dinner
  • Dessert
  • About
  • Contact
  • Privacy Policy
DisclaimerTerms Of UseGDPR PolicyCookie Policy

NO-ING-IMG

To make a Simple Cucumber Tomato Salad, you need fresh ingredients that bring a burst of flavor. Here’s what you’ll need: - 2 large cucumbers, diced into bite-sized pieces - 3 ripe tomatoes, diced into chunks - 1 red onion, thinly sliced - 1/4 cup fresh parsley, finely chopped - 1/4 cup crumbled feta cheese (optional, for extra flavor) - 3 tablespoons extra virgin olive oil - 1 tablespoon apple cider vinegar - 1 teaspoon honey or maple syrup (for a vegan option) - Salt and freshly cracked black pepper to taste These ingredients come together to create a refreshing dish. The cucumbers add crunch. The tomatoes provide sweetness. The red onion gives a nice kick. Fresh parsley brightens the salad. And feta cheese can add a creamy element, if you choose to include it. Using high-quality olive oil enhances the taste. Apple cider vinegar adds a tangy note that balances the flavors. A touch of honey or maple syrup brings out the sweetness of the tomatoes. Finally, salt and pepper are key to making all the flavors pop. For the full recipe, please check [Full Recipe]. To make a great salad, you need to prepare your vegetables well. Start with the cucumbers. I recommend using large cucumbers. Cut off both ends first. Then, slice the cucumber in half lengthwise. Next, dice it into bite-sized pieces. This helps them mix well with other ingredients. Now, let’s move to the tomatoes. Choose ripe tomatoes for the best flavor. Cut them into chunks, similar in size to your cucumber pieces. This keeps the salad looking uniform and appealing. For the red onion, slice it thinly. Start by cutting off the ends. Then, cut it in half. Place the flat side down and slice it into thin rings. This makes it easier to mix and gives a nice bite to the salad. Now, let's make a tasty dressing. In a small bowl or jar, add extra virgin olive oil and apple cider vinegar. Use three tablespoons of oil and one tablespoon of vinegar. This mix gives the salad a bright flavor. Next, add one teaspoon of honey or maple syrup. This adds a touch of sweetness. Whisk all the ingredients together until they blend smoothly. Taste the dressing and adjust it. If it needs more salt or pepper, add it now. This is your chance to make it just right for your taste. Once your veggies and dressing are ready, it's time to mix them. In a large bowl, add the diced cucumbers, tomatoes, and red onion. Be gentle when you mix. You don’t want to bruise the vegetables. Use a tossing motion instead of stirring. If you want extra flavor, add crumbled feta cheese on top. This makes the salad creamy and adds a nice salty taste. After mixing, let the salad rest for about 10-15 minutes. This gives the flavors time to meld together. For the full recipe, check the section above. Enjoy your fresh and flavorful salad! To make your salad look great, use a clear glass bowl. This lets the bright colors shine. After you mix the salad, add some parsley on top. A sprinkle of feta cheese adds a nice touch too. For a full meal, serve this salad with grilled chicken or fish. It also goes well with pita bread and hummus. This makes a fresh and light dinner. You can add more herbs to make the salad even better. Fresh basil or mint can give it a new twist. A pinch of red pepper flakes adds a bit of heat. To keep the salad crisp, mix in the dressing just before serving. This way, the veggies stay crunchy and fresh. If you want a zing, try adding lemon juice. It brightens up the taste. For the Full Recipe, you will find all the details needed to make this refreshing dish. {{image_4}} If you want to change the main ingredients, consider these options: - Cucumbers: Try zucchini or bell peppers. Both add a fresh crunch. - Tomatoes: You can use cherry tomatoes or even roasted red peppers. They bring sweetness and depth. For those who want a vegan twist, replace honey with maple syrup. It gives the same sweetness without using animal products. If you skip feta cheese, try avocado for a creamy texture that fits well. Looking to boost your salad's nutrition? Here are some great ideas: - Proteins: Add chickpeas for a plant-based protein source. Grilled chicken also works well if you want meat. - Nuts or Seeds: Toss in some sunflower seeds or almonds. They add a delightful crunch and healthy fats. These add-ons not only make the salad heartier but also enhance the overall flavor. Enjoy mixing and matching these variations to fit your taste! To keep your Simple Cucumber Tomato Salad fresh and tasty, follow these steps: - Refrigerate immediately: Store the salad in an airtight container. This keeps it crisp. - Use paper towels: Place a paper towel inside the container. It absorbs extra moisture. - Keep dressing separate: If you make the salad ahead, store the dressing in another container. Add it just before serving. This prevents soggy veggies. Your salad can last in the fridge for about 3 days. However, here are some signs of spoilage to look out for: - Wilting vegetables: If the cucumbers or tomatoes look limp, it’s time to toss them. - Off smell: If the salad smells sour, it’s best to discard it. - Color changes: Faded colors can indicate that the salad is past its prime. By following these tips, you can enjoy your Simple Cucumber Tomato Salad for days! Remember, freshness is key to flavor. For a full recipe, check out the Refreshing Cucumber Tomato Fusion Salad. Can I make the salad ahead of time? Yes, you can prepare this salad ahead of time. However, I suggest adding the dressing just before serving. This keeps the vegetables crisp and fresh. If you want to make it earlier, chop the ingredients and store them separately. What can I substitute for olive oil? If you need an alternative to olive oil, try avocado oil or sunflower oil. Both options provide a light taste. You can also use yogurt for a creamy dressing without oil. Is this salad gluten-free? Yes, this salad is gluten-free. All the ingredients, like cucumbers and tomatoes, are naturally gluten-free. Enjoy this dish without worry if you follow a gluten-free diet. Caloric breakdown per serving Each serving has about 150 calories. This includes healthy fats from olive oil and fiber from the vegetables. The feta cheese adds a bit more, so adjust based on your needs. Health benefits of main ingredients - Cucumbers: Hydrating and low in calories. They help with digestion. - Tomatoes: Packed with vitamins and antioxidants. They may promote heart health. - Red onion: Contains quercetin, which may help reduce inflammation. - Parsley: Rich in vitamins A and C. It can aid digestion. - Feta cheese: Provides protein and calcium but can add sodium, so use it wisely. This salad is not just tasty; it offers health benefits, too! For the full recipe, check out the details above. This blog post covered how to create a delicious cucumber tomato salad. You learned about the required ingredients, tips for perfect preparation, and how to make a tasty dressing. We also explored variations and storage tips to keep your salad fresh. In the end, this salad is simple to make and can fit many diets. Enjoy customizing it to your taste! With fresh ingredients and smart tips, your salad will impress every time.

Simple Cucumber Tomato Salad Fresh and Flavorful Dish

Looking for a healthy and tasty salad that’s simple to make? You’re in the right place! This Simple Cucumber Tomato

To make a delicious creamy marinated cucumber salad, you need these main ingredients: - 2 large cucumbers, thinly sliced - 1 cup Greek yogurt - 2 tablespoons apple cider vinegar - 1 tablespoon honey - 1 clove garlic, minced - 1 tablespoon fresh dill, finely chopped - Salt and pepper to taste - 1/2 teaspoon red pepper flakes (optional for a kick) - 1/4 cup red onion, thinly sliced Each ingredient adds a unique flavor. The cucumbers bring freshness, while Greek yogurt adds creaminess. Apple cider vinegar gives a nice tang, and honey balances the flavors. Garlic and dill add depth, while red onion offers crunch and zest. You can get creative with your salad by adding different ingredients: - Cherry tomatoes, halved - Avocado, diced - Bell peppers, chopped - Feta cheese, crumbled These add-ins can change the flavor and texture. For example, cherry tomatoes give sweetness, while feta adds a salty bite. Feel free to mix and match based on your taste. If you have dietary restrictions, here are some easy swaps: - Use dairy-free yogurt for a vegan option. - Substitute honey with maple syrup for a vegan sweetener. - Replace red onion with green onions for a milder taste. These substitutions keep the salad flavorful while meeting dietary needs. You can enjoy this dish no matter your preference. For the full recipe, check the details above. Start with two large cucumbers. Thinly slice them and place in a large colander. Sprinkle a pinch of salt over the cucumber slices. Let them sit for 15 to 20 minutes. This step is key. The salt pulls out extra moisture. This keeps your salad crisp and not watery. While the cucumbers rest, grab a medium bowl. Add one cup of Greek yogurt. Whisk in two tablespoons of apple cider vinegar. Then, mix in one tablespoon of honey and one clove of minced garlic. Add one tablespoon of finely chopped dill. Season well with salt and pepper. If you want some heat, add half a teaspoon of red pepper flakes. Mix until it’s smooth and creamy. After 20 minutes, rinse the cucumbers under cold water. This removes the salt. Pat them dry with a clean towel. In a large bowl, combine the rinsed cucumbers and thinly sliced red onion. Pour in the creamy dressing. Gently toss everything together. Make sure each cucumber slice is coated. Cover the bowl with plastic wrap and chill for at least 30 minutes. This helps all the flavors blend. Before serving, taste your salad. Adjust the seasoning if needed. Enjoy your fresh and creamy marinated cucumber salad! For detailed steps, refer to the Full Recipe. To make a tasty creamy marinated cucumber salad, focus on the balance of flavors. Use fresh ingredients for the best taste. The Greek yogurt adds creaminess, while apple cider vinegar gives it a nice tang. Adding honey helps balance the flavors. Don't skip the salt; it makes everything pop. Taste as you go, and adjust to your liking. Start by slicing your cucumbers thin. This helps them soak up the flavors. After slicing, sprinkle salt on them and let them sit. This draws out water and keeps your salad crisp. Rinse off the salt after 20 minutes. Then, dry them well with a towel. This step is key for a fresh, crunchy salad. Want to add a twist? Try mixing in fresh herbs like basil or mint. A splash of lemon juice can brighten everything up. If you like some heat, add red pepper flakes. You can also toss in some cherry tomatoes or bell peppers for color and crunch. These small changes make your salad unique and exciting. For the full recipe, check out the earlier section. {{image_4}} You can make your creamy marinated cucumber salad more filling by adding proteins. Cooked chicken, shrimp, or tofu work well. A cup of shredded rotisserie chicken adds great flavor. If you want a vegetarian option, try chickpeas. They add protein and a nice texture. Mix these proteins in with the cucumbers and dressing for a hearty meal. For those who love heat, try adding spices to kick up the flavor. Red pepper flakes are a good start. Just half a teaspoon can make a difference. You can also mix in diced jalapeños. If you want more heat, consider sriracha or hot sauce in the dressing. Start with a little, then taste and adjust. Make your salad shine with fresh, seasonal ingredients. In summer, add sweet cherry tomatoes or fresh corn for crunch. In fall, diced apples or pears bring a sweet twist. You can also include bell peppers for color and crunch. Use what’s fresh and available. It makes the salad taste better and is fun to create. For the full recipe, check the Creamy Marinated Cucumber Salad section above. To keep your creamy marinated cucumber salad fresh, store it in an airtight container. Make sure the salad is cool before sealing. This step helps prevent condensation, which can make the salad watery. If you have leftovers, avoid mixing them with the dressing until you are ready to eat. This keeps the cucumbers crisp and the dressing thick. Your salad can last up to three days in the fridge. However, for the best taste, enjoy it within two days. After that, the cucumbers may start to lose their crunch. Always check for any signs of spoilage, like off smells or a change in color. Freezing this salad isn’t ideal. The cucumbers have high water content, which turns mushy when thawed. If you must freeze it, consider just freezing the dressing. You can then mix it with fresh cucumbers later. This keeps the flavors intact and provides a fresh taste each time. For a full recipe, check out the previous sections. Yes, you can! If you don’t have Greek yogurt, use regular yogurt. It will change the texture a bit, but it still tastes great. You could also try plant-based yogurt, like almond or coconut. This option keeps it creamy and adds a unique flavor. To make this salad vegan, switch out the Greek yogurt for a plant-based alternative. Look for unsweetened coconut, almond, or soy yogurt. Replace honey with maple syrup or agave nectar for sweetness. This keeps the creamy taste while making it vegan-friendly. Feel free to get creative! You can add bell peppers, carrots, or even radishes. Cherry tomatoes add a nice color and sweetness. You can also mix in shredded cabbage or kale for extra crunch. Just remember to keep everything thinly sliced for the best texture. For more details, check out the Full Recipe. This creamy marinated cucumber salad is easy to make and delicious. We covered the main ingredients, like cucumbers and creamy dressing, plus ways to customize it. You can add proteins or try a spicy twist as you like. Remember to store it properly for freshness. Experimenting with this recipe can lead to fun, tasty variations. You’ll enjoy making this dish, and it can fit many diets. Dive in, and make it your own!

Creamy Marinated Cucumber Salad Fresh and Simple Recipe

Looking for a refreshing side dish that’s easy to make? This Creamy Marinated Cucumber Salad is just the recipe for

For this vibrant garden vegetable frittata, gather these fresh items: - 1 cup fresh spinach, chopped - 1/2 cup diced bell peppers (mix of red, yellow, and green) - 1 small zucchini, diced - 1 small red onion, finely chopped - 1/2 cup cherry tomatoes, halved These vegetables add color and nutrition. Spinach gives a lovely green touch, while bell peppers bring sweetness. Zucchini keeps it light and fresh. Cherry tomatoes add juiciness and a pop of flavor. Next, you will need: - 6 large eggs - 1/2 cup milk - 1/2 cup crumbled feta cheese - 1 tablespoon olive oil - Salt and pepper, to taste Eggs and milk are the base of the frittata. Feta cheese adds creaminess and a tangy kick. Olive oil helps to cook the veggies and adds flavor. To enhance the taste, consider these optional seasonings: - Fresh herbs (like basil or parsley) for garnish Fresh herbs bring a burst of flavor and brightness. You can also use dried herbs if you prefer. Each extra touch makes your frittata special. For the complete instructions, check the Full Recipe. To make a great vegetable frittata, start by gathering your ingredients. You will need eggs, milk, fresh vegetables, and cheese. Next, preheat your oven to 350°F (175°C). In a bowl, whisk together six large eggs and half a cup of milk. Make sure they blend well and become frothy. Add a pinch of salt and pepper to taste. Set this mixture aside for later. Heat one tablespoon of olive oil in a large oven-safe skillet over medium heat. Once hot, add one small, finely chopped red onion. Sauté the onion for about three to four minutes until it becomes soft and fragrant. Then, add half a cup of diced bell peppers and one small diced zucchini. Cook these veggies for five more minutes, stirring often. After that, toss in one cup of fresh spinach and half a cup of halved cherry tomatoes. Stir until the spinach wilts, which will take about two to three minutes. Remove the skillet from heat. Evenly sprinkle half a cup of crumbled feta cheese over the cooked vegetables. Carefully pour the egg mixture on top, making sure everything is well distributed. Place the skillet in your preheated oven and bake for 20 to 25 minutes. You will know it's done when the center is firm and the top is golden brown. After baking, let it cool for a few minutes. Slice the frittata into wedges and garnish with fresh herbs for a beautiful finish. Enjoy your vibrant garden vegetable frittata! For the complete recipe, check the Full Recipe section. To make a great frittata, start with good eggs. Whisk them well with milk. This helps make the frittata fluffy. Use a non-stick skillet to prevent sticking. Heat the pan before adding oil. Cook the veggies first for even flavor. Pour the egg mixture slowly over the veggies, ensuring even coverage. Bake until the center is set. A toothpick can help check doneness. You can swap many ingredients in a frittata. Don’t have spinach? Use kale or chard instead. Bell peppers can be replaced with mushrooms or leeks. If you lack feta, try goat cheese or cheddar. For a dairy-free version, use a plant-based milk and cheese. The frittata will still taste great with these changes. To boost flavor, add herbs like thyme or dill. A sprinkle of smoked paprika gives it a nice kick. You can also mix in some garlic for extra zest. For a touch of heat, add red pepper flakes. Experiment with different spices to find your favorite blend. These tips will take your frittata from simple to spectacular. For the full recipe, check out the vibrant garden vegetable frittata. {{image_4}} You can mix many veggies in your frittata. Try broccoli, carrots, or mushrooms. Each adds its own taste and texture. For a fun twist, use roasted veggies. They bring a deeper flavor. The key is to use fresh ingredients. This keeps your frittata colorful and tasty. You can even add leftover veggies from your fridge. Just chop them up and toss them in! Feta cheese adds a nice tang. But you can swap it out. Try cheddar for a sharp bite. Mozzarella gives a creamy texture. If you love blue cheese, use that for bold flavor. Goat cheese also works well. It melts nicely and adds a unique taste. Pick a cheese that you enjoy. It will make your frittata special. You can make a great vegan frittata too! Use chickpea flour instead of eggs. Mix it with water and spices. This mimics the texture of eggs. Add your favorite veggies and bake as usual. For a cheesy flavor, sprinkle nutritional yeast on top. This gives a nice umami taste without dairy. Enjoy a healthy, plant-based meal that everyone will love. Check out the Full Recipe for more ideas! After you make your frittata, let it cool. Place it in an airtight container. Store it in the fridge. It stays fresh for up to 3 days. Make sure to cover it well to keep moisture in. You can also freeze your frittata. Cut it into slices first. Wrap each slice in plastic wrap. Then place them in a freezer-safe bag. It will last for about 2 months in the freezer. Label the bag with the date. This way, you know when you made it. When you're ready to eat, reheat the frittata. You can use the microwave or the oven. For the microwave, place a slice on a plate. Heat it for 1-2 minutes. Check to make sure it’s warm all the way through. If using the oven, set it to 350°F (175°C). Heat for about 10-15 minutes. This keeps it fluffy and tasty. Enjoy your frittata again! You can tell the frittata is done when the center is firm. If you gently shake the skillet, it should not jiggle. The top should be golden brown and slightly puffed. If you insert a toothpick in the center, it should come out clean. These signs mean your frittata is ready to enjoy! Yes, you can! A frittata is great for meal prep. You can cook it in advance and store it in the fridge. Just let it cool, then cover it tightly. It will stay fresh for about 3 to 4 days. When ready to eat, simply reheat slices in the microwave or oven. Many side dishes complement a vegetable frittata. Here are some tasty options: - Fresh fruit salad - Mixed greens with lemon vinaigrette - Toast or crusty bread - Roasted potatoes - Yogurt with honey and nuts These sides add flavor and texture to your meal. For the full recipe, check out the vibrant garden vegetable frittata I shared above! In this blog post, we explored making a tasty frittata. We covered fresh ingredients, dairy, and seasonings. I shared step-by-step instructions for prep, cooking, and finishing touches. Tips included perfecting your technique and ingredient swaps. We looked at various frittata types, from veggies to vegan options. Finally, I shared how to store and reheat your frittata. With these tips, you can enjoy a delicious meal anytime. Happy cooking!

Vegetable Frittata Tasty and Simple Breakfast Recipe

Are you looking for a quick and tasty breakfast idea? If so, you are in for a treat with this

- 2 cups ripe fresh figs, stems removed and chopped - 1 cup granulated sugar - 1 tablespoon fresh lemon juice - 1 teaspoon pure vanilla extract - 1/2 teaspoon ground cinnamon (optional) When making fig jam, you want the best figs. I recommend using varieties like Black Mission or Kadota. These figs are sweet and full of flavor. Fresh figs are ideal for this recipe. Dried figs can work, but they will change the texture and taste. Fresh figs give your jam that bright, juicy flavor. To make your fig jam, you need some key tools. A heavy-bottomed saucepan helps to cook the figs evenly. A wooden spoon is great for stirring. You also need a clean jar to store your jam. A funnel can help pour the jam into the jar without spills. Having these tools ready makes the process smooth and easy. For the full recipe, check out Spreadable Fig Delight Jam 🥳. Start by washing the figs. Rinse them under cold water to clean off dirt. After washing, use a knife to cut off the stems. Chop the figs into small pieces. This helps them cook evenly and quickly. Grab a medium-sized saucepan. Combine the chopped figs, sugar, and lemon juice. Mix them well. This ensures that the figs soak in the sugar and lemon flavor. Place the saucepan on medium heat. Stir often to dissolve the sugar and warm the mixture. Watch closely as the mixture heats. When it bubbles, lower the heat to keep it simmering. Let it cook uncovered for about 15-20 minutes. Stir frequently to stop the jam from sticking. Check the thickness of the jam by dipping a spoon into it. Once it feels thick enough, remove it from heat. Add the vanilla and cinnamon if you like warm flavors. For the full recipe, refer to the earlier section. To enhance your fig jam, consider adding citrus zest or spices. Lemon zest brightens the flavors. Try adding a bit of orange zest for a sweeter touch. Ground cinnamon adds warmth and a cozy feel. You can also experiment with ginger or nutmeg for a different spin. Just a pinch can change everything! One common mistake is cooking the jam too fast. Too high heat can burn the figs. Stir often to keep the mixture from sticking. If you notice it bubbling too vigorously, lower the heat. Overcooking can also make your jam too thick. Always aim for a gentle simmer. To check if your jam is ready, use a simple spoon test. Dip a spoon into the jam and let it cool for a moment. Then, run your finger through the jam on the spoon. If it holds a line, it’s thick enough. If it runs together, give it more time. You can also place a small amount on a plate and chill it for a few minutes. This trick helps you see the true consistency. {{image_4}} You can boost the taste of your fig jam in fun ways. Adding fresh herbs like rosemary or thyme gives a savory twist. You can also mix in other fruits. Peaches, apples, or even berries work well. They add sweetness and a new flavor layer. Experiment until you find your favorite combo! If you want a healthier option, try using natural sweeteners. Honey and maple syrup can replace sugar easily. They add unique flavors too. You can also use stevia or agave syrup for a low-sugar jam. Adjust the amount to your taste, as these sweeteners can vary in sweetness. You might prefer your jam thick or thin. To make it thicker, cook it longer. Stir often to avoid burning. If it’s too thick, add a little water or lemon juice. This helps reach your desired consistency. Always test a spoonful before cooling it down. To keep your fig jam fresh, start with clean jars. Wash them in hot, soapy water. Rinse well to remove soap. Next, sterilize the jars. You can boil them in water for ten minutes. Let them cool before adding jam. This step helps to kill any germs. Sealing the jam in a sterile jar helps it stay fresh longer. Your fig jam will last about two weeks in the refrigerator. Store it in a sealed jar. After opening, always use a clean spoon. This keeps bacteria away. If you see mold or a strange smell, throw it out. Better safe than sorry! You can freeze fig jam if you want to keep it longer. Use freezer-safe jars or containers. Leave some space at the top for the jam to expand. Seal them tightly. When you’re ready to use it, thaw it overnight in the fridge. This method keeps the flavor and texture intact. Enjoy your delicious fig jam anytime! Yes, you can make fig jam without sugar. You can use natural sweeteners like honey or maple syrup. These substitutes add flavor and sweetness. Keep in mind that they might change the texture. Honey can make the jam a bit thicker. Maple syrup gives a unique taste. You'll want to adjust the amount to your liking. Aim for a 1:1 ratio to start. Test the flavor as you go. Check for signs of spoilage in your homemade jams. Look for mold on the surface. If you see any, discard the jam. Also, smell it. If it has a sour or off odor, it’s best to throw it out. Pay attention to the color too. If the color changes or looks cloudy, that’s not a good sign. Lastly, if the jam has a strange texture, it may be spoiled. Fig jam pairs well with many foods. Here are some popular ideas: - Spread on toasted bread or bagels - Serve with creamy cheeses like goat cheese - Pair with cured meats for a charcuterie board - Use as a topping for yogurt or oatmeal - Drizzle over pancakes or waffles for breakfast These combinations enhance the flavors and make your meals special. Enjoy exploring these tasty options! Making fig jam is simple and fun. We covered the best ingredients, tools, and tips to craft delicious jam. Selecting ripe figs and monitoring the cooking process is key to flavor. Remember to explore variations and storage options to keep your jam fresh. With these steps, you can create sweet spreads that impress. Enjoy your homemade fig jam on toast or as a topping. Happy cooking!

Quick Fig Jam Tasty and Simple Recipe Guide

Are you ready to whip up a sweet treat with fresh figs? In this guide, I’ll show you how to

To make crunchy pickled okra, gather these simple ingredients: - 1 pound fresh okra, washed and trimmed - 2 cups water - 1 cup apple cider vinegar - 1 tablespoon kosher salt - 2 teaspoons sugar - 1 tablespoon mustard seeds - 1 teaspoon dill seeds - 1 teaspoon red pepper flakes - 4 cloves garlic, peeled and smashed - 1 small onion, thinly sliced - 1 bay leaf These ingredients come together to create a burst of flavor. Fresh okra is key for that crunch. The vinegar adds a tangy kick, while garlic and spices bring depth. The sugar balances the acidity. Each bite packs a punch! When you pick your okra, look for vibrant green pods. They should feel firm and smooth. Avoid any that are soft or have dark spots. This ensures your pickles stay crunchy and fresh. Check out the Full Recipe to dive deeper into making your own crunchy pickled okra! To start, grab a medium saucepan. In it, combine the following ingredients: - 2 cups water - 1 cup apple cider vinegar - 1 tablespoon kosher salt - 2 teaspoons sugar Now, heat the mixture over medium-high flame. Stir it occasionally until it boils. Keep stirring until both the salt and sugar dissolve completely. Once done, remove the saucepan from heat and let the liquid cool for about 10 to 15 minutes. While your brine cools, take a clean quart-sized mason jar. Start layering your ingredients in this order: - 1 pound fresh okra, washed and trimmed - 4 cloves garlic, peeled and smashed - 1 small onion, thinly sliced - 1 tablespoon mustard seeds - 1 teaspoon dill seeds - 1 teaspoon red pepper flakes - 1 bay leaf This layering builds flavor and texture. Make sure to pack everything snugly but not too tight. When the vinegar solution cools to room temperature, carefully pour it over the layered ingredients in the jar. Ensure all the okra is fully submerged in the brine. This step is key for great flavor. Seal the mason jar tightly with a lid. Let the jar sit at room temperature for about 30 minutes. This helps the flavors meld together. After that time, place the jar in the refrigerator. Your pickled okra will be ready in about 24 to 48 hours. If you're eager, feel free to taste it after just a few hours! Look for fresh, firm okra pods when you shop. Choose ones that are bright green with no blemishes. The best okra should feel smooth and slightly tender. Avoid pods that are too large, as they can be tough and less tasty. Freshness is key for a crunchy pickle! To keep your okra crunchy, cool the brine well before pouring it over the okra. Quick refrigeration after sealing the jar helps lock in that crisp texture. Make sure the okra is fully submerged in the brine. This also helps the flavors mix well, giving you a zesty bite. Feel free to experiment with spices for unique tastes. You can add whole peppercorns, coriander seeds, or even a dash of cumin. Each spice adds its own twist to the flavor. Try using a mix of sweet and savory spices to find your favorite blend. With a little creativity, your pickled okra can be a surprise hit! {{image_4}} To give your pickled okra a kick, add jalapeños or cayenne pepper. Spicy pickled okra brings heat and flavor to the table. You can slice jalapeños and layer them with the okra. This method infuses each pod with a spicy punch. If you prefer more heat, add cayenne pepper to your brine. Just a pinch can make a big difference. Adjust the spice level to suit your taste! If you like a sweeter taste, try adding sweeteners like honey or agave. You can also switch up the vinegar type. For a sweeter flavor, use rice vinegar or white balsamic vinegar. This change gives the pickles a unique twist. The balance of sweet and sour makes a tasty snack or a fun side dish. This version pairs well with grilled meats or spicy dishes. Explore global flavors by adding different spices to your pickled okra. Think about using cumin, coriander, or even curry powder. These spices can transport your taste buds around the world! You might try adding dill for a fresh taste or mustard seeds for a tangy touch. Each spice brings a new character to your crunchy pickled okra. Experiment with these flavors to find your favorite blend. Store your crunchy pickled okra in the refrigerator. It stays fresh for about two months. Make sure the jar is tightly sealed. This helps keep out air and moisture. To make your pickled okra last longer, always use clean utensils. Avoid touching the okra with your hands. The less you expose it to air, the better it stays. If you notice the brine is low, top it off with more vinegar. Check for changes in color or smell. If you see any mold, do not eat it. A sour smell is also a red flag. Always trust your senses. If it seems off, toss it out. Your safety comes first! Pickled okra becomes crunchy after a minimum of 24 hours. The longer you let it sit, the better the flavor and crunch. I suggest waiting 48 hours for the best results. Patience is key here! The brine seeps into the okra, giving it that perfect crunch you crave. You should avoid using frozen okra for pickling. Freezing changes the texture, making it softer. Fresh okra is firm and holds its crunch well in brine. If you only have frozen okra, consider using it in soups or stews instead. You can find crunchy pickled okra at many grocery stores. Look in the condiment aisle or the international foods section. Brands like Southern Style or Wickles are good choices. Local farmers' markets often sell homemade versions too, which can be even tastier. Pickled okra is versatile and adds flavor to many dishes. Use it as a zesty topping for sandwiches or burgers. It also works well in salads or as a crunchy snack. Try adding it to a charcuterie board for a fun twist. For the full recipe, check out the Crunchy Pickled Okra recipe section. Crunchy pickled okra is simple and fun to make. You learned about the right ingredients, how to prepare the brine, and how to layer your jar. Remember to start with fresh okra for the best crunch. With tips for flavor and storage, you can enjoy crunchy pickled okra anytime. This recipe offers many ways to customize your pickles. Get creative with spices! Now go make your own batch, and savor this tasty treat in dishes or alone. Enjoy your crunchy adventure!

Crunchy Pickled Okra Simple and Delicious Recipe

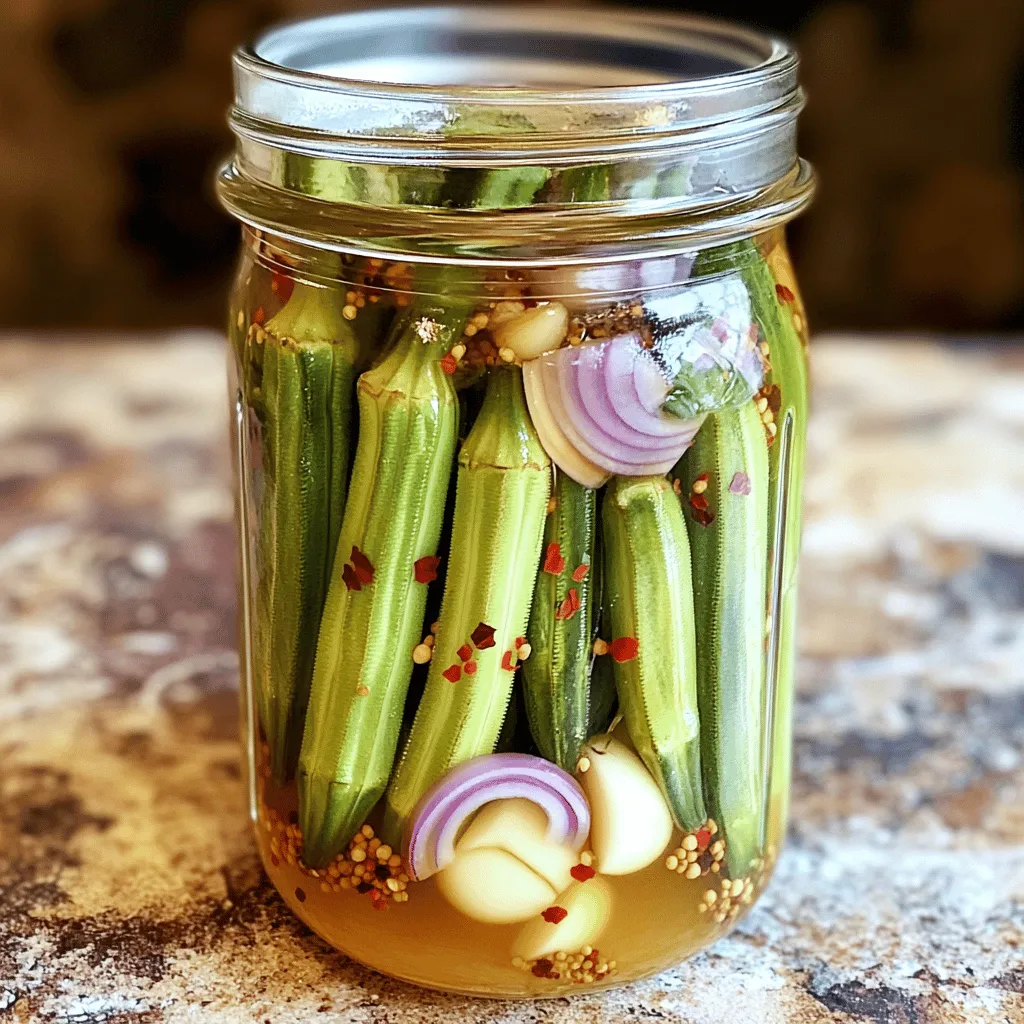
If you’re looking for a flavorful twist on pickled vegetables, crunchy pickled okra is a must-try! This simple and delicious

- Eggs and Milk: The base of our frittata is eggs. They give it structure and richness. Whole milk adds creaminess and flavor. - Vegetables: We use red onion, red bell pepper, and zucchini. These veggies bring color and nutrition. Their flavors blend well in the frittata. - Spices: Cumin, paprika, and cinnamon give this dish a warm, earthy taste. Cumin adds a nutty flavor, while smoked paprika offers a hint of sweetness. A touch of cinnamon rounds it all off. - Fresh Herbs: Cilantro adds a fresh, bright note. It balances the frittata's richness and enhances the overall flavor. - Protein Boost: Chickpeas not only add texture but also protein. They make the frittata hearty and filling. Use cooked chickpeas, thoroughly mashed, for best results. - Optional Garnish: Feta cheese can be sprinkled on top. It adds a salty, creamy finish. This optional ingredient elevates the dish even more. For the full recipe, check the section titled Full Recipe. 1. Preheating the Oven: Start by preheating your oven to 375°F (190°C). This step is key for a well-cooked frittata. 2. Whisking Together Eggs and Chickpeas: In a large bowl, whisk together 6 large eggs and 1/2 cup of whole milk. This creates a creamy base. Next, add in 1/2 cup of cooked chickpeas, mashed well. This adds texture and flavor. 3. Sautéing Vegetables in Olive Oil: Heat 2 tablespoons of extra virgin olive oil in a large oven-safe skillet over medium heat. Once the oil is hot, add in 1 finely chopped small red onion. Sauté for 2-3 minutes until soft. Then, add 1 diced red bell pepper and 1 grated medium zucchini. Cook for an additional 3-4 minutes until the veggies are tender. 1. Incorporating Spices into the Vegetable Mixture: Sprinkle in 1 teaspoon of ground cumin, 1 teaspoon of smoked paprika, and 1/2 teaspoon of ground cinnamon. Add salt and pepper to taste. Stir well to mix the spices with the vegetables. 2. Pouring Egg Mixture Over Vegetables: Carefully pour the egg and chickpea mixture over the sautéed vegetables in the skillet. Make sure it spreads evenly over all the veggies. 3. Cooking on Stovetop Before Baking: Let the frittata cook on the stovetop for about 5 minutes. You want the edges to set while the center is still a bit jiggly. 1. Oven Transfer and Baking Time: Off the heat, sprinkle 1/2 cup of roughly chopped fresh cilantro over the frittata. If you'd like, add crumbled feta cheese on top. Carefully transfer the skillet to the oven and bake for 15-20 minutes. 2. Checking for Doneness: Your frittata is done when it is puffed and golden. A toothpick inserted in the center should come out clean. 3. Cooling and Serving Suggestions: Once baked, take the skillet out of the oven. Let it cool for a few minutes. Slice into wedges and serve warm. Enjoy this flavor-packed dish with a side salad or fresh bread. For the full recipe, check out the details above! Choosing the Right Pan: Oven-Safe Skillets Using an oven-safe skillet is key. I recommend one made of cast iron or stainless steel. These materials heat evenly and hold heat well. They also go from stovetop to oven without any issues. Avoid using non-stick pans for baking, as they do not hold up well in high heat. Ensuring Even Cooking: Stovetop Tips To cook the frittata evenly, keep the heat on medium. This lets the eggs set without burning the bottom. Gently stir the mixture a few times while it cooks. Watch for the edges to firm up before you move it to the oven. This step ensures that your frittata has a nice rise and fluffy texture. Ideal Accompaniments for Flavor Enhancement Pair your Moroccan frittata with a fresh salad. A simple mix of greens, cucumber, and tomatoes works well. Drizzle a bit of olive oil and lemon juice on top to brighten the flavors. You can also serve it with crusty bread for a hearty meal. Presentation Tips for a Beautiful Serving Serve the frittata on a rustic wooden board. Sprinkle extra cilantro on top for a pop of color. Wedge slices look great and are easy to serve. For an extra touch, add a few olives or sliced radishes around the frittata. This adds interest and makes the dish visually appealing. {{image_4}} You can easily change this Moroccan frittata to suit your taste. - Adding Different Vegetables: Try using spinach or mushrooms. These greens add great flavor. Spinach wilts nicely, while mushrooms give a hearty bite. - Meat Variants: If you want more protein, add sausage or chicken. Cook them first, then mix into the egg blend. This adds richness and keeps the dish filling. Spices make the Moroccan frittata special. You can adjust them based on your likes. - Experimenting with Additional Spices: Harissa or turmeric can add a nice twist. Harissa brings heat and depth, while turmeric adds warmth and color. - Adjusting the Heat: Want more spice? Add chili peppers to the mix. They give a kick that plays well with the other flavors. Start with a little, then add more if you dare. Feel free to explore these variations to create your perfect Moroccan frittata! For the complete recipe, check out the Full Recipe section. Refrigeration Guidelines: How Long Does It Last? You can keep your Moroccan frittata in the fridge for up to four days. Make sure to place it in an airtight container to keep it fresh. This way, it will not absorb other smells from the fridge. Freezing Tips for Long-Term Storage If you want to store it longer, freeze the frittata. Wrap it tightly in plastic wrap, then place it in a freezer bag. It can last for about two months in the freezer. When you are ready to eat, simply thaw it in the fridge overnight. Best Methods for Reheating the Frittata To reheat, use the oven for best results. Preheat your oven to 350°F (175°C). Place the frittata on a baking sheet and cover it with foil. Heat it for about 15 to 20 minutes. You can also use a microwave, but the oven keeps it crisp. Flavor Preservation Techniques To keep flavors fresh, add a few drops of olive oil before reheating. This adds moisture and enhances the taste. You can also sprinkle some fresh herbs on top after reheating for extra flavor. To check if your frittata is done, look for these signs: - The edges should be set and slightly puffed. - The center should still jiggle a bit when you shake the pan. - A toothpick inserted in the middle should come out clean. These signs show that the frittata is ready to come out of the oven. It will continue to cook a little from the heat after you take it out. Keep an eye on it to avoid overcooking. Yes, you can make frittata ahead of time. This makes it a great meal prep option. Here are some tips to help you: - Cook the frittata and let it cool completely. - Store it in an airtight container in the fridge. It will last up to 3 days. - You can also freeze it for up to 2 months. Slice it into wedges before freezing for easy serving. When you're ready to eat, simply reheat in the oven or microwave. This makes it perfect for busy mornings or quick lunches. Moroccan frittata pairs well with several dishes. Here are some tasty ideas: - A fresh salad with mixed greens, tomatoes, and cucumbers. - Warm pita bread or crusty bread for dipping. - A side of yogurt or tzatziki for creaminess and tang. - Roasted vegetables to add more flavor and texture. These sides enhance the frittata's spices and make for a complete meal. Enjoy your frittata with these delightful options for a full experience. For a detailed guide, check the Full Recipe for Moroccan Frittata. The Moroccan frittata combines simple ingredients for a dish full of flavor. Remember to use eggs, fresh veggies, and warm spices to create a tasty meal. Don't forget to try chickpeas for added protein and herbs for extra flavor. Perfect your frittata with tips on cooking and serving. Variations let you customize it to your height. Store leftovers well, and reheating makes it easy to enjoy later. Dive into this unique dish and impress your family or friends. Cooking can be fun and rewarding, so enjoy every bite!

Moroccan Frittata Deliciously Packed with Flavor

Are you ready to spice up your breakfast routine? This Moroccan Frittata is a flavor-packed dish that combines fresh veggies,

To make crispy fried okra, start with fresh okra. You need one pound of it. Look for firm, bright green pods. They should feel tender but not soft. Slice them into ½ inch rounds. This size helps create that perfect crunch when fried. Next, let’s gather the coating ingredients. You will need: - 1 cup buttermilk - 1 cup cornmeal - ½ cup all-purpose flour Buttermilk adds moisture and flavor. The cornmeal gives the okra that delightful crunch. The all-purpose flour helps bind everything together. Mix them well for an even coat. Now, it’s time for seasonings and oils. You will need: - 1 teaspoon paprika - ½ teaspoon garlic powder - ½ teaspoon onion powder - ½ teaspoon cayenne pepper (adjust to your taste) - Salt and freshly ground black pepper to taste - Vegetable oil for frying Each seasoning adds depth to the flavor. Adjust the cayenne to make it spicier or milder. Use enough vegetable oil to cover the bottom of your pan. This will help the okra fry evenly and get crispy. For the full recipe, refer to the earlier sections. Start by washing the fresh okra under cold water. This step is key for removing dirt. Next, slice the okra into rounds about ½ inch thick. Make sure to set the slices aside in a bowl. This ensures they are ready for soaking and frying. Pour one cup of buttermilk into a mixing bowl. Add the sliced okra to the bowl, making sure every piece is submerged. Soak the okra for about 15 minutes. This not only enhances the flavor but also helps the breading stick better when frying. In a separate bowl, mix cornmeal, all-purpose flour, paprika, garlic powder, onion powder, cayenne pepper, and a pinch of salt and pepper. Heat vegetable oil in a large skillet over medium-high heat. Test the oil by adding a pinch of the cornmeal mixture; it should sizzle. Remove the okra from the buttermilk, letting excess liquid drip off. Dredge each piece in the cornmeal mixture, ensuring each piece gets a good coating. Carefully add the coated okra to the hot oil in small batches. Fry for about 3-4 minutes per side until golden brown and crispy. Use a slotted spoon to transfer the fried okra to a plate lined with paper towels to absorb excess oil. Continue the frying process until all the okra is done. For a detailed recipe, check out the Full Recipe. To get that perfect crispy texture, follow these steps. First, soak the okra in buttermilk. This helps the coating stick well. Next, use a mix of cornmeal and flour for the breading. The cornmeal gives a nice crunch. If you want extra crispiness, let the coated okra rest for a few minutes before frying. This step lets the coating set. You can change the spice levels to fit your taste. The recipe calls for cayenne pepper, which adds heat. If you like it mild, use less. If you want more kick, add more cayenne. You can also try other spices like chili powder or black pepper. Taste the coating before frying to find the right balance for you. Choosing the right oil is key for frying. Use oils with high smoke points like vegetable or canola oil. These oils can handle high heat without burning. Make sure the oil is hot enough before adding the okra. You can test it by dropping a bit of the coating in the oil. If it sizzles, it’s ready. This helps ensure that your fried okra comes out crispy and golden. For the full recipe, check out the Crispy Southern-Style Fried Okra. {{image_4}} If you want a lighter version of fried okra, try baking instead of frying. To do this, preheat your oven to 425°F. After coating the okra, spread it on a baking sheet lined with parchment paper. Spray the okra lightly with cooking oil. Bake for about 20-25 minutes, turning halfway through. This method gives you crispy okra with less oil. You can also use whole wheat flour instead of all-purpose flour for more fiber. To spice up your fried okra, try adding different herbs and spices to the coating. For a more savory taste, mix dried thyme or oregano into the cornmeal mixture. You can also add grated Parmesan cheese for a cheesy kick. If you love heat, consider adding more cayenne pepper or a splash of hot sauce to the buttermilk. This can really bring out the flavors and make your dish stand out. Feel free to swap out ingredients based on what you have at home. For example, if you don’t have buttermilk, mix regular milk with a splash of vinegar or lemon juice. This will mimic the tanginess. You can also use rice flour or chickpea flour for a gluten-free option. If you can’t find fresh okra, frozen okra works too. Just thaw and pat them dry before breading. These swaps keep the spirit of the dish alive while catering to your needs. For the full recipe, check out the Crispy Southern-Style Fried Okra recipe! After enjoying your fried okra, store any leftovers in an airtight container. Place a piece of paper towel in the container to absorb moisture. This helps keep the okra crispy. Store it in the fridge for up to three days. I recommend eating it within two days for the best taste. To reheat fried okra, use the oven or an air fryer. Preheat your oven to 350°F (175°C). Spread the okra on a baking sheet. Heat for about 10-15 minutes until it's hot and crispy again. If using an air fryer, set it to 350°F and cook for about 5-7 minutes. This method helps retain the crispiness. To freeze fried okra, let it cool completely first. Place the okra in a single layer on a baking sheet. Freeze for about one hour until solid. Then transfer the okra to a freezer-safe bag or container. Remove as much air as possible before sealing. You can freeze it for up to three months. When ready to eat, thaw in the fridge and reheat using the methods above. Enjoy your Classic Fried Okra anytime! For the full recipe, check out the earlier section. Yes, you can use frozen okra! It makes cooking easier and saves time. Just remember to thaw it first. Pat it dry with a towel to remove any moisture. This helps keep the coating crispy when you fry it. I love serving fried okra hot and fresh. You can place it in a basket lined with parchment paper. Pair it with ranch dressing or a spicy dip for more flavor. It also goes well as a side dish with fried chicken or barbecue. To make fried okra gluten-free, swap out the all-purpose flour. Use a gluten-free flour blend instead. You can also use cornmeal only, which adds a nice crunch. This way, everyone can enjoy the crispy goodness without worries! For the full recipe, check out the link! Fried okra is simple to make and fun to enjoy. This post covered the key ingredients and step-by-step instructions to prepare delicious fried okra. I shared tips for crispiness and adjusting spice levels, along with variations for healthier options. Proper storage methods help keep your leftovers tasty. Remember, you can still use frozen okra and adapt recipes for gluten-free diets. Now, it's time to gather your ingredients and start frying! Enjoy your cooking adventure!

Classic Fried Okra Crispy Texture Made Easy

Are you ready to make the best classic fried okra? This guide makes it easy, with crispy results you’ll love.

To make a delicious peach cobbler, you need fresh ingredients. Here’s what you will need: - 6 fresh peaches, peeled and sliced - 1 cup granulated sugar, divided (1/2 cup for peaches, 1/2 cup for batter) - 1 teaspoon ground cinnamon - 1 teaspoon vanilla extract - 1/2 cup unsalted butter, melted - 1 cup all-purpose flour - 1 tablespoon baking powder - 1/2 teaspoon salt - 1 cup milk - 1 tablespoon fresh lemon juice - Optional: Vanilla ice cream for serving Fresh peaches bring bright flavor. You want ripe, juicy peaches for the best taste. The sugar sweetens the fruit and adds flavor to the batter. Ground cinnamon gives warmth. Vanilla extract adds a sweet note, while butter makes the texture rich. Flour and baking powder combine to create a fluffy batter. Salt balances the sweetness. Milk makes the batter smooth, and lemon juice brightens up the flavors. You can find the full recipe in the next section. This cobbler recipe is simple and fun to make. Start by preheating your oven to 375°F (190°C). This helps the cobbler cook evenly. Next, take a 9x13 inch baking dish and grease it lightly with butter or cooking spray. This step keeps your cobbler from sticking. In a mixing bowl, add 6 fresh peaches, peeled and sliced. Sprinkle in 1/2 cup of granulated sugar, 1 teaspoon of ground cinnamon, and 1 teaspoon of vanilla extract. Toss everything gently to coat the peaches. Let this sit for about 10 minutes. This process draws out the juices, making the filling sweet and juicy. In a new bowl, whisk together 1/2 cup of granulated sugar, 1 cup of all-purpose flour, 1 tablespoon of baking powder, and 1/2 teaspoon of salt. Mixing these well ensures that all dry ingredients blend evenly. Pour in 1/2 cup of melted unsalted butter and 1 cup of milk into the dry mixture. Stir gently with a spatula. It’s okay if the batter remains a bit lumpy. If you mix too much, the cobbler can turn out dense. Carefully pour the batter into the greased baking dish. Use a spatula to spread it out evenly. Now, spoon the peach mixture over the batter, along with its juices. Do not stir! The peaches will sink and create lovely layers while baking. Drizzle 1 tablespoon of fresh lemon juice over the peaches for added flavor. Place the baking dish in the oven and bake for 35-40 minutes. Look for a golden brown top and bubbling edges. Remove from the oven and let it cool for about 10-15 minutes. This cooling time helps when you serve it warm, perfect with vanilla ice cream. For the complete recipe, refer to the Full Recipe. Select peaches that are ripe and fragrant. Look for peaches that yield slightly when you press them. Firm peaches will not soften well during baking. If you can, choose local peaches. They taste better and are fresher. Yellow peaches work best for this cobbler, but white peaches can also be a delightful twist. To get that gooey filling, let the peaches sit with sugar for about 10 minutes. This process, called maceration, helps draw out the juices. Do not skip the vanilla extract; it adds depth to the flavor. Finally, pour the peach mixture over the batter without stirring. This creates a lovely layered effect as it bakes. Always preheat your oven to 375°F (190°C). This ensures even cooking. Use a light coating of butter or spray on your baking dish. It prevents sticking and helps with browning. Bake until the cobbler is golden brown and bubbling at the edges. Allow it to cool for about 10-15 minutes before serving. This makes it easier to scoop and enjoy. For the best taste, serve with ice cream from the start to enhance the warm flavors of the cobbler. For the full recipe, check out the Sweet Summer Peach Cobbler section. {{image_4}} You can boost peach cobbler's flavor with spices. Cinnamon is a classic choice. Try adding nutmeg for warmth. A pinch of cardamom can add a lovely twist. Just remember, less is more. You want the spices to enhance, not overpower the peaches. Want a healthier cobbler? Substitute white sugar with honey or maple syrup. You can use whole wheat flour instead of all-purpose flour. For a lighter touch, swap butter for coconut oil. If you want to cut calories, use almond milk in place of regular milk. These swaps keep the taste tasty while making it a bit healthier. Peach cobbler is great with other fruits too! During summer, use berries like blueberries or raspberries. In fall, try apples or pears for a cozy feel. Winter is perfect for using frozen fruits. Just adjust sugar based on the fruit's sweetness. Each fruit gives a new flavor to explore. Enjoy discovering your favorites! For the full recipe, check out the Sweet Summer Peach Cobbler section above. Store leftover peach cobbler in an airtight container. You can keep it in the fridge for up to three days. Be sure to let it cool before sealing it to avoid excess moisture. This helps maintain its texture and flavor. To reheat, preheat your oven to 350°F (175°C). Place the cobbler in a baking dish. Cover it with foil to keep it moist. Heat for about 15-20 minutes. You can also use a microwave for quick reheating. Just warm individual portions for 30 seconds to 1 minute. You can freeze peach cobbler for longer storage. First, let it cool completely. Then, wrap it tightly in plastic wrap or foil. Place it in a freezer-safe bag. It can last up to three months. When ready to eat, thaw it in the fridge overnight. Reheat it in the oven for the best texture. For more details, refer to the Full Recipe. Yes, you can use frozen peaches. Just thaw them first. Drain any excess juice. This prevents a soggy cobbler. The taste might be a bit different, but it still works well. I prefer fresh peaches for their sweetness and texture. To adjust the sweetness, change the sugar amount. For less sweetness, cut the sugar by a quarter. If you want it sweeter, add more sugar to the peach mix. Remember, you can always taste and adjust as you go. Serve the cobbler warm. A scoop of vanilla ice cream on top makes it delightful. You can also add whipped cream or a sprinkle of cinnamon. It’s perfect for gatherings or a cozy night at home. The cobbler is done when it’s golden brown. Look for bubbling around the edges. Insert a toothpick into the batter; it should come out clean. If it’s mushy, give it a few more minutes in the oven. To make it gluten-free, swap all-purpose flour with a gluten-free blend. Many blends work well in this recipe. Just ensure it has a good mix of starches. This keeps the texture light and fluffy. You can find specific blends at most grocery stores. For the best results, follow the package instructions. For the full recipe, check out the Sweet Summer Peach Cobbler section above. You learned how to make a delicious peach cobbler from fresh ingredients. We covered the recipe steps, tips for success, and variations to try. Perfecting this dessert will impress everyone. With simple ingredients and methods, you can achieve a tasty result. Remember to store any leftovers properly for later enjoyment. Now, gather your ingredients and enjoy the fruits of your labor in the kitchen!

Peach Cobbler with Fresh Peaches Delightful Recipe

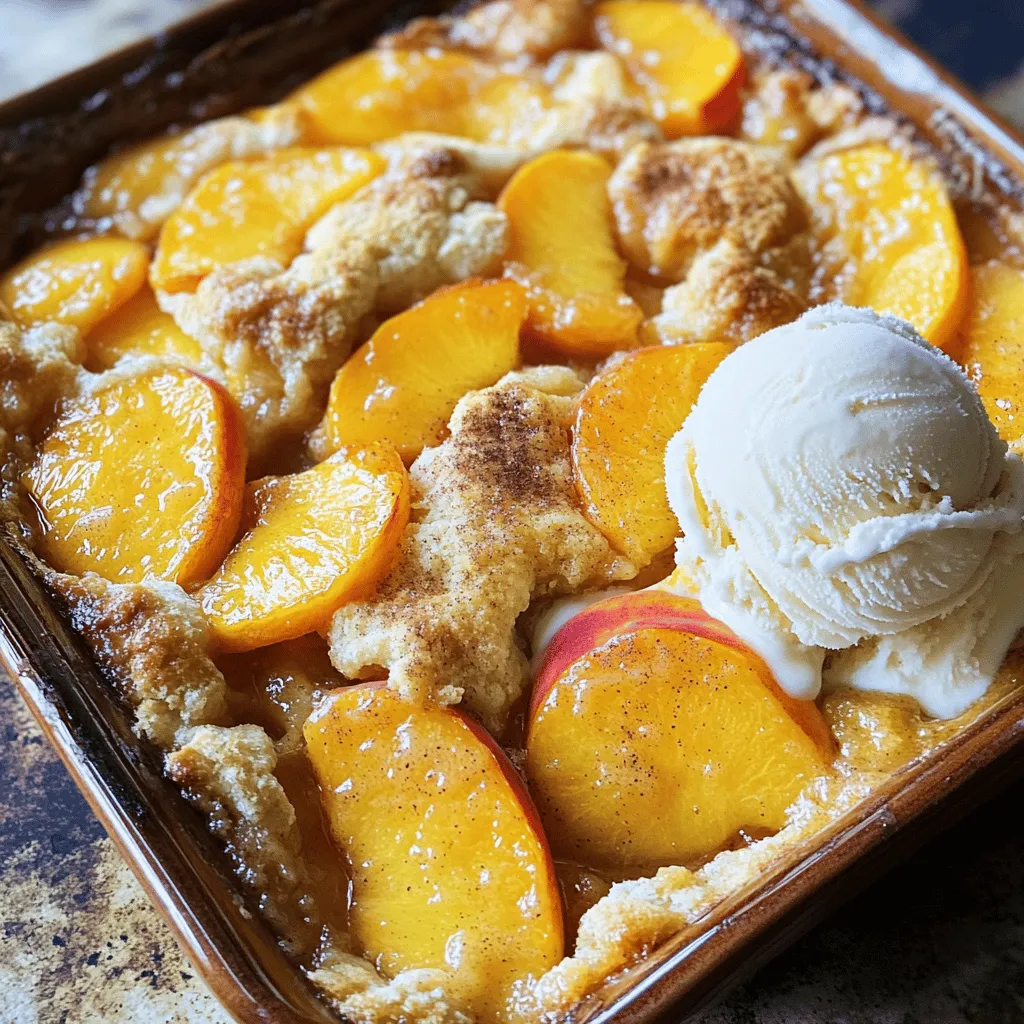
Are you ready to enjoy a burst of summer flavors? This Peach Cobbler with Fresh Peaches is a simple and

When making Southern Peach Bread, gather your ingredients first. Here’s what you need: - 2 cups all-purpose flour - 1 teaspoon baking soda - 1/2 teaspoon baking powder - 1/2 teaspoon salt - 1 teaspoon ground cinnamon - 1/2 teaspoon ground nutmeg - 1/2 cup unsalted butter, softened - 1 cup brown sugar, firmly packed - 2 large eggs - 1 teaspoon pure vanilla extract - 1 cup ripe peaches, peeled and diced - 1/2 cup chopped pecans (optional) - 1/4 cup buttermilk - 1/4 cup granulated sugar (for topping) Each ingredient plays a role. The flour gives structure, while baking soda and baking powder help it rise. The butter adds richness, and brown sugar gives it a deep, sweet flavor. Don’t skip the spices; they make the bread warm and cozy. Fresh peaches add sweetness and juiciness, while pecans add a nice crunch. For more details on the method, check the Full Recipe. - Preheat the oven to 350°F (175°C). - Prepare the loaf pan by greasing it with butter and dusting it with flour. - In a bowl, combine the flour, baking soda, baking powder, salt, cinnamon, and nutmeg. - In a large bowl, cream the butter and brown sugar until light and fluffy. - Add the eggs one by one, mixing well after each one. Then, mix in the vanilla. - Slowly add the dry mix to the wet mix, stirring gently until just combined. - Fold in the diced peaches and optional pecans until evenly mixed. - Pour in the buttermilk and fold until no flour streaks remain. - Transfer the batter to the loaf pan, smoothing the top. - Sprinkle granulated sugar on top for a sweet crust. - Bake in the oven for 55-60 minutes. Check with a toothpick for doneness. - Cool the bread in the pan for 10 minutes, then remove it to a wire rack. For the full recipe, check the details above. To bake the perfect Southern Peach Bread, check for doneness with a toothpick. Insert the toothpick into the center of the bread. If it comes out clean or with a few crumbs, your bread is ready. This simple test ensures you don’t end up with a soggy center. Avoid overmixing your batter. Mix just until the dry ingredients blend with the wet ones. Overmixing can make the bread tough. You want a tender and moist loaf, not a dense one. You can use fresh or canned peaches in this recipe. Fresh peaches give the best taste. However, if peaches are out of season, canned peaches work well too. Drain and chop them before adding to the batter. For buttermilk, you have a few easy options. You can mix regular milk with a little vinegar or lemon juice. Let it sit for about five minutes. This makes a nice substitute for buttermilk in your bread. For serving, slice the bread into thick pieces. Arrange them on a rustic wooden board for a nice look. You can garnish each slice with fresh peach slices or a dusting of powdered sugar. This adds a lovely touch to your presentation. Pair your Southern Peach Bread with a scoop of vanilla ice cream or a dollop of whipped cream. The creamy contrasts well with the sweet bread. Enjoy it warm from the oven or at room temperature for a delightful treat. {{image_4}} You can create a nut-free version of Southern Peach Bread by simply omitting the pecans. This change lets the peach flavor shine. You still get a moist and sweet bread. If you want extra texture, you can add in some oats or seeds instead. Want to jazz up your bread? Try adding spices like ginger or cloves. These spices give a warm kick and pair well with peaches. You can also fold in chocolate chips for a sweet twist. Other fruits like blueberries or cherries work great, too. They add color and a burst of flavor. For a healthier bread, use whole wheat flour instead of all-purpose flour. This adds fiber and makes it more filling. You can also reduce the sugar content. Try using half the amount or using a sugar substitute. Your bread will still taste delicious while being a bit healthier. To keep your Southern Peach Bread fresh, store it at room temperature. Place the bread in an airtight container or wrap it tightly in plastic wrap. This keeps it moist and tasty. If you live in a hot or humid area, use the fridge. The cold air helps prevent spoilage. Wrap the bread well to stop it from drying out. You can freeze Southern Peach Bread for later enjoyment. First, let the bread cool completely. Then, wrap it tightly in plastic wrap. After that, put it in a freezer bag or container. Label it with the date. This way, you know how long it has been in the freezer. When you want to eat it, thaw the bread slowly. Place it in the fridge overnight. For a quick method, leave it out at room temperature for a few hours. You can also warm it in the oven for a few minutes. This makes it taste freshly baked again. Enjoy your delicious Southern Peach Bread! Can I use frozen peaches? Yes, you can use frozen peaches. Just thaw them first and drain any extra liquid. This helps keep your bread from getting too soggy. How do I know when the bread is done? You can tell when the bread is done by using a toothpick. Insert it into the center. If it comes out clean or with a few crumbs, your bread is ready. Can I use oil instead of butter? You can use oil in place of butter. Use about 1/3 cup of oil for every 1/2 cup of butter. This will keep your bread moist but will change the flavor slightly. What are the best types of peaches? The best peaches for this bread are ripe, juicy ones. Freestone peaches work well because they are easy to cut. Look for peaches that give slightly when you press them. Can I make this bread without eggs? Yes, you can make this bread without eggs. Use a flaxseed meal or applesauce as a substitute. Mix one tablespoon of flaxseed meal with three tablespoons of water for each egg. How to enhance the peach flavor? To make the peach flavor pop, you can add a splash of peach extract. You can also mix in a little lemon juice to brighten the taste. Adding a sprinkle of nutmeg or cinnamon boosts the flavor too. For the full recipe, check out the Sweet Southern Peach Bread! This article covered how to make delicious Southern Peach Bread. You learned the ingredients needed and followed easy steps to create it. I shared tips for baking and serving suggestions to enhance your bread. Consider options for different flavors and healthy adaptations. Proper storage ensures your bread stays fresh for longer. Enjoy making and sharing this treat, and don't shy away from experimenting with new variations. Happy baking!

Southern Peach Bread Delightfully Easy to Make

If you love the sweet, juicy taste of ripe peaches, you’re in for a treat! Southern Peach Bread is simple

For this recipe, you need 2 cups of fresh okra. Make sure to chop it finely. Fresh okra brings a soft texture and unique flavor. You can find it at farmers' markets or grocery stores. Next, gather your dry ingredients: - 1 cup cornmeal - 1/2 cup all-purpose flour - 1 teaspoon baking powder - 1 teaspoon cayenne pepper (adjust for spice level) - Salt and pepper to taste These ingredients give the patties their crispy outer layer and a flavorful kick. Cornmeal adds crunch, while flour helps bind everything together. You will also need: - 1/2 cup buttermilk - 1 large egg - 1 small onion, finely diced - 1 clove garlic, minced - Vegetable oil for frying Buttermilk adds moisture and tang, while the egg helps bind the mixture. Onions and garlic provide depth in flavor. For frying, use vegetable oil, which heats well and creates that golden crust. For the full recipe, refer to the complete instructions above. Start by washing the fresh okra. Remove the tops and tails, then chop it finely. Place the chopped okra in a large bowl. Next, add the diced onion and minced garlic. These will give great flavor. Pour in the buttermilk and stir everything well. You want it all mixed evenly. This mixture is the heart of your patties. In another bowl, combine the cornmeal, all-purpose flour, baking powder, and cayenne pepper. This adds a nice kick. Season with a pinch of salt and pepper. Whisk the dry ingredients until they are free from lumps. This step is key for a nice texture in your patties. Now, slowly add the dry mix to your okra mixture. Stir gently until just combined. Be careful not to overmix. Then, beat the egg in a small bowl and fold it into the mixture. This helps bind everything together. Let the mixture rest for about 10 minutes. This resting time allows the flavors to meld and the batter to thicken. You are now ready to fry your patties! For the full recipe, check out the previous section. To get that perfect crunch, use fresh okra. Fresh okra contains more moisture than frozen. Dry it well before mixing. After frying, place the patties on paper towels to soak up extra oil. You can also bake them at 400°F for about 10 minutes for added crispiness. This helps keep them nice and crunchy. You can control the heat by adjusting the cayenne pepper. If you like it mild, use less. For a spicy kick, add more. You can also add other spices, like paprika or black pepper, for added flavor. Experimenting with spices makes each batch unique and fun. The oil you choose matters for frying. Vegetable oil is a great choice because it has a high smoke point. Peanut oil is another option for a nutty flavor. Avoid olive oil; it burns too quickly. Always heat the oil until it shimmers, but do not let it smoke. This ensures the patties cook evenly and get that nice golden color. For the full recipe, check the details above! {{image_4}} You can easily make your Southern okra patties even better. Adding cheese adds a rich flavor. Cheddar or feta works well. Just mix in a cup of your choice before frying. You can also try fresh herbs. Chopped cilantro, parsley, or dill can brighten the taste. Stir in about a tablespoon of herbs for a fresh twist. For a vegetarian version, you can skip the egg. Instead, use a flaxseed egg. Mix one tablespoon of flaxseed meal with three tablespoons of water. Let it sit for five minutes to thicken. This keeps the patties together without eggs. You can also add more veggies. Chopped bell peppers or corn add texture and flavor. If you need a gluten-free option, swap the all-purpose flour. Use almond flour or a gluten-free flour blend. Just make sure it has a good binding agent. You can also add extra cornmeal for crunch. This change keeps the patties tasty and safe for gluten-free diets. Enjoy your gluten-free Southern okra patties without missing out! For the full recipe, check out the detailed instructions above. Store leftover Southern okra patties in an airtight container. Make sure they cool to room temperature first. Place a paper towel inside to absorb extra moisture. This helps keep them crispy. They can last in the fridge for up to three days. To freeze okra patties, first let them cool completely. Then, arrange them in a single layer on a baking sheet. Freeze them for about two hours until firm. After that, transfer them to a freezer bag. Remove as much air as possible. They can stay fresh for up to three months in the freezer. Reheat your okra patties in the oven for the best crispiness. Preheat your oven to 375°F (190°C). Place them on a baking sheet lined with parchment paper. Bake for about 10-12 minutes, flipping halfway through. You can also reheat them in a skillet. Add a little oil and fry on medium heat for a few minutes until warmed through. Serve Southern okra patties hot and fresh. They taste best right out of the pan. I like to garnish them with fresh herbs like parsley or cilantro. A zesty dipping sauce adds a wonderful touch, too. You can use ranch dressing or a spicy remoulade. These patties make a great snack or side dish. They pair nicely with grilled meats or a fresh salad. Yes, you can use frozen okra for this recipe. Just make sure to thaw and drain it first. Frozen okra has more moisture than fresh, so it may change the texture a bit. Chop it finely, just like fresh okra. It will still taste great. This option is quick and convenient, especially when fresh okra is not available. Leftovers can last about 3 to 4 days in the fridge. Store them in an airtight container to keep them fresh. Reheat them in a skillet for the best texture. Avoid the microwave, as it can make them soggy. Enjoy your tasty Southern okra patties again as a quick lunch or snack! In this blog post, I covered how to make delicious Southern Okra Patties. We discussed the key ingredients, from fresh okra to the right dry mixes. Then, I shared step-by-step instructions for preparing, mixing, and resting the mixture. I included tips for a crispy finish and ideas for variations, like adding cheese or keeping it vegetarian. Lastly, I provided storage info for leftovers. Enjoy crafting your patties and experimenting with flavors!

Southern Okra Patties Flavorful and Easy Recipe

Looking for a tasty dish that captures Southern charm? My Southern Okra Patties are your answer! Crunchy, flavorful, and easy

Older posts
Newer posts
← Previous Page1 … Page38 Page39 Page40 … Page86 Next →

dsad

© 2026 lazychefmagic • Built with GeneratePress

Our Policies

  • Copyright Policy
  • Cookie Policy
  • GDPR Policy
  • Privacy Policy
  • Disclaimer
  • Terms Of Use

More Information

  • Home
  • About
  • Contact
  • Appetizers
  • Dessert
  • Dinner
  • Drinks
©2026, lazychefmagic About Back To Top