Skip to content
DisclaimerTerms Of UseGDPR PolicyCookie Policy

lazychefmagic

  • Home
  • Drinks
  • Appetizers
  • Dinner
  • Dessert
  • About
  • Contact
  • Privacy Policy
DisclaimerTerms Of UseGDPR PolicyCookie Policy

NO-ING-IMG

To make Basic Crème au Beurre Frosting, you will need the following ingredients: - 1 cup (226g) unsalted butter, softened - 4 cups (480g) powdered sugar, sifted - 1/4 cup (60ml) heavy cream (or whole milk) - 1 teaspoon pure vanilla extract - A pinch of salt These simple ingredients come together to create a smooth and creamy frosting. The unsalted butter is key for the right taste. Make sure it's soft before starting. This helps you mix it easily. Sifting the powdered sugar removes lumps. This step makes your frosting smooth and fluffy. When choosing cream, heavy cream gives a rich texture. Whole milk works too if you want a lighter frosting. The vanilla extract adds a lovely flavor, while the salt balances the sweetness. Each part plays a role in making this frosting delightful. Gather these ingredients, and you’re ready to create a frosting that will impress! {{ingredient_image_2}} To start, take 1 cup of unsalted butter from your counter. Make sure it is soft. Place the butter in a large mixing bowl. Using an electric mixer, beat the butter on medium speed. Do this for about 2-3 minutes. You want the butter to look creamy and light. This step is very important. It sets the base for your frosting. Next, add the 4 cups of sifted powdered sugar. To avoid a mess of sugar, add it in small amounts. Mix well after each addition. This will help create a smooth frosting. If you add too much sugar at once, you may end up with a cloud of powdered sugar everywhere. Now, it’s time to make your frosting even better. Pour in 1/4 cup of heavy cream. Add 1 teaspoon of pure vanilla extract. Sprinkle a pinch of salt into the mix. Keep mixing on medium speed for another 3-5 minutes. You want the frosting to be fluffy and smooth. If you want it thinner, add a little more cream. For thicker frosting, add more powdered sugar. Before you finish, taste your frosting. Adjust the flavor if you want. You can add a little more salt or vanilla to get it just right. Once you are happy with the flavor and texture, your frosting is ready to use! Spread it on cakes, cupcakes, or cookies for a sweet touch. - Importance of Softened Butter: Softened butter is key to smooth frosting. It mixes better with sugar. Cold butter makes it hard to blend, which can lead to lumps. - Mixing Time Recommendations: Beat the butter for 2-3 minutes. This makes it light and airy. After adding sugar, mix for another 3-5 minutes. This helps create that fluffy texture we love. - Adjusting Flavor Intensity: You can change the flavor by adding more vanilla. A little pinch of salt can enhance sweetness too. Just taste as you go to find the right balance. - Experimenting with Additional Ingredients: Try adding cocoa powder for chocolate flavor. You can also mix in citrus zest for a fresh twist. Get creative with flavors you enjoy! - Using a Piping Bag: A piping bag helps create fun designs. It gives your cupcakes and cakes a professional look. Simply fill it with frosting and squeeze gently to pipe. - Garnishing Ideas: Add edible glitter or colorful sprinkles on top. Fresh fruit or chocolate shavings can also make your treats stand out. A little garnish goes a long way in making desserts pop! Pro Tips Butter Temperature: Ensure your butter is softened to room temperature for the best texture. Cold butter won't incorporate air properly, resulting in a denser frosting. Sifting Sugar: Always sift your powdered sugar before adding it to the butter. This prevents lumps and ensures a smooth, velvety frosting. Flavor Balance: Don't skip the pinch of salt! It enhances the sweetness and balances the flavors in your frosting, elevating it to a whole new level. Consistency Control: Adjust the thickness of your frosting by adding more powdered sugar for a thicker consistency or more cream for a thinner one, depending on your decorating needs. {{image_4}} Chocolate Version To make a chocolate crème au beurre, add cocoa powder. Use about 3/4 cup of unsweetened cocoa. Mix it in when you add the sugar. This gives you a rich, chocolatey flavor. You can also add melted chocolate for a deeper taste. Just be sure to cool it before mixing it in. Citrus Zest Addition For a bright twist, add citrus zest. Grate the zest from lemons, limes, or oranges. About one tablespoon is enough for a fresh flavor. Stir the zest into the frosting after mixing in the cream. This will give your frosting a zesty kick that pairs well with many cakes. Dairy-Free Alternatives You can easily make this frosting dairy-free. Replace the unsalted butter with a dairy-free spread. Also, use coconut cream instead of heavy cream. This keeps the texture creamy and delicious while fitting a dairy-free diet. Sugar Substitutes If you want to cut down on sugar, use powdered erythritol or stevia. These substitutes can sweeten your frosting without added calories. Start with a smaller amount and taste as you go. This way, you can find the right sweetness for you. To store leftover frosting, place it in an airtight container. Make sure the container seals well to keep moisture out. This method helps maintain the frosting's texture. You can refrigerate it for up to one week. The cold slows spoilage and keeps it fresh. When you need it again, just take it out and let it warm up a bit. You can freeze Crème au Beurre for longer storage. To freeze, use an airtight freezer-safe container. I recommend separating it into smaller portions. This way, you can thaw only what you need later. It stays good in the freezer for about three months. To thaw, move the frosting to the fridge overnight. If you need it fast, you can let it sit at room temperature for an hour. Once thawed, mix it again to restore its creamy texture. You can use this frosting in future baking projects like cakes or cookies. Just remember to taste and adjust flavors after thawing! Crème au Beurre frosting is a rich, buttery icing. It has a smooth and creamy texture. This frosting is perfect for cakes and cupcakes. It is made mainly from butter and powdered sugar. The frosting is sweet but can be adjusted to your taste. To reduce sweetness, try these tips: - Use less powdered sugar. Start with three cups instead of four. - Add more cream. This can help balance the sweetness. - Mix in a pinch of salt. Salt can cut the sweetness and enhance flavor. - Try adding cocoa powder for a chocolate version. This adds depth and less sweetness. Yes, Crème au Beurre frosting is great for layer cakes. It spreads easily between cake layers. It holds its shape well, making it perfect for decoration. You can also pipe it into decorative swirls. Just remember to chill your cake before frosting. This helps the layers stay firm. In this blog post, we covered how to make Crème au Beurre frosting. We discussed the key ingredients, including butter and powdered sugar. You learned the step-by-step process for mixing and achieving the right texture. I shared tips for personalizing your frosting and ideas for presentation. We also explored variations and storage methods. Remember, practice will help you master this frosting. Don't be afraid to experiment with flavors and textures. Enjoy making this delightful treat!

Basic Crème au Beurre Frosting Simple and Tasty Recipe

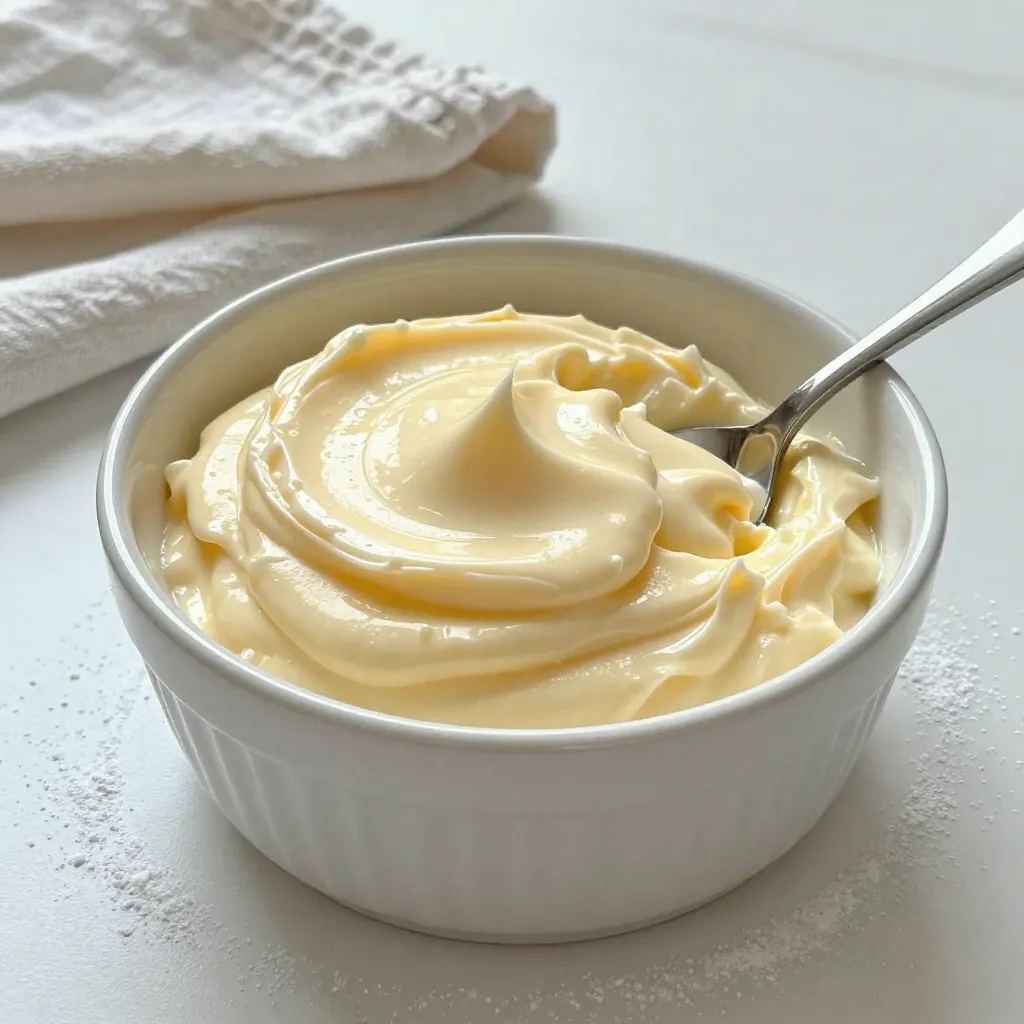
Do you want to take your baking to the next level? Crème au Beurre frosting is a classic choice that

- 4 boneless, skinless chicken breasts - 2 cups fresh spinach, finely chopped - 1/2 cup dried cranberries, roughly chopped - 1/2 cup cream cheese, softened to room temperature - 1/4 cup grated Parmesan cheese - 1/4 teaspoon garlic powder - 1 tablespoon olive oil for cooking - 1/2 teaspoon paprika for seasoning - Salt and pepper, to taste Gathering the right ingredients is key. For the main part of this dish, you'll need four boneless, skinless chicken breasts. These are easy to work with and cook nicely. Fresh spinach is another star here. It adds flavor and nutrition. You also want dried cranberries for a sweet touch. They give a nice contrast to the savory chicken. Next, let’s talk about the creamy filling. You’ll need cream cheese, which must be at room temperature to mix well. This will help create a smooth texture. Grated Parmesan cheese adds a savory kick. A bit of garlic powder enhances the taste, too. Don't forget your cooking essentials! You'll need olive oil for searing the chicken. Paprika adds color and flavor. Lastly, use salt and pepper to taste. These simple seasonings really bring out the best in your dish. {{ingredient_image_2}} Preheating the oven is very important. It helps the chicken cook evenly. Set your oven to 375°F (190°C). This way, your chicken will get that nice, juicy texture. To make the filling, grab a medium bowl. Mix 2 cups of finely chopped spinach and 1/2 cup of roughly chopped dried cranberries. Add 1/2 cup of softened cream cheese and 1/4 cup of grated Parmesan cheese. Don't forget 1/4 teaspoon of garlic powder and onion powder. Sprinkle in some salt and pepper to taste. Stir it all together until it is creamy and blended. Take your chicken breasts and use a sharp knife. Cut a pocket into the side of each breast. Be careful not to cut all the way through. This pocket will hold the filling. Now, fill each pocket with the spinach and cranberry mixture. If needed, use toothpicks to keep the filling inside. Heat 1 tablespoon of olive oil in a large oven-safe skillet over medium-high heat. Season the stuffed chicken breasts with paprika, salt, and pepper. Place the chicken in the skillet. Sear for about 4-5 minutes on each side. Look for a golden-brown color. Once done, transfer the skillet to the preheated oven. Bake the chicken for 20-25 minutes. Make sure it reaches an internal temperature of 165°F (75°C). After baking, let the chicken rest for about 5 minutes. This helps keep it juicy. If you used toothpicks, gently remove them. For a nice touch, sprinkle finely chopped fresh parsley on top. It adds color and flavor to your dish. To ensure a creamy filling, use room temperature cream cheese. This helps it mix easily with spinach and cranberries. Chop the spinach finely, so it blends well. You want a filling that is smooth and holds together. If it feels too dry, add a bit more cream cheese. Checking for doneness is key for juicy chicken. Use a meat thermometer. The chicken should reach 165°F (75°C) inside. If you do not have one, look for clear juices. Cut into the thickest part of the chicken to check. If it is pink, it needs more cooking. You can add more spices to boost flavor. Consider using Italian herbs like oregano or basil. A pinch of red pepper flakes adds heat. Lemon zest gives a fresh twist. Experiment with what you like best! Pro Tips Use Fresh Ingredients: Fresh spinach and high-quality cream cheese will enhance the flavor and texture of the filling. Don’t Overstuff: While it’s tempting to fill the chicken breasts to the brim, overstuffing can cause the filling to spill out during cooking. Let It Rest: Allowing the chicken to rest after baking helps retain its juices, resulting in a more flavorful and moist dish. Experiment with Cheese: Feel free to substitute the Parmesan with other cheeses like feta or mozzarella for a different flavor profile. {{image_4}} You can change the flavor of your spinach cranberry stuffed chicken. Try using feta cheese instead of cream cheese for a tangy twist. If you want a lighter option, use ricotta cheese. For greens, swap spinach with kale or Swiss chard. Each option gives a unique taste and texture. Baking gives a juicy chicken with a nice crust. However, grilling adds a smoky flavor. If you grill, keep the heat medium to avoid burning the outside. Cook each side for about 6-8 minutes. Both methods make this dish special. Each method brings out different flavors. Pair your stuffed chicken with a simple salad for freshness. A light vinaigrette works well. You can also serve it with pasta tossed in olive oil and garlic. This adds heartiness to your meal. For a colorful plate, add sautéed vegetables. Enjoy the harmony of flavors and textures. To store leftovers, place the chicken in an airtight container. This keeps the flavors fresh. Make sure the chicken cools down first. Leftovers can last for up to three days in the fridge. When ready to eat, check for any off smells or changes in texture. Freezing stuffed chicken is a great option for meal prep. Wrap each piece tightly in plastic wrap. Then, place them in a freezer bag. This helps prevent freezer burn. You can freeze the chicken for up to three months. When you want to cook it, thaw it overnight in the fridge before cooking. Reheat your stuffed chicken safely for best taste. Preheat your oven to 350°F (175°C). Place the chicken in an oven-safe dish and cover it with foil. Heat for about 20-25 minutes. This keeps the chicken moist. You can also use a microwave, but the oven gives better results. Always check the temperature. The inside should be 165°F (75°C) before serving. You can check if the chicken is done cooking by using a meat thermometer. Insert it into the thickest part of the chicken breast. The internal temperature should reach 165°F (75°C). Another sign is the juices should run clear when you cut into the chicken. If the juices are pink, cook it a bit longer. Yes, you can use frozen spinach. It is convenient and saves prep time. However, frozen spinach has a higher water content. This means you should drain it well before mixing it into your filling. Fresh spinach gives a brighter flavor and better texture. So, choose based on what you prefer or have on hand. If you want a lighter option, you can use Greek yogurt or ricotta cheese. Both alternatives add creaminess without the extra fat. You can also try cottage cheese, but blend it for a smoother texture. These substitutes work well and keep your dish tasty and flavorful. This blog post explored the steps to make a delicious stuffed chicken dish. We covered key ingredients like chicken breasts, spinach, and cranberries, along with cooking essentials. I also shared tips to perfect your stuffing and suggested variations to try. Don't forget the storage tips for leftovers, too. Cooking can be fun and tasty. Now, get in the kitchen and enjoy your delicious meal!

Spinach Cranberry Stuffed Chicken Flavorful and Easy Recipe

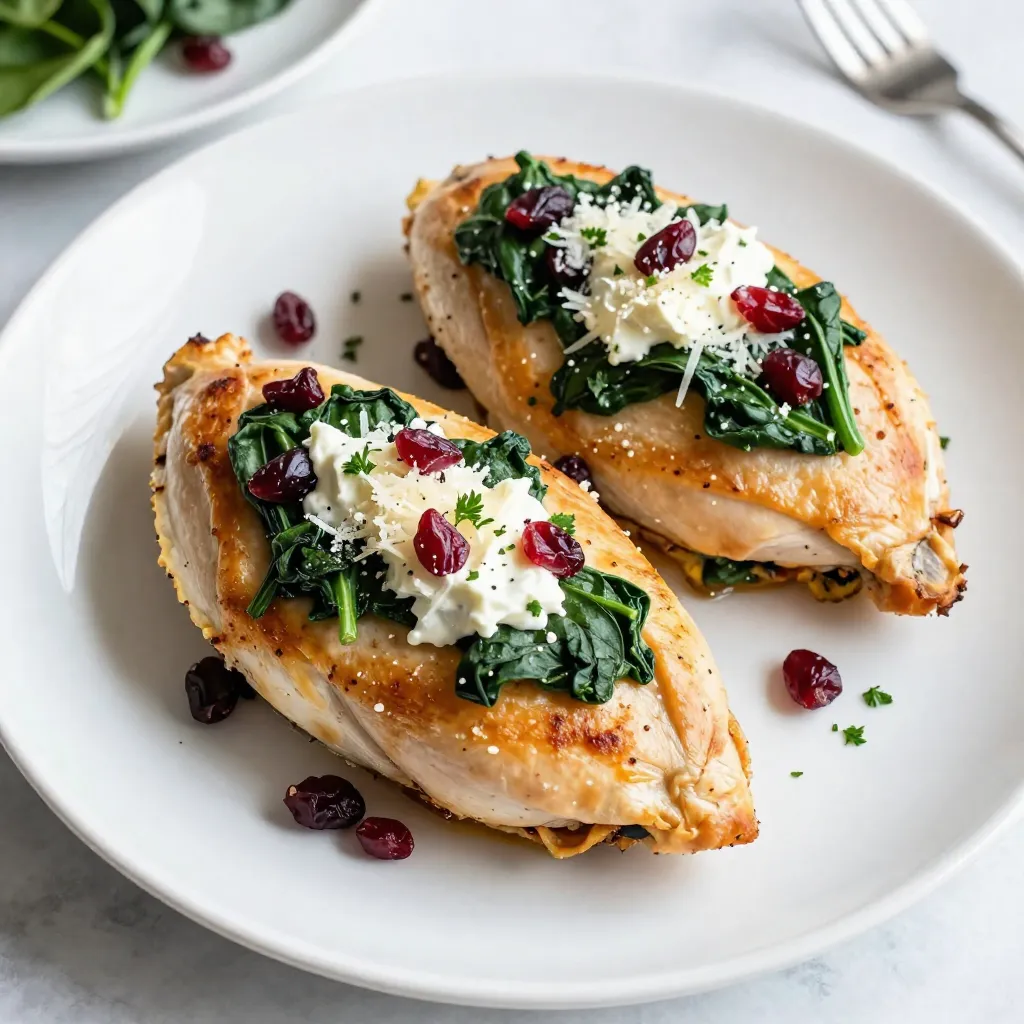
Looking for a quick and tasty dinner? This Spinach Cranberry Stuffed Chicken recipe has you covered! With juicy chicken breasts

- 8 oz penne pasta - 1 pound smoked sausage (andouille or kielbasa), sliced - 1 medium onion, finely chopped - 2 cloves garlic, minced - 1 red bell pepper, diced - 1 green bell pepper, diced - 1 cup heavy cream - 1 cup chicken broth - 2 tablespoons Cajun seasoning - 1 teaspoon smoked paprika - Salt and fresh ground pepper, to taste - 1/2 cup grated Parmesan cheese - Fresh parsley, chopped, for garnish For this dish, I always start with penne pasta. This shape holds sauce well, making each bite flavorful. Next, I choose smoked sausage, like andouille or kielbasa. The smoky flavor adds depth. I finely chop a medium onion and mince two cloves of garlic to build a strong base. Then, I add diced red and green bell peppers for color and crunch. The creamy sauce comes from one cup of heavy cream and one cup of chicken broth. The Cajun seasoning and smoked paprika give the dish its signature spice, while salt and pepper enhance the flavors. Finally, I top it all with half a cup of grated Parmesan cheese and fresh parsley. This adds a rich finish and a pop of green. Each ingredient plays a role in making this dish a dinner delight. - Start by boiling salted water in a large pot. - Add 8 oz of penne pasta and cook it according to the package instructions. - Before draining, reserve a small cup of pasta water for later use. - In a large skillet, heat 2 tablespoons of olive oil over medium heat. - Once the oil is shimmering, add 1 pound of sliced smoked sausage. - Cook the sausage for about 5-6 minutes until it browns nicely. - Next, add 1 medium chopped onion and 2 minced garlic cloves to the skillet. - Include 1 diced red bell pepper and 1 diced green bell pepper. - Sauté these for about 4-5 minutes until they become tender and fragrant. - Pour in 1 cup of chicken broth and 1 cup of heavy cream. - Sprinkle in 2 tablespoons of Cajun seasoning and 1 teaspoon of smoked paprika. - Simmer the sauce for 3-4 minutes, stirring often until it thickens. - Toss in the cooked penne pasta and mix well to coat it with the sauce. - If the sauce is too thick, add a splash of reserved pasta water for the right consistency. - Stir in 1/2 cup of grated Parmesan cheese until it melts into the sauce. - Taste the dish and adjust seasoning with salt and fresh ground pepper. - Finally, garnish with chopped parsley before serving for a fresh look. - Ensure pasta is al dente for best texture. This means it should be firm to the bite. - Stir frequently to prevent burning. This keeps your sausage and veggies from sticking to the pan. - To increase spiciness, add more Cajun seasoning or a dash of hot sauce. You can also use cayenne pepper for extra heat. - Other herbs that complement Cajun flavors include thyme and oregano. Fresh herbs can really brighten the dish. - Serve in deep bowls or wide pasta plates for aesthetic appeal. It makes the dish look more inviting. - Use extra garnishes like a sprinkle of Parmesan cheese and a drizzle of olive oil for color and taste. Fresh parsley adds a nice touch too. {{image_4}} You can swap the sausage for other types. Try chicken, turkey, or shrimp. Each will change the flavor. For a vegetarian version, use plant-based sausage or mushrooms. They add great texture and taste. You can also add beans or lentils for protein. While penne works well, you can use other pasta types. Fusilli, rotini, or even fettuccine are great choices. Each shape holds the sauce differently. If you need gluten-free options, try rice pasta or quinoa pasta. These will still give you a tasty meal. If you want a lighter sauce, use milk instead of cream. It still tastes great and cuts calories. You can also add Greek yogurt for creaminess. To spice things up, add extra Cajun seasoning or a pinch of cayenne. Experiment with spices for unique flavors. To keep your Creamy Cajun Sausage Pasta fresh, follow these steps: - Cool down: Let the pasta cool to room temperature. - Use airtight containers: Store the pasta in airtight containers. - Refrigerate: Place containers in the fridge. For the best taste, eat leftovers within 3-4 days. After this, the flavors may fade. Want to save some for later? You can freeze this dish easily: - Portion it out: Divide the pasta into portions. - Use freezer-safe containers: Store each portion in a freezer-safe container. - Label and date: Write the date on each container for reference. You can freeze it for up to 3 months. When you’re ready to eat: - Thaw overnight: Move the container to the fridge to thaw. - Reheat in a skillet: Warm it on low heat, adding a splash of broth or cream to keep it creamy. These steps ensure your meal stays tasty and fresh for another day. Making Creamy Cajun Sausage Pasta takes about 30 minutes total. This includes 10 minutes for prep and 20 minutes for cooking. You can cook the pasta while you prepare the sauce. This makes it quick and easy. Yes, you can use many types of sausage. Andouille gives a nice kick, but kielbasa is milder. You can also try chicken sausage or turkey sausage for a lighter option. Each type adds its own flavor to the dish. This dish has a mild to medium heat level. The Cajun seasoning adds warmth, but it’s not overwhelming. If you want more spice, you can add extra seasoning or red pepper flakes. Adjust it to your taste. To reheat, use a skillet on low heat. Add a splash of cream or chicken broth to keep it creamy. Stir often to prevent sticking. You can also microwave it, but add a little liquid to help it stay smooth. This blog post covered the delicious journey of making Creamy Cajun Sausage Pasta. You learned about key ingredients and easy steps to cook this dish. With tips to enhance flavor and presentation, you can impress anyone. Don't forget to try variations, like different proteins or pasta types, for fun twists. Always store your leftovers well for another tasty meal. Now, it’s time to enjoy this dish and share it with friends! You’ll love how simple and satisfying it is.

Creamy Cajun Sausage Pasta Flavorful Dinner Delight

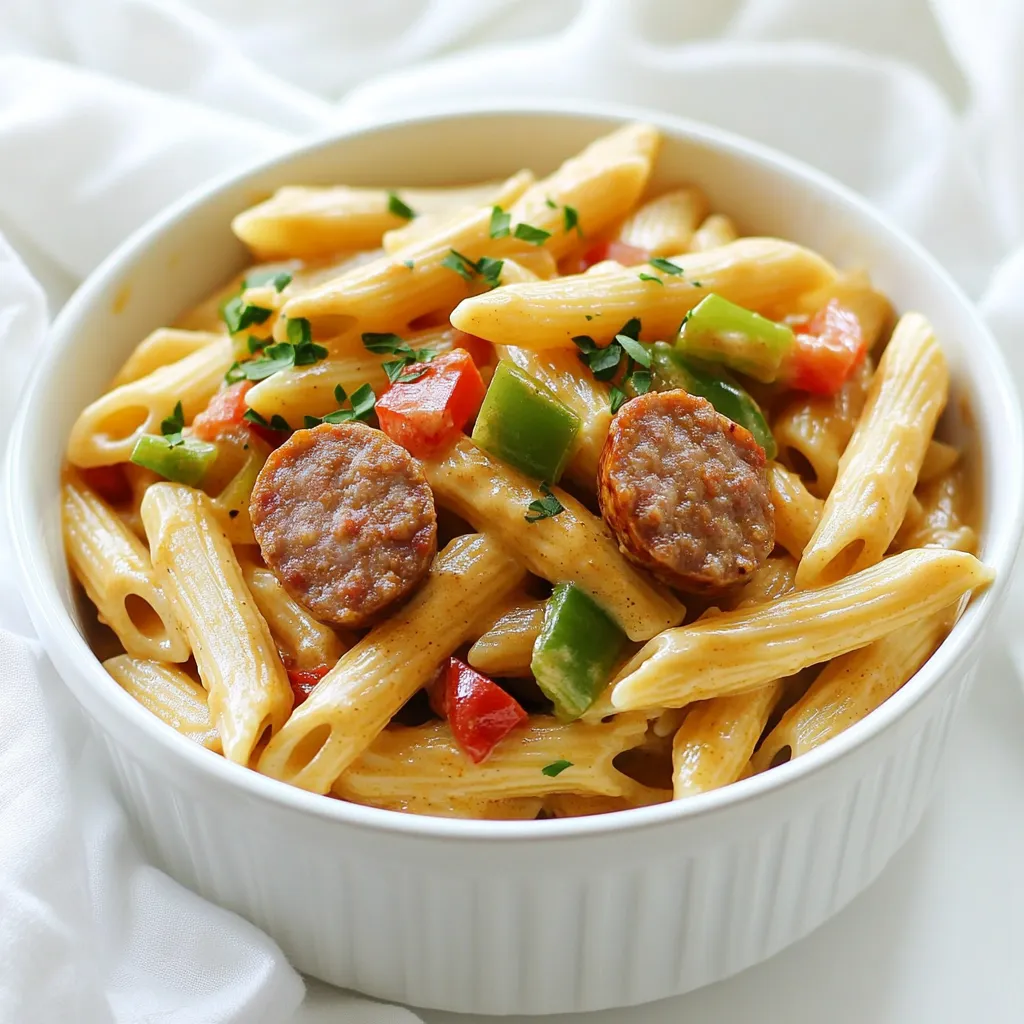
Are you ready to spice up your dinner routine? This Creamy Cajun Sausage Pasta is a flavorful delight that combines

- 2 large apples (preferably Granny Smith or Honeycrisp), diced - 1 cup Greek yogurt (vanilla flavor recommended) - 1/2 cup granola (your favorite variety) - 1/4 cup caramel sauce (store-bought or homemade for a personal touch) - 1/2 teaspoon ground cinnamon - 1 tablespoon fresh lemon juice - Whipped cream (optional, for garnish) - Chopped nuts (optional, such as walnuts or pecans, for added crunch) You can switch up the apples based on your taste. Try Fuji or Gala for a sweeter bite. For yogurt, plain Greek works too if you want less sweetness. Use a flavored yogurt like caramel or cinnamon for a fun twist. Choose your favorite granola, or even use crushed cookies for a different crunch. To boost flavor, add a splash of vanilla extract to the yogurt. You could also mix in raisins or dried cranberries for a chewy texture. Consider using coconut flakes for an exotic touch. If you love spice, a dash of nutmeg or allspice can bring warmth to your parfait. Start by washing the apples. I love using Granny Smith or Honeycrisp apples for their sweet and tart flavors. Then, dice the apples into small bits. In a medium bowl, mix the diced apples with 1 tablespoon of fresh lemon juice and 1/2 teaspoon of ground cinnamon. Toss gently. This helps the apples taste better and keeps them from browning. You want those apples to shine in your parfait! Now, grab your parfait glasses or bowls. It's time to layer! Begin with about 1/4 cup of Greek yogurt at the bottom of each glass. This creamy base is essential. Next, add a third of the apple mixture on top of the yogurt. The cinnamon apples will give each spoonful great flavor. Now, drizzle 1 tablespoon of caramel sauce over the apples. Watch it flow down into the yogurt. After that, sprinkle about 2 tablespoons of granola for a crunchy bite. Repeat these steps until your glasses are full. Finish with a layer of yogurt topped with a generous drizzle of caramel sauce. To make your parfaits even prettier, consider adding a dollop of whipped cream on top. You can also sprinkle some chopped nuts, like walnuts or pecans, for extra crunch. Serve these right away for the best taste! If you prefer, you can chill them for up to an hour. This lets the flavors blend. Using clear glass cups shows off the colorful layers, making it a fun treat to enjoy! To keep your apples fresh and bright, use lemon juice. Toss the diced apples in a bowl with one tablespoon of fresh lemon juice. This simple step stops oxidation. You can also sprinkle ground cinnamon on the apples. It adds flavor and helps reduce browning too. Layering makes your parfait look amazing. Start with Greek yogurt at the bottom. You can add about 1/4 cup of yogurt first. Then, add a layer of apples, followed by caramel. Use clear glasses to show off the colors. Repeat the layers to fill the glass. Finish with yogurt on top and a drizzle of caramel for a beautiful touch. For the best taste, choose high-quality Greek yogurt. I recommend brands like Fage or Chobani. These brands have rich, creamy yogurt that complements the apples and caramel. They enhance the flavor of your parfait and make every bite delightful. {{image_4}} You can swap Greek yogurt for low-fat yogurt. This change cuts calories while keeping taste. It still gives you a creamy texture. You can also try non-dairy yogurt if you prefer. Almond or coconut yogurt works well too. Want to switch up the flavors? Try making a caramel apple pie parfait. Add a pinch of nutmeg and a dash of vanilla extract. You can also use spiced apple. Just mix some cinnamon and nutmeg into the diced apples. This makes every bite a warm hug. Seasonal flavors can really shine in this parfait. For fall, add a pumpkin spice mix to your yogurt. This gives a cozy twist to your treat. You might also try fresh cranberries or pears in winter. These additions make your parfaits festive and fun. To store leftover parfaits, cover them tightly with plastic wrap or a lid. This keeps them fresh and prevents drying out. You can also place them in an airtight container. Make sure to store them in the fridge. They should stay tasty for up to 24 hours. If you want to prep in advance, keep the components separate. Dice apples, mix them with lemon juice and cinnamon, and store them in a bowl. Store the yogurt, granola, and caramel sauce in their own containers. This way, you can quickly assemble the parfaits when you’re ready to eat. It saves time and keeps everything fresh. - Apples: Fresh apples can last about 1-2 weeks in the fridge. - Greek yogurt: Check the expiration date. It usually lasts 1-2 weeks after opening. - Granola: It can last for several months if stored in a sealed bag or container. - Caramel sauce: Store-bought caramel sauce can last for months if unopened. Once opened, use it within a few weeks. By keeping these tips in mind, you can enjoy your Caramel Apple Yogurt Parfaits at their best! Yes, you can make these parfaits ahead of time. Prepare them a few hours in advance. Store them in the fridge. This helps the flavors mix well. Just be careful with the apples. They can brown if left too long. If you want to keep them fresh, add lemon juice to the apples. This keeps them bright and tasty. For the best flavor, use Granny Smith or Honeycrisp apples. Granny Smith apples add a nice tartness. Honeycrisp apples are sweet and crunchy. Both types give a great balance to the parfait. You can also try other apples like Fuji or Gala. Just avoid mealy or soft apples, as they won’t hold up well. Making homemade caramel sauce is easy! You need just a few ingredients: sugar, butter, and cream. Start by melting sugar in a pan over medium heat. Stir until it turns golden brown. Then, add butter and mix well. Finally, pour in heavy cream. Stir until smooth. Let it cool before using it in your parfaits. This homemade touch makes your parfaits even more special. In this blog post, we explored how to make delicious Caramel Apple Yogurt Parfaits. We talked about the key ingredients, step-by-step instructions, and useful tips. You learned how to prepare apples, layer your parfaits, and garnish them for a beautiful finish. Plus, we shared variations for flavor and healthier options. Remember, making parfaits can be a fun activity. Enjoy crafting your own tasty versions and share them with friends and family! Your creativity will shine through every layer.

Caramel Apple Yogurt Parfaits Simple and Tasty Treat

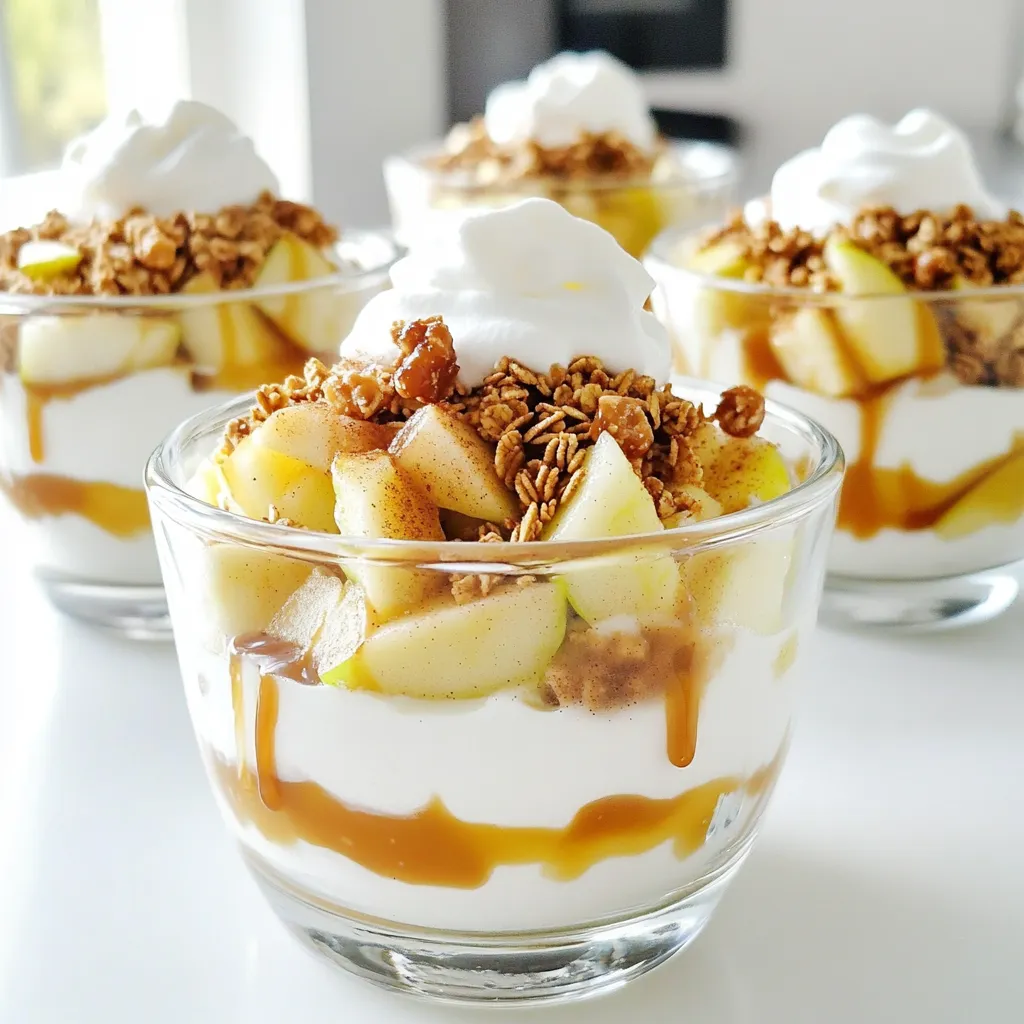
If you’re craving a sweet, simple dessert, these Caramel Apple Yogurt Parfaits are perfect! They blend creamy yogurt with juicy

To make Classic Beef Béchamel Lasagna, you need to gather some simple ingredients. Here’s what you will need: - 1 pound ground beef - 9 lasagna noodles - 2 cups ricotta cheese - 2 cups shredded mozzarella cheese - 1 cup grated Parmesan cheese - 1 medium onion, finely chopped - 3 cloves garlic, minced - 2 cups marinara sauce - 4 cups whole milk - 1/2 cup all-purpose flour - 4 tablespoons unsalted butter - 1 teaspoon dried oregano - 1 teaspoon dried basil - Salt and black pepper to taste These ingredients come together to create a rich and tasty dish. The ground beef adds protein, while the cheeses bring creaminess. The noodles hold everything together beautifully. Fresh onion and garlic give it flavor. Marinara sauce adds tang, and the béchamel sauce makes it extra special. Using whole milk is key for a creamy béchamel. The herbs add a nice touch of aroma and taste. Make sure to season well with salt and pepper. This blend of ingredients makes every bite a delight. {{ingredient_image_2}} Start by preheating your oven to 375°F (190°C). This temperature helps the lasagna cook evenly and get that nice, golden crust. In a large skillet, add 1 pound of ground beef, 1 finely chopped onion, and 3 minced garlic cloves. Season with salt, black pepper, 1 teaspoon dried oregano, and 1 teaspoon dried basil. Sauté on medium heat for about 7-10 minutes until the beef turns brown and the onions soften. If there is too much fat, drain it off to keep it light and tasty. Once the beef is cooked, stir in 2 cups of marinara sauce. Let this mixture simmer on low heat for 5 minutes. This step helps the flavors blend together and makes the sauce richer. Set the skillet aside to cool slightly. Bring a large pot of salted water to a boil. Cook 9 lasagna noodles according to the package instructions, which usually takes about 8-10 minutes. You want them to be al dente. Drain the noodles and lay them flat on parchment paper or a clean kitchen towel to stop them from sticking together. In a medium saucepan over medium heat, melt 4 tablespoons of unsalted butter. Once melted, whisk in 1/2 cup of all-purpose flour and cook for about 2 minutes. Stir constantly to avoid lumps. Gradually pour in 4 cups of whole milk, whisking until the sauce thickens, which takes about 5-7 minutes. Season this béchamel sauce with salt and black pepper to taste for added flavor. In a 9x13 inch baking dish, start with a layer of the beef mixture. Place 3 lasagna noodles over the sauce. Spoon a layer of 2 cups of ricotta cheese over the noodles. Drizzle some béchamel sauce on top and sprinkle with shredded mozzarella cheese. Repeat these layers until you reach the top, finishing with a generous layer of mozzarella and a sprinkle of grated Parmesan cheese for a lovely crust. Cover the baking dish tightly with aluminum foil to keep moisture in. Bake in the preheated oven for 25 minutes. After that, remove the foil and bake for another 15-20 minutes until the cheese is golden and bubbly. After taking the lasagna out of the oven, let it rest for 10 minutes. This helps it set and makes slicing easier. Serve warm with a fresh side salad or some crusty bread for a full meal experience. To make a great beef mixture, start with fresh ground beef. Use a medium heat to cook it. This keeps the beef juicy. Add finely chopped onion and minced garlic for flavor. Season with salt, black pepper, oregano, and basil. Sauté until the beef is brown and onions are soft. If there's too much fat, drain it off. This step lightens the dish and lets the flavors shine. Béchamel sauce can be tricky. If it’s too thick, just whisk in more milk until it’s creamy. If it’s lumpy, keep whisking and heat it gently. To avoid lumps, add flour to melted butter first. Stir it well before adding milk. This creates a smooth base. Season it with salt and black pepper for extra flavor. When you layer, be sure to spread each layer evenly. Start with beef mixture on the bottom. Then add noodles, ricotta, and béchamel. Use three noodles per layer for balance. Repeat the layers until you reach the top. Finish with a thick layer of mozzarella and Parmesan. This helps prevent sticking and ensures each bite is delicious. Pro Tips Use Fresh Herbs: Fresh herbs can elevate the flavor profile of your lasagna. Consider adding fresh basil or oregano between layers for a burst of freshness. Let it Rest: Allowing the lasagna to rest for at least 10 minutes after baking helps the layers set, making it easier to slice and serve. Mix Cheeses: For a more complex flavor, mix different types of cheese in the ricotta layer, such as adding goat cheese or cream cheese for creaminess. Freezing Tips: If you plan to freeze the lasagna, assemble it without baking and cover it tightly with foil. When ready to eat, bake from frozen, adding extra time to ensure it's heated through. {{image_4}} You can easily make a vegetarian lasagna. Instead of beef, try these tasty substitutes: - 1 pound of mushrooms, finely chopped - 1 pound of lentils, cooked - 1 pound of zucchini, sliced thin These options add great taste and texture. You can mix them up, too! Cheese makes lasagna special. Besides ricotta and mozzarella, you can try: - Goat cheese for a tangy flavor - Fontina for creaminess - Havarti for a smooth melt Mixing cheeses gives your dish a unique flavor. Feel free to get creative! Want to boost the flavor? Here are some great add-ins: - Spinach or kale for greens - Roasted red peppers for sweetness - Olives for a salty kick Adding these ingredients will make your lasagna even more delicious. Don't be afraid to experiment! To store leftover lasagna safely, first let it cool to room temperature. Then, cover it tightly with plastic wrap or aluminum foil. You can also place it in an airtight container. This helps keep the flavors fresh. Leftover lasagna stays good for about 3 to 5 days in the fridge. If you want to save lasagna for later, freezing is a great option. First, cool the lasagna completely. Then cut it into single portions. Wrap each piece in plastic wrap, then place it in a freezer bag. Remove as much air as possible. Lasagna can last in the freezer for up to 3 months. When you are ready to eat it, thaw it in the fridge overnight before reheating. To reheat lasagna without losing quality, use the oven. Preheat your oven to 375°F (190°C). Place the lasagna in an oven-safe dish and cover it with foil. Heat for about 20-25 minutes, or until it's hot throughout. If you want a crispy top, remove the foil for the last 5-10 minutes. You can also use the microwave for quick reheating, but it may not keep the texture as nice. Heat in short bursts and check often. To reheat lasagna, use your oven for the best results. Preheat your oven to 350°F (175°C). Place the lasagna in a baking dish. Add a few drops of water to keep it moist. Cover the dish with foil to trap steam. Bake for about 20-25 minutes. If you want a bubbly top, remove the foil for the last 5 minutes. This keeps the texture great and warms it evenly. Yes, you can make lasagna ahead of time. Assemble it completely, but do not bake it. Cover it tightly with foil or plastic wrap. You can store it in the fridge for up to 24 hours. When ready, bake it as usual. If it’s cold from the fridge, add 10-15 minutes to the baking time. Lasagna pairs well with several side dishes. A fresh green salad is a great choice. You can add a light vinaigrette for extra flavor. Garlic bread is another favorite to serve. It adds a nice crunch and complements the dish well. Steamed vegetables like broccoli or carrots also work well. Lasagna can last in the refrigerator for about 3-5 days. Be sure to store it in an airtight container. If you see any mold or an off smell, it’s best to toss it. Enjoy the leftovers within the week for the best taste and safety. Yes, you can use no-boil noodles in your lasagna. They work great and save time. Just layer them as you would regular noodles. They will absorb moisture from the sauce while baking. This gives you a nice, tender lasagna without the need for pre-cooking. In this blog, I shared the key ingredients and steps for making lasagna. I covered cooking the beef, preparing the béchamel, and layering the dish for the best taste. I also offered tips to perfect each part, suggested variations, and provided storage options. Lasagna is a rewarding meal to make. With practice, you can create your own delicious version. Enjoy experimenting with flavors and wow your family and friends. Now, you have all the tools to bake a tasty lasagna!

Classic Beef Béchamel Lasagna Tasty Comfort Dish

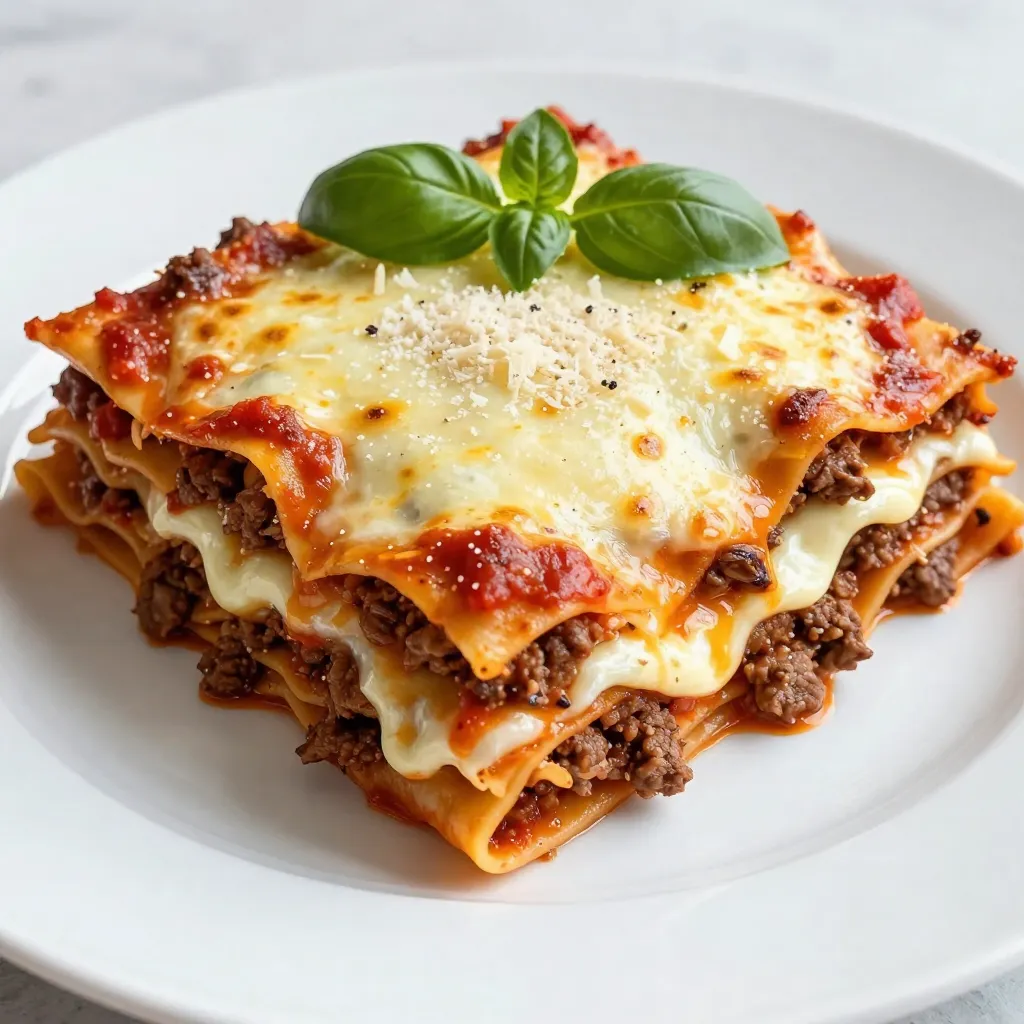
Welcome to the world of comfort food! Today, we’re diving into the heartwarming delight of Classic Beef Béchamel Lasagna. This

- 2 cups apple cider - 2 cups all-purpose flour - 1 cup granulated sugar Apple cider brings a sweet and tangy flavor to these donuts. All-purpose flour gives the donuts their structure, while granulated sugar helps them stay sweet and soft. - 1 teaspoon baking powder - 1 teaspoon baking soda - 1 teaspoon ground cinnamon - ½ teaspoon ground nutmeg - ½ teaspoon salt Baking powder and baking soda provide the rise. Ground cinnamon and nutmeg add warmth and spice, making each bite cozy. Salt enhances all the flavors, making them shine. - 2 large eggs - ½ cup buttermilk - 4 tablespoons unsalted butter, melted - 1 cup granulated sugar (for coating) - 3 tablespoons ground cinnamon (for coating) Eggs bind the mixture together, while buttermilk adds moisture and a slight tang. Melted butter keeps the donuts rich and flavorful. The coating of sugar and cinnamon creates a delightful crunch on the outside, making each bite irresistible. 1. Pour the apple cider into a small saucepan. 2. Bring the cider to a gentle boil over medium-high heat. 3. Once boiling, reduce the heat to low. 4. Let it simmer until the cider reduces to about ¾ cup. This usually takes 15-20 minutes. 5. Remove the saucepan from heat and let it cool slightly. 1. Preheat your oven to 375°F (190°C). 2. While the oven heats up, grease the donut pan well. 3. Use cooking spray or softened butter for easy release. 1. In a large mixing bowl, combine the following: - 2 cups all-purpose flour - 1 cup granulated sugar - 1 teaspoon baking powder - 1 teaspoon baking soda - 1 teaspoon ground cinnamon - ½ teaspoon ground nutmeg - ½ teaspoon salt 2. Whisk together until evenly mixed. 1. In a medium bowl, crack two large eggs and beat them lightly. 2. Add ½ cup buttermilk and 4 tablespoons melted unsalted butter. 3. Mix in the slightly cooled reduced apple cider. 4. Stir until the mixture is smooth and well combined. 1. Carefully pour the wet mixture into the bowl with the dry ingredients. 2. Gently stir the two mixtures together until just combined. 3. It’s fine if there are a few lumps in the batter. 1. Using a piping bag or a spoon, fill each cavity of the donut pan. 2. Fill them about ¾ full to allow for rising. 3. Place the donut pan in the preheated oven. 4. Bake for 10-12 minutes. 5. The donuts should be lightly golden. Test with a toothpick; it should come out clean. To get the best apple cider donuts, avoid overmixing the batter. Mix just until combined. This keeps your donuts tender and fluffy. Also, remember that a correct oven temperature is key. If your oven is too hot or too cold, it can ruin your donuts. Make sure to preheat to 375°F (190°C) for the best results. After baking, let the donuts cool for about five minutes in the pan. This step is important. If you coat them too soon, they may fall apart. For coating, mix granulated sugar and ground cinnamon in a shallow bowl. Roll each donut in this mix while they are still warm. This helps the sugar stick evenly. For a lovely display, arrange the donuts on a rustic wooden board. Dust them with powdered sugar to make them look fancy. You can also add thinly sliced fresh apples around them. This not only looks nice but adds a fresh touch. Place a small bowl of extra cinnamon sugar nearby for dipping, which makes serving even more fun! {{image_4}} You can make your apple cider donuts even more exciting by adding flavors. Consider adding extra spices like cloves or ginger. These spices give warmth and depth to each bite. You can also mix in fruits like raisins or chopped apples. These additions make your donuts unique and add natural sweetness. Plus, they boost the texture, giving you a delightful surprise in every bite. If you want a healthier donut, swap in whole wheat flour. This change gives you more fiber and nutrients. You can also reduce the sugar in the recipe. Using sugar substitutes like honey or maple syrup can work well, too. These options let you enjoy your favorite treat while keeping health in mind. For those avoiding gluten, you can use gluten-free flour alternatives. Almond flour or a store-bought gluten-free mix can work great. Just remember to adjust the moisture. Sometimes, you may need to add a bit more liquid. These changes help keep the texture light and fluffy, just like traditional donuts. Enjoy experimenting with these variations to find your perfect apple cider donut! To keep your apple cider donuts fresh, use airtight containers. This helps trap moisture and flavor. Store the donuts at room temperature for up to three days. If you want to keep them longer, place them in the fridge. Donuts stored in the fridge can last up to a week. Just note that refrigeration may change their texture a bit. You can freeze apple cider donuts for later enjoyment. First, let the donuts cool completely. Then, wrap each one in plastic wrap. Place the wrapped donuts in a freezer-safe bag. This method helps prevent freezer burn. You can freeze them for up to three months. When you're ready to enjoy them, remove a donut from the freezer. Let it thaw at room temperature for about 30 minutes. For a warm treat, reheat them in the oven. Preheat the oven to 350°F (175°C) and bake for about 5-7 minutes. This will bring back their lovely texture and taste. Enjoy your delicious apple cider donuts any time! Apple cider donuts taste best fresh. They last about 2 to 3 days at room temperature. Store them in an airtight container. This keeps them soft and tasty. If you want them to last longer, you can refrigerate them. They will stay good for about a week in the fridge. However, they may lose some of their fluffiness. Yes, you can make these donuts ahead of time! Bake them and let them cool completely. Then, place them in an airtight container. You can store them at room temperature for up to 3 days. If you want to keep them longer, freeze them. Wrap each donut in plastic wrap and put them in a freezer bag. They will last for about 2 months in the freezer. Just thaw and reheat before serving. Apple cider donuts are great on their own, but you can jazz them up! Here are some tasty ideas: - Caramel sauce for a sweet dip - Maple syrup for a classic touch - Cream cheese frosting for a rich flavor - Whipped cream for a light twist - Extra cinnamon sugar for a fun coating These options add flavor and fun to your apple cider donuts. You learned how to make delicious apple cider donuts. First, gather essential ingredients like apple cider, flour, and sugar. Then, follow simple steps to mix and bake. Remember, avoid overmixing for the best texture. Try fun variations or healthier swaps to suit your taste. Store your donuts properly to keep them fresh. Enjoy your treat with great toppings or dips. With these steps, you can impress friends and family. Make some today and savor the joy of fresh homemade donuts!

Apple Cider Donuts with Cinnamon Sugar Delight

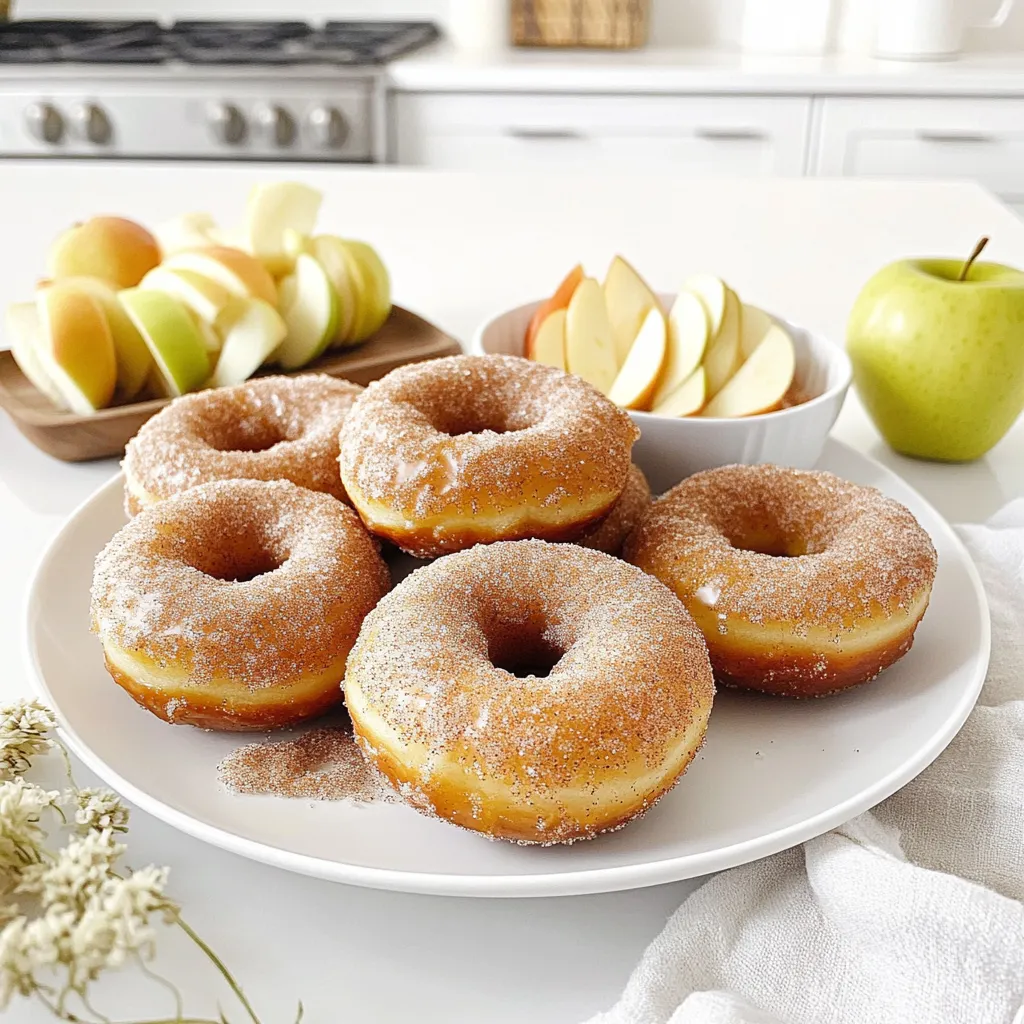
Delight your taste buds with homemade apple cider donuts rolled in cinnamon sugar! In this blog post, I’ll share step-by-step

- 4 cups fresh broccoli florets - 1 medium onion, diced - 2 cloves garlic, minced - 1 medium potato, peeled and diced - 4 cups vegetable broth - 1 cup milk (or your choice of plant-based milk) - 2 tablespoons olive oil - 1 teaspoon thyme (dried or fresh) - 2 cups shredded sharp cheddar cheese - Salt and pepper to taste - Optional: Croutons and fresh chives, finely chopped, for garnish Gather these fresh ingredients to make a warm bowl of broccoli cheddar soup. The broccoli florets bring color and nutrition. The onion and garlic add depth to the flavor. The potato helps create a creamy texture. Use vegetable broth for a rich base. You can choose either milk or a plant-based milk for creaminess. Sharp cheddar cheese is key for that classic taste. Olive oil adds richness, while thyme gives a hint of earthiness. Don't forget salt and pepper to enhance all the flavors. If you like, top your soup with croutons and chives for a fun crunch and fresh touch. These ingredients work together to create a simple and flavorful dish that warms the heart. 1. Start by heating the olive oil in a large pot over medium heat. You want the oil to shimmer. 2. Add the diced onion to the pot. Sauté for about 5 minutes. The onion should become soft and translucent. 3. Stir in the minced garlic and thyme. Cook for one more minute. This step releases great flavor. 1. Add the diced potato and broccoli florets to the pot. Pour in the vegetable broth. Increase the heat to a rolling boil. 2. Once boiling, reduce the heat to low. Cover the pot and let it simmer for 15-20 minutes. The potatoes and broccoli should become tender. 1. Remove the pot from heat. Use an immersion blender to blend the soup until smooth and velvety. 2. If you don’t have one, carefully transfer the soup into a standard blender. Hot liquids can splatter, so be cautious. 3. Return the blended soup to the stove over low heat. Stir in the milk and shredded cheddar cheese. Mix until the cheese has melted. 4. Season the soup with salt and pepper to taste. If it feels too thick, add a little more milk until you like the creaminess. 5. Serve the soup hot. Garnish with croutons and finely chopped chives for a nice touch. To make the best broccoli cheddar soup, start with cheese. Use sharp cheddar for rich flavor. It melts well and gives a nice texture. Avoid mild cheese, as it may not have enough taste. When blending, use an immersion blender for ease. It lets you mix the soup right in the pot. If using a standard blender, blend in small batches. Be careful with hot liquids to prevent splatter. You can enhance the flavor by adding herbs. A pinch of nutmeg pairs well with the cheese. Try adding crushed red pepper for a little heat. Fresh herbs like parsley or basil can also brighten the soup. If you want to swap ingredients, consider using sweet potatoes instead of regular ones. They add a hint of sweetness. You can even use a different cheese, like gouda, for a unique taste. For serving, a crusty bread pairs nicely with the soup. You could also serve it with a fresh salad for crunch. For presentation, use deep bowls to showcase the vibrant color of the soup. Top each bowl with croutons and finely chopped chives. A drizzle of olive oil adds a nice touch, making it look gourmet. Enjoy your meal with friends and family for a cozy experience! {{image_4}} You can change the cheese in this soup for a new taste. If you want a twist, use gouda or fontina. They melt well and add a unique flavor. For a sharper taste, try aged cheddar. If you need a dairy-free option, there are vegan cheeses available. Look for brands that mimic cheddar. Nutritional yeast is another great choice. It adds a cheesy flavor without dairy. Want to make your soup heartier? Consider adding protein. Cooked chicken or shredded rotisserie chicken works well. If you prefer plant-based options, add canned beans like white beans or chickpeas. You can also throw in extra veggies. Carrots or peas blend nicely with broccoli. Adding spinach or kale boosts the nutrients too. Just chop them small and toss them in the pot. To cut calories, reduce the cheese and cream. You can use half the cheese for a lighter version. Swap out whole milk for almond or oat milk. This keeps the soup creamy without the extra calories. Another option is to use a broth-based approach. Instead of adding lots of cream, use more vegetable broth. This keeps the flavor strong while making it lighter. Enjoy your healthy version without losing taste! To keep your Broccoli Cheddar Soup fresh, follow these tips: - Refrigeration tips: Let the soup cool to room temperature. Transfer it to an airtight container. Store it in the fridge for up to 3-4 days. Make sure to label the container with the date. - Freezing guidelines: For longer storage, freeze the soup. Use freezer-safe containers or bags. It can last up to 3 months in the freezer. Make sure to leave some space for expansion. When you're ready to enjoy your soup again, here’s how to warm it up: - Best methods for warming up: The stovetop is ideal for reheating. Place the soup in a pot over low heat. Stir it often to ensure even warming. You can also use a microwave. Heat in short bursts, stirring in between. - Avoiding separation or curdling: To prevent the cheese from separating, add a splash of milk while reheating. This keeps the soup creamy and smooth. Knowing how long your soup lasts is key: - How long it stays fresh: In the fridge, the soup stays fresh for about 3-4 days. If frozen, it can last up to 3 months. - Signs of spoilage: Check for off smells or mold. If the soup looks or smells bad, it’s best to toss it. Always trust your senses when it comes to food safety. Yes, you can make this soup ahead of time. To prepare in advance, follow these steps: - Cook the soup as directed and let it cool. - Store it in an airtight container. - Keep it in the fridge for up to three days. - Reheat it on the stove over low heat, stirring often. Making it ahead of time helps the flavors meld together. If you want to serve it later, just reheat and adjust the seasoning. Yes, this broccoli cheddar soup is gluten-free. Here’s what to consider: - Use gluten-free vegetable broth. - Ensure that the cheese does not contain any gluten. - Check labels on packaged ingredients for gluten sources. By choosing the right ingredients, you can enjoy this creamy dish without the gluten. If your soup is too thin, there are easy ways to thicken it: - Add more diced potatoes while cooking. - Blend in a bit of cooked broccoli for extra texture. - Stir in cornstarch mixed with cold water. - Use a bit of heavy cream or more cheese. These tips will help you achieve your desired consistency and make your soup even more satisfying. This blog post covers everything you need for a delicious broccoli cheddar soup. We explored the key ingredients, like fresh veggies and flavorful cheese. You learned step-by-step instructions for perfecting the soup and tips to enhance its taste. We also discussed fun variations and how to store leftovers properly. Enjoy making this soup with your own spin! It’s easy to prepare, tasty, and satisfying. Share your own tips and variations, and enjoy a warm bowl of comfort food!

Broccoli Cheddar Soup One Pot Simple and Flavorful Dish

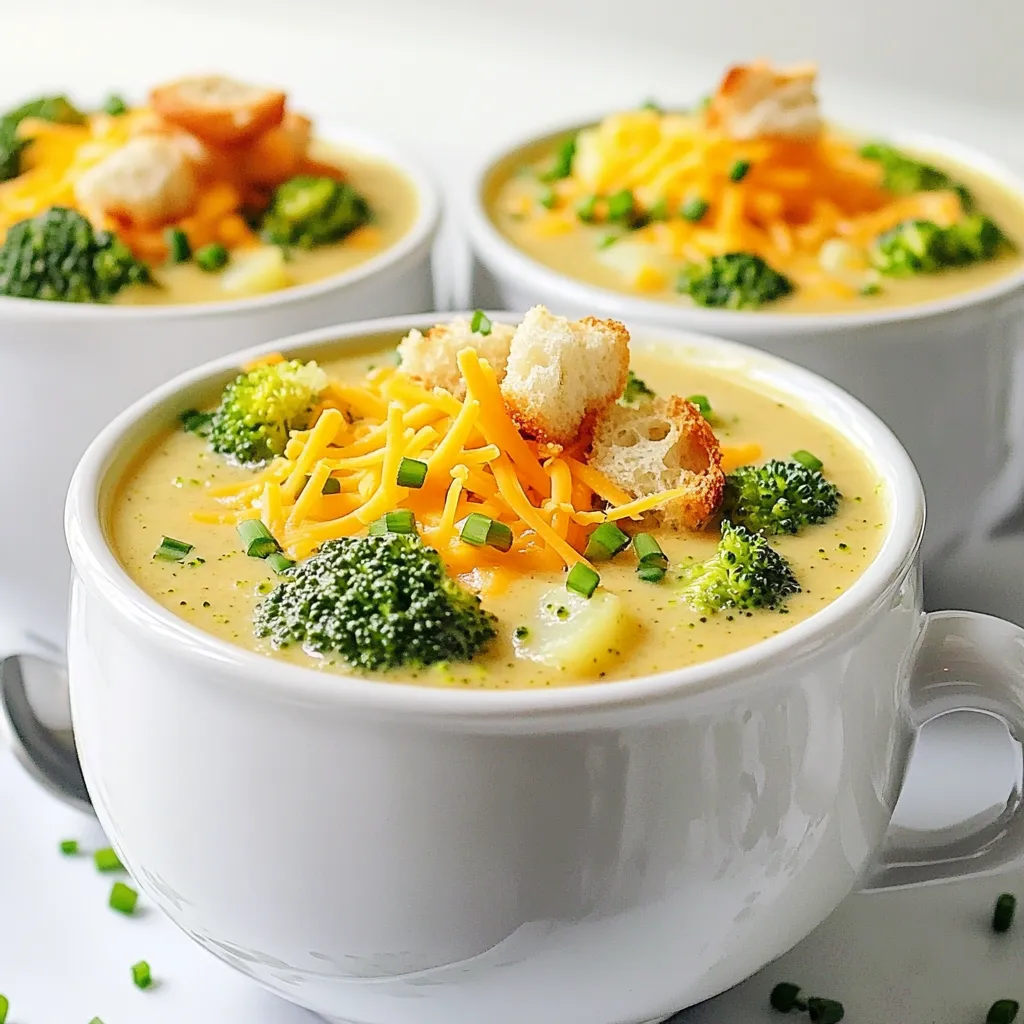
If you crave a warm, creamy bowl of comfort, this one-pot broccoli cheddar soup is for you! It combines fresh

- 1 cup unsalted butter, softened to room temperature - 1/2 cup powdered sugar, plus extra for rolling - 1 tablespoon lemon zest (from approximately 1 large lemon) - 1 tablespoon fresh lemon juice - 2 cups all-purpose flour - 1/2 cup cornstarch - 1/4 teaspoon fine sea salt - 1/2 cup finely chopped nuts (such as pecans or walnuts) When measuring butter, make sure it is soft. This helps it mix well. Use a dry measuring cup for flour and cornstarch. Spoon these ingredients into the cup and level them off. For lemon zest, use a fine grater to get just the yellow part of the peel. This gives the cookies a fresh taste. If you want to switch things up, you can use margarine for butter. If you need a nut-free option, you can leave out the nuts entirely. For a gluten-free version, use gluten-free all-purpose flour. You can also try orange zest instead of lemon for a different twist. {{ingredient_image_2}} To start, you need to preheat your oven to 350°F (175°C). This step is key for even baking. Next, line a baking sheet with parchment paper. This makes sure your cookies do not stick. In a large mixing bowl, combine 1 cup of softened unsalted butter and 1/2 cup of powdered sugar. Use a hand mixer or stand mixer to cream them together. Mix until the batter is light and fluffy, which should take about 3 minutes. This step is crucial for a nice texture. Now, add 1 tablespoon of lemon zest and 1 tablespoon of fresh lemon juice to the butter mix. Stir until fully mixed. This adds a bright, fresh flavor to your cookies. In another bowl, whisk together 2 cups of all-purpose flour, 1/2 cup of cornstarch, and 1/4 teaspoon of fine sea salt. This helps to combine the dry ingredients fully. Gradually mix this dry blend into the butter mix. Be gentle and stop mixing once just combined. Overmixing can change the texture. Finally, fold in 1/2 cup of finely chopped nuts. Pecans or walnuts work great here. This adds crunch and flavor to the cookies. Next, use a tablespoon or cookie scoop to form the dough into balls. Aim for about 1 inch in diameter. Place these dough balls on the prepared baking sheet. Make sure to space them about 2 inches apart to give them room to spread. Now it's time to bake! Place the baking sheet in your preheated oven. Bake the cookies for 12-15 minutes. The edges should be lightly golden while the centers stay soft. Once they are done, take them out of the oven and let them cool on the baking sheet for about 5 minutes. This helps them set before moving them. While the cookies are warm, roll each one in powdered sugar. This gives them that classic snowball look. Make sure they are coated completely. Next, transfer the cookies to a wire rack to cool fully. For an extra sweet touch, you can roll them in powdered sugar again after they cool. This makes them look even more like snowballs. For a fun presentation, arrange the cookies in a decorative tin or on a lovely plate. A light dusting of powdered sugar on top gives a snowy effect. Adding lemon slices or edible flowers can make your display even prettier! To get that soft, melt-in-your-mouth feel, follow these steps: - Use room temperature butter. Cold butter won’t mix well and can cause lumps. - Cream the butter and sugar until fluffy. This step adds air, which helps the cookies rise. - Don’t overmix the dough after adding flour. Mix until just combined for a tender cookie. - Use cornstarch along with flour. This helps create a light texture. Here are some pitfalls to watch out for: - Skipping the chilling time can lead to cookies that spread too much. - Not measuring flour correctly can make the dough too dry. Always spoon and level your flour. - Forgetting to roll cookies in powdered sugar while warm. This helps the sugar stick better. - Overbaking is a no-go. Take them out when the edges are golden but the center is soft. Using the right tools makes baking easier: - A stand mixer or hand mixer helps cream butter and sugar well. - Parchment paper prevents sticking and makes cleanup easy. - A cookie scoop ensures uniform dough portions for even baking. - Invest in a good cookie sheet for best results. A light-colored sheet helps cookies bake evenly. Pro Tips Room Temperature Butter: Make sure your butter is fully softened to room temperature for the best creaming results, which helps create a light and fluffy cookie texture. Fresh Ingredients: Use freshly grated lemon zest and juice for maximum flavor. The freshness will enhance the citrus notes in your cookies. Don’t Overmix: When combining the flour mixture with the butter mixture, mix just until combined to avoid tough cookies. The dough should be slightly crumbly yet hold together. Double Coating: For an extra snowy appearance, roll the cookies in powdered sugar twice—once while warm and again after cooling. This gives them a beautiful finish! {{image_4}} You can brighten up your Lemon Cream Snowball Cookies with other flavors. Try adding a hint of orange zest for a citrus twist. Almond extract adds warmth and sweetness. If you love coconut, mix in sweetened shredded coconut for a tropical vibe. Experimenting with flavors can lead to fun surprises. Nuts add crunch and texture to these cookies. While pecans and walnuts are classic, you can use other nuts too. Try almonds for a light flavor or hazelnuts for a rich taste. If you want something different, go for pistachios. Each nut brings its own character to the cookies. Making gluten-free Lemon Cream Snowball Cookies is easy. Replace all-purpose flour with gluten-free flour blends. Ensure your cornstarch is also gluten-free, which most brands are. To enhance the flavor, add a bit of almond flour. This keeps the cookies soft and delicious without gluten. Enjoy them guilt-free! To keep Lemon Cream Snowball Cookies fresh, store them in an airtight container. This will prevent them from drying out. Place parchment paper between layers to avoid sticking. You can store them at room temperature for up to a week. If your home is warm, consider refrigerating them to maintain their texture. Freezing these cookies is easy! Allow them to cool completely first. Then, place them in a single layer on a baking sheet. Freeze for about an hour. Once frozen, transfer the cookies to a freezer-safe bag or container. They can stay in the freezer for up to three months. When you are ready to enjoy, just thaw them at room temperature. Lemon Cream Snowball Cookies last about one week at room temperature. If they start to feel hard or dry, they are no longer fresh. Look for any unusual smells or mold, which are clear signs of spoilage. Always trust your senses; if something seems off, it’s best to discard the cookies. Yes, you can freeze Lemon Cream Snowball Cookies. To freeze them, first cool the cookies completely. Then, place them in an airtight container or a freezer bag. Make sure to separate layers with parchment paper to avoid sticking. You can keep them in the freezer for up to three months. To eat, just thaw them in the fridge or at room temperature. To make the cookies softer, reduce the baking time by a minute or two. This keeps the centers chewy. You can also add a little more butter, which adds moisture. For crunchier cookies, bake them longer. You can even use a bit less cornstarch. This will make the cookies firmer and crispier. You can use similar ingredients to make other tasty treats. For example, try using lemon zest and juice in lemon bars or cakes. The butter and flour can create a rich shortbread. If you enjoy nuts, add them to brownies or granola bars. Each recipe lets you play with flavors and textures! This blog post covered the key ingredients, steps, and tips needed for baking Lemon Cream Snowball Cookies. I shared how to prep the dough, bake the cookies, and add finishing touches. You learned about ingredient swaps, variations for flavors, and storage options. Remember, great cookies come from careful measuring and avoiding common mistakes. With these tips, you’ll bake cookies that impress. Enjoy the process and share your delicious results!

Lemon Cream Snowball Cookies Delightfully Simple Treat

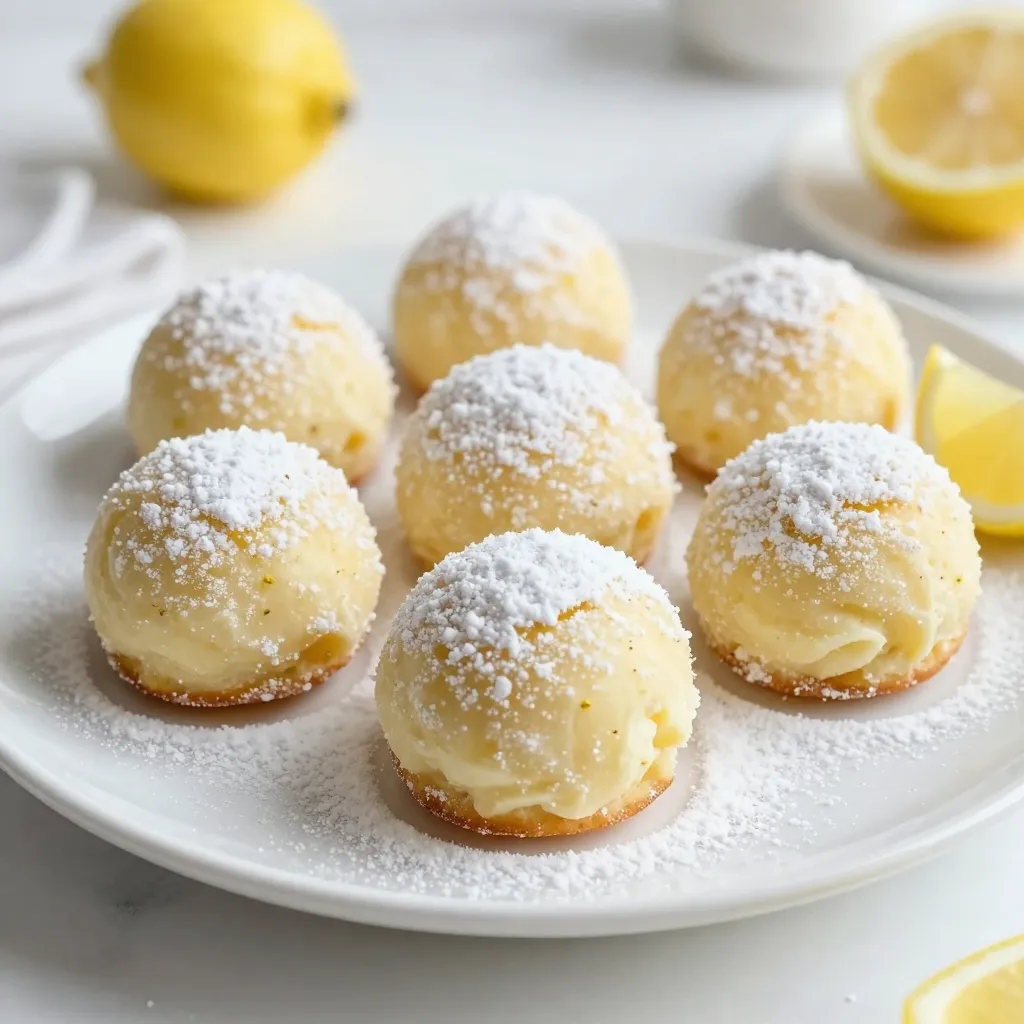
If you’re looking for a simple, yet scrumptious treat, you’ve come to the right place! Lemon Cream Snowball Cookies are

- 1 lb boneless chicken thighs - 1 can coconut milk - 2 tablespoons red curry paste - Onion - Garlic - Fresh ginger - Red bell pepper - Fresh spinach - Soy sauce and lime juice The main ingredients set the stage for a delightful dish. Boneless chicken thighs bring richness to the curry. They cook well and stay juicy, making each bite tender. Coconut milk adds creaminess and a hint of sweetness. It balances the spice of the red curry paste, which provides depth and warmth. Aromatics like onion, garlic, and fresh ginger create a fragrant base. Start by sautéing the onion until soft. Then, add minced garlic and grated ginger. This mix fills your kitchen with inviting scents. The vegetables and seasoning give the dish color and flavor. Red bell pepper adds crunch and sweetness, while fresh spinach offers a vibrant green touch. The soy sauce and lime juice bring a savory and tangy kick, enhancing the overall taste. Together, these ingredients create a simple yet flavorful dish. You can easily adapt them to suit your taste. Whether you want more spice or prefer a milder flavor, this recipe is flexible. Enjoy making your coconut chicken curry just the way you like it! {{ingredient_image_2}} 1. Heat 2 tablespoons of vegetable oil in a large skillet over medium heat. 2. Add 1 medium onion, finely chopped. Sauté for about 5 minutes. The onion should be soft and clear. 3. Next, stir in 3 minced garlic cloves and 1 tablespoon of freshly grated ginger. Cook for 1 minute until the smell is strong. 4. Add 1 pound of cubed boneless chicken thighs to the skillet. Cook for 6-7 minutes. The chicken should be browned and no longer pink. 1. Mix in 2 tablespoons of red curry paste. Make sure the chicken is coated well. Cook for 2 more minutes to blend the flavors. 2. Slowly pour in 1 can of coconut milk. Stir to mix everything together. Bring it to a gentle simmer. 1. Add 1 sliced red bell pepper. Cook for 5-7 minutes. The bell pepper should be soft but still crunchy. 2. Gently fold in 1 cup of fresh spinach leaves. Cook until they wilt, about 2 minutes. 3. Drizzle in 1 tablespoon of soy sauce and 1 tablespoon of lime juice. Season with salt and pepper to taste. 4. Serve your coconut chicken curry warm over jasmine rice or quinoa. Garnish with fresh cilantro leaves for a bright touch. - Ensure chicken is well-browned: Browning the chicken adds depth and flavor. Cook it for about 6-7 minutes. Stir often to avoid burning. - Simmer for flavor development: After adding the coconut milk, let it simmer gently. This helps all the flavors blend well together. - Using fresh cilantro for garnish: Sprinkle chopped cilantro on top for a pop of color. It also adds a fresh taste to the dish. - Serving suggestions with lime wedges: Place lime wedges on the side. A squeeze of lime brightens up the curry. - Overcooking spinach: Add spinach at the end. Cook just until it wilts, keeping its vibrant green color. - Not balancing flavors with lime and soy sauce: Taste the curry before serving. Adjust with lime juice and soy sauce for the best flavor. Pro Tips Use Fresh Ingredients: Fresh chicken and vegetables enhance the flavor and texture of your curry, making it more vibrant and enjoyable. Adjust Spice Levels: Feel free to modify the amount of red curry paste to suit your spice tolerance; start with less and add more if you prefer it spicier. Experiment with Vegetables: This curry is versatile; you can add other vegetables like zucchini, carrots, or snap peas for added nutrition and color. Let It Simmer: Allow the curry to simmer longer for deeper flavors; just be cautious not to overcook the chicken, keeping it tender. {{image_4}} You can make this coconut chicken curry vegetarian. Just swap the chicken for tofu. Use firm tofu and cut it into cubes. Sauté it until golden and add it to the curry. This keeps the dish rich and creamy. For a spicy kick, add fresh chili peppers. Slice them thin and throw them in when cooking the onions. This gives the curry a nice heat. Adjust the amount to match your taste. Get creative with other veggies! Zucchini and carrots are great choices. Just chop them up and add them with the bell peppers. They add color and texture to the dish. You can also try different types of curry paste. Green or yellow curry paste works well too. Each type brings its own flavor. Experiment to find your favorite! Serve this curry with naan or rice. Jasmine rice works best, but quinoa is a tasty option too. Both soak up the sauce nicely. To enhance the meal, add side dishes like a simple salad or roasted veggies. A light cucumber salad can cool off the spice. These sides make your dinner even more satisfying. Store your leftover Easy Coconut Chicken Curry in an airtight container. This keeps it fresh for up to four days. Ensure the curry cools down before sealing it. This helps prevent condensation inside the container, which can lead to soggy curry. To freeze coconut chicken curry, first allow it to cool completely. Then, transfer it to a freezer-safe bag or container. Press out as much air as possible. Label the bag with the date. You can freeze it for up to three months. When ready to eat, thaw it overnight in the fridge. When reheating, do it gently. Pour the curry into a pot over low heat. Stir often to avoid sticking. If the curry looks thick, add a splash of coconut milk or water. This keeps the texture creamy and delicious. You can also reheat it in the microwave. Use a microwave-safe bowl and cover it loosely. Heat in short bursts to maintain the flavor. The spice level in this Easy Coconut Chicken Curry depends on your taste. The red curry paste adds heat, but you can adjust it. If you like it mild, use less curry paste. If you want it spicy, add a bit more. You can also add fresh chili peppers for extra heat. Always taste as you go. This way, you can find the perfect balance for your dish. Yes, you can use frozen chicken thighs for this recipe. Just remember to thaw them first. You can leave them in the fridge overnight. If you need to cook them straight from frozen, it will take longer to cook. Make sure the chicken is fully cooked before serving. Use a meat thermometer to check. The internal temperature should reach 165°F (75°C). This coconut chicken curry pairs well with several sides. I recommend serving it over fluffy jasmine rice or quinoa. Both soak up the rich sauce nicely. You can also add a side of steamed veggies or a fresh salad. For a fun twist, serve with warm naan bread. A wedge of lime on the side adds a zesty touch. This blog post covered how to make an Easy Coconut Chicken Curry. We discussed the ingredients, including chicken, coconut milk, and spices. I shared step-by-step instructions for perfect preparation and cooking. We also explored tips to avoid common mistakes and ways to adjust flavors. Finally, I provided storage information and answered common questions. Now, you have all the tools to create a delicious meal. Enjoy your cooking journey!

Easy Coconut Chicken Curry Flavorful and Simple Dish

Are you ready to whip up a delicious dish that’s both simple and tasty? In this blog post, I’ll guide

To make the perfect Pumpkin Spice Chocolate Chip Cookie Skillet, you'll need some key ingredients that create a delightful blend of flavors. Here’s what you will need: - 1 cup pumpkin puree - 1/2 cup unsalted butter, softened to room temperature - 1 cup brown sugar, tightly packed - 1/2 cup granulated sugar - 1 large egg - 1 teaspoon pure vanilla extract - 2 cups all-purpose flour - 1 teaspoon baking soda - 1 teaspoon baking powder - 1 teaspoon pumpkin pie spice - 1/2 teaspoon sea salt - 1 cup semi-sweet chocolate chips - 1/2 cup chopped pecans (optional) Each ingredient plays a role in creating a rich, warm, and comforting cookie. The pumpkin puree adds moisture and flavor, while the butter provides richness. Brown and granulated sugars sweeten the dough, giving it a lovely caramel note. The egg helps bind everything together, ensuring your cookie skillet holds its shape. Using all-purpose flour gives the cookie structure, while baking soda and baking powder help it rise. Pumpkin pie spice brings that signature fall flavor, and sea salt enhances all the tastes. The semi-sweet chocolate chips bring sweetness and texture, and if you choose to add pecans, they give a nice crunch. Gather these ingredients to start your baking adventure. You’ll soon enjoy a warm and gooey treat that smells like autumn! 1. First, preheat your oven to 350°F (175°C). This helps the cookie bake evenly. 2. In a large bowl, mix 1 cup of softened butter, 1 cup of brown sugar, and 1/2 cup of granulated sugar. Beat until light and fluffy. 3. Next, add 1 cup of pumpkin puree, 1 large egg, and 1 teaspoon of pure vanilla extract. Mix until smooth and well combined. 4. In another bowl, sift together 2 cups of all-purpose flour, 1 teaspoon of baking soda, 1 teaspoon of baking powder, 1 teaspoon of pumpkin pie spice, and 1/2 teaspoon of sea salt. 5. Slowly add the dry mix to the wet mix. Stir gently until just combined. Be careful not to overmix. 6. Finally, fold in 1 cup of semi-sweet chocolate chips and 1/2 cup of chopped pecans if you like. Make sure they are evenly distributed. 1. Now, transfer the cookie dough into a greased 10-inch cast iron skillet. Spread it evenly across the bottom. 2. Bake in your preheated oven for 25-30 minutes. Check doneness by inserting a toothpick in the center. It should come out clean. 1. Once done, take the skillet out of the oven. Let the cookie cool for about 10 minutes. This makes slicing easier. 2. Serve warm for the best taste. For a special treat, add a scoop of vanilla ice cream and drizzle with caramel sauce. You can also sprinkle extra pumpkin pie spice on top for a nice touch. - Ensuring a fluffy texture: Start with soft butter. Mixing it well with sugars helps create air pockets. This makes the cookie light and fluffy. Also, ensure you mix until just combined. - Avoiding overmixing: Mix wet and dry ingredients gently. Overmixing makes the cookie tough. Stop when you see no flour. The dough should look a little lumpy. - Serving suggestions: Serve your warm cookie with a scoop of vanilla ice cream. Drizzle rich caramel sauce on top for extra flavor. This adds creaminess and sweetness. - Garnishing ideas: Sprinkle some pumpkin pie spice over the top. This not only looks nice but also enhances the flavor. A few chocolate chips can add a nice touch, too. - Adding different types of chocolate: Try using dark chocolate chips. They balance the sweetness well. You can also mix in white chocolate for a fun twist. - Alternative mix-ins: Consider adding chopped nuts like walnuts or almonds. Dried fruit like cranberries can add a tart flavor. These options make your cookie even more exciting. {{image_4}} You can change the flavor of your skillet cookie in fun ways. One great option is to use Nutella. Just swirl it into the dough before baking. This adds a rich, chocolatey twist that everyone will love. Another option is to create an Autumn Spice Cookie Skillet. You can swap out the pumpkin pie spice for other spices like cinnamon, nutmeg, or ginger. These spices add warmth and depth, perfect for fall. If you need gluten-free options, use almond flour or a gluten-free flour blend. This will keep the texture nice and soft. Just make sure to check if your baking soda and powder are gluten-free. For vegan adaptations, replace the egg with a flax egg or applesauce. Use coconut oil instead of butter. You can also swap the chocolate chips for dairy-free ones. These changes make the cookie tasty and friendly for all diets. You might want to serve fewer or more people. To make a smaller portion, you can cut the recipe in half. This works well if you want a treat for yourself or a small group. If you need a larger batch, simply double the ingredients. Just remember to use a bigger skillet or bake in two skillets. This way, you can share this deliciousness with everyone! To keep your cookie skillet fresh, follow these easy steps. First, let the skillet cool completely. Once cool, cover it tightly with plastic wrap or aluminum foil. You can also transfer slices to an airtight container. Store the skillet in the fridge if you plan to eat it within a week. If you want to save it longer, freezing is a great option. Cut the cooled cookie into slices. Wrap each slice in plastic wrap. Then place the wrapped slices in a freezer-safe bag. This way, they stay fresh for up to three months. Reheating your cookie skillet properly is key to keeping its yummy texture. For the best results, use an oven. Preheat the oven to 350°F (175°C). Place the skillet in the oven for about 10 minutes. This warms it through and keeps it soft. If you choose to use a microwave, do so carefully. Place a slice on a microwave-safe plate. Heat it for about 15-20 seconds. Check if it’s warm enough. If not, heat in small bursts to avoid making it tough. For optimal freshness, store the cookie skillet correctly. When kept in the fridge, it lasts about 5 to 7 days. If frozen, aim to eat it within three months for the best taste. After that, it may lose its flavor and texture. Enjoy your pumpkin spice chocolate chip cookie skillet while it’s at its best! Yes, you can use fresh pumpkin. Just cook it down and puree it. Make sure it is smooth and not too watery. Canned pumpkin is easier, but fresh adds a nice touch. Check the edges of your cookie. They should be golden brown. Insert a toothpick into the center. If it comes out clean, your cookie is ready. Yes, you can prepare the dough ahead. Store it in the fridge for up to 24 hours. Just let it sit at room temperature for a bit before baking. You can top your skillet cookie with ice cream, whipped cream, or caramel sauce. Chopped nuts, like pecans or walnuts, also add a nice crunch. Absolutely! You can use any oven-safe skillet. Just adjust the baking time if your skillet is larger or smaller. Enjoy getting creative with your cooking tools! In this blog post, we explored a delicious skillet cookie made with simple ingredients like pumpkin puree, butter, and chocolate chips. I walked you through each step, from mixing to baking. I also shared tips to enhance flavor and options for dietary needs. Remember, this recipe is versatile, allowing customization and easy adaptations. As you bake this treat, enjoy the process and the warm aroma filling your kitchen. You’ll create something tasty to share or savor on your own. Happy baking!

Pumpkin Spice Chocolate Chip Cookie Skillet Delight

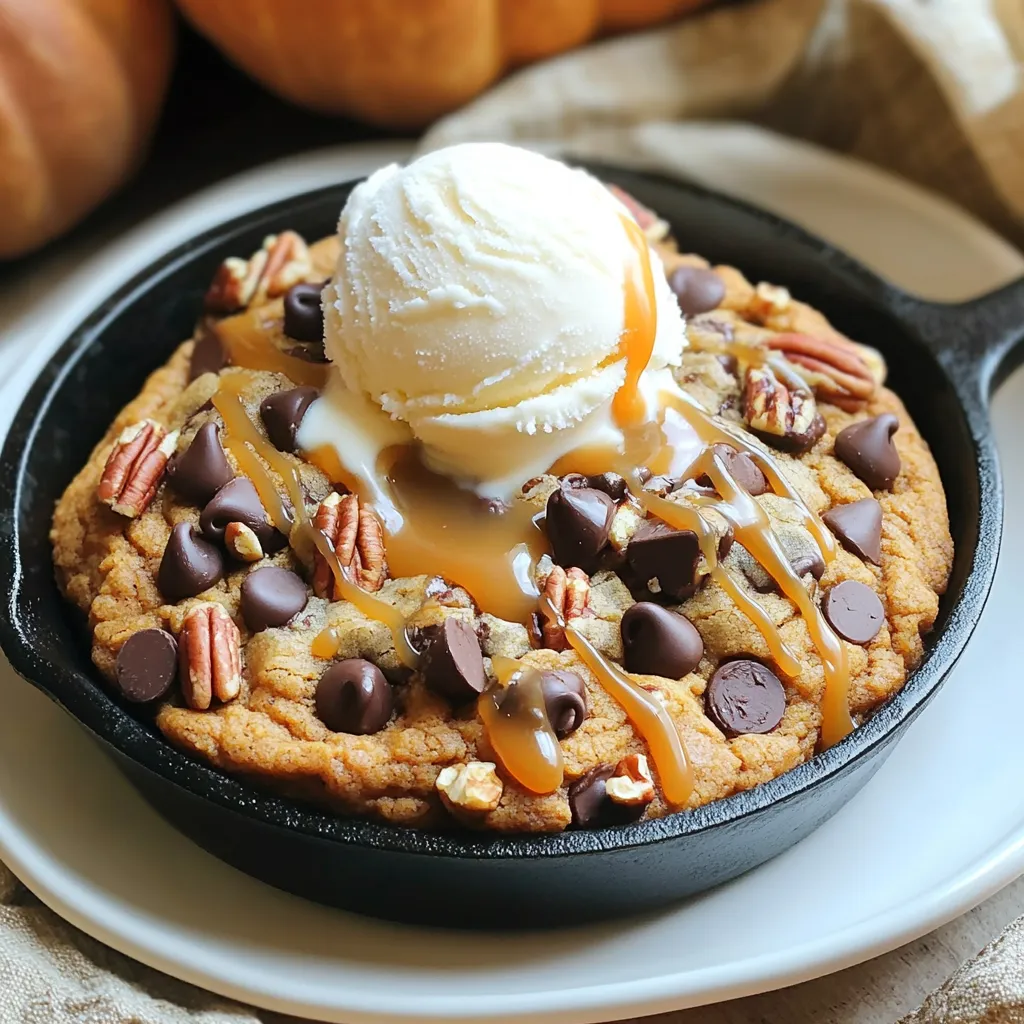
Fall is here, and that means it’s time for warm, cozy treats! Imagine a gooey, Pumpkin Spice Chocolate Chip Cookie

Older posts
Newer posts
← Previous Page1 … Page3 Page4 Page5 … Page86 Next →

dsad

© 2026 lazychefmagic • Built with GeneratePress

Our Policies

  • Copyright Policy
  • Cookie Policy
  • GDPR Policy
  • Privacy Policy
  • Disclaimer
  • Terms Of Use

More Information

  • Home
  • About
  • Contact
  • Appetizers
  • Dessert
  • Dinner
  • Drinks
©2026, lazychefmagic About Back To Top