Skip to content
DisclaimerTerms Of UseGDPR PolicyCookie Policy

lazychefmagic

  • Home
  • Drinks
  • Appetizers
  • Dinner
  • Dessert
  • About
  • Contact
  • Privacy Policy
DisclaimerTerms Of UseGDPR PolicyCookie Policy

NO-ING-IMG

Fresh figs are the star of this jam. You need one pound of ripe figs. Choose figs that are plump and soft but not mushy. The sweetness and texture of fresh figs make the jam special. You will need one cup of granulated sugar. Sugar helps to preserve the jam and adds sweetness. It balances the natural flavor of the figs. Use 1/4 cup of freshly squeezed lemon juice. Lemon juice adds brightness to the jam. It also helps the jam to set and enhances the figs' flavor. For extra flavor, add: - 1 teaspoon pure vanilla extract - 1/2 teaspoon ground cinnamon - 1/4 teaspoon ground nutmeg - A pinch of fine sea salt These spices bring warmth and depth to the jam. They make each bite taste unique and delightful. Mixing these ingredients creates a complex flavor that you will love. This combination makes your French fig jam both simple and rich. For the full recipe, refer to the section above. Enjoy making this delicious treat! Start by rinsing your fresh figs under cold water. This helps remove dirt. Next, gently pat them dry with a paper towel. Remove the stems. Carefully quarter each fig for even cooking. Quartering helps the figs break down nicely in the jam. In a medium-sized saucepan, add your quartered figs. Next, mix in 1 cup of granulated sugar and 1/4 cup of freshly squeezed lemon juice. Add a teaspoon of pure vanilla extract, 1/2 teaspoon of ground cinnamon, 1/4 teaspoon of ground nutmeg, and a pinch of fine sea salt. Gentle stirring makes sure the figs are coated with sugar and spices. This enhances the flavor of your jam. Set the saucepan on medium heat. Cook the mixture for about 10 minutes. This lets the sugar dissolve fully. The figs will start to release their natural juices. Stir occasionally to stop the mixture from sticking to the bottom of the pan. Once the sugar has dissolved, lower the heat. Let it simmer for 30 to 35 minutes, stirring often. You will see the mixture thickening. If you want a smoother jam, use an immersion blender. Blend the mixture to your preferred consistency. If you like chunkier jam, skip this step. Enjoy the delicious whole fig pieces. To check if your jam is ready, place a small spoonful on a plate. Let it cool for a minute. Run your finger through the jam. If it holds its shape and doesn’t run, it’s done. If it seems too runny, simmer for another 5-10 minutes. When the jam reaches the right thickness, take the saucepan off the heat. Carefully ladle the hot jam into sterilized jars. Leave about 1/2 inch of headspace at the top. This allows for expansion while cooling. Once the jars cool to room temperature, seal them tightly. Store in the refrigerator for up to 3 weeks. For longer shelf life, process the jars in a water bath for a vacuum seal. This is a simple approach to making French fig jam. For a full recipe, check the details above! When picking figs, look for ripe ones. They should feel soft but not mushy. The color will vary based on the type. Common types include green and purple figs. Avoid figs with any bruises or blemishes. Fresh figs have the best flavor and texture for your jam. If you can’t find fresh figs, dried figs can work in a pinch. Just soak them in water to rehydrate before using. To get the best jam, watch the cooking time. You want it thick but not too thick. Stir often to prevent sticking. To check the consistency, place a small amount on a plate and cool for a minute. If it holds its shape, you're good. If not, simmer a bit longer. Remember, the jam will thicken more as it cools. French fig jam shines on a cheese board. Pair it with creamy cheeses like brie or goat cheese. It also works well with crusty bread or toast for breakfast. Try it in pastries or as a topping for yogurt. The sweet and savory notes make it versatile. You can also serve it as a glaze for meats, enhancing their flavor. For more ideas, check out the Full Recipe to explore creative pairings! {{image_4}} You can change the sweetener in your fig jam. Instead of granulated sugar, use honey or maple syrup. Honey adds a floral note, while maple syrup gives a warm, earthy flavor. You can also try coconut sugar for a less refined option. Remember, each sweetener may adjust the cooking time slightly. Taste as you go to find the right balance for your taste buds. Infusing your fig jam with different flavors can make it unique. Try adding a sprig of rosemary or thyme while cooking. These herbs add a fresh taste that pairs well with figs. You can also add spices like ginger or cardamom for a warm kick. Don't forget to experiment with citrus zest, like orange or grapefruit, for added brightness. Each infusion can change the whole profile of your jam. If fresh figs are hard to find, use dried figs instead. Simply soak them in warm water for about an hour. This helps them soften and rehydrate. Once ready, chop the figs and follow the same recipe steps. Dried figs will give a deeper, sweeter flavor. Just keep an eye on the sugar amount, as dried figs are sweeter than fresh ones. This method is a great way to enjoy fig jam all year round! Once you make your French fig jam, store it in the fridge. Keep it in a clean, airtight jar. Your jam will stay fresh for up to three weeks. Always use a clean spoon when you scoop some out. This step helps prevent bacteria from getting into the jar. You can freeze fig jam if you want it to last longer. Use freezer-safe containers or jars. Leave some space at the top, as the jam will expand when frozen. Your fig jam can stay in the freezer for up to a year. Just remember to label the jars with the date. When you can fig jam, it can last much longer. If processed correctly, it can last for a year or more in a cool, dark place. Make sure to check the seals on your jars. If a jar is not sealed, it should be stored in the fridge and eaten within three weeks. Enjoy your homemade magic! Homemade French fig jam lasts about three weeks in the fridge. Make sure to store it in a clean, tight jar. If you want it to last longer, you can can it using a water bath. This method keeps the jam fresh for up to a year. Yes, you can use frozen figs! Just thaw them first and drain any extra water. Frozen figs work well but may make the jam a bit thinner. The flavor will still be delicious, so don’t worry if fresh figs aren’t available. Fig jam pairs well with many foods. Here are some great options: - Cheese: Creamy brie or tangy goat cheese - Meats: Prosciutto or roasted chicken - Bread: Crusty baguette or soft biscuits - Desserts: Ice cream or yogurt You can find authentic French fig jam at specialty food stores or online. Look for brands that focus on natural ingredients. Local farmers' markets might also carry homemade versions. Always check the label to ensure you're getting a quality product. If you're curious, try making your own with the Full Recipe! In this blog post, we explored making homemade French fig jam. We covered fresh figs, sugar, lemon juice, and spices for great taste. You learned about preparing figs, cooking them, and getting the right consistency. I shared tips on choosing the best figs and serving ideas, plus different variations for added flavor. Store your jam safely to enjoy later. Now, grab those figs and get started! You will love the taste of your very own fig jam.

French Fig Jam Flavorful and Simple Homemade Recipe

Are you ready to add a burst of flavor to your breakfast table? French fig jam is not just delicious;

- 1 cup grated zucchini - 1/2 cup coconut oil, melted - 1/2 cup packed brown sugar - 1/4 cup pure maple syrup - 2 large eggs, at room temperature - 1 teaspoon pure vanilla extract - 1/2 cup all-purpose flour - 1/2 cup unsweetened cocoa powder - 1/2 teaspoon baking soda - 1/2 teaspoon baking powder - 1/4 teaspoon fine sea salt - 1/2 cup dark chocolate chips The ingredients in these brownies bring out the rich flavors. Grated zucchini is a secret star. It adds moisture and nutrition without changing the taste. Coconut oil gives the brownies a nice texture. Brown sugar and maple syrup add sweetness and depth. The eggs help bind everything together while keeping the brownies soft. - Calories per serving: Each brownie has about 150 calories. This makes them a treat you can enjoy without too much guilt. - Health benefits of zucchini: Zucchini is low in calories but high in vitamins. It has fiber that helps digestion. Plus, it provides potassium, which is good for your heart. - Dietary considerations: To make these brownies gluten-free, swap the all-purpose flour for a gluten-free blend. For a vegan version, use flax eggs or applesauce instead of eggs. These swaps help everyone enjoy this treat. You can find the [Full Recipe] to make your own batch of these delightful brownies. First, preheat your oven to 350°F (175°C). This step is key to baking your brownies evenly. While the oven heats, grab an 8x8 inch baking dish. You can grease it well with coconut oil or line it with parchment paper. Lining helps with easy removal later. In a large bowl, pour in the melted coconut oil, brown sugar, and maple syrup. Mix these well until they blend smoothly. Next, add two large eggs, one at a time. Then, whisk in the pure vanilla extract. Keep mixing until everything looks uniform. Grab another bowl and sift together the all-purpose flour, cocoa powder, baking soda, baking powder, and sea salt. This step helps to break up lumps and mix the dry ingredients well. Once done, combine the dry mix into the wet mixture. Use a spatula and mix gently. Stop mixing when you see no dry flour. Now, it’s time to fold in the grated zucchini and dark chocolate chips. Gently mix until the zucchini and chips are evenly spread. This adds moisture and rich flavor. Next, transfer the batter into your prepared baking dish. Use the spatula to spread it out evenly. For a special touch, sprinkle some extra dark chocolate chips on top. Now you’re ready to bake! Check the [Full Recipe] for more details. To make sure your brownies stay moist, squeeze excess moisture from the zucchini. After grating, place the zucchini in a clean cloth. Twist and squeeze until you remove the liquid. This step is key for a perfect texture. When mixing your batter, avoid overmixing. Mix just until everything is combined. Overmixing can lead to dense brownies. You want them to be light and fluffy, not tough. To check for doneness, use a toothpick. Stick it in the center of the brownies. If it comes out with a few moist crumbs, they are ready. If it has wet batter, bake for a few more minutes. Oven types can vary. If your oven runs hot or cold, adjust the bake time. Keep an eye on your brownies. They might need more or less time based on your oven. Once your brownies cool, cut them into even squares. For a nice touch, dust them with powdered sugar. This adds a sweet and pretty finish. For extra indulgence, serve them warm with a scoop of ice cream. You can also top them with whipped cream. Both options make these brownies a treat that everyone will love. {{image_4}} You can swap some ingredients to make these brownies healthier. - Using applesauce instead of oil: Replace the coconut oil with 1/2 cup of applesauce. This change will cut fat and add moisture. - Alternative sweeteners: You can use honey, agave syrup, or stevia in place of brown sugar or maple syrup. Each option changes the taste a bit, but they all work well. Feel free to get creative with flavors. - Adding nuts or seeds: Chopped walnuts or pecans add a nice crunch. You can also sprinkle sunflower seeds for a nut-free option. - Incorporating spices: A teaspoon of cinnamon or nutmeg gives a warm flavor. These spices add depth and make the brownies even more delicious. If you need to make these brownies nut-free or vegan, I have you covered. - Suggested ingredient replacements: For a vegan version, replace the eggs with flaxseed meal. Mix 1 tablespoon of flaxseed with 2.5 tablespoons of water and let it sit for 5 minutes. Use a nut-free chocolate chip brand to keep it safe for those with nut allergies. Try these variations to suit your taste or dietary needs. They keep the brownies tasty while adding a personal touch. For the complete recipe, check out the [Full Recipe]. To keep your dark chocolate zucchini brownies fresh, store them in an airtight container. You can keep them at room temperature for up to three days. If you want them to last longer, consider placing them in the fridge. This helps maintain their moisture and flavor. Just know that cold storage can change the texture slightly. If you want to save some brownies for later, freezing is a great option. First, let the brownies cool completely. Next, cut them into squares. Wrap each square tightly in plastic wrap. Then, place the wrapped brownies in a freezer bag. Make sure to remove as much air as possible. You can freeze them for up to three months. When you’re ready to enjoy, simply take them out and let them thaw at room temperature. For the best taste, eat them within two days of thawing. This way, you can enjoy that delicious flavor and texture all over again! For the complete recipe, check out the Full Recipe section. Yes, you can use frozen zucchini. First, thaw the zucchini completely. After thawing, squeeze out the excess moisture using a clean cloth or paper towel. This step is key. Too much water can make your brownies soggy. Once you remove the moisture, your frozen zucchini will work great! To check if the brownies are done, use a toothpick. Insert it into the center of the brownies. If it comes out with a few moist crumbs, they are ready. If it comes out with wet batter, bake them a bit longer. Watch for the edges to pull away from the pan; that’s another sign they’re done. Absolutely! These brownies are a hit with kids. They are rich and chocolatey, hiding the zucchini well. Zucchini adds moisture and nutrients without a strong taste. They are also a healthier option than regular brownies. Kids will enjoy the sweetness without knowing they’re eating veggies! Yes, you can make these brownies gluten-free. Simply replace the all-purpose flour with gluten-free flour. You can try almond flour or a gluten-free baking blend. Both will work well in this recipe. Just ensure your other ingredients are gluten-free, too. These brownies combine tasty ingredients like grated zucchini and dark chocolate chips. I shared step-by-step instructions, tips for moist texture, and storage info. You now have options for healthy swaps and flavor additions. Incorporate these ideas to make your baking fun and easy. Enjoy your delicious, healthier treat!

Dark Chocolate Zucchini Brownies Simple and Delicious

Imagine biting into a rich, fudgy brownie that’s both simple and healthy. That’s what these Dark Chocolate Zucchini Brownies offer!

- 1 package (1 lb) puff pastry, thoroughly thawed Puff pastry is the base of our pastries. It puffs up when baked and creates a flaky texture. Make sure it is fully thawed before using. This ensures it rolls out easily and bakes well. - 8 oz cream cheese, softened to room temperature - 1/4 cup granulated sugar - 1 teaspoon pure vanilla extract - 1 cup fresh blueberries, rinsed and drained The cream cheese filling gives our pastries a rich, creamy taste. Softened cream cheese blends well with sugar and vanilla. The blueberries add a burst of flavor and a pop of color. - 1 egg, beaten (for egg wash) - Powdered sugar for elegant dusting The beaten egg acts as an egg wash. It gives the pastries a shiny, golden finish. Dusting with powdered sugar adds a sweet touch before serving. {{ingredient_image_2}} Start by preheating your oven to 400°F (200°C). This step is key for a nice bake. While the oven heats, line a baking sheet with parchment paper. This keeps the pastries from sticking and makes cleanup easy. In a medium bowl, mix 8 oz of softened cream cheese with 1/4 cup of granulated sugar. Add in 1 teaspoon of pure vanilla extract. Use a fork or a hand mixer to blend until smooth. Gently fold in 1 cup of fresh blueberries. Be careful not to mash the berries; we want them whole for bursting flavor. Lightly flour a clean surface. Roll out the thawed puff pastry to about 1/8 inch thick. Cut the pastry into 4x4 inch squares. Take a generous tablespoon of the cream cheese mixture and place it in the center of each square. Don’t overfill, or they may leak. Fold each square diagonally to make a triangle and press the edges to seal them well. For a fun touch, use a fork to crimp the edges. Place the sealed pastries on your prepared baking sheet, leaving space between them. Brush the tops with the beaten egg for a golden finish. Bake them for 15-20 minutes until they puff up and turn a beautiful golden brown. Watch closely in the last few minutes to get that perfect color. After baking, let them cool on the sheet for a few minutes. Dust with powdered sugar before serving for a sweet touch. To get that perfect flakiness in your pastries, keep your ingredients cold. Use very cold butter and water when making the dough. When you roll the puff pastry, do it gently. Don't overwork the dough; this keeps the layers light. Bake your pastries at a high temperature, around 400°F (200°C). This helps them puff up nicely. One common mistake is overfilling the pastries. If you add too much filling, they can leak during baking. Make sure to seal the edges well. Another mistake is not preheating the oven. This can lead to uneven baking. Always check your oven's temperature with an oven thermometer for best results. When you fill your pastries, use a generous tablespoon of the cream cheese mixture. Place it right in the center. Fold the pastry square carefully to form a triangle. Press the edges firmly to seal them. You can use a fork to crimp the edges for a pretty look. This also helps keep the filling inside while baking. Pro Tips Chill the Pastry: For best results, keep the puff pastry chilled until you're ready to roll it out. This helps maintain its flaky texture during baking. Fresh vs. Frozen Blueberries: While fresh blueberries are ideal, you can use frozen ones as well. Just be sure to thaw and drain them to prevent excess moisture in the filling. Experiment with Fillings: Feel free to mix up the filling! Try adding lemon zest or almond extract for a different flavor profile that pairs wonderfully with blueberries. Storage Tips: Store any leftovers in an airtight container at room temperature for up to 2 days, or refrigerate for longer freshness. Reheat briefly in the oven for a crispy texture. {{image_4}} You can swap the blueberries for other fruits. Strawberries, raspberries, or peaches work great. Each fruit adds its own charm and flavor. Just chop them small and mix them in with the cream cheese. Adjust the sugar to balance the fruit's sweetness. This way, you can enjoy different flavors, keeping your pastries fresh and exciting. Want to jazz up your cream cheese? Consider adding some lemon zest or a touch of cinnamon. Lemon zest brings a bright note, while cinnamon adds warmth to the filling. You can even try mixing in some chocolate chips for a sweet twist. Each addition can make your pastries unique and delightful. Mini pastries are perfect for parties or snacks. Roll out the puff pastry thinner and cut smaller squares. Use about a teaspoon of filling for each mini pastry. They bake just as beautifully and are fun to eat. Serve them on a platter for a colorful treat. Everyone will love these bite-sized delights! To keep your blueberry cream cheese pastries fresh, store them in an airtight container. This prevents them from drying out. You can also wrap them in plastic wrap for extra protection. Place the container in the fridge if you plan to eat them within three days. For longer storage, freezing is a great option. When you want to enjoy your pastries again, preheat your oven to 350°F (175°C). Place the pastries on a baking sheet. Heat them for about 10-15 minutes. This will make them warm and crispy again. You can also use a microwave, but this may make them a bit soft. If you use the microwave, heat for about 30 seconds. To freeze your pastries, first, let them cool completely. Then, wrap each pastry in plastic wrap. Place them in a freezer-safe bag or container. You can freeze them for up to three months. When you’re ready to eat, simply reheat them directly from the freezer or let them thaw in the fridge overnight first. Yes, you can use store-bought cream cheese. It saves time and is very easy to find. Just make sure it is at room temperature. This helps it blend smoothly with the sugar and vanilla. Look for a golden brown color. The pastries should puff up nicely and have a flaky texture. Bake for 15 to 20 minutes. Keep an eye on them during the last few minutes. If they look golden, they are ready! You can store leftover puff pastry in the fridge for a few days. Wrap it tightly so it does not dry out. You could also freeze it for later use. Just make sure to thaw it in the fridge before using again. Use it for more pastries or savory dishes like pot pies. You now know how to make delicious blueberry pastries from scratch. We covered the ingredients, step-by-step instructions, and how to store them. Remember to pay attention to your pastries while baking, and don’t rush the filling process. You can also try other fruit fillings or make mini pastries for fun treats. Baking is all about experimenting, so don’t hesitate to try new ideas. Enjoy your tasty creations, and share them with friends and family for even more joy!

Blueberry Cream Cheese Pastries Delightful and Easy

If you love warm, sweet treats, you are in for a real treat! My Blueberry Cream Cheese Pastries are not

- 1 pound fresh okra, washed and sliced into 1/2-inch thick pieces Fresh okra is key to making crispy fritters. Look for bright green pods that are firm and smooth. Avoid any that are dull or have blemishes. The fresher the okra, the better the taste and texture. - 1 teaspoon turmeric powder - 1 teaspoon cumin powder - 1 teaspoon garam masala - 1/2 teaspoon red chili powder - Salt, to taste These spices give the fritters their rich flavor. Turmeric adds a warm color. Cumin and garam masala bring depth, while red chili powder adds just the right amount of heat. Adjust salt based on your taste. - 1 cup chickpea flour (besan) - 1/2 cup all-purpose flour - 1 teaspoon baking powder - Water, as needed to achieve desired batter consistency - Vegetable oil, for frying The chickpea flour helps the fritters stay crispy. The all-purpose flour gives them a nice structure. Baking powder helps them puff up while frying. Add water slowly until the batter is thick but smooth. - 1 cup plain yogurt - 1 tablespoon fresh lemon juice - 1 teaspoon garlic, finely minced - 1 tablespoon fresh cilantro, chopped (for garnish) This yogurt sauce cools the heat from the fritters. Lemon juice adds brightness, while garlic gives it a kick. Garnish with fresh cilantro for a burst of flavor and color. You can find the full recipe [here](#). First, take 1 pound of fresh okra. Wash the okra and slice it into 1/2-inch thick pieces. Place the okra in a large bowl. Add a good sprinkle of salt. Mix gently. Let it sit for about 10 minutes. This step helps the okra release moisture. This moisture is key for a crispy texture. In another bowl, combine: - 1 cup chickpea flour (besan) - 1/2 cup all-purpose flour - 1 teaspoon turmeric powder - 1 teaspoon cumin powder - 1 teaspoon garam masala - 1/2 teaspoon red chili powder - 1 teaspoon baking powder - Salt, to taste Whisk these dry ingredients well. Gradually add water while stirring. You want a thick batter, like pancake batter. It should be smooth but not runny. Add the prepared okra to the batter. Toss gently to coat each piece. Let any extra batter drip back into the bowl. This ensures each piece is well-coated but not too heavy. In a deep frying pan, heat enough vegetable oil over medium heat. The oil should reach about 350°F. To check if it’s ready, drop a small spoonful of batter into the oil. It should sizzle right away. Carefully drop spoonfuls of coated okra into the hot oil. Don’t overcrowd the pan. This helps them fry evenly. Cook for 3-5 minutes. You want them golden brown and crispy. Use a slotted spoon to remove them. Place them on paper towels to drain excess oil. In a small bowl, mix: - 1 cup plain yogurt - 1 tablespoon fresh lemon juice - 1 teaspoon finely minced garlic - A pinch of salt Stir until smooth and creamy. Set this aside as it adds a nice kick. Arrange your crispy okra fritters on a nice platter. Drizzle the spicy yogurt sauce over them or serve it in a small bowl for dipping. Garnish with chopped fresh cilantro for a burst of color and flavor. Enjoy your delightful fritters! Check the Full Recipe for details. When choosing okra, look for bright green, firm pods. They should be small to medium-sized. Avoid any with brown spots or signs of wilting. Fresh okra will have a smooth texture and a slight sheen. This ensures you get the best flavor and texture for your fritters. To achieve that perfect crunch, salting the okra is key. This step draws out moisture, helping the fritters fry better. After salting, let the okra sit for at least ten minutes. For the batter, use a mix of chickpea and all-purpose flour. This combo gives a delightful flavor and crispiness. The oil must be hot enough. If it sizzles when you drop in batter, you're ready to fry. If you have leftover fritters, store them in an airtight container. Keep them in the fridge for up to three days. To reheat, place them in a hot oven for about ten minutes. This helps restore their crispiness. You can also freeze them for longer storage. Just make sure to separate them with parchment paper to avoid sticking. For more on making these delicious fritters, check out the Full Recipe! {{image_4}} You can jazz up your okra fritters with various sauces. Try a zesty mango chutney for a sweet twist. This sauce pairs well with the crunchy fritters. You can also use a spicy chili sauce for heat. This adds a kick and enhances the flavors. Each sauce creates a unique taste, making each bite exciting. For a vegan take, use tofu instead of eggs. Crumble firm tofu and mix it into the batter. You can also add seasonal veggies like zucchini or corn. These veggies add color and flavor, making your fritters more fun. They also keep the dish fresh and light. If you want a healthier option, try baking the fritters. Preheat your oven to 400°F. Place the coated okra on a baking sheet lined with parchment paper. Spray them lightly with cooking oil. Bake for about 20-25 minutes, flipping halfway through. This method keeps them crispy and saves some oil. They taste just as good while being kinder to your waistline. These variations let you enjoy okra fritters in many ways. Experiment with each to find your favorite! After cooking, let your okra fritters cool down. Place them in an airtight container. Store in the fridge for up to three days. This keeps them fresh and ready to enjoy later. To freeze fritters, allow them to cool completely. Layer them in a freezer-safe bag or container. Use parchment paper between layers to prevent sticking. They can last up to three months. When you're ready to eat, just thaw them in the fridge overnight. For the best texture, reheat fritters in an oven. Preheat to 350°F (175°C). Place the fritters on a baking sheet for about 10 minutes. This helps them regain their crispiness. You can also use an air fryer for a quicker option. Reheat at 350°F for about five minutes. Enjoy your crispy fritters just like fresh! Yes, you can use frozen okra. Just thaw it first. Pat it dry with a towel. This helps get rid of excess moisture. Drier okra makes for crispier fritters. To make the fritters less spicy, reduce the red chili powder. You can also skip it entirely if you prefer. Adding more chickpea flour can balance the heat too. Okra fritters pair well with rice dishes, salads, or curries. Serve them with a side of chutney for a tasty combo. They also make a great snack for gatherings. Yes, use only chickpea flour for a gluten-free batter. This will keep your fritters tasty and crispy. You can also mix in some cornmeal for extra crunch. Add herbs like dill or mint to the yogurt sauce for more flavor. You can also mix in a bit of cumin or smoked paprika. These will give the sauce a tasty twist. This blog post covered everything you need to know about making okra fritters. We discussed choosing fresh okra, creating a crispy batter, and frying to perfection. You learned about tasty yogurt sauce options and various ways to enjoy these fritters. Remember, there are many ways to customize this dish. Try different spices, sauces, or even go vegan. With these tips and tricks, your okra fritters will impress everyone. Enjoy cooking and sharing this fun recipe with friends and family!

Savory Okra Recipes for Crispy Fritter Delights

Are you ready to spice up your meal with crispy okra fritters? I’m here to share some savory okra recipes

- 1 pound fresh okra, stems trimmed - 2 cups distilled white vinegar - 1 cup water - 2 tablespoons sea salt - 2 teaspoons granulated sugar - 4 cloves of garlic, crushed - 1 tablespoon dill seeds - 1 tablespoon black mustard seeds - 1 teaspoon red pepper flakes The main star of our dish is fresh okra. Look for firm, bright green pods. They should feel crisp when you touch them. The vinegar adds the right tang, while garlic and spices bring depth. Together, they create a flavor that sings. - 1 teaspoon pickling spice - 1 bay leaf - Adjusting spice level with red pepper flakes You can add pickling spice for extra flavor. This spice mix often includes herbs like coriander or allspice. If you enjoy heat, add more red pepper flakes. Adjust the amount based on your taste. A little heat can really kick things up! For the full recipe, check out the detailed steps. Start by washing the okra under cool water. Make sure to clean each pod well. Next, trim the stems carefully. Don’t cut too deep, or you risk losing the seeds inside. This step helps keep the okra crunchy. Once washed and trimmed, it's time to pack the okra in the jar. Use a clean mason jar for this task. Place the okra upright, packing them tightly. This maximizes space and keeps them looking nice. To make the pickling solution, combine vinegar, water, salt, and sugar in a medium saucepan. Use 2 cups of vinegar, 1 cup of water, 2 tablespoons of salt, and 2 teaspoons of sugar. Set the heat to medium. Bring the mixture to a gentle boil. Stir occasionally until the salt and sugar dissolve completely. This step is key to a flavorful brine. Once the brine is ready, layer ingredients in the jar. Between the layers of okra, add crushed garlic, dill seeds, black mustard seeds, and red pepper flakes. You can also add a bay leaf for extra flavor. After layering, carefully pour the hot pickling solution over the okra. Ensure all the okra is fully submerged. If you see air pockets, tap the jar gently against a surface to release them. Allow the jar to cool to room temperature without a lid. This prevents condensation. Once cool, seal the jar tightly. For the best flavor, refrigerate the pickled okra for at least 24 hours. However, waiting 3 to 5 days gives you the best taste. For the full recipe, check out the [Full Recipe]. To keep your okra crunchy, do not cut too deep when trimming. If you cut too close to the seed, the okra will lose its texture. Focus on just removing the stem. Another key to crisp okra is refrigeration. After preparing your pickles, let them cool at room temperature. Once cooled, seal the jar and place it in the fridge. The cold helps maintain that satisfying crunch. Spices can boost the flavor of your pickled okra. I recommend adding dill seeds, garlic, and black mustard seeds. These spices give a nice balance to the okra's taste. You can also play with the acidity and sweetness. Use a bit more sugar if you like a sweeter flavor. This balance can enhance the overall taste of your pickles. For more zest, adjust the red pepper flakes based on your spice preference. For more details, follow the Full Recipe to make your own Crisp Pickled Okra. {{image_4}} To make your okra pop with heat, add more red pepper flakes. This simple tweak gives a nice kick. If you love spice, try adding jalapeños or other hot peppers. Slice them thin and layer them in the jar with the okra. This change brings bold flavors to your pickles. For a fun twist, increase the sugar content. This will balance the sour vinegar taste. You can also mix in unique spices like cinnamon or allspice. These warm spices add depth and warmth to your pickled okra. Each bite will surprise you with sweet and spicy notes, making them even more enjoyable. For the full recipe, check out the Crisp Pickled Okra Delight. Enjoy exploring these variations! To keep your pickled okra fresh and crunchy, choose the right container. A glass jar with a tight lid works best. Make sure it is clean and dry before use. Avoid plastic containers since they can absorb odors and colors. Store your jar in the fridge. Keep it away from light and heat. Light can change the taste over time. A dark corner in your fridge is perfect. Expect your pickled okra to last about 1 to 2 months in the fridge. The flavor gets better over time, but enjoy them before they lose their crunch. Watch for signs of spoilage. If you see mold or notice an off smell, throw it out. Also, if the okra becomes soft or mushy, it’s time to discard them. Keeping an eye on these signs helps ensure you enjoy the best flavor and texture. For the best flavor, refrigerate your pickled okra for at least 24 hours. However, I recommend waiting 3 to 5 days. This gives the spices time to blend with the okra, making each bite more delicious. The longer you wait, the better the taste. You can use frozen okra, but I don't recommend it. Frozen okra tends to lose its crunch. If you do use it, make sure to thaw and dry it well. This helps reduce moisture, but be aware that the final texture may differ. You can find pre-made crisp pickled okra at local grocery stores. Look in the canned goods aisle or the pickle section. If you prefer online shopping, check websites like Amazon or specialty food stores. They offer a variety of options to suit your taste. Now that you know how to make pickled okra, you have all the tools for success. You learned about the key ingredients, preparation steps, and storage tips. Keeping your okra crisp is vital, so remember to follow the tips closely. If you want to spice things up, try different flavors or adjust the sweetness. Enjoy your homemade pickled okra and experiment with variations. This simple process leads to tasty results. Happy pickling!

Crisp Pickled Okra Perfected for Crunchy Flavor

Are you ready to bring a burst of flavor and crunch to your meals? My Crisp Pickled Okra Perfected for

To make delicious Peach Pie Cruffins, you will need the following ingredients: - 2 cups all-purpose flour - 1/2 cup granulated sugar - 1 tablespoon baking powder - 1/2 teaspoon salt - 1/2 cup unsalted butter, melted - 3/4 cup milk - 1 teaspoon vanilla extract - 2 large peaches, peeled and diced - 1 teaspoon ground cinnamon - 1/4 teaspoon ground nutmeg - 1 tablespoon fresh lemon juice - 1 egg (for egg wash) - Powdered sugar for dusting Each ingredient plays a key role in the flavor and texture of the cruffins. The flour gives structure, while the sugar adds sweetness. Baking powder helps them rise, and salt enhances all the flavors. Using unsalted butter gives you control over the salt level. Milk adds moisture and richness, while vanilla brings warmth. Peaches are the star, giving a fresh, fruity taste. Cinnamon and nutmeg add warmth and spice, and lemon juice brightens the flavor. Finally, the egg wash gives a golden crust. For a sweet finish, sprinkle powdered sugar on top. These Peach Pie Cruffins are sure to impress! If you're ready, check the Full Recipe for more details. - Preheat your oven to 375°F (190°C). Grease a standard muffin tin with cooking spray or butter. - In a large bowl, combine 2 cups of all-purpose flour, 1/2 cup of granulated sugar, 1 tablespoon of baking powder, and 1/2 teaspoon of salt. Whisk these dry ingredients together until blended. - In another bowl, mix 1/2 cup of melted unsalted butter, 3/4 cup of milk, and 1 teaspoon of vanilla extract. Gradually pour this wet mix into the dry ingredients. Stir gently until just combined. It’s okay if the batter is a bit lumpy. - Carefully fold in 2 diced peaches, 1 teaspoon of ground cinnamon, 1/4 teaspoon of ground nutmeg, and 1 tablespoon of fresh lemon juice. Mix until everything is well distributed. - On a floured surface, roll out the dough to about 1/2 inch thick. Cut the dough into strips that are about 2 inches wide. - Take each strip and fold it into thirds, like a letter. Then roll the folded strip tightly to form a spiral. Place each cruffin in the prepared muffin tin, standing them upright. - In a small bowl, beat 1 egg until mixed. Brush a thin layer of egg wash over each cruffin for a golden color while baking. - Bake the cruffins for 20-25 minutes, or until they are golden brown. A toothpick should come out clean when inserted. - Once baked, cool the cruffins in the tin for 5 minutes. Gently remove them and transfer to a wire rack. Dust with powdered sugar just before serving. For the full recipe, check out the detailed instructions above. Enjoy the warm, peachy goodness! To make the best Peach Pie Cruffins, avoid overmixing the batter. When you mix, do it gently. A few lumps are okay. This keeps your cruffins soft and fluffy. Achieving the ideal swirl is key. After rolling your dough, fold it carefully. Then, roll it tightly. This method makes the beautiful layers you want. Baking time and temperature can change results. Preheat your oven to 375°F (190°C). Bake for 20 to 25 minutes. Check with a toothpick. When it comes out clean, your cruffins are ready. For presentation, use a rustic wooden board. This gives your Peach Pie Cruffins a warm look. You can also use a stylish platter. Add fresh peach slices for color and a dusting of powdered sugar. Pair your cruffins with drinks. Coffee complements the sweet flavors well. For a fun twist, serve with iced tea. This will enhance your treat's taste and make it special. {{image_4}} You can switch up the fruit in your cruffins. Try using apples or berries for a new twist. Apples bring a nice crunch, while berries add a sweet burst. You can also mix fruits for a fun medley. If you want texture, consider adding nuts. Chopped pecans or walnuts work great. They add a delightful crunch and richness to your cruffins. Flavor extracts can change the whole vibe of your cruffins. Add almond or coconut extract for a unique taste. Just a little goes a long way. You can also boost the flavor with spices. Try adding cardamom or ginger for warmth. These spices can make your cruffins more aromatic and exciting. You can use these ideas to make your Peach Pie Cruffins even more special. For the full recipe, check out the complete guide above! To keep your cruffins fresh at room temperature, place them in an airtight container. Make sure the container is sealed well. You can store them this way for up to two days. If you have a lot, try to separate layers with parchment paper. This helps to keep them from sticking together. For longer storage, freeze your cruffins. Allow them to cool completely first. Then, wrap each cruffin in plastic wrap. Place them in a freezer-safe bag or container. They can last in the freezer for up to three months. When you're ready to eat them, take the cruffins out and let them thaw at room temperature. To reheat, preheat your oven to 350°F (175°C). Place the cruffins on a baking sheet and warm them for about 10 minutes. This keeps them soft and tasty. You can also microwave them for 15-20 seconds if you need a quick fix. For the best flavor and texture, always cool cruffins before freezing. This helps keep them moist and delicious. Enjoy your Peach Pie Cruffins fresh, warm, and full of flavor! What are Peach Pie Cruffins? Peach Pie Cruffins are a tasty mix of croissants and muffins. They are soft, flaky, and filled with juicy peaches. This treat brings the best of both worlds into one bite. You can enjoy them for breakfast or dessert. How long do they take to bake? They bake for about 20 to 25 minutes at 375°F (190°C). You want them golden brown. A toothpick should come out clean when they are done. Can I make them ahead of time? Yes, you can prepare the batter a day in advance. Just keep it in the fridge. Bake the cruffins when you are ready to enjoy them fresh. Are there gluten-free options for this recipe? You can use gluten-free flour in place of all-purpose flour. Make sure it has a good binding agent to hold the cruffins together. Where can I buy Peach Pie Cruffins? You can often find them at local bakeries or cafes. Some grocery stores also sell them in the bakery section. If you want to try making them at home, check out the Full Recipe for all the details! You have the key ingredients and steps to make delicious peach pie cruffins. Remember to preheat your oven and fold in the peaches gently. Each bite will bring you joy. Use the tips to elevate your baking and impress friends. Try out different fruit or flavor twists, too! With proper storage, your cruffins can stay fresh and tasty. So, gather your ingredients and start baking. Enjoy the sweet rewards of your hard work!

Peach Pie Cruffins Delicious and Easy Recipe

Get ready to delight your taste buds with Peach Pie Cruffins! This easy recipe merges flaky pastry and juicy peaches,

- 4 medium zucchinis, sliced into thin rounds - 1 cup shredded cheddar cheese - 1 cup shredded mozzarella cheese - 1/2 cup grated Parmesan cheese - 1 medium onion, finely chopped - 2 cloves garlic, minced - 2 large eggs, beaten until frothy - 1/2 cup unsweetened almond milk (or your choice of milk) - 1 cup whole wheat breadcrumbs - 1 teaspoon dried oregano - 1 teaspoon Italian seasoning - Salt and black pepper, to taste - 2 tablespoons olive oil - Fresh herbs (such as basil or parsley), chopped, for garnish The main ingredients create a solid base for the casserole. Zucchini adds moisture and nutrition. Cheddar and mozzarella give cheesy goodness. Parmesan adds a nice touch of flavor. Onions and garlic build a savory depth. The binding ingredients help hold everything together. Eggs create a fluffy texture. Almond milk keeps it creamy. Whole wheat breadcrumbs give a crunchy top. For seasoning, oregano and Italian seasoning bring warmth. Salt and pepper enhance flavors. Olive oil adds richness. Fresh herbs on top make it pretty and fresh. This dish is simple yet tasty. You can find the full recipe above for more details. - Preheat the oven to 375°F (190°C). - In a large skillet, heat 2 tablespoons of olive oil over medium heat. - Add 1 medium onion, finely chopped, and 2 cloves of minced garlic. Sauté until soft and translucent, about 4-5 minutes. - Slice 4 medium zucchinis into thin rounds. Add them to the skillet. - Season the mixture with 1 teaspoon of dried oregano and 1 teaspoon of Italian seasoning. Stir and cook for another 5-7 minutes. - In a large bowl, combine 2 large beaten eggs and 1/2 cup of unsweetened almond milk. - Stir in half of the shredded cheddar and mozzarella cheese (1 cup each). - Carefully fold in the sautéed zucchini mixture, mixing until well-blended. - Lightly grease a 9x13 inch baking dish. Pour the mixture into the dish. - Spread it evenly and top with the remaining cheeses and breadcrumbs. - Bake for 25-30 minutes until the top is golden and bubbly. - Let the casserole cool for 5-10 minutes before slicing. Enjoy your delicious Cheesy Zucchini Casserole! You can find the full recipe above. - Opt for medium-sized zucchinis for the best consistency. - Allow the zucchini to cool slightly before mixing to avoid excess moisture. - Experiment with spices like paprika or cayenne for added heat. - Incorporate spinach or mushrooms for extra nutrients and depth. - Pair with a side salad or crusty bread for a complete meal. - Serve warm, garnished with fresh herbs for visual appeal. Using these tips, you can create a Cheesy Zucchini Casserole that is not only tasty but also has the right texture and flavor. Try adding your favorite spices to make it your own. The simple additions of greens or other veggies can boost both health and taste. For the best experience, serve it fresh and warm, and enjoy with a nice salad or bread. Check the Full Recipe to make this dish today! {{image_4}} You can make this dish even better by adding more veggies. Include cooked quinoa or lentils for added protein. These options make it heartier and boost nutrition. You can also add bell peppers or corn. They add extra flavor and texture. This makes your casserole colorful and fun to eat. If you need a gluten-free version, don't worry! Substitute whole wheat breadcrumbs with gluten-free options like rice crumbs. You can also use almond flour or ground oats. They give a similar crunch and keep the dish tasty. For a dairy-free dish, replace the cheese with vegan cheese options. There are many choices to fit your taste. You can also use coconut milk or cashew milk instead of almond milk. These swaps keep the casserole creamy and delicious. If you want the full recipe, check it out now! After enjoying the cheesy zucchini casserole, let it cool completely. This step helps keep it fresh. Once cool, place it in an airtight container. You can store it in the fridge for up to four days. This way, you can enjoy leftovers without waste. If you want to save some for later, freezing works great. Freeze individual portions in airtight freezer bags. This makes for easy meals on busy days. When you're ready to eat, thaw your portion overnight in the refrigerator. This method keeps the flavors intact. To reheat, using the oven gives the best results. Place the casserole in the oven until it’s heated through. If you're short on time, the microwave works too. For an extra treat, sprinkle some cheese on top before reheating. This adds a delicious creaminess that you’ll love. Prep time is 15 minutes. The total time is 50 minutes. This recipe serves 6. Yes, you can substitute or add vegetables like carrots, bell peppers, or spinach. This adds color and flavor. Always cut them small, so they cook evenly. Yes, you can prepare it a day in advance. Just bake it right before serving. This makes meal prep easy. You can enjoy it fresh without stress. For the full recipe, check out the details above. This blog post explored how to make a Cheesy Zucchini Casserole. We covered the main ingredients, binding agents, and seasonings that create a delicious base. I shared step-by-step instructions for preparation and baking. You also learned tips for perfecting texture and enhancing flavor. Variations cater to different diets, and storage info helps you save leftovers. Cooking doesn’t have to be hard. With this recipe, you can enjoy a tasty, healthy dish any time. Try it out, impress your family, and savor every bite.

Cheesy Zucchini Casserole Tasty Comfort Food Dish

Are you craving comfort food that’s both delicious and healthy? This Cheesy Zucchini Casserole hits all the right notes. With

Here’s what you need for your moist zucchini bread. Each ingredient plays a key role in flavor and texture. - 2 cups grated zucchini (about 2 medium zucchinis) - 1 ½ cups all-purpose flour - 1 teaspoon baking powder - ½ teaspoon baking soda - 1 teaspoon ground cinnamon - ½ teaspoon ground nutmeg - ¼ teaspoon salt - 1 cup granulated sugar - ½ cup packed brown sugar - 3 large eggs - ¾ cup vegetable oil - 1 teaspoon vanilla extract - ½ cup chopped walnuts or pecans (optional) - ½ cup chocolate chips (optional) Grated zucchini is the star here. It keeps the bread moist and adds a subtle flavor. The combination of sugars gives a nice balance of sweetness. Using both granulated and brown sugar adds depth. Eggs and oil help bind everything and make it rich. The spices create warmth and a lovely aroma. Optional add-ins like nuts or chocolate chips can make your bread even more special. You can find the full recipe above if you want to dive deeper into the process! - Preheat your oven to 350°F (175°C). - Grease the loaf pan with butter or cooking spray. Dust it lightly with flour. You could also use parchment paper for easy removal. - In a large bowl, sift together the all-purpose flour, baking powder, baking soda, ground cinnamon, ground nutmeg, and salt. This helps mix the dry ingredients well and makes the bread light. - In another bowl, whisk together the granulated sugar, brown sugar, eggs, vegetable oil, and vanilla extract. Mix until smooth and creamy. This step is important for a rich flavor. - Gently fold the grated zucchini into the wet mixture. Make sure it is evenly mixed. - Gradually add the dry ingredients to the wet mixture. Use a spatula to fold them together. Do not overmix; it’s okay if the batter is a bit lumpy. - Pour the batter into the greased loaf pan. Smooth the top with your spatula. - Bake in the preheated oven for 50-60 minutes. Check it with a toothpick; it should come out clean or with a few moist crumbs. - Once baked, let the zucchini bread cool in the pan for about 10 minutes. Then, transfer it to a wire rack to cool completely. For the full recipe, check the complete ingredient list and instructions. To keep your zucchini bread moist, start with the right zucchini. Grate it finely and squeeze out excess water. If you don’t, your bread may end up too wet. Next, watch the baking time. Overbaking can dry out your bread quickly. I recommend checking the bread at the 50-minute mark. A toothpick should come out clean with some moist crumbs. You can make this bread even healthier with a few swaps. Try whole wheat flour instead of all-purpose flour. It adds fiber and a nutty flavor. You could also use coconut sugar or honey instead of granulated sugar. For oil, consider using unsweetened applesauce. This will help cut fat while keeping it moist. When mixing, fold your ingredients gently. This helps keep the bread light and fluffy. Overmixing can make your bread dense and tough. It's okay to have some lumps in your batter. They won’t hurt the final product. Take your time, and don’t rush this step for the best texture. {{image_4}} You can make your zucchini bread even better by adding spices. Cardamom gives a warm, sweet taste. Ginger adds a nice zing that pairs well with zucchini. Try adding just a pinch of each spice to see what you like best. This small change can really brighten the flavor of your bread. You can also switch up what you add to the batter. Dried fruits like raisins or cranberries add sweetness and chewiness. Seeds like sunflower or pumpkin seeds bring a nice crunch. These add-ins make your zucchini bread unique and fun. Don’t be afraid to mix and match to find your favorite combination! If you want a new shape, try making muffins or mini loaves. Muffins bake faster than a loaf, so they are great for quick snacks. Mini loaves are perfect for sharing or gifting. Just adjust the baking time to about 20-25 minutes for muffins or 30-40 minutes for mini loaves. You can find the full recipe for all these variations in the Moist Zucchini Bread section above. To keep your moist zucchini bread fresh, store it properly. You can keep it at room temperature for up to three days. Just wrap it in plastic wrap or place it in an airtight container. If your kitchen is warm, it’s better to refrigerate it. This extends its life to about a week. However, the fridge can dry it out a bit. So, make sure it’s tightly sealed. If you want to save zucchini bread for later, freezing is a great option. First, let the bread cool completely. Then, slice it into pieces for easy use. Wrap each slice in plastic wrap. Next, place the wrapped slices in a freezer bag. This way, you can grab just what you need. Zucchini bread can last up to three months in the freezer. When ready to eat, just thaw it in the fridge overnight. Reheating your zucchini bread is simple. You can use an oven or a microwave. For the oven, preheat it to 350°F (175°C). Place the bread on a baking sheet and cover it with foil. Heat it for about 10-15 minutes. If using a microwave, place a slice on a plate and cover it with a damp paper towel. Heat for 15-20 seconds. Enjoy your warm, moist zucchini bread! For the full recipe, check here: [Full Recipe]. To keep zucchini bread moist, follow these tips: - Use fresh, grated zucchini. - Don't squeeze out all the moisture from the zucchini. - Add a bit more oil or sugar if needed. - Bake just until a toothpick comes out clean. - Let it cool in the pan for a few minutes before removing. These steps help trap moisture in the bread. The zucchini adds natural moisture. This gives the bread a tender, soft texture. Yes, you can use frozen zucchini. First, thaw it completely and drain excess water. Here’s how to prepare frozen zucchini for bread: - Place the frozen zucchini in a colander. - Let it sit for about 30 minutes to drain. - Pat it dry with paper towels to remove extra moisture. Using frozen zucchini is a great way to use up leftovers. It still adds flavor and moisture to your bread. You can replace eggs with several options for a vegan version. Here are some egg replacements: - 1/4 cup unsweetened applesauce for each egg. - 1/4 cup mashed banana for each egg. - 1 tablespoon ground flaxseed mixed with 2.5 tablespoons water for each egg. These substitutions keep the bread moist and bind the ingredients well. Zucchini bread lasts about 2-3 days at room temperature. Keep it in an airtight container. It can last about a week in the fridge. Make sure it is well-wrapped. If you freeze it, it can last for up to 3 months. Thaw it in the fridge before using. Enjoy your delicious zucchini bread fresh! For the full recipe, check the earlier sections. In this blog post, we covered how to make delicious zucchini bread. We talked about the ingredients, from grated zucchini to different sugars. Then, I shared step-by-step instructions for preparation and baking. We also shared tips for keeping your bread moist and healthy options. You can add your favorite mix-ins for a twist. Remember to store your bread properly to enjoy it longer. Whether you use fresh or frozen zucchini, this recipe is sure to delight. Happy baking and enjoy your tasty creation!

Moist Zucchini Bread Easy and Delicious Recipe

Are you ready to bake the best zucchini bread ever? My easy and delicious recipe ensures moistness in every bite.

To make whole fried okra, start with fresh okra. You need one pound. Choose bright green, firm pods. Avoid any that are brown or soft. Fresh okra gives the best taste and crunch. Next, gather your dry ingredients. You will need: - 1 cup cornmeal - 1/2 cup all-purpose flour - 1 teaspoon garlic powder - 1 teaspoon onion powder - 1 teaspoon cayenne pepper (adjust for heat) - 1 teaspoon salt - 1 teaspoon black pepper These ingredients create a flavorful and crispy coating. The cornmeal adds crunch, while the spices give it a kick. Now, for the buttermilk. You’ll need one cup. Soaking okra in buttermilk makes it tender and flavorful. This step is key for a tasty snack. Sprinkle some salt and pepper into the buttermilk for extra flavor. For a complete guide, check out the Full Recipe. Start by washing the okra. Rinse it under cold water to remove dirt. Once clean, pat it dry using a paper towel. This step is key. If the okra is wet, it won't fry well. You want the outside to be very dry. Next, soak the okra in buttermilk. Pour the buttermilk into a bowl. Add the okra and let it sit for about 10 to 15 minutes. This step makes the okra tender and adds flavor. While the okra soaks, prepare the coating. In a separate bowl, mix together the cornmeal, flour, and spices. Use garlic powder, onion powder, cayenne pepper, salt, and black pepper. Whisk these ingredients until well combined. This mix gives the okra its tasty crunch. Now it’s time to fry! Heat vegetable oil in a large skillet. Aim for about 2 inches of oil. The oil needs to reach 350°F (175°C). You can test it by dropping in a small bit of the coating. If it sizzles, the oil is ready. Remove the okra from the buttermilk. Let the extra liquid drip off. Toss the okra in the coating mixture. Make sure each piece is well covered. This ensures a crispy finish. Carefully add the okra to the hot oil in batches. Don’t overcrowd the pan; this helps it fry evenly. Fry the okra for about 3 to 4 minutes. Look for a golden brown color and a crispy texture. Once done, use a slotted spoon to take the okra out of the oil. Place them on a plate with paper towels. This step absorbs excess oil and keeps them crunchy. While they are hot, sprinkle a little salt on top. This enhances the flavor. Repeat this process until all the okra is cooked. Enjoy your crispy snack! For more details on the process, check the Full Recipe. To get that nice crispy texture, you must start with dry okra. Wash it well, then pat it dry with a paper towel. Soaking the okra in buttermilk helps, too. It adds flavor and moisture. When coating, make sure each piece is thoroughly covered in the cornmeal mix. This creates a crunch that everyone loves. Fry them in hot oil, around 350°F (175°C). If the oil is too cool, the okra will become soggy. Fry in small batches to keep the temperature steady. Many people make the mistake of overcrowding the pan. This cools the oil and ruins the crispiness. Another common error is skipping the drying step. Wet okra will not fry well. Ensure your coating is well mixed. If you see lumps in it, your okra won't be as crispy. Lastly, don’t forget to sprinkle more salt while they are hot. This enhances the flavor right away. Whole fried okra is great on its own, but you can take it up a notch. Pair it with ranch dressing for a creamy dip. If you like heat, try a spicy sauce, like sriracha or hot sauce. You can also serve it with a tangy vinegar-based dip. For a fun twist, add some fresh herbs on top. Chopped parsley or cilantro adds color and freshness. Check out the Full Recipe for more serving ideas and tips! {{image_4}} If you love heat, try adding more spices. Mix in paprika for a smoky flavor. You can also use cayenne pepper, like in the original recipe, to kick it up a notch. Add chili powder for an extra layer of flavor. Use a mix of spices to make your okra unique. Not in the mood to fry? You can bake your okra instead! Preheat your oven to 425°F (220°C). Toss the okra in the same buttermilk and coating mix. Spread them out on a baking sheet. Bake for about 20 to 25 minutes, flipping halfway. This method gives you a crispy snack with less oil. For a gluten-free option, swap all-purpose flour with gluten-free flour. You can also use cornstarch or almond flour. Both work well for a crunchy texture. Just make sure your cornmeal is also gluten-free. This way, everyone can enjoy crispy okra, regardless of dietary needs. For the complete guide to making crispy fried okra, check out the Full Recipe. To store leftover fried okra, first let it cool. Place it in an airtight container. Make sure to layer paper towels between the okra and the lid. This helps absorb moisture and keeps them crispy. Store it in the fridge. Fried okra stays fresh for about 2 to 3 days. When you're ready to enjoy your leftover okra, avoid the microwave. Microwaving makes the okra soggy. Instead, heat your oven to 350°F (175°C). Spread the okra on a baking sheet in a single layer. Bake for about 10 to 15 minutes. This method revives the crunchiness. You can freeze fried okra for later. First, let it cool completely. Then, place the okra in a single layer on a baking sheet. Freeze them for about 1 hour. After that, transfer the okra to a freezer bag. Remove as much air as possible to prevent freezer burn. Fried okra can last up to 2 months in the freezer. When you’re ready to eat, reheat it directly from the freezer in the oven for best results. For more detailed steps, check the Full Recipe. The best oil for frying okra is vegetable oil. It has a high smoke point and neutral flavor. Other good options include canola oil and peanut oil. These oils can reach high temperatures without burning. This ensures your okra gets crispy and golden. Yes, you can use frozen okra. However, fresh okra gives the best taste and texture. If using frozen, thaw it first. Pat the okra dry to remove moisture. This helps the coating stick better. Frying frozen okra may take a bit longer. Keep an eye on it to avoid sogginess. To keep fried okra crispy, place it on a wire rack. A wire rack allows air to circulate around the okra. It prevents steam from making it soggy. Avoid stacking the fried okra on a plate. If you need to hold it for a while, place it in a warm oven. Set it to low heat, around 200°F (93°C). This method keeps it warm and crispy. Enjoy your snack! Fried okra is a tasty treat that is easy to make. We discussed fresh whole okra, dry coating ingredients, and buttermilk with spices. You learned step-by-step how to prepare, coat, and fry okra. I shared tips for a crispy texture and common mistakes to avoid. You also saw fun variations and how to store leftovers. Enjoy making fried okra your way. With these tips, you’ll impress your friends and family!

Whole Fried Okra Crispy Snack for All Occasions

If you want a fun snack that’s crispy and full of flavor, try whole fried okra! This tasty treat is

For a delicious French onion squash casserole, gather these key ingredients: - 2 medium butternut squashes, peeled and diced into 1-inch cubes - 2 large onions, thinly sliced into rings - 3 cups vegetable broth - 1 cup grated Gruyère cheese, plus extra for garnish - 1/2 cup sour cream - 1 teaspoon dried or fresh thyme leaves - 1 tablespoon extra virgin olive oil - 2 cloves garlic, finely minced - Salt and freshly ground black pepper to taste - 1 cup seasoned breadcrumbs - 1 tablespoon fresh parsley, chopped, for a vibrant garnish You may want to change some ingredients based on what you have. Here are some great swaps: - Butternut Squash: Try acorn squash or sweet potatoes for different flavors. - Gruyère Cheese: Use Swiss or mozzarella if you need a milder cheese. - Sour Cream: Plain yogurt works well here as a lighter option. - Vegetable Broth: Chicken broth can add more flavor if you prefer. To make your casserole shine even more, serve it with these tasty sides: - A fresh green salad with a simple vinaigrette. - Crusty bread or dinner rolls for dipping. - Roasted vegetables for a colorful plate. - A sprinkle of extra herbs like thyme or parsley for freshness. Follow this guide to create a lovely and flavorful French onion squash casserole. For the full recipe, check out the details above. Start by preheating your oven to 375°F (190°C). This step warms the oven, ensuring even cooking. Grab a 9x13-inch casserole dish and lightly grease it with olive oil or butter. This helps prevent the casserole from sticking. Next, heat 1 tablespoon of olive oil in a large pot over medium heat. Add the sliced onions. Stir them often for about 15 to 20 minutes. You want them soft and golden brown. This process makes them sweet and full of flavor. With 2 minutes left, add 2 cloves of minced garlic. Stir it in to infuse the dish with that rich garlic taste. In a large mixing bowl, combine the following ingredients: - 2 medium butternut squashes, peeled and diced into 1-inch cubes - The caramelized onions from your pot - 3 cups vegetable broth - 1 teaspoon dried or fresh thyme leaves - Salt and freshly ground black pepper to taste Gently mix everything. Make sure the squash is well-coated with the broth and spices. Pour this mixture into your prepared casserole dish. Spread it out evenly. For the topping, mix 1 cup of seasoned breadcrumbs with 1 cup of grated Gruyère cheese and a pinch of salt and pepper in another bowl. Sprinkle this mix over the squash layer. Finally, dollop 1/2 cup of sour cream evenly across the top. It adds a creamy texture. Cover the dish with aluminum foil and bake it for 30 minutes. After that, remove the foil. Bake for another 20 minutes. This step makes the squash tender and the top crispy. When done, let the casserole cool for a few minutes. Garnish with fresh parsley for a pop of color. Enjoy your savory French onion butternut squash casserole! To caramelize onions, you need time and patience. Start with a large skillet over medium heat. Add your sliced onions and a bit of olive oil. Stir them often. This helps them cook evenly. Cook for 15 to 20 minutes until they turn golden brown. To add depth, add minced garlic in the last two minutes. This step gives your casserole a rich flavor. Layering is crucial for even cooking. Start with the butternut squash mix. Spread it evenly in your greased casserole dish. Next, add the caramelized onions on top. This helps the flavors meld together. After that, sprinkle the breadcrumb and cheese mix evenly over the top. Finally, dollop sour cream across the surface. This layering keeps everything moist and flavorful. Serve your casserole hot from the oven. It pairs well with a simple green salad. A crisp salad adds a nice crunch. You can also serve it with crusty bread to soak up the flavors. For a fun twist, top each serving with extra Gruyère cheese. This adds a melty touch that everyone loves. For the full recipe, check the section above. {{image_4}} If you want a gluten-free version, choose gluten-free breadcrumbs. Many stores sell them. You can also make your own. Just pulse gluten-free bread in a food processor. This option keeps the dish tasty and safe for those with gluten issues. Cheese can change the taste of your casserole. Gruyère is great, but you can try others. Cheddar offers a sharp bite. Feta adds a tangy twist. For a creamy touch, use goat cheese. Mix and match to find your favorite flavors. While butternut squash shines here, other squashes work too. Try acorn squash for a nutty flavor. Zucchini adds moisture and softness. Pumpkin can give a sweet touch. Each squash brings its own flair, making this dish fun year-round. To store leftovers, first let the casserole cool. Then, cover it tightly with plastic wrap or aluminum foil. You can also transfer it to an airtight container. Leftovers will stay fresh in the fridge for about three to four days. When you are ready to reheat, preheat your oven to 350°F (175°C). Place the casserole in a baking dish. Cover it with foil to keep it from drying out. Heat for about 20-25 minutes or until warmed through. If you want a crispy top, remove the foil for the last 5 minutes. For long-term storage, you can freeze the casserole. Slice it into portions for easy use. Wrap each portion in plastic wrap, then in foil. Label them with the date. It will last in the freezer for up to three months. To thaw, move it to the fridge overnight. Reheat as mentioned above for the best texture. For the full recipe, check out the complete guide on making this dish. Yes, you can use frozen squash or onions. However, fresh vegetables give the best taste. Frozen veggies may have extra water. Drain them well before using. This keeps your casserole from getting too watery. You can use Greek yogurt as a great substitute for sour cream. It has a similar texture and taste. Cream cheese or cashew cream also works well. Just blend them until smooth for a creamy finish. To prevent sogginess, ensure you cook the onions well. Caramelizing them reduces their moisture. Also, avoid adding too much broth. Use the right amount to keep the texture firm. Lastly, bake the casserole uncovered in the last part of cooking. For the full recipe, refer to the Savory French Onion Butternut Squash Casserole section above. This dish is not only easy to make but also full of rich flavors. Enjoy! In this blog post, we explored how to make a tasty French Onion Squash Casserole. We reviewed key ingredients and smart substitutes. You learned step-by-step instructions for cooking and layering. I shared tips for perfect caramelization and creative variations, plus how to store and reheat leftovers. Always remember, cooking is about experimenting. Enjoy the flavors and make this dish your own! The joy of cooking comes from trying new things and sharing them with friends.

French Onion Squash Casserole Flavorful and Easy Recipe

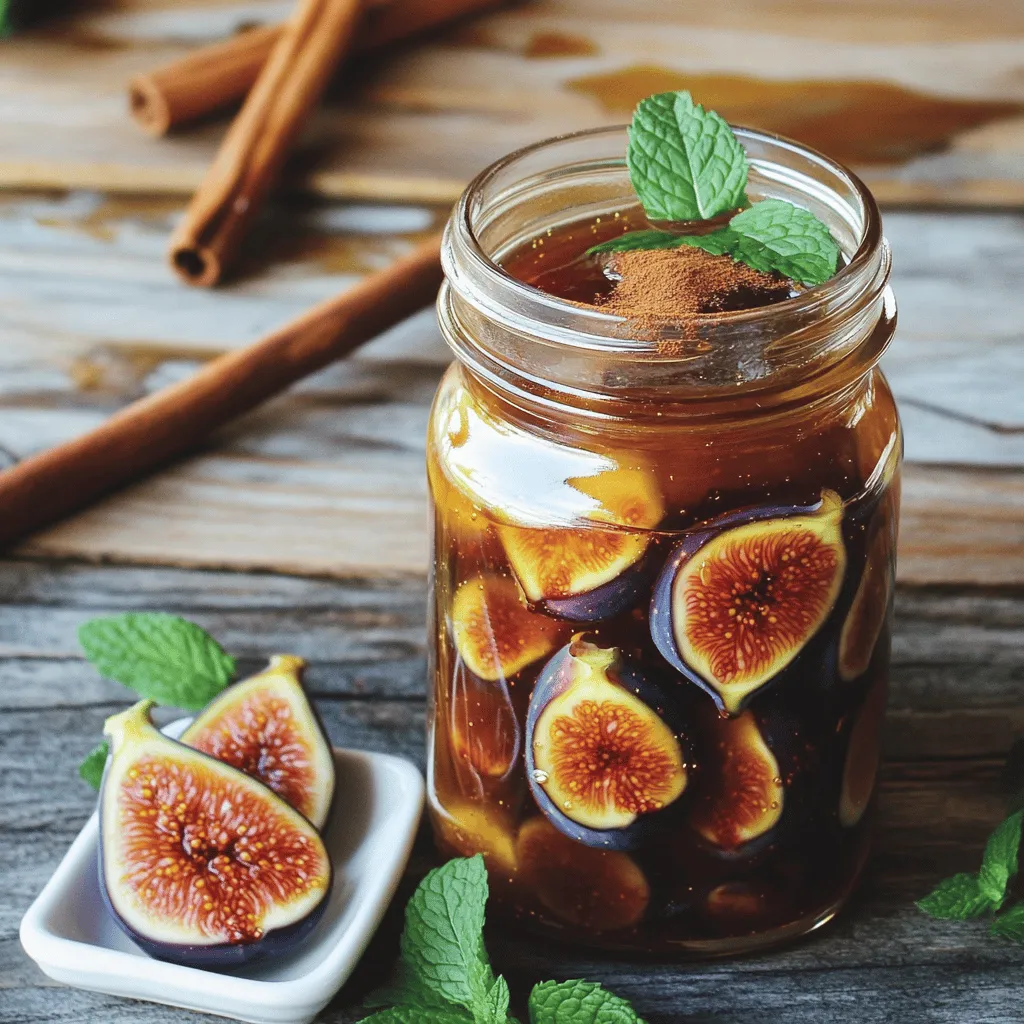
Looking for a delicious side dish that’s both easy to make and packed with flavor? You’ve found it! My French

Older posts
Newer posts
← Previous Page1 … Page39 Page40 Page41 … Page86 Next →

dsad

© 2026 lazychefmagic • Built with GeneratePress

Our Policies

  • Copyright Policy
  • Cookie Policy
  • GDPR Policy
  • Privacy Policy
  • Disclaimer
  • Terms Of Use

More Information

  • Home
  • About
  • Contact
  • Appetizers
  • Dessert
  • Dinner
  • Drinks
©2026, lazychefmagic About Back To Top