Skip to content
DisclaimerTerms Of UseGDPR PolicyCookie Policy

lazychefmagic

  • Home
  • Drinks
  • Appetizers
  • Dinner
  • Dessert
  • About
  • Contact
  • Privacy Policy
DisclaimerTerms Of UseGDPR PolicyCookie Policy

NO-ING-IMG

- 2 large cucumbers, thinly sliced - 1 large red onion, thinly sliced - 3 ripe tomatoes, diced into bite-sized pieces - 1/4 cup rice vinegar - 2 tablespoons extra virgin olive oil - 1 tablespoon honey (or agave syrup for a vegan option) - 1 teaspoon garlic powder - 1 teaspoon dried oregano - Salt and freshly ground black pepper, to taste - Fresh parsley, finely chopped (for garnish) To make marinated cucumbers, onions, and tomatoes, you need fresh, vibrant veggies. I always choose large cucumbers for crunch. Red onions add sweetness and color. Ripe tomatoes bring juiciness to the dish. For the dressing, rice vinegar gives a tangy kick. Olive oil adds smoothness. Honey sweetens it just right. Garlic powder and oregano lend depth, while salt and pepper enhance all the flavors. Garnish with fresh parsley for a pop of green. It makes the dish look beautiful and adds fresh flavor. This mix of ingredients creates a light, refreshing salad. Check the [Full Recipe] for exact steps on making this delight. Mixing the Vegetables Start by gathering your fresh produce. Grab 2 large cucumbers, 1 large red onion, and 3 ripe tomatoes. Thinly slice the cucumbers and onion. Dice the tomatoes into bite-sized pieces. Place all the vegetables in a large mixing bowl. Use your hands or a spoon to mix them gently. Make sure each veggie is spread out evenly. Preparing the Dressing In a separate small bowl, whisk together the dressing. Add 1/4 cup of rice vinegar, 2 tablespoons of extra virgin olive oil, and 1 tablespoon of honey. If you're vegan, use agave syrup instead. Then, add 1 teaspoon of garlic powder and 1 teaspoon of dried oregano. Season with salt and freshly ground black pepper to taste. Mix well until the honey dissolves and the ingredients blend nicely. Combining and Marinating Drizzle the dressing over your vegetable mixture. Use a large spoon to toss the salad. Make sure all the ingredients are coated in the zesty dressing. Cover the bowl tightly with plastic wrap or a lid. Place it in the refrigerator for at least 30 minutes. This allows the flavors to meld beautifully. After marinating, give the salad another gentle toss. Just before serving, garnish with finely chopped fresh parsley. This adds a nice pop of color and freshness. For the complete recipe, check the Full Recipe. Selecting Fresh Ingredients Start with fresh cucumbers, onions, and tomatoes. Look for vibrant colors and firm textures. Choose cucumbers with smooth skin. For tomatoes, pick ones that yield slightly to touch. Fresh produce enhances taste and crunch. Adjusting Flavors to Your Preference Taste your dressing before adding it to the veggies. You can adjust the sweetness or tanginess. If you like it sweeter, add more honey. For extra zest, increase the rice vinegar. Personalize it to match your palate. Marination Time Recommendations Let the salad marinate for at least 30 minutes. This time allows the flavors to blend well. If you have more time, marinate it for up to two hours. Just remember, longer marinating can make the veggies softer. Enjoy the crispness by not exceeding the 2-hour mark. For the complete method and ingredients, check the Full Recipe. {{image_4}} You can change up the flavors and textures in this salad. Adding bell peppers or radishes gives a nice crunch. Try using red or yellow bell peppers for sweetness. Radishes add a spicy kick. Incorporating avocado makes the dish creamy and rich. Slice the avocado and mix it in right before serving. This keeps it from browning. Utilizing fresh herbs like dill or basil brightens the dish. These herbs add fragrance and flavor. Toss in a handful to elevate your salad. You can also switch the dressing to make it your own. Substituting different vinegars can change the taste. Balsamic vinegar gives a sweet, deep flavor. Apple cider vinegar adds a hint of fruitiness. Making it spicier with jalapeños is fun if you like heat. Chop them finely and mix them into the dressing. Start with a small amount and taste as you go. If you're looking for vegan dressing options, use agave syrup instead of honey. This keeps the dish sweet without animal products. You can try adding a splash of lemon juice for brightness. For the Full Recipe, refer back to the beginning for all the details. To keep your marinated cucumbers, onions, and tomatoes fresh, store them in the fridge. Use an airtight container to lock in the flavors. This method helps prevent spoilage and keeps the veggies crisp. For best quality, consume the salad within three days. After that, the veggies may start to lose their crunch and flavor. Don't let leftovers go to waste! You can add them to a wrap or sandwich. They also make a great topping for grilled chicken or fish. Toss them into a grain bowl for extra flavor and crunch. When reheating, avoid high heat. Instead, use a microwave at low power to warm them gently. This way, you maintain the texture and taste. How long should I marinate the salad? You should marinate the salad for at least 30 minutes. This time lets the flavors blend well. The longer you marinate, the more intense the taste. I often let it sit for an hour. Can I prepare this salad ahead of time? Yes, you can make this salad ahead of time. I recommend preparing it a few hours before serving. This gives the flavors time to develop. Just keep it in the fridge until you are ready to eat. What is the best way to serve marinated cucumbers, onions, and tomatoes? Serve the salad in a clear glass bowl. This showcases the vibrant colors of the veggies. You can drizzle extra olive oil on top for added flavor. Garnish with fresh parsley for a nice touch. For the full recipe, check out the recipe section. This blog covered a simple and tasty salad recipe. You learned about key ingredients like cucumbers, onions, and tomatoes. I provided clear steps for mixing and marinating the salad. You discovered tips to select fresh produce and adjust flavors. We explored fun variations with different vegetables and dressings. Lastly, I shared storage tips to keep your salad fresh. I hope you feel confident making this marinated salad. Enjoy creating delicious meals that friends and family will love!

Marinated Cucumbers Onions and Tomatoes Delight

Looking for a refreshing dish that’s simple to make? Try my Marinated Cucumbers, Onions, and Tomatoes Delight! This easy recipe

For this easy peach galette, you need simple, fresh items. Here’s what to gather: - 2 cups ripe peaches, pitted and thinly sliced - 1 pre-made pie crust (either store-bought or homemade) - 3 tablespoons granulated sugar, divided - 1 tablespoon cornstarch - 1 teaspoon pure vanilla extract - 1 tablespoon freshly squeezed lemon juice - 1 egg, beaten (for the egg wash) - 1/4 teaspoon ground cinnamon - A pinch of salt Getting the measurements right is key. Use the following proportions: - Peaches: 2 cups give a sweet base. - Sugar: 3 tablespoons balance the tartness of the peaches. - Cornstarch: 1 tablespoon thickens the juices. - Vanilla and lemon juice: 1 teaspoon and 1 tablespoon add flavor depth. - Cinnamon: Just a pinch enhances the warmth of the dish. - Salt: A tiny pinch helps all the flavors shine. You can make your galette even better with a few extras: - Coarse sugar for a sweet, crunchy topping. - Fresh herbs like mint for a burst of color and freshness. - A sprinkle of nutmeg for a warm, spicy note. These ingredients can help you create a galette that is not only delicious but also visually appealing. For the full recipe, check the details above. First, wash your ripe peaches under cool water. Next, cut each peach in half and remove the pit. Slice the peaches thinly for even cooking. In a medium bowl, mix the peach slices with 2 tablespoons of granulated sugar, cornstarch, vanilla extract, lemon juice, ground cinnamon, and a pinch of salt. Stir gently to coat the peaches. Let this mixture sit for about 10 minutes. This allows the flavors to blend and the peaches to soften. Start by preheating your oven to 400°F (200°C). Line a baking sheet with parchment paper. Unroll your pie crust onto the sheet. If needed, roll it a bit larger to fit your filling. Spoon the peach mixture into the center of the crust, leaving a 2-inch border. Fold the edges of the crust over the peaches, making pleats as you go. This will give your galette a rustic look and hold in the filling. Brush the crust with the beaten egg for a golden finish. Sprinkle the remaining tablespoon of sugar on top. Place your galette in the hot oven. Bake for 25 to 30 minutes. The crust should turn golden brown, and the peach filling should bubble. Once done, take it out and let it cool for a few minutes. Then, slice it into wedges. This easy peach galette is now ready to serve! Enjoy it warm or at room temperature, perhaps with vanilla ice cream for a delightful treat. For the full recipe, check out the earlier section. To create the best peach galette, you need ripe peaches. Look for peaches with a deep yellow or orange color. They should feel slightly soft when you press them gently. Avoid peaches that are too hard or too mushy. Sweet, juicy peaches make the filling burst with flavor. You can also smell them; ripe peaches have a sweet aroma. A flaky pie crust is key to a great galette. If you use a pre-made crust, choose one made with real butter. If you prefer homemade, keep your butter cold. Chop the butter into small pieces and mix it with flour quickly. This helps create layers. Don’t overwork the dough; it should be soft but not sticky. Chill the crust before filling it for the best texture. For a beautiful golden finish, brush the crust with a beaten egg. This gives a shiny look as it bakes. You can also sprinkle some coarse sugar on top for added crunch and sweetness. Bake your galette at 400°F (200°C) until the crust is golden and the filling bubbles. This usually takes about 25 to 30 minutes. The right bake time ensures a great look and taste. For the full recipe, check out the Easy Peach Galette instructions provided earlier. {{image_4}} You can switch peaches for other fruits. Try using blueberries, strawberries, or apples. Each fruit brings its own taste. For example, apples add a crisp bite. Berries offer a sweet-tart flavor. Use the same method as with peaches. Adjust sugar based on the fruit's sweetness. To boost flavor, add spices like nutmeg or ginger. A sprinkle of lemon zest brightens the taste. You can also use flavored extracts. Almond or lemon extracts add a unique twist. For a touch of warmth, consider adding a splash of bourbon or rum to the fruit mix. For a gluten-free galette, use a gluten-free pie crust. Many stores sell good options. You can also make your own with gluten-free flour. For dairy-free, skip the egg wash. Brush the crust with almond milk instead. This keeps the crust golden and tasty. Enjoy the same delicious results! For the complete recipe, check out the Full Recipe. To keep your peach galette fresh, cover it with plastic wrap. You can also use an airtight container. Store it in the fridge for up to three days. Make sure the galette cools completely before you cover it. This way, the crust stays crisp. To reheat your galette, preheat your oven to 350°F (175°C). Place the galette on a baking sheet lined with parchment paper. Heat for about 10 to 15 minutes or until warm. This method keeps the crust flaky. Avoid using the microwave, as it can make the crust soggy. You can freeze peach galette for later. Wrap it tightly in plastic wrap and then in foil. It can stay in the freezer for up to three months. When you're ready to enjoy it, thaw it overnight in the fridge. Then, reheat as described above. This way, you can have a delicious dessert anytime! For the full recipe, refer to the previous sections. A peach galette is a free-form pie made with fresh peaches. It features a flaky crust that wraps around the juicy fruit filling. Unlike traditional pies, a galette has a rustic look. It is simple to make and perfect for showcasing ripe peaches. You will love how the sweet, tender peaches shine in this dish. Yes, you can use frozen peaches. Just remember to thaw and drain them first. This prevents excess moisture in the galette. If you use frozen fruit, the galette may need a few extra minutes in the oven. The flavors will still be delightful, and this is a great option when fresh peaches are not in season. Your galette is done when the crust is golden brown. You should also see the peach filling bubbling. This usually takes about 25 to 30 minutes at 400°F (200°C). Keep an eye on it during the last few minutes. A perfectly baked galette will smell heavenly and look irresistible. Serve your peach galette warm or at room temperature. It pairs well with vanilla ice cream or whipped cream. A sprinkle of coarse sugar adds a nice touch. You can also add a fresh mint sprig for color. These options enhance the flavors and make your dessert even more enjoyable. For more details, check the Full Recipe. Making a peach galette is simple and fun. We covered fresh ingredients, measurements, and baking steps. You learned tips for ripe peaches, pie crusts, and great finishes. Variations can make your galette unique, and storage tips help keep it fresh. As you create this treat, enjoy the process and the tasty results. Happy baking!

Easy Peach Galette Simple and Delicious Dessert Recipe

Are you ready to impress your friends and family with a dessert that’s as easy as it is delicious? In

- 2 medium zucchini, sliced into half-moons - 2 medium yellow squash, sliced into half-moons - 1 red bell pepper, chopped into bite-sized pieces - 1 small red onion, thinly sliced - 3 cloves garlic, minced - 1 tablespoon extra virgin olive oil - 1 teaspoon fresh thyme leaves - 1 tablespoon balsamic vinegar - Sea salt and freshly cracked black pepper, to taste - Fresh basil leaves, torn, for garnish Summer squash sauté is simple and full of flavor. I love using fresh vegetables in my cooking. Zucchini and yellow squash are two of my favorites. They are easy to find and work well together. You can add a splash of color to your dish with a red bell pepper. The sweet taste of red bell pepper pairs well with the squash. A small red onion adds depth and sweetness. Garlic brings out the best in all the veggies. Extra virgin olive oil is a must for sautéing. It gives a rich flavor and helps cook the vegetables evenly. Fresh thyme leaves add a lovely aroma. The balsamic vinegar adds a bit of tang. Don't forget the sea salt and black pepper to enhance the taste. Want to mix things up? You can add other summer veggies, like corn or more peppers. If you want protein, try adding chicken or shrimp. To make this dish, you only need a few tools. A large skillet or frying pan works best. A cutting board and knife are needed to prep your veggies. Measuring spoons help you get the right amounts. For the full recipe, check the [Full Recipe] section. - Heat olive oil in the skillet. - Prepare vegetables by slicing, chopping, and mincing. Start by placing a large skillet over medium heat. Pour in one tablespoon of extra virgin olive oil. Let it heat until it shimmers. This step ensures your vegetables cook evenly and gain flavor. Next, prepare your vegetables. Slice two medium zucchini and two medium yellow squash into half-moons. Thinly slice one small red onion. Chop one red bell pepper into bite-sized pieces. Finally, mince three cloves of garlic. Having everything ready makes cooking easier. - Sauté onions and garlic. - Introduce zucchini and yellow squash. - Add red bell pepper and thyme. Once your oil is hot, add the sliced red onion to the skillet. Sauté for about 2-3 minutes. Stir often until the onion turns slightly translucent. This adds a sweet base to your dish. Then, mix in the minced garlic. Cook for one minute while stirring. You want the garlic fragrant, but not browned. Next, add the sliced zucchini and yellow squash. Sauté these for 5-6 minutes. Stir occasionally until all the veggies become tender but still crunchy. Now, toss in the chopped red bell pepper and one teaspoon of fresh thyme leaves. Cook for an additional 2-3 minutes. This step combines all the flavors nicely. - Augment with balsamic vinegar. - Season with salt and pepper. - Garnish with fresh basil. Drizzle one tablespoon of balsamic vinegar over your sautéed vegetables. Stir gently to mix. This adds a tangy depth to the dish. Season it with sea salt and freshly cracked black pepper to taste. Finally, remove the skillet from heat. Garnish with torn fresh basil leaves. This adds color and fresh flavor. You can find the Full Recipe here for more details! To get the best crunch from your summer squash, adjust the cooking time. Sauté for about 5-6 minutes, or until the veggies are soft but still firm. If you want crunchier squash, reduce the time. Stir often to promote even cooking. Use a spatula to gently lift and mix the squash as they cook. This helps all sides get that nice golden touch. Add herbs and spices to enhance the taste. Fresh thyme is a great choice, but feel free to try oregano or rosemary. You can add them early in the cooking process. For salty or acidic flavors, add balsamic vinegar near the end. This keeps the flavors bright. Sea salt and black pepper should also be added at that time for the best flavor balance. Pair your sauté with proteins and starches for a complete meal. Grilled chicken or shrimp works great. Serve it with rice or quinoa to round it out. For a pretty presentation, use a large shallow bowl. Place the sauté in the center and sprinkle fresh basil on top. A drizzle of balsamic vinegar can add a lovely touch. This will make your dish look as good as it tastes! {{image_4}} This sauté is simple to make gluten-free and vegan. Use fresh vegetables like zucchini and yellow squash. They are naturally gluten-free. For a vegan touch, skip any cheese or animal products. You can enjoy this dish without worry. You can change the vegetables based on the season. In summer, use fresh corn or cherry tomatoes. In fall, try adding sweet potatoes or kale. This keeps the dish fresh and exciting throughout the year. You can even add roasted peppers for a smoky flavor. Add spices from around the world to change the taste. For a spicy kick, try adding cumin or smoked paprika. If you want an Italian flair, sprinkle in some oregano or basil. These spices can create a unique twist on the classic recipe. You can mix and match flavors to find what you love best. Want to try more ideas? Check the Full Recipe for inspiration! To store your summer squash sauté, let it cool first. Use an airtight container. This keeps moisture out and flavor in. You can keep it in the fridge for about 3 to 4 days. Always check for signs of spoilage before eating. To freeze sautéed vegetables, place them in a freezer-safe bag. Remove as much air as you can. This helps prevent freezer burn. You can freeze for up to 3 months. When ready to eat, thaw in the fridge overnight. Reheat gently on the stove or in the microwave. You can use leftovers in many ways. Mix them into pasta or rice for a quick meal. Add them to omelets or frittatas for breakfast. You can also blend them into soups for added flavor. Try using them in a wrap or sandwich for a tasty lunch. For more ideas, check out the Full Recipe. To pick ripe summer squash, look for a firm skin. It should feel heavy for its size. Choose squash with vibrant color and no soft spots. Small to medium squash is best for this dish. These sizes have better flavor and texture. Yes, you can use frozen vegetables. However, fresh squash gives a better taste. Frozen veggies may also release more water when cooked. If using frozen, thaw them first and drain excess moisture. This prevents a soggy dish. Summer Squash Sauté pairs well with grilled chicken or fish. It also goes great with rice or quinoa. For a light meal, enjoy it with a fresh salad. You can even make it a main dish with some crusty bread. Leftovers can stay in the fridge for up to three days. Store them in an airtight container. When reheating, add a splash of water to keep the squash moist. Avoid reheating more than once to maintain flavor. Absolutely! You can add chicken, shrimp, or tofu for extra protein. Cook the protein first and set it aside. Then, add it back during the last few minutes of cooking. This way, the flavors blend nicely. You can find the Full Recipe for Vibrant Summer Squash Sauté in this article. This blog post covered a delicious summer squash sauté. We explored the key ingredients and shared step-by-step cooking instructions. I also offered tips for perfecting your dish, including serving suggestions, variations, and storage advice. In conclusion, you can make this dish your own by adding seasonal veggies or proteins. Enjoy this vibrant recipe now, or get creative with it later. Your kitchen adventures await!

Savory Summer Squash Sauté Quick and Easy Dish

Are you craving a light and tasty summer dish? Look no further! This Savory Summer Squash Sauté is quick to

For the Classic Yellow Squash Casserole, you will need simple, fresh ingredients. Here’s what to gather: - 4 medium yellow squashes, sliced into thin rounds - 1 medium onion, finely diced - 1 cup shredded sharp cheddar cheese - 1 cup crushed buttery crackers - ¼ cup milk - 2 large eggs - 2 tablespoons butter, melted (plus extra for greasing) - 1 teaspoon garlic powder - 1 teaspoon dried thyme - Salt and pepper to taste - Fresh parsley or chives for garnish (optional) These ingredients make a great blend of flavors. The yellow squash shines in this dish. The cheddar cheese brings a nice sharpness. Buttery crackers add a good crunch. Together, they create a warm and comforting side dish. As you prepare, remember to pick fresh squashes for the best taste. Each bite should be flavorful and satisfying. If you want to follow the complete preparation process, check out the Full Recipe. Enjoy your cooking! 1. Preheat oven and prepare baking dish Start by setting your oven to 350°F (175°C). Grease a 9x13 inch baking dish with butter. This helps prevent sticking. 2. Sauté onions and squash In a large skillet, melt 1 tablespoon of butter over medium heat. Add the finely diced onion and cook for 3-4 minutes. The onion should be soft and clear. Then, add your sliced yellow squashes. Sprinkle in garlic powder, thyme, salt, and pepper. Cook for 5-7 minutes. The squash should be tender but still firm. 3. Combine egg mixture with squash mixture In a mixing bowl, whisk together 2 large eggs and ¼ cup of milk until frothy. Then, stir in the remaining melted butter, ½ cup of cheddar cheese, and half of the crushed crackers. Mix until smooth. 4. Transfer to baking dish and add toppings Gently fold the sautéed squash into your egg mixture. Be careful not to mash the squash. Pour this mix into your greased baking dish and smooth the top. 5. Bake until golden brown Sprinkle the rest of the cheddar cheese on top. Add the remaining crushed crackers for crunch. Place the dish in the oven and bake for 25-30 minutes. The casserole should be set and the top golden brown. For the full recipe, check out the detailed instructions above. Choosing the right squash For a great casserole, pick fresh yellow squash. Look for firm squashes with smooth skin. They should feel heavy for their size. Avoid squashes with soft spots or blemishes. Fresh squash gives a better taste and texture. Adjusting seasoning levels Taste is key. Start with the recipe’s garlic powder and thyme. You can add more if you want more flavor. Salt and pepper are also important. Always taste the mixture before you bake. You can adjust to your liking. The importance of cooling before serving Letting your casserole cool for about five minutes helps it set. This small wait makes it easier to serve. It keeps the layers together and makes for a nice presentation. If you cut it too soon, it might fall apart. Make sure to check the [Full Recipe] for all steps and tips! {{image_4}} You can easily change this recipe to fit your taste. Here are some fun ideas: - Adding proteins like chicken or sausage: You can boost the flavor by adding cooked chicken or sausage. Just chop them up and mix them in with the squash. This adds heartiness and makes your dish more filling. - Using different cheese types: While sharp cheddar is great, feel free to swap it out. Try mozzarella for a milder taste or pepper jack for a spicy kick. Each cheese adds its own flavor and texture. - Incorporating other vegetables: Want to sneak in more veggies? Add some chopped bell peppers or spinach. They blend well and add extra nutrients. Just remember to adjust the cooking time, so all veggies are tender. These swaps allow you to make the dish your own. Each variation brings new flavors and textures to the table. Enjoy experimenting! For the full recipe, check out the details above. To keep your Classic Yellow Squash Casserole fresh, follow these tips: - Refrigeration Instructions: Store leftovers in an airtight container. Place them in the fridge within two hours of cooking. This keeps the casserole fresh for up to four days. - Freezing and Reheating Tips: If you want to freeze the casserole, let it cool completely. Then, wrap it tightly in plastic wrap and foil. It can last in the freezer for up to three months. To reheat, thaw it in the fridge overnight. Bake it at 350°F (175°C) until warm, about 25-30 minutes. - Shelf Life of Leftovers: The casserole is best enjoyed fresh. However, if stored properly, it can stay good in the fridge for up to four days. Freezing extends its life to three months, but the texture may change slightly. Following these steps helps keep your dish tasty and safe to eat! For more details, check out the Full Recipe. Yes, you can prepare this casserole ahead of time. Just follow the recipe until you are ready to bake. Cover it well and store it in the fridge for up to 24 hours. When ready to bake, just pop it in the oven. This saves time on busy days and lets the flavors mix well. This casserole pairs well with many dishes. Here are some ideas: - Grilled chicken or fish for a healthy protein option. - A fresh garden salad to add crunch and color. - Roasted vegetables for a hearty side. - Rice or quinoa to soak up the flavors. Yes, this recipe is perfect for vegetarians. It has no meat and uses fresh veggies, cheese, and eggs. You can easily make it vegan by swapping eggs and cheese with plant-based options. This way, everyone can enjoy this tasty dish! This blog covered the key steps for a tasty yellow squash casserole. We listed the ingredients, gave easy instructions, and shared helpful tips. I shared ways to change flavors and textures, too. With proper storage methods, your leftovers will last. I hope you feel confident to try this dish. It's easy, fun, and delicious. Enjoy your cooking!

Classic Yellow Squash Casserole Delightful Side Dish

Looking for a side dish that impresses without the fuss? Let me introduce you to Classic Yellow Squash Casserole. This

- 8 oz elbow macaroni - 2 tablespoons unsalted butter - 2 tablespoons all-purpose flour - 2 cups whole milk - 1 teaspoon garlic powder - 1 teaspoon onion powder - 1 teaspoon Dijon mustard - 1 cup sharp cheddar cheese, shredded - 1 cup Gruyère cheese, shredded - 1 cup mozzarella cheese, shredded - ½ cup crumbled blue cheese - Salt and pepper, to taste - ½ cup breadcrumbs - 2 tablespoons fresh parsley, chopped (for garnish) What are the benefits of sharp cheddar cheese? Sharp cheddar cheese has a strong taste, which adds depth to the dish. It melts nicely, making the sauce creamy and rich. The flavor pairs well with other cheeses. What are the characteristics of Gruyère cheese? Gruyère cheese has a nutty flavor and melts smoothly. It adds a lovely creaminess to the sauce. Its taste enhances the overall flavor profile of the mac and cheese. What is the flavor profile of blue cheese? Blue cheese has a bold and tangy flavor. It offers a unique taste that contrasts well with the other cheeses. This cheese adds a gourmet touch to your mac and cheese. - Large pot for pasta - Whisk and wooden spoon - Baking dish To start, bring a large pot of salted water to a boil. This step is important, as it will help flavor the pasta. Once the water is boiling, add 8 ounces of elbow macaroni. Cook the macaroni for about 7 to 8 minutes. It should be al dente, which means it is cooked but still firm. After cooking, drain the macaroni well and set it aside. Next, we’ll make the cheese sauce. In the same pot, melt 2 tablespoons of unsalted butter over medium heat. When the butter is melted and bubbly, sprinkle in 2 tablespoons of all-purpose flour. Whisk this mixture for about 2 minutes until it turns light golden. This will be our roux. Slowly whisk in 2 cups of whole milk. Keep stirring as it heats up. Let it thicken for about 5 to 7 minutes until creamy. To add flavor, stir in 1 teaspoon of garlic powder, 1 teaspoon of onion powder, and 1 teaspoon of Dijon mustard. Taste the sauce and add salt and pepper to your liking. Now, it’s time to make our dish rich and cheesy. Remove the pot from the heat. Gradually add in the cheeses: 1 cup of sharp cheddar cheese, 1 cup of Gruyère cheese, 1 cup of mozzarella cheese, and ½ cup of crumbled blue cheese. Stir until all the cheeses melt and the sauce is smooth. Finally, mix the drained macaroni back into the cheese sauce. Stir thoroughly so every piece of pasta gets coated with that creamy goodness. This step is key to enjoying a well-balanced dish. For the full recipe, check the details above. To make great mac and cheese, cook your pasta until it’s al dente. This means it should be firm when you bite it. If you overcook it, the pasta will turn mushy when baked. The right heat is also key for your cheese sauce. Keep it on medium heat. This way, the cheese melts without burning. Use good quality cheese for the best flavor. Sharp cheddar gives a wonderful taste, while Gruyère adds richness. I also like to include seasonings like garlic powder and onion powder. These add depth to the dish. You can adjust the seasonings according to your taste. Don’t forget to taste your cheese sauce before mixing in the pasta! Pair your mac and cheese with a fresh salad or some roasted vegetables. This adds color and balance to your meal. To elevate your dining experience, serve it with a glass of white wine, like Chardonnay. It complements the creamy cheese well. For a fun twist, you could even offer a light beer alongside it! {{image_4}} You can make your mac and cheese even better with fun add-ins. Adding vegetables is one way to boost flavor and nutrition. Spinach and broccoli are great choices. They mix well with cheese and add a nice color. You can also try peas or roasted red peppers for extra taste. If you want to add protein, think about crispy bacon or grilled chicken. Bacon gives a nice crunch and a salty flavor. Chicken adds heartiness and pairs well with the cheese. You can mix in cooked sausage for a spicy kick, too. While four cheeses make a great base, you can explore more options. Try different cheeses that melt well, like fontina or gouda. These cheeses can change the flavor and texture. You can also use a mix of sharp and mild cheeses for balance. If you prefer a dairy-free option, there are non-dairy cheeses available. Look for brands that melt nicely. Many made from nuts or soy taste good and work well in recipes. Give your mac and cheese an international flair. For a Mediterranean twist, add feta cheese, olives, or sun-dried tomatoes. These ingredients can add a fresh, tangy flavor that’s unique. If you like heat, try using jalapeños or pepper jack cheese. This spicy version will wake up your taste buds. You can add a bit of hot sauce for extra kick. These variations let you create a dish that suits your tastes and mood. For the full recipe, check out the Four Cheese Mac and Cheese Extravaganza. To keep your Four Cheese Mac and Cheese fresh, store it in an airtight container. This helps lock in flavors and moisture. Place it in the fridge within two hours of cooking. Proper storage keeps it safe to eat. Leftovers will last up to three days in the refrigerator. After that, the quality may drop. When reheating, we want to keep that creamy texture. A good method is to use a microwave. Heat in short bursts, about 30 seconds at a time. Stir in between to ensure even warming. You can also add a splash of milk to revive creaminess. If using an oven, cover the dish with foil. This helps retain moisture and prevents drying out. Bake at 350°F (175°C) until heated through. To freeze mac and cheese, let it cool completely first. Then, portion it into freezer-safe bags. Squeeze out as much air as possible before sealing. Label the bags with dates for easy tracking. It can last up to three months in the freezer. When ready to eat, thaw it in the fridge overnight. For best results, reheat gently, adding a little milk or cream. This helps restore its rich texture. The best cheese for mac and cheese often blends flavors and textures. I recommend using: - Sharp cheddar cheese: It adds a rich, tangy flavor. - Gruyère cheese: This cheese brings a nutty taste and melts well. - Mozzarella cheese: It offers a stretchy, gooey texture. - Blue cheese: This adds a bold flavor that enhances the dish. Combining these cheeses creates a balanced and rich taste. You can also try other cheeses like fontina or gouda for unique flavors. Yes, you can make mac and cheese without baking. Here are two easy methods: 1. Stove-top method: After mixing the pasta and cheese sauce, serve it directly. Heat on low until warm. 2. Microwave method: Place the mac and cheese in a microwave-safe dish. Heat for a few minutes, stirring halfway through. These methods save time and still give you a creamy dish. To make your mac and cheese creamier, follow these tips: - Use whole milk: It creates a richer sauce compared to low-fat milk. - Add cream cheese: Mixing in cream cheese enhances the creamy texture. - Incorporate more cheese: Use extra cheese like mascarpone or cream cheese for added creaminess. - Cook pasta properly: Make sure the pasta is al dente for a better texture. These steps will help you achieve a velvety mac and cheese before baking. Yes, you can prep mac and cheese ahead of time. Here’s how: - Make the cheese sauce: Prepare the sauce and store it in the fridge. - Cook the pasta: Cook and cool the pasta. Mix with the sauce later. - Assemble the dish: Combine pasta and cheese sauce in a baking dish. Cover and refrigerate. You can bake it later. Just add a few minutes to the baking time if it's cold. This way, you can enjoy a delicious meal with less fuss! Four cheese mac and cheese is a delightful dish that combines rich flavors and creamy textures. We explored the essential ingredients, including various cheeses and key kitchen tools. I shared clear steps to cook the pasta and make a smooth cheese sauce, along with tips to enhance the flavor. Remember, you can customize this dish with different cheeses or add-ins. Enjoy your cooking journey and create a meal that brings joy to your table!

Four Cheese Mac and Cheese Rich and Creamy Delight

If you’re craving comfort food that warms the soul, look no further! My Four Cheese Mac and Cheese is the

To make classic banana bread, gather these items: - 3 ripe bananas, mashed until smooth - 1/3 cup virgin coconut oil, melted - 1/2 cup packed brown sugar - 1 large egg, gently beaten - 1 teaspoon pure vanilla extract - 1 teaspoon baking soda - A pinch of sea salt - 1 cup all-purpose flour - 1/2 cup chopped walnuts or pecans (optional) - 1/2 teaspoon ground cinnamon (optional) Ripe bananas are key for this recipe. They give the bread sweetness and moisture. Choose bananas that are brown and soft. Virgin coconut oil adds a rich, subtle flavor. It also keeps the bread moist. Brown sugar enhances the taste with its deep notes. Don't skip the egg; it binds everything together. Pure vanilla extract brightens the flavor. Baking soda is your leavening agent, making the bread rise. A pinch of sea salt balances the sweetness. All-purpose flour forms the base of your batter. You can add nuts for crunch or cinnamon for warmth. For the full recipe, check the detailed instructions to create this delightful treat. First, preheat your oven to 350°F (175°C). This step warms up the oven for even baking. Next, grab a 4x8 inch loaf pan. You can grease it with coconut oil or line it with parchment paper. This makes it easy to remove the bread later. In a large bowl, mash the ripe bananas until smooth. Add in the melted coconut oil. Mix them well until they blend together. Now, add the brown sugar, beaten egg, and vanilla extract. Stir this mixture until everything is well combined. Sprinkle the baking soda and a pinch of sea salt over the wet mix. Gently fold them into the batter so they mix in well. Next, gradually add the all-purpose flour. Stir it in until the flour is just combined. Be careful not to overmix! If you like, you can fold in chopped nuts or a bit of ground cinnamon at this point. Once your batter is ready, pour it into the prepared loaf pan. Spread it out evenly with a spatula. Now, place the loaf pan in your preheated oven. Bake for 50 to 60 minutes. The bread is done when a toothpick inserted comes out clean or with a few crumbs. After baking, let it cool in the pan for about 10 minutes. Then, transfer it to a wire rack to cool completely. Enjoy your fresh banana bread! For the complete instructions, check out the Full Recipe. To make great banana bread, do not overmix. Overmixing makes the bread dense and tough. Mix just until you see no dry flour. The right bananas are key too. Use bananas that are very ripe with brown spots. They are sweeter and give great flavor. Add spices to boost flavor. Cinnamon or nutmeg brightens the taste. You can also mix in some vanilla or a pinch of ginger. If you want extra fun, try adding chocolate chips or dried fruits. Nuts like walnuts or pecans also add a nice crunch. For a lovely presentation, slice the banana bread warm. Serve it with creamy butter or a drizzle of honey. You can also add fresh banana slices or a sprig of mint to make it look special. This makes your banana bread not just tasty but also beautiful. For the full recipe, check the Banana Bliss Bread 🥖 section above. {{image_4}} You can make banana bread healthier with simple swaps. One great option is to use applesauce instead of coconut oil. This change cuts down on fat while keeping the bread moist. You can use a 1:1 ratio, so if the recipe calls for 1/3 cup of oil, use 1/3 cup of unsweetened applesauce. Another option is to use whole wheat flour instead of all-purpose flour. Whole wheat flour adds fiber and nutrients. It gives a nutty flavor, making your banana bread even better. Substitute the same amount of flour in the recipe for a healthier twist. Want to jazz up your banana bread? Add chocolate chips or dried fruits like raisins or cranberries. These ingredients bring sweetness and chewiness. You can use about 1/2 cup of chocolate chips or fruit. Mix them into the batter before pouring it into the loaf pan. Nuts also add crunch and flavor. Try walnuts or pecans for a classic taste. You can even experiment with different nuts like almonds or hazelnuts. Just chop them up and fold them into the batter. If you need a gluten-free option, you can use gluten-free flour blends. Look for a blend that works for baking. Measure it the same as all-purpose flour for a smooth swap. For vegan banana bread, you can replace the egg with a flax egg. To make one, mix one tablespoon of ground flaxseed with three tablespoons of water. Let it sit for about five minutes to thicken. This will help bind the ingredients without using any eggs. These variations let you enjoy banana bread in many ways. Try them out and see what you like best! For the full recipe, be sure to check out the complete article. Store banana bread at room temperature for up to three days. Keep it in an airtight container or wrap it tightly in plastic wrap. If you must refrigerate it, use a sealed container. However, this may dry out the bread. To freeze banana bread, wrap it tightly in plastic wrap, then place it in a freezer bag. You can freeze it for up to three months. For best results, slice the bread before freezing. This makes it easy to thaw only what you need. To thaw, leave it at room temperature for a few hours or microwave individual slices for a quick treat. Check for signs of spoilage before eating banana bread. Look for mold or an off smell. If the bread feels dry or overly hard, it may not taste good. Slices should be soft and moist. Enjoy your banana bread, and remember to check it often! For the best banana bread, use very ripe bananas. Look for bananas that are mostly brown. They should feel soft when you press them. The sweeter and softer they are, the better your bread will taste. This helps create a moist and flavorful loaf. Yes, you can make banana bread without an egg. Use a simple substitute like applesauce or mashed banana. About 1/4 cup of applesauce works well for one egg. This keeps the bread moist and helps it rise. You can also use flaxseed meal mixed with water. Mix one tablespoon of flaxseed with three tablespoons of water and let it sit for a few minutes. To check if your banana bread is done, use a toothpick. Insert it into the center of the loaf. If it comes out clean, your bread is ready. If it has some crumbs, it may need a few more minutes. You can also look for a golden-brown top. The sides should pull away slightly from the pan. Yes, you can double the banana bread recipe. Use a larger loaf pan or two smaller ones. Be sure to adjust the baking time. Larger loaves may take longer to bake. Start checking for doneness a bit earlier than the original time. To slice banana bread, use a serrated knife. This helps create even slices without squishing the bread. Make sure your bread is cool before slicing. This helps maintain its shape and texture. Aim for slices about one inch thick for the best serving size. For the full recipe, check out my Banana Bliss Bread 🥖 section. To sum it up, making banana bread is simple and fun. You need ripe bananas, coconut oil, brown sugar, and a few more items. Follow the steps, mix your ingredients, and bake at 350°F. Remember, not overmixing helps create a great texture. You can add your favorite flavors and even store it for later. Whether you choose healthier options or try new flavors, there’s always a way to make this bread your own. Enjoy each bite of your moist, delicious banana bread!

Classic Banana Bread Irresistible and Simple Recipe

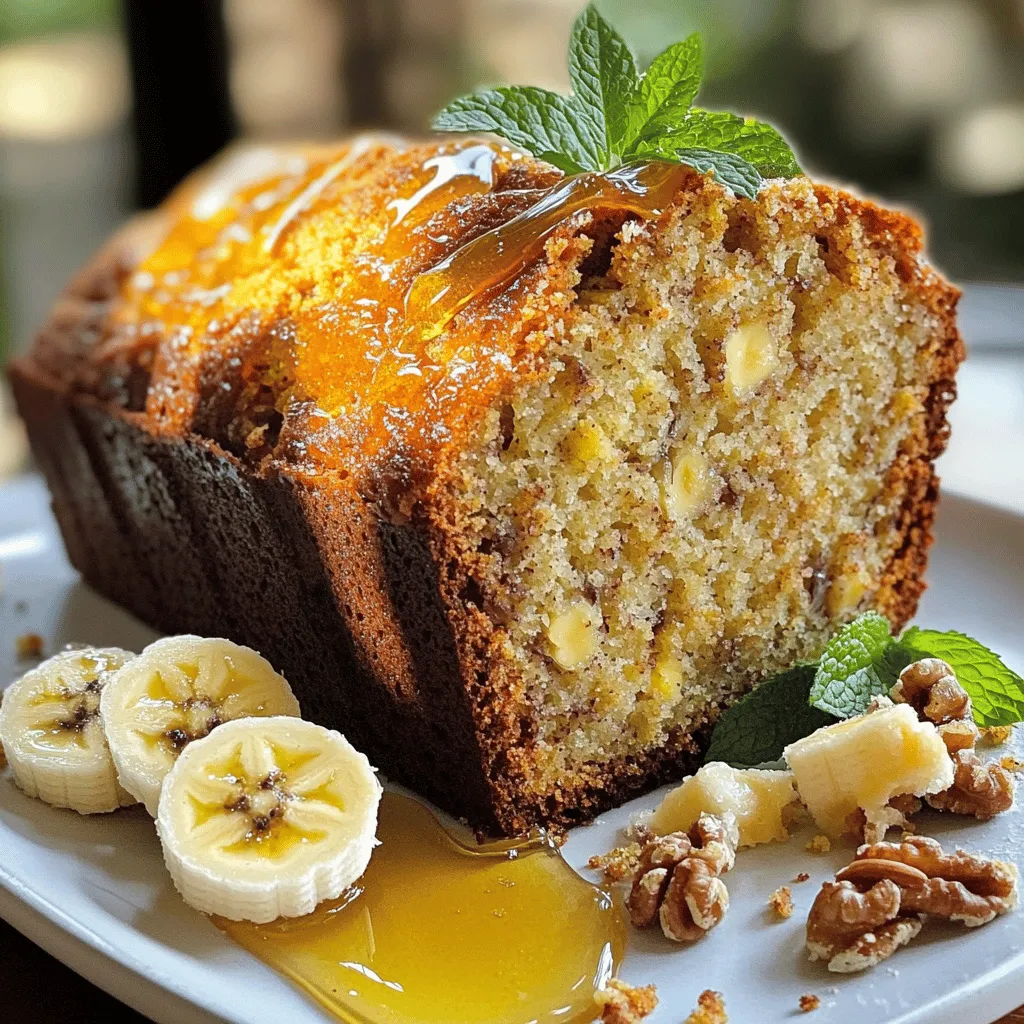
Are you ready to bake the perfect loaf of classic banana bread? With just a few simple ingredients, you can

To make the best s'mores cookie bars, gather these simple ingredients: - 1 cup unsalted butter, softened - 1 cup brown sugar, tightly packed - 1/2 cup granulated sugar - 2 large eggs, at room temperature - 2 teaspoons pure vanilla extract - 2 1/2 cups all-purpose flour - 1 teaspoon baking soda - 1/2 teaspoon fine sea salt - 1 cup semi-sweet chocolate chips - 1 cup mini marshmallows - 1/2 cup crushed graham crackers These ingredients blend together to create a rich, gooey treat. The butter adds a soft texture, while the sugars bring sweetness. Eggs help bind the mix, giving it structure. Flour is the base, making the bars hold together. I use semi-sweet chocolate chips for a balanced flavor. Mini marshmallows melt perfectly, adding that classic s'mores taste. Crushed graham crackers add crunch and a nod to the campfire favorite. When you gather these items, make sure they are fresh. Fresh ingredients yield the best results. This recipe is not just easy; it’s also fun. You can enjoy making these bars with friends or family. For the complete details on how to bring these delicious bars to life, check out the Full Recipe. Set your oven to 350°F (175°C). Grab a 9x13 inch baking pan. Lightly grease it with cooking spray or line it with parchment paper. This helps with easy removal after baking. In a large bowl, use an electric mixer. Beat the softened butter, brown sugar, and granulated sugar together. Mix on medium speed until it's light and fluffy. This takes about 2 to 3 minutes. Add the eggs one at a time to the butter-sugar mix. Ensure each egg is fully mixed in before adding the next. Then, stir in the vanilla extract until it blends well with the mix. In another bowl, whisk together the all-purpose flour, baking soda, and sea salt. Gradually mix this dry mix into the wet ingredients. Blend gently until just combined. Avoid overworking the dough. Now, gently fold in the semi-sweet chocolate chips and crushed graham crackers. Use a spatula for this step. Save a bit of both for topping later. Spread half of the cookie dough into the bottom of your prepared pan. Smooth it out evenly. Sprinkle half of the mini marshmallows over this layer. Make sure they are well spread. Carefully pour the rest of the cookie dough over the marshmallows. Press it down gently to create a smooth layer. Top with the reserved mini marshmallows and chocolate chips evenly. Place the pan in your preheated oven. Bake for 25 to 30 minutes. The top should turn golden brown. A toothpick inserted in the center should come out clean. Let the bars cool in the pan for 15 minutes. Use the parchment to lift the entire bar onto a wire rack. Let it cool completely before cutting into squares. For the complete recipe, check the Full Recipe section. To ensure even baking, start by preheating your oven. Set it to 350°F (175°C). Use a light-colored metal pan. Dark pans can cause the edges to brown too fast. Rotate the pan halfway through baking. This helps all sides cook evenly. Keep an eye on the bars during the last few minutes. The top should turn golden brown when done. Ingredient temperature matters. Use room temperature butter and eggs. This helps them mix better, creating a smooth batter. Cold ingredients can lead to a dense texture. Let your butter sit out for about 30 minutes before you start. It should feel soft, not melted. Room temperature eggs also blend well, giving you a light and airy cookie bar. To present s'mores cookie bars elegantly, use a rustic wooden platter. Cut the bars into neat squares for a tidy look. Drizzle melted chocolate over the top for a fancy touch. You can also sprinkle more crushed graham crackers and mini marshmallows on top. This adds color and texture. Serve them warm with a side of ice cream for a special treat. {{image_4}} You can switch up the chocolate in these bars. Dark chocolate chips add a rich flavor. If you prefer something sweeter, use white chocolate chips. Each type brings its twist. Feel free to mix and match! A blend of semi-sweet and dark chocolate creates a lovely taste balance. Nuts can add great crunch to your s'mores cookie bars. Chopped pecans or walnuts work well. They add texture and a nutty flavor. Just fold in about half a cup when mixing in the chocolate chips. You can also try almond or hazelnut for a unique touch. If you need a gluten-free version, substitute the all-purpose flour. Use almond flour or gluten-free all-purpose flour. These options keep the texture nice and soft. Just make sure the other ingredients are gluten-free too. This way, everyone can enjoy s'mores cookie bars! To keep your s'mores cookie bars fresh, store them in an airtight container. Place a piece of parchment paper between layers to prevent sticking. They stay good on the counter for up to four days. If you want them to last longer, refrigerate them. Just let them come to room temperature before enjoying. Freezing s'mores cookie bars is easy. First, cut them into squares. Wrap each square in plastic wrap tightly. Then, place the wrapped bars in a freezer-safe bag or container. They can last in the freezer for up to three months. When you are ready to eat them, simply thaw in the fridge overnight. To warm up your cookie bars, preheat your oven to 350°F (175°C). Place the bars on a baking sheet. Heat them for about 5 to 10 minutes. This method keeps the texture soft and gooey. You can also use a microwave. Heat for about 10-15 seconds. Just be careful not to overheat them. Enjoy the melty goodness! Cookie bars and cookies differ mainly in shape and texture. Cookies are small, round, and often crisp. They bake individually on a sheet. Cookie bars are baked in one large pan. They are thicker and chewier, offering a more cake-like texture. Yes, you can make these S'mores Cookie Bars ahead of time. Prepare the bars and store them in an airtight container. You can also freeze them for up to three months. Just thaw before serving. This makes them perfect for parties or family gatherings. Check the edges and top of the bars. They should be golden brown and firm to the touch. Insert a toothpick in the center. If it comes out clean or with a few crumbs, the bars are ready. Avoid overbaking, as it can dry them out. For the complete S'mores Cookie Bars recipe, including step-by-step instructions, please refer to the Full Recipe. In this post, we covered tasty s'mores cookie bars. We explored ingredients, step-by-step instructions, and helpful tips. You can use variations to make these bars your own. Plus, we shared how to store or freeze leftovers. With these insights, you can enjoy making these treats easily. Baking should be fun and rewarding. You now have everything you need to create delicious s'mores cookie bars that everyone will love. Enjoy your baking adventure!

S’mores Cookie Bars Irresistible Treat for Everyone

If you love s’mores, you’re in for a treat! S’mores Cookie Bars are gooey, sweet, and oh-so-easy to make. These

- 4 boneless, skinless chicken breasts - 1 cup freshly grated Parmesan cheese - 1 cup panko breadcrumbs - 2 teaspoons garlic powder - 1 teaspoon dried oregano - 1 teaspoon smoked paprika - Salt and freshly ground black pepper to taste - 2 large eggs - 2 tablespoons Dijon mustard - Olive oil spray or 2 tablespoons extra virgin olive oil - 1 tablespoon fresh parsley for garnish To make Crispy Parmesan Crusted Chicken, you will need a few simple ingredients. The main components are the chicken, cheese, and breadcrumbs. I use boneless and skinless chicken breasts because they cook evenly and stay juicy. Freshly grated Parmesan cheese gives the dish a rich flavor. Panko breadcrumbs are key for that extra crunch. For seasonings, I like garlic powder, oregano, and smoked paprika. These add depth to the dish. Don't forget salt and pepper to bring everything together. You also need eggs and Dijon mustard. They help the breadcrumbs stick to the chicken. Lastly, a little olive oil spray or extra virgin olive oil can boost crispiness. You can garnish with fresh parsley for a pretty touch. This recipe is easy and perfect for any weeknight meal. If you want the full recipe, check back for a detailed cooking guide. - Preheat oven to 400°F (200°C). - Line baking sheet with parchment paper. First, set your oven to 400°F (200°C). This step ensures your chicken cooks evenly. Next, grab a baking sheet and line it with parchment paper. This helps prevent sticking and makes cleanup easy. - Whisk eggs and Dijon mustard together. - Combine dry ingredients in a separate bowl. In a shallow bowl, whisk together two large eggs and two tablespoons of Dijon mustard. This mixture binds the breadcrumbs to the chicken. In another bowl, mix one cup of grated Parmesan cheese, one cup of panko breadcrumbs, two teaspoons of garlic powder, one teaspoon of dried oregano, one teaspoon of smoked paprika, and a pinch of salt and pepper. Make sure the dry ingredients blend well for even flavor. - Dip chicken into egg mixture. - Coat with breadcrumb mixture. - Space chicken on baking sheet before baking. Take a chicken breast and dip it into the egg mixture. Make sure it's fully coated. Let any extra egg drip off. Next, place the chicken in the breadcrumb mixture. Press it down gently to coat both sides. Repeat this for all chicken breasts. Once coated, space them out on the prepared baking sheet. If you like, use olive oil spray or drizzle olive oil over them for extra crispiness. Now, your chicken is ready to bake! For the full recipe, refer back to the beginning. To make your chicken super crispy, use panko breadcrumbs. They add a nice crunch. You can also spray the chicken with olive oil or drizzle it lightly with oil. This step adds even more texture. Bake your chicken for 20-25 minutes. Look for a golden brown color. To check if it's done, use a meat thermometer. The internal temperature should reach 165°F (75°C). This ensures your chicken is safe to eat. Once your chicken is done, let it rest for 5 minutes. This allows the juices to settle and keeps it juicy. When serving, sprinkle some fresh parsley on top. It adds a pop of color and flavor. For a complete meal, try serving it with a fresh salad or roasted vegetables. Enjoy your Crispy Parmesan Crusted Chicken! For the full recipe, refer to the previous section. {{image_4}} You can switch up the cheese for new flavors. Mozzarella or cheddar works well. These cheeses melt nicely and add great taste. You can also play with herbs and spices. Try Italian seasoning for a warm flavor. Add cayenne pepper for some heat. These small changes can make your dish exciting. Want a crunchy twist? Use crushed cornflakes or potato chips. They give a unique texture and flavor. They can make your chicken even crunchier. This swap is fun and easy. Just crush them and use them like breadcrumbs. Pair your chicken with delicious sides. A fresh salad makes a great match. Roasted vegetables add color and nutrition. You can also serve it with rice or pasta. These sides help create a complete meal. They complement the chicken nicely. Enjoy your cooking adventure with these ideas! You should store leftover chicken in an airtight container. This keeps it fresh and tasty. Consume it within 3-4 days. If you wait too long, the chicken may spoil. To freeze leftover chicken, wrap each piece tightly in freezer-safe plastic wrap. This helps prevent freezer burn. Place the wrapped chicken in a freezer bag, and label it with the date. When you want to eat your frozen chicken, thaw it in the fridge overnight. For best results, reheat the chicken in the oven at 350°F (175°C) until it is hot. This keeps the crust crispy and the inside juicy. Enjoy your meal! Yes, you can use chicken thighs. Chicken thighs are juicier and have more flavor. They also have more fat, which makes them tender when cooked. However, they take a bit longer to cook than breasts. If you choose thighs, check the internal temperature to ensure they reach 165°F (75°C). To keep your chicken juicy, start by marinating it. Use a mix of olive oil and lemon juice to add moisture. Cook at 400°F (200°C) to seal in the juices. Avoid overcooking; check the internal temperature early. Let the chicken rest for five minutes after baking. This helps the juices settle back into the meat. You can serve many sides with this chicken. A fresh garden salad pairs well and adds crunch. Roasted vegetables like broccoli or carrots add color and nutrition. For a heartier meal, consider mashed potatoes or pasta. Lemon wedges brighten the dish and enhance flavors. For the full recipe, check the ingredients and instructions included in this section. Here’s a quick reference for Crispy Parmesan Crusted Chicken: - 4 boneless, skinless chicken breasts - 1 cup freshly grated Parmesan cheese - 1 cup panko breadcrumbs - 2 teaspoons garlic powder - 1 teaspoon dried oregano - 1 teaspoon smoked paprika - Salt and freshly ground black pepper - 2 large eggs - 2 tablespoons Dijon mustard - Olive oil spray or 2 tablespoons extra virgin olive oil - 1 tablespoon fresh parsley for garnish In summary, we covered how to make Crispy Parmesan Crusted Chicken. You learned about key ingredients like chicken, Parmesan, and panko breadcrumbs. We explored step-by-step instructions and tips for achieving the perfect crunchy texture. Don't forget about the tasty variations and how to store leftovers, too. This dish is simple and tasty, perfect for any meal. Try it your way and enjoy every bite!

Crispy Parmesan Crusted Chicken Simple and Tasty Meal

If you’re looking for a simple and tasty meal that impresses, you’ve landed in the right place! My Crispy Parmesan

- 2 cups shredded cooked chicken - 1 cup cream cheese, softened - 1/2 cup Greek yogurt - 1/2 cup hot sauce (e.g., Frank's RedHot) - 1 cup shredded sharp cheddar cheese - 1/2 cup crumbled blue cheese (optional) The main ingredients create the base of the dip. The shredded chicken gives it a hearty texture. I prefer rotisserie chicken for the best flavor. The cream cheese and Greek yogurt make it creamy and rich. Hot sauce adds the signature kick that makes this dip a favorite. The cheddar cheese enhances the taste and brings a sharpness to the mix. Blue cheese is optional but provides a wonderful tang. - 1 tablespoon ranch seasoning mix - 1/4 teaspoon garlic powder - Salt and pepper to taste - Fresh chives or sliced green onions for garnish Seasonings add depth to the flavor. Ranch seasoning gives a nice herby touch. Garlic powder enhances the overall taste without overpowering it. A pinch of salt and pepper helps to bring out all the flavors. Finally, fresh chives or green onions add a bright color and a slight crunch. These small touches make a big difference in the final dish. You can find the full recipe for Buffalo Chicken Dip by following the link. Enjoy your cooking! - Preheat the oven to 350°F (175°C). - Blend chicken, cream cheese, and Greek yogurt together in a bowl. Start by warming your oven. This helps the dip cook evenly. While it heats, take your shredded chicken and add it to a big bowl. Next, toss in the cream cheese. Make sure it is soft. This makes mixing easier. Then, add the Greek yogurt. Use a fork or hand mixer to blend. You want it to be smooth and creamy. - Add remaining ingredients and mix well. - Transfer to a baking dish. - Bake until bubbly (20-25 minutes). Now, it’s time to add the fun stuff! Pour in the hot sauce, sharp cheddar, and blue cheese if you like it. Sprinkle in the ranch mix and garlic powder. Stir everything until well mixed. Taste it! You can add salt and pepper if needed. Next, take a baking dish and spread the mixture in it. Make sure it is even across the top. Now, place the dish in your preheated oven. Set a timer for 20-25 minutes. You will know it’s done when it is bubbly and the edges turn light brown. Your Buffalo Chicken Dip is almost ready! Let it cool for a few minutes. Then, garnish it with fresh chives or green onions for a pop of color. Serve it warm with chips, celery, or carrot sticks for dipping. Enjoy this tasty treat! For the complete recipe, check out the Full Recipe. Choosing the right chicken is key. I prefer using rotisserie chicken. It has great flavor and saves time. Shredded chicken works best. You can also cook chicken breasts if you prefer. For creamy consistency, use softened cream cheese. This helps blend smoothly. Greek yogurt gives a nice tang and creaminess. Mix everything well until it’s smooth. If it feels too thick, a splash of milk can help. The best dippers for Buffalo Chicken Dip are crunchy! Try crispy tortilla chips, celery sticks, or carrot sticks. Sliced bell peppers are also great. They add color and crunch. For creative presentation, serve the dip in a fun bowl. Arrange dippers around it nicely. You can garnish with fresh chives or green onions for a pop of color. This makes your dish look even more appetizing. {{image_4}} When it comes to cheese, you can get creative. You can use different types of cheese to change the flavor. For a milder taste, try mozzarella. For something sharper, use pepper jack. This adds a nice kick! If you want a dairy-free option, choose plant-based cream cheese. You can also find dairy-free cheeses that melt well. These options let everyone enjoy this dip. Are you a fan of heat? You can easily adjust the spice level. Start with less hot sauce and add more as needed. This way, you can control how spicy it gets. For unique flavors, consider adding spices like paprika or cayenne pepper. These spices can add depth and interest. You can even mix in some taco seasoning for a fun twist. Make it your own! To store leftovers, place the Buffalo Chicken Dip in an airtight container. Make sure the lid seals tightly to keep the dip fresh. It can last in the fridge for about 3 to 5 days. Always check for any off smells or changes in texture before consuming. If you notice anything unusual, it’s best to toss it out to be safe. When reheating, the best method is to use the oven. Preheat your oven to 350°F (175°C). Place the dip in an oven-safe dish and cover it with foil. Heat for about 15 minutes or until it’s warm throughout. You can also use the microwave, but be careful not to overheat it, as this can make the dip dry. Yes, Buffalo Chicken Dip can be frozen! Store it in a freezer-safe container. It will keep well for up to 2 months. When you're ready to eat it, thaw it in the fridge overnight before reheating. Can I make Buffalo Chicken Dip ahead of time? Yes, you can make Buffalo Chicken Dip ahead of time. Prepare the dip and store it in the fridge. When you’re ready to serve, just bake it. This helps mix the flavors together better. What are the best chips to serve with this dip? Tortilla chips are the best choice. They are sturdy and hold up well. You can also use veggie sticks like celery or carrots. They add a nice crunch and freshness. How to fix a dip that’s too spicy? If your dip is too spicy, add more cream cheese or Greek yogurt. This will balance the heat. You can also add some shredded cheese. It helps cool the flavor down. Can I use canned chicken instead of cooked chicken? Yes, you can use canned chicken. It’s quick and easy. Just make sure to drain it well before mixing. This saves time when you want to whip up the dip fast. How can I make it healthier? To make it healthier, use low-fat cream cheese and Greek yogurt. You can also reduce the amount of cheese. Adding more veggies, like chopped spinach, can enhance the nutrition too. You can create a delicious Buffalo Chicken Dip with simple ingredients. We covered the main ingredients, step-by-step instructions, and helpful tips. You can make it your own by trying different cheeses and spice levels. Don't forget to store leftovers properly for later enjoyment. Now, you have all the tools to impress friends and family with this tasty dish. Enjoy making and sharing your Buffalo Chicken Dip!

Buffalo Chicken Dip Flavorful Party Favorite Recipe

Buffalo Chicken Dip is the ultimate party hit you need on your table! With creamy, cheesy goodness and a spicy

To make honey garlic glazed salmon, you need simple yet tasty ingredients. Here is the list: - 4 salmon fillets (6 ounces each) - 1/4 cup honey - 3 tablespoons soy sauce - 4 cloves garlic, minced - 2 tablespoons fresh ginger, grated - 1 tablespoon sesame oil - 1 tablespoon olive oil - Juice of 1 lime - Salt and pepper to taste - 2 green onions, sliced (for garnish) - 1 tablespoon sesame seeds (for garnish) These ingredients create a rich and sweet glaze that enhances the salmon's natural flavor. The honey adds sweetness, while the garlic and ginger bring warmth. The soy sauce ties it all together with umami notes. Using fresh ingredients makes a big difference in taste. You want your salmon to shine, so opt for quality fish. The right balance of flavors will make everyone at your table smile. For the full recipe, check out the Honey Garlic Glazed Salmon section. Happy cooking! - Combine honey, soy sauce, garlic, ginger, sesame oil, lime juice, salt, and pepper. - Whisk the ingredients until fully blended. I love making this marinade. It takes just a few minutes and boosts flavor. The mix of honey and soy sauce gives a sweet and salty taste. Garlic and ginger add a nice kick. This blend will coat the salmon in a tasty glaze. - Place salmon fillets in a shallow dish or resealable bag. - Pour marinade over the fillets and refrigerate. After preparing the marinade, it's time to marinate the salmon. I recommend using a shallow dish or a resealable bag. This way, the salmon soaks up all the flavors. I usually let it sit for at least 30 minutes. If you have time, marinating for up to 2 hours makes it even better. - Preheat oven to 400°F (200°C). - Sear salmon skin-side down in an oven-safe skillet. - Flip and pour remaining marinade over salmon before baking. - Bake for 8-10 minutes, then broil for 1-2 minutes if desired. Once marinated, preheat your oven to 400°F (200°C). I like to heat an oven-safe skillet with olive oil over medium-high heat. When the oil shines, place the salmon skin-side down. This step creates a crispy skin. After 3-4 minutes, flip the fillets and pour any leftover marinade on top. Bake for 8-10 minutes until the salmon flakes easily. If you want a caramelized glaze, broil it for 1-2 minutes. Keep an eye on it to avoid burning. Don't forget to check the Full Recipe for all steps and tips! To get that crispy skin on your salmon, make sure your skillet is hot. Heat it over medium-high heat until the oil shimmers. This step is key for a great texture. Also, avoid overcrowding the pan. If you add too many fillets at once, they will steam rather than sear. Cook them in batches if needed. For the best taste, marinate your salmon for at least 30 minutes. If you have time, try marinating for up to 2 hours. This will let the flavors really soak in. When serving, consider garnishing with sliced green onions and sesame seeds. These add a nice touch to the dish. If your salmon turns out overcooked, don’t worry. You can still enjoy it! Serve it with a sauce or a squeeze of fresh lime. This will add moisture and flavor. To achieve the perfect glaze, pour the remaining marinade over the salmon before baking. It helps create a sweet and savory crust. For more details, check out the Full Recipe. {{image_4}} If you want to switch things up, consider these options. You can use maple syrup instead of honey. This swap gives a rich flavor. For soy sauce, try tamari or coconut aminos. Both work well and add a nice depth. You might also think about adding fresh herbs. Dill or cilantro can brighten the dish. For extra zing, a bit of cayenne pepper or smoked paprika can elevate the taste. There are several ways to cook salmon. Grilling gives it a smoky flavor. Use a grill pan or outdoor grill for this method. Baking is another great choice. It cooks evenly and keeps the fish moist. If you're looking for crispiness, pan-searing is the way to go. Heat oil in a skillet and get the skin nice and crispy. It adds a delightful crunch! Pairing your honey garlic glazed salmon is easy! Serve it with steamed broccoli or asparagus for a fresh touch. A side of fluffy jasmine rice is a perfect match too. For a fun twist, try serving it atop a salad. This adds texture and brightness. For presentation, place the salmon on a colorful platter. Add lime wedges for a pop of color. Enjoy making your dish look as good as it tastes! You can find the full recipe at the beginning. To keep your honey garlic glazed salmon fresh, store it in the fridge. Place the salmon in an airtight container. This helps to avoid air exposure and keeps it tasty. You can safely eat leftovers within three days after cooking. Always check for any strange smells or changes in color before eating. When reheating, you want to keep the salmon moist. The best way is to use the oven. Preheat your oven to 300°F (150°C). Place the salmon on a baking sheet and cover it with foil. This will help trap moisture. Heat for about 10-15 minutes. You can also use a microwave if you are in a hurry. Just cover the salmon with a damp paper towel and heat for short bursts, checking often. Use glass or silicone containers for storage, as they are safe for reheating. If you want to save honey garlic glazed salmon for later, freezing works well. Wrap each piece tightly in plastic wrap, then place it in a freezer-safe bag. Squeeze out any air before sealing. You can freeze it for up to three months. When you want to eat it, thaw the salmon in the fridge overnight. After thawing, reheat it using the tips above for best results. Enjoy your tasty salmon anytime! You should marinate the salmon for at least 30 minutes. This time allows the flavors to soak in. If you have more time, try marinating for up to 2 hours. This longer time gives a stronger taste. Just remember to keep it in the fridge while it marinates. Yes, you can use other fish like trout or halibut. These fish have similar cooking times and will absorb the honey garlic flavors well. Just adjust the cooking time if you choose a thicker or thinner fish. I recommend serving the salmon with steamed vegetables or fluffy rice. Both options balance the sweet and savory flavors of the salmon. You can also add a fresh salad or roasted potatoes for a complete meal. Yes, you can prepare the marinade ahead of time. Just store it in the fridge until you’re ready to use it. You can also marinate the salmon a few hours before cooking. This makes meal prep easy and quick. The best way to check is by looking for flakiness. When salmon is cooked, it will flake easily with a fork. You can also check the internal temperature. It should reach 145°F (63°C) for safe eating. In this article, we explored a tasty honey garlic glazed salmon recipe. You learned about essential ingredients, step-by-step instructions, and effective tips for cooking. We also discussed variations, storage methods, and answers to common questions. This dish is simple to make and full of flavor. Enjoy trying it out for yourself. Your meal will impress anyone at your table. Happy cooking!

Honey Garlic Glazed Salmon Tasty and Simple Dish

Craving something delicious and easy to make? Honey garlic glazed salmon is the answer. This dish combines sweet honey, savory

Older posts
Newer posts
← Previous Page1 … Page43 Page44 Page45 … Page86 Next →

dsad

© 2026 lazychefmagic • Built with GeneratePress

Our Policies

  • Copyright Policy
  • Cookie Policy
  • GDPR Policy
  • Privacy Policy
  • Disclaimer
  • Terms Of Use

More Information

  • Home
  • About
  • Contact
  • Appetizers
  • Dessert
  • Dinner
  • Drinks
©2026, lazychefmagic About Back To Top