Skip to content
DisclaimerTerms Of UseGDPR PolicyCookie Policy

lazychefmagic

  • Home
  • Drinks
  • Appetizers
  • Dinner
  • Dessert
  • About
  • Contact
  • Privacy Policy
DisclaimerTerms Of UseGDPR PolicyCookie Policy

NO-ING-IMG

To make a great Cheesy Spinach Artichoke Dip, you will need a few simple ingredients. Here’s what you should gather: - Frozen spinach - Canned artichoke hearts - Cream cheese - Sour cream - Mayonnaise - Shredded mozzarella cheese - Grated Parmesan cheese - Minced garlic - Seasonings These ingredients come together to create a creamy and flavorful dish. I love using frozen spinach because it is easy and quick to prepare. Just thaw it and squeeze out the water. The canned artichoke hearts add a nice texture and taste. For the creamy base, I use cream cheese, sour cream, and mayonnaise. This combination gives the dip a rich and smooth feel. The shredded mozzarella and grated Parmesan provide that cheesy goodness we all crave. Don't forget the minced garlic! It brings a wonderful aroma and flavor to the mix. Lastly, adding some simple seasonings will enhance the taste. You can adjust the flavors based on your own preference. For the full recipe, check out my detailed steps in the next section! First, preheat your oven to 375°F (190°C). This step is key. A hot oven helps the dip cook evenly. It also makes sure the top gets that nice golden brown color. Next, take a large mixing bowl. Add the softened cream cheese, sour cream, and mayonnaise. Mix them well with a whisk or electric mixer. Blend until you have a smooth and creamy base. This creamy mix is the heart of your dip. Now, fold in the thawed spinach and chopped artichoke hearts. Take your time to mix them well. Then, add the minced garlic, onion powder, and crushed red pepper flakes if you like a bit of heat. Make sure everything is well combined. Transfer the mixture into a greased baking dish. Spread it evenly across the surface. Place it in the preheated oven and bake for 25 to 30 minutes. Keep an eye on it. You want it bubbling and golden brown on top. Once it’s baked, take it out and let it cool for about 5 minutes. This keeps you from burning your mouth. Serve the dip warm with tortilla chips, slices of baguette, or fresh veggies. For a nice touch, sprinkle some extra Parmesan cheese on top and add a sprig of parsley. Enjoy this creamy and flavorful dish! For the full recipe, check the recipe section above. Start with frozen spinach. It's easy to use and offers great taste. Look for canned artichoke hearts packed in water or brine. This adds nice flavor to the dip. For creaminess, use full-fat cream cheese. It blends nicely with sour cream and mayonnaise. Choose fresh garlic for a stronger taste. You can adjust the flavor based on your preference. To enhance the taste, add some spices. Onion powder gives a nice depth. If you like heat, add crushed red pepper flakes. This small amount really amps up the flavor. Always taste your mix before baking. Adjust the salt and pepper to your liking. This step is key for a tasty dip. If your dip is too thick, add a little more sour cream or mayonnaise. Mix until smooth. If it’s too runny, bake it a bit longer. This helps to thicken the dip. You want a creamy texture that holds up with chips or bread. Follow these tips, and your Cheesy Spinach Artichoke Dip will shine. For the full recipe, check out the entire guide. {{image_4}} You can make your cheesy spinach artichoke dip even better by adding spices. Try adding a pinch of smoked paprika for a nice, smoky flavor. A dash of cumin gives it warmth. For a bit of heat, add more crushed red pepper flakes. You could also mix in some fresh herbs, like basil or parsley. These herbs add freshness and a pop of color. If you want a lighter dip, swap some ingredients for healthier ones. Use Greek yogurt instead of sour cream and mayonnaise. This change cuts calories and adds protein. You can also use low-fat cream cheese. For a boost of nutrition, mix in chopped kale or fresh vegetables. This will give your dip more vitamins and fiber. Making this dip vegan is easy and just as tasty! Replace cream cheese with cashew cream or tofu. Use vegan mayonnaise in place of regular mayonnaise. For the cheese, try nutritional yeast for a cheesy flavor without dairy. You can also find vegan cheese blends that melt well. This way, everyone can enjoy the dip, no matter their diet. For the full recipe, check out Creamy Spinach Artichoke Delight. After you make Cheesy Spinach Artichoke Dip, let it cool. Cover it tightly with plastic wrap or place it in an airtight container. It can last up to three days in the fridge. When you want to enjoy it again, just remember to reheat before serving. If you want to save some for later, freezing is a great option. Scoop the dip into a freezer-safe container. Make sure to leave some space at the top, as it will expand when frozen. You can freeze it for up to two months. When you're ready to eat, thaw it in the fridge overnight. To reheat, you can use your oven or microwave. If using the oven, preheat it to 350°F (175°C). Place the dip in a baking dish and cover with foil. Heat for about 20 minutes or until warm. If using the microwave, heat in short bursts of 30 seconds, stirring in between. This will help keep the dip smooth and creamy. For the full recipe, check out the Creamy Spinach Artichoke Delight! Yes, you can prepare this dip in advance. Make the dip, then cover and chill it. When ready, bake it as per the instructions in the Full Recipe. This saves time and helps the flavors blend well. You have many tasty options! Serve it with: - Tortilla chips - Slices of baguette - Fresh vegetable sticks like carrots or celery - Pita chips These pairings enhance the dip's creamy goodness. Cheesy Spinach Artichoke Dip lasts about three to four days in the fridge. Store it in an airtight container to keep it fresh. Just reheat it in the oven or microwave before serving. Absolutely! Fresh spinach works well too. Use about 2 cups of fresh spinach. Cook it down first, then chop and drain it. This way, you avoid excess water in your dip. This blog post covered how to make a tasty Cheesy Spinach Artichoke Dip. We discussed key ingredients like frozen spinach, canned artichokes, and cream cheese. You learned the simple steps to mix and bake your dip, with tips for perfecting flavor and texture. We explored fun variations and storage tips, ensuring you can enjoy this dip anytime. Remember, cooking is about creativity, so feel free to add your own twist! Enjoy your delicious dip, and share it with friends and family.

Cheesy Spinach Artichoke Dip Creamy and Flavorful Dish

Looking for a tasty appetizer that everyone will love? You’re in the right place! My Cheesy Spinach Artichoke Dip is

- 1 lb (450g) boneless, skinless chicken thighs - 1/2 cup all-purpose flour - 1/2 cup cornstarch - 1 teaspoon baking powder - 1 teaspoon garlic powder - 1 teaspoon onion powder - Salt and pepper to taste - Oil for frying For the Honey Garlic Sauce: - 1/2 cup honey - 3 tablespoons soy sauce - 4 cloves garlic, finely minced - 1 tablespoon freshly grated ginger - 1 teaspoon sesame oil - 2 tablespoons fresh green onions, chopped (for garnish) - Skillet or frying pan - Mixing bowls - Measuring cups and spoons When I make Crispy Honey Garlic Chicken, I focus on quality ingredients. I love using chicken thighs for their juicy texture. The flour and cornstarch mix gives the chicken that perfect crunch. For the sauce, the mix of honey, soy sauce, and garlic creates a delightful taste. The fresh ginger adds a nice zing. Always use fresh green onions for garnish; they make a big difference in flavor and look. Having the right equipment is key. A good frying pan helps you fry the chicken evenly. Mixing bowls are great for preparing the flour mix and sauce. Measuring cups and spoons ensure you get the right amounts. This dish is not only tasty but also fun to make. You can easily share it with family and friends. Enjoy the process, and remember to experiment with your own flavors! Start by cutting the chicken thighs into bite-sized pieces. This helps them cook evenly. You want them to be about one inch each. In a mixing bowl, add the flour, cornstarch, baking powder, garlic powder, onion powder, salt, and pepper. Stir until it's mixed well. This will be your dry coating. Now, take each piece of chicken and coat it in the flour mixture. Make sure each piece is covered. When you finish, shake off any extra flour. This keeps the chicken from clumping. For frying, pour about one inch of oil into a skillet. Heat it on medium-high. To test if the oil is hot enough, drop in a small piece of chicken. If it sizzles, it’s ready! While the chicken fries, let's make the sauce. In a small saucepan, mix honey, soy sauce, minced garlic, grated ginger, and sesame oil. Stir it well and heat it on medium. Let it simmer for about 2-3 minutes. This thickens the sauce a bit and enhances the flavor. With these steps, you're close to enjoying a tasty dish! Follow the [Full Recipe] for complete details. To get that great crunch, you need hot oil. Aim for 350°F (175°C). If the oil is too cool, the chicken soaks up oil and becomes soggy. You can test the oil by dropping a small piece of chicken in it. If it bubbles up right away, it's ready! Next, avoid putting too much chicken in the pan at once. This can lower the oil's temperature. Cook in batches if you have to. This keeps your chicken crispy and golden. You can play with the type of honey you use. Different honeys, like clover or wildflower, add unique tastes. Try using local honey for a special touch. Adjust the sweetness by adding more or less honey. If you love spice, mix in some chili flakes or hot sauce. This makes the dish even more exciting. The balance of sweet and spicy makes every bite a delight. For the full recipe, check out the detailed instructions above. Enjoy your cooking! {{image_4}} You can switch out chicken thighs for other proteins. Chicken breast or drumsticks will work well. Chicken breast cooks faster and is leaner. Drumsticks offer a juicy bite. Both options taste great with the honey garlic sauce. If you prefer a vegetarian meal, try tofu. Use firm tofu for the best texture. Press the tofu to remove excess water. Cut it into cubes. Then, follow the same coating and frying steps as with chicken. The sauce will add wonderful flavor to the tofu. If you need a gluten-free version, you can easily adapt this recipe. Substitute all-purpose flour with almond flour or rice flour. These options create a crispy coating without gluten. Adjust the coating mixture by adding cornstarch. Cornstarch will help with the crispiness. Make sure to check the labels of your ingredients for hidden gluten. Enjoy your gluten-free crispy honey garlic chicken! To keep your crispy honey garlic chicken fresh, store it properly. First, allow the chicken to cool to room temperature. Place it in an airtight container. This helps keep the chicken moist and tasty. You can refrigerate it for up to three days. For longer storage, freeze your leftovers. Wrap the chicken tightly in plastic wrap, then place it in a freezer bag. This can last for about three months in the freezer. When you're ready to enjoy your chicken again, reheating is key. The best method to keep that crispy texture is to use an oven. Preheat your oven to 375°F (190°C). Spread the chicken on a baking sheet. Heat for about 10-15 minutes or until it’s hot and crispy. If you only have a microwave, use it with care. Place the chicken on a microwave-safe plate. Cover it with a damp paper towel to prevent it from drying out. Microwave in short bursts, checking often. This method won’t keep the chicken as crispy, but it works in a pinch. Enjoy your delicious meal again with these easy storage and reheating tips! For the full recipe, check [Full Recipe]. You can use two great methods: pan-searing or oven-baking. - Pan-Seared Method: Heat a skillet with a small amount of oil. Cook the coated chicken pieces over medium heat. Turn them often until they are golden and crispy, about 8-10 minutes. - Oven-Baked Option: Preheat your oven to 425°F (220°C). Place the coated chicken pieces on a baking sheet lined with parchment paper. Spray them lightly with cooking spray. Bake for about 20-25 minutes, flipping halfway through. This gives you a crispy texture without frying. Yes, you can switch up the sauce for new flavors. - Alternatives to Honey Garlic Sauce: Try teriyaki, sweet chili, or barbecue sauce for a twist. Each adds a unique taste that pairs well with chicken. - Sweet and Spicy Variations: Mix honey with sriracha or chili flakes. This adds a kick to your dish while keeping the sweetness. Many sides complement this chicken dish nicely. - Recommended Side Dishes: Serve it with steamed rice, fried rice, or a fresh salad. They balance the flavors well. - Ideas for Balanced Meals: Add steamed veggies like broccoli or green beans. They bring color and nutrients to your plate. For a fun touch, you can also serve it with garlic bread or Asian-style veggies like bok choy. For the complete guide on making this dish, check the Full Recipe. In this post, we covered how to make crispy honey garlic chicken. You learned about the main ingredients, cooking tools, and step-by-step instructions. We also shared tips for crispiness and flavor, plus variations for proteins and gluten-free options. Proper storage and reheating methods help you enjoy leftovers too. Try these ideas in your kitchen. Enjoy the process and the tasty results!

Crispy Honey Garlic Chicken Quick and Tasty Delight

Looking for a quick and tasty dish that’s packed with flavor? Try my Crispy Honey Garlic Chicken! This easy recipe

To make a No Bake Biscoff Cheesecake, you need a few key ingredients. Here’s the list: - 200g Biscoff cookies, finely crushed - 80g unsalted butter, melted - 400g cream cheese, softened - 100g powdered sugar - 200ml heavy whipping cream - 150g Biscoff spread, at room temperature - 1 teaspoon vanilla extract - A pinch of salt - Additional Biscoff cookies for topping Each ingredient plays a role in creating a rich and creamy cheesecake. The Biscoff cookies form a delicious crust, while the cream cheese gives the filling its creamy texture. The Biscoff spread adds a sweet, spiced flavor that is hard to resist. When choosing your ingredients, I recommend using high-quality cream cheese and real Biscoff spread. Avoid low-fat versions; they often lack the rich taste we want. For the best results, let the cream cheese sit out until it’s soft. This makes mixing easier and helps create a smooth filling. To learn how to combine these ingredients into a delightful dessert, check out the Full Recipe. First, take 200g of Biscoff cookies and crush them finely. You can use a food processor or a bag and a rolling pin. Next, melt 80g of unsalted butter in a small bowl. Combine the crushed cookies and melted butter in a medium mixing bowl. Mix them well until the cookie crumbs look wet and sandy. Now, grab a 9-inch springform pan. Press the cookie mixture firmly into the bottom of the pan. Make sure it is even and compact. After that, place the pan in the fridge to let the crust set while you make the filling. In a large mixing bowl, add 400g of softened cream cheese. Use an electric mixer to beat it with 100g of powdered sugar. Mix on medium speed until the mixture is creamy and smooth. There should be no lumps left. Then, add 150g of Biscoff spread, 1 teaspoon of vanilla extract, and a pinch of salt. Keep mixing until everything is blended well. The mixture should be velvety and rich. Take another bowl and pour in 200ml of heavy whipping cream. Beat it using an electric mixer until stiff peaks form. This means the cream will hold its shape well. Be careful not to over-whip it, or it can turn grainy. Now, gently fold the whipped cream into the cream cheese mixture. Use a rubber spatula and be gentle. You want to keep the light and fluffy texture of the whipped cream. Carefully pour the cheesecake filling over the chilled cookie crust in the springform pan. Use a spatula to smooth the top for an even finish. Once done, cover the cheesecake with plastic wrap. Place it in the fridge and chill for at least 4 hours, but overnight is best. This allows the cheesecake to set firmly. When ready, gently remove the cheesecake from the springform pan. Top it with extra Biscoff cookies for a nice finish. Enjoy this tasty treat! For the complete recipe, refer to the [Full Recipe]. Using room temperature ingredients is key. Cold cream cheese will not mix well. Let it sit out for 30 minutes before you start. This helps create a smooth filling. When mixing, use a hand mixer on medium speed. Mix until the cream cheese and sugar blend into a creamy texture. To make your cheesecake look stunning, slice it carefully. Use a hot knife for clean cuts. Wipe the knife with a damp cloth between slices. For garnishes, add a dollop of whipped cream on each slice. Drizzle extra Biscoff spread for a nice touch. You can also sprinkle crushed Biscoff cookies on top. One common mistake is the crust sticking to the pan. To avoid this, grease your springform pan lightly. Also, press the crust firmly and evenly. Another mistake is over-whipping the cream. Stop mixing as soon as stiff peaks form. If you mix too much, the cream can become grainy. For the full recipe, check out the section above. {{image_4}} You can change the flavor of your cheesecake by swapping the cookie base. Try using Oreos, graham crackers, or even chocolate wafers. Each cookie adds a new taste to your dessert. If you want a different spread, consider Nutella or peanut butter. Both options create a unique twist. You can make a hazelnut cheesecake or a rich peanut butter version. Mixing these flavors can be fun and tasty! For a dairy-free or vegan cheesecake, use cashew cream instead of cream cheese. Blend soaked cashews with a bit of coconut cream for a smooth texture. You can also use dairy-free whipped cream, which works well in the recipe. If you need a gluten-free option, substitute the Biscoff cookies with gluten-free cookies. Check the labels to ensure they meet your needs. This way, everyone can enjoy your cheesecake without worry. Explore these variations to make a No Bake Biscoff Cheesecake that suits your taste and dietary needs. For the full recipe, check out the detailed instructions above. To keep your No Bake Biscoff Cheesecake fresh, store it in the fridge. Always cover it with plastic wrap or a lid. This helps keep the cheesecake moist and prevents it from absorbing other smells. It will stay fresh for about 5 days. You can freeze your cheesecake if you want to keep it longer. First, let it chill in the fridge for at least 4 hours. Then, wrap it tightly in plastic wrap. Next, place it in an airtight container. It can stay in the freezer for up to 3 months. When you are ready to eat it, take it out and let it thaw in the fridge overnight. This way, it will stay creamy and delicious. Enjoy your cheesecake any time! For the full recipe, check out the No Bake Biscoff Cheesecake section above. No Bake Biscoff Cheesecake lasts about 5 days in the fridge. Keep it in an airtight container. After that, it may lose its texture and flavor. Always check for any signs of spoilage before eating. Yes, you can use light cream cheese. It will work well in this recipe. The cheesecake may be slightly less rich but still delicious. I recommend using full-fat cream cheese for a creamier texture, but light cream cheese is a fine substitute. Absolutely! You can make this cheesecake a day or two ahead. Just cover it well and keep it in the fridge. This gives the flavors time to blend, making it even tastier when you serve it. Yes, you can get creative with toppings! Try fresh fruit like berries or banana slices. You can also use chocolate shavings or caramel drizzle. These options can add extra flavor and a fun look to your cheesecake. You learned how to make a delicious No Bake Biscoff Cheesecake. We covered key ingredients, step-by-step instructions, and essential tips for success. Remember, using room temperature ingredients is key for a smooth texture. Explore variations to make this dessert your own and follow storage tips to keep it fresh. Enjoy your baking and impress others with your skills! Each bite of this cheesecake is a delight that brings joy.

No Bake Biscoff Cheesecake Simple and Delicious Recipe

Are you ready to treat yourself? My No Bake Biscoff Cheesecake recipe is simple and oh-so-delicious! With easy steps and

- 2 cups of cooked white or brown rice - 2 cups of fresh broccoli florets - 1 cup of shredded sharp cheddar cheese - 1 cup of cream of mushroom soup - 1/2 cup of milk - 1/2 teaspoon of garlic powder - 1/2 teaspoon of onion powder - 1/4 teaspoon of freshly ground black pepper - 1/4 teaspoon of salt - 1/2 cup of breadcrumbs (for topping) - 2 tablespoons of extra virgin olive oil - Optional: 1/4 cup of grated Parmesan cheese To make your casserole great, measure your ingredients well. Use dry measuring cups for rice and breadcrumbs. For liquids, use a liquid measuring cup. This keeps your dish balanced. Too much or too little can change the taste. A kitchen scale is also helpful for precision. When choosing broccoli, look for bright green florets. They should be tight and firm. Avoid yellow or wilting broccoli, as this means it’s old. Fresh broccoli adds a nice crunch. It also helps your casserole taste bright and fresh. If possible, buy organic to ensure quality. First, set your oven to 350°F (175°C). This step is key for even cooking. A hot oven helps the casserole cook perfectly. In a large bowl, mix the cooked rice with the sharp cheddar cheese. Next, add the cream of mushroom soup and the milk. Stir well until the mixture is smooth. It should look creamy and inviting. Then, add the garlic powder, onion powder, black pepper, and salt. Make sure to mix everything evenly. The spices enhance the flavor of the rice mixture. Now, it’s time to prepare the broccoli. Boil some water in a pot. Add the fresh broccoli florets and let them cook for 2-3 minutes. You want them bright green and just tender. After that, drain the broccoli and rinse it with cold water. This stops the cooking. Fold the broccoli gently into the rice and cheese mixture. This adds color and crunch to your dish. Take a greased 9x13 inch baking dish. Spread the rice and broccoli mixture evenly across the bottom. This helps with even cooking. In a small bowl, mix the breadcrumbs with olive oil. If you like, add Parmesan cheese for extra flavor. Sprinkle this mix over the casserole for a nice, crispy top. Cover the baking dish with aluminum foil. Bake it in the preheated oven for 25 minutes. This keeps the casserole moist. After 25 minutes, take off the foil. Bake for another 10-15 minutes until the top is golden brown. Let it cool for a few minutes before serving. This helps the flavors come together. For the full recipe, check the section above. To make your casserole truly shine, focus on the cheese. Use sharp cheddar for a bold flavor. Mix in some grated Parmesan for extra richness. The choice of rice matters too. I prefer brown rice for its nutty taste and added nutrition. Always ensure your broccoli is bright green. Fresh florets add texture and color. Soggy casseroles can ruin the experience. To prevent this, avoid overcooking the broccoli. Blanch it just until it’s bright green. Drain well and rinse with cold water. This stops the cooking process. When mixing, don’t add too much liquid. Stick to the recipe for milk and soup. Lastly, bake uncovered for the last part to create a crispy top. You can easily make the casserole healthier. Swap out the cream of mushroom soup for a homemade version. This gives you control over the ingredients. Use low-fat milk instead of regular milk for fewer calories. If you want extra fiber, try adding some cooked quinoa. You can also replace the white rice with cauliflower rice for a low-carb option. Check out the Full Recipe for more ideas! {{image_4}} You can easily add protein to your casserole. Chicken, shrimp, or tofu all work well. Start with cooked chicken, as it mixes nicely with the rice. For shrimp, use small, peeled, and deveined ones. Tofu is a great choice for a vegan option. Just cube it and sauté it lightly before adding. This extra step helps pack in flavor. Adjust the cooking time based on your chosen protein. Each option adds richness and makes the dish heartier. The cheese in your casserole can change its taste. Try using mozzarella for a milder flavor and gooey texture. Gouda brings a smoky taste, adding depth to your dish. If you're looking for a vegan option, use vegan cheese. It melts well and keeps the dish creamy. Each cheese variety will add a unique twist to the casserole. Feel free to mix and match for even more fun flavors. Do you like heat? Adding hot sauce or red pepper flakes can spice things up. A few dashes of hot sauce will give your casserole a nice kick. If you prefer flakes, sprinkle them on top before baking. Start with a small amount, then taste and adjust. Spice can elevate the flavors and make the dish exciting. Don't be afraid to experiment with different levels of heat to find your perfect blend. For the full recipe, check out the Cheesy Broccoli Rice Casserole details. To keep your cheesy broccoli rice casserole fresh, let it cool down first. Then, place it in an airtight container. You can store it in the fridge for up to three days. Make sure to cover it well so it does not dry out. If you want to enjoy it later, freezing is a great option. When you're ready to eat the leftovers, preheat your oven to 350°F (175°C). Place the casserole in an oven-safe dish. Cover it with foil to keep it moist. Heat for about 20-25 minutes or until it's hot all the way through. You can also use the microwave for quicker reheating. Just make sure to cover it to avoid splatters. Heat in short bursts of 1-2 minutes, stirring in between. If you want to freeze your casserole, prepare it as normal but do not bake it. Once mixed, transfer it to a freezer-safe container. You can freeze it for up to three months. When you're ready to cook it, thaw it overnight in the fridge. Then, bake it in the oven as per the full recipe instructions. This way, you can enjoy a warm, cheesy meal anytime! Yes, you can make this casserole ahead. Prepare it, then cover and store it in the fridge. It’s best if you bake it the next day. This helps the flavors blend nicely. Just remember to let it sit out for about 30 minutes before baking. You can serve this casserole with many dishes. Try it with grilled chicken or fish for protein. A fresh salad also pairs well. You can even enjoy it with crusty bread for a complete meal. This casserole lasts about 3 to 5 days in the fridge. Make sure to store it in a sealed container. If you want it to last longer, you can freeze it. Yes, you can easily make this dish gluten-free. Use gluten-free breadcrumbs and check your cream of mushroom soup. Many brands offer gluten-free options. This way, everyone can enjoy it without worry. The best way to reheat this casserole is in the oven. Preheat it to 350°F (175°C). Cover the dish with foil to keep it moist. Heat for about 20 minutes or until it’s hot all the way through. You can also use the microwave, but the oven keeps the top crispy. For a full recipe, check out the details above! You now know how to make a tasty Cheesy Broccoli Rice Casserole. You have the list of ingredients, the steps to follow, and tips for perfecting it. Remember, you can mix in proteins or different cheeses for fun. Store leftovers safely and reheat them easily. This dish is simple and satisfying for any meal. Enjoy making it for your family and friends!

Cheesy Broccoli Rice Casserole Simple and Delightful Dish

Are you ready to whip up a cozy and tasty meal? My Cheesy Broccoli Rice Casserole is a simple delight

To make Chicken Alfredo Stuffed Shells, gather these key ingredients: - 12 large jumbo pasta shells - 1 cup cooked chicken, shredded - 1 cup ricotta cheese - 1 cup grated mozzarella cheese, plus extra for topping - 1/2 cup grated Parmesan cheese - 1 cup Alfredo sauce (store-bought or homemade) - 1 teaspoon garlic powder - 1 teaspoon Italian seasoning - Salt and pepper to taste These ingredients make a rich, creamy filling. The chicken adds protein, while the cheeses provide flavor and texture. The Alfredo sauce brings it all together with its smooth, buttery taste. You can enhance your dish with these tasty garnishes and toppings: - Fresh parsley, chopped - Extra grated Parmesan cheese - A sprinkle of red pepper flakes for heat - Sliced green onions for a fresh crunch These extras add color and flavor to your meal. They also make the dish look even more appealing. Having the right tools makes cooking easier. Here’s what you need: - A large pot for boiling pasta - A mixing bowl for the filling - A 9x13 inch baking dish for baking - Aluminum foil to cover while baking - A spatula for mixing and stuffing These tools help you prepare and bake your Chicken Alfredo Stuffed Shells with ease. They ensure everything comes together smoothly. For the complete recipe, check out the Full Recipe. First, preheat your oven to 375°F (190°C). This step is key for a great bake. A hot oven helps the cheese melt perfectly and makes the pasta warm throughout. Next, bring a large pot of salted water to a boil. Add the jumbo pasta shells and cook them for 8-10 minutes. You want them al dente, so they are firm but not hard. Once cooked, drain the shells and let them cool a bit. This makes them easier to handle. In a mixing bowl, combine the shredded chicken, ricotta cheese, 1 cup of mozzarella cheese, Parmesan cheese, garlic powder, Italian seasoning, and a pinch of salt and pepper. Use a fork to mix everything until smooth. This filling is the heart of your dish. Spread half of the Alfredo sauce on the bottom of a 9x13 inch baking dish. This keeps the pasta from sticking. Now, take each pasta shell and fill it with your chicken mix. Place the filled shells in the dish, open side up. Drizzle the rest of the Alfredo sauce over the shells, ensuring they are well covered. Sprinkle more mozzarella cheese on top for that cheesy goodness. Cover the dish with foil and bake it for 20 minutes. After that, take off the foil and bake for another 10 minutes. This helps the cheese turn golden and bubbly. When done, let it cool for about 5 minutes. Garnish with fresh parsley for a pop of color. You can find the full recipe above for all the details! To get the best shells, follow these steps. First, boil salted water. Use a large pot for even cooking. Cook the shells until they are al dente, which means firm but not hard. This usually takes 8 to 10 minutes. After cooking, drain the shells gently. Avoid breaking them. Rinse them with cold water to stop the cooking process. Set them aside on a clean towel to dry. Flavor is key in the filling. Start with cooked chicken, shredded finely. This helps mix well with the cheeses. Use ricotta for creaminess and mozzarella for stretch. Add Parmesan for a salty kick. Garlic powder and Italian seasoning boost taste. Don’t forget to season with salt and pepper. Mix until the filling is creamy and smooth. This makes every bite tasty and satisfying. How you serve the dish matters. Use a large platter for a beautiful display. Start with a layer of Alfredo sauce at the bottom. Arrange the stuffed shells neatly. Drizzle more sauce over the top for shine. Sprinkle extra mozzarella and Parmesan for a cheesy look. Finally, add chopped parsley for color. This makes the dish look fresh and inviting. {{image_4}} You can make Chicken Alfredo Stuffed Shells healthier by using whole wheat shells. They add fiber and nutrients. You can also use low-fat cheese and Alfredo sauce. Greek yogurt can replace some of the ricotta for a protein boost. You still get that creamy taste while cutting calories. Adding vegetables not only boosts nutrition but also adds flavor. Spinach and mushrooms work well in the filling. You can sauté them first to enhance their taste. Broccoli or zucchini can also be mixed in. Just chop them small so they fit in the shells easily. This adds color and crunch to your meal. While Alfredo sauce is classic, you can try other sauces. A marinara sauce can give a nice twist. You can also use pesto for a fresh, herbal flavor. Mixing the sauces offers a unique taste experience. Don’t hesitate to experiment and find your favorite combo. For the full recipe, check out the complete guide to Chicken Alfredo Stuffed Shells. After enjoying your Chicken Alfredo Stuffed Shells, let them cool to room temperature. Place any leftovers in an airtight container. They will stay fresh for up to three days in the fridge. Make sure to cover the shells well with plastic wrap or a lid to keep moisture in. When you're ready to eat the leftovers, preheat your oven to 350°F (175°C). Place the stuffed shells in a baking dish. You can add a splash of Alfredo sauce on top to keep them moist. Cover the dish with aluminum foil. Bake for about 20 minutes or until heated through. You can also microwave them for about 2-3 minutes. Just make sure to cover them to avoid splatters. If you want to save some for later, freezing is a great option. First, let the stuffed shells cool down completely. Then, arrange them in a single layer on a baking sheet. Freeze them for about two hours until solid. After that, transfer the frozen shells to a freezer-safe bag or container. They can last up to three months in the freezer. When you’re ready to eat, thaw them overnight in the fridge before reheating. This keeps them tasty and fresh. You can find the full recipe and enjoy this dish anytime! Yes, you can choose other pasta types. I recommend using manicotti or conchiglie. These shapes hold fillings well too. Just ensure they can hold the creamy sauce. If you want a different protein, use shredded turkey or cooked sausage. You can also use tofu for a meatless option. Beans or lentils work well, too. Absolutely! You can prepare the stuffed shells a day in advance. Just cover them tightly and store them in the fridge. Bake them when you’re ready to eat. Serve the shells hot from the oven. Garnish with fresh parsley and extra cheese. You can pair them with a salad or some garlic bread for a full meal. For the full recipe, check out the details above. This blog post covered Chicken Alfredo Stuffed Shells from start to finish. We went over the main ingredients and kitchen tools you'll need, plus cooking steps. I shared tips for perfect shells and flavor boosts, as well as fun variations. You can easily store and reheat leftovers, too. Now, you’re ready to make delicious stuffed shells that impress. Enjoy exploring your kitchen creations!

Delicious Chicken Alfredo Stuffed Shells Recipe

Craving a comforting and indulgent meal? These Chicken Alfredo Stuffed Shells are a game-changer! They combine tender pasta shells filled

- 2 pounds beef chuck, cut into 1-inch cubes - 2 tablespoons olive oil - 1 medium onion, finely chopped - 3 cloves garlic, minced - 4 medium carrots, peeled and sliced into rounds - 3 medium potatoes, peeled and diced into 1-inch cubes - 3 cups beef broth (low sodium preferred) - 1 cup frozen peas (added just before serving) - 2 tablespoons tomato paste - 1 teaspoon dried thyme - 1 teaspoon smoked paprika - 1 bay leaf - Salt and freshly ground black pepper to taste When making Instant Pot beef stew, the right ingredients make all the difference. First, I like to use beef chuck because it’s tender and flavorful after cooking. The olive oil helps sear the beef and lock in flavor. For aromatics, finely chopped onion and minced garlic add depth. Carrots and potatoes bring color and heartiness. I prefer low-sodium beef broth for control over salt levels. Adding frozen peas at the end keeps them bright and fresh. Now for the seasonings: tomato paste adds richness, while dried thyme and smoked paprika give a warm, earthy taste. A bay leaf enhances the overall flavor. Finally, don't forget salt and pepper to taste. These ingredients come together to create a dish that is both hearty and comforting. For the full recipe, check out the detailed instructions. - Press the Sauté button on your Instant Pot. - Add olive oil and cook beef cubes until browned. Start by heating the olive oil. Once it shimmers, add the beef cubes. Cook them in batches. This keeps the pot from getting crowded. Brown each side for about 5-7 minutes. Once done, use a slotted spoon to take the beef out. Set it aside on a plate. - Add onions and garlic to the pot. - Cook until onions are soft and translucent. In the same pot, add the chopped onion and minced garlic. Sauté them for about 3-4 minutes. You want the onions to become soft and clear. This step builds a great base for our stew. - Stir in tomato paste and return beef to pot. - Add carrots, potatoes, broth, thyme, smoked paprika, and seasonings. - Seal lid, set to High Pressure for 35 minutes. Next, stir in the tomato paste. Cook for one more minute to boost the flavor. Then, add the beef back into the pot. Now, toss in the sliced carrots, diced potatoes, beef broth, dried thyme, smoked paprika, and salt and pepper. Mix it well. Secure the lid and set the pot to High Pressure for 35 minutes. - Allow natural pressure release for 10-15 minutes. - Stir in frozen peas and adjust final seasoning. When the timer goes off, let the pressure release naturally for 10-15 minutes. After that, switch the valve to venting. Carefully open the lid and stir in the frozen peas. Let the stew sit for 5 minutes. This warms the peas without losing their bright color. Finally, taste your stew. Adjust the seasoning if needed. For the full recipe, check the details above! To make the best beef stew, start with beef chuck. This cut has good fat and flavor. It cooks down nicely, making it tender. Don’t skip searing the beef before pressure cooking. Searing adds depth to the flavor. It locks in juices and gives your stew a rich color. You can boost the stew's taste by adding a splash of Worcestershire sauce. A bit of red wine can also enhance the flavor profile. Fresh herbs like thyme or rosemary can elevate your dish. They add a fresh, fragrant touch that makes the stew feel special. For a beautiful finish, garnish your stew with fresh parsley. The bright green adds color and freshness. Serve your beef stew with crusty bread or warm rolls. This combo makes for a comforting meal. You can soak up every last drop of that rich broth! For the full recipe, check out the detailed instructions above. {{image_4}} You can swap beef for chicken thighs or turkey. These options are leaner and still tasty. They also cook well in the Instant Pot. If you want to explore plant-based options, try using lentils or a plant-based meat alternative. Both options offer a different texture and flavor. Feel free to get creative with the veggies. You can add bell peppers, mushrooms, or even green beans. Each brings its own taste and nutrition. Seasonal vegetables also work great. Think of zucchini in summer or root veggies in winter for variety. Changing up the spices can lead to new flavors. For a fresh twist, try using Italian seasoning. If you love heat, add some cayenne or crushed red pepper flakes. These small changes can make a big impact on your stew. Try out these variations to find your favorite! For the full recipe, check [Full Recipe]. - Store leftovers in an airtight container. - Keep in the fridge for up to 3-4 days. It's best to cool the stew before storing. This helps prevent condensation. You want to keep all the great flavors fresh. - Freeze in portions for convenience. - Consume within 2-3 months for best quality. When freezing, use freezer-safe bags or containers. This helps save space and keeps the stew tasty. If you want to reheat later, just thaw it overnight in the fridge. - Reheat on the stove or microwave until warmed through. - Add a splash of broth to maintain consistency. Reheating on the stove helps keep the texture nice. If it seems thick, a bit of broth will help. This way, each bite tastes as good as the first! Follow the provided steps in the recipe for best results. Start by sautéing the beef. Brown it well to add flavor. Then, cook the onions and garlic until soft. Combine all ingredients and pressure cook. The process is quick and easy. It's recommended to thaw your beef for even cooking. Frozen beef may not brown well. This step is key to building a rich flavor. Always aim for fresh or thawed meat for best results. Consider serving with mashed potatoes or a green salad. Both sides complement the stew's rich flavors. You can also pair it with crusty bread. This offers a nice way to soak up the stew. Taste the stew before serving and adjust salt and pepper as needed. Everyone has different taste buds. Start with a small amount, then add more as you like. This ensures the stew is just right for you. Yes, but check the broth for gluten-free labeling if sensitive. Some store-bought broths contain gluten. Always read the labels to ensure your meal is safe. Enjoy this hearty dish without worry! In this blog post, I outlined a simple recipe for Instant Pot beef stew. I shared key ingredients, step-by-step cooking instructions, and storage tips. You learned how to enhance flavor and explore variations in protein and vegetables. Keep in mind that good searing and the right cut of beef lead to tender results. With these tips, you can create a delicious meal your family will enjoy. I hope you feel confident trying this recipe. Cooking should be fun and rewarding!

Instant Pot Beef Stew Hearty and Flavorful Recipe

Looking for a warm, comforting meal? My Instant Pot Beef Stew recipe is hearty and packed with flavor. In just

- 3 ripe bananas, thoroughly mashed - 1/2 cup unsalted butter, melted and slightly cooled - 3/4 cup packed brown sugar - 1 large egg, lightly beaten - 1 teaspoon pure vanilla extract - 1 teaspoon baking soda - Pinch of salt - 1 1/2 cups all-purpose flour - 1/2 cup dark chocolate chips - 1/4 cup walnuts, roughly chopped (optional) Ripe bananas are key to this recipe. They bring natural sweetness and moisture. The more spots they have, the better! Unsalted butter adds richness without extra salt. I prefer brown sugar for its deep flavor and moisture. Dark chocolate chips melt beautifully and add a rich taste. - Chopped walnuts - Additional spices (e.g., cinnamon or nutmeg) Adding chopped walnuts gives a nice crunch. You can also sprinkle in cinnamon for warmth or nutmeg for a unique twist. These optional add-ins make the bread even more special. Feel free to mix and match based on your taste! For the full recipe, visit the section above. To start, preheat your oven to 350°F (175°C). This step is key for even baking. Next, prepare your loaf pan. Grease a 9x5-inch loaf pan with butter or non-stick spray. Dust it lightly with flour. This helps the bread release easily once baked. In a large bowl, combine the ripe bananas with the melted butter. Use a fork or whisk to mix them well until smooth. Now, add in the brown sugar, beaten egg, and vanilla extract. Whisk until everything blends nicely. Sprinkle the baking soda and a pinch of salt over this mix. Stir gently to combine; this activates the baking soda for a good rise. Next, add the all-purpose flour gradually. Fold it in carefully. This prevents overmixing, which can make your bread tough. Finally, fold in the dark chocolate chips. If you like, add chopped walnuts for a crunchy twist. Make sure everything is evenly mixed without overdoing it. Pour the batter into your prepared loaf pan. Use a spatula to smooth the top. This helps the bread bake evenly. Place the loaf pan in the preheated oven. Bake for 55 to 60 minutes. Check for doneness by inserting a toothpick in the center. It should come out clean or with a few moist crumbs. Once baked, take the bread out and let it cool in the pan for about 10 minutes. Then, transfer it to a wire rack to cool completely before slicing. Enjoy your delicious Chocolate Chip Banana Bread! For the full recipe, check out the details above. Choose ripe bananas for the best flavor. Ripe bananas have a yellow peel with some brown spots. These spots show they are sweet and soft. Overripe bananas are dark brown or black. They can be too mushy for some tastes, but they add great flavor to your bread. Mixing is key to a soft banana bread. Avoid overmixing the batter. When you mix too much, the bread becomes dense. Stir just until the flour is blended in. This keeps your bread light and fluffy. Bake your bread evenly by using a good loaf pan. Use a 9x5-inch pan and grease it well. This helps the bread rise evenly. Position the pan in the center of the oven. This way, hot air can circulate around it for perfect baking. Serve your banana bread warm for the best taste. You can add a dollop of whipped cream on top. This makes it look nice and adds sweetness. Try sprinkling extra chocolate chips on top too. Pair the bread with a hot drink. Coffee or tea goes well with the sweet flavor. You can also serve it with fresh fruit. Slices of strawberries or a scoop of ice cream make it a treat. For more details, check the Full Recipe. {{image_4}} For a fun twist, try using milk chocolate or white chocolate chips. These will add a sweeter touch. Milk chocolate gives a creamy flavor, while white chocolate offers a rich, buttery taste. You can also mix dark chips with these options for a unique blend. Adding dried fruits like raisins or cranberries can enhance the taste too. Their natural sweetness pairs well with bananas. Plus, they add some chewy texture to your bread. If you need a gluten-free version, use gluten-free flour. Look for a blend that works well in baking. Almond flour or coconut flour are great choices. Adjust the liquid in your recipe. Gluten-free flours often absorb more moisture. Make sure to monitor your baking time, as gluten-free bread might bake faster or slower. Check for doneness by using a toothpick. To make this banana bread vegan, replace dairy products. Use plant-based butter or oil instead of unsalted butter. For the egg, use a flaxseed meal or applesauce. One tablespoon of flaxseed mixed with three tablespoons of water works as a good substitute. These changes will keep your bread moist and tasty, just like the original. Enjoy experimenting with these options! For the full recipe, check out the complete guide on Choco-Banana Bliss Bread. To keep your chocolate chip banana bread fresh, store it in an airtight container. This helps keep moisture inside and prevents it from drying out. You can also wrap it tightly in plastic wrap or aluminum foil. If you plan to eat it within a few days, keep it at room temperature. If you want it to last longer, put it in the fridge. Just remember, the fridge can make the bread a bit dry. Freezing chocolate chip banana bread is simple and effective. First, let the bread cool completely. Then, slice it into pieces. Wrap each slice tightly in plastic wrap. This keeps air out and preserves flavor. After wrapping, place the slices in a freezer bag. Be sure to label the bag with the date. To thaw your bread, take a slice out and unwrap it. Leave it at room temperature for about 30 minutes. If you want it warm, you can pop it in the microwave for about 10-15 seconds. This method keeps the bread soft and tasty. Enjoy your chocolate chip banana bread anytime! For the full recipe, check out my Choco-Banana Bliss Bread. Yes, you can use frozen bananas in this recipe. Frozen bananas work well because they become soft when thawed. Here are some tips for success: - Thaw the bananas completely before mashing them. - Drain any excess liquid after thawing. - Use ripe bananas for the best flavor and sweetness. To check if the bread is done, look for a few signs: - The bread should be golden brown on top. - A toothpick inserted into the center should come out clean or with a few crumbs. - The bread should spring back lightly when you press on it. Yes, you can double the recipe to make two loaves. Here are some tips for scaling up: - Use a larger mixing bowl to combine your ingredients. - Divide the batter between two greased loaf pans. - Bake both loaves, but check their doneness a few minutes earlier. To make your banana bread less sweet, you can try these options: - Reduce the brown sugar by 1/4 cup. - Use less chocolate chips or opt for unsweetened chips. - Add a pinch of salt to balance the flavors. You can find the Full Recipe for this delicious chocolate chip banana bread above. In this blog post, we explored how to make delicious chocolate chip banana bread. We covered key ingredients like ripe bananas, unsalted butter, and dark chocolate chips. I shared step-by-step instructions to mix and bake the bread, along with tips for selecting bananas and perfecting the texture. Variations such as gluten-free and vegan options are also possible. Finally, we discussed how to store the bread for fresh flavor. Enjoy this treat and make it your own with creative add-ins whenever you bake!

Chocolate Chip Banana Bread Soft and Flavorful Bake

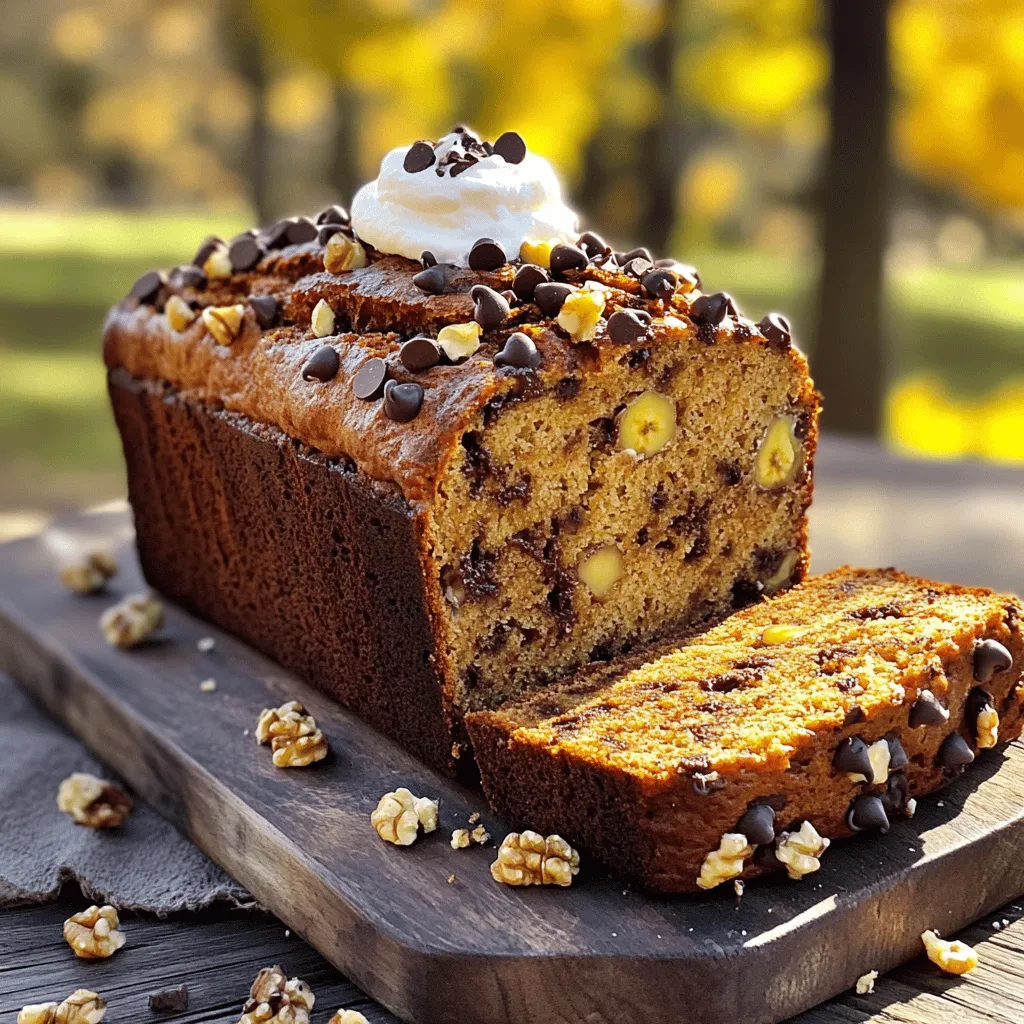
Are you ready to bake the perfect Chocolate Chip Banana Bread? This soft, flavorful treat combines ripe bananas, rich butter,

- 2 cups jasmine rice, thoroughly rinsed - 4 boneless, skinless chicken thighs - 1 medium onion, finely diced - 3 cloves garlic, minced - 1 cup low-sodium chicken broth - 1 cup water - 1 large lemon, juiced and zested - 1 teaspoon dried oregano - 1 teaspoon dried thyme - 1 teaspoon paprika - 2 tablespoons extra virgin olive oil - Salt and freshly cracked pepper to taste - Fresh parsley, finely chopped, for garnish To add more flavor, you can try some extra herbs and spices. Here are a few ideas: - Rosemary gives a woodsy taste. - Basil adds a sweet note. - Cumin offers a warm, earthy flavor. - A pinch of cayenne can bring heat. Mix and match these options to suit your taste. They can transform your one pot chicken rice into something special. Using fresh ingredients can make a big difference. Fresh chicken tastes better and is juicier. Fresh herbs like parsley and thyme add bright flavors. They also bring more nutrients to your dish. Dried herbs and spices are great when fresh is not available. They have a longer shelf life. Just remember, dried herbs are stronger. Use less than you would with fresh. Both options work well in this recipe, so choose what you have! For the best flavor, I recommend using fresh chicken and herbs when you can. If you want to try the Full Recipe, you’ll see how these choices can elevate your meal. First, I sauté the chicken. In a large pot or Dutch oven, I heat extra virgin olive oil over medium heat. I season both sides of the chicken thighs with salt, pepper, paprika, oregano, and thyme. Once seasoned, I add the chicken to the pot. I let it sear for about five minutes on each side until it turns golden brown. After searing, I carefully remove the chicken and set it aside on a plate. Next, I focus on the aromatics. In the same pot, I add the diced onion and minced garlic. I sauté for about three to four minutes, stirring occasionally. I wait until the onion becomes translucent and gives off a fragrant aroma. This step builds a great base for the dish. Now, I mix the rice and liquid. I introduce the rinsed jasmine rice to the pot. Stirring well, I ensure the rice combines with the softened onion and garlic. I let it cook for one to two minutes. This helps the rice absorb all the lovely flavors. After that, I add the chicken broth and water. I also pour in the lemon juice and zest, stirring everything together thoroughly. I bring the mixture to a gentle boil. Next, I return the chicken to the pot. I nestle the seared chicken thighs among the rice. I cover the pot tightly, reduce the heat to low, and let it simmer undisturbed for about 20 to 25 minutes. This allows the rice to become tender and the chicken to cook fully. After the cooking time, I remove the pot from heat but let it rest for an additional five minutes with the lid on. This step helps the rice steam and become fluffy. Once rested, I fluff the rice gently with a fork and taste it. If needed, I adjust the seasoning with more salt and pepper. Finally, I serve the dish warm. For a vibrant touch, I garnish each serving with a sprinkle of freshly chopped parsley. This brightens the meal and adds a fresh flavor. Enjoy this flavorful and easy meal with family or friends! To make your chicken juicy and your rice fluffy, start with good seasoning. Always salt your chicken well before cooking. This helps lock in moisture. Sear the chicken thighs in olive oil until they turn golden brown. This step adds flavor and keeps them tender. Use medium heat to avoid burning. After searing, let the chicken rest. It helps the juices settle, making every bite yummy. When you add the rice, stir it for about two minutes. This toasting step gives the rice a nice nutty flavor. Want to spice things up? Add veggies like bell peppers, peas, or carrots. They bring color and nutrients. You can also try different spices. Cumin or curry powder can add a warm touch. Fresh herbs like basil or cilantro can make a difference, too. Just toss them in right before serving for a burst of flavor. Feel free to mix and match until you find your favorite combo. The key to perfect One Pot Chicken Rice is timing. After you combine everything, cover the pot and lower the heat. Let it simmer for about 20-25 minutes. Avoid lifting the lid during this time. It lets the steam escape, and you want to keep that in. After cooking, let the pot rest for 5 minutes with the lid on. This helps the rice finish cooking and become fluffy. Check the rice for tenderness and the chicken for doneness before serving. If it’s not quite right, give it a few more minutes. {{image_4}} You can switch the chicken for other proteins. Try using turkey, pork, or beef. Each meat adds its own taste. For a lighter option, use tofu or tempeh. They soak up flavors well and make it a great vegetarian dish. Just remember to adjust cooking times based on the protein you choose. While jasmine rice is my favorite, you can use different rice types. Brown rice gives a nutty flavor and more fiber. Basmati rice adds a nice aroma. Quinoa is a great gluten-free choice. Each type changes the texture and taste, so feel free to experiment. You can adapt the recipe to fit various cuisines. For an Asian twist, add soy sauce and ginger. To make it Mediterranean, try olives and feta cheese. Adding spices like cumin or chili can give it a Mexican vibe. Each change makes the dish unique and fun to explore. After you enjoy your One Pot Chicken Rice, store the leftovers in an airtight container. Make sure the rice cools down first. This helps keep it fresh. Place the container in the fridge. Use the leftovers within three to four days for the best taste. When you reheat, add a splash of water. This keeps the rice moist. Heat it on the stove or in the microwave until warm. You can freeze One Pot Chicken Rice for later. First, let it cool completely. Then, scoop portions into freezer-safe bags or containers. Make sure to remove as much air as possible. Label the bags with the date. This will help you track how long it’s been frozen. For best quality, enjoy it within three months. To reheat, thaw it in the fridge overnight. Heat it on the stove or microwave until it’s piping hot. One Pot Chicken Rice lasts in the fridge for about four days. If you freeze it, it can stay safe for up to three months. Always check for signs of spoilage before eating. If it smells off or looks strange, it’s best to toss it. Enjoy your meal safe and sound! Yes, you can use brown rice. It has more fiber and nutrients than jasmine rice. However, it takes longer to cook. You need to adjust the liquid and cooking time. Use about 2 ½ cups of liquid for 1 cup of brown rice. Cook it for 40-50 minutes instead of 20-25. The texture will be chewier, and the flavor will be nuttier. To make this dish gluten-free, use gluten-free chicken broth. Check labels to ensure no hidden gluten. You can also use tamari instead of soy sauce if needed. The rest of the ingredients should be gluten-free. Always double-check your spices as some may contain gluten. Yes! For a slow cooker, sear the chicken first, then add it to the pot. Mix all other ingredients in the slow cooker. Cook on low for 4-6 hours or high for 2-3 hours. For an instant pot, use the sauté function to sear the chicken. Follow the full recipe steps, then cook on high pressure for 10 minutes. Allow for natural release for 10 minutes. This method keeps the flavors locked in while cooking. This blog post covered everything about making One Pot Chicken Rice. We explored essential ingredients, seasoning tips, and the benefits of fresh versus pantry staples. I shared easy step-by-step instructions and handy cooking tips to ensure a perfect dish. You now have variations to personalize the recipe and advice on proper storage. In conclusion, this dish is both simple and versatile. You can enjoy it however you like. Happy cooking!

One Pot Chicken Rice Flavorful and Easy Meal

Looking for a simple yet delicious meal? Let me introduce you to One Pot Chicken Rice! This dish combines juicy

To make a great spinach artichoke dip, gather these must-have items: - 1 cup frozen spinach, meticulously thawed and thoroughly drained - 1 cup canned artichoke hearts, coarsely chopped - 1 cup cream cheese, softened to room temperature - 1/2 cup sour cream - 1/2 cup mayonnaise - 1 cup shredded mozzarella cheese, plus extra for topping - 1/2 cup grated Parmesan cheese - 2 cloves garlic, finely minced - 1 teaspoon onion powder - 1/2 teaspoon crushed red pepper flakes (optional) - Salt and freshly cracked pepper to taste These ingredients blend well to create a creamy, rich dip. The spinach adds a nice green color, while the artichokes give it a unique twist. The cheeses provide a stretchy, gooey texture that everyone loves. You can enhance the dip with these optional ingredients: - Fresh herbs like parsley or basil for a pop of freshness - A splash of lemon juice for brightness - A dash of Worcestershire sauce for depth - Different cheese, like cheddar or gouda, for a new flavor Adding these items can change the dip's taste profile. Feel free to experiment based on your preferences. When choosing between fresh and frozen ingredients, consider these tips: - Frozen spinach is often picked at peak ripeness and is convenient. - Fresh spinach can offer a brighter taste and texture. To use it, sauté it first to reduce moisture. - Look for artichoke hearts packed in water or oil. Avoid those with added preservatives. For the best flavor, use high-quality ingredients. They make a big difference in your dip's taste and texture. Start by gathering all your ingredients. You need: - 1 cup frozen spinach, thawed and drained - 1 cup canned artichoke hearts, chopped - 1 cup cream cheese, softened - 1/2 cup sour cream - 1/2 cup mayonnaise - 1 cup shredded mozzarella cheese, plus more for topping - 1/2 cup grated Parmesan cheese - 2 cloves garlic, minced - 1 teaspoon onion powder - 1/2 teaspoon crushed red pepper flakes (optional) - Salt and pepper to taste Make sure your spinach is really drained. Moisture can make the dip runny. In a large bowl, mix the cream cheese, sour cream, and mayonnaise. Use a spatula or mixer to blend until smooth. Add the minced garlic, onion powder, crushed red pepper, and a pinch of salt and pepper. Stir it all together. Next, gently fold in the spinach and chopped artichokes. Be careful not to overmix. Finally, add the mozzarella and Parmesan cheese. Save a little mozzarella for the top later. Preheat your oven to 350°F (175°C). Spoon the mixture into a baking dish. Spread it evenly for the best cooking. Top with the reserved mozzarella cheese. Bake for 25-30 minutes. Look for bubbling edges and a golden top. When done, take it out and let it cool for a few minutes. This dip is best served warm. For more details, refer to the Full Recipe. To achieve a creamier dip, use full-fat cream cheese. This adds richness. You can also mix in more sour cream or mayonnaise. These ingredients help create a smooth texture. Another tip is to blend the mixture longer. This eliminates lumps and incorporates air, giving it a fluffy feel. If you want a healthier dip, swap regular cream cheese for low-fat versions. You can also use Greek yogurt instead of sour cream. This adds protein and cuts calories. For mayonnaise, try using avocado or hummus. These options boost flavor without added fat. Serve your dip hot for the best experience. Pair it with crispy bread or tortilla chips. Fresh veggies like carrots and bell peppers also work well. For extra flavor, sprinkle some herbs on top before serving. You can find the full recipe to make this delightful dish. {{image_4}} You can swap out cheeses in your dip for fun twists. Try using gouda for a smoky taste. Cheddar adds a sharp flavor that many love. Cream cheese is key, but mixing in ricotta gives a light texture. You can also toss in feta for a tangy kick. Each cheese adds a unique flair, so feel free to mix and match! Spinach and artichokes are great, but you can add more veggies. Diced bell peppers or chopped kale can boost nutrition. Mushrooms add earthiness and texture, too. If you want protein, consider adding cooked chicken or crab meat. These additions make the dip heartier and more filling, making it a full meal option. If you like heat, spice up your dip with jalapeños or diced green chiles. They bring a fresh, fiery flavor. You can also add more crushed red pepper flakes for extra warmth. For a smoky touch, try chipotle peppers in adobo sauce. This adds depth to the flavor and will impress your guests. For more ideas, check out the Full Recipe for Spinach Artichoke Dip and let your creativity shine! To keep your spinach artichoke dip fresh, store it in an airtight container. Make sure it cools down first. Place it in the fridge. This will last for about three to four days. Avoid leaving it out for too long. Bacteria can grow fast in warm temperatures, which is not safe. When you're ready to enjoy your leftovers, the oven is your best friend. Preheat it to 350°F (175°C). Place the dip in an oven-safe dish. Cover it with foil to prevent it from drying out. Heat for about 15-20 minutes, or until it's hot and bubbly. If you want a golden top, remove the foil for the last few minutes. If you plan to freeze your dip, do it before baking. Pack it in an airtight container or freezer-safe bag. Make sure to remove all air. This will keep it good for up to three months. When you're ready to eat, thaw it in the fridge overnight. After that, bake it as usual according to the Full Recipe. To make Spinach Artichoke Dip from scratch, follow these steps: - Preheat your oven to 350°F (175°C). - Mix 1 cup softened cream cheese, 1/2 cup sour cream, and 1/2 cup mayonnaise in a bowl. - Add 2 minced garlic cloves, 1 teaspoon onion powder, and season with salt and pepper. - Fold in 1 cup drained spinach and 1 cup chopped artichoke hearts. - Stir in 1 cup shredded mozzarella and 1/2 cup grated Parmesan cheese. - Transfer the mixture to a baking dish and top with extra mozzarella. - Bake for 25-30 minutes until bubbly and golden. This recipe is easy and full of flavor. Check out the Full Recipe for more details. Yes, you can use fresh spinach instead of frozen. - Start with about 1 cup of fresh spinach. - Cook it in a pan with a little water until wilted. - Drain it well to remove excess water. - Chop the cooked spinach before adding it to the dip. Fresh spinach gives a nice texture and bright flavor. You have many great options to serve with Spinach Artichoke Dip. - Crispy toasted baguette slices are a classic choice. - Tortilla chips add a nice crunch. - Fresh vegetable sticks like carrots, celery, and bell peppers are healthy options. - You can also serve it with crackers or pita chips. These sides make your dip even more enjoyable. Spinach Artichoke Dip lasts about 3-5 days in the fridge. - Store it in an airtight container to keep it fresh. - Before serving, reheat it in the oven or microwave until warm. This dip is perfect for leftovers and great for snacking. You now know how to make tasty Spinach Artichoke Dip. We covered key ingredients and tips for fresh picks. I shared easy steps to prepare, mix, and bake the dip perfectly. For extra creaminess or health swaps, I provided great tricks. You can try many fun variations, like different cheeses and spices. Lastly, I outlined smart storage methods to keep leftovers fresh. Enjoy sharing this delicious dip at your next gathering!

Spinach Artichoke Dip Simple and Delightful Recipe

Spinach Artichoke Dip is a creamy, tasty treat that everyone loves. In this simple and delightful recipe, I’ll show you

To make a tasty Cheesy Taco Casserole, you need some key ingredients. You can choose ground meat options like turkey or beef. Ground turkey offers a leaner choice, while beef gives a richer flavor. Next, you will want canned goods. Black beans and corn are perfect additions. Black beans add protein and fiber, while corn brings a sweet crunch. For seasoning, grab taco seasoning and salsa. Taco seasoning packs tons of flavor. Salsa adds moisture and a touch of heat, depending on your choice. Cheese is crucial in this dish. I recommend using cheddar cheese for that classic taste. You can also try other cheese varieties if you prefer. Don't forget the additional toppings! Sour cream is a great way to balance flavors. If you like heat, add sliced jalapeños for a spicy kick. Lastly, consider garnishing with fresh cilantro. This herb adds a burst of color and fresh flavor. For the complete list of ingredients, check the [Full Recipe]. Preheat your oven to 350°F (175°C) now. This step is key for a perfect bake. While the oven heats, grab a large skillet. Cook 1 pound of ground turkey or beef over medium heat. Use a wooden spoon to break the meat into small pieces. Cook it until it turns brown, which takes about 7-10 minutes. Don’t forget to drain any excess fat from the skillet. Next, sprinkle the taco seasoning over the cooked meat. Stir well to combine. Add the drained black beans, sweet corn, and 1 cup of salsa to the skillet. Mix everything together. Allow this mixture to simmer for about 5 minutes. This lets the flavors blend and develop. Grab a 9x13 inch baking dish for the next step. Create the base by layering half of the coarsely crushed tortilla chips evenly at the bottom. Spread half of the savory meat mixture over the chips. Then, dollop half of the sour cream on top of the meat. Finish this layer with half of the shredded cheddar cheese. Ensure it’s spread evenly for balanced flavors. Repeat the process with the second half of the crushed tortilla chips and the remaining meat mixture. Add the rest of the sour cream and cheese on top. If you like heat, add sliced jalapeños on top. Cover the casserole dish with aluminum foil. This helps to cook everything evenly. Bake in the preheated oven for 25 minutes. After that time, carefully remove the foil. Continue baking for another 10-15 minutes. You want the cheese to be melted and bubbly. It should form a delightful golden crust when done. Let the casserole cool for about 5 minutes before serving. For a fresh touch, garnish with sprigs of cilantro if desired. For the full recipe, check out the details above. To boost the taste, adjust your taco seasoning. You can add more spice or herbs. Consider adding garlic powder or onion powder for depth. If you love heat, add more jalapeños or red pepper flakes. For the meat, ensure it cooks evenly. Break it into small pieces as it browns. This way, each bite is tender and full of flavor. Drain any excess fat to keep it light. Pair your casserole with a fresh salad or rice. A crisp green salad balances the rich flavors. If you want something heartier, serve it with Mexican rice. When serving, think about fun presentations. Scoop portions into colorful bowls and top with fresh cilantro. You can also drizzle extra salsa or sour cream over each serving for flair. Make this dish fit your diet. Use ground turkey for a lean option or swap for plant-based meat. For gluten-free needs, choose corn tortilla chips. If you want less cheese, try low-fat options or skip it entirely. Add more veggies like bell peppers or zucchini for extra nutrients. Feel free to mix in your favorite beans, too! For the Full Recipe, check out the main recipe section. {{image_4}} You can make a tasty vegetarian version of Cheesy Taco Casserole. Start with plant-based meat alternatives, like lentils or crumbled tofu. These options provide great texture and flavor. For added nutrition and taste, swap in vegetables like bell peppers, zucchini, or mushrooms. These colorful veggies not only add flavor but also make the dish more vibrant. Cheese plays a big role in this casserole. While cheddar is a popular choice, you can explore other blends. Try Monterey Jack for a creamier texture or pepper jack for a spicy kick. Mixing different cheeses can deepen the flavor. Remember, the type of cheese you use will change the taste and melt quality of your dish. So, choose wisely! Adjusting the spice level is easy. You can make it mild, medium, or hot based on your taste. For a milder dish, skip the jalapeños and use mild salsa. If you like heat, add more jalapeños or use spicy salsa. Balancing heat is key. Pair spicy elements with creamy toppings like sour cream to cool things down. This way, everyone can enjoy the dish! For the full recipe, click here: [Full Recipe]. To keep your cheesy taco casserole fresh, use a glass or plastic container with a tight lid. Make sure to cool the casserole to room temperature before sealing it. This helps prevent moisture buildup, which can make the food soggy. You can store the leftovers in the fridge for up to four days. Just remember to label your container with the date to track freshness. If you want to save some for later, freezing is a great option. Before freezing, cut the casserole into individual portions. Wrap each piece tightly in plastic wrap, then place them in a freezer-safe bag. This way, you can pull out just what you need! When you're ready to eat, thaw in the fridge overnight. To reheat, bake at 350°F (175°C) for about 20-25 minutes. This keeps the texture nice and cheesy. Typically, if stored properly, cheesy taco casserole lasts about four days in the fridge. When frozen, it can last up to three months. Check for signs of spoilage before eating. Look for any off smells, changes in color, or mold. If you see any, it’s best to discard it. Always trust your senses; they help keep you safe! To make Cheesy Taco Casserole from scratch, you start by cooking your choice of ground meat. I often use ground turkey or beef. Cook it in a skillet until it’s brown. Then, mix in taco seasoning, black beans, corn, and salsa. This gives your dish a rich flavor. Next, layer crushed tortilla chips, this meat mix, sour cream, and cheese in a baking dish. Repeat the layers and bake until bubbly. You can find the full recipe above for all the details. Yes, you can make Cheesy Taco Casserole ahead of time. Prepare the casserole up to the baking step. Cover it well with foil or plastic wrap. Store it in the fridge for up to 24 hours. When ready to bake, just add a few minutes to the cooking time. This makes it easy for busy nights. You can serve many sides with Cheesy Taco Casserole. I like to pair it with a fresh salad. A simple green salad with lime dressing works well. You can also serve tortilla chips with salsa. For drinks, try a fruity soda or iced tea. These choices balance the flavors nicely. Cheesy Taco Casserole can be healthy if you choose the right ingredients. Using lean ground turkey cuts down on fat. Black beans add fiber and protein. You can also use low-fat cheese and sour cream. If you want to make it even lighter, add more veggies like bell peppers or zucchini. This way, you still get all that great taste with better nutrition. This blog post covered all the steps for making Cheesy Taco Casserole, from ingredients to storage. We explored meat choices, canned goods, and tasty toppings. Preparing the casserole involved mixing flavors, layering ingredients, and baking for perfection. I shared tips for adjusting spice levels and suggested sides that pair well. Finally, we discussed storage options to keep leftovers fresh. Try adding your own twist to this dish and enjoy!

Cheesy Taco Casserole Flavorful Weeknight Meal

Are you tired of the same old weeknight meals? Let me introduce you to a dish that packs a punch:

Older posts
Newer posts
← Previous Page1 … Page45 Page46 Page47 … Page86 Next →

dsad

© 2026 lazychefmagic • Built with GeneratePress

Our Policies

  • Copyright Policy
  • Cookie Policy
  • GDPR Policy
  • Privacy Policy
  • Disclaimer
  • Terms Of Use

More Information

  • Home
  • About
  • Contact
  • Appetizers
  • Dessert
  • Dinner
  • Drinks
©2026, lazychefmagic About Back To Top