Skip to content
DisclaimerTerms Of UseGDPR PolicyCookie Policy

lazychefmagic

  • Home
  • Drinks
  • Appetizers
  • Dinner
  • Dessert
  • About
  • Contact
  • Privacy Policy
DisclaimerTerms Of UseGDPR PolicyCookie Policy

NO-ING-IMG

- 4 boneless, skinless chicken thighs - 1 cup cherry tomatoes, halved - 1 cup fresh spinach - 12 oz penne pasta - Olive oil - Garlic powder - Italian seasoning - Heavy cream - Chicken broth - Red pepper flakes - Grated Parmesan cheese To make One-Pot Creamy Tuscan Chicken, gather these ingredients. The chicken thighs give the dish a rich flavor. Cherry tomatoes add a nice sweetness. Fresh spinach brings a pop of color and nutrition. The penne pasta makes it hearty. Now, don’t forget your pantry items! Olive oil is key for cooking the chicken. Garlic powder and Italian seasoning add depth. Heavy cream creates that creamy texture we all love. Chicken broth helps bring everything together. If you want to spice things up, use red pepper flakes. Grated Parmesan cheese adds a salty kick and enhances the creaminess. You can get creative with your ingredients based on what you have on hand. For the full recipe, check out the cooking steps to see how all these tasty components come together. Enjoy cooking! - Season the chicken thighs with garlic powder, Italian seasoning, salt, and pepper. - Heat olive oil in a large pot or deep skillet over medium-high heat. - Sear the seasoned chicken thighs until they turn golden brown, about 5-6 minutes on each side. - Remove the chicken and set it aside on a plate. - In the same pot, add the halved cherry tomatoes. Sauté for 2-3 minutes until they soften. - Stir in the fresh spinach and cook for another 1-2 minutes until the spinach wilts. - Carefully pour in the chicken broth and bring the mixture to a gentle simmer. - Reduce the heat to low, then stir in the heavy cream and grated Parmesan cheese. - Mix well until the cheese melts and the sauce thickens. - Add the penne pasta, making sure it is submerged in the creamy sauce. - Place the seared chicken thighs back into the pot on top of the pasta. - Cover the pot and cook on low heat for about 15-20 minutes until the pasta is al dente. - Ensure the chicken reaches an internal temperature of 165°F (75°C). - Stir gently to combine everything before serving. For the full recipe, check out the detailed instructions. To get the best flavor from your chicken, sear it well. Start by heating olive oil in your pot. Make sure the oil is hot before adding the chicken. Sear each thigh until golden brown, about 5-6 minutes on each side. This helps lock in juices and gives a nice crust. To keep your pasta from sticking, stir it often while it cooks. Make sure the water is boiling before adding the pasta. A pinch of salt in the water also helps prevent sticking. If you follow these steps, your pasta will stay nice and separate. If you don’t have heavy cream, you can use half-and-half or whole milk. For a thicker sauce, mix in a bit of cornstarch. This will still give you a creamy texture without the heaviness of cream. Fresh herbs can really boost the flavor of your dish. Try adding basil or parsley at the end of cooking. This adds bright notes that enhance the creamy sauce. You can also use dried herbs if fresh ones are not available. Some great side dishes to pair with creamy Tuscan chicken are garlic bread and a fresh salad. The bread is perfect for soaking up the sauce, while the salad adds a crisp contrast. For a beautiful plate, garnish your dish with extra grated Parmesan cheese. A sprinkle of fresh basil on top gives a pop of color. This makes your dish look as good as it tastes! Enjoy this delightful meal with family and friends. For the full recipe, check out the One-Pot Creamy Tuscan Chicken recipe above. {{image_4}} You can switch chicken thighs for chicken breasts. Chicken breasts are leaner and cook faster. They still taste great in this dish. If you want a vegetarian option, try using tofu or chickpeas. Both options soak up flavors well, making them tasty substitutes. Feel free to mix in other vegetables. Zucchini, bell peppers, or mushrooms can add fun textures and flavors. You can also change the pasta type. Fusilli or farfalle work well, too. Using different shapes makes the dish fun and keeps it exciting. For a deeper flavor, add a splash of white wine when cooking. It will enhance the sauce and add a touch of brightness. If you need a dairy-free option, replace heavy cream with coconut milk or cashew cream. These alternatives give a rich taste without dairy. For the full recipe, check the link above. To keep your One-Pot Creamy Tuscan Chicken fresh, let it cool down first. Place it in a storage container with a tight lid. Glass or plastic containers work well. This helps prevent spills and keeps the dish tasty. Store it in the fridge for up to four days. You can freeze One-Pot Creamy Tuscan Chicken for later. First, let it cool completely. Then, pour it into a freezer-safe container. Be sure to leave some space at the top because it will expand when frozen. This dish can last up to three months in the freezer. For reheating, thaw it in the fridge overnight. Reheat it on the stove over low heat, stirring often until hot. You can store leftovers in the fridge for about four days. If you notice any off smells, strange colors, or mold, it’s best to throw it away. Always trust your senses when it comes to food safety. Can I make this dish ahead of time? Yes, you can make One-Pot Creamy Tuscan Chicken ahead of time. Cook the meal and let it cool. Store it in the fridge for up to three days. When you are ready to eat, reheat it gently on the stove. What is the best way to reheat creamy Tuscan chicken? The best way to reheat this dish is on the stove. Use a medium heat and stir often. This helps prevent the sauce from separating. You can also add a splash of chicken broth if the sauce is too thick. Is One-Pot Creamy Tuscan Chicken gluten-free? Yes, this dish can be gluten-free. Just use gluten-free penne pasta. Be sure to check all ingredient labels. Some may have gluten hidden in them. Can I omit dairy from the recipe? You can omit dairy by using almond milk or coconut cream. This will change the flavor slightly but will keep it creamy. Nutritional yeast can add a cheesy flavor without dairy. Why is my sauce too thin? If your sauce is too thin, try cooking it longer. This will help it thicken. You can also mix a small amount of cornstarch with water and stir it in. This will help it reach the right consistency. How can I add more flavor to the dish? To add more flavor, use fresh herbs like basil or parsley. You can also add more spices like thyme or oregano. A splash of lemon juice can brighten the dish, too. In this article, we explored how to make a delicious One-Pot Creamy Tuscan Chicken. You learned about the main ingredients, essential pantry items, and optional extras that can boost flavor. I shared step-by-step cooking methods and helpful tips to ensure your dish turns out great every time. Remember to try different proteins, pasta, and sauce options for variety. With proper storage, you can enjoy your leftovers, too. Now, you're ready to create a meal that impresses! Enjoy your cooking adventure!

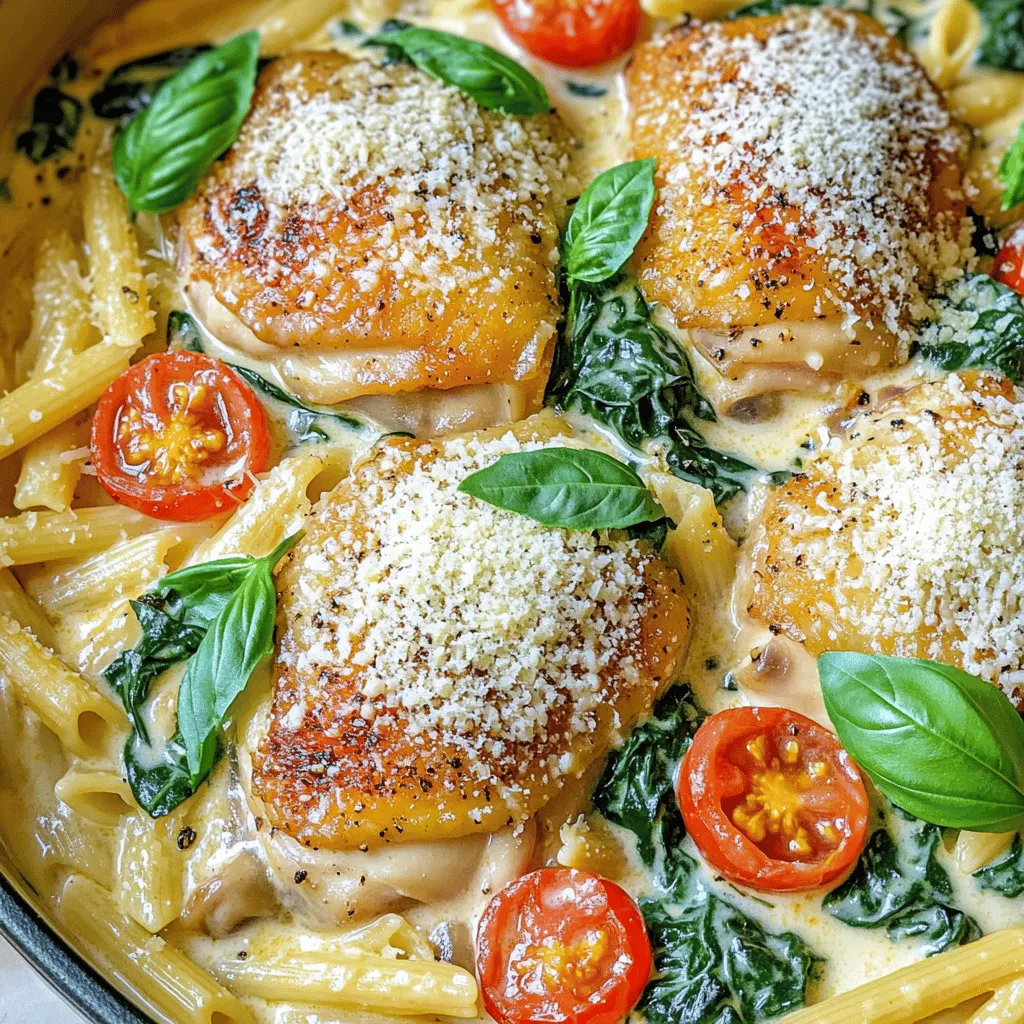
One-Pot Creamy Tuscan Chicken Easy and Flavorful Dish

Want a quick and tasty dinner? This One-Pot Creamy Tuscan Chicken is your answer! Packed with juicy chicken, fresh spinach,

You need a few key items for easy sheet pan chicken fajitas. Here’s what to gather: - 1 lb (450g) boneless chicken breasts, sliced into thin strips - 1 red or yellow bell pepper, sliced - 1 green bell pepper, sliced - 1 medium onion, sliced - 3 tablespoons extra virgin olive oil These main ingredients create a tasty base. The chicken adds protein, while the peppers and onion bring color and flavor. The right spices make this dish special. Here’s what you will need: - 2 teaspoons chili powder - 1 teaspoon ground cumin - 1 teaspoon garlic powder - 1 teaspoon onion powder - ½ teaspoon smoked paprika - ½ teaspoon sea salt - ½ teaspoon freshly ground black pepper Mix these spices together. They will give a great kick to your fajitas. Each spice adds depth and warmth to the dish. Garnishes can take your fajitas to the next level. Consider adding: - Juice of 1 lime - Fresh cilantro, chopped (for garnish) - Warm tortillas, for serving These garnishes bring freshness and brightness. Lime juice adds tang, while cilantro gives a nice herbal note. Warm tortillas are perfect for wrapping your fajitas. For the complete recipe, check the [Full Recipe]. Start by preheating your oven to 400°F (200°C). This step is important for even cooking. Next, line a large baking sheet with parchment paper. This makes cleanup easier later. In a big bowl, combine the sliced chicken, red or yellow bell pepper, green bell pepper, and onion. Make sure to slice them thin for quick cooking and great flavor. Now, drizzle three tablespoons of extra virgin olive oil over the chicken and veggies. This helps everything cook well. In a small bowl, mix the chili powder, ground cumin, garlic powder, onion powder, smoked paprika, sea salt, and black pepper. Sprinkle this spice mix evenly over the chicken and vegetables. It adds lots of flavor! Squeeze the juice of one lime over the mix. Use your hands or a spatula to toss everything together. You want the chicken and veggies coated nicely. Spread the mixture evenly on the prepared baking sheet. Try to keep it in a single layer. This helps them cook evenly and develop great taste. Place the sheet in the oven and bake for 20-25 minutes. The chicken should reach an internal temperature of 165°F (75°C). Halfway through, stir the mixture for even roasting. When done, carefully remove the sheet from the oven. Let it rest for a couple of minutes so the flavors meld. Just before serving, add freshly chopped cilantro on top for a pop of color. Serve the fajitas with warm tortillas and your favorite toppings. For the complete steps, check the Full Recipe. To cook evenly, spread the chicken and veggies in a single layer. This lets heat reach every piece. Use a large baking sheet to avoid crowding. If you need more space, use two sheets. Stir the mix halfway through cooking. This helps all sides get that nice roast. Always check that the chicken hits 165°F (75°C). This keeps everything safe and tasty. Add more flavor by marinating the chicken. Combine olive oil, spices, and lime juice. Let it sit for at least 30 minutes. You can also mix in fresh herbs like oregano or thyme. A dash of hot sauce before serving adds a nice kick. If you love heat, try adding jalapeños or chipotle powder. These tips make your fajitas shine with flavor. Serve your fajitas on a big platter. This makes it fun for everyone to build their own. Warm tortillas are a must. Offer toppings like avocado, sour cream, and salsa. Fresh cilantro adds a nice touch, too. You can even include lime wedges for extra zest. For a complete meal, pair with rice or beans. This creates a colorful, tasty feast for all! {{image_4}} You can switch out the chicken for other proteins. Try beef, shrimp, or pork. Each protein adds its own flavor. For beef, use flank steak sliced thin. For shrimp, choose large, peeled shrimp. Pork tenderloin is also a great choice. Adjust cooking time based on the protein you choose. Shrimp cooks fast, while beef may need a bit longer. If you want a meatless meal, I have tasty options for you. Use firm tofu or tempeh as a protein base. Slice them into strips and marinate with the spices. You can also use hearty vegetables like mushrooms, zucchini, or eggplant. These add texture and flavor. Mix in black beans or chickpeas for extra protein. Get creative with the spices to change the flavor. Add lime zest for a bright touch. You can also use different spice blends like taco seasoning. If you want heat, toss in some cayenne pepper. Fresh herbs like oregano or thyme can add depth too. Experiment with your favorite flavors to make this dish your own! Feel free to check out the Full Recipe for more details. Once you finish your meal, let any leftovers cool. Place the chicken fajitas in an airtight container. They can stay fresh in the fridge for up to three days. When you store them, keep the tortillas separate. This will help them stay soft and not soggy. If you want to save fajitas for later, freezing is a great option. Use a freezer-safe container or a heavy-duty freezer bag. Make sure to squeeze out as much air as possible. The fajitas can last up to three months in the freezer. When ready to eat, let them thaw in the fridge overnight. To reheat chicken fajitas, the oven works best. Preheat your oven to 350°F (175°C). Spread the fajitas on a baking sheet. Heat them for about 15-20 minutes, or until warm. If you’re in a hurry, you can use a microwave. Just place the fajitas in a microwave-safe dish and cover with a damp paper towel. Heat for 1-2 minutes, stirring halfway through. Enjoy your tasty meal again! You need to bake the fajitas for 20-25 minutes. Preheat your oven to 400°F (200°C). This high heat helps the chicken cook well and the veggies to become tender. Stir the mix halfway through to ensure even cooking. Yes, you can use other veggies. Feel free to add zucchini, mushrooms, or corn. Just cut them into similar sizes. This way, they cook evenly with the chicken. Each veggie adds its own flavor and texture to the dish. The best toppings for fajitas include sliced avocado, creamy sour cream, and spicy salsa. You can also add cheese, fresh cilantro, or lime wedges. Each topping brings its own taste and makes your fajitas even better. For the full recipe, check out the Sizzle & Spice Sheet Pan Chicken Fajitas. This post covered all you need for tasty fajitas. We explored main ingredients, spices, and optional garnishes. You learned step-by-step instructions, from prep to baking. I shared tips for even cooking and flavor boosts. We also discussed variations, like using different proteins or going vegetarian. Lastly, I included storage tips for leftovers. Now, get cooking and enjoy every bite of your fajitas!

Easy Sheet Pan Chicken Fajitas Tasty Family Meal

If you’re looking for a quick and tasty dinner, you’ve found it! Easy sheet pan chicken fajitas are perfect for

- 2 cups cooked fusilli pasta - 1 cup cooked shrimp - 1 cup canned tuna - 1 cup cherry tomatoes - 1/2 cup cucumber - 1/4 cup red onion - 1/4 cup black olives - 1/4 cup parsley - 1/4 cup mayonnaise - 2 tablespoons lemon juice - 1 teaspoon Dijon mustard - Salt and pepper to taste Gathering the right ingredients makes your seafood pasta salad shine. Start with 2 cups of cooked fusilli pasta. This pasta holds sauce well and adds a fun twist. Next, you need 1 cup of cooked shrimp. Make sure they are peeled and deveined. 1 cup of canned tuna adds protein and flavor. 1 cup of cherry tomatoes gives sweetness and color. I love using them halved for a juicy bite. Then, chop up 1/2 cup of cucumber for a refreshing crunch. To add some zing, include 1/4 cup of red onion. Slice 1/4 cup of black olives for a salty touch. For freshness, 1/4 cup of parsley brightens the dish. The dressing is key, so use 1/4 cup of mayonnaise. 2 tablespoons of lemon juice will add a nice zing. Finally, 1 teaspoon of Dijon mustard gives a flavorful kick. Don't forget to season with salt and pepper to taste. These ingredients create a colorful and tasty seafood pasta salad. Check out the Full Recipe to see how to bring it all together! - Combine pasta and seafood Start by placing your cooked fusilli pasta in a large bowl. Add the cooked shrimp and flaked tuna. Toss these together gently. This mix brings together the rich flavors of seafood with the pasta. - Make the creamy dressing In another bowl, whisk together mayonnaise, lemon juice, and Dijon mustard. This will create a zesty and creamy dressing. Make sure it is smooth and free of lumps. - Toss salad ingredients Pour the creamy dressing over the pasta and seafood mix. Use a spatula or tongs to toss everything together. Ensure every piece is coated well for that great flavor in every bite. - Adjust seasoning and fold in parsley Taste the salad. Add salt and pepper to your liking. Next, fold in the chopped parsley. This adds a fresh touch and brightens up the dish. - Chill for optimal flavor Cover the bowl with plastic wrap or a lid. Place it in the fridge for at least 30 minutes. This chilling time helps the flavors blend perfectly together, making every bite even more delicious. For the full recipe, check the detailed instructions and ingredients list provided above. - Use fresh seafood to enhance taste: Fresh shrimp and tuna bring big flavor to your salad. They taste better than canned or frozen options. Visit your local fish market for the best selection. - Opt for whole grain pasta for added nutrition: Whole grain pasta has more fiber than regular pasta. It makes your salad heartier and keeps you full longer. You can find it in most grocery stores. - Adjust creaminess with mayo or yogurt: You can use mayonnaise for a rich taste or yogurt for a lighter option. Mixing them can give you the best of both worlds. Try different ratios to see what you like best. - Tips for resting time before serving: Let your salad chill for at least 30 minutes before serving. This helps all the flavors mix and taste better. If you have time, chill it even longer for a more robust flavor. These tips will take your seafood pasta salad to the next level. For the full recipe, check out the earlier section. Enjoy your cooking! {{image_4}} You can change this seafood pasta salad to suit your taste. Here are some easy swaps: - Alternative seafood options: If you want a different flavor, try using crab or salmon instead of shrimp and tuna. These options add a rich, meaty taste to your salad. Crab has a sweet note, while salmon gives a nice, smoky flavor. - Veggie add-ins for extra crunch: Want more texture? Toss in some diced bell peppers, shredded carrots, or even chopped celery. These veggies add color and crunch. You can also use peas or corn for a pop of sweetness. - Different dressings for unique flavors: If you want to mix things up, try using Greek yogurt instead of mayonnaise for a lighter option. You can also add a splash of soy sauce or a drizzle of olive oil mixed with vinegar for a different twist. A pesto dressing can give your salad a herby kick. These variations keep your seafood pasta salad fresh and exciting. Experiment with flavors to find your favorite combination! For the full recipe, check out the section above. To keep your seafood pasta salad fresh, you must store it properly. First, place the salad in an airtight container. This helps prevent air from spoiling the ingredients. Store it in the fridge right after serving. Your salad should stay fresh for about 3 days. Make sure to check for any off smells or changes in texture before eating. If you see any signs of spoilage, it's best to toss it out. Freezing seafood pasta salad is not ideal. The pasta and seafood may become mushy when thawed. If you do freeze it, use a freezer-safe container. Consume it within a month to ensure the best taste. Remember, always label your container with the date. This way, you won’t forget how long it has been stored. For more details on making this dish, check the Full Recipe. Can I use frozen seafood? Yes, you can use frozen seafood. Just thaw it first. Cooked shrimp or crab works great. Make sure it's fully cooked before adding it to your salad. How long does the salad last in the fridge? The salad lasts about three days in the fridge. Store it in an airtight container. The flavors get better as it sits. What can I substitute for mayonnaise? You can use Greek yogurt as a healthier option. It gives a nice creaminess. You could also try avocado or a vinaigrette for a lighter taste. Is this recipe gluten-free? This recipe is not gluten-free with fusilli pasta. However, you can use gluten-free pasta. Look for options made from rice or quinoa for a great swap. For the full recipe, check out the detailed instructions to create this refreshing dish! This seafood pasta salad is easy and tasty. We used fresh shrimp, tuna, and a mix of colorful veggies. I shared steps for making a creamy dressing and tips to enhance flavor. You can even swap seafood or add extra veggies for fun. Remember to store your salad correctly to keep it fresh. With these tips, you will impress your guests and make a salad they love. Enjoy creating this dish and exploring your own variations!

Quick and Easy Seafood Pasta Salad Fresh and Simple Meal

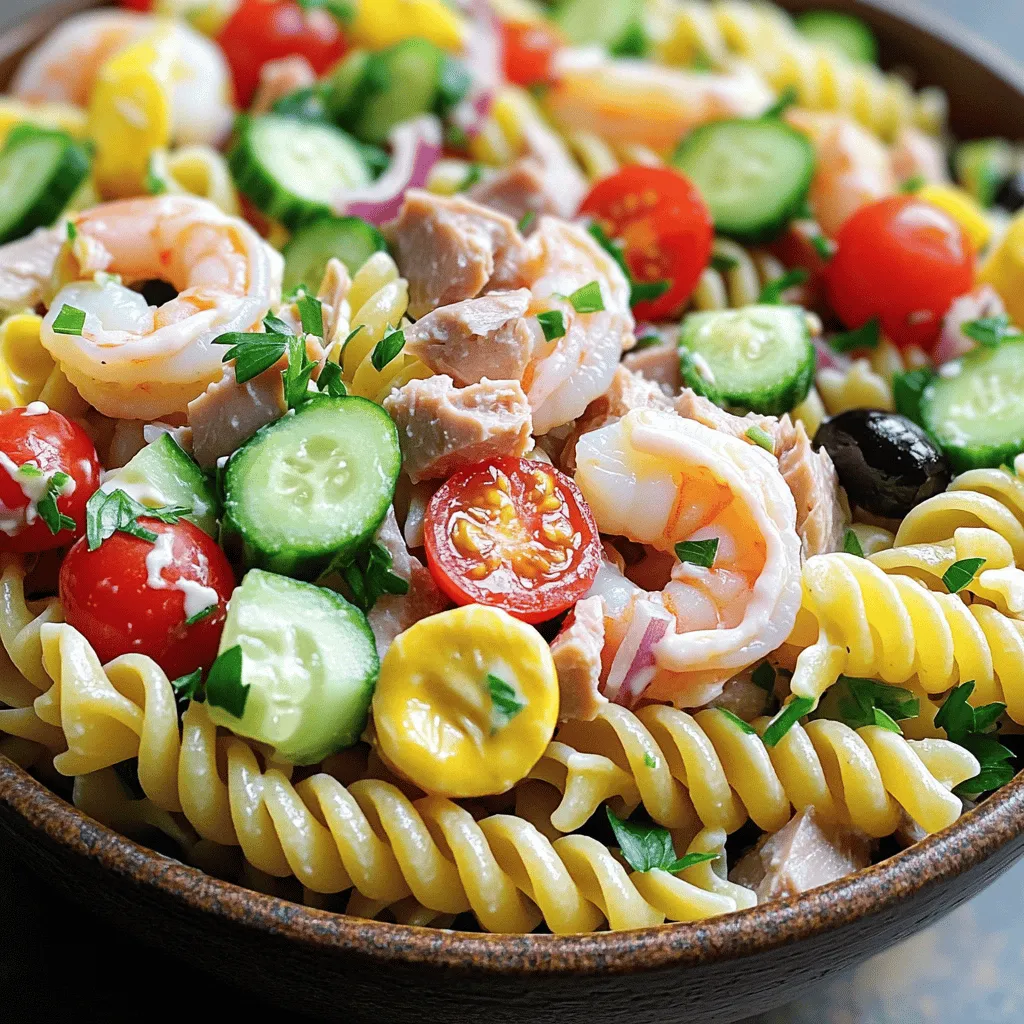
Are you craving a meal that’s quick, easy, and full of flavor? Look no further! My Quick and Easy Seafood

- 2 ripe avocados - 8 ounces fettuccine or spaghetti - 3 cloves garlic - 1 tablespoon fresh lemon juice - 1/4 cup fresh basil leaves - 1/4 cup grated Parmesan cheese - Sea salt and freshly cracked black pepper - Cherry tomatoes for garnish - Additional fresh basil leaves - Vegan options: nutritional yeast instead of Parmesan - Gluten-free pasta alternatives To make creamy avocado pasta, gather your main ingredients first. Choose ripe avocados; they should feel soft but not mushy. Fettuccine or spaghetti works well, but you can use any pasta you love. Garlic adds a savory touch, while fresh lemon juice gives brightness to the dish. Basil brings in a burst of fresh flavor, and Parmesan adds that cheesy richness. For optional ingredients, add sea salt and pepper to taste. Cherry tomatoes can brighten up your dish and add color. If you want more basil, sprinkle some on top for extra freshness. If you want to make this dish vegan, swap the Parmesan cheese for nutritional yeast. This keeps the flavor and adds a cheesy taste without using dairy. Gluten-free pasta is also an option if you need it. This recipe is flexible, so feel free to mix and match based on what you have at home. For the full recipe, check the link provided. - Measure 8 ounces of fettuccine or spaghetti. - Bring a large pot of salted water to a rolling boil. - Cook the pasta according to package instructions, about 8-10 minutes. - Before draining, reserve 1 cup of the pasta cooking water. - Drain the pasta and set it aside in a large mixing bowl. - In a food processor, combine 2 ripe avocados, 3 cloves of minced garlic, 1 tablespoon of fresh lemon juice, 1/4 cup of fresh basil leaves, and 1/4 cup of grated Parmesan cheese. - Blend the mixture until it is smooth and creamy. - If the sauce is too thick, adjust the consistency with the reserved pasta water. - Pour the creamy avocado sauce over the drained pasta. - Gently toss the pasta until it is evenly coated with the sauce. - Adjust the seasoning with sea salt and freshly cracked black pepper to taste. For the full recipe and more details, check out the [Full Recipe]. Enjoy your cooking! Choosing ripe avocados is key. Look for avocados that yield slightly when you press them. If they feel hard, wait a few days. If they feel mushy, they may be too ripe. A perfect avocado makes a smooth sauce. Achieving the right creaminess takes some skill. Blend the avocados with garlic, lemon juice, basil, and cheese. Drizzle olive oil slowly while blending. If your sauce is too thick, add reserved pasta water. This water helps reach that creamy texture. For a beautiful dish, garnish with halved cherry tomatoes. They add color and freshness. You can also sprinkle extra cheese or nutritional yeast on top. Pair your pasta with a light salad. A simple arugula salad with lemon dressing works well. This adds crunch and balances the creamy avocado sauce. Overcooking the pasta is a common mistake. Cook it until al dente. This keeps the pasta firm and tasty. Incorrect measuring of ingredients can ruin the dish. Use precise amounts for the sauce. Too much garlic or lemon juice can overpower the flavor. Stick to the Full Recipe for best results. {{image_4}} You can easily boost the protein in your creamy avocado pasta. Grilled chicken or shrimp pairs well with the dish. Simply season and cook the protein of your choice, then slice it and mix it in. For a plant-based option, consider chickpeas or lentils. These options add protein without changing the dish's flavor too much. To enhance the taste of your pasta, try adding spices or herbs. A pinch of red pepper flakes gives a nice kick. Fresh herbs like parsley or cilantro can brighten the dish. You can also change up the cheese. Swap Parmesan for feta or goat cheese for a tangy twist. Each cheese brings a unique flavor to your meal. Make your creamy avocado pasta fit the season by adding fresh vegetables. In spring, try sweet peas or asparagus. In summer, add zucchini or bell peppers. In the fall, roasted butternut squash works great. You can also adapt this dish for special occasions or diets. For a light summer meal, serve it cold. For a cozy winter dish, use warm pasta with hearty veggies. Explore the full recipe to get started on your creamy avocado pasta journey! To store leftovers, place the creamy avocado pasta in an airtight container. This helps keep it fresh. You can keep it in the fridge for up to three days. To keep your avocado from browning, add a little lemon juice. This will help preserve its bright color. Yes, you can freeze the sauce! Just store it in a freezer-safe container. The sauce can last up to three months in the freezer. When you are ready to use it, thaw it overnight in the fridge. For reheating, warm it gently in a pan. You can also mix in a little reserved pasta water to make it creamy again. Leftover pasta lasts about three to five days in the fridge. Check for signs of spoilage like off smells or mold. If it smells bad or looks unusual, it’s best to throw it away. Always remember safety first when it comes to food! The creaminess of this pasta comes from ripe avocados. When you blend avocados with garlic, lemon juice, and Parmesan, you create a smooth sauce. The olive oil adds richness. This mix makes the sauce silky and thick. Yes, you can use many types of pasta. Fettuccine and spaghetti work well. You can also try penne or even gluten-free options. Choose your favorite pasta to match the creamy sauce. To keep avocados fresh, use lemon juice. The acid in lemon slows browning. Store any leftover sauce in an airtight container. Press plastic wrap against the surface to limit air exposure. This dish is great for meal prep. You can cook the pasta and sauce ahead of time. Store them separately in the fridge. Just mix them when you're ready to eat. Yes, you can make this dish vegan. Replace Parmesan cheese with nutritional yeast. This keeps the flavor while making it plant-based. This pasta pairs well with salads or grilled veggies. You can serve it with garlic bread for a tasty meal. For extra protein, add grilled chicken or shrimp. For the full recipe, check out Creamy Avocado Pasta Delight. This blog post covered the delicious journey of making creamy avocado pasta. We explored main and optional ingredients, outlining easy steps for perfecting this dish. I shared tips to prevent mistakes and exciting variations to keep it fresh. Remember, using ripe avocados and proper cooking techniques makes a big difference. Enjoy the versatility of this recipe, whether you prefer it vegan or with added protein. With proper storage, your leftovers stay tasty too. Embrace this creamy delight and make it your own!

Creamy Avocado Pasta Flavorful and Easy Weeknight Meal

Craving a tasty meal that won’t take hours to make? This Creamy Avocado Pasta is your answer! With just a

To make cheesy garlic pull apart bread, gather these simple ingredients. Each one plays a key role in creating that warm, gooey delight. - 1 loaf of Italian or French bread - 1 cup shredded mozzarella cheese - 1 cup shredded cheddar cheese - 1/2 cup unsalted butter, melted - 4 cloves garlic, finely minced - 1 tablespoon fresh parsley, chopped finely - 1/2 teaspoon dried oregano - 1/2 teaspoon salt - 1/4 teaspoon freshly ground black pepper - Optional: a pinch of red pepper flakes for extra heat These ingredients blend together to bring out rich flavors. The buttery garlic mixture infuses the bread, while the cheese creates that irresistible pull apart effect. Each bite bursts with flavor and warmth. For more details, check out the Full Recipe. This recipe is perfect for gatherings or cozy nights in. Don’t forget to have a dipping sauce ready; it pairs beautifully! 1. Preheating the oven Start by preheating your oven to 350°F (175°C). This step is key for even baking and melting cheese. 2. Mixing the garlic butter In a small bowl, combine the melted butter, minced garlic, chopped parsley, oregano, salt, and black pepper. Mix well to create a tasty garlic butter. If you like spice, add a pinch of red pepper flakes. 3. Slicing the bread properly Take your loaf of Italian or French bread. Slice it carefully both horizontally and vertically, creating small square sections. Do not cut through the bottom crust. This keeps the loaf together. 1. Drizzling the garlic butter mixture Place the sliced bread on a large piece of aluminum foil. Use a spoon or pastry brush to drizzle the garlic butter into all the cuts. Make sure each piece is well coated with that buttery goodness. 2. Stuffing the cheese Now, take the shredded mozzarella and cheddar cheese. Stuff it into each cut of the bread. Spread the cheese evenly throughout for maximum cheesy delight. 1. Wrapping and baking instructions Wrap the bread tightly in aluminum foil, sealing it well. This keeps moisture in during baking. Place the wrapped bread on a baking sheet for easy handling. 2. Achieving the perfect golden finish Bake the bread in your preheated oven for 15-20 minutes. This allows the cheese to melt and the bread to toast. After that, unwrap the foil and bake for another 5 minutes. This step gives you a golden, crispy top. Now, you have a delicious cheesy garlic pull apart bread ready to enjoy! If you want the full details, check out the Full Recipe. - How to avoid soggy bread To keep your bread crispy, do not over-saturate it with the garlic butter. Use just enough to coat the cuts. Also, make sure to wrap the bread loosely in foil. This allows steam to escape, keeping the crust nice and crunchy. - Ensuring even cheese distribution When stuffing the cheese, use a mix of shredded mozzarella and cheddar. Spread it evenly across all cuts. Press the cheese down gently to push it into the bread. This way, every bite will have that cheesy goodness you crave. - Presentation ideas for serving For a great look, place the pull-apart bread on a wooden board. Garnish it with some fresh parsley for color. You can even sprinkle a bit of extra cheese on top for a fun touch. - Pairing options with dips or sides Serve the bread with a small bowl of marinara sauce for dipping. You could also try it with a creamy ranch dressing or a spicy aioli. These dips add a nice kick and make it even more fun to eat. - Fixing overcooked or undercooked bread If your bread is overcooked, it can become hard. To fix this, wrap it in a damp paper towel and microwave it for a few seconds. If it's undercooked, pop it back in the oven for a few more minutes. Check often to prevent burning. - Adjusting flavors and spice levels If the flavor is too mild, add more garlic or spices next time. A pinch of red pepper flakes can add a nice kick. Taste the garlic butter before using it to ensure it has the flavor you want. {{image_4}} You can change the type of bread to fit your taste. Try using a sourdough loaf for a tangy twist. Whole wheat bread adds a nutty flavor. Each type brings its own charm. For cheese, while mozzarella and cheddar shine, you can mix it up. Gouda melts wonderfully and adds a rich flavor. Cream cheese gives a creamy texture. Experiment with your favorites! Herbs and spices can really change the game. Add fresh basil for a sweet touch. A bit of thyme brings earthiness. You can also sprinkle in some chili powder for heat. Switch sauces or toppings too! Drizzle some pesto if you want a herbal kick. A layer of marinara sauce offers a classic Italian flavor. The choices are endless! If you need gluten-free options, look for gluten-free bread. Many brands offer tasty alternatives that work well in this recipe. For dairy-free needs, try dairy-free cheese. There are great brands today that melt nicely. Nutritional yeast can add a cheesy flavor without dairy. This way, everyone can enjoy cheesy garlic pull apart bread, no matter their diet! For the full recipe, check the details above! After you enjoy your cheesy garlic pull apart bread, you might have some leftovers. To keep it fresh, wrap it tightly in plastic wrap or aluminum foil. This will help prevent it from drying out. Store it at room temperature for up to two days. If you notice it getting stale, it’s time to use it or freeze it. If you want to save your cheesy garlic pull apart bread for later, freezing is a great option. First, let the bread cool completely. Then, wrap it tightly in plastic wrap and aluminum foil. This will keep it safe in the freezer for up to three months. When you're ready to eat it, simply take it out and let it thaw in the fridge overnight. For reheating, wrap it in foil and bake it at 350°F (175°C) for about 15 minutes. This keeps the bread soft and the cheese melty. Leftover cheesy garlic pull apart bread can be transformed into other tasty dishes. You can slice it into cubes and use it for a savory bread pudding. Or, you could turn it into croutons for a salad. Just cut the bread, toss it in olive oil and herbs, and bake until crispy. You can also make a delicious garlic bread soup by adding it to a broth with veggies. The options are endless with this delightful bread! How long will cheesy garlic pull apart bread last? Cheesy garlic pull apart bread stays fresh for about 2 days at room temperature. Keep it in an airtight bag. For longer storage, wrap it tightly and freeze it for up to three months. Can I make this recipe in advance? Yes, you can prepare it a few hours ahead. Just wrap the bread after adding the garlic butter and cheese. Store it in the fridge, then bake when ready to serve. What can I serve with cheesy garlic pull apart bread? This bread pairs well with marinara sauce or a fresh salad. You can also serve it with soups for a hearty meal. Can I use a different type of cheese? Absolutely! You can use any cheese you like. Gouda, pepper jack, or even feta can add great flavors. Is there a gluten-free version of this recipe? Yes, you can use gluten-free bread. Just make sure it has a good texture for pulling apart. What’s the best way to reheat leftover cheesy garlic pull apart bread? To reheat, wrap it in foil and place it in a preheated oven at 350°F (175°C) for about 10-15 minutes. This keeps the bread soft and the cheese melty. For the full recipe, check out the details above! This blog post covered how to make cheesy garlic pull apart bread. We explored the best ingredients, shared step-by-step instructions, and offered handy tips. Remember to choose the right bread and cheese for the best flavor. Get creative with herbs and toppings to make it your own. Proper storage helps keep leftovers fresh. You can use this bread in many ways. Enjoy making this tasty treat and impress your friends and family!

Cheesy Garlic Pull Apart Bread Irresistible Delight

Welcome to the cheesy paradise of pull apart bread! This easy recipe combines rich flavors of garlic and gooey cheese,

- 2 pounds chicken wings - 1/2 cup Sriracha sauce - 1/4 cup honey - 2 tablespoons soy sauce - 2 cloves garlic, minced - 1 teaspoon ginger, freshly grated - 1 tablespoon sesame oil - 1 tablespoon rice vinegar - Salt and freshly ground black pepper to taste - Sesame seeds for garnish - Chopped green onions for garnish - Mixing bowl - Baking sheet - Wire rack - Small saucepan - Whisk and measuring spoons To make Spicy Sriracha Honey Wings, gather all your ingredients first. You'll need chicken wings, Sriracha, honey, soy sauce, garlic, ginger, sesame oil, rice vinegar, salt, and pepper. Let's dive into what makes this dish special. The Sriracha brings heat, while honey adds sweet notes. Together, they create a tasty balance. You also need some basic tools. A mixing bowl helps mix the marinade. A baking sheet and wire rack are key for crisp wings. A small saucepan is for thickening the sauce later. Make sure you have a whisk and measuring spoons too. These will help you measure everything accurately. This recipe's fun because it’s easy to prepare. The flavors come together quickly, and everyone loves wings. Check out the Full Recipe for detailed steps! Start by grabbing a large mixing bowl. Add the Sriracha, honey, and soy sauce. Mix well until combined. Now, add minced garlic, freshly grated ginger, sesame oil, rice vinegar, and a pinch of salt and pepper. This marinade will give your wings a sweet and spicy kick. Next, take the chicken wings and place them in the bowl with the marinade. Use your hands or a spoon to coat each wing evenly. Make sure every wing gets a good layer of that tasty mix. Cover the bowl with plastic wrap and let it sit in the fridge. For the best flavor, marinate for at least one hour or overnight. Time to bake! First, preheat your oven to 425°F (220°C). While it heats, prepare your baking sheet. Line it with aluminum foil for easy cleanup. Place a wire rack on top and spray it lightly with cooking oil. Lay the marinated wings on the rack in a single layer. They should not touch each other. Save any leftover marinade for later. Bake the wings for 25-30 minutes. Remember to flip them halfway through. This ensures they cook evenly and get nice and crispy. While the wings bake, pour the leftover marinade into a small saucepan. Heat it over medium heat until it boils, then reduce to a simmer for about 5 minutes. This will thicken the sauce. Once the wings are golden and crispy, take them out of the oven. Brush them generously with the thickened marinade. This step adds extra flavor and a sticky glaze. Return the wings to the oven for 5-10 more minutes. This caramelizes the glaze for that perfect finish. Finally, sprinkle sesame seeds and chopped green onions on top for a burst of color and crunch. You can find the full recipe [here](#). Enjoy your spicy Sriracha honey wings! To get those wings extra crispy, make sure to dry them well before marinating. Wet wings don’t crisp up nicely. Use a paper towel to pat them dry. The best oven temperature for baking these wings is 425°F (220°C). This high heat helps achieve crispy skin while keeping the meat juicy. The ideal marinating time for deeper flavor is at least one hour. For the best taste, marinate the wings overnight. This allows the wings to soak up all the delicious flavors. If you want to adjust the heat levels, you can add more or less Sriracha. For a milder version, use a bit of ketchup or BBQ sauce mixed with the Sriracha. For side dishes, I recommend serving the wings with celery sticks and a cool ranch dip. These balance the spicy flavor. You could also pair them with a fresh salad for a light, crisp bite. For presentation, serve the wings on a large platter lined with crisp lettuce. Drizzle extra honey on top for a sweet touch, and sprinkle sesame seeds for a nice crunch. You can find the full recipe for Spicy Sriracha Honey Wings to create this bold dish. {{image_4}} You can change the flavor of your spicy Sriracha honey wings easily. Try adding some extra spices like cayenne or paprika for more heat. For a sweet twist, mix in brown sugar or maple syrup. If you want a citrus kick, add lime or orange juice to the marinade. This adds a bright note that balances the heat. You can also swap Sriracha with other hot sauces like chili garlic sauce for a different taste. Remember, adjust the amount of honey for sweetness based on your taste. You can cook wings in different ways, each giving a unique flavor. Grilling adds a smoky taste that many love. To grill, preheat your grill and cook wings for about 20 minutes, flipping often. Baking is simple and keeps the wings crispy. If you have an air fryer, use it! Air frying takes about 25 minutes at 400°F. This method makes the wings crispy and cuts down on oil. Just shake the basket halfway through to ensure even cooking. Making these wings fit your diet is easy. For a gluten-free option, use gluten-free soy sauce or tamari. This keeps the flavor while removing gluten. If you want a low-sugar version, reduce the honey. You can replace honey with a sugar-free syrup or even omit it for less sweetness. Just remember, this might change the final taste, but you can still achieve a delicious wing. Experiment with these options to find what works best for you. For the full recipe, check out the detailed instructions above. To store leftover wings, let them cool first. Place the wings in an airtight container. You can also wrap them tightly in plastic wrap. Store these in the refrigerator. They will stay fresh for about three to four days. If you want to keep them longer, freeze the wings. They can last in the freezer for up to three months. The best method to reheat wings is in the oven. Preheat the oven to 375°F (190°C). Place the wings on a baking sheet and heat for about 10-15 minutes. This keeps them crispy. You can also use an air fryer. Set it to 350°F (175°C) and heat for 5-7 minutes. If you need to use a microwave, place the wings on a microwave-safe plate. Heat them for about 1-2 minutes. This method may make them a bit soggy, so use it as a last resort. For the best taste, I recommend the oven or air fryer. Enjoy those spicy Sriracha honey wings! For more details, check the Full Recipe. Spicy Sriracha honey wings are a tasty mix of sweet and spicy. The Sriracha sauce gives heat, while the honey adds a nice sweetness. Together, they create a bold flavor that makes your taste buds dance. The wings get crispy when baked, making them perfect for parties or game day. Yes, you can prep these wings ahead of time! To do this, mix the marinade and coat the wings. Cover the bowl and put it in the fridge for at least one hour, or even overnight. This helps the wings soak up all the flavors. When you're ready, just bake them as the recipe says. If you want a different flavor, try using hot sauce or chili garlic sauce. You can also mix in some BBQ sauce for a sweeter taste. Adjust the amount based on how spicy you want your wings. Feel free to experiment with flavors you enjoy. To make your wings spicier, add more Sriracha or sprinkle in some cayenne pepper. For a milder version, reduce the Sriracha or mix in some ketchup. You can also try adding more honey to tone down the heat. Taste as you go to find the perfect balance for you. Great sides to serve with spicy wings include celery sticks and carrot sticks. They add crunch and help cool your mouth. You can also serve ranch or blue cheese dressing for dipping. Other good options are crispy fries or a fresh salad. These sides create a nice mix of flavors and textures. In this article, we explored how to make delicious spicy Sriracha honey wings. We covered the key ingredients, tools needed, and detailed step-by-step instructions. You also learned tips for marinating, baking, and serving these wings, along with flavorful variations and storage advice. Enjoy these wings at your next gathering or for a tasty snack. With simple adjustments, you can make them suit your taste. Get creative and have fun with your cooking!

Spicy Sriracha Honey Wings Bold and Flavorful Dish

Get ready to tantalize your taste buds with my Spicy Sriracha Honey Wings! This bold and flavorful dish combines the

- 1 1/2 cups all-purpose flour - 1 cup granulated sugar - 1/2 cup packed brown sugar - 1 teaspoon baking powder - 1 teaspoon baking soda - 1 teaspoon ground cinnamon - 1/2 teaspoon ground nutmeg - 1/4 teaspoon ground ginger - 1/2 teaspoon salt - 1/2 cup unsalted butter - 2 large eggs - 1 cup pumpkin puree - 1 teaspoon pure vanilla extract - 1/2 cup brewed coffee - 1/4 cup milk The key to great pumpkin spice latte cupcakes lies in the right ingredients. Each one plays a big role in flavor and texture. Flour: All-purpose flour gives structure. Too much can make them dense. Sugars: Granulated and brown sugars add sweetness. Brown sugar brings a hint of caramel. Spices: Ground cinnamon, nutmeg, and ginger give that warm, cozy flavor. Use fresh spices for the best taste. Pumpkin Puree: This is the star of the show. It keeps cupcakes moist and adds natural sweetness. Coffee: Brewed coffee enhances the latte flavor. It makes the cupcakes taste rich. Butter and Eggs: Room temperature butter and eggs mix well. They help create a light, fluffy texture. For a fun twist, you can add optional toppings. Cream cheese frosting is popular, or sprinkle extra cinnamon on top. Mini marshmallows can add a cute look and extra sweetness. You can find the full recipe in the article. Enjoy baking these delightful cupcakes! - Preheat the oven to 350°F (175°C). - Line the muffin tin with cupcake liners. - Combine all-purpose flour, sugars, baking powder, baking soda, spices, and salt. Mix these well in a large bowl until there are no lumps. - Cream the butter until light and fluffy. - Add the eggs one at a time, mixing well after each. - Stir in the pumpkin puree and vanilla extract until smooth. - Alternate adding the dry mixture with cooled coffee and milk. - Start and end with the dry mix. - Mix gently until just combined. Do not overmix. - Use a spoon or ice cream scoop to fill the liners. - Fill each about two-thirds full to allow room for rising. - Bake for 18-20 minutes. - Insert a toothpick in the center. It should come out clean. - Cool the cupcakes in the tin for 5 minutes. - Then, transfer them to a wire rack to cool completely. For the full recipe, check the [Full Recipe]. Enjoy the warm, festive flavors of these cupcakes! - Avoid overmixing the batter - Use room temperature ingredients To get a soft cupcake, be gentle when mixing. Overmixing can lead to dense cupcakes. Stir just until the ingredients blend. For the best results, let your butter, eggs, and milk sit out for about 30 minutes before you start. This simple step helps blend everything together easily. - Incorrect oven temperature - Not allowing cupcakes to cool properly Always check your oven's temperature with a reliable thermometer. An oven that is too hot can burn cupcakes. If it's too cool, they won't rise well. After baking, let the cupcakes sit in the pan for five minutes. Then move them to a wire rack. This step helps them cool evenly and keeps them from getting soggy. - How to pipe frosting beautifully - Adding seasonal garnishes Piping frosting can be fun. Use a large round tip for a classic swirl. Start from the edge and work your way to the center. For a fall touch, sprinkle some cinnamon on top. You can also add mini marshmallows for a cozy vibe. Get creative and make each cupcake look special! For the full recipe, check here. {{image_4}} To make gluten-free pumpkin spice latte cupcakes, use a gluten-free flour blend. Look for blends made with rice flour, almond flour, or oat flour. These blends can work well. Just replace the all-purpose flour in the recipe with the same amount of your chosen blend. The texture may change a bit, but they will still be delicious. For a vegan version, swap out the eggs for flax eggs. To make a flax egg, mix one tablespoon of ground flaxseed with three tablespoons of water. Let it sit for five minutes until it thickens. Use dairy-free butter and a non-dairy milk like almond or oat milk. This keeps the flavor rich while making it plant-based. You can add chocolate chips or nuts for extra flavor. Semisweet chocolate chips give a sweet contrast to the spices. Walnuts or pecans add crunch and warmth. You can also experiment with different spices. Try adding cardamom or cloves for a unique twist. Mix and match until you find your favorite flavor blend. For the full recipe, check out the Pumpkin Spice Latte Cupcakes section. To keep your pumpkin spice latte cupcakes fresh, store them at room temperature. Place them in an airtight container. This helps to lock in moisture and flavor. Avoid direct sunlight or heat. Cupcakes can last about three days this way. If you have cream cheese frosting, refrigerate them. Just remember to let them sit out for a bit before eating. Freezing your cupcakes is easy! First, let them cool completely. After that, wrap each cupcake in plastic wrap. Make sure it’s tight to prevent freezer burn. Then, place the wrapped cupcakes in a freezer bag. They can last up to three months in the freezer. When you’re ready to eat, simply thaw them in the fridge overnight or at room temperature for a few hours. These cupcakes are best enjoyed fresh, but they can last for some time. At room temperature, they stay good for about three days. In the fridge, they may last up to a week. If frozen, they can be stored for three months. Always check for any signs of spoilage, like an off smell or mold, before enjoying your treat. For the full recipe, check the earlier section. To help your cupcakes rise, measure your ingredients carefully. Use dry measuring cups for flour and sugar. Fill each cup without packing the flour down. Always spoon flour into the cup and level it off. Mix your ingredients just until combined. Overmixing can lead to dense cupcakes. Always use fresh baking powder and baking soda. These ingredients help your cupcakes rise. Yes, you can use homemade pumpkin puree. Make sure to drain excess liquid for the right texture. This helps keep your cupcakes fluffy. Fresh pumpkin also adds a bright flavor. For best results, roast your pumpkin until tender. Then, blend it until smooth. Taste your puree to ensure it has a rich pumpkin flavor. I love using cream cheese frosting for these cupcakes. It pairs well with the pumpkin spice flavor. To create a smooth finish, whip the cream cheese until fluffy. Then, add powdered sugar gradually. Use a piping bag with a star tip for a pretty swirl. Make sure your frosting is at room temperature for easy piping. To boost coffee flavor, try adding espresso powder. Just a teaspoon can make a big difference. You can also use coffee extract for a more intense taste. Mix it into the wet ingredients for even flavor. If you want to keep it strong, use a dark roast coffee. This will enhance the cupcake's overall depth. For the full recipe, check out the [Full Recipe]. This blog post covered all you need to make pumpkin spice cupcakes. We talked about ingredients, steps, tips, and storage. You learned how to ensure great texture and avoid common mistakes. Remember, you can customize these cupcakes to fit your taste, with options like gluten-free or vegan. Enjoy sharing them with friends and family or savoring them yourself. With these easy steps, you can bake a delicious treat that brightens any day. Dive in and let your creativity shine!

Pumpkin Spice Latte Cupcakes Flavorful Fall Treat

Get ready to embrace the flavors of fall with my Pumpkin Spice Latte Cupcakes! These delightful treats blend warm spices,

- 6 large eggs - 3 tablespoons mayonnaise - 1 teaspoon Dijon mustard - 1 teaspoon apple cider vinegar - 1/4 teaspoon smoked paprika - Salt and pepper to taste - Fresh chives (for garnish) - 1/2 teaspoon sriracha (optional) In this recipe, you start with six large eggs. These eggs provide the base for your deviled eggs. Mayonnaise adds creaminess, while Dijon mustard gives a slight tang. Apple cider vinegar brightens the flavor. Smoked paprika brings a warm, smoky finish. Salt and pepper enhance the taste. Fresh chives offer a nice pop of color and freshness. If you like heat, add sriracha for an extra kick. - Additional spices (e.g., cayenne pepper) - Pickled onions - Bacon bits You can personalize your deviled eggs with various toppings. Sprinkle cayenne pepper for heat. Pickled onions add a sweet and tangy crunch. Bacon bits provide a savory crunch. These options let you explore different flavors and textures. Enjoy making your deviled eggs uniquely yours! For the full recipe, refer to the Devilish Delight Deviled Eggs. To make perfect deviled eggs, start by boiling the eggs. Place six large eggs in a pot. Cover them with cold water, at least one inch above the eggs. Heat it over medium-high heat until it boils. Once boiling, cover the pot and remove it from heat. Let the eggs sit for twelve minutes. This helps them cook evenly. After twelve minutes, move the eggs to a bowl of ice water. This cools them down quickly and stops cooking. Let them sit in the ice water for about ten minutes. Now, it's time to peel the eggs. Crack the shells gently on a hard surface. Peeling them under running water makes it easier. The water helps the shell come off cleanly. Next, we will make the filling. Slice each egg in half lengthwise. Scoop out the yolks and place them in a bowl. Set aside the egg whites for later. Add three tablespoons of mayonnaise to the yolks. Then mix in one teaspoon of Dijon mustard, one teaspoon of apple cider vinegar, and a quarter teaspoon of smoked paprika. Don’t forget a pinch of salt and pepper. If you want some heat, add half a teaspoon of sriracha. Use a fork to mash the yolks and mix well. Keep mashing until the mixture is creamy and smooth. Taste it and adjust seasoning if needed. This filling should be rich and flavorful. Now it’s time to fill the egg whites with your yolk mixture. You can use a spoon or a piping bag for this. A piping bag makes it look neater and more fun. If you use a spoon, just be careful not to overfill. Aim for a nice dome on each egg half. For a beautiful finish, sprinkle a little smoked paprika on top. Garnish with finely chopped fresh chives for color and flavor. Arrange the deviled eggs on a decorative platter. You can even drizzle some sriracha around the platter for flair. Enjoy your gorgeous, classic deviled eggs! To make the best deviled eggs, timing is key. Start by boiling your eggs for 12 minutes. This gives you firm yolks without a gray ring. Place the eggs in icy water right after boiling. This helps them cool down fast and makes peeling easy. Adjusting the seasoning can enhance flavor. Try adding more mustard for a tangy kick or more vinegar for brightness. Salt and pepper should always be used to taste. Deviled eggs can look fancy without much effort. For parties, arrange them on a colorful platter. Add a drizzle of sriracha around the eggs for a vibrant touch. You can also sprinkle extra paprika for a pop of color. Use a piping bag to fill the egg whites neatly. This creates a fun, swirly look. Garnish with fresh chives for that gourmet touch. One common mistake is overcooking the eggs. This makes them rubbery and dry. Keep an eye on the timer! Another mistake is not balancing the seasoning. Too much salt can overpower the dish. Taste as you go and adjust as needed. Remember, the goal is a creamy, flavorful filling that makes everyone smile. {{image_4}} To add heat to your deviled eggs, try using hot sauces. You can use any brand you like, but sriracha works great. This sauce gives a nice kick without being too overwhelming. You can also add fresh jalapeños. Just chop them finely and mix them with the yolk filling. This adds a fresh crunch and a spicy bite that many love. For a fancier touch, think about adding avocado. Mash ripe avocado with your yolks for a creamy texture. You can also try smoked salmon. Just chop it up and mix it in for a rich flavor. Want something unique? Consider flavor combos like curry powder or truffle oil. These additions can turn simple deviled eggs into gourmet bites. If you want a plant-based version, swap out the mayo. Use vegan mayo or even mashed chickpeas. Both options keep things creamy and tasty. To boost flavor, try adding lemon juice or fresh herbs. These simple swaps let everyone enjoy deviled eggs, no matter their diet. For the full recipe, check out the Full Recipe section. To keep deviled eggs fresh, store them in the fridge. Place them in an airtight container. This method helps prevent them from drying out. If you don’t have a container, cover them with plastic wrap. Deviled eggs are best eaten within 2 to 3 days. After this time, they may lose quality and flavor. Can you freeze deviled eggs? I do not recommend freezing them. Freezing changes the texture of the eggs, making them watery and unappetizing. However, if you want to prepare in advance, you can freeze the yolk mixture. Store it in a separate container. When ready to use, thaw it in the fridge overnight. Then, fill the egg whites right before serving. This keeps your deviled eggs fresh and tasty. To boil eggs for deviled eggs, I suggest a simple method. Place your eggs in a pot and cover them with cold water. The water should be at least one inch above the eggs. Heat the pot on medium-high until the water boils. Once it boils, cover the pot and remove it from heat. Let the eggs sit for 12 minutes. This method helps to cook the eggs evenly. After 12 minutes, put the eggs in ice water for about 10 minutes. This cools them down and makes peeling easier. Yes, deviled eggs can be made ahead of time. You can prepare them up to two days in advance. Store the filled eggs in the fridge. Keep them covered with plastic wrap to prevent drying out. If you plan to make them early, add fresh toppings just before serving. This keeps them looking their best. If your deviled eggs taste bland, there are easy ways to boost the flavor. Start by adding a bit more salt and pepper. You can also mix in spices like cayenne pepper or paprika. Adding a splash of hot sauce gives a nice kick. For extra depth, try adding a bit of pickle juice or capers. Fresh herbs like chives or dill can brighten the taste too. Feel free to experiment with flavors until you find your perfect mix. You learned how to make classic deviled eggs with our easy steps. From ingredients to optional toppings, you can customize your recipe to suit your taste. Remember to avoid common mistakes, like overcooking the eggs, for the best results. Try variations for spicy or gourmet flavors too. With storage tips, you can keep your deviled eggs fresh longer. Enjoy making this versatile dish for any occasion! Your next gathering will impress with these tasty deviled eggs.

Classic Deviled Eggs Simple and Flavorful Recipe

Are you ready to impress your guests with a classic snack? My simple and flavorful deviled eggs recipe is just

- 1 lb chicken breast Cut the chicken into even strips. This size helps them cook evenly. - 1 cup buttermilk Buttermilk makes the chicken juicy and tender. It helps the coating stick too. - 1 cup all-purpose flour This is the base for your dry coating. It creates a strong layer. - 1 cup panko breadcrumbs Panko adds extra crunch. It creates a delightful texture when cooked. - 1 teaspoon garlic powder Garlic powder gives a great flavor. It enhances the overall taste. - 1 teaspoon onion powder Onion powder adds depth to the seasoning. It makes the chicken more savory. - 1 teaspoon paprika Paprika brings warmth and color. It makes the dish visually appealing. - 1 teaspoon dried oregano Oregano adds a hint of earthiness. It rounds out the flavor profile. - Salt and black pepper, to taste These are essential for seasoning. Adjust them to your preference. - Cooking spray (optional) This helps achieve an extra crisp. It prevents sticking in the air fryer. These ingredients come together to create a tasty and crispy dish. Each part plays a role in flavor and texture. For the full recipe, check the earlier section to get cooking! To start, we need to marinate the chicken. This step makes the meat juicy and flavorful. I use buttermilk for the marination. It adds a nice tang and helps tenderize the chicken. Place the chicken strips in a large bowl. Pour the buttermilk over them. Make sure each piece is well-coated. Cover your bowl with plastic wrap or a lid. Let it sit for at least 30 minutes at room temperature. You can also refrigerate it for up to 24 hours for even better flavor. Next, we prepare the dry coating. In a separate bowl, combine the flour, garlic powder, onion powder, paprika, oregano, salt, and pepper. Whisk them together until mixed well. This mix will give the chicken a delicious flavor. Now, set up the breading station. In a third bowl, put the panko breadcrumbs. This will be the final coating for that extra crunch. Now, we get to the fun part—cooking! First, preheat your air fryer to 400°F (200°C). This step is crucial for getting that crispy texture. Let it warm for about 5 minutes. While the air fryer heats, take the marinated chicken out of the buttermilk. Let the excess buttermilk drip off. First, dredge each piece in the seasoned flour, coating it fully. Then, dip it back into the buttermilk briefly. Finally, press it into the panko breadcrumbs to ensure a thick coating. Next, lightly spray the air fryer basket with cooking spray to help prevent sticking. Place the chicken tenders in a single layer in the basket. Avoid overcrowding to ensure even cooking. Air fry the tenders for 10-12 minutes. Flip them halfway through cooking. They’ll be done when golden brown and cooked through. Once cooked, carefully remove them from the air fryer. Let them rest for a couple of minutes on a plate. This helps the juices redistribute. For the full recipe, you can refer to the section above. To get the best crisp on your chicken tenders, follow these steps: - Coating Technique: Start by marinating your chicken in buttermilk. This tenderizes the meat and adds moisture. After marinating, coat each strip in seasoned flour, dip it back in the buttermilk, and then press it into panko breadcrumbs. This double-coating gives you that amazing crunch. - Cooking Spray: Lightly spray the coated chicken with cooking spray before air frying. This small step adds extra crispiness and helps the breadcrumbs brown nicely. Cooking in batches is key to great results: - Avoid Overcrowding: Place the chicken tenders in a single layer in the air fryer. If you crowd them, they will steam instead of fry. This means less crispiness. - Batch Efficiency: If you have a lot of chicken to cook, do it in batches. While one batch cooks, you can prepare the next. This keeps everything moving smoothly and ensures each piece gets the attention it needs. Following these tips will help you create the crispiest, most flavorful chicken tenders, just like the ones in the Full Recipe. {{image_4}} You can change the taste of your chicken tenders easily. Try using different spices and herbs. Here are some ideas: - Cajun Seasoning: For a spicy kick, mix in Cajun spice. - Italian Herbs: Use dried basil, thyme, or rosemary for an Italian twist. - Lemon Zest: Add zest for a fresh, bright flavor. For breading, you can swap the panko breadcrumbs. Here are some alternatives: - Cornmeal: This gives a crunchy texture and a unique flavor. - Crushed Crackers: Use any savory crackers for a tasty coating. - Ground Oats: This is a great option for a healthier choice. If you want a healthier version of chicken tenders, you have great options. For whole grain coatings, consider using: - Whole Wheat Flour: This adds fiber and nutrients. - Oat Flour: Ground oats can be a great gluten-free choice. For low-carb options, try these substitutes: - Almond Flour: This works well for a nutty flavor and keeps it low-carb. - Coconut Flour: Use this for a hint of sweetness and fewer carbs. These variations not only make your meal healthier but also keep it fun and exciting! For more ideas, check the Full Recipe and get creative in your kitchen. After cooking your air fryer chicken tenders, you might have some left. To keep them fresh, follow these tips: - Cool Down: Let the chicken tenders cool to room temperature first. - Use Airtight Containers: Store them in airtight containers to keep moisture out. - Refrigerate: Place the containers in the fridge. They will stay good for up to four days. I recommend using glass containers. They don’t stain and are easy to clean. If you want to store them longer, consider freezing. When you want to enjoy your chicken tenders again, reheating them right is key. Here’s how: - Air Fryer Method: Preheat the air fryer to 375°F (190°C). Place the tenders in a single layer and heat for about 5-7 minutes. This keeps them crispy. - Oven Method: Preheat your oven to 400°F (200°C). Spread the tenders on a baking sheet and heat for 10-15 minutes. To avoid sogginess, skip the microwave. The microwave makes them soft and chewy. For best results, always reheat in the air fryer or oven. For the full recipe, check the instructions above and enjoy your crispy air fryer chicken tenders! Air fryer chicken tenders can last in the fridge for about 3 to 4 days. Store them in an airtight container to keep them fresh. If you want to keep them longer, you can freeze them. Freeze them in a single layer on a baking sheet first, then transfer to a freezer bag. They will last up to 3 months in the freezer. Yes, you can use frozen chicken breasts for air fryer chicken tenders. Just make sure to adjust the cooking time. Cook them at 400°F (200°C) for about 15 to 18 minutes. Flip them halfway through to ensure even cooking. Always check the internal temperature. It should be at least 165°F (75°C) for safe eating. Chicken tenders pair well with many sauces. Here are a few tasty options: - Honey mustard - Barbecue sauce - Ranch dressing - Sweet and sour sauce - Sriracha mayo These dips add fun flavors and enhance your chicken tenders. To check if chicken tenders are done, use a meat thermometer. The inside should reach 165°F (75°C). If you don't have a thermometer, cut one open. The meat should be white and the juices clear. Avoid undercooking to ensure safety. Enjoy your crispy air fryer chicken tenders! You now have a clear path to prepare tasty air fryer chicken tenders. We covered the ingredients you need, how to marinate the chicken, and the steps for breading and cooking. Remember to use the tips for crispiness and avoid overcrowding your air fryer. Don’t forget the fun variations and how to store leftovers to keep them fresh. Enjoy making this dish your own, and savor the delicious results with your favorite dipping sauces. Happy cooking!

Air Fryer Chicken Tenders Crispy and Flavorful Snack

Are you ready to make the crispiest, most flavorful chicken tenders ever? Using an air fryer transforms ordinary chicken into

To make a delicious Caprese pasta salad, you will need the following ingredients: - 12 oz fusilli pasta - 1 cup cherry tomatoes, halved - 1 cup fresh mozzarella balls (either bocconcini or ciliegine) - 1 cup fresh basil leaves, torn into smaller pieces - 3 tablespoons extra-virgin olive oil - 2 tablespoons balsamic glaze - Salt and black pepper to taste - 1 clove garlic, finely minced - ¼ teaspoon red pepper flakes (optional for a hint of spice) These ingredients work together to create a fresh and tasty dish. You can swap some ingredients to fit your taste. Here are a few ideas: - Use penne or rotini pasta instead of fusilli. - Try grape tomatoes if cherry tomatoes aren't available. - Substitute mozzarella with burrata for a creamier texture. - Add arugula or spinach for extra greens. - Replace balsamic glaze with lemon juice for a zesty twist. Feel free to get creative with these swaps! Using high-quality ingredients makes a big difference. Fresh tomatoes bring sweetness and flavor. Good mozzarella has a creamy texture. Extra-virgin olive oil enhances taste and health benefits. When you invest in quality, your dish shines. Fresh basil adds a fragrant touch. Cheap or old ingredients can make the salad bland. Always choose the best you can find. This will elevate your Caprese pasta salad and impress your guests. To cook your pasta just right, start with a large pot. Fill it with water and add a good amount of salt. This helps flavor the pasta. Bring the water to a rolling boil. Once boiling, add 12 oz of fusilli pasta. Stir it well to keep it from sticking. Cook the pasta according to the package instructions, usually about 8 to 10 minutes, until it is al dente. This means it will still have a slight bite. After cooking, drain the pasta in a colander. Rinse it under cold water to stop the cooking. This also cools it down, making it perfect for your salad. In a large mixing bowl, add the cooled fusilli pasta, 1 cup of halved cherry tomatoes, and 1 cup of fresh mozzarella balls. Next, toss in 1 cup of fresh basil leaves, torn into smaller pieces. Mixing these ingredients together is key. Gently toss them so the flavors spread evenly. The tomatoes will add juiciness while the mozzarella gives a creamy texture. The fresh basil brings a lovely scent and taste. You want every bite to be full of flavor. Now, let’s make the dressing. In a small bowl, whisk together 3 tablespoons of extra-virgin olive oil and 1 clove of finely minced garlic. Add 2 tablespoons of balsamic glaze, a sprinkle of salt, and black pepper. If you like some heat, toss in ¼ teaspoon of red pepper flakes. Whisk until everything blends well and becomes smooth. This dressing is what ties the salad together. Once ready, drizzle it over the pasta salad mixture. Use a large spoon to gently toss everything again. Make sure every piece gets coated in that delicious dressing. Let the salad sit in the fridge for at least 30 minutes to let the flavors meld. Enjoy this fresh and vibrant Caprese Pasta Salad! For the full recipe, check out the complete guide. One common mistake is overcooking the pasta. Cook the fusilli only until it is al dente. This keeps it firm and prevents it from becoming mushy. Another mistake is skipping the rinse after cooking. Rinsing the pasta with cold water halts cooking and cools it down. Don’t forget to season each layer. Add salt to the pasta while it cooks, and sprinkle more salt and pepper when mixing. Lastly, avoid adding too much dressing too soon. Dress the salad just before serving to keep it fresh. To boost flavors, use fresh, high-quality ingredients. Opt for ripe cherry tomatoes and creamy mozzarella. Fresh basil is a must for that aromatic touch. You can also try adding a pinch of crushed red pepper flakes for a bit of heat. Another tip is to marinate the salad. Let it sit in the fridge for at least 30 minutes after mixing. This allows the flavors to meld beautifully. For an extra zing, add a squeeze of fresh lemon juice just before serving. You can make this salad ahead of time. Prepare the pasta and dressing a day before. Keep them separate until you’re ready to serve. This keeps the pasta from getting soggy. When you mix everything, remember to let the salad chill. This allows the flavors to deepen. If you want to eat it later, store it in an airtight container. It will stay fresh in the fridge for up to three days. For the full recipe, check out Caprese Pasta Salad Delight! {{image_4}} To make your Caprese Pasta Salad more filling, add protein. Here are some tasty options: - Grilled chicken: Cooked and sliced, this adds a great flavor. - Shrimp: Lightly sautéed shrimp gives a nice touch. - Chickpeas: For a plant-based option, add canned chickpeas. - Bacon: Crispy bacon bits add a tasty crunch. These proteins blend well with the pasta and make it a complete meal. You can change your Caprese Pasta Salad to fit the seasons. Here are some ideas: - Summer: Use fresh corn or zucchini for a bright touch. - Fall: Add roasted butternut squash for warmth and depth. - Winter: Try using kale or arugula for a peppery kick. - Spring: Toss in peas or asparagus for a fresh taste. Each season brings unique flavors that can enhance your salad. While the classic dressing is great, you can try new ones for variety. Here are some ideas: - Pesto: Swap out the olive oil for pesto to boost flavor. - Lemon vinaigrette: A tangy lemon dressing can brighten the dish. - Ranch dressing: For a creamy option, ranch works well. - Avocado dressing: A smooth avocado dressing adds richness. These alternatives can make your Caprese Pasta Salad exciting and different every time. Try them out for fun! For the full recipe, check out the Caprese Pasta Salad Delight. After you make Caprese pasta salad, store it right. Use an airtight container. This keeps the salad fresh. If you don’t have one, cover the bowl tightly with plastic wrap. It is best to chill it in the refrigerator. This helps the flavors mix well. Caprese pasta salad can last about three days in the fridge. After that, the tomatoes can get too soft. If you notice any strange smells, throw it away. Always check before you eat leftovers to stay safe. If you want to reheat the pasta salad, do it gently. Use the microwave for a quick warm-up. Heat it in short bursts and stir in between. This way, the salad warms evenly. You can also serve it cold. Cold pasta salad is refreshing on warm days. The best pasta for Caprese Pasta Salad is fusilli. Its spiral shape holds the dressing and ingredients well. Other great options include penne or farfalle. These shapes also mix nicely with the salad's flavors. Try to avoid flat pasta like spaghetti, as it doesn't hold the sauce as well. Yes, you can easily make this salad vegan-friendly. Simply swap the mozzarella for vegan cheese or omit it entirely. You can also use a plant-based dressing. Look for a balsamic glaze that does not use honey. This way, the salad stays fresh and tasty without any animal products. To serve Caprese Pasta Salad for a crowd, make a larger batch. Use 24 oz of pasta and double the other ingredients. Present it in a big bowl for everyone to enjoy. You can also pre-portion servings into smaller bowls for easy sharing. This adds a fun and personal touch to your gathering. For more details, check the Full Recipe. Caprese pasta salad is fresh, tasty, and easy to make. We covered key ingredients, cooking tips, and storage advice. Remember, use high-quality ingredients for the best flavor. Don’t rush the cooking process and avoid common mistakes. You can also customize the salad for seasonal events with different proteins or dressings. With these tips, you can impress everyone at your next meal. Enjoy making this delightful dish!

Caprese Pasta Salad Fresh and Flavorful Recipe Guide

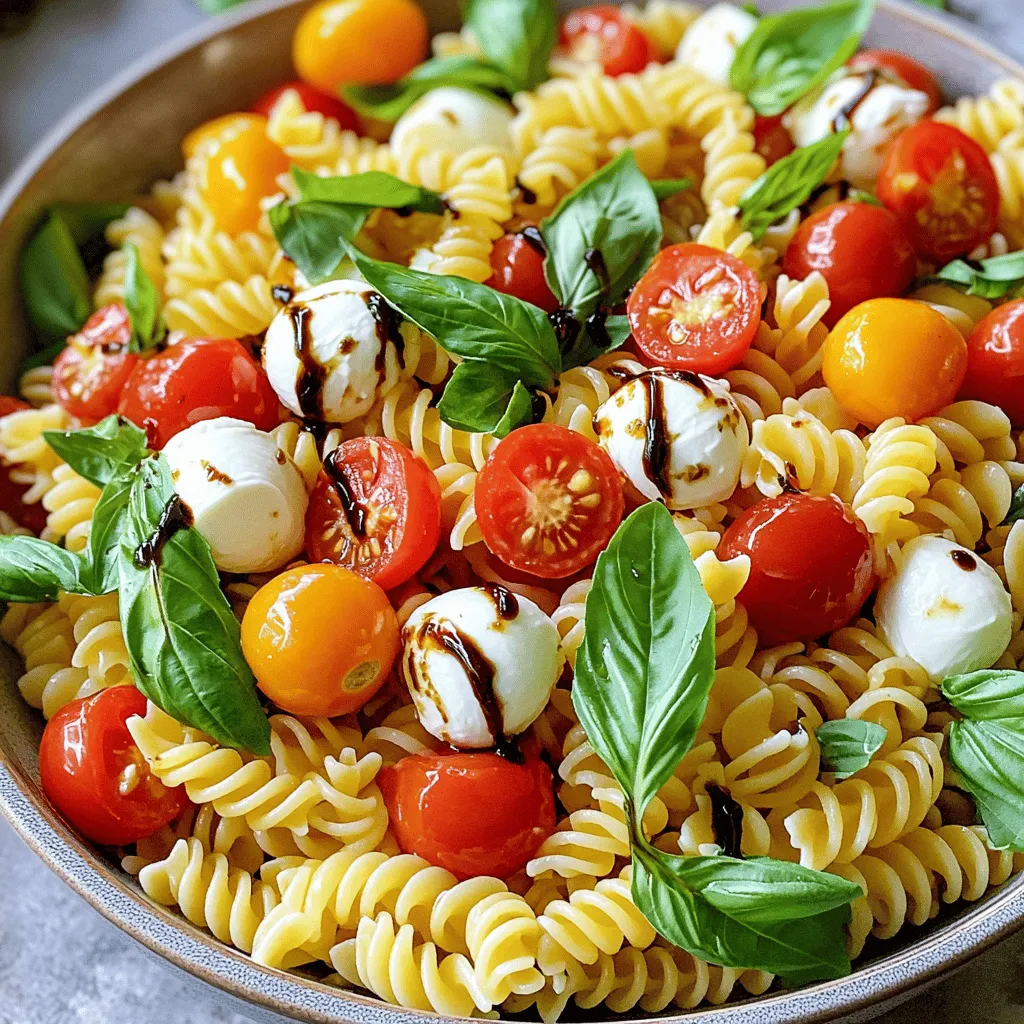
Are you ready to elevate your summer meals? Discover my fresh and flavorful Caprese Pasta Salad recipe. This dish combines

Older posts
Newer posts
← Previous Page1 … Page48 Page49 Page50 … Page86 Next →

dsad

© 2026 lazychefmagic • Built with GeneratePress

Our Policies

  • Copyright Policy
  • Cookie Policy
  • GDPR Policy
  • Privacy Policy
  • Disclaimer
  • Terms Of Use

More Information

  • Home
  • About
  • Contact
  • Appetizers
  • Dessert
  • Dinner
  • Drinks
©2026, lazychefmagic About Back To Top