Skip to content
DisclaimerTerms Of UseGDPR PolicyCookie Policy

lazychefmagic

  • Home
  • Drinks
  • Appetizers
  • Dinner
  • Dessert
  • About
  • Contact
  • Privacy Policy
DisclaimerTerms Of UseGDPR PolicyCookie Policy

NO-ING-IMG

Gather these simple ingredients to make your savory spinach and feta breakfast puffs: - 1 sheet of puff pastry, thawed - 2 cups fresh spinach, roughly chopped - 1 cup feta cheese, crumbled - 1/2 cup cream cheese, softened - 1 small onion, finely chopped - 2 cloves garlic, minced - 1 egg, beaten (for egg wash) - 1 tablespoon olive oil - Salt and freshly ground black pepper to taste - Optional: 1/4 teaspoon freshly grated nutmeg Each ingredient plays a role in both flavor and texture. The puff pastry gives a flaky and airy base. Fresh spinach adds a vibrant green color and a subtle earthiness. Feta cheese brings a tangy and creamy element, while cream cheese adds smoothness. Onions and garlic provide aromatic depth, making the puffs irresistible. Feel free to adjust seasoning to your taste. Adding nutmeg enhances the flavors, but it is not required. Enjoy mixing and matching these ingredients to create your ideal breakfast treat! First, preheat your oven to 400°F (200°C). This step is key for a perfect bake. While the oven heats, grab a baking sheet. Line it with parchment paper to make cleanup easy. In a medium skillet, add one tablespoon of olive oil. Heat it on medium. Once hot, add one small, finely chopped onion. Sauté for around 3-4 minutes. You want the onions to get soft and clear. Next, add two cloves of minced garlic. Cook for one more minute. Stir often to keep the garlic from burning. Now, toss in two cups of roughly chopped fresh spinach. Cook for about 2-3 minutes. The spinach will wilt down nicely. Season with salt, pepper, and a pinch of nutmeg if you like. Once everything looks good, remove the skillet from heat. Let it cool for a bit. In a large mixing bowl, combine the cooled spinach mixture with one cup of crumbled feta and half a cup of softened cream cheese. Mix it well until creamy. This filling is where the magic happens. On a floured surface, roll out one thawed puff pastry sheet. Aim for a smooth, even surface. Cut the pastry into squares, about 4x4 inches each. Keep them uniform for even baking. Take a spoonful of the spinach and feta filling. Place it in the center of each pastry square. Don't overfill; you need to seal them. Fold the corners over the filling to form a pocket. Press the edges with a fork or pinch them closed. Brush the tops with a beaten egg for a golden finish. Place the puffs on your prepared baking sheet, leaving some space between them. Bake for 15-20 minutes. They should puff up and turn golden brown. Once done, let them cool slightly before serving. Enjoy your savory breakfast puffs! To get the best flaky puff pastry, keep your dough cold. Warm dough does not rise well. When rolling out the pastry, use flour to prevent sticking. This helps keep layers intact. The more layers you have, the flakier your puffs will be. If you feel the dough getting warm, chill it for a few minutes. It makes a big difference! You can change the flavors in your puffs. Try adding herbs like dill or parsley for freshness. Want a kick? Add red pepper flakes or crushed black pepper. If you like a richer taste, mix in some grated cheese, like mozzarella or cheddar. You can even swap spinach for kale or mushrooms for a different twist. The options are endless! For that beautiful golden brown finish, use an egg wash. Brush it on just before baking. This gives your puffs that shiny, appealing look. Bake them at 400°F (200°C) for 15 to 20 minutes. Keep an eye on them. When they puff up and turn golden, they’re done. Your friends and family will love this perfect finish! {{image_4}} You can swap some ingredients based on what you have. Use frozen spinach instead of fresh; just make sure to thaw and drain it well. Cream cheese can be replaced with ricotta or cottage cheese for a lighter filling. If you prefer a vegan option, use a plant-based cream cheese and egg substitute. Feta cheese gives a nice tang, but you can try other cheeses too. Goat cheese offers a creamy texture and a strong taste. Cheddar cheese adds a sharp flavor, while mozzarella brings a mild, stretchy quality. Mix different cheeses to create a unique flavor. Feel free to get creative with your fillings! Add diced bell peppers for sweetness or sun-dried tomatoes for a burst of flavor. Cooked mushrooms can bring umami, while fresh herbs like dill or parsley add freshness. You can even include cooked sausage or bacon for a heartier puff. To store your savory spinach and feta breakfast puffs, let them cool first. Place them in an airtight container. You can keep them in the fridge for up to three days. If you want to maintain their crispiness, reheat them in the oven instead of the microwave. This keeps the pastry flaky and fresh. If you want to save some for later, these puffs freeze well. After cooling, wrap each puff in plastic wrap. Then, place them in a freezer bag or airtight container. They can last in the freezer for up to three months. When you're ready to eat, you can bake them straight from the freezer. Reheat the puffs in the oven for the best results. Preheat your oven to 350°F (175°C). Place the puffs on a baking sheet and heat for about 10-15 minutes. This method warms them up without making them soggy. You can also use an air fryer for a quick reheat. Enjoy them warm for a tasty breakfast treat! Yes, you can prepare these breakfast puffs in advance. Make the filling and fill the pastry squares. Then, cover them tightly and store in the fridge for up to 24 hours. When ready, bake them straight from the fridge. This saves time on busy mornings and keeps your puffs fresh. These puffs pair well with various sides. Try serving them with a fresh salad. A simple green salad with lemon vinaigrette brightens the meal. You can also enjoy them with a yogurt dip or a chunky salsa for extra flavor. They work great as an appetizer too! You can tell the puffs are done when they are golden brown. Look for a nice puffed shape, indicating they are cooked through. The baking time is about 15-20 minutes at 400°F (200°C). If they're golden and crisp, they are ready to enjoy! You learned how to make tasty spinach and feta breakfast puffs from this post. We covered the key ingredients, step-by-step instructions, and useful tips. I shared ways to customize your puffs and store them for later. Remember, using high-quality puff pastry results in the best texture. Keep experimenting with flavors and fillings to find your favorites. Enjoy making these puffs as a fun meal or snack! Your kitchen is about to smell fantastic.

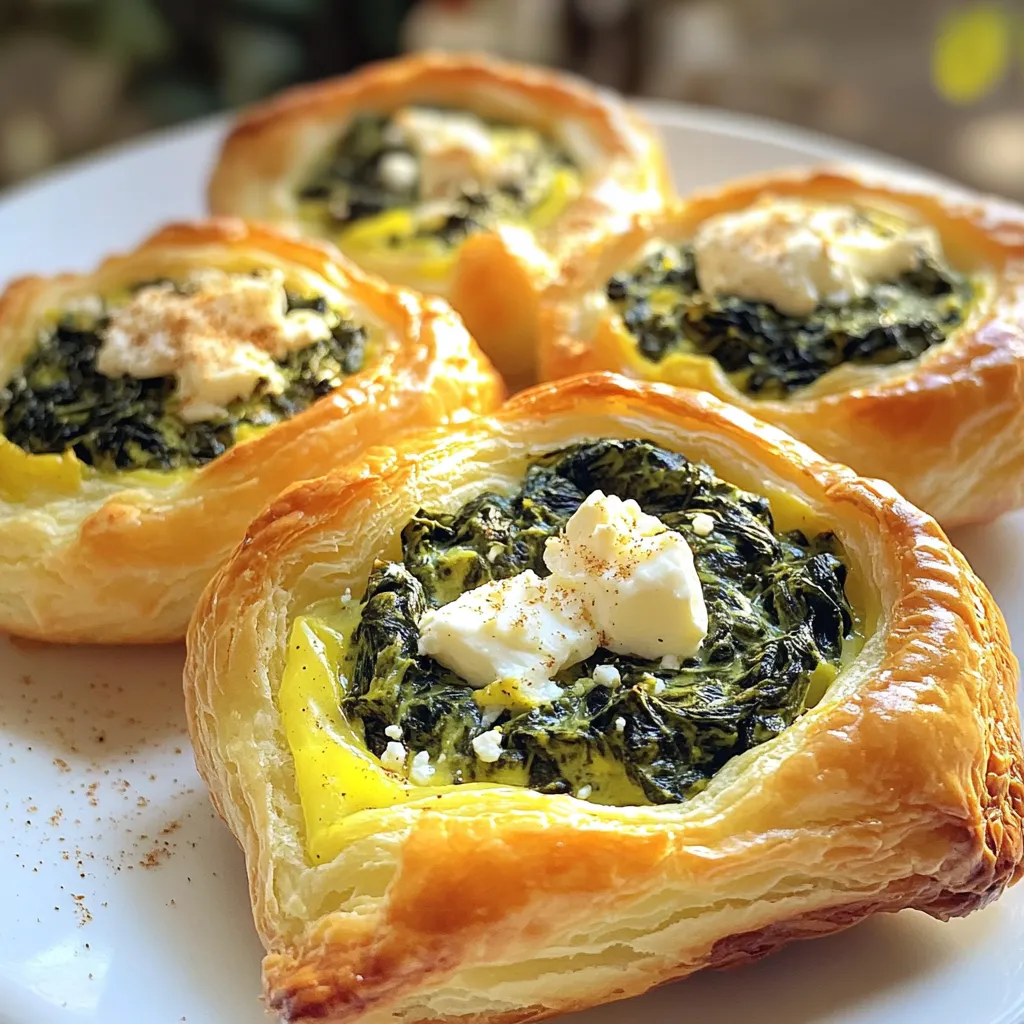
Savory Spinach and Feta Breakfast Puffs Tasty Recipe

Are you ready to elevate your breakfast game? These Savory Spinach and Feta Breakfast Puffs are simple, delicious, and packed

- 1 cup egg whites - Fresh spinach - Cherry tomatoes - Bell pepper - Low-fat feta cheese - Extra virgin olive oil - Garlic powder - Seasonings (salt, pepper) - Fresh herbs for garnish To create a high protein egg white scramble, you need just a few simple ingredients. Start with one cup of egg whites. This is about eight large eggs. Egg whites pack a protein punch without the extra fat. Next, grab some fresh spinach. It adds color and nutrients. Cherry tomatoes bring sweetness and a pop of flavor. You can use any color bell pepper. It adds crunch and color. Finally, low-fat feta cheese gives a creamy touch. You also need some cooking essentials. Extra virgin olive oil adds healthy fat. Garlic powder gives your dish depth. Don’t forget salt and pepper for basic seasoning. Fresh herbs, like parsley or chives, add a bright finish. This simple mix creates a tasty and healthy meal. It’s quick to make, and you can customize it easily! - Heat 1 tablespoon of extra virgin olive oil in a large non-stick skillet over medium heat. - Sauté 1/4 cup of diced bell peppers and 1/4 cup of halved cherry tomatoes for 2-3 minutes. - Add 1/2 cup of coarsely chopped spinach to the skillet and mix well. - In a bowl, whisk together 1 cup of egg whites, 1/4 teaspoon of garlic powder, salt, and pepper. - Pour the egg white mixture over the sautéed veggies and let it sit for a few minutes. - Stir gently until the eggs are fully cooked, about 3-4 minutes. - Sprinkle 1/4 cup of crumbled low-fat feta cheese on top and let it warm for 1 minute. - Garnish with fresh herbs before serving. - Use a non-stick skillet for easy cooking. - Don't overcrowd the skillet. This allows even cooking and prevents sticking. - Experiment with spices or sauces. Try adding cayenne pepper for heat or salsa for zest. - Add more veggies for variety. You can toss in zucchini, mushrooms, or even kale. This boosts nutrients and flavor. When you cook with a non-stick skillet, your egg whites slide out easily. It saves time and makes cleanup a breeze. Keeping the skillet clear of too many ingredients lets everything cook evenly. Each bite will taste just right. Don’t be afraid to play with flavors. Spices like cumin or smoked paprika can change the whole dish. Fresh herbs also brighten up the meal. They add color and aroma that makes your scramble pop. Adding extra vegetables not only makes the scramble more colorful but also packs in nutrients. You can mix in whatever you have at home. This way, you make the dish your own. Enjoy the fun of creating a meal that suits your taste! {{image_4}} You can boost your protein with lean turkey or ham. These meats add a savory taste and extra nutrients. If you prefer a plant-based option, try adding beans. Black beans or chickpeas work great. They give your scramble a hearty texture and are full of fiber. Want to change up your veggies? Use zucchini or mushrooms instead of spinach. They add moisture and a nice bite. If you want to swap spinach, kale or arugula are great choices. Both have a strong flavor and add more nutrients. If you like cheese, try goat cheese or cheddar for a different flavor. They melt well and add creaminess. If you're avoiding dairy, simply skip the cheese. Your scramble will still be tasty and satisfying! Store any leftovers in an airtight container. This helps keep your egg white scramble fresh. You can keep it in the fridge for up to 3 days. Make sure to let it cool before sealing. You can easily reheat the scramble in the microwave or on the stove. If using the microwave, heat in short bursts. Stir in between to avoid hot spots. If using the stove, add a splash of water to help steam it. This keeps the texture soft and fluffy. Remember, you want to warm it, not cook it again. Enjoy your meal, even on day two! Egg whites are a smart choice for many reasons: - Low-calorie and low-fat: They offer fewer calories than whole eggs, making them great for weight control. - High protein content: Egg whites pack a protein punch, providing about 26 grams of protein per cup. This helps build and repair muscles. Egg whites also have no cholesterol, which can be good for heart health. They are a clean source of protein, perfect for any meal. Yes, you can use whole eggs instead of just egg whites. Here’s how they compare: - Nutrition: Whole eggs have more calories and fat, but they also have essential nutrients like vitamin D and omega-3s. - Tips for adjusting the recipe: If you choose whole eggs, use about 4 large eggs to match the volume of 1 cup of egg whites. You may need to cook them a bit longer to ensure they are fully set. Using whole eggs adds richness and flavor, but be mindful of the extra calories and fat. To make your egg whites extra fluffy, follow these tips: - Whipping techniques: Whisk the egg whites vigorously until they form soft peaks. This adds air, making them light and airy. You can use a hand whisk or an electric mixer for speed. - Importance of freshness: Fresh egg whites whip better. So, always use eggs that are as fresh as possible for the best results. Fluffy egg whites create a lovely texture in your scramble, making each bite delightful. This dish combines simple ingredients and straightforward steps to create a healthy meal. You learned about the main ingredients like egg whites, spinach, and feta cheese. I shared tips for cooking and ways to customize your dish. You can add protein, swap veggies, or even change up the cheese. Storing and reheating leftovers keeps the meal easy and convenient. Eating healthy can be simple and fun! Now, get cooking and enjoy your tasty creation!

High Protein Egg White Scramble Simple and Tasty Meal

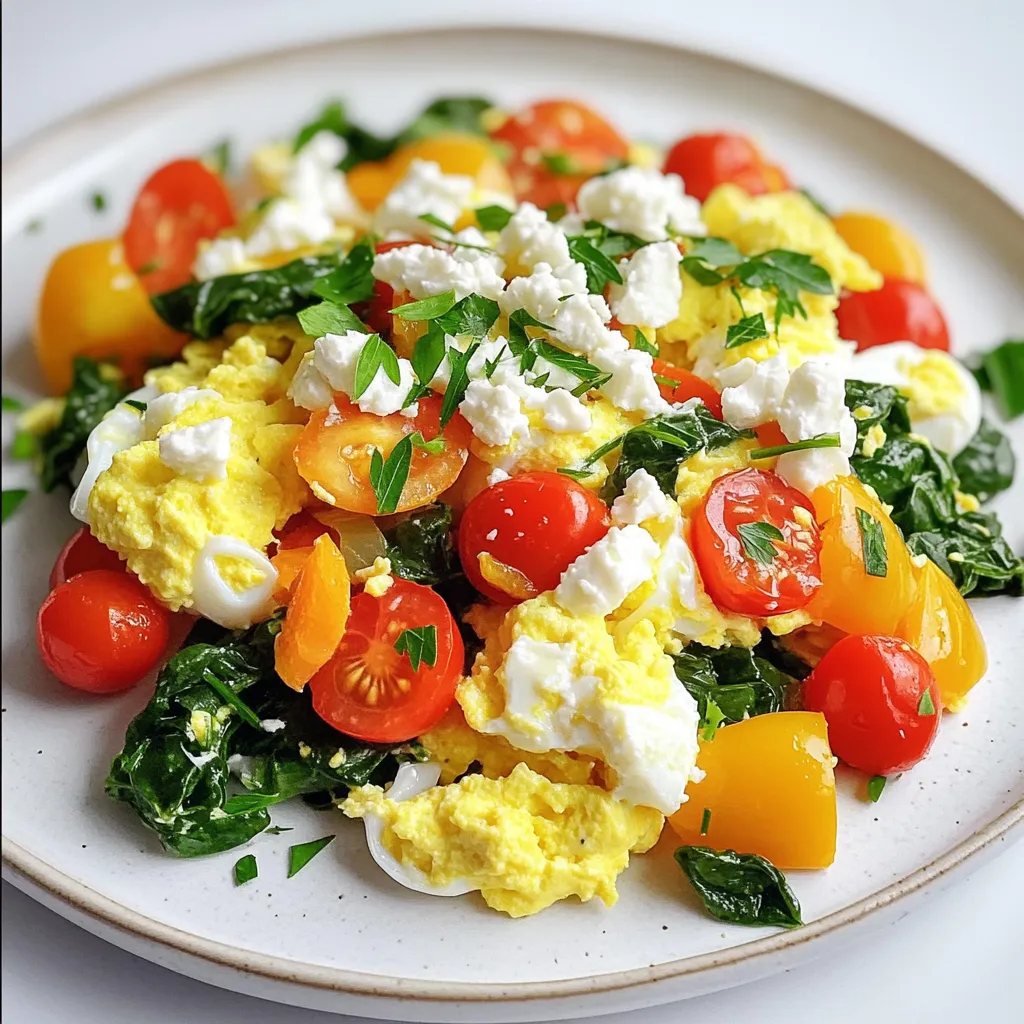
Looking for a quick and healthy meal? My High Protein Egg White Scramble is the answer! This simple dish packs

- 1 lb beef flank steak, thinly sliced against the grain - 4 cups fresh broccoli florets - 1 red bell pepper, thinly sliced - 3 tablespoons soy sauce - 2 tablespoons oyster sauce - 1 tablespoon cornstarch - 1 tablespoon sesame oil - 2 cloves garlic, minced - 1 teaspoon fresh ginger, grated - 1 tablespoon vegetable oil (for cooking) - Cooked jasmine rice, for serving - Sesame seeds and sliced green onions, for garnish Beef flank steak works best for this dish. It is tender and flavorful. Slice it against the grain for the best texture. Fresh broccoli keeps its crunch and bright color. Use red bell pepper for sweetness and a pop of color. Soy sauce and oyster sauce create a rich umami flavor. Cornstarch helps thicken the sauce and gives the beef a nice coating. Garlic and ginger add a fresh kick to the dish. You can add other veggies like carrots or snow peas for more color and texture. If you like heat, add red pepper flakes or sliced chili peppers. For a nutty flavor, sprinkle some toasted sesame seeds on top. You can also use brown rice instead of jasmine for a heartier option. To start, marinate the beef. Take 1 pound of flank steak and slice it thinly against the grain. This helps make the beef tender. In a medium bowl, mix the sliced beef with 3 tablespoons of soy sauce, 2 tablespoons of oyster sauce, and 1 tablespoon of cornstarch. Make sure the beef is well coated. Let it sit for at least 15 minutes. This step adds flavor and makes the beef juicy. Next, we will cook the beef and veggies. Heat 1 tablespoon of vegetable oil in a large skillet or wok over medium-high heat. Once the oil is hot, add 2 cloves of minced garlic and 1 teaspoon of grated ginger. Stir for about 30 seconds. This will fill your kitchen with a great smell. Now, add the marinated beef to the skillet. Spread it out in a single layer. Let it sear without stirring for 2 to 3 minutes. This will give the beef a nice brown color. Once it’s nearly cooked, remove the beef and set it aside. In the same skillet, add more oil if you need it. Toss in 4 cups of fresh broccoli florets and 1 thinly sliced red bell pepper. Stir-fry the veggies for about 5 minutes. They should be bright and tender but still crisp. Now, it’s time to bring everything together. Return the cooked beef to the skillet with the veggies. Drizzle 1 tablespoon of sesame oil over the mix. Toss everything together for 1 to 2 minutes. This ensures all the flavors blend well. Serve this delicious beef and broccoli over bowls of fluffy jasmine rice. For a nice touch, sprinkle sesame seeds and sliced green onions on top. Enjoy your homemade dish that tastes even better than takeout! To get a nice sear, start with a hot pan. Heat your skillet well before adding oil. Lay the beef in one layer and don’t stir for a few minutes. This helps the beef brown nicely. If you crowd the pan, the beef will steam and not sear. Use a good amount of heat but watch it closely to avoid burning. If you want a veggie version, swap the beef for tofu or tempeh. Both soak up flavors well and provide a great texture. Use the same marinade for tofu to keep the taste strong. You can also try adding mushrooms or bell peppers for more variety. This keeps the dish vibrant and tasty. To boost the flavors, add a splash of rice vinegar or lime juice. This adds a nice zing. Fresh herbs like cilantro can also brighten the dish. You might want to try adding chili flakes for some heat. Always taste as you go. This helps you find the perfect balance for your palate. {{image_4}} You can switch out beef for other proteins. Chicken works great and cooks fast. Thinly slice it like the beef. You can also use shrimp for a lighter dish. Cook shrimp just until pink and tender. Tofu is a nice option too for a vegetarian choice. Press and cube the tofu for best results. Feel free to add more veggies. Carrots add a nice crunch and color. Snow peas give a sweet bite. Mushrooms bring umami and soak up the sauces. Just make sure to cut all veggies into small pieces for even cooking. Mix and match based on what you have at home or what’s in season. Change up the sauces for a new taste. Try teriyaki sauce instead of soy sauce for a sweeter flavor. You can add a splash of rice vinegar for tang and brightness. Want some heat? Try adding chili paste or red pepper flakes. A dash of sesame oil at the end amps up the flavor too. Store any leftover beef and broccoli in an airtight container. Let it cool first. Place the container in the fridge. It will stay fresh for up to three days. If you want to enjoy it later, consider freezing. To reheat, you can use a microwave or a skillet. For the microwave, place your food in a bowl. Heat it for one to two minutes. Stir halfway to warm it evenly. If using a skillet, add a splash of water. Heat on medium until hot. This keeps the beef moist. To freeze beef and broccoli, portion it into freezer-safe bags. Remove as much air as you can before sealing. Label each bag with the date. It can last up to three months in the freezer. When ready to eat, thaw it overnight in the fridge. Then, reheat as mentioned above. Yes, you can use frozen broccoli. It saves time and still tastes good. Just add it to the pan for a few extra minutes. This will help it cook through and heat up. Remember, fresh broccoli gives a nice crunch, but frozen works fine in a pinch. The best cut for this dish is flank steak. It’s thin and tender when cooked right. You can also use sirloin or ribeye if you want something richer. Slice the beef thin against the grain. This makes it more tender and easier to chew. To make this dish gluten-free, swap soy sauce for tamari. Tamari is a great gluten-free substitute. Also, check the oyster sauce for gluten. Some brands offer gluten-free options. Using these swaps will keep your meal tasty and safe for gluten-free diets. This post covered all you need for a tasty meal. We explored essential ingredients, cooking steps, and helpful tips. I shared ways to vary the recipe and store leftovers correctly. Using these insights, you can impress anyone with your cooking skills. Remember, cooking should be fun and creative, so feel free to make this your own!

Better Than Takeout Beef and Broccoli Simple Recipe

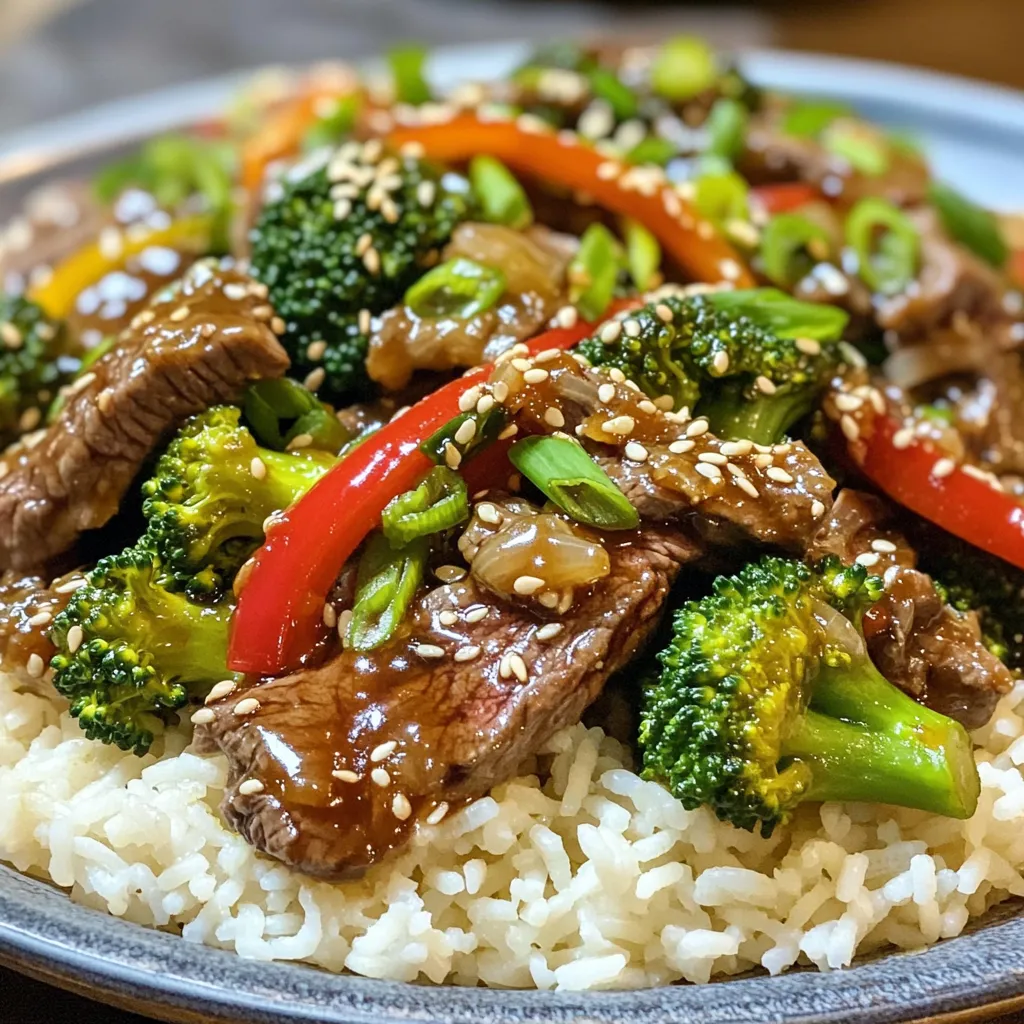
Craving something tasty and easy for dinner? You’re in the right place! This Better Than Takeout Beef and Broccoli recipe

To make these tasty Pumpkin Pie Streusel Bars, you need some key ingredients. Here’s what you need: - 1 cup all-purpose flour - 1/2 cup brown sugar, packed - 1/2 cup rolled oats - 1/4 teaspoon salt - 1/2 teaspoon ground cinnamon - 1/2 cup unsalted butter, melted - 1 cup pumpkin puree - 1/2 cup sweetened condensed milk - 1/4 cup granulated sugar - 1 large egg, beaten - 1 teaspoon vanilla extract - 1 teaspoon ground nutmeg - 1/2 teaspoon ground ginger - 1/4 teaspoon ground cloves These ingredients create a rich flavor and a great texture. The pumpkin puree gives the bars their delicious autumn taste. The spices like cinnamon and nutmeg add warmth and depth. For a little twist, you can add some optional ingredients: - 1/4 cup chopped pecans Adding pecans gives a nice crunch and some nutty flavor. You can also consider adding chocolate chips or even a sprinkle of sea salt on top. These options can make your bars even more delightful. If you don’t have certain items, there are easy swaps. For instance: - Use whole wheat flour instead of all-purpose flour for a healthier option. - Swap brown sugar with coconut sugar for a different sweetness. - If you want to skip the egg, try 1/4 cup of applesauce. These substitutions can change the flavor and texture slightly, but they still taste great. Feel free to get creative based on what you have at home! First, preheat your oven to 350°F (175°C). Grab a 9x9 inch baking pan. Line it with parchment paper. Make sure to leave some paper hanging over the edges. This helps you lift the bars out later. In a medium bowl, mix together 1 cup of all-purpose flour, 1/2 cup of packed brown sugar, 1/2 cup of rolled oats, 1/4 teaspoon of salt, and 1/2 teaspoon of ground cinnamon. Then, pour in 1/2 cup of melted unsalted butter. Stir this mixture until it looks like coarse crumbs. Set aside 1/2 cup of this mix for later. Press the rest firmly into the bottom of the pan to create a crust. In another bowl, combine 1 cup of pumpkin puree, 1/2 cup of sweetened condensed milk, 1/4 cup of granulated sugar, and 1 large beaten egg. Add 1 teaspoon of vanilla extract, 1 teaspoon of ground nutmeg, 1/2 teaspoon of ground ginger, and 1/4 teaspoon of ground cloves. Mix everything until it is smooth and well combined. Next, pour the pumpkin filling over the crust in the baking pan. Use a spatula to spread the filling evenly, making sure to reach every corner. Now, take the reserved streusel and sprinkle it generously over the filling. If you want, add 1/4 cup of chopped pecans on top for extra crunch. Place the pan in your preheated oven. Bake for 30 to 35 minutes. You know they are done when the center is set and the edges are golden brown. Once baked, take the pan out and let it cool completely on a wire rack. Lift the bars out using the parchment paper and cut them into squares. To make the best streusel, you need the right texture. Mix flour, brown sugar, oats, salt, and cinnamon. Use cold butter for a crumbly finish. I like to melt the butter, but you can also cut it into small pieces. This gives a nice crunch. Reserve half the streusel for the top. Press the rest firmly into the pan for a solid base. One common mistake is overmixing the pumpkin filling. Just mix until smooth. Overmixing can add air and make the bars puffy. Also, make sure to measure your ingredients correctly. Too much liquid can make the filling runny. If the bars look too wet after baking, they might not set properly. These bars shine when served warm. A dollop of whipped cream adds a nice touch. Another great idea is to dust them with powdered sugar. You can also serve them with a scoop of vanilla ice cream. For an extra crunch, sprinkle more pecans on top right before serving. Enjoy these bars with a warm drink for a cozy fall treat! {{image_4}} You can make gluten-free pumpkin pie streusel bars. Swap all-purpose flour for a gluten-free blend. Many options work well, like almond flour or coconut flour. Just remember, each flour has a unique texture. You may need to add a bit more liquid to your mix. This keeps your bars moist and tasty. To create vegan pumpkin pie streusel bars, replace the egg with a flax or chia seed egg. Mix one tablespoon of seeds with three tablespoons of water. Let it sit until it thickens. Use a plant-based butter instead of regular butter. Also, swap sweetened condensed milk for coconut or almond milk. These changes keep the flavor while making it vegan-friendly. Adding nuts can boost flavor and crunch. Try walnuts or almonds in place of pecans. You can also mix in some chocolate chips for a sweet twist. For a unique touch, add a hint of maple syrup or honey to the filling. This adds depth and makes your bars even more special. To keep your Pumpkin Pie Streusel Bars fresh, store them in an airtight container. This helps keep moisture in and prevents them from drying out. I like to place a piece of parchment paper between layers to avoid sticking. You can store them at room temperature for up to three days. If you want to keep them longer, you should refrigerate them. Freezing these bars is a great idea for later enjoyment. First, let the bars cool completely. Then, cut them into squares. Wrap each square tightly in plastic wrap. Place the wrapped bars in a freezer-safe bag or container. Label it with the date. They can last in the freezer for up to three months. When you’re ready to enjoy them, just thaw in the fridge overnight. These bars stay fresh for about three days at room temperature. In the fridge, they can last up to a week. To reheat, place a bar in the microwave for 10-15 seconds. This warms it just enough to soften the streusel. You can also enjoy them cold if you prefer. Yes, you can use fresh pumpkin. Start by roasting or steaming the pumpkin until soft. Then, mash it until smooth. Make sure to drain any excess water. This keeps your bars from becoming too watery. Fresh pumpkin gives a rich flavor, but canned puree is convenient and consistent. You will know the bars are done when the center is set and the edges turn golden brown. Insert a toothpick into the center; it should come out clean or with a few moist crumbs. If it comes out wet, bake a little longer. Keep an eye on them, as oven times can vary. Absolutely! You can swap nutmeg and ginger with allspice or cardamom. Each spice will add its own twist to the flavor. Just keep the amounts similar to what the recipe calls for. Feel free to experiment based on your taste. A 9x9 inch square pan works best for these bars. It ensures even baking and easy cutting. Using a metal or glass pan is fine, but make sure to line it with parchment paper. This helps with easy removal and keeps the bars intact. In this post, we explored the key ingredients for Pumpkin Pie Streusel Bars. We covered essential and optional ingredients, plus substitutions. The detailed steps for making the bars included preparing the pan and baking. I shared tips for perfecting the topping and avoiding common mistakes. You also learned about gluten-free and vegan options. For storage, I provided methods for keeping your bars fresh. Pumpkin Pie Streusel Bars are a tasty treat worth trying. Enjoy every delicious bite!

Pumpkin Pie Streusel Bars Flavorful Autumn Dessert

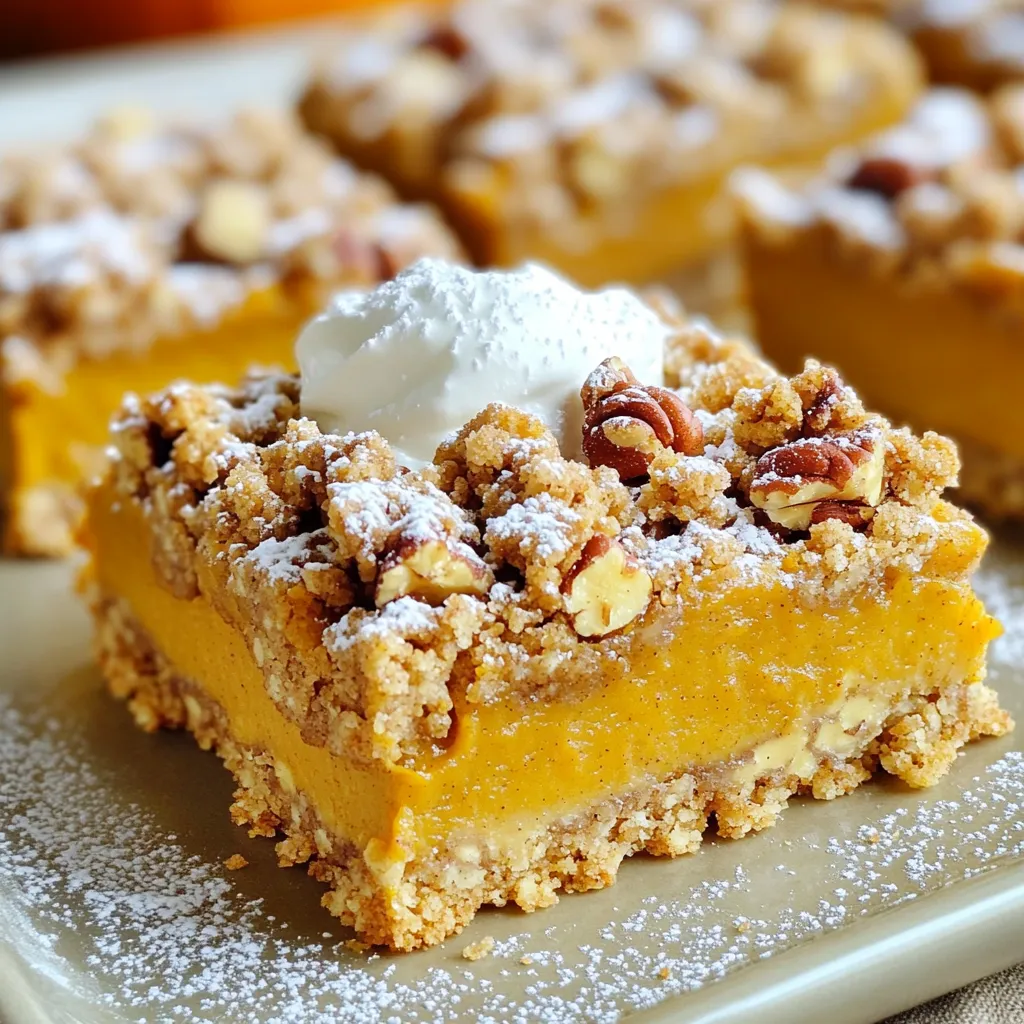
Looking for a delightful treat to celebrate autumn? You’ve found it! These Pumpkin Pie Streusel Bars blend sweet pumpkin filling

- 2 lbs boneless, skinless chicken thighs - 1 cup BBQ sauce (store-bought or homemade) - 1/2 cup low-sodium chicken broth - 1 tablespoon apple cider vinegar - 1 tablespoon packed brown sugar - 1 teaspoon garlic powder - 1 teaspoon onion powder - 1/2 teaspoon smoked paprika - Salt and freshly ground black pepper - 4 soft hamburger buns - Optional toppings: creamy coleslaw, dill pickles, sliced jalapeños When I make these sandwiches, I love using chicken thighs. They stay juicy and tender. You can use your favorite BBQ sauce. Homemade works great, but store-bought is just fine too. I also add chicken broth and apple cider vinegar to keep the chicken moist. The vinegar gives a nice tang to the sauce. For the seasoning, brown sugar adds sweetness. Garlic and onion powder boost flavor. Smoked paprika gives a subtle smokiness that pairs well with BBQ. Don’t forget to add salt and pepper to taste. For serving, I use soft hamburger buns. They hold the filling well. You can top your sandwich with creamy coleslaw for crunch, dill pickles for tang, or sliced jalapeños for a spicy kick. Customize it to your liking! - Lay chicken thighs in a single layer. - This helps ensure even cooking. Start by placing the boneless, skinless chicken thighs at the bottom of your slow cooker. Make sure they are in a single layer. This is key for even cooking. If they overlap, some pieces may cook faster than others. - Whisk together until well combined. In a medium bowl, combine the BBQ sauce, chicken broth, apple cider vinegar, brown sugar, garlic powder, onion powder, smoked paprika, and a pinch of salt and pepper. Use a whisk to mix everything well. This creates a rich sauce full of flavor. - Slow cook on low for 6-7 hours or high for 3-4 hours. - Shred chicken after cooking. Pour the sauce over the chicken thighs, making sure they are well coated. Cover the slow cooker. Set it to low and let it cook for 6-7 hours. If you’re short on time, set it to high for 3-4 hours. The chicken will be tender and easy to pull apart when done. When the time is up, carefully move the chicken to a plate. Use two forks to shred the chicken into bite-sized pieces. Discard any fat you find. - Return chicken to sauce. - Toasting buns and assembling sandwiches. Put the shredded chicken back into the slow cooker. Stir it into the remaining sauce to coat every piece. If you want, let it warm for 10-15 minutes. Next, toast your hamburger buns for extra crunch. You can use an oven or skillet for this. Once golden brown, it’s time to assemble your sandwiches. Spoon a generous portion of the BBQ pulled chicken onto the bottom half of each bun. Top it with creamy coleslaw, dill pickles, or sliced jalapeños for some extra flavor. Enjoy each bite of your savory creation! To get the best flavor, choose a BBQ sauce you love. You can use store-bought sauce or make your own. Each choice gives a different taste. Don't forget to season well. A pinch of salt and pepper can elevate the dish. Use garlic powder and smoked paprika for depth. Toasting your buns makes a big difference. You can use an oven or a skillet. Lightly toast them until they are golden brown. This adds a nice crunch. For serving, place the pulled chicken on the bottom half of the bun. Add your favorite toppings for extra fun. Trim any fat from the chicken thighs. This helps with texture and flavor. Lay chicken in a single layer in the slow cooker. This ensures even cooking. Overcrowding can lead to uneven results. A well-prepared chicken makes for a tasty sandwich. {{image_4}} You can change the flavor of your pulled chicken by trying different BBQ sauces. Sweet, tangy, or smoky sauces can create unique tastes. You can also make it spicy by adding hot sauce or diced jalapeños to your BBQ mix. If you like a kick, try adding chipotle peppers in adobo sauce. This adds heat and depth. While chicken thighs work great, you can use chicken breasts too. They will still cook well but may be a bit dry. Turkey is another option; just make sure to adjust the cooking time. If you want to switch it up, try pork shoulder. It becomes tender and juicy when cooked slowly. To make your meal even better, pair your sandwiches with tasty sides. Fresh coleslaw adds crunch and balances the rich BBQ flavors. You can also serve chips or a simple green salad. This will create a well-rounded meal. For a fun twist, try adding some grilled corn on the side. It brings a sweet flavor that goes well with BBQ. After you enjoy your pulled chicken, cool it down quickly. Place leftovers in shallow containers. This helps them cool faster and stay safe. Use airtight containers to keep the chicken fresh. Glass or BPA-free plastic works great. Make sure to store the chicken within two hours of cooking. To freeze pulled chicken, first let it cool completely. Then, place it in freezer-safe bags. Squeeze out as much air as you can before sealing. This helps prevent freezer burn. For best quality, eat it within three months. When you're ready to eat, thaw it in the fridge overnight. Reheat it in a pot on low heat or in the microwave until warm. Stored correctly, pulled chicken lasts about three to four days in the fridge. Always check for bad smells or slimy texture. If you see any signs of spoilage, it's best to throw it away. Freshness is key for great taste! Yes, you can use frozen chicken. Just note that cooking times will change. If you use frozen chicken thighs, add an hour to the cooking time. Cook on low for 7-8 hours or on high for 4-5 hours. Always make sure the chicken reaches a safe internal temperature of 165°F. The best BBQ sauce depends on your taste. If you like sweet, go for a honey or maple-based sauce. For a tangy flavor, choose vinegar-based sauces. Smoky sauces work well too. My favorite is a homemade sauce with apple cider vinegar and brown sugar. It adds depth and richness to the chicken. Yes, you can adapt this recipe for an Instant Pot. Cook the chicken on high pressure for 15 minutes. Allow for a natural release for 10 minutes, then quick release the rest. Shred the chicken and mix it with the sauce as usual. It saves time and still gives you tender chicken. Toppings can really change your sandwich. Here are some ideas: - Creamy coleslaw for crunch - Dill pickles for tang - Sliced jalapeños for heat - Crispy fried onions for texture - Avocado slices for creaminess Try mixing and matching to find your favorite combination! This recipe guide shows you how to make delicious pulled chicken sandwiches. You learned about the key ingredients and how to prepare them step-by-step. I shared tips for flavor, texture, and different serving options. You can also store leftovers for later meals easily. Pulled chicken sandwiches are tasty and versatile. I hope you feel ready to create a meal your family will love. Enjoy experimenting with flavors and toppings!

Savory Slow Cooker BBQ Pulled Chicken Sandwiches

If you crave a meal that bursts with flavor and is effortless to prepare, you’re in the right place. These

- 1 cup unsalted butter - 1 cup packed brown sugar - 1/2 cup granulated sugar - 2 large eggs - 1 tablespoon vanilla extract - 2 cups all-purpose flour - 1 teaspoon baking powder - 1/2 teaspoon baking soda - 1/4 teaspoon salt - 1/2 cup pure maple syrup - 1 cup chopped walnuts (optional) - 1/2 cup white chocolate chips (optional) For more flavor, consider adding: - 1 cup of chopped dark chocolate - 1 teaspoon of cinnamon for a warm spice - A pinch of sea salt on top before baking for contrast You can adjust these ingredients based on what you have. Here are some tips: - Use salted butter instead of unsalted if you prefer a richer taste. - Coconut sugar can replace brown sugar for a different flavor. - If you don’t have maple syrup, honey or agave syrup works too. - For a nut-free version, skip the walnuts or use seeds like pumpkin or sunflower. Start by melting 1 cup of unsalted butter in a medium saucepan over medium heat. Stir it often. You want it to melt completely before cooking it more. Keep an eye on it for about 5-7 minutes. The butter will turn a rich golden color. You will also smell a nice nutty aroma. This browning adds a deep flavor to your blondies. Once done, take it off the heat and let it cool for a few minutes. In a large mixing bowl, combine the warm brown butter with 1 cup of packed brown sugar and 1/2 cup of granulated sugar. Use a whisk to mix until it's smooth and creamy. Make sure there are no lumps. Next, add 2 large eggs, one at a time. Mix well after each egg. This helps blend everything nicely. Finally, stir in 1 tablespoon of vanilla extract for extra flavor. In a separate bowl, mix together 2 cups of all-purpose flour, 1 teaspoon of baking powder, 1/2 teaspoon of baking soda, and 1/4 teaspoon of salt. Gradually add this dry mix to the wet ingredients. Be careful to mix just until combined. Overmixing can make the blondies tough. Now, gently fold in 1/2 cup of pure maple syrup. If you want more texture, add 1 cup of chopped walnuts and/or 1/2 cup of white chocolate chips. Prepare your baking dish by preheating the oven to 350°F (175°C). Line a 9x13 inch dish with parchment paper, leaving some paper hanging over the sides. This makes it easy to lift the blondies out later. Pour the batter into the dish and spread it evenly. Bake for 25-30 minutes. They are done when the edges are set and a toothpick comes out with a few moist crumbs. Let them cool in the pan for about 15 minutes. Then, lift them out using the parchment paper and cool completely on a wire rack before slicing into squares. To get the right texture in your blondies, start with brown butter. Brown the butter until it’s a rich golden color. This step adds flavor and helps keep the blondies moist. When mixing, do not overmix the batter. Mix just until the dry ingredients blend in. This keeps your blondies tender and chewy. Serve your blondies warm for a cozy treat. Dust them with powdered sugar right before serving. A drizzle of extra maple syrup on top makes them even better. You can also pair them with a scoop of vanilla ice cream. This adds a creamy touch that everyone loves. After baking, cool the blondies in the pan for 15 minutes. Lift them out using the parchment paper. Let them cool completely on a wire rack. For storage, keep them in an airtight container at room temperature. They stay fresh for up to five days. If you want to keep them longer, freeze them. Wrap each blondie in plastic wrap, then place them in a freezer bag. They’ll taste great even after a month! {{image_4}} You can boost the taste of your blondies in many ways. Adding spices like cinnamon or nutmeg can bring warmth. A pinch of salt can deepen the sweet flavor. For a twist, try mixing in some lemon zest for freshness. The combination of sweet and zesty will surprise your taste buds. If you have dietary needs, you can make changes. For a vegan option, replace butter with coconut oil. Use flax eggs instead of regular eggs. Just mix one tablespoon of flaxseed meal with three tablespoons of water and let it sit. For gluten-free blondies, swap all-purpose flour with almond or oat flour. Mix-ins can change the whole vibe of your blondies. Chopped pecans or almonds can add crunch. For a fruity touch, try dried cranberries or cherries. If you love chocolate, dark chocolate chips can be a great choice. Get creative and make your blondies special to you! To keep your brown butter maple blondies fresh, store them in an airtight container. This method helps keep them moist. Place a piece of parchment paper between layers to prevent sticking. You can store them at room temperature for up to three days. For longer freshness, put them in the fridge, where they last about a week. Freezing blondies is easy and keeps them tasty. First, let them cool completely. Then, cut them into squares. Wrap each square in plastic wrap. Place the wrapped squares in a freezer-safe bag or container. They can stay frozen for up to three months. When you want to enjoy them, just thaw them at room temperature. If you like your blondies warm, reheating is simple. You can use the microwave or the oven. For the microwave, heat a single square for about 10-15 seconds. For the oven, preheat to 350°F (175°C). Place the blondies on a baking sheet and heat for about 5-10 minutes. This brings back their soft texture and delicious flavor. Enjoy them warm for a cozy treat! Yes, you can use regular butter, but it won't taste the same. Brown butter adds a rich, nutty flavor. To make brown butter, melt unsalted butter in a saucepan until it turns golden brown. This process gives your blondies depth and warmth. Blondies go well with many treats. Here are some great pairings: - Vanilla ice cream - Whipped cream - Fresh berries - Hot chocolate - Caramel sauce These add flavors that complement the sweet, rich taste of blondies. Check your blondies after 25 minutes. The edges should look set, but the center may seem soft. Insert a toothpick into the center. If it comes out with a few moist crumbs, they are done. If it has wet batter, bake for a few more minutes. This ensures a chewy texture. You learned about the key ingredients and steps to make blondies. We covered tips for texture, serving, and storing too. Don’t forget to explore variations and dietary adjustments. These options can give you your perfect sweet treat. Remember, the joy of baking is in experimenting. Enjoy making your blondies, and share them with friends! Use these insights to create something delicious and unique. Happy baking!

Brown Butter Maple Blondies Sweet and Simple Delight

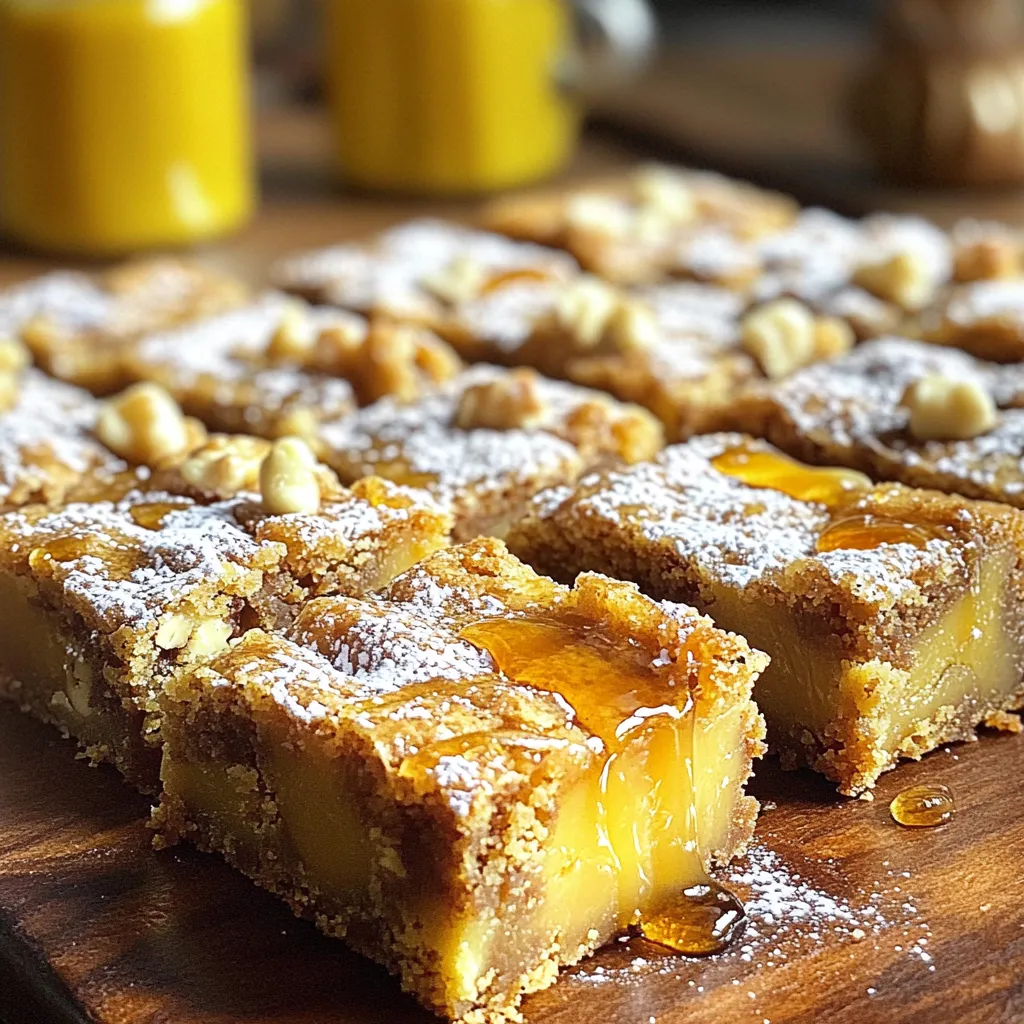
Are you ready to dive into a sweet treat that’s as simple as it is delicious? Brown Butter Maple Blondies

To make this dish, we need some key ingredients. These include: - 4 bone-in, skin-on chicken thighs - 1 pound baby potatoes, halved The chicken thighs bring rich flavor. Their skin adds crispiness. The baby potatoes soak up the tasty juices as they cook. Next, we have the flavoring ingredients. These ingredients are vital for taste. They include: - 3 tablespoons extra virgin olive oil - Zest of 1 large lemon - 2 tablespoons freshly squeezed lemon juice - 1 tablespoon fresh rosemary, finely chopped - 1 tablespoon fresh thyme, finely chopped - 2 garlic cloves, minced - Salt and fresh cracked pepper to taste The olive oil helps everything cook nicely. Lemon zest and juice add brightness. Fresh rosemary and thyme give an earthy touch. Garlic adds depth and aroma. Salt and pepper enhance all these flavors. For a finishing touch, we have optional garnishes: - Fresh parsley, finely chopped Chopped parsley adds color and freshness. It makes the dish look appealing and bright. You can sprinkle it on just before serving. Start by warming your oven to 425°F (220°C). This step helps cook the chicken and potatoes evenly. In a big bowl, mix together 3 tablespoons of olive oil, the zest of one lemon, and 2 tablespoons of lemon juice. Add 1 tablespoon each of chopped rosemary and thyme. Then, toss in 2 minced garlic cloves, along with salt and pepper. Mix it all up until it blends well. Next, place 4 chicken thighs into the bowl. Make sure each piece is covered in that tasty marinade. Let the chicken sit for at least 15 minutes. You can also put it in the fridge for up to one hour if you have time. This wait lets the flavors soak in. While the chicken marinates, grab a large baking sheet. Spread out 1 pound of halved baby potatoes on it. Drizzle a little olive oil over the potatoes and sprinkle them with salt and pepper. Toss them around in the baking sheet until they’re all coated. This step makes sure every potato is seasoned well. After the chicken has marinated, take it out of the bowl. Place the chicken thighs on the baking sheet next to the potatoes. Pour any leftover marinade from the bowl over both the chicken and potatoes. This adds even more flavor to the dish. Put the baking sheet in the oven and roast for 35-40 minutes. Use a meat thermometer to check that the chicken reaches 165°F (74°C). The chicken should look golden brown, and the potatoes should be soft when poked with a fork. In the last 5 minutes, turn on the broiler. This helps crisp up the chicken skin. Watch it closely so it doesn’t burn. Once done, take the baking sheet out and let it rest for a few minutes. This lets the juices settle in the chicken. Finally, sprinkle some chopped parsley on top. It adds a nice color and fresh taste. Serve your dish hot and enjoy the burst of flavors! To get the best taste, let your chicken marinate. I suggest at least 15 minutes. For deeper flavor, marinate for up to 1 hour in the fridge. This lets the herbs and lemon soak in. The olive oil helps to keep the chicken juicy. For crispy skin, start by patting the chicken dry. This helps the skin to crisp up in the oven. When the chicken is on the baking sheet, make sure it is not crowded. Give it space. In the last 5 minutes, turn on the broiler. Watch closely to avoid burning. This step gives the skin a perfect crunch. Cooking times can vary based on your oven and chicken size. Check your chicken with a meat thermometer. It should reach 165°F (74°C). If your chicken thighs are larger, they may need more time. For the potatoes, they should be fork-tender. If they are still hard, give them a few extra minutes. Just keep an eye on everything to ensure it cooks perfectly. {{image_4}} You can switch out chicken for other proteins. Salmon works great with lemon. It cooks fast and stays moist. Pork chops are another good choice. They soak up flavors well. For a plant-based option, try tofu. Use firm tofu and press it to remove water. Marinate it just like chicken. You will enjoy a tasty dish! Add your favorite veggies for more flavor. Carrots bring sweetness and color. Bell peppers add crunch and a slight sweetness. Broccoli or green beans can make it vibrant and healthy. Just chop them up and toss them with the potatoes. Every vegetable adds its own taste, making the dish more exciting! Herbs can change the whole dish. If you love basil, use it instead of rosemary. Oregano can also bring a nice twist. Dill adds a bright flavor that pairs well with lemon. Feel free to mix and match herbs. Use what you have on hand for a unique meal! To keep your Zesty Lemon Herb Chicken and potatoes fresh, store them in an airtight container. Let them cool down first. Place the chicken and potatoes together or separately. They will last in the fridge for about three days. Make sure to label the container with the date. When you’re ready to eat leftovers, preheat your oven to 350°F (175°C). Place the chicken and potatoes on a baking sheet. Cover them with foil to prevent drying out. Heat for about 20 minutes or until hot. You can also use a microwave. Heat in short bursts of 1-2 minutes. Check often to avoid overheating. If you want to freeze your meal, let it cool completely first. Use freezer-safe containers or bags. Be sure to remove as much air as possible before sealing. Your dish will keep well for up to three months in the freezer. To thaw, place in the fridge overnight before reheating. To check if the chicken is done, use a meat thermometer. It should read 165°F (74°C). The chicken will also look golden brown. If your chicken thighs are not at this temperature, continue cooking them. Yes, you can use boneless chicken thighs. They will cook faster and stay juicy. Reduce the cooking time by about 10 minutes. Check the temperature to ensure they reach 165°F (74°C). Some great sides include: - Steamed green beans - Roasted carrots - A fresh garden salad - Quinoa or rice These will complement the lemon herb flavors nicely. Leftovers can be stored in an airtight container for up to three days in the fridge. If you want to keep them longer, freeze them for up to three months. Just ensure they are well sealed. This blog post covers everything you need for Lemon Herb Chicken. We discussed the main ingredients and flavor boosters. I provided step-by-step cooking instructions and shared tips for great flavor and crispy skin. You learned about variations and how to store leftovers effectively. In the end, a little planning goes a long way. Enjoy experimenting with this dish. Happy cooking!

Sheet Pan Lemon Herb Chicken Potatoes Delight

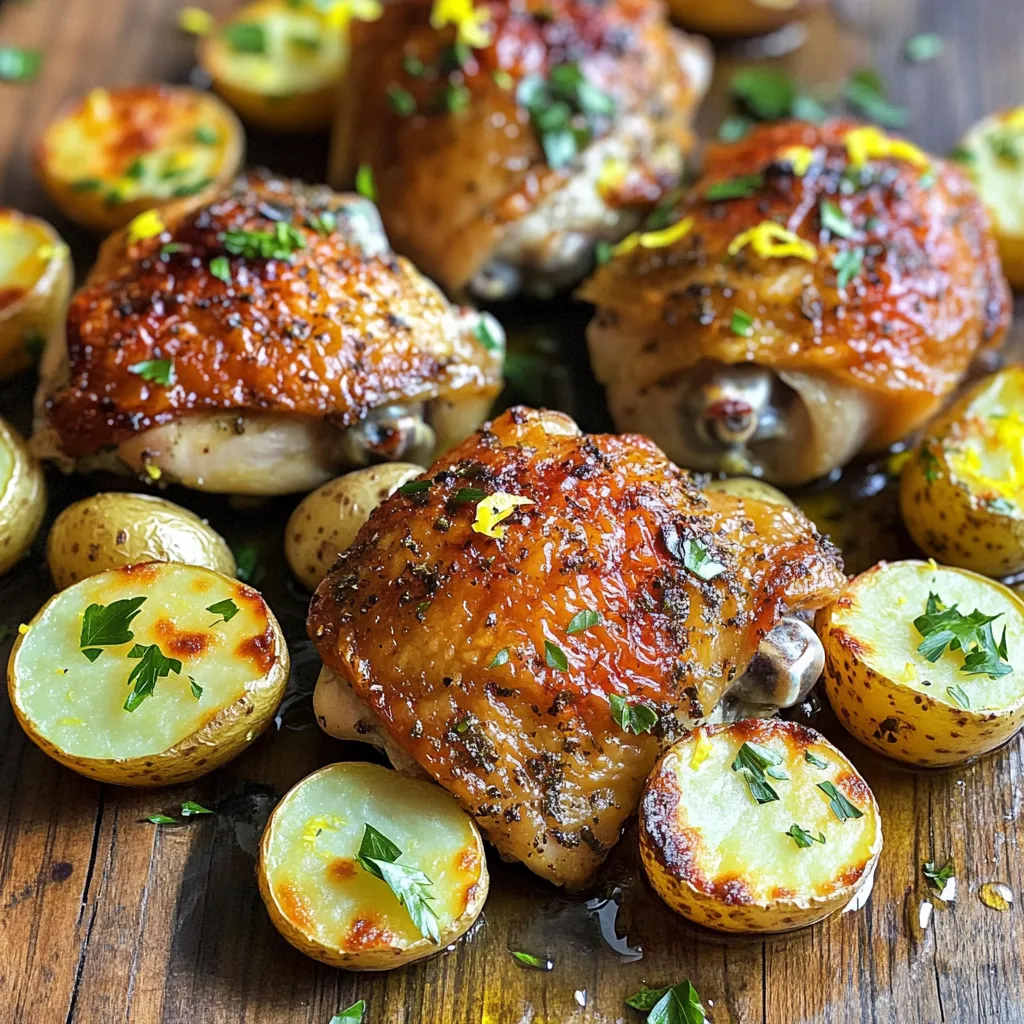
Looking for a simple and tasty family meal? You’ve found it with my Sheet Pan Lemon Herb Chicken Potatoes Delight!

- 2 cups cooked chicken, shredded - 1 cup black beans, rinsed and drained - 1 cup corn (frozen or canned) - 1 teaspoon ground cumin - 1 teaspoon chili powder - ½ cup red onion, finely diced - 2 cloves garlic, minced - 8 small flour tortillas - 2 cups enchilada sauce (store-bought or homemade) - 2 cups shredded cheese (cheddar and Monterey Jack blend) - Fresh cilantro for garnish - Optional: Jalapeños for spice Gathering these ingredients is key to making delicious cheesy chicken enchiladas. You can change some items based on what you like. If you want to mix things up, here are some great swaps: - Use turkey instead of chicken for a lighter dish. - Swap black beans with pinto or kidney beans for a different flavor. - Try bell peppers instead of red onion for a sweet crunch. Garnishes make your enchiladas look great and add taste. Here are my favorites: - Chopped fresh cilantro adds color and flavor. - A dollop of sour cream offers creaminess. - Sliced jalapeños give a spicy kick for heat lovers. - Avocado slices add creaminess and freshness. These ingredients and ideas make your cheesy chicken enchiladas special. Enjoy the cooking! {{ingredient_image_2}} First, set your oven to 375°F (190°C). This helps the enchiladas cook evenly. In a large bowl, combine the shredded chicken, black beans, corn, and diced red onion. Add the minced garlic, ground cumin, and chili powder. Stir until everything is well mixed. This filling gives the enchiladas great flavor. Grab a 9x13 inch baking dish. Pour ½ cup of enchilada sauce into the dish. Spread it evenly across the bottom. This sauce adds moisture and taste to the base of your enchiladas. Take a tortilla and place about ⅓ cup of the chicken mixture in the center. If you like, add a bit of shredded cheese on top. Roll the tortilla tightly and place it seam-side down in the baking dish. Repeat this for all tortillas, filling and rolling them snugly. Pour the remaining enchilada sauce over the rolled tortillas. Make sure they are well coated. Then, sprinkle the rest of the shredded cheese on top. This will melt and create a cheesy layer. Cover the dish with aluminum foil to stop them from browning too fast. Bake in the oven for 20 minutes. After 20 minutes, remove the foil carefully. Return the dish to the oven and bake for another 10-15 minutes. Look for the cheese to be melted and bubbly, with a golden color. Once baked, take the dish out of the oven. Let it cool for a few minutes. This helps the enchiladas set. Garnish with chopped fresh cilantro and jalapeño slices if you want some heat. Serve warm and enjoy your delicious cheesy chicken enchiladas! To make great enchiladas, start with fresh ingredients. Use cooked chicken that is tender and juicy. Shred it well to mix easily with other ingredients. Rinse and drain black beans to keep them from being too wet. For flavor, use spices like cumin and chili powder. Don’t skip the garlic; it adds a nice kick. When filling tortillas, do not overstuff. About ⅓ cup of filling works best. This helps the tortillas stay rolled. Place them seam-side down in the dish to keep them closed during baking. For a great cheese melt, choose a blend of cheeses. A mix of cheddar and Monterey Jack works well. Grate the cheese yourself for better melting. Pre-shredded cheese often contains anti-caking agents that can affect melt quality. Add cheese both inside and on top of the enchiladas. This creates a gooey texture throughout. Cover the dish with foil for the first part of baking. This keeps the moisture in and helps the cheese melt evenly. Remove the foil for the last few minutes to get that golden brown finish. Spices can change the flavor of your enchiladas. Start with the amounts in the recipe, then adjust as needed. If you like heat, add more chili powder or some diced jalapeños into the filling. For a milder taste, reduce the spices slightly. Taste the filling before rolling it into the tortillas. This way, you can make sure it has the flavor you want. Remember, you can always add more spice, but it’s hard to take it away! Pro Tips Use Leftover Chicken: For a quicker preparation, utilize leftover rotisserie chicken. It saves time and adds great flavor! Customize the Heat: Adjust the spice level by adding more chili powder or including diced jalapeños in the filling for an extra kick. Cheese Variations: Experiment with different cheese blends, such as pepper jack or queso blanco, to create unique flavor profiles. Make Ahead: Prepare the enchiladas in advance and store them in the refrigerator. Just bake them right before serving for a convenient meal! {{image_4}} You can swap the chicken for veggies. Use beans, peppers, and zucchini. You may also add spinach or mushrooms. This keeps the flavor rich and cheesy while being meat-free. Choose your favorite cheese blend to melt on top. I love using a mix of cheddar and Monterey Jack for a creamy texture. To spice things up, add jalapeños or hot sauce to your filling. You can also use spicy chicken or pepper jack cheese. This will give your enchiladas a nice kick. Adjust the amount of chili powder based on your heat preference. The added heat makes every bite an adventure! For a fun twist, layer the ingredients like a casserole. Spread some sauce in the dish, add tortillas, then the chicken mix. Repeat layers until you run out of ingredients. Top with sauce and cheese, then bake. This method saves time and makes serving a breeze. Plus, you get extra cheesy goodness in every bite! Store leftover enchiladas in an airtight container. Layer parchment paper between the enchiladas to prevent sticking. Keep them in the fridge for up to three days. If you want to keep them longer, consider freezing. To reheat, preheat your oven to 350°F (175°C). Place the enchiladas in a baking dish. Add a splash of enchilada sauce on top to keep them moist. Cover the dish with foil and heat for about 20 minutes. Make sure they are hot all the way through before serving. Freezing enchiladas is easy! Wrap each enchilada tightly in plastic wrap. Then, place them in a freezer-safe bag. They can last for up to three months. To cook from frozen, bake at 375°F (190°C) for 40-50 minutes. Remove foil in the last 10 minutes for a nice cheese melt. Enjoy later! It takes about 50 minutes to cook Cheesy Chicken Enchiladas. You’ll need 20 minutes for prep and 30 minutes to bake. Baking time includes 20 minutes covered and 10-15 minutes uncovered. Yes, you can use rotisserie chicken. It saves time and adds great flavor. Just shred the chicken and mix it into your filling. This shortcut makes the dish even easier to prepare. Serve Cheesy Chicken Enchiladas with Mexican rice and a fresh salad. You can also add sour cream and guacamole for extra flavor. These sides balance the meal and add color to your plate. Yes, you can prepare the filling ahead of time. Store it in the fridge for up to two days. When you're ready, just fill the tortillas and bake them. This makes dinner prep quick and easy. To make homemade enchilada sauce, combine 1 can of tomato sauce with spices. Use garlic powder, chili powder, and ground cumin to taste. Simmer the sauce for 10-15 minutes. This sauce adds a fresh touch to your enchiladas. You’ve learned how to make Cheesy Chicken Enchiladas. Start with the right ingredients like chicken, beans, and spices. Follow the simple steps to bake a hearty dish. Remember the tips for cheese and spice adjustments. Feel free to explore variations and make it your own. Enjoy these tasty enchiladas with friends and family. They’ll love the flavor. This dish is great for meals now or later. Happy cooking!

Cheesy Chicken Enchiladas Easy Oven-Baked Recipe

Craving something cheesy and satisfying? You’re in the right spot! My easy oven-baked Cheesy Chicken Enchiladas are a delight for

- 1 block (200g) feta cheese - 2 cups cherry tomatoes, halved - 3 cloves garlic, minced These main ingredients form the heart of this dish. Feta cheese gives a creamy and tangy flavor. The cherry tomatoes burst with sweetness when roasted. Garlic adds depth and aroma, making this pasta dish truly irresistible. - 1 teaspoon dried oregano - 1/4 teaspoon red pepper flakes (adjust according to your spice preference) - 3 tablespoons olive oil Using dried oregano brings a Mediterranean touch. Red pepper flakes add just the right amount of heat. Olive oil helps everything blend together, making the dish rich and smooth. - 12 oz (340g) pasta of your choice (spaghetti, penne, etc.) - Fresh basil leaves, for garnish - Zest of 1 lemon The pasta acts as a perfect base for the sauce. Fresh basil leaves add a pop of color and flavor. A sprinkle of lemon zest brightens the dish, giving it a fresh finish. {{ingredient_image_2}} - Preheat the oven to 400°F (200°C). This is key for cooking the feta and tomatoes just right. - Grab a medium-sized baking dish. Place the block of feta cheese in the center. Surround it with the halved cherry tomatoes. Evenly spread them out for the best roasting. - Sprinkle minced garlic over the feta and tomatoes. This adds great flavor. - Next, add dried oregano and red pepper flakes. Then, drizzle 3 tablespoons of olive oil over everything. Finish with salt and pepper to taste. - Place the baking dish in the oven. Bake for about 30 minutes. The feta should turn golden, and the tomatoes will blister and release juices. - While the feta and tomatoes bake, fill a large pot with salted water and bring it to a boil. - Cook your pasta according to the package instructions until it's al dente. Drain it but save about 1 cup of the pasta water. This water helps adjust the sauce later. To make your dish pop, adjust the spice levels. If you love heat, add more red pepper flakes. Start with a little and taste as you go. This keeps the dish balanced and fun. I also love adding freshness with lemon and basil. The zest from one lemon brightens the whole dish. It adds a zing that pairs well with the creamy feta. Fresh basil leaves bring a lovely aroma. Just tear them and mix them in before serving. Getting the perfect pasta texture is key. Cook your pasta until it is al dente. This means it should be firm but not hard. Make sure to taste it a minute or two before the time is up. Roasting the feta and tomatoes enhances their flavor. The tomatoes burst and become sweet. The feta turns creamy and rich. Bake them until they are golden and bubbly. This adds depth to your dish. For a beautiful presentation, serve the pasta in shallow bowls. This makes it look fancy and inviting. Add a few extra basil leaves on top for color. A sprinkle of cracked black pepper adds a nice touch too. Pair your pasta with a side salad or a glass of white wine. A light, crisp drink works well. It balances the richness of the dish. Enjoy your meal and impress your friends! Pro Tips Choose Your Pasta Wisely: Opt for pasta shapes with ridges or holes, like penne or fusilli, to help catch the creamy feta-tomato sauce, ensuring every bite is flavorful. Use High-Quality Feta: For the best flavor, select a good quality feta cheese. Greek feta made from sheep's milk will add a rich, tangy flavor that elevates the dish. Customize the Spice Level: Feel free to adjust the amount of red pepper flakes according to your personal heat preference. You can also add a pinch of smoked paprika for a subtle smokiness. Fresh Herbs for the Win: To enhance the freshness of the dish, use fresh herbs like parsley or mint alongside basil. This adds complexity and brightness to the overall flavor profile. {{image_4}} You can change the feta cheese if you want. Try goat cheese for a tangy taste. Cream cheese also works well for a creamy texture. Feel free to swap out cherry tomatoes too. You can use diced regular tomatoes or even sun-dried tomatoes. These will add different flavors to your dish. If you need gluten-free pasta, use rice or chickpea pasta. These options taste great and keep the dish light. For vegan variations, skip the feta cheese. Use a plant-based cheese or nutritional yeast instead. This gives you a cheesy flavor without dairy. Add proteins to make it heartier. Cooked chicken or shrimp pairs nicely with the feta and tomatoes. Just toss them in with the pasta for extra flavor. You can also experiment with herbs. Try fresh thyme or parsley for a different twist. Adding spices like smoked paprika can give your dish a fun kick. To keep your feta tomato pasta fresh, store leftovers in the fridge. Place the pasta in an airtight container. This helps to prevent moisture loss and keeps flavors intact. If you don’t have an airtight container, use plastic wrap tightly over a bowl. Make sure it’s covered well. Leftovers can stay fresh for about three days. When you're ready to enjoy leftovers, you can reheat them easily. The best method is to use the stove. Just add the pasta to a pan over medium heat. Stir in a splash of water or olive oil to keep it moist. Heat until warm. You can also use a microwave. Place the pasta in a microwave-safe dish and cover it. Heat in 30-second intervals, stirring in between. This helps to warm it evenly while keeping the flavor and texture. You can freeze this pasta dish if you want to save it for later. Freezing the entire dish works best. Let it cool completely before placing it in a freezer-safe container. Make sure to leave some space at the top for expansion. When you're ready to eat, thaw it overnight in the fridge. Reheat it on the stove or microwave as explained above. If you freeze just the pasta, it may get mushy when reheated. Keeping the sauce and pasta together helps maintain the perfect texture. If you can't find feta cheese, try these options: - Goat cheese: It’s tangy and creamy. - Ricotta cheese: This will add a light and fluffy texture. - Cream cheese: It will create a rich and smooth sauce. - Cottage cheese: Use this for a lower-fat option with a mild taste. Each cheese brings its own flavor. You can adjust the recipe based on your choice. Yes, you can prepare this dish ahead of time. Here’s how: - Cook the pasta: You can cook it earlier and store it separately. - Baked feta and tomatoes: Bake and let it cool before storing. - Storage tips: Keep the pasta and sauce in airtight containers in the fridge. When ready to eat, just reheat both parts and mix them together. Check for these signs: - Feta cheese: It should be golden brown on top. - Tomatoes: Look for blistered skin and soft texture. These cues show that the flavors have melded well together. Enjoy the creamy sauce! This blog post shared a tasty pasta recipe featuring feta cheese, cherry tomatoes, and garlic. We explored the key ingredients, best cooking steps, and helpful tips. You learned how to adjust flavors, try variations, and store leftovers. Remember, cooking should be fun and creative. Don't be afraid to experiment. Enjoy your pasta journey with fresh flavors and unique twists!

TikTok Feta Tomato Pasta Easy and Delicious Recipe

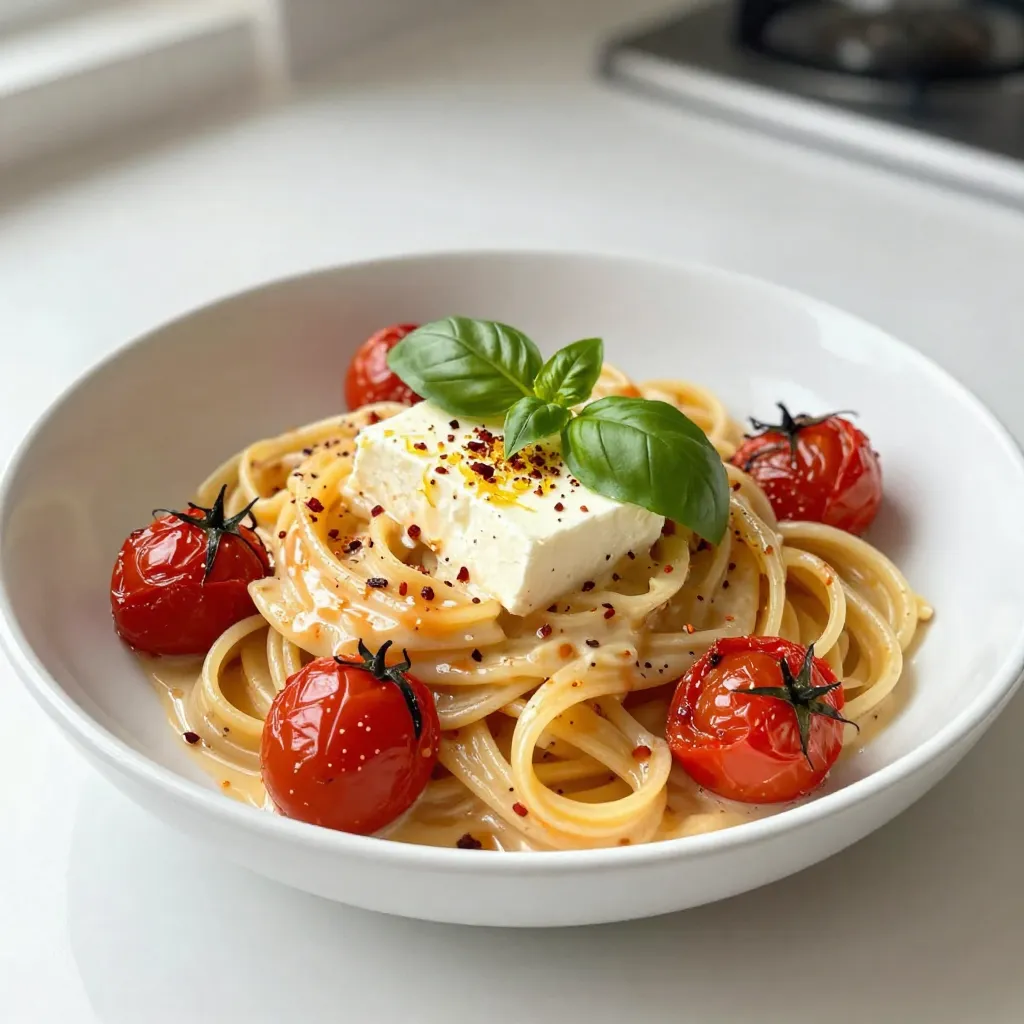
Want a dish that’s both easy to make and packed with flavor? Try TikTok Feta Tomato Pasta! This simple recipe

To make Swiss meringue buttercream, you need a few simple ingredients. Here is the list: - 4 large egg whites - 1 cup granulated sugar - 1 ½ cups unsalted butter, softened and cut into small cubes - 1 teaspoon pure vanilla extract - Pinch of salt - Optional: gel food coloring These ingredients work together to create a smooth, rich buttercream. The egg whites and sugar form the meringue base. The butter adds creaminess, while vanilla and salt enhance the flavor. If you want some color, gel food coloring can add fun hues. Using quality ingredients matters. Fresh eggs and real vanilla make a big difference. The butter should be softened but not melted. This helps it mix well into the meringue. {{ingredient_image_2}} To make Swiss meringue buttercream, you need a double boiler. This helps control the heat. Fill a pot with a couple of inches of water. Bring it to a gentle simmer. Use a heatproof bowl for mixing. Place the bowl over the pot. Make sure it does not touch the water. This setup will gently heat the egg whites and sugar without cooking them. Now, it’s time to mix. Add the egg whites and sugar to your bowl. Use a whisk to stir continuously. This helps dissolve the sugar. Keep whisking until the sugar is fully dissolved. You need to check the temperature. Aim for 160°F (70°C). You can use a candy thermometer for this. Rub a small amount between your fingers. If it feels smooth, you are ready to go. Once your mixture is hot, remove it from the heat. Grab your electric mixer and attach the whisk. Beat the mixture on high speed. You want to achieve stiff, glossy peaks. This usually takes about 8-10 minutes. The bowl should feel cool to the touch when done. Now, let’s add the butter. Use 1 ½ cups of softened butter, cut into small cubes. Add a few cubes at a time while mixing on medium speed. If your buttercream looks curdled, don’t panic! Just keep mixing. Eventually, it will turn into a velvety smooth buttercream. To enhance the flavor, add a teaspoon of pure vanilla extract and a pinch of salt. If you like color, add some gel food coloring. Mix until the color is even. You can adjust the amount to reach your desired shade. Now, your Swiss meringue buttercream is ready to use! Fixing a grainy texture If your buttercream feels grainy, it may be from undissolved sugar. Heat the egg whites and sugar longer until smooth. Ensure the mixture reaches 160°F. Once done, it should feel soft and silky. What to do if buttercream is too soft or too stiff If your buttercream is too soft, chill it for a few minutes, then re-beat it. For stiff buttercream, add a bit of milk or cream to soften it. Mix slowly until you reach the right texture. Recommended mixers and bowls A stand mixer works best for this recipe. It saves your arms from tiring out. Use a large heatproof bowl for mixing the egg whites and sugar. Make sure it fits well over your pot for steaming. Best piping bags and nozzles for decoration Invest in a good piping bag. A reusable silicone bag is eco-friendly and easy to clean. For nozzles, choose a star tip for beautiful swirls. A flat tip works well for smooth edges on cakes. Importance of room temperature ingredients Using room temperature butter is key. Cold butter does not blend well. Let your butter sit out for about 30 minutes before starting. This helps in achieving a light and fluffy texture. Rebeating after refrigeration If you store your buttercream, it may harden. Allow it to sit at room temperature for about 30 minutes. Then, rebeat it for a few minutes until fluffy. This restores its creamy consistency, ready for decorating. Pro Tips Room Temperature Butter: Ensure your butter is at room temperature before adding it to the meringue for smoother incorporation. Preventing Sugar Graininess: Whisk the egg whites and sugar mixture thoroughly over the double boiler to avoid any graininess in your final buttercream. Coloring Tips: When adding gel food coloring, start with a small amount and gradually add more until the desired shade is achieved for vibrant results. Storage Secrets: If refrigerating, always allow the buttercream to come to room temperature and re-beat it to restore its fluffy consistency before use. {{image_4}} You can easily change the flavor of Swiss meringue buttercream. One tasty option is to add citrus zest. Try lemon or orange zest for a fresh twist. Just mix in one to two teaspoons after adding the vanilla extract. This will brighten up your buttercream. Another fun idea is to make chocolate Swiss meringue buttercream. To do this, add half a cup of unsweetened cocoa powder. Mix it in after you add the vanilla. This will give your buttercream a rich, chocolatey flavor. You can also melt dark chocolate and fold it in for a deeper taste. Color can take your buttercream to the next level. Use natural food colorings to create beautiful shades. Beet juice can give a lovely pink hue, while matcha can add green. Just a few drops will do, so mix slowly until you reach your desired color. For a fun, marbled effect, use two colors of buttercream. Fill a piping bag with both colors side by side. When you pipe, it will create stunning swirls. This is perfect for cakes or cupcakes at parties. Swiss meringue buttercream is great for themed decorations. For holidays, create festive colors. Use red and green for Christmas or pastels for Easter. You can also make simple decorations, like flowers or leaves, using a piping bag. For special occasions, Swiss meringue can really shine. Use it for a wedding cake or birthday cupcakes. Its smooth finish makes it easy to create beautiful designs. Plus, it tastes amazing, making your treats extra special. Swiss meringue buttercream lasts at room temperature for up to 3 days. Store it in an airtight container to keep it fresh. Avoid placing it in direct sunlight or near heat sources. You can refrigerate Swiss meringue buttercream for up to a week. Place it in a tight container. When ready to use, take it out and let it sit at room temperature for 30 minutes. Re-beat it with a mixer to restore its fluffy texture. To freeze Swiss meringue buttercream, place it in a freezer-safe container. It can last for up to 3 months. For best results, thaw it overnight in the fridge. After thawing, let it sit at room temperature for about 30 minutes, then re-beat it to get that perfect smoothness again. Yes, you can make Swiss meringue buttercream without a stand mixer! You just need a strong hand and a whisk. You can use a hand mixer instead, but it will take longer. If you choose to whisk by hand, watch out! It will tire your arms. Just keep whisking until you reach stiff peaks. If your buttercream looks curdled, don’t panic. This happens sometimes. Keep mixing, and it will come together. If it is too soft, chill it for a few minutes. Then, re-beat it until it thickens. If it is too stiff, add a tiny bit of milk to loosen it up. Always mix slowly to avoid splatters. Swiss meringue buttercream is often smoother than regular buttercream. It has a light and airy texture, making it great for cakes. It also tastes less sweet, so many people prefer it. Regular buttercream can be thick and sugary. Swiss meringue is a nice balance of sweet and creamy, making it a favorite for many bakers. To decorate cakes, use a piping bag with a nozzle. Start with a crumb coat to seal in crumbs. Then, spread a thick layer of buttercream on the cake. Use a spatula to smooth the sides and top. For designs, pipe swirls or rosettes. You can create beautiful patterns easily with Swiss meringue buttercream! Making Swiss meringue buttercream is simple and fun. We covered the key ingredients and steps to create smooth, flavorful frosting. I shared tips for mixing, beating, and fixing common issues. You can explore flavor and color variations to personalize your buttercream. Proper storage tips will help keep it fresh for your baking needs. With practice, you can master this technique and impress friends and family. Enjoy making your desserts more delicious with this versatile buttercream. Happy baking!

Swiss Meringue Buttercream Easy Recipe to Try

If you’re looking for that light, creamy frosting that takes your cakes to the next level, then Swiss meringue buttercream

Older posts
Newer posts
← Previous Page1 … Page4 Page5 Page6 … Page86 Next →

dsad

© 2026 lazychefmagic • Built with GeneratePress

Our Policies

  • Copyright Policy
  • Cookie Policy
  • GDPR Policy
  • Privacy Policy
  • Disclaimer
  • Terms Of Use

More Information

  • Home
  • About
  • Contact
  • Appetizers
  • Dessert
  • Dinner
  • Drinks
©2026, lazychefmagic About Back To Top