Skip to content
DisclaimerTerms Of UseGDPR PolicyCookie Policy

lazychefmagic

  • Home
  • Drinks
  • Appetizers
  • Dinner
  • Dessert
  • About
  • Contact
  • Privacy Policy
DisclaimerTerms Of UseGDPR PolicyCookie Policy

NO-ING-IMG

- 1 pound chicken breast tenders - 1/4 cup honey - 1/4 cup Dijon mustard - 2 tablespoons olive oil - 1 teaspoon garlic powder - 1 teaspoon onion powder - 1/2 teaspoon smoked paprika - Salt and pepper to taste - 1 cup Panko breadcrumbs - 1/2 cup all-purpose flour - 2 large eggs For this recipe, I love to use fresh chicken breast tenders. They cook quickly and stay juicy. The honey adds a sweet touch, while the Dijon mustard brings a nice tang. Olive oil keeps everything moist and helps with browning. For seasonings, I always reach for garlic powder and onion powder. They add depth and flavor without being too strong. Smoked paprika gives a lovely warmth and color. Adjust the salt and pepper to match your taste. When it comes to breading, I prefer Panko breadcrumbs. They create that perfect crunch. All-purpose flour helps the egg stick to the chicken. Lastly, the eggs bind the breadcrumbs nicely. You can find the full recipe details in the link provided. In a medium bowl, whisk together the honey and Dijon mustard. Add garlic powder, onion powder, smoked paprika, and a pinch of salt and pepper. Mix until smooth. Remember to reserve half of this marinade for your dipping sauce later. This will add a nice touch to the meal. Take the chicken tenders and place them in a large bowl. Pour the remaining marinade over the chicken. Toss gently, making sure every piece is coated well. For the best flavor, let the chicken marinate for at least 15 minutes. If you can wait longer, it’s even better! Now, let’s prepare a breading station. You will need three shallow bowls: - One with flour - One with whisked eggs - One with Panko breadcrumbs Start by adding flour to the first bowl. In the second bowl, beat the eggs until they are smooth. Fill the third bowl with Panko breadcrumbs, ready for the chicken. Preheat your oven to 400°F (200°C). Line a baking sheet with parchment paper for easy cleanup. After marinating, take each chicken tender and dip it first into the flour. Shake off any excess flour. Next, move it to the eggs, coating it completely. Finally, press it into the Panko breadcrumbs, ensuring it’s well covered. Arrange the breaded chicken tenders on the baking sheet in a single layer. Bake them in the oven for about 15-20 minutes. Keep an eye on them until they turn golden brown. The chicken should reach an internal temperature of 165°F (75°C) for safety. Serve the warm chicken tenders with the reserved honey mustard dipping sauce. Enjoy this easy and tasty meal! For the complete recipe, check out the Full Recipe section. To get that perfect crunch, use Panko breadcrumbs. They create a light, crispy texture. Panko has larger flakes than regular breadcrumbs, which helps them to crisp up better in the oven. When you coat the chicken, press the breadcrumbs onto the chicken firmly. This ensures the crumbs stick well and gives you that satisfying crunch. For the best flavor, marinate the chicken for at least 15 minutes. If you have more time, let it soak longer. This allows the chicken to absorb all that tasty honey mustard goodness. You can also add spices like cayenne pepper or paprika to the marinade for an extra kick. Feel free to mix in your favorite herbs too! Pair the chicken tenders with sides like crispy fries or a fresh salad. Veggies like carrot sticks or cucumber slices add a nice crunch. For a fun presentation, arrange the tenders on a platter. Garnish with fresh parsley for color. Serve with the reserved honey mustard dipping sauce on the side, and watch everyone enjoy! {{image_4}} To spice up your honey mustard chicken tenders, add hot sauce to the marinade. This gives a nice kick! You can use your favorite hot sauce or try a mix of sriracha and honey mustard. If you want more flavor, use seasoning blends like Cajun or chili powder. These will bring a new taste and make your dish exciting. Using an air fryer is a great way to cook chicken tenders. First, preheat your air fryer to 400°F (200°C). Place the breaded chicken tenders in a single layer in the basket. Cook them for about 8-10 minutes. Be sure to flip them halfway through. This method makes the tenders crispy with less oil. Keep an eye on them so they don’t overcook. If you need a gluten-free option, you can easily substitute the flour and breadcrumbs. Use almond flour or coconut flour in place of all-purpose flour. For the breadcrumbs, look for gluten-free Panko or crushed rice cereal. These choices will help keep the crunch while making the dish safe for those with gluten sensitivities. To keep your honey mustard chicken tenders fresh, store them in the fridge. Place them in an airtight container. This way, they stay juicy and tasty. They last about 3 to 4 days in the fridge. After that, they may lose flavor and texture. You can reheat the chicken tenders in two ways: the oven or the microwave. For the oven, set it to 375°F (190°C). Place the tenders on a baking sheet and heat for about 10 to 15 minutes. This keeps them crispy. If you use the microwave, heat them in short bursts of 30 seconds. Flip them to avoid sogginess. You can freeze both raw and cooked tenders. For raw tenders, place them in a freezer bag. Remove as much air as possible. They can last up to 3 months in the freezer. For cooked tenders, let them cool first. Then, store them in airtight containers or freezer bags. To thaw, move them to the fridge overnight. For quick thawing, use the microwave on the defrost setting. I suggest marinating chicken tenders for at least 15 minutes. This gives the meat time to soak up the flavors. If you have more time, marinating for an hour or more will make the taste even better. Just remember, the longer you marinate, the more flavor your chicken will have. Yes, you can use chicken breasts! Just cut them into strips about the same size as chicken tenders. This helps them cook evenly. You might need to adjust the cooking time. Chicken breasts may take a few extra minutes to cook through compared to tenders. Honey mustard chicken tenders pair well with many sides. Some popular choices are: - French fries - Coleslaw - Steamed broccoli - Mashed potatoes - A fresh garden salad These sides balance the sweet and tangy taste of the chicken. To check if chicken tenders are done, use a meat thermometer. The safe internal temperature for chicken is 165°F (75°C). When you hit this temperature, the chicken is safe to eat. The meat should also be golden brown and crispy on the outside. You now have a clear guide to make delicious honey mustard chicken tenders. Start with quality ingredients and follow the steps to marinate and bread your chicken. Remember to personalize flavors with spices and try our variations. Store extras properly for later use. A simple meal can impress anyone. Enjoy your cooking and share these tips to make tasty chicken tenders every time!

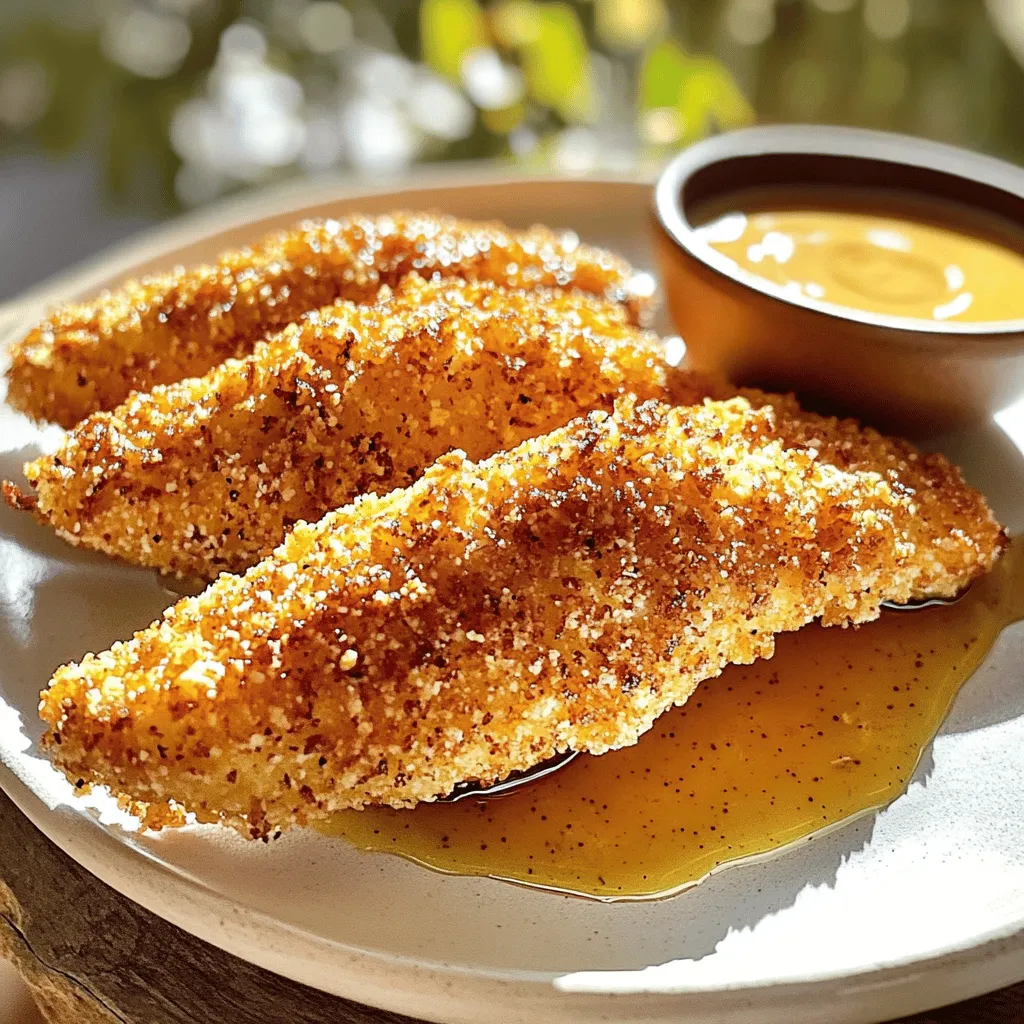
Honey Mustard Chicken Tenders Easy and Tasty Meal

If you’re craving a meal that’s both easy and delicious, look no further! Honey Mustard Chicken Tenders are the perfect

- Jumbo pasta shells - Ground beef - Ricotta cheese - Shredded mozzarella cheese - Grated Parmesan cheese - Egg - Marinara sauce - Garlic and spices For stuffed shells, you need specific ingredients to create a rich meal. Jumbo pasta shells are the base, holding all the goodness inside. Ground beef gives a hearty flavor. Ricotta cheese adds creaminess, while shredded mozzarella and Parmesan bring that melty goodness. An egg helps bind the filling. Marinara sauce adds moisture and flavor, and garlic and spices enhance the taste. - Vegetables, such as spinach or zucchini - Additional cheese varieties - Spices for enhanced flavor You can customize your stuffed shells. Adding spinach or zucchini makes it healthier and adds texture. You can also try different cheese like goat cheese or cheddar for a unique twist. If you want more flavor, add spices like red pepper flakes or Italian herbs. - Large pot for boiling pasta - Skillet for browning beef - Mixing bowl for filling - Baking dish To make these stuffed shells, you’ll need some tools. A large pot is essential for boiling the pasta. Use a skillet to brown the ground beef. A mixing bowl helps combine your filling. Finally, a baking dish is needed for baking your delicious creation to perfection. First, bring a large pot of water to a rolling boil and add salt. This helps flavor the pasta. Next, carefully add the jumbo pasta shells. Cook them according to the package instructions until they are al dente. After cooking, drain the shells in a colander. Let them cool on a wire rack to prevent sticking together. In a large skillet, set the heat to medium. Add the ground beef and cook it while stirring. You want the meat to be nicely browned and no longer pink. This should take about 6 to 8 minutes. Then, drain any excess fat from the skillet. This step is key for a leaner filling. In a large mixing bowl, combine the cooked ground beef with ricotta cheese, half of the shredded mozzarella cheese, grated Parmesan cheese, and one egg. Then add minced garlic, Italian seasoning, and a pinch of salt and pepper. Mix everything thoroughly. You want a creamy and well-combined filling. If it feels too dry, you can add a bit more ricotta. Preheat your oven to 375°F (190°C). Using a teaspoon or a piping bag, take a spoonful of the filling mixture. Gently stuff each cooked pasta shell. Fill them well, but be careful not to overstuff. This helps prevent the filling from spilling out during baking. In a 9x13 inch baking dish, spread a thin layer of marinara sauce on the bottom. This keeps the shells from sticking. Arrange the stuffed shells in the dish, open side up. Pour the remaining marinara sauce over the shells, ensuring each one is coated. Finally, sprinkle the rest of the shredded mozzarella cheese on top. Cover the dish with aluminum foil and bake it for 25 minutes. Then remove the foil and bake for an additional 10 to 15 minutes. Look for bubbly and golden cheese on top. Enjoy this rich and flavorful meal straight from the oven! For those looking for the complete recipe, you can check the Full Recipe. To make your stuffed shells even creamier, consider adding more ricotta cheese. Ricotta adds richness and smoothness. Mix in an extra half cup for a delightful texture. Choosing the right cheese is also key. Opt for a high-quality ricotta and fresh mozzarella. They melt well and create a lovely, creamy filling. You might even try blending in some cream cheese for extra richness. Covering your dish while baking is crucial. It helps steam the shells and keeps them moist. This will prevent drying out. After 25 minutes, remove the foil to let the cheese brown. For perfect baking times, check your shells. They need about 25 minutes covered and another 10-15 minutes uncovered. Keep an eye on the cheese. It should bubble and turn golden. Pairing sides can enhance your meal. A simple green salad works well with stuffed shells. Garlic bread also makes a great side, adding crunch and flavor. For presentation, place the stuffed shells on a large platter. Drizzle some marinara sauce on top and sprinkle fresh basil. This will make your dish look even more appetizing. For the complete recipe, check out the [Full Recipe]. {{image_4}} You can make a tasty vegetarian version of stuffed shells. Swap the ground beef for lentils or mushrooms. Lentils give a nice texture and flavor. Mushrooms add a rich, earthy taste. You can also use leafy greens like spinach or kale. This adds color and nutrition. Mix the greens into your filling for a fresh twist. If you want to change things up, try turkey or chicken. Both meats have less fat than beef. You may need to adjust the flavors with more spices or herbs. A bit of smoked paprika can add depth. Switching meats can give you a whole new dish while keeping it delicious. Don't just stick to one type of marinara sauce. Explore different flavors! You can try roasted garlic or spicy arrabbiata. Homemade sauce is easy too. Just cook tomatoes, garlic, and herbs in a pot. This allows you to control the taste. Try different sauces to find your favorite blend. Your stuffed shells will be even better with a new sauce! For the full recipe, check out Stuffed Shells Delight with Ground Beef. After you enjoy your stuffed shells, store leftovers in the fridge. Place them in an airtight container. This keeps them fresh for up to three days. If you want to save some for later, freezing is a great option. Arrange the stuffed shells in a single layer on a baking sheet. Freeze them until solid, then transfer to a freezer-safe bag. This helps to prevent them from sticking together. To reheat your stuffed shells, use the oven for the best results. Preheat it to 350°F (175°C). Place the shells in a baking dish and cover them with foil. This keeps moisture in, so they do not dry out. Heat for about 20 minutes or until warmed through. If you prefer the microwave, place a shell on a plate and cover it with a damp paper towel. Heat in short bursts until hot, but this may not keep them as moist. Stuffed shells last about three days in the fridge if stored properly. Just be sure to check for any signs of spoilage before eating. For frozen stuffed shells, they can last up to three months. Just remember to label your bags with the date. When ready to eat, thaw them in the fridge overnight before baking. This ensures they heat evenly. For detailed steps, refer to the Full Recipe. Baking stuffed shells takes about 35 to 40 minutes. Preheat your oven to 375°F (190°C). Cover the dish with foil and bake for 25 minutes. Then, remove the foil and bake for an extra 10 to 15 minutes. You want the cheese to bubble and turn golden brown. Yes, you can prepare stuffed shells ahead of time. Assemble the shells and place them in the baking dish. Cover the dish tightly with plastic wrap or foil. Store them in the fridge for up to 24 hours. When ready to bake, just add a few extra minutes to the baking time. If you need a ricotta substitute, you have options. Here are some ideas: - Cottage cheese: Blend it for a smoother texture. - Cream cheese: Mix with a bit of milk for creaminess. - Greek yogurt: Use plain for a tangy flavor. - Silken tofu: Blend for a dairy-free option. Yes, stuffed shells can be frozen. After assembling, cover the dish tightly with foil. Freeze them for up to three months. Thaw in the fridge overnight before baking. You can bake them straight from frozen, but add about 10 to 15 minutes to the total baking time. In this post, we explored how to make delicious stuffed shells. We covered ingredients, cooking steps, and tips for perfect results. You can customize your dish and make it your own. Remember, you can swap meats, use different sauces, or add vegetables. Storing and reheating are essential for maintaining taste. With these steps, you’ll enjoy a hearty meal any time. Try this dish, and impress your friends and family with your cooking skills. Enjoy every bite!

Stuffed Shells with Ground Beef Rich and Flavorful Meal

Are you ready to impress your family with a delicious dinner? Stuffed Shells with Ground Beef are rich, creamy, and

- 1 lb shrimp, peeled and deveined - 1/2 lb smoked sausage, sliced into rounds - 1 cup long grain rice - 1 medium onion, finely chopped - 1 green bell pepper, diced - 2 celery stalks, diced - 3 cloves garlic, minced - 1 can (14.5 oz) diced tomatoes with green chilies - 4 cups chicken broth - 2 tablespoons Cajun seasoning - 1 teaspoon dried thyme - 1 teaspoon paprika - 1 bay leaf - 2 tablespoons olive oil - Salt and black pepper, to taste - Fresh parsley, chopped (for garnish) Fresh shrimp gives the best flavor and texture. I always choose shrimp that’s bright pink and firm. Frozen shrimp works too, but thaw it safely in the fridge overnight. For sausage, I prefer smoked or Cajun sausage. Both add great depth to the dish. Cajun seasoning is a key flavor in jambalaya. It usually blends paprika, cayenne, garlic powder, and herbs. This adds a nice kick to your meal. Dried thyme and paprika enhance the taste too. If you don’t have Cajun seasoning, you can mix your own or use a store-bought blend. Use a Dutch oven or a large pot for even cooking. A good knife and a cutting board are key for prep. Measuring cups help keep your ingredients right. Always wash your hands after handling raw shrimp. This keeps your kitchen safe and clean. First, gather all your ingredients. Chop the onion, bell pepper, and celery. Measure out the rice and spices. This step helps you cook faster. Keep your workspace clean to avoid mess. When handling raw shrimp, wash your hands. Use a separate cutting board for the shrimp. This will prevent cross-contamination. Heat olive oil in a large pot over medium heat. Add the sliced sausage and cook for about five minutes. The sausage should turn golden brown. Remove the sausage and set it aside. Next, add the chopped vegetables to the pot. Sauté them for 5-7 minutes until the onion is soft. Now, stir in the rice. Toasting it for two minutes adds flavor. Add diced tomatoes, chicken broth, and seasonings. Bring everything to a boil, then cover and reduce heat. Let it simmer for 20-25 minutes. You’ll know it’s done when the rice absorbs most of the liquid. Now, add the shrimp. Fold them gently into the pot. Cover again and cook for another 5-7 minutes. The shrimp should turn pink and opaque. This means they are perfectly cooked. Once the shrimp are ready, remove the bay leaf. Taste your jambalaya and adjust the salt and pepper. Stir in fresh parsley for color. For serving, use deep bowls. Top with extra parsley and a sprinkle of Cajun seasoning. This adds a nice visual touch and flavor. For the full recipe, check out the previous sections. - For a great jambalaya, make sure your rice is not too wet. - Use long-grain rice for a light, fluffy texture. - Rinse the rice before cooking to remove excess starch. - Avoid mushy rice by not stirring too much during cooking. - Cook shrimp until they turn pink; this takes about 5 minutes. - If you like spice, add cayenne pepper to the sausage mix. - For milder jambalaya, use less Cajun seasoning or omit it. - Fresh shrimp have the best taste, so buy them from local markets. - Look for shrimp that smell sweet, not fishy. - Quality sausage adds great flavor; choose smoked or Andouille sausage. - Visit farmers' markets for fresh produce like bell peppers and onions. - Supermarkets can have good options, but local shops often have better quality. - Marinate shrimp in lemon juice and garlic for 15 minutes before cooking. - Add bell peppers, okra, or corn for extra flavor and texture. - Homemade chicken broth gives a richer taste than store-bought. - Try using beer instead of broth for a unique twist. - Adjust the cooking time based on any added vegetables or meats. For the full recipe, check out the Spicy Shrimp & Sausage Jambalaya section. {{image_4}} You can swap shrimp for many other proteins. Chicken works great in jambalaya. Just cut it into bite-sized pieces. Cook it longer than shrimp, about 10-15 minutes, until it is no longer pink. If you prefer a meatless dish, tofu is a tasty option. Use firm tofu and cube it. Sauté it for a few minutes before adding it to the jambalaya. For seafood lovers, try scallops or crab for a fun twist. Just remember to adjust the cooking time to avoid overcooking. Want more heat? You can add cayenne pepper or a splash of hot sauce. Mix in extra spices, too, like crushed red pepper flakes. For a fresh taste, add herbs like basil or oregano. Swap out the Cajun seasoning if you want a different flavor profile. You can use Creole seasoning or even a mix of paprika and garlic powder. Each region has its own spin on jambalaya, so feel free to experiment! Making jambalaya gluten-free is simple. Just choose gluten-free sausage or skip it altogether. For a vegan version, use vegetable broth and omit any meat. Replace shrimp with extra veggies or tofu. You can also make low-calorie jambalaya by using less oil and more veggies. Cut down on sausage and shrimp portions, too. This keeps the dish flavorful but light! Storing leftover jambalaya is easy. First, let it cool to room temperature. Then, place it in an airtight container. This keeps it fresh. You can store it in the fridge for up to three days. If it smells sour or looks off, it’s best to toss it. When reheating, use the stove or microwave. Add a splash of broth to keep it moist. To freeze jambalaya, portion it into smaller containers. Make sure they are freezer-safe. You can freeze it for up to three months. When ready to eat, take a portion out and let it thaw in the fridge overnight. For quick reheating, use the microwave or stovetop. Remember, shrimp can become rubbery if frozen too long, so enjoy sooner rather than later. Batch cooking jambalaya is a smart move. Make a large pot and divide it into portions. Store them in the fridge or freezer. This way, you have meals ready to go. Pair jambalaya with a simple salad or crusty bread for a complete meal. Fresh herbs or a squeeze of lemon can brighten the dish. This adds flavor and makes it feel fresh. What is the difference between jambalaya and gumbo? Jambalaya is a rice dish that is cooked all together. Gumbo is a soup that serves over rice. Both are flavorful but differ in texture and cooking method. Can I make jambalaya in a slow cooker? Yes, you can! Just brown the sausage and sauté the veggies first. Then, add everything to the slow cooker with the rice. Cook on low for about 4 hours. What side dishes pair well with jambalaya? Some great sides include cornbread, a simple green salad, or coleslaw. These add a nice contrast to the spicy jambalaya. Can I omit the sausage for a lighter dish? Absolutely! You can skip the sausage. Use extra shrimp or add more veggies for flavor. What is the origin of jambalaya? Jambalaya comes from Louisiana, influenced by Spanish and French cooking. It is a dish that reflects the region’s rich culture and flavors. How spicy is the dish typically? The spice level can vary. With Cajun seasoning, it has a good kick. You can adjust spices to your taste. How can I make jambalaya less spicy? Try using mild sausage and less Cajun seasoning. You can also add a little sugar to balance the heat. Can I use brown rice instead of white rice? Yes, but brown rice takes longer to cook. Increase the liquid and cooking time for best results. What are some good topping suggestions? Chopped green onions, fresh parsley, or a squeeze of lemon work great. They add freshness and flavor to each bowl. For the complete recipe of Spicy Shrimp & Sausage Jambalaya, check the [Full Recipe]. Spicy Shrimp & Sausage Jambalaya is a flavorful dish that you can easily master. Fresh ingredients and proper cooking techniques are key. Remember to choose your spices wisely and keep safety in mind. You can customize this dish to fit your taste and dietary needs. Store leftovers well for later enjoyment. With a little practice, you will create an unforgettable jambalaya. Now, it’s time to get cooking and enjoy a taste of Louisiana at home!

Savory Spicy Shrimp & Sausage Jambalaya Recipe

If you’re craving a dish that warms the soul and excites your taste buds, look no further than my Savory

- 1 lb ground beef - 1 lb ground turkey - 1 large onion, finely chopped - 2 cloves garlic, minced - 1 cup breadcrumbs - 1/2 cup grated Parmesan cheese - 1/4 cup fresh parsley, finely chopped - 2 large eggs - 1 cup beef broth - 1 tablespoon Worcestershire sauce - 1 teaspoon dried thyme - 1 teaspoon salt - 1/2 teaspoon black pepper - 1 cup French onion dip (for topping) - Sliced green onions for garnish Using the right ingredients is key to a great meatloaf. I enjoy using both ground beef and turkey for a lovely texture and flavor. The beef adds richness, while the turkey keeps it light. Onions and garlic bring a sweet and savory touch. Sautéing them until soft makes all the difference. If you want a burst of freshness, add chopped parsley. It brightens the dish. Breadcrumbs help bind the meatloaf. They keep it moist and hold everything together. For extra creaminess, I like to mix in grated Parmesan cheese. It adds a nice depth of flavor. The beef broth and Worcestershire sauce give body and a savory kick. Dried thyme, salt, and pepper round out the seasoning. Don't forget the French onion dip on top; it’s a creamy delight that enhances the flavor. When you gather these ingredients, you'll set yourself up for a delicious meal. Check out the Full Recipe for detailed steps on how to put it all together! - Preheat oven to 350°F (175°C). - Lightly grease the loaf pan. - Cook chopped onion until golden brown. - Add minced garlic near the end. In a large skillet, heat a little oil over medium heat. Add the chopped onion and cook it until it turns golden and soft. This should take about 10 minutes. Stir in the garlic for the last minute of cooking. This makes the flavor pop! - Mix all main and additional ingredients in a bowl. - Fold in the sautéed onion and garlic. In a big bowl, combine the ground beef, ground turkey, breadcrumbs, and the rest of the ingredients. Mix them well until they are evenly spread. Be careful not to overwork the meat. Now, gently fold in the cooked onion and garlic. This adds a nice depth to the meatloaf. - Form mixture into a loaf shape. - Spread French onion dip on top. - Bake until internal temperature reaches 160°F. Shape the mixture into a loaf and place it in the greased pan. Spread the French onion dip on top to give it a rich flavor. Bake it in the oven for about one hour. Use a meat thermometer to check that the inside reaches 160°F. This ensures it's safe to eat. Once it's done, let it cool for 10 minutes before slicing. Enjoy your Savory French Onion Meatloaf! For the complete details, check the Full Recipe. To keep your meatloaf tender, avoid overmixing the meat. Overmixing makes it tough. Mix just enough to get everything combined. Gently fold in the onions and garlic. Your meatloaf will turn out soft and juicy. Adding herbs can take your meatloaf to the next level. Consider using rosemary or basil to boost the taste. Each herb brings its own flavor. You can also try different types of cheese. A sharp cheddar or creamy mozzarella can change the dish entirely. Feel free to get creative and mix flavors. This meatloaf shines when served with mashed potatoes or a fresh salad. The creamy potatoes balance the flavors. A crisp salad adds a nice crunch. Don’t forget garnishes! Sliced green onions on top make it look great and add flavor. For an extra touch, drizzle some French onion dip around the plate. It adds color and taste to your meal. For more on crafting this delicious dish, check out the Full Recipe. {{image_4}} You can switch the ground beef or turkey for chicken or pork. Each meat brings its own flavor. Chicken adds a light taste, while pork gives a richer one. This swap keeps the meatloaf juicy and delicious. If you use chicken, try adding some extra spices for more flavor. For pork, consider using a bit of apple or sage for a sweet twist. If you want a meatless option, use lentils or chickpeas instead of meat. Both lentils and chickpeas are rich in protein and fiber. They also take on flavors well. Mash them slightly before adding to the mix to help bind everything together. This choice makes the dish healthy and hearty. Plus, you can sneak in extra veggies for more taste and texture. You can also change the topping from French onion dip. Try sour cream or cream cheese instead. Both options add a creamy texture and rich flavor. Sour cream gives a slight tang, while cream cheese adds smoothness. You could mix herbs or spices into the topping for an extra kick. This little change can make your meatloaf stand out even more. For the full recipe, check out the link above! Store your leftover meatloaf in an airtight container. It will stay fresh for up to 3 days. Make sure to let it cool before sealing it. This helps keep the moisture in, so it stays tasty. If you want to save meatloaf for later, you can freeze it. Wrap it tightly in plastic wrap or foil. Then, place it in a freezer-safe bag. It will keep well for up to 3 months. This way, you can enjoy it even when you are short on time. To reheat your meatloaf, use the oven or microwave. If using the oven, preheat it to 350°F (175°C). Place the meatloaf in a dish and cover it with foil. This helps keep it moist. In the microwave, add a splash of broth or water to keep it from drying out. Heat in short bursts, checking often. Enjoy your warm, savory meatloaf again! To keep your meatloaf moist, you can follow a few simple tips: - Add moisture-rich ingredients: Include beef broth and eggs in your mix. - Avoid overmixing: Mix just enough to combine ingredients. Overworking leads to dryness. - Let it rest: After baking, let your meatloaf sit for 10 minutes. This helps juices redistribute. These steps will help you achieve a juicy and flavorful meatloaf every time. Pair your French onion meatloaf with tasty sides. Some great options include: - Creamy mashed potatoes: Their smooth texture complements the meatloaf well. - Crisp green salad: Add freshness and crunch to your meal. - Roasted vegetables: Carrots or green beans add color and nutrients. These sides enhance the meal and create a balanced plate. Yes, you can cook meatloaf in a slow cooker! Here’s how: - Shape your meatloaf: Form it just like you would for the oven. - Place in the slow cooker: Use a lightly greased liner for easy cleanup. - Cook on low: Let it cook for 6-8 hours or until the internal temp reaches 160°F. Using a slow cooker makes it easy and keeps your meatloaf moist. You can find the full recipe in the article to guide you through all the steps! This blog post shared a simple meatloaf recipe and useful tips. You learned about key ingredients, step-by-step cooking methods, and variations to try. Cooking meatloaf can be fun and flexible, fitting your taste. Remember to keep your meatloaf moist and experiment with toppings. Enjoy your next meal with this hearty dish!

Savory French Onion Meatloaf with Simple Tips

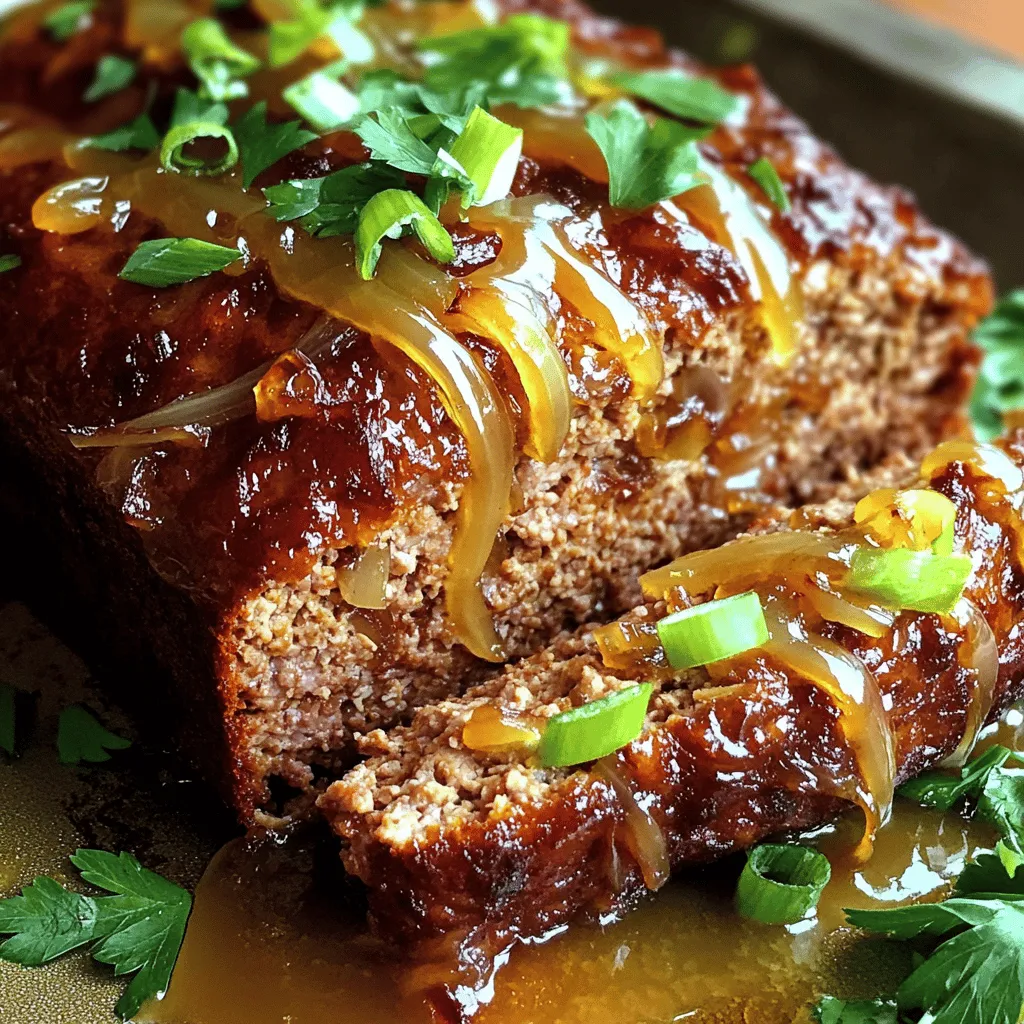
Craving comfort food? Try my Savory French Onion Meatloaf! This dish combines juicy beef and turkey with rich onions, making

When making Linguini with Clam Sauce, you need quality ingredients for the best taste. Here’s what you’ll need: - 12 oz linguini pasta - 2 cans (6.5 oz each) chopped clams, packed in juice - 3 tablespoons extra virgin olive oil - 3 cloves garlic, finely minced - 1 small onion, diced - 1 teaspoon red pepper flakes - Zest of 1 lemon - 2 tablespoons fresh lemon juice - 1/4 cup fresh parsley, finely chopped - Salt and freshly ground black pepper, to taste - Grated Parmesan cheese, for serving These ingredients blend together to create a delightful dish. The clams give the sauce a rich, briny flavor. The garlic adds warmth, while the lemon brings brightness. You can adjust the red pepper flakes to match your spice level. Fresh parsley not only adds color but also freshness. This recipe is simple yet elegant, making it a great choice for any occasion. For cooking instructions, check the full recipe. Enjoy crafting this dish! Bring a large pot of salted water to a rolling boil. Add the linguini and cook it according to the package instructions, usually about 8 to 10 minutes. Make sure to reserve 1 cup of the starchy pasta water before draining. This water helps thicken the sauce later. After cooking, drain the linguini and set it aside. In a spacious skillet, heat 3 tablespoons of olive oil over medium heat. Once the oil shimmers, add 1 small diced onion. Sauté this for about 3 to 4 minutes until it becomes soft and clear. Next, add 3 minced garlic cloves and 1 teaspoon of red pepper flakes. Stir for about a minute, making sure the garlic does not brown. Now, carefully pour in the 2 cans of chopped clams with their juice. Increase the heat slightly and let it simmer for about 5 minutes. This allows all the flavors to blend well together. Once the clam sauce simmers, add the zest of 1 lemon and 2 tablespoons of fresh lemon juice. Mix it in well. If the sauce seems too thick, gradually add some reserved pasta water until you reach the consistency you like. Now, gently fold the cooked linguini into the skillet. Toss it well so every strand is coated in the savory clam sauce. Finally, season with salt and freshly ground black pepper to taste. Enjoy your Linguini with Clam Sauce Delightful Simple Recipe! For the complete details, check the Full Recipe. - Avoid overcooking garlic. If it burns, it tastes bitter. - Spice it up! Use red pepper flakes to adjust heat to your taste. When cooking garlic, keep an eye on it. Garlic cooks fast, so stir it often. If you let it turn dark, the flavor goes wrong. For spice lovers, red pepper flakes are great. Start with a little, then add more if you like heat. You control how spicy your dish gets! - Garnish your dish with fresh parsley and grated Parmesan. - Serve with lemon wedges for a zesty kick. A beautiful plate makes the meal even better. Add a sprig of parsley on top for color. A sprinkle of grated Parmesan adds creaminess and flavor. Lemon wedges on the side let everyone add a bright flavor. A quick squeeze can change the whole dish! Enjoy this tasty linguini, and make it look as good as it tastes. {{image_4}} You can switch out the linguini pasta for other types. Spaghetti or fettuccine work great too. If you want a gluten-free option, try using rice noodles. They soak up the sauce nicely. For clams, you have options too. If you can't find canned clams, try using fresh clams. Just steam them until they open. You can also add shrimp or scallops for more seafood flavor. Just make sure to cook them until they are opaque. Adding white wine can boost the sauce's flavor. Use a dry white wine like Pinot Grigio. Pour it in after sautéing the onions and garlic. Let it simmer a bit to cook off the alcohol and mix in the flavors. You can also add vegetables to your dish. Spinach adds a nice pop of color and nutrition. Just toss it in the sauce until it wilts. Cherry tomatoes can add a sweet touch too. Halve them and stir them in just before serving. These tweaks make your dish special. You can create your own version of linguini with clam sauce. You can find the full recipe [here](#). Enjoy experimenting! To keep your linguini with clam sauce fresh, follow these steps: - Cool Before Storing: Let the dish cool down to room temperature first. - Use Airtight Containers: Store leftovers in airtight containers to keep air out. - Refrigeration: Leftovers can last up to 3 days in the fridge. - Freezing: If you want to save it longer, you can freeze it for up to 2 months. Reheating is easy if you follow these methods: - Stovetop: Heat the pasta and sauce over low heat. Add a splash of water or broth to keep it moist. - Microwave: Place the leftovers in a microwave-safe bowl. Cover with a damp paper towel to trap steam. Heat in short bursts, stirring in between. - Sauce Consistency: If the sauce thickens too much, add a little reserved pasta water or broth while reheating. This will help restore its creamy texture. You can serve many great side dishes with linguini and clam sauce. Here are some ideas: - A simple green salad with mixed greens and a light vinaigrette. - Garlic bread or crusty bread for dipping. - Roasted vegetables like asparagus or zucchini. - A side of sautéed spinach with garlic for added flavor. - A fresh tomato salad with basil and mozzarella. These sides brighten your meal and balance the flavors. Yes, you can prep this dish in advance. Here are some tips to help: - Cook the linguini and store it in an airtight container in the fridge, but don’t toss it with the sauce yet. - Prepare the clam sauce ahead of time and cool it before storing it. - When ready to serve, reheat the sauce over low heat, then mix in the cooked pasta. - Add fresh parsley and lemon juice right before serving for the best flavor. This way, you save time when you’re ready to eat! You can tell clams are cooked by looking for these signs: - They should open fully during cooking. This means they are safe to eat. - If some clams stay closed, discard them. They are not good. - Cook them for about 5 minutes in the sauce for best results. Enjoy your meal while knowing your clams are just right! You now know the key steps to make a tasty linguini with clam sauce. Start with fresh, quality ingredients and follow the simple cooking process. Adjust flavors to your liking and make it your own with variations. Proper storage and reheating tips will help you enjoy leftovers. Trust me, this dish is not just easy; it’s delicious and satisfying. You can impress your family and friends with this meal that packs flavor and joy. Enjoy every bite and happy cooking!

Linguini with Clam Sauce Delightful Simple Recipe

Looking for a quick and tasty dinner idea? My Linguini with Clam Sauce recipe is both simple and satisfying. With

- 200g fettuccine pasta - 150g shrimp, peeled and deveined - 150g scallops - 1 cup heavy cream - 1 tablespoon olive oil - 2 cloves garlic, minced - 1/2 teaspoon red pepper flakes - 1/2 cup cherry tomatoes, halved - 1/4 cup fresh parsley, chopped - 1/2 teaspoon lemon zest - Salt and pepper to taste - Grated Parmesan cheese for garnish The main ingredients create a rich and creamy dish. Fettuccine blends well with the seafood. Shrimp and scallops provide a sweet and delicate taste. The heavy cream makes the sauce smooth and luscious. Garlic adds aroma, while red pepper flakes give a gentle heat. - 1/2 cup white wine - 1 teaspoon Italian seasoning - 1/4 cup green peas These optional ingredients can elevate your dish. White wine adds depth and brightness. Italian seasoning brings a mix of herbs. Green peas add sweetness and color. - Extra parsley for freshness - Lemon wedges for a citrus kick - Crushed red pepper flakes for heat Garnishes make the dish visually appealing. Fresh parsley brightens the plate. Lemon wedges add a zesty touch. Crushed red pepper flakes let diners adjust the heat. For a full recipe, you can refer to the Ocean Delight Creamy Seafood Pasta. Start by boiling water in a large pot. Add a generous amount of salt to the water. Once it boils, add 200g of fettuccine pasta. Cook it for about 8-10 minutes. You want it to be al dente, which means it should have a slight bite. After cooking, drain the pasta. Save 1/2 cup of the pasta water for later use. Grab a large skillet and heat 1 tablespoon of olive oil over medium heat. Add 2 cloves of minced garlic and 1/2 teaspoon of red pepper flakes. Sauté these for about 30 seconds until fragrant. Next, add 150g of shrimp and 150g of scallops to the skillet. Cook them for 2-3 minutes on each side. The shrimp should turn pink, and the scallops should look golden. Once done, take them out and set them on a plate to keep warm. In the same skillet, pour in 1 cup of heavy cream. Bring it to a gentle simmer. Stir in 1/2 teaspoon of lemon zest. Let the sauce cook for 2-3 minutes while stirring. You want it to thicken a bit, enough to coat the back of a spoon. Now, add the cooked fettuccine, sautéed shrimp, scallops, and 1/2 cup of halved cherry tomatoes to the creamy sauce. Toss everything gently. If the sauce is too thick, add the reserved pasta water a little at a time until it reaches your desired creaminess. Taste your pasta. Season it with salt and pepper to your liking. Remove the skillet from the heat. Sprinkle fresh chopped parsley on top for a pop of color. Serve the creamy seafood pasta in bowls. For extra flavor, add grated Parmesan cheese on each serving. Enjoy your meal! For the full recipe, check the earlier section. To cook seafood well, freshness is key. Always buy seafood that smells like the ocean. When cooking shrimp, look for a bright pink color. For scallops, a golden crust shows they are ready. Avoid overcrowding the pan, as this can lead to steaming instead of searing. Cook shrimp for 2-3 minutes per side. Scallops need about the same time. Use a hot skillet with oil to get a great sear. To make a creamy sauce, use heavy cream. Start with a gentle simmer. Stir in lemon zest for brightness. If the sauce is too thick, add some reserved pasta water. This helps thin it out while keeping flavor. Mix everything carefully to coat the pasta and seafood. The right creaminess makes each bite rich and satisfying. Store leftovers in an airtight container. Keep them in the fridge for up to 2 days. Reheat gently on the stove over low heat. Add a splash of water or cream to restore the sauce. Avoid the microwave if you want to keep the cream nice. Enjoy your creamy seafood pasta again with these tips. For the full recipe, check out the details included earlier. {{image_4}} You can use many types of seafood for this dish. Shrimp and scallops are great, but don’t stop there! You can also try: - Crab meat - Mussels - Clams - Lobster Using a mix of seafood adds flavor and texture. Each kind brings its unique taste. If you want a vegetarian option, skip the seafood. Instead, use: - Grilled zucchini - Sliced mushrooms - Fresh spinach - Artichoke hearts These ingredients add depth and flavor. You can also add plant-based cream for richness. Adjusting the spice level is easy! If you like it mild, use less red pepper flakes. For more heat, add: - Fresh chopped chili - Cayenne pepper - A dash of hot sauce Start with a little, taste, and add more if needed. Balancing flavors makes this dish even better! To store leftover creamy seafood pasta, place it in an airtight container. Make sure to cool the pasta to room temperature first. This helps keep the sauce creamy and fresh. Store the container in the fridge for up to three days. If you think you won't eat it soon, consider freezing it. When you’re ready to eat your leftovers, reheat them carefully. Use a skillet over low heat to warm the pasta gently. Add a splash of water or cream to help bring back the sauce's creaminess. Stir often to prevent sticking. You can also microwave it in short bursts, stirring in between, to keep it moist. If you decide to freeze your creamy seafood pasta, portion it out into smaller containers. This makes it easier to thaw only what you need. Wrap the containers tightly to prevent freezer burn. When you want to eat it, move the container to the fridge the night before. Let it thaw slowly. Then, reheat it on the stove or in the microwave as mentioned before. I recommend using fettuccine for creamy seafood pasta. Its flat shape holds sauce well. You can also try linguine or tagliatelle for a similar effect. Each pasta type adds a unique texture to the dish. Yes, you can use frozen seafood. Just thaw it before cooking. This makes it easy to prepare. Frozen shrimp or scallops work well in this dish. Make sure to pat them dry to avoid excess moisture in your sauce. To make it healthier, try these tips: - Use whole wheat pasta for added fiber. - Swap heavy cream for a lighter option, like Greek yogurt. - Add more vegetables, such as spinach or bell peppers. These changes keep the flavors without losing enjoyment. Yes, you can make the sauce dairy-free. Use coconut milk or almond milk instead of heavy cream. These alternatives add a nice creaminess. You can also add nutritional yeast for a cheesy flavor without dairy. This dish goes well with several side items: - A fresh green salad adds crunch and balance. - Garlic bread is great for soaking up sauce. - Steamed vegetables bring color and nutrients. These sides enhance your meal while keeping it light. For the full recipe, check out the Ocean Delight Creamy Seafood Pasta . In this post, we covered the key ingredients for creamy seafood pasta. We discussed cooking tips, making a rich sauce, and serving it perfectly. I shared variations, such as vegetarian options, and storage tips for leftovers. Creating this dish is easy and rewarding. With these steps, you can impress anyone at your table. Dive into the kitchen and let your cooking skills shine! Enjoy your creamy seafood pasta, and have fun experimenting!

Creamy Seafood Pasta Savory and Quick Meal Recipe

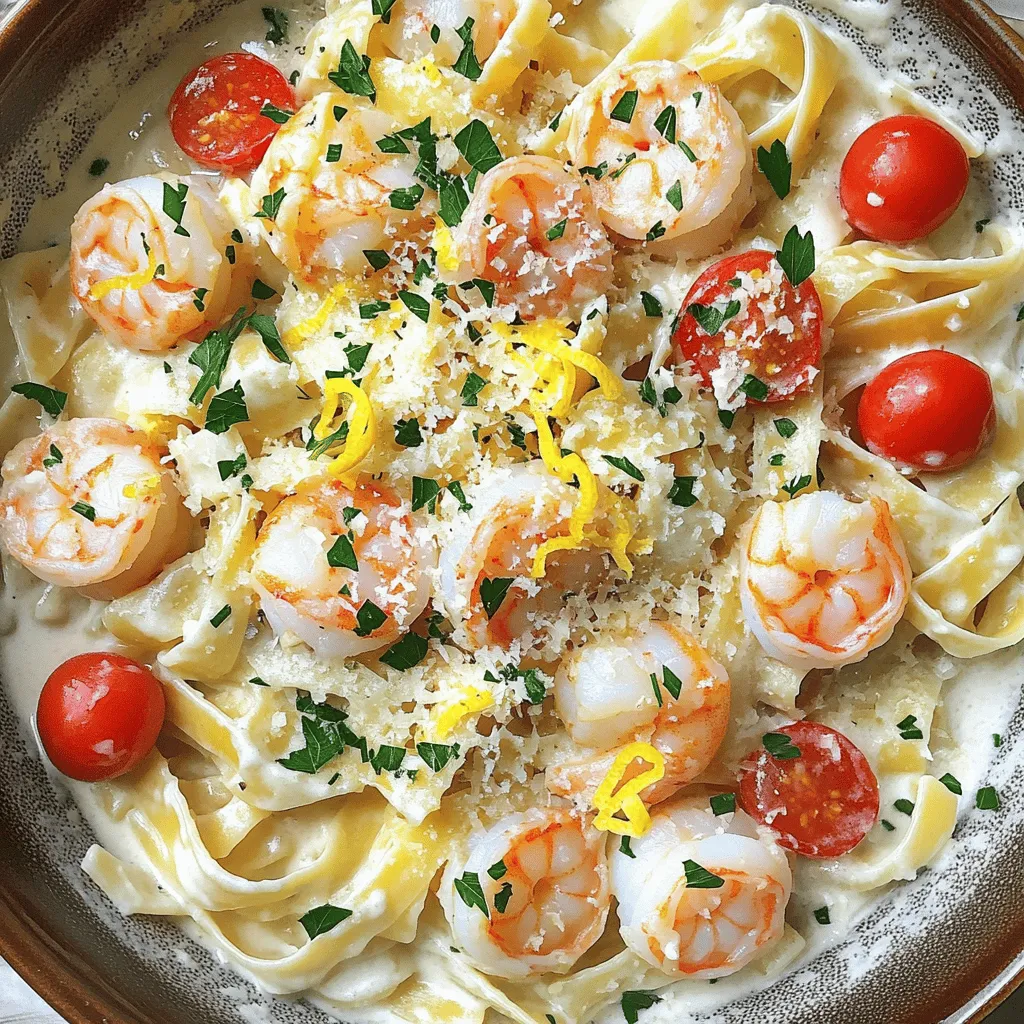
Looking for a quick and savory dinner? This Creamy Seafood Pasta recipe is perfect for you. In just a few

- 12 large sea scallops, cleaned and dried - 4 tablespoons unsalted butter, melted - 4 cloves garlic, minced - 1 tablespoon fresh parsley, chopped - 1 tablespoon lemon juice - Zest of 1 lemon - 1/2 teaspoon red pepper flakes (optional) - Salt and pepper to taste - Breadcrumbs (optional for topping) Gathering the right ingredients is key. Start with quality sea scallops. Choose 12 large ones. Make sure they are clean and dry. This helps them bake evenly. Next, melt 4 tablespoons of unsalted butter. This adds rich flavor. Mince 4 cloves of fresh garlic finely. You want that garlic to blend well. Chop 1 tablespoon of fresh parsley for a touch of color. Squeeze 1 tablespoon of lemon juice for brightness. Don't forget to zest 1 lemon too. The zest boosts the lemon flavor. If you like heat, add 1/2 teaspoon of red pepper flakes. Adjust salt and pepper to your taste. Breadcrumbs are optional. They add a nice crunchy topping. These ingredients create a lovely and savory dish. You can find the Full Recipe for detailed steps and tips. - Preheat oven to 375°F (190°C). - Prepare baking dish with light greasing. First, set your oven to preheat. This step ensures your scallops cook evenly. While the oven heats, grab your baking dish. A little grease on the bottom helps prevent sticking. - Combine melted butter, garlic, parsley, lemon juice, zest, and seasonings. - Whisk until smooth and combined. Next, melt the butter in a bowl. I like to use unsalted butter for better control of flavor. Add minced garlic, chopped parsley, lemon juice, and zest. You can add red pepper flakes if you want some heat. Whisk it all together until smooth. The smell will be amazing! - Dry scallops thoroughly. - Arrange in a single layer in the baking dish. - Drizzle garlic butter mixture over scallops. Now, take your scallops and dry them well with a towel. This step is key to getting that nice sear and texture. Lay the scallops in a single layer in your greased dish. Drizzle the garlic butter mixture generously over them. Every scallop deserves a good coat! - Optional: Sprinkle breadcrumbs on top. - Bake for 12-15 minutes until opaque. - Optional: Broil for 2-3 minutes for a golden finish. If you want a crunchy top, sprinkle some breadcrumbs over the scallops. Then, pop them in the oven for about 12 to 15 minutes. They are done when they look opaque and firm. For a golden finish, switch on the broiler for a few minutes. Just keep an eye on them; you don’t want to burn the top! Enjoy your Garlic Butter Baked Scallops, a dish that's simple yet full of flavor. For the full recipe, check the section above. To get the best flavor and texture, always dry your scallops before cooking. This step removes excess moisture. If scallops are wet, they won't brown properly. Use a paper towel to pat them dry thoroughly. When baking, look for signs of doneness. Scallops should turn opaque and feel firm. They usually take about 12-15 minutes at 375°F (190°C). You can add more flavor to your scallops. Fresh herbs like thyme or basil can elevate the dish. Spices such as paprika or dill also work well. Mix in a touch of Parmesan cheese for a rich taste. Experiment with different types of butter. Garlic herb butter or lemon butter can bring unique flavors. Garnishing makes your dish visually appealing. Fresh parsley or chives add a pop of color. Lemon wedges not only look great but add fresh zest when squeezed. Serve scallops on a bed of greens or with rice for a stunning plate. A sprinkle of paprika can add color and enhance the look. {{image_4}} You can make garlic butter baked scallops even more delicious by adding cheese. Try a sprinkle of Parmesan or Gruyère on top. This will bring a creamy texture and rich flavor. Another fun twist is to use different citrus juices. You can swap lemon juice for lime or orange juice. This change adds a bright taste to the dish. If you need a gluten-free option, use gluten-free breadcrumbs. They work just as well as regular ones. You can also skip the breadcrumbs if you want a lighter dish. For a dairy-free version, replace the butter with olive oil or a dairy-free spread. This keeps the dish tasty while meeting your dietary needs. To keep your garlic butter baked scallops fresh, store them properly. First, let the scallops cool to room temperature. Then, use these best practices: - Place the scallops in an airtight container. - If you have extra garlic butter, pour it over the scallops. - Store in the fridge for up to 2 days. Using glass or BPA-free plastic containers works best for storage. These materials help keep the scallops fresh and safe. Reheating scallops needs care to avoid overcooking them. Here’s how to do it right: - Use the oven: Preheat it to 350°F (175°C). Place scallops in a baking dish and cover with foil. Heat for about 10 minutes. - Use the microwave: Place scallops on a microwave-safe plate. Heat in short bursts of 30 seconds, checking often. For the best taste, enjoy leftovers as is, or add them to pasta or salads. This way, you can savor the flavors of garlic butter baked scallops again! Yes, you can use frozen scallops. First, thaw them safely. Place them in the fridge overnight or run them under cold water for about 30 minutes. After thawing, make sure to pat them dry with a paper towel. Drying helps them sear well and prevents excess water in your dish. Garlic Butter Baked Scallops go well with many sides. Here are some great options: - Creamy mashed potatoes - Lightly seasoned rice - Steamed asparagus - Fresh garden salad - Garlic bread for a crunchy contrast These sides balance the rich flavors of the scallops and create a full meal. Perfectly cooked scallops should look opaque and firm. They will feel slightly springy to the touch. If they are slightly translucent, they need more time. Always watch them closely to avoid overcooking, which can make them tough. For detailed instructions on making Garlic Butter Baked Scallops, check out the [Full Recipe]. This blog post covered everything you need to make delicious garlic butter baked scallops. We discussed the important ingredients, step-by-step instructions, tips for perfecting your dish, and various serving ideas. Now, you're ready to impress your guests or enjoy a tasty meal at home. Remember, the key is in the details. Follow these steps, and your scallops will turn out amazing. Enjoy your cooking adventure!

Garlic Butter Baked Scallops Savory and Simple Dish

If you’re craving a dish that’s both savory and simple, Garlic Butter Baked Scallops are perfect for you! This dish

- Sweet potatoes - Andouille sausage - Vegetables (onion, red bell pepper, garlic) - Spices (smoked paprika, cayenne pepper, salt, pepper) - Olive oil - Garnish (fresh parsley) Choosing fresh ingredients makes a big difference. Look for sweet potatoes that feel heavy and firm. They should have smooth skin. Avoid any with dark spots or wrinkles. For the Andouille sausage, check the label for quality. A good sausage should have a spicy, smoky smell. Spice tolerance varies by person. Adjust the cayenne pepper to fit your taste. If you like it mild, start with less. You can always add more later. Always use fresh spices if possible, as they give the best flavor. Using high-quality olive oil enhances the dish's richness. Look for extra virgin olive oil for a deeper taste. Fresh parsley adds a nice touch at the end. It makes the dish look great and adds a fresh flavor. For the full recipe, check out the details above. - Start by peeling the sweet potatoes. Use a sharp peeler for ease. - Cut the sweet potatoes into ½-inch dice. Keep them uniform for even cooking. - Slice the Andouille sausage into rounds. This helps it brown nicely. - Chop the onion and red bell pepper. Mince the garlic as well. - Heat a large skillet over medium heat. Add olive oil and let it shimmer. - Toss in the diced sweet potatoes. Sauté them for about 10 minutes. Stir often until they turn golden. - Once the sweet potatoes soften, push them to one side. Add the sliced sausage to the other side. Cook for 5-7 minutes until browned. - Mix in the chopped onion, bell pepper, and garlic. Stir well to combine everything evenly. - Sprinkle smoked paprika and cayenne pepper over the mix. Stir thoroughly for even flavor. - Cook for another 5-7 minutes. Make sure all veggies are tender and heated. - Season with salt and pepper to taste. Toss everything to ensure even seasoning. - Remove from heat and let it sit for a minute. This step helps the flavors meld beautifully. For the full recipe, check the earlier section. Enjoy your cooking! For perfect sweet potatoes, cut them into even ½-inch dice. This way, they cook evenly. Sauté them in hot olive oil until they soften. Look for a light golden color. This shows they are ready. For the sausage, slice it thinly. This helps it brown nicely. Cook it separately in the skillet for about 5-7 minutes. Stir it gently to get all sides browned. Pair your dish with fresh greens or a simple salad. A light vinaigrette goes well. You can also serve it with bread to soak up juices. For drinks, a cold iced tea or lemonade works best. When you serve it, use a large platter. It looks great when you spread everything out. Garnish with fresh parsley for a pop of color. To save time, peel and dice sweet potatoes the night before. Keep them in water to prevent browning. You can also slice the sausage and chop veggies ahead of time. This cuts down on prep time. For meal prep, cook a double batch of this dish. Store leftovers in the fridge for easy lunches or dinners later. {{image_4}} You can easily swap out the Andouille sausage for other types. Try chicken sausage or turkey sausage for a lighter option. If you want a plant-based choice, use tempeh or mushrooms for added texture. You can also include different vegetables. Zucchini, carrots, or even kale can add great flavor and color. You can adjust the spice levels to fit your taste. If you like it mild, skip the cayenne pepper. Instead, try sweet paprika for a gentle flavor. On the other hand, if you crave heat, add more cayenne or even some chili powder. To boost flavor, mix in herbs like thyme or rosemary. Fresh herbs can bring a fresh twist to the dish. To make this dish vegan or vegetarian, simply omit the sausage. Add more veggies and some beans for protein. Black beans or chickpeas work great. For gluten-free options, this recipe is already gluten-free. Just check the sausage label to ensure it meets your needs. Enjoy the dish without worrying about gluten! To keep your sweet potatoes and Andouille sausage dish fresh, store leftovers in an airtight container. This will help keep out moisture and odors. Place the container in the fridge. This dish lasts about 3-4 days in the refrigerator. Always check for any signs of spoilage before eating. You can reheat this dish in several ways: - Microwave: Place a serving in a microwave-safe dish. Cover it with a microwave-safe lid or wrap. Heat for 1-2 minutes, stirring halfway through. This method keeps the flavors intact. - Stovetop: Heat a skillet over medium heat. Add a splash of olive oil to prevent sticking. Add the leftover dish and stir occasionally until warmed through. This method helps maintain texture better than the microwave. If you want to save some for later, you can freeze this dish. Here are some tips: - Tips for freezing: Allow the dish to cool completely first. Then, transfer it to a freezer-safe container or bag. Make sure to remove as much air as possible to prevent freezer burn. Label the container with the date before freezing. - Thawing and reheating frozen portions: To enjoy later, take the container out of the freezer. Thaw it in the fridge overnight or use the microwave on the defrost setting. Reheat using one of the methods above to restore the great taste of the dish. For the full recipe, check out the details above. How do I know when sweet potatoes are cooked properly? You can tell sweet potatoes are cooked when they are soft and tender. A fork should slide in easily. This usually takes about 15 minutes of cooking. Keep an eye on them to avoid overcooking. Can I make this dish ahead of time? Yes, you can make this dish ahead of time. Cook it fully and let it cool. Store it in the fridge for up to three days. Reheat it gently on the stove before serving. This enhances the flavors too. What is Andouille sausage and how is it different from other sausages? Andouille sausage is a smoked sausage made from pork. It has a spicy and smoky flavor. This sausage is key to Cajun and Creole dishes. Unlike other sausages, it has a coarser texture and distinct seasoning. Can I use other types of potatoes for this recipe? You can use other types of potatoes, but the taste will change. Russet or Yukon Gold potatoes work well. They will give a different texture and flavor, but may not be as sweet. How can I adjust the spiciness of this dish? To adjust spiciness, change the amount of cayenne pepper. Start with less, then add more if needed. Taste as you go to find your perfect heat level. You can also use milder sausage for less heat. What are some good sides to pair with Sweet Potatoes & Andouille Sausage? Good sides include a fresh green salad or steamed broccoli. Rice or cornbread also pair nicely. These sides balance the meal and add more color to your plate. This recipe combines sweet potatoes and Andouille sausage for a tasty meal. We covered ingredients, cooking steps, and helpful tips for the best results. Remember to choose fresh ingredients for great taste. Feel free to adjust spices to suit your taste. Use this guide to make a delicious dish that fits your preferences. Enjoy your cooking and sharing this meal with others!

Sweet Potatoes & Andouille Sausage Flavorful Dish

Looking for a hearty dish that packs flavor without hours of effort? My Sweet Potatoes & Andouille Sausage recipe is

For a hearty Crockpot Chicken Corn Chowder, gather these simple ingredients: - 2 boneless, skinless chicken breasts - 4 cups fresh or frozen corn kernels - 1 medium onion, diced - 2 cloves garlic, minced - 3 medium potatoes, peeled and diced into small cubes - 3 cups chicken broth - 1 cup milk (or coconut milk for a dairy-free version) - 1 teaspoon dried thyme - 1 teaspoon smoked paprika - Salt and black pepper to taste - 1 tablespoon olive oil - 1/4 cup fresh parsley, chopped (for garnish) You can make this chowder fit your needs. Here are some easy swaps: - Chicken: Use turkey or firm tofu for a vegetarian twist. - Milk: Coconut milk works great for a dairy-free option. Almond milk is another choice. - Broth: Vegetable broth can replace chicken broth for a vegetarian version. - Potatoes: Sweet potatoes add a nice flavor and extra nutrients. Quality matters in cooking. Here are some brands I trust: - Chicken Broth: Swanson or Pacific Foods offer rich flavors. - Coconut Milk: Thai Kitchen is creamy and delicious. - Olive Oil: California Olive Ranch provides high-quality oil. - Spices: McCormick spices are always reliable for freshness and flavor. These choices help make your chowder taste just right! Enjoy the cooking process and make it your own. {{ingredient_image_2}} To start, gather all your ingredients. You need two boneless, skinless chicken breasts, four cups of corn, one onion, and two cloves of garlic. You will also need three medium potatoes, three cups of chicken broth, and one cup of milk. Don't forget the dried thyme, smoked paprika, salt, and black pepper. Lastly, have some olive oil and fresh parsley ready for garnish. First, peel and dice the potatoes into small cubes. Next, dice your onion and mince the garlic. This step helps build flavor in your chowder. Now, grab your crockpot. Place the chicken breasts at the bottom. This keeps them moist while cooking. Next, layer the corn and diced potatoes evenly on top of the chicken. In a medium skillet, heat olive oil. Add the diced onion and minced garlic, cooking for about 3-4 minutes until soft. This adds great flavor. Pour this mixture over the layers in the crockpot. Sprinkle in the dried thyme, smoked paprika, salt, and pepper. Now, pour the chicken broth over everything. Ensure the ingredients are well submerged to cook evenly. Cover your crockpot with the lid. Set the temperature to LOW for 6-7 hours or HIGH for 3-4 hours. Cooking it low and slow allows flavors to meld together. In the last hour, take out the chicken breasts. Shred them into bite-sized pieces using two forks. Return the shredded chicken back into the chowder. Finally, stir in the milk or coconut milk. Let the chowder cook for an extra 30 minutes on LOW. Taste it and adjust the seasoning if needed. Your chowder is now ready to serve! Shredding chicken can be simple and quick. After cooking, remove the chicken breasts from the crockpot. Use two forks to pull the meat apart gently. If you want a finer shred, use your hands. Shredding while the chicken is hot makes it easier. Don’t worry if it looks a bit messy; that adds to the charm of your chowder. Taste is key in a great chowder. After cooking, taste your dish. You may want to add more salt or pepper. If you like spice, try adding a pinch of cayenne. Fresh herbs, like parsley, can brighten the flavor. Don’t be afraid to experiment until it feels just right for you. Serve your chowder warm in rustic bowls. A slice of crusty bread pairs perfectly. You can also add a side salad for some crunch. Another great option is to serve it with tortilla chips for a fun twist. Enjoy your meal with family or friends for a cozy gathering. Pro Tips Use Fresh Ingredients: Whenever possible, opt for fresh corn and potatoes to enhance the flavor and texture of your chowder. Customize the Creaminess: Adjust the thickness of your chowder by varying the amount of milk or coconut milk you add based on your preference. Add Spice: For a kick of heat, consider adding a pinch of cayenne pepper or diced jalapeños to the mixture before cooking. Storage Tips: This chowder can be stored in the refrigerator for up to 3 days or frozen for later use. Just reheat gently on the stove. {{image_4}} You can make this chowder even better with extra veggies. Try adding diced carrots or celery for more crunch. You can also toss in some bell peppers. These will add color and flavor. Frozen peas or green beans work well too. Just remember to adjust the cooking time if you add fresh veggies. They may need a bit more time to soften. If you want to make this dish dairy-free, use coconut milk instead of regular milk. It gives a nice, creamy texture and adds a subtle sweetness. Almond milk or oat milk are also great options. They will change the taste a bit but will still be tasty. Just ensure you pick an unsweetened version to keep the flavors in balance. For a kick, add some heat to your chowder. You can mix in diced jalapeños or a splash of hot sauce. Chili powder or cayenne pepper also works well. Start with a small amount and taste as you go. This way, you can control the spice level. Enjoy the extra flavor that heat brings to this cozy dish! Store any extra chowder in an airtight container. Let it cool first. Place it in the fridge. It will last for about 3-4 days. Label the container with the date. This helps you keep track of freshness. To reheat, pour the chowder into a pot. Heat it over medium heat. Stir it often to prevent sticking. You can also use the microwave. Place the chowder in a microwave-safe bowl. Heat for 1-2 minutes, stirring halfway. Check that it is hot all the way through. For longer storage, freeze the chowder. Use a freezer-safe container or bag. Leave some space for expansion. It can last for up to 3 months in the freezer. When ready to eat, thaw it overnight in the fridge. Then reheat it on the stove or microwave. This way, your delicious chowder stays ready for any meal! Yes, you can use frozen chicken in this recipe. Just place the frozen chicken breasts at the bottom of the crockpot. They will cook well in the broth. Make sure to adjust cooking time slightly. If using frozen, cook for about 30 minutes longer. The chicken will be tender and easy to shred. The chowder can be stored in the fridge for about 3 to 4 days. Make sure to let it cool before putting it in a container. Use airtight containers to keep it fresh. Reheat on the stove or in the microwave before serving. You can serve several tasty sides with this chowder. Here are some ideas: - Crusty bread for dipping - A fresh salad with greens - Cornbread for a sweet touch - Crackers for a crunchy bite These sides add to the chowder's warm and cozy feel. Enjoy them with your meal! This blog post covered key aspects of making chicken corn chowder. We explored ingredients, cooking steps, and smart tips. You learned how to personalize the chowder with variations and how to store leftovers. Remember, cooking should be fun and tasty. Try different veggies or spices to make it yours. Enjoy this cozy dish and share it with friends. Happy cooking!

Crockpot Chicken Corn Chowder Simple and Flavorful Dish

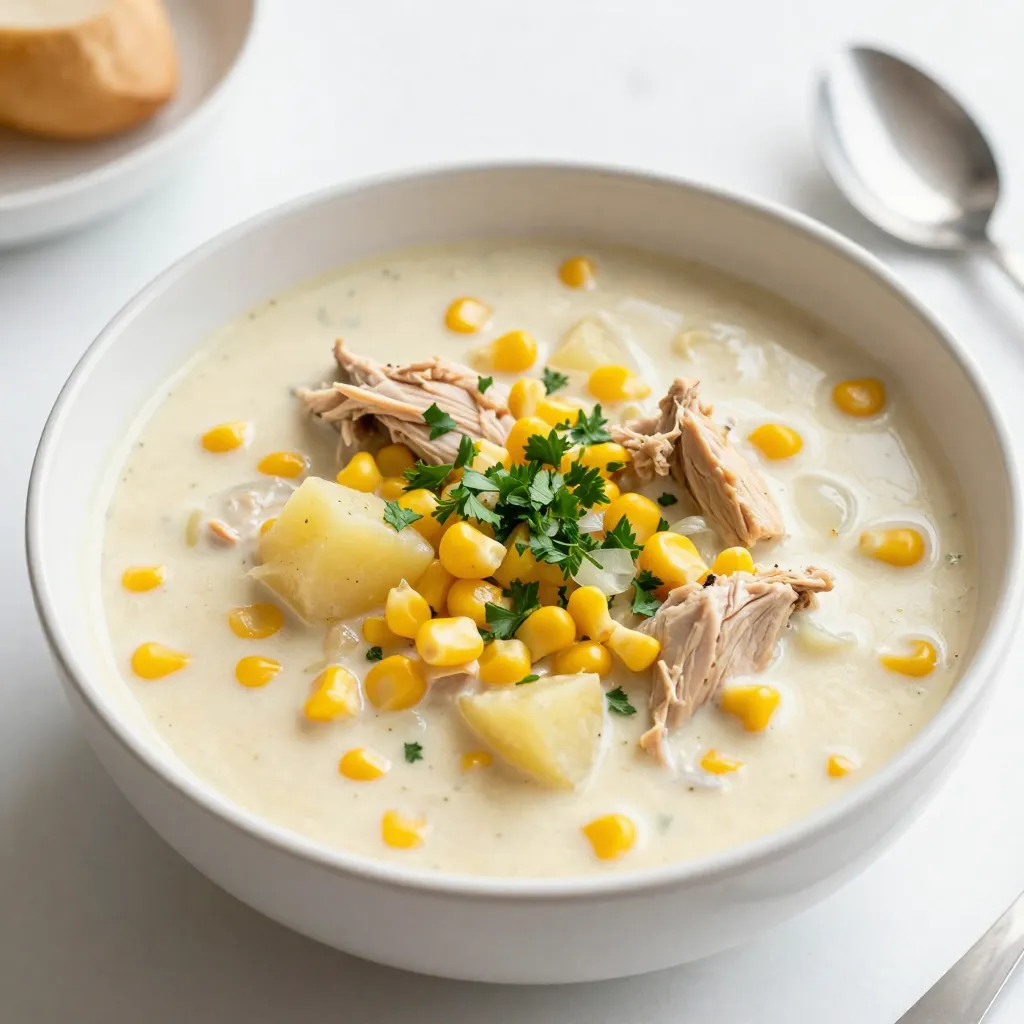
Looking for a delicious and easy meal? This Crockpot Chicken Corn Chowder is your answer! I’ll show you how to

To make a Tuscan grilled rib eye steak, gather these ingredients: - 2 rib eye steaks (approximately 1 inch thick) - 4 cloves garlic, finely minced - 2 tablespoons fresh rosemary, finely chopped - 2 tablespoons fresh thyme, finely chopped - 1 tablespoon extra virgin olive oil - 1 teaspoon fresh lemon zest - Sea salt and freshly ground black pepper, to taste - 1 cup cherry tomatoes, halved - 1/4 cup balsamic vinegar - Fresh arugula, for serving Fresh herbs bring the dish to life. Rosemary and thyme add depth. They create a fragrant blend that enhances the rich flavor of the rib eye. Fresh herbs also provide a pop of color. This makes your dish not just tasty, but also visually appealing. Using dried herbs lacks the same brightness. Fresh herbs keep your meal vibrant and fresh. I recommend using extra virgin olive oil for this recipe. It adds a fruity note that blends well with the herbs. Season your steak generously with sea salt and black pepper. These basics enhance the natural flavors. If you want to experiment, consider adding herbs like oregano or sage. Each adds its unique twist to the flavor profile. For the best taste, always use high-quality ingredients. Freshness matters in every bite. Start by making the herb paste. In a small bowl, mix together: - 4 cloves garlic, finely minced - 2 tablespoons fresh rosemary, finely chopped - 2 tablespoons fresh thyme, finely chopped - 1 tablespoon extra virgin olive oil - 1 teaspoon fresh lemon zest - Sea salt and freshly ground black pepper, to taste Stir well until it forms a fragrant mix. Take your rib eye steaks and rub the herb paste all over them. Make sure they are well coated. Let the steaks sit at room temperature for about 30 minutes. This step helps the flavors soak in and makes the steak taste great. While your steaks marinate, it's time to prepare the grill. Preheat your grill to medium-high heat. Make sure it gets hot enough to cook the steaks evenly. This step is key to achieving that perfect sear. A well-heated grill gives the meat a nice crust while keeping it juicy inside. Once the grill is hot, place your marinated rib eye steaks on the grates. Cook them for about 4-5 minutes on one side. This timing is for medium-rare doneness. After that, flip the steaks over and cook for another 4 minutes. If you like your steak cooked more, adjust the time accordingly. After grilling, take the steaks off the grill and let them rest on a cutting board for about 5 minutes. Resting is important! It allows the juices to settle, making each bite juicy and tasty. Now, slice the steaks against the grain into thick pieces. Serve them over a bed of fresh arugula and top with the balsamic-marinated cherry tomatoes for added flavor and color. Enjoy your delicious Tuscan Grilled Rib Eye Steak! For the complete process, check the Full Recipe. To cook the rib eye steak just right, use a meat thermometer. Aim for 130°F for medium-rare. Keep in mind that cooking times vary with grill heat. I cook the steak for about 4-5 minutes on one side. After flipping, cook for 4 more minutes. Let the steak rest for 5 minutes after grilling. This step helps the juices settle back in. Flavor is key with rib eye steaks. Use fresh herbs like rosemary and thyme for the best taste. I love making a herb paste with garlic, olive oil, and lemon zest. Rub this paste all over the steak. It adds depth and freshness. For a sweet touch, toss cherry tomatoes in balsamic vinegar. This mix brightens the dish and adds color. Many cooks make the mistake of skipping the rest period. Resting helps keep the steak juicy. Another mistake is not preheating the grill enough. A hot grill gives you those beautiful sear marks. Lastly, don’t be shy with seasoning. A good amount of sea salt and black pepper makes all the difference. For the full recipe, check the Tuscan Herb Grilled Rib Eye Steak. {{image_4}} If you want to switch things up, try different spice blends. A simple mix of smoked paprika and cumin adds a nice depth. You can also use a blend of Italian herbs, like oregano and basil, to boost those Tuscan flavors. For heat, add crushed red pepper. Each blend brings a unique taste to your rib eye. Choosing the right veggies can enhance your meal. Grilled zucchini and bell peppers are great options. They add color and flavor. You can also try sautéed mushrooms for a rich taste. Roasted asparagus pairs well, too. These vegetables complement the juicy steak and make your plate pop. Not everyone has a grill, and that's okay! You can cook rib eye in a cast-iron skillet on the stove. Heat the skillet until it's hot, then sear the steak for 4-5 minutes on each side. You can also broil it in the oven for a quick and flavorful meal. Each method offers a delicious way to enjoy your Tuscan grilled rib eye steak. For the full recipe, check out the detailed steps in the earlier section. After your meal, let any leftover steak cool down. Wrap it tightly in plastic wrap or foil. You can also place it in an airtight container. Store it in the fridge for up to three days. This keeps it fresh and tasty for later. When you're ready to enjoy the leftovers, there are a few ways to reheat the steak. The best method is to use a skillet. Heat it on medium heat and add a splash of olive oil. Place the steak in the skillet and warm it for about 2-3 minutes on each side. You can also use the oven. Preheat it to 250°F (120°C) and place the steak on a baking sheet. Heat it for about 10-15 minutes. This keeps the steak juicy without overcooking it. If you want to keep the steak longer, freezing is a great option. First, wrap it tightly in plastic wrap. Then, place it in a freezer-safe bag or container. Make sure to remove as much air as possible. You can freeze the steak for up to three months. When you’re ready to eat it, thaw it in the fridge overnight before reheating. For more details, check the Full Recipe. You can tell if the steak is perfectly grilled by using a meat thermometer. For medium-rare, the temperature should be 130°F (54°C). Press the steak gently with your finger; it should feel firm but still springy. If you don't have a thermometer, look for a nice brown crust. You want the inside to be warm and juicy. Yes, you can marinate the steak overnight. This helps the flavors soak in deeply. Just make sure to keep it in the fridge. Take it out about 30 minutes before grilling. This way, it can come to room temperature. It makes for a better cook. Tuscan Grilled Rib Eye Steak pairs well with many sides. Here are a few ideas: - Roasted vegetables, like zucchini and bell peppers - Creamy mashed potatoes or polenta - A fresh arugula salad with lemon dressing - Grilled corn on the cob - Garlic bread for that extra crunch These sides will complement the steak's rich flavors and enhance your meal's overall experience. For the full recipe, check out the complete guide! This article covered the key steps to make a great Tuscan Grilled Rib Eye Steak. We discussed the best ingredients, the marinating process, and proper grilling techniques. Fresh herbs and the right oils boost flavors. Remember to check doneness and avoid common mistakes for the best results. Explore variations with spice blends and veggies to keep things interesting. Finally, proper storage helps you enjoy leftovers later. Experiment and have fun grilling your perfect steak every time.

Tuscan Grilled Rib Eye Steak Flavorful and Juicy Dish

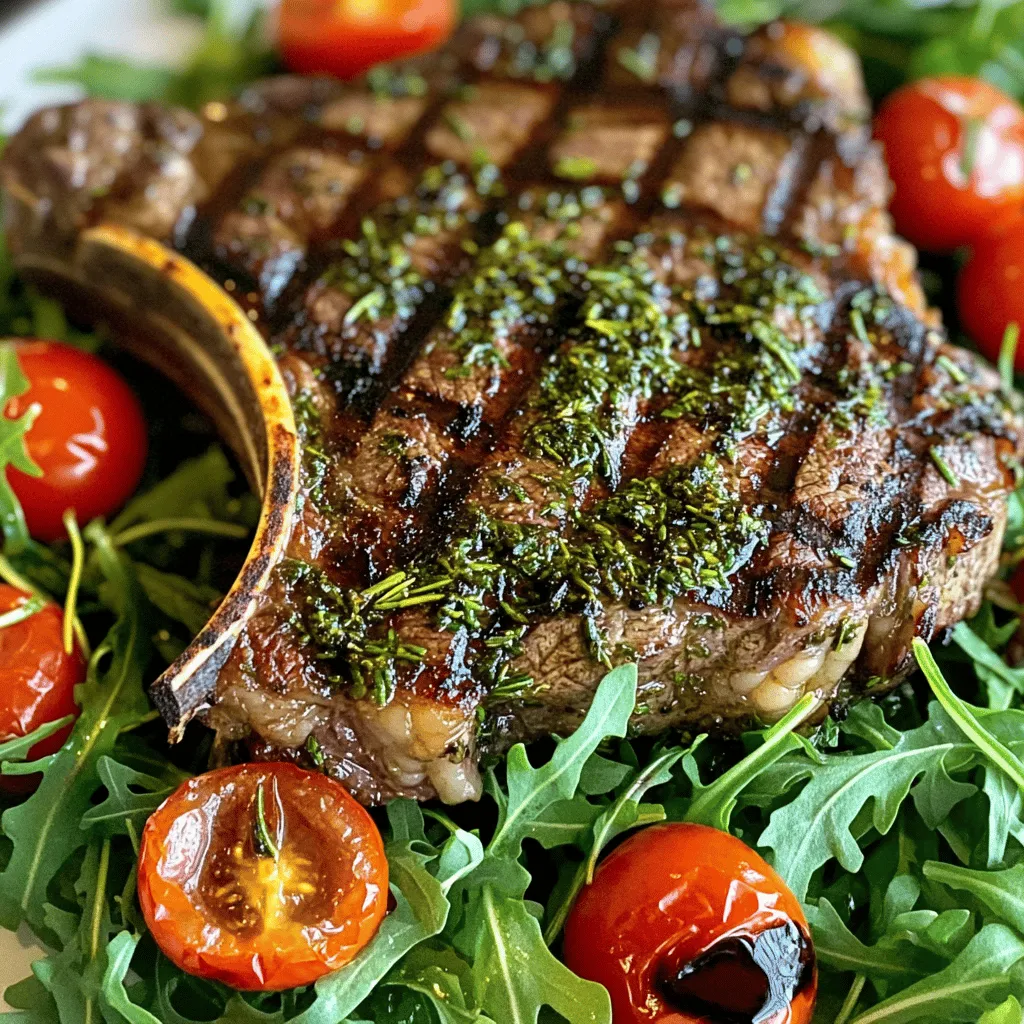
Are you ready to elevate your grilling game? The Tuscan Grilled Rib Eye Steak is a flavorful and juicy dish

Older posts
Newer posts
← Previous Page1 … Page54 Page55 Page56 … Page86 Next →

dsad

© 2026 lazychefmagic • Built with GeneratePress

Our Policies

  • Copyright Policy
  • Cookie Policy
  • GDPR Policy
  • Privacy Policy
  • Disclaimer
  • Terms Of Use

More Information

  • Home
  • About
  • Contact
  • Appetizers
  • Dessert
  • Dinner
  • Drinks
©2026, lazychefmagic About Back To Top