Skip to content
DisclaimerTerms Of UseGDPR PolicyCookie Policy

lazychefmagic

  • Home
  • Drinks
  • Appetizers
  • Dinner
  • Dessert
  • About
  • Contact
  • Privacy Policy
DisclaimerTerms Of UseGDPR PolicyCookie Policy

NO-ING-IMG

- 2 cups rotini or penne pasta - 2 cups cooked chicken, shredded (preferably rotisserie for added flavor) - 1 cup marinara sauce (store-bought or homemade) - 1 cup ricotta cheese - 1 ½ cups mozzarella cheese, shredded (divided) - ¾ cup Parmesan cheese, grated - 1 teaspoon garlic powder - 1 teaspoon Italian seasoning (or a blend of dried basil, oregano, and thyme) - Salt and pepper to taste - Fresh basil leaves for garnish (optional) Using fresh ingredients makes a big difference. Fresh pasta will cook better and taste nicer. Quality chicken, like rotisserie, adds flavor. Homemade marinara sauce often tastes richer than store-bought. Fresh cheeses melt better, giving a creamier texture. Always check the expiration dates on your dairy products. You can use gluten-free pasta for a gluten-free meal. If you want a lighter option, swap ricotta for cottage cheese. For a vegetarian twist, replace chicken with sautéed mushrooms or spinach. Use vegan cheese to make it dairy-free. Adjust the spices to fit your taste or dietary needs. First, set your oven to 375°F (190°C). This heat makes the cheese melt perfectly. While the oven heats, bring a large pot of salted water to a boil. Add your rotini or penne pasta to the boiling water. Cook it according to the package instructions until it is al dente. Once done, drain the pasta well and let it cool slightly. This step ensures the pasta does not become mushy in the bake. In a big mixing bowl, combine your shredded chicken, marinara sauce, and ricotta cheese. Add garlic powder and Italian seasoning for flavor. Mix in half of the shredded mozzarella cheese, about ¾ cup. Stir everything together until well-blended. Gently fold in the cooled pasta. Make sure each piece of pasta gets coated. Taste the mixture, and add salt and pepper based on your liking. Now, pour the pasta and chicken mixture into a greased 9x13 inch baking dish. Spread it evenly in the dish. Sprinkle the remaining mozzarella and grated Parmesan cheese on top. This creates a cheesy crust that everyone loves. Place the dish in your preheated oven and bake for 25-30 minutes. Look for a bubbly, golden top with slightly crispy edges. After baking, let it sit for 5 minutes. This resting time helps the flavors mix and makes serving easier. If you want, add fresh basil leaves on top for a nice touch. Enjoy the deliciousness! To get a perfect cheese crust, use a mix of cheeses. I like to use mozzarella and Parmesan. Spread the cheeses evenly over the top. This helps create a golden, bubbly layer. Baking at 375°F (190°C) works best. Bake it until the cheese melts and turns golden brown. If you want a crunchier top, broil for the last 2-3 minutes. Just watch it closely to avoid burning! Want to save time? Use rotisserie chicken. It adds flavor and cuts down on prep. You can also cook the pasta in advance. This way, you only need to mix and bake. Pre-measure your ingredients. This small step makes cooking faster and easier. Another tip is to use store-bought marinara sauce. It tastes great and saves time. Cooking pasta can be tricky. Start with a large pot of salted water. This adds flavor to your pasta. Bring the water to a rolling boil before adding the pasta. Cook it until it's al dente, or firm to the bite. This helps the pasta hold its shape in the bake. Don't forget to drain the pasta well. You want it to be slightly dry before mixing it with the sauce. {{image_4}} You can make this dish healthier. Use gluten-free pasta for a gluten-free meal. Zucchini noodles are a great low-carb option. They add a fresh taste and reduce carbs. You can also replace ricotta with cottage cheese. This switch lowers fat and adds protein. Get creative with your ingredients! Add vegetables like spinach, bell peppers, or broccoli. These veggies bring color and nutrients. You can also use different proteins, like turkey or tofu. Each choice adds a new flavor and texture. Spice up your dish with different flavors. Try adding crushed red pepper for heat. A splash of lemon juice can brighten the flavors. You can also experiment with herbs, like fresh parsley or cilantro. Using pesto instead of marinara gives a fresh twist. These options keep each meal exciting and new. To keep your Parmesan chicken pasta bake fresh, store it in an airtight container. This prevents moisture loss and keeps flavors intact. Wait until it cools before sealing the container. You can keep it in the fridge for up to three days. If you want to enjoy it later, freezing is a great option. Reheating your pasta bake can be simple. Preheat your oven to 350°F (175°C). Place the pasta bake in a baking dish and cover it with foil. This helps keep moisture in. Heat for about 20 minutes. Check it to ensure it's hot throughout. You can remove the foil for the last 5 minutes if you want a crispy top. If you want to freeze your pasta bake, make sure it cools completely first. Portion it into freezer-safe containers, leaving space for expansion. It will stay fresh for about three months in the freezer. To reheat, thaw it in the fridge overnight. Then, follow the reheating steps for best results. Enjoy your delicious meal at your convenience! You can use uncooked chicken, but it needs more cooking time. Start by cooking the chicken fully before mixing it with the other ingredients. This ensures the chicken is safe to eat and tender. Rotini and penne are great choices because their shapes hold sauce well. Other pasta shapes like fusilli or ziti also work nicely. Just choose a pasta that you love! To make this dish vegetarian, swap the chicken for cooked mushrooms, zucchini, or spinach. You can also add beans for protein. Keep the other ingredients the same for a tasty meal. For the complete list of ingredients and detailed steps, check the Full Recipe. You’ll find everything you need to create this tasty Parmesan chicken pasta bake. Enjoy cooking! This post covered essential ingredients, baking steps, and tips for the recipe. You learned how to pick the best ingredients and ensure fresh flavors shine through. Adapting the recipe for health needs is easy with simple swaps. I shared cooking tips that save time and improve taste. Remember to store leftovers properly to maintain flavor and texture. With these insights, you can create a successful dish every time. Enjoy experimenting with different flavors and variations to suit your taste!

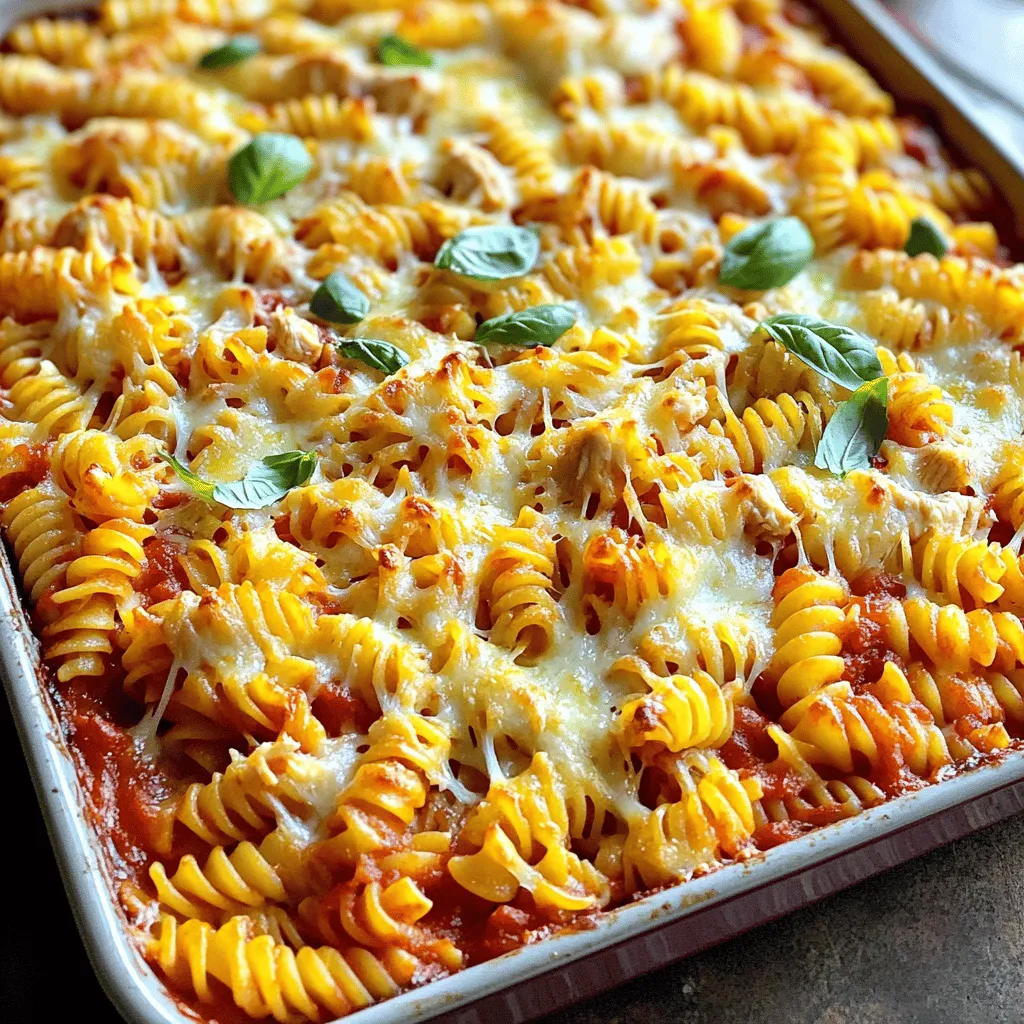
Parmesan Chicken Pasta Bake Wholesome Family Meal

Looking for a cozy and delicious family meal? Try my Parmesan Chicken Pasta Bake! It’s creamy, cheesy, and packed with

- 1 cup jasmine rice, thoroughly rinsed - 2 cups coconut milk (full-fat for creaminess) - 1 cup whole milk - ½ cup granulated sugar - 1 teaspoon pure vanilla extract - 1 teaspoon ground cinnamon - ½ teaspoon sea salt - 1 cup crushed pineapple, well-drained - ½ cup unsweetened shredded coconut - Fresh mango slices and mint sprigs for garnish - Selecting the right rice type for authenticity: Use jasmine rice for a sweet, floral flavor. This rice absorbs coconut milk well and gives a creamy texture. Other rice types may not provide the same taste or texture. - Best coconut milk options for richness: Choose full-fat coconut milk for a rich and creamy pudding. It adds depth and enhances the tropical flavor. Light coconut milk can work, but the pudding may be thinner. - Substitutes for dietary restrictions: If you need a dairy-free version, use almond milk or oat milk instead of whole milk. For a sugar substitute, try maple syrup or agave syrup, adjusting the amount to taste. - In a medium saucepan, combine: - 1 cup jasmine rice, thoroughly rinsed - 2 cups coconut milk (full-fat for creaminess) - 1 cup whole milk - ½ cup granulated sugar - 1 teaspoon pure vanilla extract - 1 teaspoon ground cinnamon - ½ teaspoon sea salt This mix creates a rich base for your Hawaiian rice pudding. Stir gently to get everything combined well. - Place the saucepan over medium heat. Bring the mixture to a gentle boil while stirring occasionally. This step is key to prevent the rice from sticking to the bottom. - Once it boils, reduce the heat to low. Cover the saucepan and let it simmer. Cook for about 20-25 minutes. Stir occasionally to avoid sticking. You’ll know it’s ready when the rice is tender, and the pudding thickens to your liking. - Stirring is crucial. It stops the rice from sticking and burning. Keep a close eye on it as it cooks. - Watch for signs that show your pudding is ready. The rice should be soft, and the mixture should look creamy and thick. If it seems too runny, let it cook a bit longer. - After cooking, take the saucepan off the heat. Gently fold in: - 1 cup crushed pineapple, well-drained - ½ cup unsweetened shredded coconut Make sure everything mixes evenly. This adds tropical flavor and texture to the pudding. - Let the pudding cool for about 10 minutes at room temperature. It will thicken more as it cools. You can serve the pudding warm or chilled. For an extra touch, top each serving with fresh mango slices and a sprig of mint. This adds color and a burst of flavor. For the complete process, check the Full Recipe. To make your Hawaiian rice pudding truly special, use fresh local ingredients. For instance, try ripe mangoes and fresh coconut. These can elevate the dish and add a genuine tropical taste. Toppings can also enhance flavor and richness. I love using a sprinkle of toasted coconut or a drizzle of honey. Fresh mint adds a pop of color and taste too. When serving, choose clear dessert cups. This way, guests can see the creamy pudding and colorful toppings. Serve it warm or chilled; both options delight. You can add creative toppings for extra flavor. Consider a dollop of whipped cream, a sprinkle of cinnamon, or even a few edible flowers for a stunning presentation. For fun flavor twists, think about adding spices or extracts. A pinch of nutmeg or a splash of almond extract can bring new life to your pudding. Certain fruits pair well with the pudding too. In addition to mango, try bananas, passion fruit, or even berries. They all add a refreshing contrast to the creamy base. For the Full Recipe, check the earlier section and enjoy making this comforting dessert! {{image_4}} You can make Hawaiian rice pudding even more exciting. Add tropical fruits like mango or banana. These fruits bring bright flavors and colors. They make the dessert feel fresh and lively. Macadamia nuts are another great addition. These nuts add crunch and a nutty taste. Try toasting them first for extra flavor. You can sprinkle them on top or mix them in. Both fruits and nuts create a fun twist on the classic recipe. If you follow a vegan diet, you can still enjoy this pudding. Use plant-based milk, like almond or oat milk. They will keep the creamy texture. For sweeteners, try maple syrup or agave. These options keep your dessert tasty and vegan-friendly. For gluten-free eaters, you're in luck! This dish is already gluten-free. Just ensure your ingredients, especially any toppings, are also gluten-free. You can enjoy this dish without worry. Rice pudding is popular in many cultures. In India, they make a version called kheer. It often has cardamom and raisins. In the Middle East, they serve it with rose water and nuts. Both styles show how versatile rice pudding is. You can also create fusion recipes. Try adding spices from different cultures. A hint of cinnamon and nutmeg can bring warmth. Mixing flavors from around the world can make this dish truly unique. For the full recipe, check out the Tropical Paradise Hawaiian Rice Pudding section. To keep your Hawaiian rice pudding fresh, store it in an airtight container. Place it in the fridge right after it cools. This helps maintain its creamy texture. Rice pudding lasts about 3 to 5 days in the fridge. Always check for any off smells before eating. You can freeze rice pudding for longer storage. First, let it cool completely. Then, scoop it into freezer-safe containers. Leave some space at the top, as it will expand. Seal the containers tightly. It can last up to 3 months in the freezer. When you're ready to eat, thaw it in the fridge overnight. To reheat, warm it gently in a saucepan. Add a splash of coconut milk for creaminess. Don’t let your leftovers go to waste! You can turn rice pudding into a tasty breakfast. Just add some fresh fruit and nuts. It also makes a great snack. Try mixing it with yogurt for a creamy treat. You can even use it as a filling for crepes or pastries. The possibilities are endless! Hawaiian rice pudding is a sweet, creamy dessert. It combines rice, coconut milk, and tropical fruits. This dish reflects Hawaii's rich culture and flavors. Locals enjoy it at family gatherings and celebrations. The use of coconut and pineapple shows the island’s bounty. Each bite transports you to a warm beach, making it special. Yes, you can make Hawaiian rice pudding in advance. Prepare it a day before, then store it in the fridge. This helps the flavors meld together. When you're ready to serve, just give it a quick stir. If it looks thick, add a splash of milk to loosen it. This method saves you time and keeps things stress-free for your gathering. To make your pudding creamier, use full-fat coconut milk. This adds richness to the dish. Cooking on low heat helps maintain a smooth texture. Stir frequently to prevent sticking, which keeps it creamy. You can also add an extra splash of milk toward the end. This little trick enhances the overall creaminess of your pudding. If you need a substitute for coconut milk, try whole milk or heavy cream. Almond milk is a lighter option, but it changes the flavor. Soy milk is another plant-based choice that works well. Each option brings a different taste, so choose based on your preference. You can still enjoy Hawaiian rice pudding, even without coconut milk. In this article, I covered the essential ingredients for Hawaiian rice pudding, from jasmine rice to crushed pineapple. I shared tips on how to prepare and cook for the best flavor and texture. We explored variations, storage tips, and answered common questions. Hawaiian rice pudding is a fun dish to make and enjoy. You can customize it to fit your taste and dietary needs. I hope you create this delicious treat and savor every bite!

Hawaiian Rice Pudding Comforting Tropical Dessert

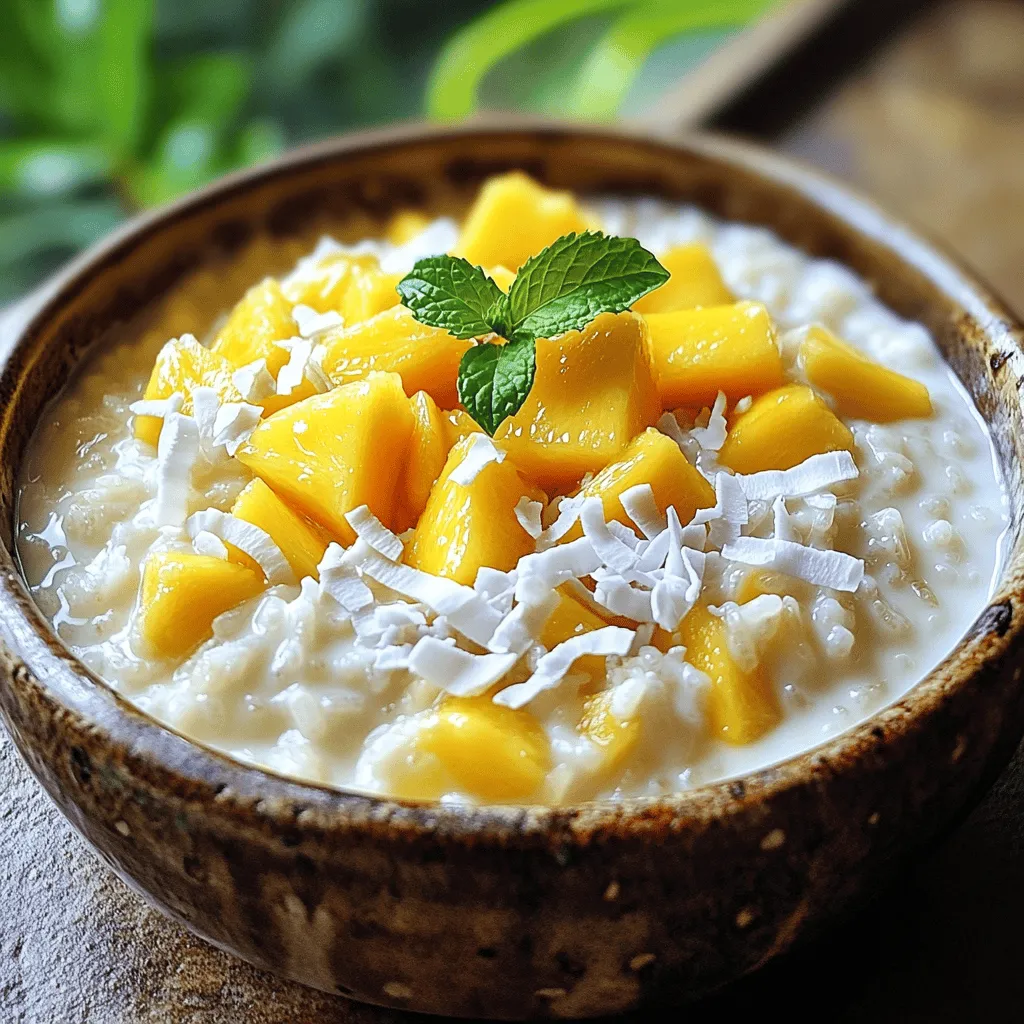
Are you ready to dive into a tropical treat that’s both comforting and delicious? Hawaiian Rice Pudding is your go-to

- 1 cup fresh broccoli florets - 1 vibrant red bell pepper, thinly sliced - 1 cup crisp snap peas - 1 medium carrot, cut into julienne strips - 1 cup baby corn, halved lengthwise - 3 cloves of garlic, finely minced - 1 tablespoon fresh ginger, finely grated - Sea salt and freshly ground black pepper to taste - 3 tablespoons soy sauce - 1 tablespoon sesame oil - 1 tablespoon extra virgin olive oil - 1 tablespoon sesame seeds (optional for garnish) Gathering these ingredients sets the stage for a quick, colorful meal. Fresh vegetables bring life to the dish. Each vegetable adds its own unique flavor and crunch. The garlic and ginger give a wonderful aroma. They also enhance the taste. Using soy sauce and sesame oil ties everything together. This simple mix brings out the best in your veggies. If you want to see the detailed cooking steps, check out the Full Recipe. - Thoroughly wash all vegetables. - Cut broccoli into bite-sized florets. - Slice the red bell pepper thinly. - Julienne the carrot into strips. - Prepare snap peas and baby corn as directed. - Heat olive oil in a skillet or wok over medium-high heat. - Sauté minced garlic and grated ginger for 30 seconds. - Add the prepared vegetables and stir-fry for 5-7 minutes. - Drizzle soy sauce and sesame oil over the vegetables. - Cook for an additional 2-3 minutes, seasoning to taste. - Add optional sesame seeds before serving. This process makes a quick, tasty dish. You can find the Full Recipe above for more details! - Experiment with different sauces or spices. - Add crushed red pepper for a spicy kick. To make your veggie stir fry pop, try new sauces. Soy sauce is a classic, but you can also use teriyaki or hoisin. Each adds a unique taste. If you like heat, crushed red pepper flakes bring warmth. Just sprinkle a little in to spice things up. - Stir-fry quickly over high heat to maintain crispness. - Avoid overcrowding the pan to ensure even cooking. For a great texture, cook your veggies fast. High heat keeps them crisp and bright. If the pan is too full, the heat drops. This leads to soggy veggies. Cook in batches if needed. Keep the stir-fry moving to get an even cook. - Serve over rice, noodles, or quinoa for a complete meal. - Pair with a protein source like tofu or tempeh if desired. Serving your stir fry over rice or noodles makes it filling. Quinoa is also a great choice for added protein. If you want more substance, add tofu or tempeh. These options boost protein and flavor. For a fun twist, try serving it in lettuce wraps! {{image_4}} You can make your stir fry even better by using seasonal vegetables. Vegetables like zucchini or asparagus add great flavor and texture. These veggies taste fresh and give your dish a unique twist. You can also add leafy greens like spinach. Spinach cooks quickly and boosts the nutrition of your meal. If you need a gluten-free option, swap soy sauce for tamari or coconut aminos. These alternatives keep the rich umami flavor without gluten. For some crunch, add nuts or seeds. Almonds or sesame seeds not only add texture but also provide extra nutrients. To give your stir fry a new flair, try adding curry powder for an Indian twist. This spice brings warmth and depth to your dish. Another option is to use teriyaki sauce for a Japanese flavor. It adds a sweet and savory touch that pairs well with your fresh veggies. You can find the full recipe to guide you in adding these variations. To store your veggie stir fry, cool it completely first. This helps keep the food safe and tasty. Next, place it in an airtight container. It can last in the fridge for up to 3 days. When ready to eat, check for freshness before reheating. You can freeze the stir fry, too! Portion it out into small containers. This way, you can take out just what you need. It will stay good for up to 2 months in the freezer. When you want to eat it, thaw it overnight in the fridge. This keeps the veggies from getting mushy when you reheat. Reheating is easy. You can use a skillet or microwave. For a skillet, heat on low with a splash of water or oil. This keeps the stir fry moist. If you use a microwave, heat it in 30-second bursts until it’s hot throughout. Enjoy the great flavors of your stir fry again! For more details, check the Full Recipe. Yes, frozen vegetables can be utilized; add them directly to the hot skillet. I often keep a bag of mixed frozen veggies handy. They save time and still taste great! Cook over high heat and avoid overcrowding the skillet. This way, the veggies will stay crisp. I always cook in batches if I have a lot of veggies. Oils with high smoke points like sesame oil or canola oil are ideal for stir frying. I like using sesame oil for its rich flavor. It adds a nice touch to my stir fry. This blog post covered how to make a delicious stir-fry with fresh vegetables, aromatics, and essential liquids. Each step is designed for you to create a vibrant dish easily. Remember to keep your stir-fry quick to maintain crispness and flavor. Don’t hesitate to experiment with different veggies and sauces. This way, you can personalize your meal. Lastly, store leftovers properly to enjoy later. You now have the tools to make a tasty, healthy stir-fry that fits your taste!

Simple Veggie Stir Fry Flavorful and Quick Recipe

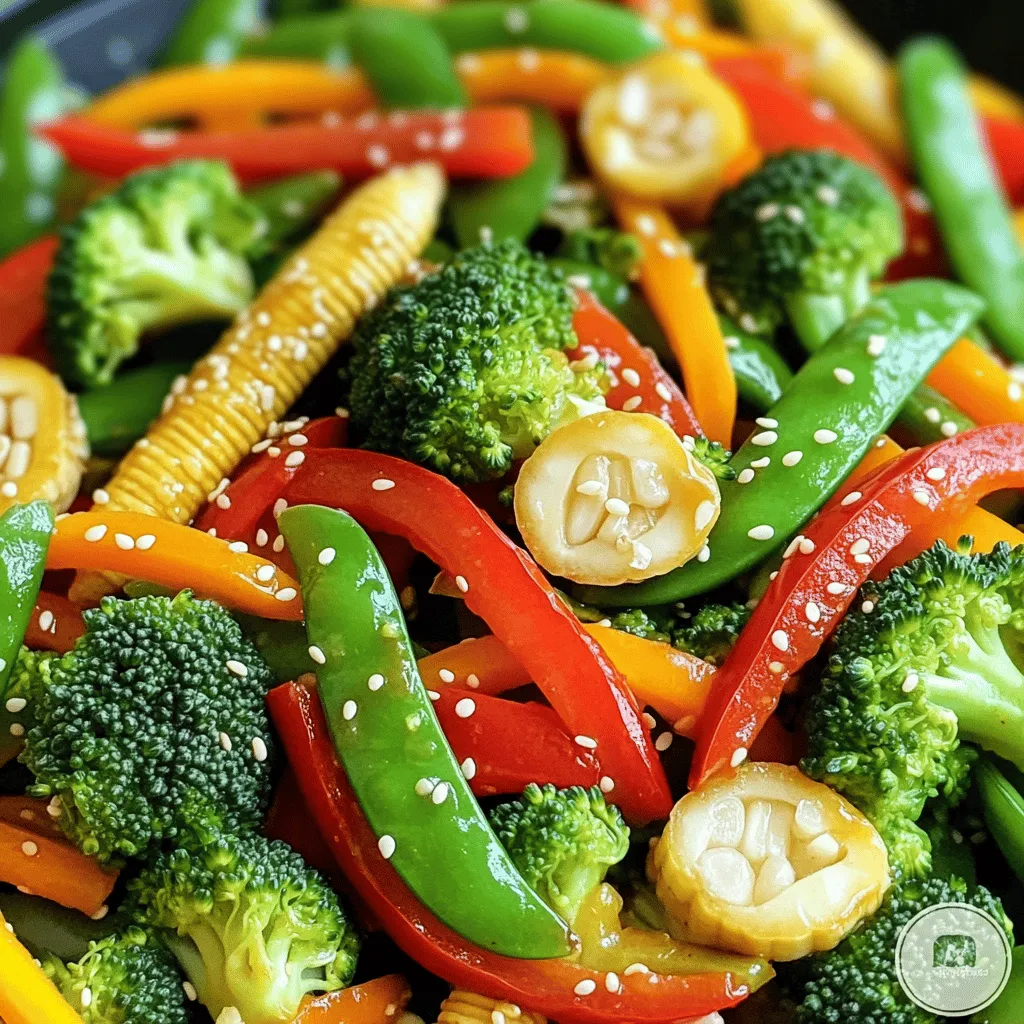
Looking for a quick and tasty meal? This Simple Veggie Stir Fry has you covered! With fresh veggies and easy

- 2 lbs chicken wings - 1/2 cup honey - 1/4 cup soy sauce - 4 cloves garlic, finely minced - 1 tablespoon fresh ginger, freshly grated - 1 teaspoon sesame oil - 1/2 teaspoon freshly ground black pepper - 1/4 teaspoon red pepper flakes (optional for adding heat) - 2 green onions, thinly sliced (for garnish) - Sesame seeds (for garnish) When making honey garlic chicken wings, the right ingredients matter. First, you need chicken wings, which are the star. I use 2 lbs for a great crowd-pleaser. Honey gives that sweet touch, at 1/2 cup. A splash of soy sauce, about 1/4 cup, adds saltiness and depth. Next, the flavor comes from garlic and ginger. I finely mince 4 cloves of garlic and grate 1 tablespoon of fresh ginger. This mix makes the wings pop. A teaspoon of sesame oil adds a nutty taste that ties it all together. Want to kick it up a notch? You can add a little black pepper for warmth. If you like heat, sprinkle in 1/4 teaspoon of red pepper flakes. For the final touch, garnish with 2 sliced green onions and a sprinkle of sesame seeds to make it look fancy. This recipe is easy and packed with flavor, perfect for game day or a fun dinner. You can find the [Full Recipe] to guide you through the steps! To start, grab a medium mixing bowl. In this bowl, combine honey, soy sauce, minced garlic, grated ginger, sesame oil, black pepper, and red pepper flakes. Mix these ingredients well using a whisk. You want a smooth marinade that blends all the flavors. This step is key to making your wings tasty and sticky! Next, take 2 lbs of chicken wings and place them in a large resealable plastic bag or a shallow dish. Pour the marinade over the wings, making sure each wing gets coated well. Seal the bag tightly or cover the dish with plastic wrap. Now, place it in the fridge. Let it marinate for at least 1 hour. If you can, let it sit overnight. This gives the wings time to soak up all the delicious flavors. Now it's time to cook! Preheat your oven to 400°F (200°C). This helps the wings cook evenly and get crispy. Line a baking sheet with aluminum foil for easy cleanup. Place a wire rack on top of the sheet. Spread the marinated wings on the rack in a single layer. Save the leftover marinade for later. Bake the wings in the preheated oven for 25-30 minutes. Flip them halfway through to ensure they get crisp on all sides. They should turn golden brown and crispy. While the wings bake, take the reserved marinade and pour it into a small saucepan. Bring it to a boil over medium heat, then reduce to a simmer. Let it bubble for 5-7 minutes, stirring often until it thickens slightly. When the wings are done, remove them from the oven. In a large bowl, toss the wings with the thickened glaze until they are fully coated. Serve them on a platter, and don’t forget to garnish with thinly sliced green onions and a sprinkle of sesame seeds. Enjoy your tasty honey garlic chicken wings! For the full recipe, check the entire preparation guide. Marinating chicken wings is key for great flavor. I find that an hour is the minimum time. For deeper flavor, marinate overnight. Always keep the wings in the fridge while they marinate. This prevents any risk of bacteria. For crispy wings, preheat your oven to 400°F (200°C). Bake for 25 to 30 minutes. Flipping the wings halfway through is crucial. This helps them get golden brown all over. You want that perfect crunch! To achieve the right glaze thickness, keep an eye on your sauce. As it simmers, stir occasionally. You want it to bubble and thicken without burning. A thicker glaze clings better to the wings, making each bite delicious. {{image_4}} You can switch up the honey garlic wings in many ways. For a spicy kick, add more red pepper flakes or some hot sauce. If you want a tangy twist, mix in some lime juice or rice vinegar. You can even try a sweet twist by using maple syrup instead of honey. Each option brings a new flavor to the table. For a quick and healthy choice, use an air fryer. Set it to 375°F (190°C) and cook the wings for about 25 minutes. Shake the basket halfway through for even cooking. This method gives you crispy wings with less oil. Grilling is another great method. It adds a smoky flavor that pairs well with the honey garlic mix. Preheat your grill to medium-high heat. Cook the wings for 20-25 minutes, turning often. This will keep them juicy and tasty. Pair your honey garlic chicken wings with tasty side dishes. A fresh salad or crispy fries works great. You can also serve them with a side of ranch or blue cheese dressing for dipping. For drinks, try a cold beer or a fruity soda. These choices will enhance your meal and make it even more enjoyable. After enjoying your honey garlic chicken wings, store any leftovers in the fridge. Place the wings in an airtight container. This keeps them fresh and tasty. You can also wrap them tightly in aluminum foil or plastic wrap. Make sure to eat them within three to four days for the best flavor. To reheat your chicken wings, use the oven for the best results. Preheat your oven to 350°F (175°C). Spread the wings on a baking sheet. Bake them for about 10-15 minutes. This helps keep the wings crispy. You can also microwave them, but they may lose some crispiness. If you use the microwave, cover them with a damp paper towel to keep them moist. If you want to save wings for later, freezing is a great option. First, let the wings cool completely. Then, place them in a freezer-safe bag. Squeeze out as much air as possible before sealing. Label the bag with the date. When you’re ready to eat them, thaw the wings in the fridge overnight. Reheat them in the oven for the best texture. Enjoy your flavorful wings anytime! You should marinate chicken wings for at least 1 hour. However, for the best flavor, I recommend marinating them overnight. This gives the wings time to soak up the honey and garlic mix. It also helps the meat become tender and juicy. Just remember to keep the wings in the fridge while they marinate. This ensures they stay safe to eat. Yes, you can make honey garlic chicken wings in an air fryer! First, marinate the wings just as you would in the oven. Preheat your air fryer to 375°F (190°C). Place the wings in a single layer in the basket. Cook them for about 25 minutes, flipping them halfway through. This method makes the wings crispy without needing much oil. It’s a quick and healthy way to enjoy this recipe. If you need a substitute for soy sauce, you have options. You can use tamari, which is gluten-free. Coconut aminos is another great choice and has a sweeter taste. For a low-sodium option, you can mix water with a bit of salt. This will still give you a savory flavor without all the sodium. These alternatives keep the dish tasty while fitting your dietary needs. You can find the full recipe at the beginning of the article. Enjoy your cooking! This blog post covered how to make delicious honey garlic chicken wings. We discussed key ingredients like chicken, honey, and soy sauce. The step-by-step instructions guide you through marinating and cooking for great flavor. Tips help with achieving crispy wings and adjusting glaze thickness. You can even try variations like air frying or grilling. Remember, proper storage keeps leftovers fresh. Enjoy your wings, and don’t forget to share with friends! Exploring these flavors can turn any meal into a special occasion.

Honey Garlic Chicken Wings Easy and Flavorful Recipe

If you’re craving a dish that’s both easy and packed with flavor, look no further than these Honey Garlic Chicken

To make a tasty creamy mushroom risotto, you need these key ingredients: - 1 cup Arborio rice - 4 cups vegetable broth - 1 cup mushrooms, sliced - 1 small onion, finely chopped - 2 cloves garlic, minced - 1 cup fresh spinach, roughly chopped - 1/2 cup Parmesan cheese, freshly grated - 3 tablespoons olive oil - 2 tablespoons unsalted butter - Salt and black pepper, to taste - Fresh parsley, finely chopped (for garnish) Using Arborio rice is crucial. This rice absorbs liquid well, making your risotto creamy. You can add different ingredients to boost flavor and texture. Here are some fun options: - Peas for sweetness - Bacon or pancetta for a smoky taste - Thyme or rosemary for earthy notes - Lemon zest for brightness These add-ins let you create a dish that fits your taste. Choosing the right mushrooms plays a big role in your risotto. Here are some great choices: - Cremini mushrooms for a rich flavor - Shiitake mushrooms for a more intense taste - A mix of wild mushrooms for depth Using a variety of mushrooms adds complexity and makes your dish special. For the full recipe, check out the details above! Start by grabbing a medium saucepan. Pour in 4 cups of vegetable broth. Set the heat to low and warm it up. Do not let it boil; this keeps the broth ready for the rice. You want it hot but not bubbling. Now, take a large skillet and heat 2 tablespoons of olive oil over medium heat. Add 1 small finely chopped onion. Sauté it for about 3 to 4 minutes. You want the onion soft and clear. Next, stir in 2 minced garlic cloves and 1 cup of sliced mushrooms. Cook these for 5 to 7 minutes. Keep stirring until the mushrooms are soft and give off their juice. Let the liquid cook down a bit so the mushrooms get a nice color. Time to add the rice! Put in 1 cup of Arborio rice and stir well. Coat each grain with oil. Sauté the rice for about 2 minutes. You want it to look a little clear at the edges. Now, start adding the warm broth, one ladle at a time. Stir as you go. Wait until the rice absorbs most of the broth before adding more. This part takes about 18 to 20 minutes. You should end up with creamy, al dente rice. Once the last bit of broth is gone, mix in 1 cup of chopped spinach and 1/2 cup of grated Parmesan cheese. Don’t forget the last tablespoon of butter! Season with salt and black pepper to taste. Let the risotto rest for a minute before serving. For a full recipe, check out the previous sections. Enjoy every bite! To get that rich and creamy texture, you need to stir a lot. As you cook your Arborio rice, add broth gradually. This helps the rice absorb the liquid slowly. Each time you add broth, wait until it disappears before adding more. This process gives the risotto its signature creaminess. You can also add a bit of butter and cheese at the end. This adds more creaminess and flavor. Be sure to mix them in while the risotto is still hot. Having the right tools makes cooking risotto easier. Here are the must-haves: - A large skillet or wide pot: This allows for even cooking. - A wooden spoon: Use this for stirring; it works well for scraping the pot. - A ladle: You’ll need this for adding broth slowly. - A medium saucepan: This keeps your broth warm while you cook. These tools help you manage the risotto-making process better and ensure a great outcome. Even skilled cooks can make mistakes with risotto. Here are some common ones to watch out for: - Adding broth too quickly: This prevents the rice from absorbing the flavors well, making it less creamy. - Not stirring enough: Stirring helps release starch from the rice, which is key for creaminess. - Using cold broth: Always keep your broth warm to help the rice cook evenly. - Overcooking the rice: Check for doneness around 18 minutes. You want it soft but with a slight bite. Avoid these pitfalls and you’ll create a delicious risotto every time. For a detailed recipe, check out the Full Recipe. {{image_4}} You can boost the taste of your creamy mushroom risotto by adding protein. Chicken, shrimp, or tofu work well. - Chicken: Cook bite-sized chicken pieces in the skillet before adding onion. This gives a great flavor. - Shrimp: Add shrimp after the mushrooms. Cook them until they turn pink. This adds a nice seafood twist. - Tofu: Use firm tofu for a vegetarian option. Sauté it until golden brown before mixing it in. Adding protein not only makes the dish more filling but also adds fun flavors. Herbs can change the taste of your risotto. Try these fresh herbs for new flavors: - Thyme: This herb pairs well with mushrooms. It adds an earthy taste. - Basil: Add fresh basil for a sweet and fragrant touch. - Rosemary: Use a little rosemary for a strong flavor. Just a bit goes a long way. Mix in the herbs while you cook the rice. This way, the flavors blend well. Vegetables can add color and nutrition to your risotto. Here are some great options: - Peas: Sweet green peas add a pop of color and flavor. - Asparagus: Add chopped asparagus for a fresh crunch. Cook it until tender. - Carrots: Grate some carrots for a sweet and bright touch. Feel free to experiment with what you have on hand. Each veggie brings a new twist to this classic dish. For the full recipe, check out the earlier section! To store leftover risotto, let it cool down first. Place it in an airtight container. Store it in your fridge for up to three days. Make sure to seal it well to keep it fresh. The risotto may thicken as it cools. Reheating risotto can be tricky. To do it right, add a splash of broth or water to the risotto. This helps bring back its creamy texture. Heat it in a pan over low heat. Stir often until it's warm. You can also use a microwave. Heat it in short bursts, stirring in between. You can freeze risotto for longer storage. First, let it cool completely. Then, spoon it into freezer-safe bags. Flatten the bags to save space. It can last up to three months in the freezer. When ready to eat, thaw it overnight in the fridge before reheating. For the best flavor, use the full recipe quickly after cooking. The best rice for risotto is Arborio rice. This rice has a high starch content. It helps create that creamy texture we love in risotto. Other good options include Carnaroli and Vialone Nano. These types also absorb liquids well. They keep their shape while cooking. Yes, you can make risotto ahead of time, but it may lose its creamy texture. If you want to prepare it early, cook it until it’s almost done. Then, cool it quickly and store it in the fridge. When you are ready to eat, reheat it slowly. Add a bit of broth or water to bring back creaminess. Risotto is done when it is creamy and the rice is al dente. The grains should be firm yet tender. To check, taste a grain; it should have a slight bite. When it's ready, stir in cheese and other ingredients. This will enhance the flavor and texture. For the full recipe, check out the Creamy Mushroom Risotto Delight. You've learned how to make creamy mushroom risotto with easy steps and key tips. From choosing the right ingredients to avoiding common mistakes, each part matters. Remember to pick flavorful mushrooms and add proteins or herbs for variety. Knowing how to store and reheat risotto ensures you waste nothing. With practice, you will create a delicious dish that impresses everyone. Enjoy your cooking journey and savor every bite!

Creamy Mushroom Risotto Flavorful and Simple Recipe

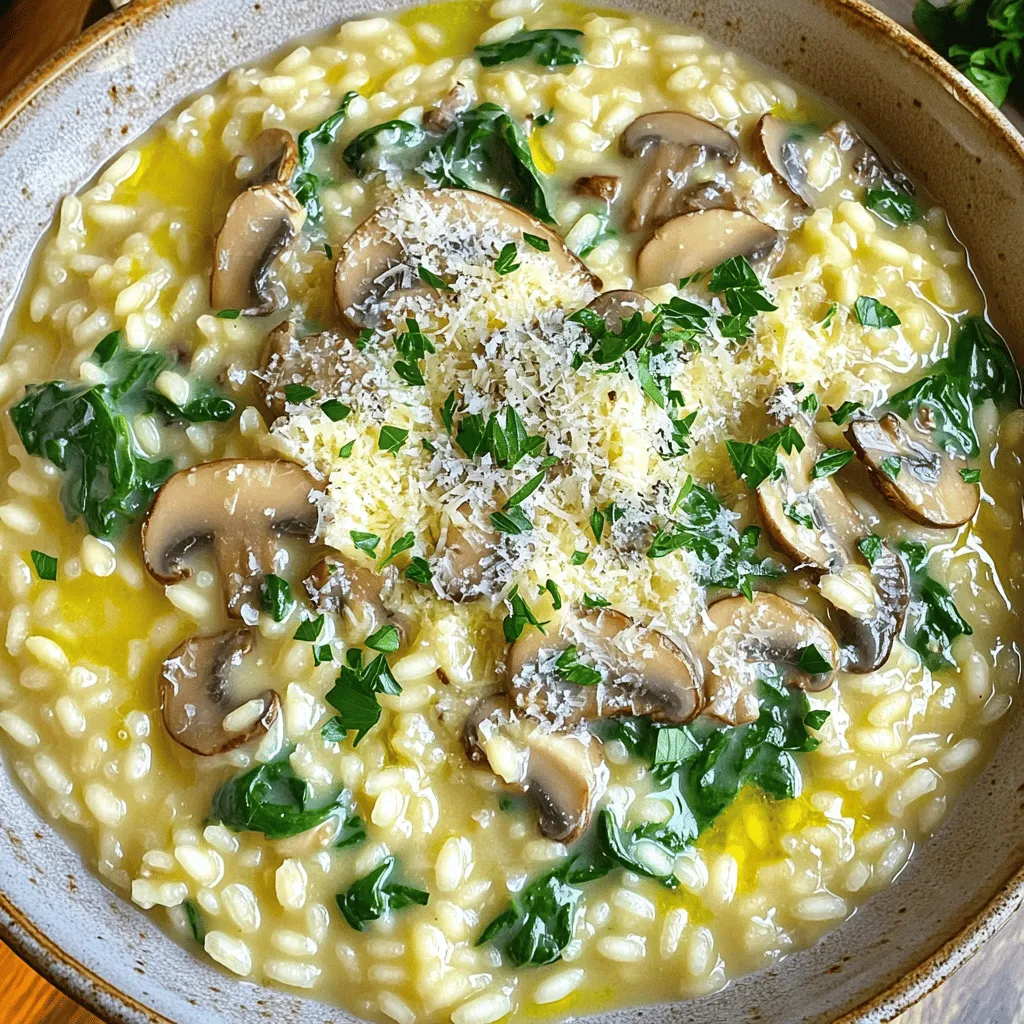
If you’re craving a warm and comforting dish, look no further than my creamy mushroom risotto. This flavorful and simple

- 1 pound (450g) shrimp, peeled and deveined - 4 cloves garlic, finely minced - 1 tablespoon extra virgin olive oil - 8 small corn tortillas - 1 teaspoon smoked paprika - 1 teaspoon ground cumin - 1 teaspoon chili powder - Salt and freshly cracked black pepper to taste - 1 ripe avocado, thinly sliced - 1 cup finely shredded green cabbage - Fresh cilantro leaves, for garnish - Lime wedges, for serving To make spicy garlic shrimp tacos, you need fresh shrimp. I use one pound of shrimp. Make sure they are peeled and deveined. This saves time and makes cooking easier. Next, you need garlic. Four cloves of finely minced garlic add a great taste. Olive oil is important too. Use one tablespoon of extra virgin olive oil to help with cooking. For the tortillas, I prefer small corn tortillas. They hold the shrimp well and add flavor. Spices are key to this dish. One teaspoon of smoked paprika gives a nice smoky taste. Ground cumin adds warmth, and chili powder brings heat. Use salt and black pepper to taste. Fresh ingredients make the tacos pop. I love adding a ripe avocado, sliced thin. It balances the spice perfectly. Shredded green cabbage gives crunch and freshness. Don’t forget fresh cilantro for garnish! Lastly, serve with lime wedges for extra zing. You can find the full recipe details in the section above. Enjoy these bold and flavorful tacos! To start, gather your shrimp. In a medium bowl, combine the shrimp with: - 4 cloves garlic, finely minced - 1 teaspoon smoked paprika - 1 teaspoon ground cumin - 1 teaspoon chili powder - 1 tablespoon extra virgin olive oil - 1 tablespoon freshly squeezed lime juice - Salt and freshly cracked black pepper to taste Gently toss the shrimp to coat them well with the spices. Allow to marinate for 15-20 minutes. This step lets the flavors sink in and makes the shrimp tasty. Next, preheat a large skillet over medium-high heat. Once hot, add the marinated shrimp in a single layer. Cook the shrimp for about 2-3 minutes on each side. They should turn pink and opaque when done. This will ensure they cook evenly and keep their juicy flavor. While the shrimp cooks, warm your corn tortillas. You can do this by: - Placing them in another skillet over low heat - Gently toasting them over a gas flame Warm them until they are soft and have slight char marks. This step adds a nice texture and flavor to the tacos. Now it’s time to put everything together. Start with a handful of shredded cabbage on each tortilla. Next, add a portion of the cooked shrimp on top. Follow this with a few slices of ripe avocado. For the final touch, garnish each taco with fresh cilantro leaves and a squeeze of lime juice. This adds a zesty kick! Serve the tacos right away, with lime wedges on the side for extra flavor. Enjoy your meal! - Ensure shrimp are not overcooked. Overcooked shrimp become rubbery and tough. - Use high heat for a good sear. This gives shrimp a nice crust and flavor. - Pair with additional sides like rice or beans. These add more nutrition and flavor to your meal. - Suggestions for drinks that complement tacos include limeade or a light beer. Both enhance the taco experience. - Extra spice variations for heat can include adding cayenne or hot sauce. This makes your tacos even more exciting. - Using different herbs for garnish can elevate your dish. Try parsley or dill for a fresh twist. Feel free to explore the [Full Recipe] to dive deeper into making these tacos! {{image_4}} You can easily swap the shrimp with other proteins. Fish works great, too. Use firm white fish like cod or tilapia. If you want a vegetarian option, try grilled veggies. Bell peppers, zucchini, and mushrooms add a nice touch. These swaps keep the meal fresh and exciting. Tortillas are key to good tacos. Corn tortillas are traditional, but flour tortillas taste great, too. If you're watching carbs, try low-carb tortillas. They still hold up well with fillings. Choose what you enjoy most, and don’t be afraid to mix it up. Toppings can change the whole flavor. Try unique salsas, like mango or pineapple. These fruity salsas add sweetness and zing. You can also add cheese for creaminess. Crumbled queso or a dollop of sour cream makes every bite rich. Get creative and find your favorite combo! For the full recipe, check the earlier section. To keep leftover shrimp tasty, store it in an airtight container. This helps keep moisture in and air out. Place the shrimp in the fridge right after your meal. Use it within two days for the best flavor. For tortillas, wrap them in a damp paper towel. Place them in a ziplock bag. This keeps them fresh and soft. Yes, you can freeze cooked shrimp. Make sure they cool down first. Place the shrimp in a freezer-safe bag. Squeeze out as much air as you can. They can stay fresh for up to three months. When you want to eat them again, thaw them overnight in the fridge. To reheat, warm them in a skillet over medium heat. This keeps them juicy and tasty. Cooked shrimp lasts about three to four days in the fridge. Always check for signs of spoilage. If the shrimp smells sour or looks dull, it’s time to toss it. Fresh shrimp should look bright and shiny. If your tortillas get hard or dry, they are no longer good. Keep an eye on your leftovers so you can enjoy them at their best. To make Spicy Garlic Shrimp Tacos, follow these simple steps: 1. Mix shrimp, garlic, spices, olive oil, and lime juice in a bowl. 2. Let the shrimp marinate for 15-20 minutes. 3. Heat a skillet over medium-high heat and cook the shrimp until pink. 4. Warm the corn tortillas in a separate skillet. 5. Layer shredded cabbage, shrimp, and avocado on each tortilla. 6. Add fresh cilantro and a squeeze of lime juice. 7. Serve with lime wedges on the side. For the complete details, check the Full Recipe. The best shrimp for tacos are medium to large varieties. They provide a nice bite and texture. Here are some great options: - Jumbo shrimp: These offer a sweet flavor. They are meaty and filling. - Medium shrimp: These are versatile and cook quickly. They balance well in tacos. - Wild-caught shrimp: They often taste better and have a firmer texture. Always choose shrimp that are fresh and firm to the touch. Yes, you can use frozen shrimp for tacos. They are often just as good as fresh. Here are some tips for cooking with frozen shrimp: - Thawing methods: You can thaw shrimp overnight in the fridge. This is the best way. If you're short on time, place shrimp in a bowl of cold water for 15-20 minutes. - Cooking from frozen: If you cook shrimp straight from the freezer, add an extra minute to the cooking time. Frozen shrimp can still be flavorful and tender when cooked right. To wrap up, we've explored how to make delicious shrimp tacos. You learned about the key ingredients, from fresh shrimp to spices. We also discussed tips, like how to avoid overcooking shrimp for the best results. These tacos are easy to customize for various tastes. I encourage you to enjoy them with your favorite sides. Remember, cooking should be fun and creative! Now, gather your ingredients and start making tasty shrimp tacos!

Spicy Garlic Shrimp Tacos Bold and Flavorful Recipe

Get ready to spice up your dinner with my bold and flavorful Spicy Garlic Shrimp Tacos! This recipe is simple

- 1 cup unsalted butter (softened) - 3/4 cup brown sugar (light or dark) - 1/2 cup granulated sugar - 2 large eggs (room temperature) - 1 tablespoon pure vanilla extract - 2 1/4 cups all-purpose flour (sifted) - 1 teaspoon baking soda - 1/2 teaspoon salt - 2 cups semi-sweet chocolate chips - 1/2 cup walnuts (optional) - 1/4 teaspoon instant coffee granules To make the best cookies, I focus on quality. Here are my tips: - Choosing Chocolate: Use high-quality semi-sweet chocolate chips. Brands like Guittard or Ghirardelli offer great flavor. If you prefer dark chocolate, feel free to swap in your favorite. Just remember, the better the chocolate, the tastier your cookies will be. - Room Temperature Eggs: Using room temperature eggs helps the dough mix well. Cold eggs can cause the butter to clump, making it hard to blend. Take them out of the fridge at least 30 minutes before you start. - Softened Butter: Always use softened butter. This makes it easy to cream with the sugars. You want a light and fluffy texture. If your butter is too hard, your cookies may turn out dense. So, let it sit out for a bit before mixing. This ingredient list sets the stage for your ultimate chocolate chip cookies. For the complete process, check the Full Recipe. 1. First, preheat your oven to 350°F (175°C). This helps bake your cookies evenly. 2. Line a baking sheet with parchment paper. This makes cleanup easy and prevents sticking. 3. In a large mixing bowl, add 1 cup of softened unsalted butter, 3/4 cup of packed brown sugar, and 1/2 cup of granulated sugar. Use an electric mixer to cream these together for 2-3 minutes. The mix should look light and fluffy. 4. Crack 2 large eggs into a small bowl. This ensures no shells end up in your dough. Add the eggs one at a time to the creamed mix. Mix well after each addition. Finally, stir in 1 tablespoon of pure vanilla extract. 1. Grab another bowl and whisk together 2 1/4 cups of sifted all-purpose flour, 1 teaspoon of baking soda, 1/2 teaspoon of salt, and 1/4 teaspoon of instant coffee granules. This ensures everything mixes evenly. 2. When you combine the dry mix with the wet mix, do it gently. Stir until just combined. Overmixing can make your cookies tough. 1. Use a cookie scoop or tablespoon to drop rounded balls of dough onto your lined baking sheet. Leave about 2 inches between each scoop to allow for spreading. 2. Bake your cookies for 10-12 minutes. Look for a light golden color on the edges. The centers may seem underbaked—that’s okay! They will firm up as they cool. 3. Let the cookies cool on the baking sheet for about 5 minutes. This helps them set before moving them to a wire rack. Cooling makes the texture just right. To avoid flat cookies, make sure your butter is softened but not melted. Cream the butter and sugars until fluffy. This adds air and helps the cookies rise. Measure your flour carefully. Use a spoon to fluff the flour in its container. Then scoop it into a measuring cup and level it off with a knife. This method prevents too much flour, which leads to dry cookies. For deeper chocolate flavor, add a touch of instant coffee. Just a tiny amount, like 1/4 teaspoon, boosts the chocolate taste without making it taste like coffee. Try using different types of chocolate chips. Semi-sweet, dark, or even milk chocolate all give unique flavors. Mixing different types can create a fun flavor burst. Gentle mixing is key. When you add dry ingredients to wet, stir slowly with a spatula. Overmixing can make your cookies tough. Use an electric mixer for creaming butter and sugar. For the rest, hand mixing is best. It allows for better control and helps keep the cookies soft. These tips will guide you toward making the ultimate chocolate chip cookies. For the full recipe, check out the Ultimate Chocolate Chip Cookies . {{image_4}} You can make your ultimate chocolate chip cookies even more fun with mix-ins. Here are some ideas: - Different Nuts: Try using pecans or macadamia nuts. They add a nice crunch and flavor. - Dried Fruit: Add raisins, cranberries, or even cherries for a sweet twist. Dried fruit pairs well with chocolate. These mix-ins can change the taste and texture of your cookies. Get creative and find what you love! Want to make these cookies fit your diet? Here are some easy swaps: - Gluten-Free Flour: Use almond flour or coconut flour. They work well in this recipe. - Vegan Substitutions: Replace butter with coconut oil and eggs with flaxseed meal. This keeps the cookie moist and tasty. These changes allow more people to enjoy the cookies. Don't be afraid to experiment! You can also play with flavors to make your cookies unique. Here are some suggestions: - Flavored Extracts: Try almond or hazelnut extract instead of vanilla. This adds a new layer of flavor. - Spices: A dash of cinnamon or sea salt can elevate the taste. These small additions make a big difference. These flavor infusions will surprise your taste buds. Let your creativity shine in the kitchen! To store your cookies at room temperature, place them in an airtight container. This keeps them soft and fresh. If you add a slice of bread, it helps retain moisture. Make sure not to stack them too high to avoid squishing. You can freeze cookie dough or baked cookies. Freezing dough lets you bake fresh cookies anytime. To freeze, scoop dough balls onto a baking sheet and freeze until firm. After that, transfer them to a freezer bag. For baked cookies, let them cool completely first. Wrap each cookie in plastic wrap and place them in a freezer bag. To thaw, take the cookies out and leave them at room temperature for about 30 minutes. If you freeze dough, bake straight from the freezer; just add a couple of extra minutes to the baking time. To reheat cookies, use the oven. Preheat it to 350°F (175°C). Place cookies on a baking sheet and heat for about 5 minutes. This method helps restore their soft texture. You can also use the microwave. Heat cookies for about 10-15 seconds. Watch closely to avoid overheating. Enjoy your warm cookies! For the Full Recipe, check the ingredients and steps to make your cookies perfect every time! Why are my cookies flat? Cookies can be flat for a few reasons. First, check the butter. If it's too soft, it melts too quickly. Second, make sure you measure your flour correctly. Too little flour can lead to flat cookies. Lastly, avoid skipping the chilling step. Chilling the dough helps it hold shape while baking. Can I use margarine instead of butter? Yes, you can use margarine. However, it may alter the flavor and texture. Butter gives a richer taste and a chewier texture. If you choose margarine, select one with at least 80% fat content for better results. How do I know when my cookies are done? Look for a light golden edge. The center should look slightly underbaked. Cookies continue to bake on the sheet after you take them out. Let them rest for a few minutes to firm up. What’s the best way to store cookies to keep them soft? Store cookies in an airtight container at room temperature. Place a slice of bread in the container. The bread will keep the cookies soft and fresh. Avoid stacking them too high to prevent squishing. Can I freeze chocolate chip cookies after baking? Yes, you can freeze them. Let the cookies cool completely, then place them in a freezer-safe bag. They can last up to three months in the freezer. When ready to eat, thaw at room temperature or warm them in the oven. What to do if my dough is too dry? If your dough feels too dry, add a bit of milk or water. Start with a teaspoon at a time. Mix well after each addition. This will help bring the dough together without making it too wet. How can I make these cookies even chewier? To achieve chewier cookies, try adding an extra egg yolk. You can also reduce the baking time slightly. Using brown sugar instead of white sugar will enhance the chewiness too. In this post, we covered how to make ultimate chocolate chip cookies. We discussed key ingredients and why they matter. I shared step-by-step instructions for perfect dough and baking techniques. You also learned tips for texture and flavor, plus creative variations. Remember, the right ingredients and careful mixing lead to great results. Enjoy your baking journey and share these delicious cookies with others!

Ultimate Chocolate Chip Cookies Irresistible Treat Recipe

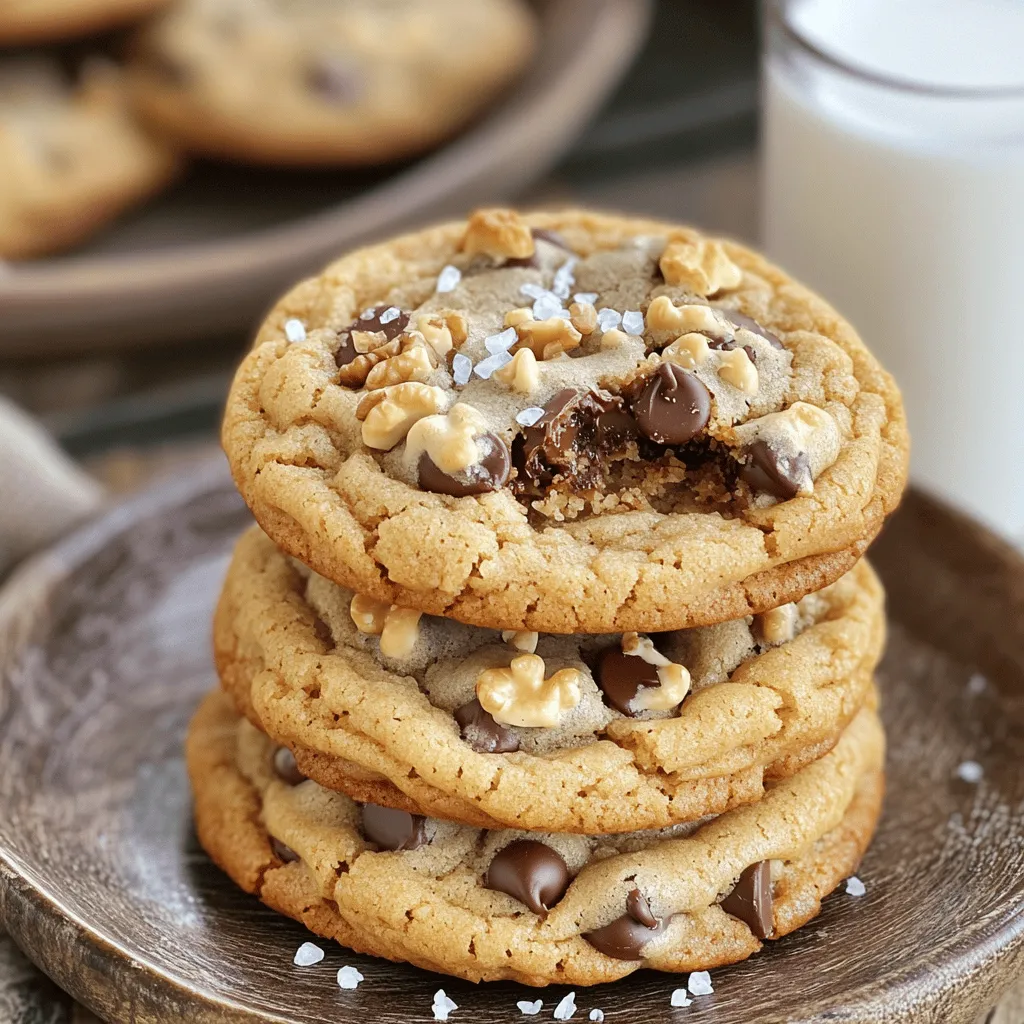
Do you crave the ultimate chocolate chip cookie experience? Look no further! I’ll guide you through an easy, step-by-step recipe

- 4 large bell peppers (red, yellow, or green; tops cut off and seeds removed) - 1 cup cooked quinoa (follow package instructions) - 1 cup black beans (canned, drained, rinsed) - 1 cup corn (frozen or fresh kernels) - 1 cup diced tomatoes (fresh or canned, drained if canned) - 1 small red onion (finely chopped) - 2 cloves garlic (minced) - 1 teaspoon ground cumin - 1 teaspoon smoked paprika - 1 teaspoon chili powder - 1 cup shredded cheese (cheddar for mild or pepper jack for heat) - Salt and freshly ground black pepper to taste - 2 tablespoons olive oil - Fresh cilantro or parsley (chopped, for garnish) For substitutions, you can use brown rice instead of quinoa. Swap black beans for pinto or kidney beans. You can also use any cheese you like or skip it for a dairy-free option. Fresh herbs add a nice touch too; try basil or oregano if you want a different flavor. Each stuffed pepper has about 300 calories. You get about 15 grams of protein, 45 grams of carbs, and 10 grams of fat. The quinoa provides protein and fiber, making this dish filling. Black beans boost the protein and add iron. Bell peppers are rich in vitamins A and C, which support your immune system. Corn gives a sweet crunch and adds more fiber. First, preheat your oven to 375°F (190°C). This helps cook the peppers evenly. Next, heat two tablespoons of olive oil in a medium skillet over medium heat. Once the oil is hot, add one small red onion, finely chopped, and two cloves of minced garlic. Sauté for about 3-4 minutes. Stir them occasionally. You want the onion to turn soft and slightly clear. Now, let's stuff the peppers. Take four large bell peppers and cut off the tops. Remove the seeds carefully. In a large bowl, mix the cooked quinoa, one cup of black beans, one cup of corn, and one cup of diced tomatoes. Add the sautéed onion and garlic to this mix. Next, stir in one teaspoon of ground cumin, one teaspoon of smoked paprika, and one teaspoon of chili powder. Don't forget to add half of the shredded cheese. Season with salt and black pepper to your taste. Once the stuffing is ready, take each bell pepper and fill it up. Press down gently to pack the stuffing well. Place them upright in a baking dish. If a pepper wobbles, trim a bit from the bottom to help it stand. Cover the dish loosely with aluminum foil. Bake for 25 minutes. This will soften the peppers. After that, remove the foil and sprinkle the remaining cheese on top of each pepper. Return them to the oven and bake for another 10-15 minutes. You want the cheese to melt and bubble. The peppers should be tender. Finally, take the dish out of the oven. Let the peppers cool for a few minutes. Before serving, sprinkle chopped cilantro or parsley on top for some color and flavor. For detailed cooking steps, check out the Full Recipe. To get the best texture and flavor in your stuffed peppers, follow these tips: - Use firm peppers. Choose large, fresh bell peppers. They should stand upright and have no soft spots. - Cook the filling well. Sauté onions and garlic until soft. This adds a rich taste to your dish. - Don’t overcrowd the filling. Pack the mixture lightly. This keeps the peppers tender and avoids mushy spots. - Bake covered first. Cover with foil for the first part of baking. This steams the peppers and makes them soft. - Add water to the dish. Pour a little water into the baking dish before covering. This helps keep the peppers moist. To prevent soggy peppers, try these suggestions: - Pre-bake the peppers. Bake them for about 10 minutes before stuffing. This helps remove extra moisture. - Use less liquid in the filling. Drain canned beans and tomatoes well. This avoids added moisture in the dish. For the best meal experience, consider these pairings: - Serve with rice or quinoa. This adds a hearty side and complements the flavors. - Pair with a fresh salad. A simple green salad adds crunch and freshness to the meal. - Offer crusty bread. This is great for dipping in any sauce left on the plate. To present your stuffed peppers attractively: - Use colorful plates. Bright plates make the dish pop visually. - Garnish with herbs. A sprinkle of chopped cilantro or parsley adds color and flavor. - Drizzle sauces. A bit of balsamic glaze or lime juice can enhance taste and appearance. For the complete cooking process, check the Full Recipe. Enjoy crafting your delightful stuffed bell peppers! {{image_4}} You can create many tasty stuffed bell peppers by changing the filling. Here are some ideas: - Protein Sources: - Ground turkey or chicken adds a lean protein option. - Beef or pork gives a hearty taste. - Try shrimp or scallops for a seafood twist. - Vegetarian or Vegan Alternatives: - Use lentils or chickpeas for a protein-packed vegan option. - Tofu or tempeh adds a nice texture and protein. - Mix in nuts or seeds for added crunch and flavor. You can easily adjust the flavor of your stuffed peppers. Here’s how: - Spicing It Up: - Add jalapeños or chili flakes for heat. - Experiment with different herbs, like basil or oregano. - Use fresh lime or lemon juice for a zesty kick. - Seasonal Vegetables: - Add zucchini or mushrooms for extra veggies. - Bell peppers pair well with spinach or kale. - In fall, try adding pumpkin or squash for a new flavor. These variations help you enjoy stuffed peppers in many ways. You can find the Full Recipe to try these ideas! To keep your savory stuffed bell peppers fresh, store them in an airtight container. You can refrigerate them for up to four days. If you want to keep them longer, freeze them. Wrap each pepper in plastic wrap and place them in a freezer-safe bag. They can stay in the freezer for three months. When it's time to eat, reheat your stuffed peppers properly. For best results, place them in the oven at 350°F (175°C) for about 20 minutes. This helps keep the peppers firm and the filling warm. If you're in a hurry, you can use the microwave. Heat them for about 2-3 minutes, but check to make sure they’re hot all the way through. Stuffed bell peppers can last a few days in the fridge. If stored well, they can stay fresh for four days. In the freezer, they can last up to three months. When checking for spoilage, look for any signs of mold or an off smell. If the peppers feel mushy or have changed color, it’s best to toss them. Always trust your senses; if it seems off, don’t eat it. For more detailed cooking steps, check the Full Recipe. How do I make them gluten-free? To make stuffed bell peppers gluten-free, use quinoa instead of rice. Quinoa is naturally gluten-free. Check all canned items like beans and tomatoes for gluten-free labels. This keeps the dish safe for everyone. Can I use different types of peppers? Yes, you can use any type of bell pepper. Red, yellow, and green peppers all work well. You can also try mini sweet peppers for bite-sized treats. Each pepper brings its own flavor and color to the dish. How long do they take to cook? Stuffed bell peppers take about 50 minutes to cook. This includes 25 minutes covered and 10-15 minutes uncovered to melt the cheese. The peppers should be tender when done. Can the filling be prepared in advance? Yes, you can prepare the filling ahead of time. Store it in the fridge for up to two days. Just stuff the peppers before cooking. This saves time on busy nights. For detailed cooking steps, check the Full Recipe. In this post, we covered all you need for great stuffed peppers. You learned about ingredients, nutrition, and how to prepare and bake them perfectly. I shared tips to make your dish stand out and suggested exciting variations and storage methods. Remember, cooking should be fun and easy. Experiment with flavors and as you practice, you’ll create a meal your friends and family will love. For a detailed recipe, check the full recipe section. Enjoy your cooking journey!

Savory Stuffed Bell Peppers Easy and Flavorful Dish

If you’re looking for a tasty and easy dinner idea, savory stuffed bell peppers are a winner. Packed with flavor

To make this delightful cinnamon roll swirl coffee cake, you need a few key ingredients. Here’s the complete list: - 2 cups all-purpose flour - 1 cup granulated sugar - 1 tablespoon baking powder - 1/2 teaspoon salt - 1/2 cup unsalted butter, softened to room temperature - 3/4 cup milk, at room temperature - 2 large eggs, preferably at room temperature - 1 teaspoon pure vanilla extract - 1 tablespoon ground cinnamon - 1/2 cup brown sugar, packed tightly - 1/2 cup chopped walnuts or pecans (optional, for added crunch) - 1/2 cup powdered sugar (for glaze) - 2 tablespoons milk (for glaze) Each ingredient plays an important role in creating the perfect texture and flavor. All-purpose flour gives the cake a good structure. Granulated sugar sweetens and helps with browning. Baking powder makes the cake rise. Salt enhances all the flavors. Butter adds richness, while milk and eggs provide moisture. Vanilla extract gives a warm taste. Ground cinnamon and brown sugar create that delightful swirl. Lastly, optional nuts add crunch and flavor if you wish. For the glaze, powdered sugar and milk create a smooth topping. This glaze brings the whole cake together, making it extra special. You can find the full recipe in the article. 1. Preheat your oven to 350°F (175°C). Grease a 9-inch round or square pan. Dust it with flour to stop the cake from sticking. 2. In a large bowl, mix 2 cups of all-purpose flour, 1 cup of granulated sugar, 1 tablespoon of baking powder, and 1/2 teaspoon of salt. This blend creates a great base for your cake. 3. Add 1/2 cup of softened butter, 3/4 cup of room-temperature milk, 2 large eggs, and 1 teaspoon of pure vanilla extract to the dry mix. Beat it with an electric mixer for about 2 minutes until the batter is smooth. Remember to scrape the bowl’s sides to mix well. 1. In a small bowl, mix 1 tablespoon of ground cinnamon, 1/2 cup of packed brown sugar, and 1/2 cup of chopped nuts (if you want). This is your tasty filling. 2. Pour half of the cake batter into the greased pan, spreading it evenly. Sprinkle half of the cinnamon mixture over the batter. Then, layer the rest of the cake batter on top. Finally, add the remaining cinnamon mix and swirl it gently with a fork or knife. 1. Place the cake in the oven and bake for 30-35 minutes. 2. Check if it's done by inserting a toothpick into the center. It should come out clean with no wet batter stuck to it. Follow these steps for a delightful treat. For the complete process, check the Full Recipe. To ensure a perfect cake texture, use room-temperature ingredients. This helps them mix better. Mix the dry ingredients well before adding wet ones. This makes the batter light and fluffy. Avoid over-mixing once you combine all ingredients. It can make the cake dense and tough. To avoid a soggy bottom, make sure you grease and flour your baking pan. This creates a barrier that keeps moisture at bay. Also, let the cake cool in the pan for about 10 minutes. This helps it set before transferring it to a wire rack. For the best glaze drizzle, wait until the cake is warm. This allows the glaze to soak in and enhance the flavor. Use a fork or spoon to drizzle in a zigzag pattern. This gives a beautiful finish. If your glaze is too thick, add a little more milk. If it's too thin, add more powdered sugar. Adjust it until you reach the right consistency. For an appealing presentation, slice the cake into generous pieces. Place them on a decorative plate for a lovely display. A light dusting of powdered sugar adds charm. Pair each slice with a hot cup of coffee or a nice cup of tea. This makes for a delightful treat. If you like, sprinkle some chopped nuts on top for added texture and flair. Enjoy your stunning creation! {{image_4}} You can change the flavor of your cinnamon roll swirl coffee cake easily. Try using different spices like nutmeg or cardamom. These spices can add a warm touch. You can also swap in extracts like almond or maple for a new twist. Adding fruits can brighten the cake's taste. Chopped apples or ripe bananas work well. You could even mix in chocolate chips for a sweet surprise. They melt and give a rich flavor to each bite. If you need a gluten-free option, you can use gluten-free flour. It works just as well in this recipe. Make sure to check for a blend that is suitable for baking. For vegan substitutions, replace the eggs with applesauce or flaxseed meal. Use almond milk or oat milk instead of regular milk. These swaps keep the cake moist and tasty without any dairy. You can serve this cake in fun ways. Make miniature cakes or muffins for a cute treat. They are great for parties or brunch. Just adjust the baking time to about 15-20 minutes. For a layered cake, bake two round cakes. Stack them with frosting or cream in between. This makes a stunning dessert that will impress anyone. You can find the full recipe to guide your baking adventures. To keep your cinnamon roll swirl coffee cake fresh, store it in an airtight container. This helps keep moisture in and prevents the cake from drying out. You can also wrap the cake in plastic wrap for extra protection. Store it at room temperature if you plan to eat it within a few days. For longer storage, keep it in the fridge. Just remember, the cake tastes best fresh! Freezing is a great option if you want to save some cake for later. To freeze, first wrap slices in plastic wrap tightly. Then place them in a freezer-safe bag. This keeps air out and helps prevent freezer burn. Your coffee cake will last up to three months in the freezer. When you’re ready to eat, simply thaw the slices in the fridge overnight. To reheat your cake, the best method is using the oven. Preheat it to 350°F (175°C). Place the slices on a baking sheet and cover them loosely with foil. Heat for about 10-15 minutes until warm. This way, the cake stays soft and moist. You can also use a microwave, but be careful not to overheat. Just heat each slice for about 15-20 seconds. Enjoy the warm, gooey goodness of the swirls! What is the best way to measure flour? I recommend using the spoon and level method. First, fluff the flour in its container. Then, use a spoon to scoop flour into your measuring cup. Finally, use a knife to scrape off the excess. This method gives you an accurate measurement. Can I use milk alternatives in this recipe? Yes, you can use milk alternatives like almond milk or oat milk. Make sure the alternative is unsweetened and at room temperature for the best results. This keeps the texture of the cake light and fluffy. How can I tell when the coffee cake is fully baked? The best way to check is by using a toothpick. Insert it into the center of the cake. If it comes out clean, the cake is done. If it has wet batter, give it more time in the oven. What are the best nuts to use for this recipe? Chopped walnuts or pecans work well. Both add a nice crunch and flavor. You can choose your favorite or leave them out if you prefer a nut-free cake. Can I make this recipe ahead of time? Absolutely! You can bake the cake a day in advance. Just store it in an airtight container at room temperature. You can also prepare the batter and store it in the fridge overnight. Just remember to bring it to room temperature before baking. Check out the Full Recipe for more details! You learned the key ingredients for a delicious cinnamon roll swirl coffee cake. I shared step-by-step instructions to make baking easy. Tips ensure your cake is perfect every time. You can customize flavors and adjust for diets too. Remember to store your leftovers right and use my reheating tips. This cake is a treat that pairs well with many drinks. I hope you enjoy making it as much as I do!

Cinnamon Roll Swirl Coffee Cake Delightful and Easy Recipe

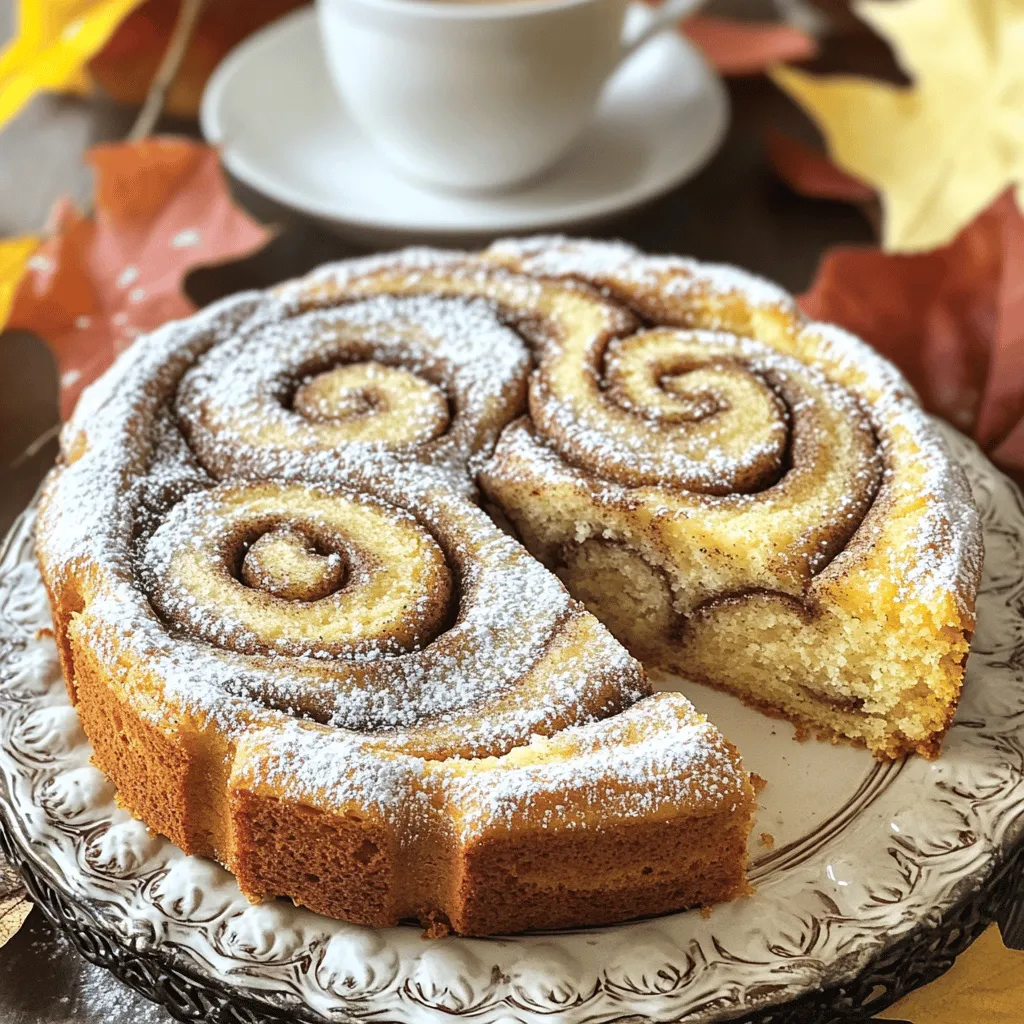
Are you ready to bake something scrumptious that blends your favorite flavors? This Cinnamon Roll Swirl Coffee Cake recipe is

- 8 oz rotini pasta - 1 cup cherry tomatoes, halved - 1 cucumber, diced - 1 bell pepper (any color), diced - 1/2 red onion, finely chopped - 1 cup black olives, sliced - 1/2 cup feta cheese, crumbled - 1/4 cup fresh basil, chopped - 1/4 cup extra virgin olive oil - 2 tablespoons red wine vinegar - 1 teaspoon dried oregano - Salt and freshly ground pepper to taste For this Quick Italian Pasta Salad, you need fresh, colorful ingredients. The rotini pasta acts as a great base. It holds the dressing well and mixes easily with other veggies. Cherry tomatoes add a sweet burst, while cucumbers give a nice crunch. The bell pepper adds color and flavor. Red onion brings a sharp taste, but you can use green onions if you prefer a milder flavor. Black olives add a briny touch that pairs well with feta cheese. Feta adds creaminess and tang, making each bite delightful. Fresh basil brings a lovely aroma and taste, tying all the flavors together. - Optional add-ins (e.g., grilled chicken, artichokes) - Substitute ingredients for dietary preferences Feel free to mix in grilled chicken for protein or artichokes for extra flavor. You can also swap out the feta for a dairy-free cheese if needed. There are many ways to make this dish your own, so be creative! You can check the Full Recipe for more ideas. To start, you need to boil the rotini pasta. Fill a large pot with water and add a pinch of salt. Bring the water to a rolling boil. Once boiling, add 8 oz of rotini pasta. Cook it for about 8-10 minutes until it is al dente. This means it should be firm but not hard. After cooking, drain the pasta in a colander. Rinsing the pasta is key. Run cold water over it to stop the cooking. This helps keep the pasta from getting mushy. Set the cooled pasta aside for mixing. Now it’s time to combine fresh vegetables with the pasta. In a large bowl, add the cooled rotini, cherry tomatoes, diced cucumber, diced bell pepper, finely chopped red onion, sliced black olives, and crumbled feta cheese. Gently mix these fresh ingredients. Use a spatula to fold them together. This way, you ensure everything is evenly distributed. The colors and textures will make your salad pop! Next, let's make the dressing. In a small bowl, whisk together 1/4 cup extra virgin olive oil, 2 tablespoons red wine vinegar, and 1 teaspoon dried oregano. Add a pinch of salt and some freshly ground pepper. Whisk until the dressing is well mixed. You want a slightly thickened consistency. This dressing will bring all the flavors together. Drizzle the dressing over your pasta salad. Toss everything together gently. Make sure all the ingredients are coated in the delicious dressing. For the final touch, fold in the chopped fresh basil. This adds an aromatic finish that enhances the Mediterranean flavors. Enjoy your vibrant salad! For the full recipe, check out the details provided earlier. - Chop your veggies the night before. This saves time when you cook. - Use store-bought dressing if you’re in a hurry. It can taste great too. - Let the salad sit for about 15 minutes. This helps the flavors blend well. - Taste the salad after mixing. Adjust the salt and pepper to fit your taste. - Serve the salad in a large, bright bowl to show off its colors. - Add whole basil leaves on top for a nice touch. A sprinkle of feta looks great too. {{image_4}} You can easily make this dish vegetarian. Start by adding more vegetables. Try adding artichokes, zucchini, or even spinach. These add color and taste. You can also switch the feta cheese. Use mozzarella or a vegan cheese if you prefer. This gives a creamy texture while keeping it plant-based. To make your pasta salad a complete meal, add grilled chicken or shrimp. Cook them simply with salt and pepper, then slice or chop. Mix them into your salad for added protein. This not only boosts nutrition but makes it more filling. You can also use chickpeas for a vegetarian protein option. If you need a gluten-free version, swap the rotini with gluten-free pasta. Many brands offer great options that cook well. Always check that all your other ingredients are gluten-free too. This includes dressing and any cheese to ensure your dish meets gluten-free needs. To store leftovers, first, let the pasta salad cool. This step helps keep the flavors fresh. Use an airtight container to prevent air from spoiling the taste. Make sure to fill the container, leaving little empty space. This keeps the salad fresh longer. Store it in the fridge for up to three days. You can freeze pasta salad, but some ingredients may change in texture. If you wish to freeze it, follow these steps: - Prepare the salad without adding fresh ingredients like tomatoes or cucumbers. - Place the salad in a freezer-safe container. - Label it with the date and type of salad. - Freeze for up to a month. Before serving, thaw it overnight in the fridge. To refresh the salad before serving, add a splash of olive oil. This helps revive the flavors. You can also toss in fresh herbs to boost the taste. Avoid reheating the salad in the microwave. This can make the veggies soggy. Instead, serve it cold or at room temperature. Enjoy your Quick Italian Pasta Salad with friends and family! The prep time for Quick Italian Pasta Salad is 15 minutes. The total time to make it is 30 minutes. This includes cooking the pasta and mixing all the fresh ingredients. Yes, you can make this salad ahead of time. I recommend making it up to 24 hours in advance. This allows the flavors to blend well together. Just store it in the fridge until you’re ready to serve. Absolutely! You can use other pasta types instead of rotini. Good options include penne, fusilli, or even farfalle. Just be sure to cook them until al dente. If you want a different dressing, you can use creamy dressings. Ranch or Italian dressing works well. Store-bought options can save you time and still taste great. When stored properly, this salad lasts about 3 to 5 days in the fridge. Keep it in an airtight container to maintain its freshness. To make a great Quick Italian Pasta Salad, start with the right ingredients and follow easy steps. You can mix fresh veggies with rotini pasta, drizzle on a tasty dressing, and enjoy a healthy meal. Remember, you can change ingredients based on your likes or needs. Try new flavors, save time with prep tips, and store leftovers well. This salad is not just simple; it’s also flexible. You can enjoy it in many ways to fit your taste. Happy cooking!

Quick Italian Pasta Salad Fresh and Flavorful Dish

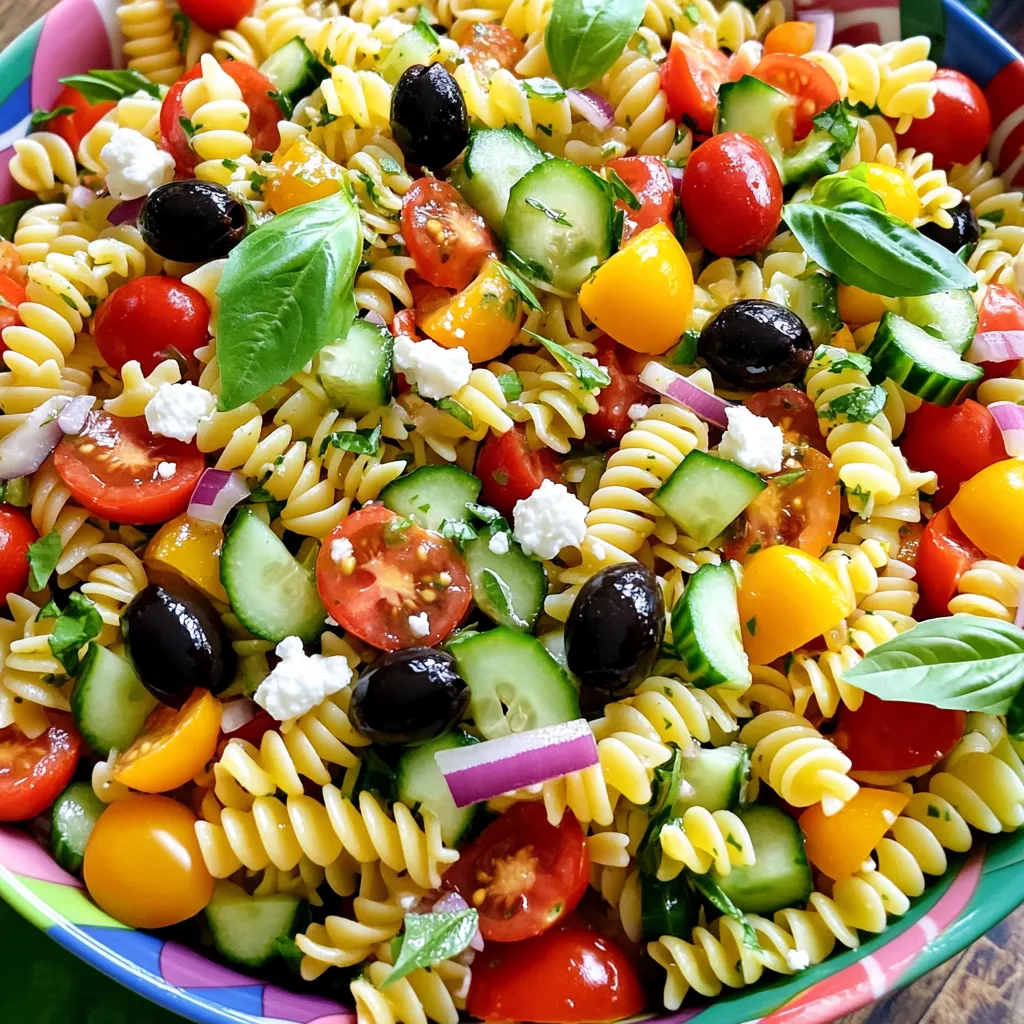
Looking for a fast and tasty meal? This Quick Italian Pasta Salad is your answer! With fresh veggies, zesty olives,

Older posts
Newer posts
← Previous Page1 … Page57 Page58 Page59 … Page86 Next →

dsad

© 2026 lazychefmagic • Built with GeneratePress

Our Policies

  • Copyright Policy
  • Cookie Policy
  • GDPR Policy
  • Privacy Policy
  • Disclaimer
  • Terms Of Use

More Information

  • Home
  • About
  • Contact
  • Appetizers
  • Dessert
  • Dinner
  • Drinks
©2026, lazychefmagic About Back To Top